

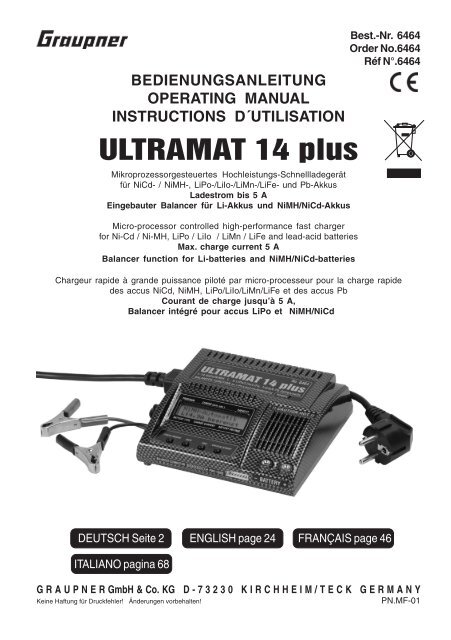
ULTRAMAT 14 plus - Graupner
ULTRAMAT 14 plus - Graupner
ULTRAMAT 14 plus - Graupner

You also want an ePaper? Increase the reach of your titles
YUMPU automatically turns print PDFs into web optimized ePapers that Google loves.
BEDIENUNGSANLEITUNG<br />
OPERATING MANUAL<br />
INSTRUCTIONS D´UTILISATION<br />
<strong>ULTRAMAT</strong> <strong>14</strong> <strong>plus</strong><br />
Mikroprozessorgesteuertes Hochleistungs-Schnellladegerät<br />
für NiCd- / NiMH-, LiPo-/LiIo-/LiMn-/LiFe- und Pb-Akkus<br />
Ladestrom bis 5 A<br />
Eingebauter Balancer für Li-Akkus und NiMH/NiCd-Akkus<br />
Micro-processor controlled high-performance fast charger<br />
for Ni-Cd / Ni-MH, LiPo / LiIo / LiMn / LiFe and lead-acid batteries<br />
Max. charge current 5 A<br />
Balancer function for Li-batteries and NiMH/NiCd-batteries<br />
Chargeur rapide à grande puissance piloté par micro-processeur pour la charge rapide<br />
des accus NiCd, NiMH, LiPo/LiIo/LiMn/LiFe et des accus Pb<br />
Courant de charge jusqu’à 5 A,<br />
Balancer intégré pour accus LiPo et NiMH/NiCd<br />
DEUTSCH Seite 2<br />
ITALIANO pagina 68<br />
ENGLISH page 24<br />
Best.-Nr. 6464<br />
Order No.6464<br />
Réf N°.6464<br />
FRANÇAIS page 46<br />
G R A U P N E R GmbH & Co. KG D - 7 3 2 3 0 K I R C H H E I M / T E C K G E R M A N Y<br />
Keine Haftung für Druckfehler! Änderungen vorbehalten!<br />
PN.MF-01<br />
1
Inhaltsverzeichnis<br />
Kapitel Seite<br />
2<br />
1. Allgemeines 2<br />
2. Warn- und Sicherheitshinweise, bitte unbedingt beachten! 3<br />
3. Allgemeine Betriebshinweise 4<br />
4. Empfohlene Ladekabel, Polaritäten 5<br />
5. Bedienelemente, Bedienung, Ladestart 5<br />
6. Ladeprogramme 6<br />
7. Programmstruktur 6<br />
8. Auswahl der Ladeprogrammgruppe 7<br />
9. Inbetriebnahme 7<br />
10. Starten des Ladevorgangs 8<br />
11. Nickel-Cadmium (NiCd) - Ladeprogramme 9<br />
12. Nickel-Metall-Hydrid (NiMH) - Ladeprogramme 11<br />
13. LithiumIonen (LiIo)/ LithiumPolymer (LiPo)/ LiMn/ LiFe - Ladeprogramme <strong>14</strong><br />
<strong>14</strong>. Blei (Pb) - Ladeprogramme 17<br />
15. Displayanzeigen 18<br />
16. Kontrollanzeigen auf dem Display 18<br />
Anzeige der Einzelzellenspannungen 19<br />
17. Fehler- und Warnmeldungen 20<br />
18. Reinigung und Wartung 22<br />
19. Hinweise zum Umgang mit Akkus 22<br />
20. Technische Daten 23<br />
Garantieurkunde Rückseite<br />
1. Allgemeines<br />
Um alle Eigenschaften Ihres neuen Ladegerätes voll nutzen zu können, lesen Sie vor Inbetriebnahme,<br />
die nachfolgende Beschreibung vollständig und sorgfältig durch. Beachten Sie vor<br />
allem die Warn- und Sicherheitshinweise. Diese Anleitung ist an einem sicheren Ort aufzubewahren<br />
und einem nachfolgenden Benutzer des Ladegeräts unbedingt mit auszuhändigen.<br />
Mit dem <strong>ULTRAMAT</strong> <strong>14</strong> <strong>plus</strong> haben Sie ein ausgereiftes Produkt mit überragenden Eigenschaften<br />
erworben. Durch den Einsatz modernster Halbleitertechnologie, gesteuert durch einen leistungsfähigen<br />
RISC-Microprozessor werden überragende Ladeeigenschaften, einfache Bedienbarkeit und<br />
optimale Zuverlässigkeit, erreicht die normalerweise nur in deutlich teureren Geräten zu finden sind.<br />
Mit dem <strong>ULTRAMAT</strong> <strong>14</strong> <strong>plus</strong> lassen sich nahezu alle im Modellbau vorkommenden Nickel-Cadmium<br />
(Ni-Cd)-Sinterzellenakkus, Nickel-Metall-Hydrid (Ni-MH) Akkus, Lithium-Polymer (LiPo) Akkus,<br />
Lithium Mangan (LiMn) Akkus, Lithium-Ionen (LiIo) Akkus, LiFePO (LiFe) Akkus wie auch Blei-Gel oder<br />
4<br />
Blei-Säure (Plumbum, Pb) Akkus aufladen. Diese gasdicht verschlossenen Akkus haben sich für den<br />
RC-Betrieb am besten bewährt. Sie sind mechanisch robust, lageunabhängig und störunanfällig. Bei<br />
der Lagerung sind außer der Überwachung vor Tiefentladung keine besonderen Vorkehrungen<br />
erforderlich.<br />
Hinweis<br />
Es sind stets die Ladehinweise der Akkuhersteller zu beachten, sowie die Ladeströme und Ladezeiten<br />
einzuhalten. Es dürfen nur Akkus schnellgeladen werden, welche ausdrücklich für diesen hohen<br />
Ladestrom geeignet sind! Bitte bedenken Sie, dass neue Akkus evtl. erst nach mehreren Ladezyklen<br />
ihre volle Kapazität erreichen, auch kann es bei neuen Akkus zu einer vorzeitigen Ladungsabschaltung<br />
kommen. Überzeugen Sie sich unbedingt durch mehrere Probeladungen von der einwandfreien<br />
und zuverlässigen Funktion der Ladeabschaltautomatik und der eingeladenen Kapazität.
Sicherheits- und Warnweise<br />
Das Ladegerät vor Staub, Feuchtigkeit, Regen, Hitze (z. B. direkte Sonneneinstrahlung) und Vibration<br />
schützen. Nur zur Verwendung im Trockenen!<br />
Nicht für Kinder unter <strong>14</strong> Jahren, kein Spielzeug!<br />
Die Schlitze im Gehäuse dienen der Kühlung des Geräts und dürfen nicht abgedeckt oder verschlossen<br />
werden. Das Gerät muss so aufgestellt sein, damit die Luft ungehindert zirkulieren kann.<br />
Das Ladegerät ist sowohl für den Anschluss an eine 12 V-Autobatterie (12...<strong>14</strong>VDC) als auch für den<br />
Anschluss an 100~240VAC geeignet. Wählen Sie den entsprechenden Eingang. Schließen Sie niemals<br />
an beide Eingänge gleichzeitig eine Betriebsspannung an. Schließen Sie niemals eine Wechselspannung<br />
an den Gleichspannungseingang an! Es dürfen keinerlei Veränderungen am Ladegerät durchgeführt<br />
werden.<br />
Das Ladegerät und die zu ladende Batterie muss während des Betriebs auf einer nicht brennbaren,<br />
hitzebeständigen und elektrisch nicht leitenden Unterlage stehen! Niemals direkt auf den Autositzen,<br />
Teppiche o. ä. abstellen! Auch sind brennbare oder leicht entzündliche Gegenstände von der Ladeanordnung<br />
fernzuhalten. Auf gute Belüftung achten.<br />
Akkus können durch einen Defekt explodieren oder brennen!<br />
Verbinden Sie das Ladegerät nur direkt mit den Original-Anschlussleitungen und den Anschlussklemmen<br />
direkt mit der Autobatterie. Der Motor des Kfz’s muss, solange das Ladegerät mit dem Kfz<br />
in Verbindung steht, abgestellt sein! Die Autobatterie darf nicht gleichzeitig von einem anderen<br />
Ladegerät aufgeladen werden!<br />
Die Ladeausgänge und die Anschlusskabel dürfen nicht verändert oder untereinander in irgendeiner<br />
Weise verbunden werden. Zwischen den Ladeausgängen und der Fahrzeug-Karosserie besteht beim<br />
Betrieb an der Autobatterie Kurzschlussgefahr! Lade- und Anschlusskabel dürfen während des Betriebs<br />
nicht aufgewickelt sein! Vermeiden Sie Kurzschlüsse mit dem Ladeausgang bzw. dem Akku und<br />
der Autokarosserie. Stellen Sie deshalb das Gerät niemals direkt auf die Fahrzeugkarosserie.<br />
Lassen Sie das Ladegerät niemals unbeaufsichtigt an der Stromversorgung angeschlossen.<br />
Es darf nur ein zu ladender Akku an den Ladeanschluss angeschlossen werden.<br />
Folgende Batterien dürfen nicht an das Ladegerät angeschlossen werden:<br />
- NiCd- / NiMH-Akkus mit mehr als <strong>14</strong> Zellen, LiFePO 4 /Lithium-Ionen/LiMn/LithiumPolymer-Akkus mit<br />
mehr als 6 Zellen oder Bleibatterien mit mehr als 12V Nennspannung.<br />
- Akkus die eine andere Ladetechnik als NiCd-, NiMH-, Lithium- oder Bleiakkus benötigen.<br />
- Defekte, beschädigte Zellen oder Batterien.<br />
- Batterien aus parallel geschalteten oder unterschiedlichen Zellen.<br />
- Mischungen aus alten und neuen Zellen oder Zellen unterschiedlicher Fertigung.<br />
- Nicht aufladbare Batterien (Trockenbatterien). Achtung: Explosionsgefahr!<br />
- Batterien oder Zellen die vom Hersteller nicht ausdrücklich für die beim Laden mit diesem<br />
Ladegerät auftretenden Ladeströmen zugelassen sind.<br />
- Bereits geladene, heiße oder nicht völlig entleerte Zellen oder Batterien.<br />
- Batterien oder Zellen mit integrierter Lade- oder Abschaltvorrichtung.<br />
- Batterien oder Zellen die in ein Gerät eingebaut sind oder gleichzeitig mit anderen Teilen elektrisch in<br />
Verbindung stehen.<br />
Um Kurzschlüsse an den Bananensteckern des Ladekabels zu vermeiden, verbinden Sie bitte immer<br />
zuerst das Ladekabel mit dem Ladegerät und dann erst mit dem Akku! Beim Abklemmen umgekehrt.<br />
Vergewissern Sie sich generell nach einer "fertig"-Meldung, ob die vom Gerät angezeigte Lademenge<br />
der von Ihnen erwarteten Lademenge entspricht. So erkennen Sie zuverlässig und rechtzeitig fehlerhafte<br />
Frühabschaltungen. Die Wahrscheinlichkeit von Frühabschaltungen ist von vielen Faktoren abhängig<br />
und am größten bei tiefentladenen Akkus, geringer Zellenzahl oder bestimmten Akkutypen.<br />
Vergewissern Sie sich durch mehrere Probeladungen, (vor allem bei geringen Zellenzahlen) von der<br />
einwandfreien Funktion der Abschaltautomatik. u. U. werden volle Akkus durch einen zu schwachen Peak<br />
nicht erkannt.<br />
Vor dem Laden prüfen: Sind die zum Akku passenden Ladeprogramme, die richtigen Ladeströme<br />
sowie die bei NiCd und NiMH wichtigen, richtige Abschaltspannungen eingestellt?<br />
Sind alle Verbindungen einwandfrei, gibt es Wackelkontakte? Bitte bedenken Sie, dass das Schnellladen<br />
von Batterien gefährlich sein kann. Eine, wenn auch nur kurze Unterbrechung aufgrund eines Wackelkontakts<br />
führt unweigerlich zu Fehlfunktionen, kann einen erneuten Ladestart auslösen und den<br />
angeschlossenen Akku total überladen.<br />
3
4<br />
3. Allgemeine Betriebshinweise<br />
Laden von Akkus<br />
Beim Laden wird dem Akku eine bestimmte Strommenge zugeführt, welche sich aus dem Produkt<br />
aus Ladestrom x Ladezeit ergibt. Der maximal zulässige Ladestrom ist vom jeweiligen Akku-Typ<br />
abhängig und ist den Datenangaben des Akkuherstellers zu entnehmen.<br />
Nur bei ausdrücklich als schnellladefähig bezeichneten Akkus darf der Normalladestrom überschritten<br />
werden. Als NORMAL-LADESTROM wird der Strom bezeichnet, der 1/10 des Nennwertes<br />
der Kapazitätsangabe beträgt (z. B. bei einer Kapazitätsangabe von 1,7 Ah beträgt der Normalladestrom<br />
170 mA).<br />
Der zu ladende Akku wird über ein passendes Ladekabel an die Anschlussbuchsen des Ladegeräts<br />
angeschlossen (rot = Pluspol, schwarz = Minuspol).<br />
Es sind stets die Ladehinweise der Akkuhersteller zu beachten, sowie die Ladeströme und Ladezeiten<br />
einzuhalten. Es dürfen nur Akkus schnellgeladen werden, welche ausdrücklich für die an<br />
diesem Ladegerät auftretenden hohen Ladeströme geeignet sind.<br />
Bitte bedenken Sie, dass neue Akkus erst nach mehreren Ladezyklen ihre volle Kapazität erreichen.<br />
Auch kann es im Besonderen bei neuen oder tiefentladenen Akkus zu einer vorzeitigen<br />
Ladeabschaltung kommen.<br />
Sollte nach einer Schnellladung eine Zelle des NC-Akkupacks besonders heiß geworden sein, kann<br />
dies auf einen Defekt dieser Zelle hinweisen. Dieser Akkupack sollte dann nicht mehr weiterverwendet<br />
werden (verbrauchte Batterien gehören in den Sondermüll!).<br />
Achten Sie auf sicheren und guten Kontakt aller Steck- und Klemmverbindungen. Eine auch nur<br />
kurzzeitige Unterbrechung aufgrund eines Wackelkontakts kann einen erneuten Ladestart auslösen<br />
und den angeschlossenen Akku u. U. total überladen.<br />
Eine häufige Ursache Fehlfunktionen liegt meist in der Verwendung von unsachgemäßen Ladekabeln.<br />
Da das Ladegerät nicht zwischen Akkuinnenwiderstand, Kabelwiderstand und Steckverbindungswiderstand<br />
unterscheiden kann, ist die erste Voraussetzung für eine einwandfreie Funktion<br />
ein Ladekabel mit ausreichendem Draht-Querschnitt und einer Länge von nicht mehr als 30 cm<br />
sowie hochwertigen Steckverbindungen auf beiden Seiten (Goldkontakte).<br />
Laden von Senderbatterien<br />
Ein in einem Fernsteuersender eingebauter Akku kann über die meist am Sender angebrachte<br />
Ladebuchse aufgeladen werden.<br />
Senderladebuchsen enthalten meist eine Rückstromsicherung (Diode). Diese verhindert ein Beschädigen<br />
des Senders durch Verpolung oder Kurzschluss mit den blanken Enden der Ladekabelstecker.<br />
Eine Aufladung des Senderakkus mit dem Ladegerät ist jedoch nur nach deren Überbrückung möglich<br />
- bitte unbedingt die Angaben in der Sender-Bedienungsanleitung beachten!<br />
Der für den Sender max. erlaubte Ladestrom darf niemals überschritten werden.<br />
Um Schäden im Senderinneren durch Überhitzung und Wärmestau zu vermeiden, sollte der<br />
Senderakku aus dem Sender-Batteriefach herausgenommen werden.<br />
Der Sender muss während des gesamten Ladevorgangs auf „OFF“ (AUS) geschaltet sein!<br />
Niemals einen Fernsteuersender, solange er mit dem Ladegerät verbunden ist, einschalten.<br />
Eine, auch nur kurzzeitige Unterbrechung des Ladevorgangs kann die Ladespannung durch das<br />
Ladegerät derart ansteigen lassen, dass der Sender durch Überspannung sofort zerstört wird.<br />
Führen Sie keine Akku-Entladungen oder Akkupflegeprogramme über die Ladebuchse durch!<br />
Die Ladebuchse ist für diese Verwendung nicht geeignet.<br />
Das Ladegerät stellt den geforderten Ladestrom nur dann ein, wenn dadurch die technischen<br />
Möglichkeiten des Ladegerätes nicht überschritten werden! Soll durch das Ladegerät ein Ladestrom<br />
erbracht werden, den das Ladegerät technisch bedingt nicht leisten kann, wird der Wert automatisch<br />
auf den maximal möglichen Wert reduziert. Der tatsächlich benutzte Ladestrom wird angezeigt und<br />
im Display erscheint abwechselnd mit dem Ladestrom der Schriftzug „ MAX“.
Haftungsausschluss<br />
Die Einhaltung der Betriebsanleitung sowie die Bedingungen und Methoden bei Installation, Betrieb,<br />
Verwendung und Wartung des Ladegerätes können von der Fa. GRAUPNER nicht überwacht werden.<br />
Daher übernimmt die Fa. GRAUPNER keinerlei Haftung für Verluste, Schäden oder Kosten, die sich aus<br />
fehlerhafter Verwendung und Betrieb ergeben oder in irgendeiner Weise damit zusammenhängen.<br />
Japan<br />
Best.-Nr. 3371<br />
4. Empfohlene Ladekabel / Polaritäten<br />
Verschiedene Anforderungen bei der Verwendung und Einsatz von wiederaufladbaren Akkus machen<br />
auch unterschiedliche Steckverbindungen erforderlich. Beachten Sie, dass Anschlüsse, Bezeichnungen<br />
und Polaritäten anderer Hersteller unterschiedlich sein können. Verwenden Sie deshalb<br />
immer nur zueinander passende, Original-Steckverbindungen gleicher Bauart.<br />
Für die Aufladung geeignet sind folgende Ladekabel:<br />
G2 (AMP/G2,5)<br />
Best.-Nr. 3011<br />
BEC<br />
Best.-Nr. 3037<br />
JR<br />
Best.-Nr. 3021<br />
Verwenden Sie nur Original-Ladekabel mit ausreichendem Drahtquerschnitt.<br />
Anschlussstecker<br />
für Netzgerät<br />
Polklemmen<br />
für Autobatterie<br />
5. Bedienelemente / Bedienung / Ladestart<br />
Display<br />
+<br />
-<br />
Balancer-Anschluss<br />
für <strong>Graupner</strong> LiPo-<br />
Balancerstecker<br />
Bedientasten<br />
JR-Sender<br />
Best.-Nr. 3022<br />
Kaltgeräteanschluss für ein<br />
Netzkabel Eingang 100~240V AC<br />
(im Lieferumfang entlhalten!)<br />
für internes Netzgerät<br />
Ladeanschluss<br />
„Akku “<br />
Die Bedienung des Ladegeräts erfolgt durch nur 4 Bedientasten.<br />
Abgesehen von der - /DEC- und +/INC-Taste, mit welcher die Strom- und Spannungswerte verändert<br />
werden, haben die Bedientasten, je nachdem ob am Ladeanschluss ein Akku angeschlossen ist oder<br />
nicht, unterschiedliche Funktionen:<br />
Bedien-Tasten Funktion<br />
Kein Akku PROGRAMM/MODE Auswahl der Ladeprogrammeuntergruppe<br />
angeschl.: PROGRAMM/MODE 2 s. Auswahl der (Lade-)Programm-Gruppe<br />
ENTER/START Nächste Wert Einstellung<br />
Akku ENTER/START Beenden des Ladevorgangs, Unterbrechen des Summers,<br />
angeschl.: Nächste Wert Einstellung<br />
ENTER/START 2 sek. Starten des Ladevorgangs<br />
5
6<br />
6. Ladeprogramme<br />
Die verschiedenen Möglichkeiten des Ladegeräts sind in 4 Programm-Gruppen aufgeteilt, die Sie in<br />
nachfolgend aufgeführter Reihenfolge mit der MODE-Taste (2 sek. drücken) anwählen können.<br />
Ni-Cd-Akku-Programme: Aufladen, Balancieren.<br />
Ni-MH-Akku-Programme: Aufladen, Balancieren.<br />
LiPo/LiIo/LiFe-Akku-Programme: Aufladen<br />
Blei-Akku-Programme: Aufladen, Erhaltungsladung für Stand by Betrieb.<br />
NiCd<br />
AUTOMATIK-<br />
Programm<br />
MODE<br />
(2 sek.)<br />
NiMH<br />
AUTOMATIK-<br />
Programm<br />
MODE<br />
(2 sek.)<br />
Lithium<br />
MANUELL-<br />
Programm<br />
MODE<br />
(2 sek.)<br />
Pb<br />
MANUELL-<br />
Programm<br />
MODE<br />
(2 sek.)<br />
NiCd<br />
MANUELL-<br />
Programm<br />
NiMH<br />
MANUELL-<br />
Programm<br />
Lithium<br />
Typen-<br />
Auswahl<br />
7. Programmstruktur<br />
NiCd<br />
∆ ∆ delta-peak<br />
Abschaltspannung<br />
MODE MODE MODE MODE<br />
Balancierprogramm<br />
MODE (2 sek.)<br />
NiMH<br />
∆ ∆ delta-peak<br />
Abschaltspannung<br />
MODE MODE MODE MODE<br />
Balancierprogramm<br />
MODE (2 sek.)<br />
MODE<br />
MODE (2 sek.)<br />
MODE<br />
NiCd<br />
NiMH
NiCd<br />
AUTOMATIK<br />
Programm<br />
MODE (2 sek.)<br />
NiMH<br />
AUTOMATIK<br />
Programm<br />
MODE (2 sek.)<br />
Lithium<br />
MANUELL<br />
Programm<br />
MODE (2 sek.)<br />
Pb<br />
MANUELL<br />
Programm<br />
MODE (2 sek.)<br />
9. Inbetriebnahme<br />
Wird das Ladegerät mit am Eingang 100~240V AC an eine Steckdose angeschlossen oder am Eingang<br />
12V DC mit einer Autobatterie oder einem Netzteil mind. 8,5A mit 11...15V DC verbunden, drücken Sie<br />
die Tasten INC und DEC gleichzeitig, um in die Sprachauswahl zu gelangen. Ansonsten läuft zunächst<br />
die Informationsroutine ab, welche einen schnellen Überblick über die wichtigsten Benutzer-Einstellungen<br />
des Ladegerätes gibt. Auf dem Display des Ladegeräts werden nacheinander folgende<br />
Informationen angezeigt:<br />
INC DEC<br />
________________<br />
LANGUAGE SELECT<br />
________________<br />
GERMAN<br />
ENTER<br />
________________<br />
<strong>Graupner</strong><br />
________________<br />
U L T R A M A T <strong>14</strong> <strong>plus</strong><br />
3 sek.<br />
________________<br />
Sicherheitstimer<br />
________________<br />
ein<br />
3 sek.<br />
MODE<br />
MODE<br />
Summer ________________<br />
ein ________________<br />
8. Auswahl der Ladeprogrammgruppe<br />
MODE<br />
Die Lade- und Einstellmöglichkeiten des Ladegerätes sind übersichtlich<br />
und logisch in vier Programmgruppen unterteilt.<br />
Für die unterschiedlichen Akkutypen: NickelCadmium-, Nickel-Metal-Hydrid-,<br />
LiFe/LitiumIonen/LithiumPolymer und Pb (Blei)-Akkus<br />
steht jeweils eine eigene Programmgruppe zur Verfügung.<br />
Programmwechsel:<br />
Der Wechsel der Programm-Gruppe erfolgt mit der Taste MODE,<br />
die für ca. 2 Sekunden gedrückt werden muss. Mit einem Kurzdruck<br />
der MODE Taste können Sie innerhalb der Programm-Gruppe wechseln.<br />
Drücken Sie die Tasten INC und DEC gleichzeitig, während Sie<br />
das Gerät mit der Eingangsspannung versorgen, um in die<br />
Sprachauswahl zu gelangen. Drücken Sie die Tasten INC<br />
oder DEC um die gewünschte Sprache ENGLISH, GERMAN<br />
(Deutsch) oder FRENCH auszuwählen. Verlassen Sie die<br />
Sprachauswahl mit indem Sie die Taste ENTER drücken.<br />
Der <strong>ULTRAMAT</strong> <strong>14</strong> <strong>plus</strong> meldet sich mit seinem Namen.<br />
Nach 3 Sekunden erscheint das im Display Sicherheitstimer<br />
ein oder aus. Etwa 3 Sekunden lang lässt sich der Sicherheitstimer<br />
mit den Tasten INC oder DEC aus- bzw. einsschalten.<br />
Der Sicherheitstimer ist im Pb-Ladeprogramm niemals aktiv.<br />
Für alle anderen Ladeprogramme ist der Sicherheitstimer im<br />
eingeschalteten Zustand auf 180min fest eingestellt.<br />
Nach weiteren 3 Sekunden lässt sich der Summer mit den INCoder<br />
DEC-Tasten aus- bzw. einschalten.<br />
Nach weiteren 3 Sek. ist das Ladegerät einsatzbereit, s. 10..<br />
7
8<br />
LiPo-Manuell<br />
________________<br />
L:2.5A ________________<br />
2000mAh<br />
START<br />
3 sek.<br />
2<br />
sek.<br />
VERMESSE ________________<br />
AKKU<br />
BITTE ________________<br />
WARTEN...<br />
2<br />
sek.<br />
Man. ________________<br />
23:40 00863<br />
LP+2.50A ________________<br />
<strong>14</strong>.017V<br />
10. Starten des Ladevorgangs<br />
Zum Laden, Balan cieren wählen Sie das gewünschte Programm<br />
wie nachfolgend beschrieben aus und stellen die<br />
passenden Werte dazu ein.<br />
Schließen Sie, wenn vorhanden, den Balancerstecker des<br />
Akkus an den Balancereingang (BALANCER CONNECTOR)<br />
an.<br />
Achten Sie dabei auf die richtige Polung.<br />
Von rechts nach links: (Pin 1 (GND): Masse = Akku - ,<br />
Pin 2 (1): + Zelle 1, Pin 3 (2): + Zelle 2, Pin 4 (3): + Zelle 3,<br />
Pin 5 (4): + Zelle 4, Pin 6 (5): + Zelle 5, Pin 7 (6): + Zelle 6)<br />
Schließen Sie dann den 2 pol. Anschlussstecker des Akkus<br />
an den Ladegerätausgang - BATTERY + richtig gepolt mit Hilfe<br />
eines Ladekabels an.<br />
Nachdem Sie für ca. 2sek. die START-Taste gedrückt halten<br />
wird angezeigt, ob der Balancer angeschlossen oder nicht<br />
angeschlossen ist. Bei angeschlossenem Balancer können<br />
die einzelnen Zellenspannungen angezeigt werden, s. 16..<br />
**INFORMATION***<br />
________________ **INFORMATION***<br />
________________<br />
BALANCER ________________<br />
ANG. BALANCER ________________<br />
N. ANG.<br />
2<br />
sek.<br />
VERMESSE ________________<br />
AKKU<br />
BITTE ________________<br />
WARTEN...<br />
________________<br />
**LiPo Zellen**<br />
________________<br />
3 Zellen(13.73V)<br />
+ -<br />
INC DEC<br />
START<br />
2<br />
sek.<br />
2<br />
sek.<br />
Nachdem Sie die START-Taste erneut<br />
drücken wird der angeschlossene<br />
Akku geladen oder entladen.<br />
Ist bei Li-Akkutypen kein Balancerstecker<br />
angeschlossen, so erfolgt die Abfrage der<br />
Zellenzahl, die mit der START- Taste bestätigt<br />
werden muss.<br />
!Achtung ! Stellen Sie<br />
unbedingt die Richtige<br />
Zellenzahl ein und<br />
überprüfen Sie den<br />
Akkutyp, da sonst der<br />
Akku explodieren und<br />
brennen könnte!<br />
Durch einen erneuten kurzen Druck auf die START-Taste<br />
können Sie den Ladevorgang jederzeit abbrechen.<br />
Hinweis: Wird der Ladevorgang mit der START-Taste<br />
abgebrochen, so sind alle Displayparameter unwiderruflich<br />
gelöscht.
NiCd<br />
AUTOMATIK-<br />
Programm<br />
11. NiCd-Programme<br />
Komfortable Ladeprogramme für die Aufladung von im Modellbau üblichen Nickel-Cadmium-Akkus.<br />
Ist das Programm beendet, so erscheint bis zum Abklemmen des Akkus das Ladeprogramm<br />
abwechselnd mit dem Schriftzug “*ENDE*” im Display, die Ladezeit, der letzte Ladestrom, die geladene<br />
Kapazität sowie Akkuspannung werden angezeigt. Diese Daten geben unter Umständen wertvolle<br />
Hinweise auf das Ladeverhalten, die Kapazität des angeschlossenen Ni-Cd Akku-Packs oder<br />
fehlerhafte Vollerkennung.<br />
NiCd-Automatik<br />
________________<br />
L:2.5A ________________<br />
begrenzt<br />
+ -<br />
INC DEC<br />
NiCd-Manuell<br />
________________<br />
________________<br />
L:2.5A<br />
+ -<br />
INC DEC<br />
NiCd<br />
MANUELL-<br />
Programm<br />
NiCd<br />
NiCd<br />
∆ ∆ delta-peak<br />
Abschaltspannung<br />
MODE MODE MODE MODE<br />
Balancierprogramm<br />
NiCd-Automatik-Programm<br />
In diesem Programm erkennt das Ladegerät den angeschlossenen<br />
Ni-Cd Akkutypen und passt den Ladestrom dementsprechend<br />
an, sodass eine Überlastung des Akkupacks<br />
verhindert wird.<br />
Der maximale Ladestrom muss vor dem Anstecken des zu<br />
ladenden Akkus mit den INC / DEC-Tasten von 0,1A -5A bzw.<br />
ohne Begrenzung so eingestellt werden, dass der max.<br />
zulässige Ladestrom des Akkus nicht überschritten werden<br />
kann.<br />
Die Ladeabschaltung erfolgt nach den eingestellten Werten für<br />
„NiCd-Delta-Peak-Abschaltspannung“.<br />
NiCd-Manuell-Programm<br />
Bei diesem Programm wird der Akku mit dem eingestellten<br />
Ladestrom aufgeladen.<br />
Der maximale Ladestrom kann vor dem Anstecken des zu<br />
ladenden Akkus mit den INC / DEC-Tasten von 0,1A -5A<br />
eingestellt werden. Beachten Sie die Angaben des Akkuherstellers!<br />
Die Ladeabschaltung erfolgt nach den eingestellten Werten für<br />
„NiCd-Delta-Peak-Abschaltspannung“.<br />
9
NiCd ________________<br />
Balancer-<br />
________________<br />
spannung = 1.20V<br />
10<br />
START<br />
2<br />
sek.<br />
NiCd-Delta-Peak (-∆ Peak) Abschaltspannung<br />
NiCd ________________<br />
Delta-Peak-<br />
________________<br />
Volt =10mV/Zelle<br />
+ -<br />
INC DEC<br />
NiCd-Balancier-Programm<br />
+ -<br />
INC DEC<br />
**INFORMATION***<br />
________________<br />
BALANCER ________________<br />
ANG.<br />
2<br />
sek.<br />
BLC ________________<br />
28:30 0<strong>14</strong>25<br />
NC+0.00A ________________<br />
07.717V<br />
Dieses Programm dient zur Angleichung der Zellenspannungen<br />
der einzelnen Akkuzellen für Akkupacks mit 2-6 Zellen.<br />
Mit der INC oder DEC Taste stellen Sie die<br />
Balancerentladeschlussspannung 1.20...1.30V ein.<br />
Vor dem Laden eines Akkus sollten die einzelnen Zellen<br />
angeglichen werden, damit beim Laden nicht einzelne Zellen<br />
überladen werden. Besonders nach einer längeren Lagerzeit<br />
sollte ein Akku ausbalanciert werden.<br />
Dazu muss der Balancerstecker angeschlossen sein.<br />
Weiterhin müssen alle Zellen eine Spannung aufweisen, die<br />
höher ist, als die eingestellte Balancerentladeschlussspannung.<br />
Um die max. Kapazität eines Akkus zu erhalten, sollten die<br />
einzelnen Zellen einige Stunden, aber max. 24h vor der<br />
erneuten Ladung auf 1.20V entladen werden. Bei einer Spannung<br />
unter 1.20V verlieren die Akkuzellen an Kapazität.<br />
Deshalb muss ein Akku vor einer längeren Lagerung mit etwa<br />
60% Ladung gelagert werden.<br />
Das Programm balanciert die Einzelzellen mit ca. 100mA<br />
Entladestrom.<br />
Haben alle Zellen die Balancerentladeschlussspannung<br />
(+0.01V) erreicht, so wird der Balanciervorgang beendet.<br />
Die Ladeabschaltautomatik (Akku-Vollerkennung)<br />
arbeitet nach dem millionenfach<br />
bewährten Delta-Peak-Verfahren<br />
(auch bekannt als Delta-U- oder Delta-<br />
V-Verfahren). Dieses Verfahren wertet<br />
das Spannungsmaximum der Ladekurve aus, welches recht<br />
genau das Erreichen des maximalen Ladungsinhaltes angibt.<br />
Während der Ladung steigt die Akkuspannung zunächst kontinuierlich an, bei vollem Akku sorgt die<br />
Temperaturerhöhung wieder für einen leichten Rückgang (-∆V) der Batteriespannung. Dieser<br />
Rückgang wird ermittelt und ausgewertet.<br />
Die Abschaltspannung (in mV pro Zelle!) der Abschaltautomatik für NiCd-Akkus kann eingestellt<br />
werden. Als praktikabel haben sich Spannungen von 10...30 mV/Zelle herausgestellt. Höhere<br />
Spannungen führen häufig zur Überladung der Batterie, niedrigere Spannungen führen oft zu<br />
Frühabschaltung. Den für Ihren Akku günstigsten Wert sollten Sie durch Probeladungen ermitteln.<br />
Um dem Akku nicht zu überladen, beginnen Sie mit einer Delta-Peak-Abschaltspannung von 10mV.
NiMH<br />
AUTOMATIK-<br />
Programm<br />
12. NIMH-Programme<br />
Komfortable Ladeprogramme für die Aufladung von im Modellbau üblichen Nickel-Metall-Hydrid-<br />
Akkus.<br />
Ist das Ladeprogramm beendet, so erscheint bis zum Abklemmen des Akkus das Ladeprogramm<br />
abwechselnd mit dem Schriftzug “*ENDE*” im Display, die Ladezeit, der letzte Ladestrom, die<br />
geladene Kapazität sowie Akkuspannung werden angezeigt. Diese Daten geben unter Umständen<br />
wertvolle Hinweise auf das Ladeverhalten, die Kapazität des angeschlossenen Ni-MH- Akku-Packs<br />
oder fehlerhafte Vollerkennung.<br />
________________<br />
NiMH-Automatik<br />
L:2.5A ________________<br />
begrenzt<br />
+ -<br />
INC DEC<br />
NiMH<br />
MANUELL-<br />
Programm<br />
NiMH<br />
NiMH<br />
∆ ∆ ∆ delta-peak<br />
Abschaltspannung<br />
MODE MODE MODE MODE<br />
Balancierprogramm<br />
NiMH-Automatik-Programm<br />
In diesem Programm erkennt das Ladegerät den angeschlossenen<br />
Ni-Mh Akkutypen und passt den Ladestrom dementsprechend<br />
an, sodass eine Überlastung des Akkupacks<br />
verhindert wird.<br />
Der maximale Ladestrom muss vor dem Anstecken des zu<br />
ladenden Akkus mit den INC / DEC-Tasten von 0,1A -5A bzw.<br />
ohne Begrenzung so eingestellt werden, dass der max.<br />
zulässige Ladestrom des Akkus nicht überschritten werden<br />
kann. Laden Sie die Akkus auf keinen Fall mit mehr als 2C!<br />
Bsp.: NiMH 6N-4200, max. Ladestrom 8,4A, empfohlener<br />
Schnellladestrom für <strong>Graupner</strong>-Akkus 4,2A.<br />
Senderakkus müssen auf max. 2A Ladestrom begrenzt werden!<br />
Die Ladeabschaltung erfolgt nach den eingestellten Werten für<br />
„NiMH-Delta-Peak-Abschaltspannung“.<br />
11
NiMH-Manuell<br />
________________<br />
12<br />
________________<br />
L:2.5A<br />
+ -<br />
INC DEC<br />
NiMH ________________<br />
Balancer-<br />
________________<br />
spannung = 1.20V<br />
START<br />
2<br />
sek.<br />
NiMH-Manuell-Programm<br />
Bei diesem Programm wird der Akku mit dem eingestellten<br />
Ladestrom aufgeladen.<br />
Der maximale Ladestrom kann vor dem Anstecken des zu<br />
ladenden Akkus mit den INC / DEC-Tasten von 0,1A -5A<br />
eingestellt werden. Beachten Sie die Angaben des Akkuherstellers!<br />
Laden Sie die Akkus auf keinen Fall mit mehr als 2C!<br />
Bsp.: NiMH 6N-4200, max. Ladestrom 8,4A, empfohlener<br />
Schnellladestrom für <strong>Graupner</strong>-Akkus 4,2A.<br />
Senderakkus müssen auf max. 2A Ladestrom begrenzt werden!<br />
Die Ladeabschaltung erfolgt nach den eingestellten Werten für<br />
„NiMH-Delta-Peak-Abschaltspannung“.<br />
NiMH-Balancier-Programm<br />
+ -<br />
INC DEC<br />
**INFORMATION***<br />
________________<br />
BALANCER ________________<br />
ANG.<br />
2<br />
sek.<br />
BLC ________________<br />
28:30 0<strong>14</strong>25<br />
NM+0.00A ________________<br />
07.717V<br />
Dieses Programm dient zur Angleichung der Zellenspannungen<br />
der einzelnen Akkuzellen für Akkupacks mit 2-6 Zellen.<br />
Mit der INC oder DEC Taste stellen Sie die<br />
Balancerentladeschlussspannung 1.20...1.30V ein.<br />
Vor dem Laden eines Akkus sollten die einzelnen Zellen<br />
angeglichen werden, damit beim Laden nicht einzelne Zellen<br />
überladen werden. Besonders nach einer längeren Lagerzeit<br />
sollte ein Akku ausbalanciert werden.<br />
Dazu muss der Balancerstecker angeschlossen sein.<br />
Weiterhin müssen alle Zellen eine Spannung aufweisen, die<br />
höher ist, als die eingestellte Balancerentladeschlussspannung.<br />
Um die max. Kapazität eines Akkus zu erhalten, sollten die<br />
einzelnen Zellen einige Stunden, aber max. 24h vor der<br />
erneuten Ladung auf 1.20V entladen werden. Bei einer Spannung<br />
unter 1.20V verlieren die Akkuzellen an Kapazität.<br />
Deshalb muss ein Akku vor einer längeren Lagerung mit etwa<br />
60% Ladung gelagert werden.<br />
Das Programm entlädt Zellen mit einer höheren Zellenspannung<br />
mit einem Strom von ca. 100mA.<br />
Haben alle Zellen die Balancerentladeschlussspannung<br />
(+0.01V) erreicht, so wird der Balanciervorgang beendet.
NiMH-Delta-Peak (-∆ Peak) Ansprechspannung<br />
NiMH ________________<br />
Delta-Peak-<br />
________________<br />
Volt =10mV/Zelle<br />
+ -<br />
INC DEC<br />
Die Ansprechspannung (in mV pro Zelle!) der Abschaltautomatik<br />
für NiMH-Akkus kann eingestellt werden. NiMH-<br />
Akkus haben gegenüber NiCd-Akkus einen weniger ausgeprägten<br />
Spannungsrückgang. Als praktikabel haben sich<br />
Spannungseinstellungen von 5 ... 25mV/Zelle herausgestellt.<br />
Höhere Spannungen führen häufig zur Überladung der<br />
Batterie, niedrigere Spannungen führen oft zu Frühabschaltung.<br />
Den für Ihren Akku günstigste Wert sollten Sie durch<br />
Probeladungen ermitteln. Beginnen Sie mit 5mV/Zelle, um den<br />
Akku nicht zu überladen.<br />
13
<strong>14</strong><br />
13. Lithium-Programme<br />
Die Ladeprogramme sind nur zum Laden von LiFePO 4 (LiFe) -Akkus mit einer Zellenspannung von<br />
3,3 V/Zelle, Lithium Ionen-Akkus mit einer Zellennennspannung von 3,6 V/Zelle, Lithium Polymer- und<br />
Lithium Mangan-Akkus mit einer Zellen Nennspannung von 3,7 V/Zelle geeignet.<br />
Lithium-Akkus zeichnen sich vor allem durch ihre, im Vergleich zu anderen Akkutypen, wesentlich<br />
höhere Energiedichte aus. Dieser wesentliche Vorteil auf der einen Seite erfordert jedoch andere<br />
Behandlungsmethoden in Bezug auf die Ladung sowie für einen gefahrlosen Betrieb.<br />
Die hier grundlegenden Vorschriften müssen auf alle Fälle beachtet werden. Weitere entsprechende<br />
Angaben und Sicherheitshinweise entnehmen sie bitte den technischen Angaben des Akkuherstellers.<br />
Prinzipiell können Akkus auf Lithiumbasis NUR mit speziellen Ladegeräten<br />
geladen werden, die auf den jeweiligen Akkutyp (Ladeschlussspannung, Kapazität)<br />
eingestellt sind.Die Aufladung erfolgt anders als bei NiCd- oder NiMH-Akkus<br />
durch eine sog. Konstantstrom/Konstantspannungs-Methode. Der für die Ladung<br />
erforderliche Ladestrom ergibt sich aus der Akkukapazität und wird vom Ladegerät<br />
automatisch eingestellt. Lithiumakkus werden gewöhnlich mit 1 C Ladestrom aufgeladen (1 C<br />
Ladestrom = Kapazitäts-Ladestrom. Beispiel: Bei einer Kapazität von z. B.: 1500 mAh ist der<br />
entsprechende 1 C Ladestrom = 1500 mA (1,5A)).<br />
Da manche Zellentypen auch 2C oder 4C zulassen, muss am Ladegerät der Ladestroms und die<br />
Kapazität des Akkus eingestellt werden. Wird die zum jeweiligen Akkutyp gehörende, spezifische<br />
Ladeschlussspannung erreicht, wird der Ladestrom automatisch reduziert, um ein Überschreiten der<br />
Ladeschlussspannung zu verhindern.Gibt der Akku-Hersteller einen kleineren als den 1 C Ladestrom<br />
an, so muss auch der Ladestrom entsprechend verringert werden.<br />
Für eine optimale Ladung und eine höhere Lebensdauer und eine höhere Sicherheit bei der<br />
Ladung empfehlen wir dringend den Balancerstecker beim Laden und Entladen an den<br />
Ultramat <strong>14</strong> <strong>plus</strong> anzuschließen.<br />
Probleme bei Fehlbehandlung der Akkus:<br />
Lithium-Ionen-Akkus sind durch Überladung stark gefährdet. Sie kann zu Gasentwicklung, Überhitzung<br />
und sogar zur Explosion der Zelle führen. Wird die Ladeschlussspannung von 3,6 V/Zelle<br />
(LiFePO 4 ), 4,1 V/Zelle (Lithium Ionen) bzw. 4,2 V/Zelle (Lithium Polymer und Mangan) um mehr als 1%<br />
überschritten, so beginnt in der Zelle die Umwandlung der Lithium-Ionen in metallisches Lithium.<br />
Dieses reagiert jedoch in Verbindung mit Wasser aus dem Elektrolyten sehr heftig, was zur Explosion<br />
der Zelle führt. Andererseits darf die Ladeschlussspannung aber auch nicht unterschritten werden,<br />
da die Li Ionen-Akkuzelle sonst eine deutlich geringere Kapazität aufweist. 0,1V unter der Schwelle<br />
bedeuten bereits etwa 7% Kapazitätsverlust.Tiefentladung von Lithium-Akkus führt zum rapiden<br />
Kapazitätsverlust. Dieser Effekt ist nicht umkehrbar, sodass man es auf jeden Fall vermeiden muss,<br />
den Akku unter 2,5 V/Zelle zu entladen.<br />
Achtung: Der eingestellte Zellentyp, die Zellenkapazität und die Zellenanzahl muss immer<br />
mit dem zu ladenden Akku übereinstimmen und darf niemals abweichen - Brandgefahr und<br />
Explosionsgefahr! Es dürfen keine Akkus mit integrierten Lademechanismen angeschlossen<br />
werden! Laden Sie Ihre Lithium-Akkus nur auf brandsicherem Untergrund.<br />
Lithium<br />
MANUELL-<br />
Programm<br />
MODE<br />
Lithium<br />
Typen-<br />
Auswahl<br />
MODE
LiPo-Manuell<br />
________________<br />
________________<br />
L:4.0 A 4000mAh<br />
+ -<br />
INC DEC<br />
ENTER<br />
Lithium-Manuell-Programm<br />
Bei diesem Programm wird der Akku mit dem eingestellten<br />
Ladestrom aufgeladen.<br />
Vor dem Anstecken des zu ladenden Akkus wird mit den INC<br />
/ DEC-Tasten der Ladestrom (0,10...5,00A, links im Display)<br />
und nach dem Drücken der ENTER-Taste wird mit den INC<br />
/ DEC-Tasten die Kapazität des Akkus eingestellt (50 ...<br />
8000mAh, rechts im Display). Bei Überschreitung der eingestellten<br />
Kapazität um 10% wird der Ladevorgang aus<br />
Sicherheitsgründen abgebrochen.<br />
Beim Laden wird der Anschluss des Balancersteckers aus Sicherheitsgründen dringend<br />
empfohlen!<br />
Wird der Akku anschließend an das Ladegerät angeschlossen und der Ladevorgang gestartet, so<br />
beginnt der Ladestrom von 0,00 A an langsam bis an die eingestellte Begrenzung anzusteigen.<br />
Wundern Sie sich jedoch nicht, wenn der von Ihnen eingestellte Ladestrom nicht erreicht wird, denn<br />
das Ladeprogramm überwacht ständig die Batteriespannung und verhindert so ein aufblähen des<br />
Akkus, solange die Spannungen der Zellen eines Akkupacks gleich sind. Bei angeschlossenem<br />
Balancerstecker werden die einzelnen Akkuzellen automatisch angeglichen.<br />
Der Ladestrom wird automatisch reduziert, wenn die Entladeschlussspannung einer Zelle erreicht ist.<br />
Beträgt der Ladestrom etwa 1/10 des eingestellten Stromwertes, so wird der Ladevorgang beendet<br />
und wird im Display durch den Schriftzug „ENDE.“ abwechselnd mit dem Ladestrom angezeigt.<br />
________________<br />
**LiPo Zellen**<br />
________________<br />
2 Zellen( 7.73V)<br />
+ -<br />
INC DEC<br />
+ -<br />
INC DEC<br />
!Achtung ! Stellen Sie unbedingt die<br />
Richtige Zellenzahl und den<br />
richtigen Akkutyp ein, da sonst der<br />
Akku explodieren und brennen<br />
könnte!<br />
Lithium-Zellenzahl<br />
Nachdem der Akkupack an das Ladegerät ohne<br />
Balancerstecker angeschlossen wird und Sie die START-<br />
Taste für ca. 2 sek. gedrückt haben, sehen Sie die Anzeige mit<br />
der Lithium Zellenzahl, die bei 1-2 Zellen voll automatisch<br />
erkannt und eingestellt wird.<br />
Ab 2 Zellen kann es evtl. sein, dass Sie die Zellenzahl manuell<br />
mit den INC/DEC Tasten nachstellen müssen, da eine automatische<br />
Erkennung ab 3 Zellen nicht mehr möglich ist. Auf der<br />
rechten Seite sehen Sie zur Kontrolle die Spannung des<br />
angeschlossenen Akkupacks.<br />
Durch einen weiteren Tastendruck der START-Taste wird der<br />
Ladevorgang gestartet.<br />
15
________________<br />
Lithium Typ<br />
________________<br />
LiPo<br />
INC<br />
+ -<br />
DEC<br />
16<br />
Lithium-Typ-Auswahl-Programm<br />
<strong>14</strong>. Pb-Programme<br />
Pb<br />
MANUELL-<br />
Programm<br />
Dies ist das wichtigste Einstellprogramm für Lithiumakkus.<br />
In dieser Auswahl wird der Akkutyp eingestellt.<br />
Dieser ist sehr sorgfältig einzustellen und zu überprüfen, da<br />
das Ladegerät aus diesen Einstellungen alle anderen Ladeparameter<br />
ableitet.<br />
Die Einstellung des Akkutyps (LiPo, LiIo oder LiFe) beeinflusst<br />
die Abschaltspannung. Sollte ein Lithium-Akku wider Erwarten<br />
nur zu 2/3 aufgeladen werden, so haben Sie vielleicht hier den<br />
falschen Akkutyp eingestellt.<br />
Achtung: wird hier ein falscher Wert eingestellt, so kann der<br />
Akku dadurch irreparabel beschädigt werden oder gar explodieren!<br />
Beim Laden werden die Akkutypen wie folgt angezeigt:<br />
LiPo (LiMn) = LP<br />
LiIo = LI<br />
LiFe = LF<br />
Das Programm ist nur zum Laden und Entladen von Blei-Schwefelsäure- und Blei-Gel-Akkus mit genau<br />
2, 4, 6, und 12 V und (1, 2, 3, 6 Zellen) geeignet.<br />
Achtung: Blei-Batterien mit anderen Nennspannungen werden vom Gerät nicht erkannt und dürfen<br />
nicht angeschlossen werden.<br />
Bleiakkus verhalten sich gänzlich anders als die NiCd- oder NiMH-Akkus. Im Bezug zur Kapazität sind<br />
Bleiakkus im Vergleich zu NiCd- oder NiMH-Akkus nur mit relativ geringen Strömen belastbar. Das<br />
gleiche gilt vor allem auch für deren Ladung, bei denen die Hersteller meist <strong>14</strong> bis 16 Stunden zum<br />
Erreichen der Nennkapazität bei der Aufladung mit dem Normalladestrom angeben. Als Normalladestrom<br />
wird der Ladestrom bezeichnet der ein 10tel der Nennkapazität des Akkus ausmacht. Beispiel:<br />
Kapazität des Akku = 12 Ah --> Normalladestrom = 1,2 A. Die Voll-Erkennung erfolgt, (anders wie bei<br />
den NiCd- oder NiMH-Batterien) für Bleibatterien typisch, durch die Höhe der Akkuspannung.<br />
Achtung: Bleibatterien sind nicht schnellladefähig! Wählen Sie deshalb immer nur die<br />
vom Akkuhersteller empfohlenen Ladeströme aus. Bedenken Sie auch, dass die Nennkapazität<br />
(d. h. Lebensdauer) eines Pb-Akkus sehr schnell durch falsche Pflege (Überladungen, viele 100%<br />
Entladungen und im besonderen Tiefentladungen) negativ beeinflusst wird. Auch entscheidet die<br />
Höhe des Ladestroms über die entnehmbare Batteriekapazität. Je höher der Strom, desto geringer<br />
die Kapazitätsausbeute.<br />
Die in den Benutzereinstellungen für Ladeabschaltverzögerung und Sicherheits-Timer eingestellten<br />
Werten haben in den PB-Ladeprogrammen keine Wirkung.
Pb-Manuell<br />
________________<br />
________________<br />
L:2.5A<br />
+ -<br />
INC DEC<br />
Pb-Manuell-Programm<br />
Bei diesem Programm wird vor dem Anstecken des zu<br />
ladenden Akkus mit den INC / DEC-Tasten der für den Akku<br />
maximal zulässige Ladestrom (maximal Ladestrom) eingestellt.<br />
Diese Einstellung legt nur die Obergrenze fest, den das<br />
Ladegerät dem Akku zumuten darf.<br />
Gibt der Akku-Hersteller einen kleinen Ladestrom an, so muss auch der Ladestrom begrenzt werden,<br />
da u. U. vom Ladegerät aufgrund einer guten Ladewilligkeit des Akkus sonst ein höherer Ladestrom<br />
eingestellt werden könnnte.<br />
Wird der Akku anschließend an das Ladegerät angeschlossen und der Ladevorgang gestartet, so<br />
beginnt der Ladestrom von 0,00 A an langsam bis an die eingestellte Begrenzung anzusteigen.<br />
Der Akku wird dabei laufend neu vermessen und der Ladestrom den Gegebenheiten angepasst.<br />
Das Ladeprogramm ermittelt aufgrund der Spannungslage automatisch die zum Akku gehörende<br />
Zellenzahl.<br />
Wundern Sie sich jedoch nicht, wenn der von Ihnen eingestellte Ladestrom nicht erreicht wird, denn<br />
das Ladeprogramm überwacht ständig die Batteriespannung und verhindert so ein Übergasen des<br />
Akkus.<br />
Der Akku wird nun bis zum Erreichen von etwa 2,3 bis 2,35 Volt pro Zelle mit den maximal möglichen<br />
Strömen geladen. Danach erfolgt ein Übergang auf eine schonende Vollladung. Dabei wird der<br />
Ladestrom nochmals reduziert um einen möglichst hohen Füllgrad des Akkus zu erreichen.<br />
Das Beenden des Ladevorgangs erfolgt automatisch bei Erreichen einer Akkuspannung von etwa 2,45<br />
Volt pro Zelle bis 2,5 Volt pro Zelle.<br />
Durch die automatische Ladestromanpassung ist eine schnelle Aufladung in deutlich weniger als den<br />
üblichen <strong>14</strong> bis 16 Stunden möglich.<br />
Ist der Ladevorgang beendet, so ertönen akustische<br />
ENDE ________________<br />
CHG 367:09 04448<br />
Signaltöne für einen bestimmten Zeitinterval. Parallel dazu,<br />
Pb ________________<br />
0mA 2.<strong>14</strong>7V wird im Display der Schriftzug „ENDE“ eingeblendet.<br />
17
18<br />
15. Displayanzeigen<br />
Programm Ladezeit min.:s.<br />
Akkutyp<br />
Man. ________________<br />
12:56 00321<br />
NC+4.50A ________________<br />
11.985V<br />
Ladestrom<br />
Fertigmeldung<br />
Kapazität in mAh<br />
Akkuspannung<br />
Die während der Ladung / des Balanciervorganges wichtigen Daten werden übersichtlich auf der<br />
zweizeiligen Flüssigkristallanzeige wiedergegeben und sind bis zum Abklemmen des zu ladenden<br />
Akkus sichtbar. Wird ein weiterer Akku geladen sind die vorher angezeigten Werte nicht mehr abrufbar.<br />
16. Kontrollanzeigen auf dem Display<br />
Das Ladegerät ist mit einer Vielzahl an Schutz- und Überwachungseinrichtungen zur Kontrolle der<br />
einzelnen Funktionen und der Geräteelektronik ausgestattet. Eine Überschreitung von Grenzwerten führt<br />
in einigen Fällen zur Abschaltung des Ladevorganges (z.B. bei Überspannung, Übertemperatur oder<br />
leerwerdender Autobatterie).<br />
Diese Ursachen werden in der Anzeige der Fehlerursache auf der Flüssigkristallanzeige sowie zum<br />
Ansprechen des Summers führen.<br />
VERMESSE ________________<br />
AKKU<br />
BITTE ________________<br />
WARTEN...<br />
ENDE ________________<br />
48:32 03363<br />
NC ________________<br />
200mA 9.773V<br />
Messvorgang<br />
Nach Drücken der START-Taste für ca. 2sek wird der Akku<br />
vermessen, sodass für 1-2sek. diese Meldung im Display<br />
erscheint, bevor der Ladevorgang gestartet wird.<br />
Ist ein Lade/Entladeprogramm abgearbeitet, so erscheint im<br />
Display abwechselnd mit der Programmbezeichnung der<br />
Schriftzug *ENDE*. Gleichzeitig ertönt der eingebaute Summer<br />
für eine beschränkte Zeit.<br />
Anzeige Balancerstecker angeschlossen<br />
BLC ________________<br />
Man. 28:30 02850<br />
LP+6.00A ________________<br />
<strong>14</strong>.717V<br />
Ist der Balancerstecker des Akkus mit dem Ladegerät verbunden<br />
und der Balancer aktiv, so erscheint links oben im Display<br />
BLC, abwechselnd mit der Programmbezeichnung.
Anzeige der Eingangsspannung und des Innenwiderstandes<br />
INC DEC<br />
Die aktuelle Eingangsspannung und der Innenwiderstand des<br />
Akkus (nur im NiCd-und NiMH- Manuell-Modus) kann jederzeit<br />
Eingangsspannung<br />
________________ durch gleichzeitiges Drücken der INC- und DEC-Tasten<br />
13.62V ________________ abgerufen werden. Durch drücken der INC- oder DEC-Taste<br />
wechseln Sie die Anzeige zum Innenwiderstand, den<br />
Innenwid. Batt.<br />
Einzelzellenspannungen oder zur Eingangsspannung.<br />
Die Anzeige der Eingangsspannung ist vor allem sehr nützlich,<br />
________________<br />
25m<br />
wenn Sie eine Autobatterie als Stromquelle verwenden.<br />
Die Anzeige des Innenwiderstandes ermöglicht die Kontrolle der Akkuqualität. Der Innenwiderstand<br />
wird beim Laden nach 5 min. und am Ende des Ladevorgangs und beim Entladen nach 2 min. gemessen.<br />
Durch drücken der MODE oder START - Taste kehren Sie ins Menü zurück.<br />
INC<br />
________________<br />
Eingangsspannung<br />
________________<br />
13.62V<br />
Anzeige der Einzelzellenspannungen<br />
DEC<br />
________________<br />
Innenwid.Batt.<br />
________________<br />
25m<br />
1. ________________<br />
4.153V<br />
2. ________________<br />
4.168V<br />
3. ________________<br />
4.053V<br />
4. ________________<br />
0.000V<br />
5. ________________<br />
0.000V<br />
6. ________________<br />
0.000V<br />
Die aktuelle Eingangsspannung und der Innenwiderstand des<br />
Akkus (nur im NiCd-und NiMH- Manuell-Modus) kann jederzeit<br />
durch gleichzeitiges Drücken der INC- und DEC-Tasten<br />
abgerufen werden. Durch drücken der INC- oder DEC-Taste<br />
wechseln Sie die Anzeige zum Innenwiderstand, den<br />
Einzelzellenspannungen oder zur Eingangsspannung.<br />
Die Anzeige der Einzellenspannungen dient der Überprüfung<br />
der einzelnen Zellenspannungen (1-6 Zellen).<br />
19
20<br />
17. Fehler- und Warnmeldungen<br />
Das Ladegerät ist mit einer Vielzahl an Schutz- und Überwachungseinrichtungen zur Kontrolle der<br />
einzelnen Funktionen und der Geräteelektronik ausgestattet. Eine Überschreitung von Grenzwerten<br />
führt in einigen Fällen zur automatischen Reduzierung der Geräteeinstellungen (z.B. Lade- oder<br />
Entladestrom) oder zur Abschaltung des Ladevorganges (z.B. bei leerwerdender Autobatterie).<br />
Die Ursachen dafür werden im Fehlerfall auf der Flüssigkristallanzeige angezeigt. Die meisten<br />
Fehlerursachen sind selbsterklärend. Die nachstehende Auflistung soll jedoch bei der Fehlerfindung<br />
hilfreich sein. Die Warnmeldung sowie das akustische Warnsignal sind mit der „ENTER“-Taste<br />
abstellbar.<br />
________________<br />
*****FEHLER*****<br />
________________<br />
Autobatt. leer<br />
________________<br />
*****FEHLER*****<br />
________________<br />
Falschpolung<br />
________________<br />
*****FEHLER*****<br />
________________<br />
Unterbrechung<br />
________________<br />
*****FEHLER*****<br />
________________<br />
Ladezeit übersch<br />
________________<br />
*****FEHLER*****<br />
________________<br />
Spann. übersch.<br />
________________<br />
*****FEHLER*****<br />
________________<br />
Spann. untersch.<br />
Unterschreitet die Spannung der Autobatterie den im Programm-Menü<br />
„Unterspannungsabschaltung“ in den Benutzereinstellungen<br />
eingestellten Wert, (11,0 V), so erfolgt diese<br />
Warnmeldung.<br />
Wird an die Ladeanschlüsse des Ladegeräts ein Akku mit<br />
falscher Polarität angeschlossen, so erfolgt diese Warnmeldung.<br />
Stellt das Ladegerät während der Ladung/Entladung eine<br />
Unterbrechung der Verbindung zwischen Akku und Ladegerät<br />
fest, so wird diese Fehlermeldung ausgegeben.<br />
Tritt diese Fehlermeldung während des Betriebs auf, kann dies<br />
auf einen Wackelkontakt hinweisen.<br />
Hinweis: Diese Fehlermeldung erfolgt auch, wenn Sie die<br />
Ladung, z. B. durch Abziehen des Ladekabels unterbrechen.<br />
Ist der interne Ladesicherheitstimer abgelaufen, erfolgt zur<br />
Sicherheit eine Unterbrechung des laufenden Vorgangs.<br />
Der Sicherheitstimer ist bei NiCd/NiMH Akkus fest auf 180min.<br />
eingestellt. Bei Lithium-Akkus auf 180min, bei Bleibakkus ist<br />
dieser deaktiviert. Diese Einstellungen können nicht verändert<br />
werden.<br />
Mögliche Ursachen: Ladestrom zu gering - Akku wird nicht voll,<br />
Ladekabel zu dünn und zu lang - Ladestrom kann nicht weit<br />
genug ansteigen, Kapazität des Akkus zu groß.<br />
Stellt das Ladegerät eine zu hohe Spannung fest z.B. falsche<br />
Einstellung bei der Lithium Zellenzahl oder bei Bleiakkus, so<br />
erscheint diese Fehlermeldung.<br />
Außerdem kann diese Fehlermeldung bei Überladung der<br />
angeschlossenen Zellen erscheinen.<br />
Sollte das Ladegerät eine zu niedrige Spannung feststellen z.<br />
B. falsche Einstellung bei der Lithium Zellenzahl oder bei<br />
Bleibakkus, so erscheint diese Fehlermeldung.<br />
Grund für diese Fehlermeldung ist, dass die Zellen durch die<br />
falsche Einstellung zu tief entladen werden.
________________<br />
*****FEHLER*****<br />
________________<br />
Bal.Spg.übersch.<br />
________________<br />
*****FEHLER*****<br />
________________<br />
Bal.Spg.untersch<br />
________________<br />
*****FEHLER*****<br />
BALANCER ________________<br />
N. ANG.<br />
Stellt das Ladegerät eine zu hohe Zellenspannung am Balancereingang<br />
fest, so erscheint diese Fehlermeldung.<br />
Die Fehlermeldung erscheint bei folgenden Spannungen:<br />
LiPo > 4,3V, LiIo > 4,2V, LiFe > 3,9V, NiCd/NiMH > 2,0V<br />
Außerdem kann diese Fehlermeldung bei Überladung der<br />
angeschlossenen Zellen erscheinen.<br />
Stellt das Ladegerät eine zu niedrige Zellenspannung am<br />
Balancereingang fest, so erscheint diese Fehlermeldung.<br />
Die Fehlermeldung erscheint bei folgenden Spannungen:<br />
LiPo < 2,75V, LiIo < 2,75V, LiFe < 2,0V, NiCd/NiMH < 0,1V<br />
In diesem Fall empfiehlt sich das Anladen des Akkus für wenige<br />
Minuten (max. 5 min) z. B. im LiFe Programm Modus, das eine<br />
Spannung von 2V pro Zelle zulässt, ohne Balanceranschluss.<br />
Warnung: Es könnten Zellen beschädigt sein und der<br />
Akkupack darf daher nur unter strengster Beobachtung<br />
aufgeladen werden. Sobald die Spannung wieder hoch<br />
genug ist, muss der Akku aus Sicherheitsgründen unbedingt<br />
mit angeschlossenem Balancerstecker geladen<br />
werden (Explosions- und Brandgefahr)!<br />
Wird das NiCD/NiMH-Entladebalancier-Programm gestartet,<br />
ohne dass der Balancerstecker angeschlossen ist, so erscheint<br />
diese Fehlermeldung.<br />
Wird der Balancerstecker während eines Lade- oder Entladevorgangs<br />
abgezogen, so erscheint ebenfalls diese Fehlermeldung.<br />
21
Das Ladegerät arbeitet wartungsfrei und benötigt daher keinerlei Wartungsarbeiten. Bitte schützen Sie<br />
es jedoch in Ihrem eigenen Interesse unbedingt vor Staub, Schmutz und Feuchtigkeit!<br />
Zur Reinigung das Ladegerät von Autobatterie und Akku trennen und nur mit einem trockenen Lappen<br />
(keine Reinigungsmittel verwenden!) leicht abreiben.<br />
22<br />
18. Reinigung und Wartung<br />
19. Hinweise zum Umgang mit Akkus<br />
Das Laden einzelner NiCd- oder NiMH-Zellen oder Batterien mit 1...4 Zellen stellt die Abschaltautomatik<br />
vor eine schwere Aufgabe, da hier der Spannungs-Peak nicht sehr ausgeprägt ist,<br />
kann eine einwandfreie Funktion nicht garantiert werden. Die Automatik kann nicht oder nicht<br />
richtig ansprechen. Überprüfen Sie deshalb durch mehrfache, überwachte Probeladungen ob<br />
bei den von Ihnen verwendeten Akkus eine einwandfreie Abschaltung erfolgt.<br />
Warme Batterien sind leistungsfähiger als kalte, wundern Sie sich deshalb nicht wenn Ihre Batterien<br />
im Winter nicht so leistungsfähig sind.<br />
Überladen sowie Tiefentladung führt zu irreparabler Beschädigung der Zellen und schädigt dauerhaft<br />
die Leistungsfähigkeit des Akkus und vermindert die Kapazität.<br />
Akkus niemals ungeladen, leer oder teilgeladen für längere Zeit lagern. Vor der Lagerung Akkus<br />
aufladen und von Zeit zu Zeit Ladezustand überprüfen. NiMH-Zellen sollten 1,2V pro Zelle und LiIo/<br />
LiPo-Zellen sollten 3V pro Zelle niemals unterschreiten, um eine optimale Lebensdauer zu erreichen.<br />
Beim Kauf von Akkus auf gute Qualität achten, neue Akkus zunächst nur mit kleinen Strömen aufladen<br />
und erst allmählich an höhere Ströme herantasten.<br />
Akkus erst kurz vor der Verwendung aufladen, die Akkus sind dann am leistungsfähigsten.<br />
An den Akkus nicht löten - Die beim Löten auftretenden Temperaturen beschädigen meist die<br />
Dichtungen und Sicherheitsventile der Zellen, der Akku verliert daraufhin Elektrolyt oder trocknet aus<br />
und büßt seine Leistungsfähigkeit ein.<br />
Überladung schädigt die Kapazität des Akkus. Deshalb keine heißen oder bereits geladenen Akkus<br />
erneut aufladen.<br />
Hochstromladungen und -entladungen verkürzen die Lebenserwartung des Akkus. Überschreiten<br />
Sie daher nicht die vom Hersteller vorgegebenen Angaben.<br />
Bleibatterien sind nicht hochstromladefähig. Überschreiten Sie daher niemals die vom Akkuhersteller<br />
angegebenen Ladeströme.<br />
Akkus vor Vibration schützen sowie keiner mechanischen Belastungen aussetzen.<br />
Beim Laden und während des Betriebs der Akkus kann Knallgas (Wasserstoff) entstehen, achten<br />
Sie deshalb auf ausreichende Belüftung.<br />
Batterien nicht mit Wasser in Berührung bringen, Explosionsgefahr.<br />
Batteriekontakte niemals kurzschließen, Explosionsgefahr.<br />
Akkus können durch einen Defekt Explodieren oder brennen. Wir empfehlen daher bei allen<br />
Li-Akkus sowie NiCd und NiMH-Akkus die Akkus in einem LiPo-Sicherheitskoffer Best.-Nr.<br />
8370 oder 8371 zu laden.<br />
Batterien nicht öffnen, Verätzungsgefahr.<br />
NiCd- oder NiMH-Akkupacks lassen sich am besten formieren indem zuerst alle Zellen einzeln und<br />
separat entladen werden und anschließend den Akkupack aufladen. Das Entladen erfolgt mit dem<br />
Ladegerät (Zelle für Zelle).<br />
Wundern Sie sich auch nicht, wenn Ihre Akkupacks im Winter nicht so ladewillig sind wie im Sommer.<br />
Eine kalte Zelle ist nicht so stromaufnahmefähig wie eine warme.<br />
Hinweise zur Batterieverordnung: Verbrauchte Batterien sind Sondermüll und dürfen nicht über die<br />
Mülltonne entsorgt werden. Im Fachhandel, wo Sie die Batterien erworben haben, stehen Batterie-<br />
Recycling-Behälter für die Entsorgung bereit. Der Handel ist zur Rücknahme verpflichtet.
20. Technische Daten<br />
Akku:<br />
Ladeströme / Leistung 100 mA bis 5,0 A / max. 50 W mit Netzanschluss 100~240VAC<br />
100mA bis 5,0A / max. 50W mit 11...15VDC-Anschluss<br />
am Eingang<br />
Ni-Cd & Ni-MH-Akkus:<br />
Zellenzahl 1 - <strong>14</strong> Zellen<br />
Kapazität<br />
Lithium-Akkus:<br />
ab 0,1 Ah bis 8,0 Ah<br />
Zellenzahl 1-6 Zellen<br />
Zellenspannungen 3,3V (LiFe), 3,6 V (LiIo) bzw. 3,7 V (LiPo/LiMn)<br />
Kapazität<br />
PB-Akkus:<br />
ab 0,05 Ah-8,0 Ah<br />
Zellenzahl 1, 2, 3, 6<br />
Akkuspannungen 2, 4, 6, 12 V<br />
Kapazität ab 1 Ah<br />
Sonstiges:<br />
Betriebsspannungsbereich DC-Eingang: 11,0 bis 15 V<br />
Betriebsspannungsbereich AC-Eingang: 100~240V<br />
Erforderliche Autobatterie 12 V, min. 30 Ah<br />
Erforderliches Netzgerät für 12V DC-Anschluss: 12-<strong>14</strong>V, min. 8,5A stabilisiert 1)<br />
Leerlaufstromaufnahme ca. 0,1A<br />
Unterspan.-Abschaltung ca. 11,0 V<br />
Balanceranschluss: 1...6 NiMH/NiCd/LiPo/LiIo/LiFe Zellen<br />
Balancierstrom max. ca: NiMH/NiCd: 0,1A, LiPo/LiIo/LiFe: 0,3A<br />
Gewicht ca. 600 g<br />
Abmessungen ca. (BxTxH) <strong>14</strong>8 x <strong>14</strong>6 x 54 mm<br />
Alle Daten bezogen auf eine Autobatteriespannung von 12.7 V.<br />
Die angegeben Werte sind Richtwerte, die abhängig vom verwendeten Akkuzustand, Temperatur usw. abweichen können.<br />
1) Der einwandfreie Betrieb des Ladegeräts an einem Netzteil ist von vielen Faktoren wie z.B. Brummspannung, Stabilität, Lastfestigkeit usw.<br />
abhängig. Bitte verwenden Sie nur die von uns empfohlenen Geräte.<br />
Hinweise zum Umweltschutz<br />
Das Symbol auf dem Produkt, der Gebrauchsanleitung oder der Verpackung weist darauf hin,<br />
dass dieses Produkt bzw. elektronische Teile davon am Ende seiner Lebensdauer nicht über den<br />
normalen Haushaltsabfall entsorgt werden dürfen. Es muss an einem Sammelpunkt für das Recycling von<br />
elektrischen und elektronischen Geräten abgegeben werden.<br />
Die Werkstoffe sind gemäß ihrer Kennzeichnung wiederverwertbar. Mit der Wiederverwendung, der stofflichen<br />
Verwertung oder anderen Formen der Verwertung von Altgeräten leisten Sie einen wichtigen Beitrag zum<br />
Umweltschutz.<br />
Batterien und Akkus müssen aus dem Gerät entfernt werden und bei einer entsprechenden Sammelstelle<br />
getrennt entsorgt werden.<br />
Bei RC-Modellen müssen Elektronikteile, wie z.B. Servos, Empfänger oder Fahrtenregler aus dem Produkt<br />
ausgebaut und getrennt bei einer entsprechenden Sammelstelle als Elektro-Schrott entsorgt werden.<br />
Bitte erkundigen Sie sich bei der Gemeindeverwaltung die zuständige Entsorgungsstelle.<br />
23
Contents<br />
Chapter Page<br />
24<br />
1. Introduction 24<br />
2. Warnings and safety notes, please read and observe! 25<br />
3. General notes on using the charger 26<br />
4. Recommended charge leads, polarity 27<br />
5. Controls, using the charger, starting the charge process 27<br />
6. Charge and discharge programs 28<br />
7. Program flowchart 28<br />
8. Selecting the charge program group 29<br />
9. Using the charger for the first time 29<br />
10. Starting the charge process 30<br />
11. Nickel-Cadmium (Ni-Cd) charge programs 31<br />
12. Nickel-Metal-Hydride (Ni-MH) charge programs 33<br />
13. Lithium-Ion / Lithium-Polymer / Li-Mn / LiFePO 4 - charge programs 36<br />
<strong>14</strong>. Lead-acid (Pb) charge programs 38<br />
15. Screen displays, cycle data display 40<br />
16. Monitor displays 40<br />
17. Error messages, warnings 42<br />
18. Cleaning and maintenance 44<br />
19. Notes on handling rechargeable batteries 44<br />
20. Specification, Environnemental Protection Notes 45<br />
Guarantee certificate Back cover<br />
1. Introduction<br />
Please study these instructions, reading them completely and attentively, before using<br />
the unit for the first time. This will guarantee that you will be able to exploit all the<br />
facilities of your new battery charger. The warnings and safety notes are particularly<br />
important. Please store these instructions in a safe place, and be sure to pass them on<br />
to the new owner if you ever dispose of the charger.<br />
In the <strong>ULTRAMAT</strong> <strong>14</strong> <strong>plus</strong> you have acquired a mature product with an excellent performance. It<br />
incorporates the latest semi-conductor technology, controlled by a high-performance RISC<br />
micro-processor, to provide superior charging characteristics combined with simple operation<br />
and optimum reliability. These features can normally be expected only from much more expensive<br />
units. The <strong>ULTRAMAT</strong> <strong>14</strong> <strong>plus</strong> represents a reliable method of charging sintered Nickel-<br />
Cadmium (NC, Ni-Cd) packs, Nickel-Metal-Hydride (Ni-MH) batteries, Lithium-Polymer (Li-Po),<br />
Lithium-Manganese (Li-Mn), Lithium-Ion (Li-Io) and LiFePO 4 (LiFe) batteries, and also lead-gel<br />
and lead-acid (Plumbum: Pb) batteries These sealed, gas-tight batteries have proved excellent<br />
for our purposes in RC models. They are mechanically robust, can be used in any attitude and<br />
are generally highly reliable. They require no special measures for storage apart from protecting<br />
the cells from becoming deep-discharged.<br />
Note<br />
It is important always to observe the charging instructions supplied by the battery manufacturer,<br />
and to keep to the recommended charge currents and times Do not fast-charge batteries unless<br />
the manufacturer states expressly that they are suitable for the high currents which flow during<br />
these processes. When charging new batteries you may also encounter problems with<br />
premature charge termination. Whenever you wish to use a new battery it therefore makes<br />
sense to carry out a series of monitored test charges, so that you can check that the automatic<br />
charge termination circuit works correctly and reliably with your packs, and charges them to full<br />
capacity.
2. Warnings and safety notes<br />
This product isn‘t designed for use by children under the age of <strong>14</strong>, it isn‘t a toy!<br />
Protect the charger from dust, damp, rain, heat (e.g. direct sunshine) and vibration. It should only be<br />
operated in dry indoor conditions.<br />
The case slots serve to cool the charger, and must not be covered or enclosed; set up the charger<br />
with space round it, so that cooling air can circulate unhindered.<br />
The charger is designed to be powered by a 12 V DC car battery or power supply or 100~240V AC<br />
main socket only. It is not permissible to modify the charger in any way. Never use both inputs AC and<br />
DC at the same time!<br />
The charger and the battery to be charged should be set up on a heat-resistant, non-inflammable<br />
and non-conductive surface before use. Never place the charger directly on a car seat, carpet or<br />
similar. Keep all inflammable and volatile materials well away from the charging area. Provide good<br />
ventilation. Defective batteries can explode or burn!<br />
Connect the charger 12DC input directly to the car battery using the original cables and connectors<br />
supplied. The car’s engine must be stopped all the time the Charger is connected to the car’s battery.<br />
Do not recharge the car battery at any time when the Charger is connected to it.<br />
The charge output sockets and connecting leads must not be modified, and must not be interconnected<br />
in any way. There is a danger of short-circuit between the charge outputs and the vehicle’s<br />
bodywork when the charger is connected to the car battery. The charge leads and connecting leads<br />
must not be coiled up when the charger is in use. Avoid short-circuiting the charge output or the<br />
model battery with the car bodywork. For this reason the charger must never be placed directly on the<br />
vehicle’s bodywork.<br />
Never leave the charger running or connected to the car battery unsupervised.<br />
Only one battery may be connected to the unit for charging at any one time.<br />
The following types of battery must not be connected to the charger:<br />
- Ni-Cd / Ni-MH batteries consisting of more than <strong>14</strong> cells, Lithium-Ion / Li-Mn / Lithium-Polymer /<br />
LiFePO 4 (LiFe) batteries of more than 6 cells, or lead-acid batteries with a nominal voltage of more<br />
than 12V.<br />
- Batteries which require a different charge method from Ni-Cd, Ni-MH, Lithium or lead-acid types.<br />
- Faulty or damaged cells or batteries.<br />
- Batteries consisting of parallel-wired cells, or cells of different types.<br />
- Batteries consisting of old and new cells, or cells of different makes.<br />
- Non-rechargeable batteries (dry cells). Caution: explosion hazard!<br />
- Batteries which are not expressly stated by the manufacturer to be suitable for the currents which<br />
this unit delivers during the charge process.<br />
- Packs which are already fully charged or hot, or only partially discharged.<br />
- Batteries or cells fitted with an integral charge circuit or charge termination circuit.<br />
- Batteries installed in a device, or which are electrically connected to other components.<br />
To avoid short-circuits between the banana plugs fitted to the charge leads, please always connect<br />
the charge leads to the charger first, and only then to the battery to be charged. Reverse the sequence<br />
when disconnecting.<br />
As a basic rule always check that the charge quantity is approximately the same as you expected after<br />
the charger has indicated that the pack is fully charged. This is a simple method of detecting a problem<br />
reliably and in good time, should the charge process be terminated prematurely for any reason. The<br />
likelihood of premature termination varies according to many factors, but is at its highest with deepdischarged<br />
packs, low cell counts and particular cell types which are known to cause problems.<br />
We recommend that you carry out a series of test charges to satisfy yourself that the automatic<br />
termination circuit is working perfectly. This applies in particular when you are charging packs consisting<br />
of a small number of cells. If the cells feature has a poorly defined voltage peak, the charger may fail<br />
to detect the fully charged state.<br />
Before charging please check: have you selected the appropriate charge program for the battery?<br />
Have you set the correct charge or discharge current? Have you set the important cut-off voltage<br />
when charging Ni-Cd and Ni-MH packs? Are all connections firm, or is there an intermittent contact at<br />
any point in the circuit? Please bear in mind that it can be dangerous to fast-charge batteries. For<br />
example, if there is a brief interruption due to an intermittent contact, the result is inevitably a<br />
malfunction such as a restart of the charge process, which would result in the pack being massively<br />
overcharged.<br />
25
26<br />
3. General notes on using the charger<br />
Charging batteries<br />
When a battery is charged, a particular quantity of electrical energy is fed into it. The charge<br />
quantity is calculated by multiplying charge current by charge time. The maximum permissible<br />
charge current varies according to the battery type, and can be found in the information provided<br />
by the battery manufacturer.<br />
It is only permissible to charge batteries at rates higher than the standard (slow) current if they are<br />
expressly stated to be rapid-charge capable. The STANDARD CHARGE CURRENT is 1/10 (one<br />
tenth) of the cells’ nominal capacity (e.g. for a 1.7 Ah pack the standard charge current is 170 mA).<br />
• Connect the battery to be charged to the charger output sockets using a suitable charge lead (red<br />
= positive terminal, black = negative terminal).<br />
Be sure to read the information provided by the battery manufacturer regarding charging methods,<br />
and observe the recommended charge currents and charge times. Do not attempt to fast-charge<br />
batteries unless they are expressly stated to be suitable for the high currents which this charger<br />
delivers.<br />
Please bear in mind that new batteries do not reach their full capacity until they have undergone<br />
several charge / discharge cycles. You should also be aware that the charger may terminate the<br />
charge process prematurely when connected to new packs, and batteries which have been<br />
deep-discharged.<br />
A Ni-Cd pack will normally be warm at the end of a rapid-charge process, but if you notice that one<br />
cell of the pack is much hotter than the others, this may well indicate a fault in that cell. Such packs<br />
could fail completely without warning, and should not be used again. Dispose of the battery safely,<br />
preferably taking it to a toxic waste disposal centre.<br />
Ensure that all connectors and terminal clamps make good, sound contact. For example, if there<br />
is a brief interruption due to an intermittent contact, the result is inevitably a malfunction such as<br />
a restart of the charge process, which would result in the pack being massively overcharged.<br />
A common cause of malfunctions is the use of unsuitable charge leads. Since the charger is<br />
incapable of detecting the difference between a pack’s internal resistance, cable resistance and<br />
connector transfer resistance, the first requirement if the charger is to work perfectly is that the<br />
charge lead should be of adequate conductor cross-section and should be not be more than<br />
30 cm long Good-quality connectors (gold-contact types) must be fitted to both ends.<br />
Charging transmitter batteries<br />
A battery installed in a radio control transmitter can usually be recharged via the integral charge<br />
socket which is fitted to the transmitter itself. Transmitter charge sockets generally include a<br />
diode which prevents reverse current flow. This prevents damage to the transmitter electronics<br />
should the charger be connected with reverse polarity, or if a short-circuit occurs between the<br />
bare ends of the charge lead connectors. However, a transmitter battery protected in this way<br />
can only be charged by the <strong>ULTRAMAT</strong> 16 if the diode is by-passed. Please read your transmitter<br />
operating instructions for information on how to do this. The stated maximum charge current for<br />
the transmitter battery must never be exceeded. To avoid possible damage to the internal<br />
transmitter components due to overheating and heat build-up, we recommend that the battery<br />
should be removed from the transmitter’s battery compartment prior to charging. The transmitter<br />
must be set to „OFF“ and left in that state for the whole period of the charge process.<br />
Never switch a radio control transmitter on when it is still connected to the battery charger. The<br />
slightest interruption in the charge process may allow the charge voltage to rise to the point<br />
where it immediately ruins the transmitter.<br />
Never attempt to carry out any battery discharge or battery maintenance programs via the<br />
transmitter’s integral charge socket. The charge socket is not suitable for this purpose.<br />
When you set a particular current for charging, the charger only supplies that current if the<br />
value does not exceed the unit’s technical capacity. If you set a charge current which the<br />
Charger cannot deliver because it falls outside its technical limits, the unit automatically<br />
reduces the current to the maximum possible value. In this case the screen displays the<br />
charge current which is actually flowing, alternating with the warning message „MAX“.
Liability exclusion<br />
As manufacturers, we at GRAUPNER are not in a position to ensure that you observe the<br />
correct methods of operation when installing, using and maintaining this charger. For this reason<br />
we are obliged to deny all liability for loss, damage or costs which are incurred due to the<br />
incompetent or incorrect use and operation of our products, or which are connected with such<br />
operation in any way.<br />
Japan<br />
Order No. 3371<br />
4. Recommended charge leads /polarity<br />
The requirements made on rechargeable batteries vary greatly according to their particular<br />
application, and this in turn calls for different types of battery connector. Please note that<br />
connectors, connector names and polarities may vary from one manufacturer to another. For<br />
this reason we recommend that you always use genuine matching connectors of identical<br />
construction. The following charge leads are suitable for battery charging with this unit:<br />
G2 (AMP/G2,5)<br />
Order No. 3011<br />
+<br />
-<br />
BALANCER<br />
CONNECTOR for<br />
<strong>Graupner</strong> LiPobattery<br />
BEC<br />
Order No. 3037<br />
JR<br />
Order No. 3021<br />
JR-Sender<br />
Order No. 3022<br />
Be sure to use genuine charge leads fitted with cable of adequate conductor cross-section.<br />
5. Charger controls / Using the charger / Starting the process<br />
Car battery<br />
terminal clips<br />
Screen<br />
-<br />
Power plug for<br />
100~240V AC<br />
cable (included)<br />
Operating buttons<br />
power input<br />
„BATTERY “<br />
All the charger’s functions are controlled by means of just four buttons.<br />
The - / DEC and + / INC buttons are used to change the current and voltage values. The function<br />
of the other two buttons varies according to the presence or otherwise of a battery at the charge<br />
sockets:<br />
Operating button Function<br />
No battery PROGRAMM/MODE Select charge programs and sub-groups<br />
connected: PROGRAMM/MODE 2s. Select the (charge) program group<br />
ENTER/START Select next Value position<br />
Battery PROGRAMM/MODE Ends the charge process, stops the buzzer,<br />
connected: Select next Value position<br />
ENTER/START 2 sec. Starts the charge process<br />
27
28<br />
6. Charge programs<br />
The various facilities of the charger are divided up into four program groups which you can select by<br />
holding the MODE button pressed in for two seconds. The sequence is shown in the flow chart<br />
below.<br />
Ni-Cd battery programs: charging, balancing cells.<br />
Ni-MH battery programs: charging, balancing cells.<br />
LiPo / LiIo / LiFe battery programs: charging cells.<br />
Lead-acid battery programs: charging, trickle charge for stand-by operation.<br />
NiCd<br />
AUTOMATICprogram<br />
MODE<br />
(2 sec.)<br />
NiMH<br />
AUTOMATICprogram<br />
MODE<br />
(2 sec.)<br />
Lithium<br />
MANUALprogram<br />
MODE<br />
(2 sec.)<br />
Pb<br />
MANUALprogram<br />
MODE<br />
(2 sec.)<br />
NiCd<br />
MANUALprogram<br />
NiMH<br />
MANUALprogram<br />
MODE Lithium<br />
type<br />
select<br />
MODE<br />
7. Program flowchart<br />
NiCd<br />
∆ ∆ delta-peak<br />
trigger voltage<br />
MODE MODE MODE MODE<br />
balancing<br />
program<br />
MODE (2 sec.)<br />
NiMH<br />
∆ ∆ delta-peak<br />
trigger voltage<br />
MODE MODE MODE MODE<br />
balancing<br />
program<br />
MODE (2 sec.)<br />
MODE (2 sec.)<br />
NiCd<br />
NiMH
NiCd<br />
AUTOMATIC<br />
program<br />
MODE (2 sec.)<br />
NiMH<br />
AUTOMATIC<br />
program<br />
MODE (2 sec.)<br />
Lithium<br />
MANUAL<br />
program<br />
MODE (2 sec.)<br />
Pb<br />
MANUAL<br />
program<br />
MODE (2 sec.)<br />
9. Using the charger for the first time<br />
When the INC and DEC buttons are pressed simultaneously and the <strong>ULTRAMAT</strong> <strong>14</strong> <strong>plus</strong> is initially<br />
connected to a 12 V DC car battery or power supply or a 100~240V AC mains socket, the unit goes<br />
to the language select menu, otherwise it runs through the information routine which provides you<br />
with a brief summary of the essential user settings. The charger’s screen displays the following<br />
information.<br />
INC<br />
________________<br />
LANGUAGE SELECT<br />
________________<br />
ENGLISH<br />
ENTER<br />
3 sec.<br />
________________<br />
Safety timer<br />
________________<br />
on<br />
3 sec.<br />
DEC<br />
________________<br />
<strong>Graupner</strong><br />
________________<br />
U L T R A M A T <strong>14</strong> <strong>plus</strong><br />
________________<br />
bu z z e r<br />
________________<br />
on<br />
8. Selecting the charge program group<br />
MODE<br />
MODE<br />
MODE<br />
In the interests of clarity, the charge and set-up facilities of the<br />
<strong>ULTRAMAT</strong> <strong>14</strong> <strong>plus</strong> are divided into four logical program groups.<br />
A separate program group is provided for each of the different<br />
battery types: Nickel-Cadmium, Nickel-Metal-Hydride, Lithium-<br />
Ion / Lithium-Polymer / LiFePO 4 (LiFe) and Pb (lead-acid)<br />
batteries.<br />
Switching programs:<br />
Changing from one program group to another is carried out using<br />
the MODE button, which must be held pressed in for about two<br />
seconds. A brief press on the MODE button makes changes within<br />
the program group.<br />
Press and hold the INC and DEC buttons simultaneously,<br />
then switch on the charger to get the language selection<br />
display. Select your language using the INC or DEC button<br />
and confirm with pressing the ENTER button.<br />
The <strong>ULTRAMAT</strong> <strong>14</strong> <strong>plus</strong>’s name appears on the screen.<br />
After 3 sec. the adjustment of the safety timer (on or off) is<br />
displayed. For about 3 sec. the safety timer can be switched<br />
on or off by pushing the INC or DEC button.<br />
The safety timer is always switched of for Pb manual charge.<br />
For all other charging programs, the safety timer will be 180min,<br />
if it‘s switched on.<br />
After another 3 sec. the adustment of the buzzer (on or<br />
off) can be changed by pushing the INC or DEC button.<br />
After another 3 sec. the charger is now ready for use, see<br />
10..<br />
29
3 sec.<br />
LiPo ________________<br />
manual<br />
C:2.5A ________________<br />
2000mAh<br />
BATTERY ________________<br />
CHECK<br />
WAIT ________________<br />
PLEASE...<br />
30<br />
START<br />
2<br />
sec.<br />
2<br />
sec.<br />
CHG ________________<br />
23:40 00863<br />
LP+2.50A ________________<br />
<strong>14</strong>.017V<br />
10. Starting the charge process<br />
For charging / discharging, or conditioning a pack, select<br />
the desired program as described below, and then set<br />
suitable values.<br />
If the battery does have a balancer connector, connect the<br />
balancer connector to the balancer input (BALANCER<br />
CONNECTOR) of the charger.<br />
Make sure for the right polarity.<br />
From right handed to left side:<br />
Pin 1 (GND): Ground = battery -,<br />
Pin 2 (1): + cell 1, Pin 3 (2): + cell 2, Pin 4 (3): + cell 3,<br />
Pin 5 (4): + cell 4, Pin 6 (5): + cell 5, Pin 7 (6): + cell 6<br />
Connect the two pole power charging cable of the battery to<br />
the charger output - BATTERY + with the right polarity.<br />
Hold the START button pressed in for about two seconds,<br />
and the charger display, if the balancer connector is<br />
connected or not. With connected balancer connector the<br />
single cell voltages can be displayed, see 16..<br />
**INFORMATION***<br />
________________ **INFORMATION***<br />
________________<br />
BALANCER ________________<br />
CON. BALANCER ________________<br />
NOT CON<br />
START<br />
2<br />
sec.<br />
BATTERY ________________<br />
CHECK<br />
WAIT ________________<br />
PLEASE...<br />
2<br />
sec.<br />
________________<br />
***LiPo cells***<br />
________________<br />
3 cells (13.73V)<br />
+ -<br />
INC DEC<br />
START<br />
2<br />
sec.<br />
Press the START button again,<br />
and the charger will assess the<br />
battery.<br />
If a Li-battery is connected and the balancer<br />
connector is not connected, the charger<br />
will display the cell count of the Lithium<br />
pack, which must be corrected manually,<br />
if it is wrong..<br />
! Caution ! Please<br />
take great care to set<br />
the correct cell<br />
count. and the right<br />
battery type. If you<br />
make a mistake, the<br />
battery could<br />
explode and burst<br />
into flames !<br />
You can interrupt the charge process at any time with another<br />
short press on the START button.<br />
Note: if you interrupt the charge process by pressing<br />
the START button, all display parameters are<br />
irretrievably erased.
NiCd<br />
AUTOMATICprogram<br />
11. Ni-Cd programs<br />
A set of convenient charge programs for recharging Nickel-Cadmium batteries, as commonly<br />
used for modelling purposes. When the charge/balancing program is finished, the screen<br />
displays the name of the charge program alternating with the message „END“, together with the<br />
(charge) time, the last charge current, the charged-in capacity and the battery voltage, and<br />
continues to do so until you disconnect the battery. This information can often give you a useful<br />
indication about the Ni-Cd pack’s charge characteristics and capacity, or warn you if the charger<br />
has incorrectly assessed the pack as being „full“.<br />
NiCd ________________<br />
automatic<br />
C:2.5A ________________<br />
limited<br />
+ -<br />
INC DEC<br />
NiCd ________________<br />
manual<br />
________________<br />
C:2.5A<br />
+ -<br />
INC DEC<br />
NiCd<br />
MANUALprogram<br />
NiCd<br />
NiCd<br />
∆ ∆ delta-peak<br />
trigger voltage<br />
MODE MODE MODE MODE<br />
balancing<br />
program<br />
Ni-Cd automatic program<br />
In this program the charger detects the type of Ni-Cd<br />
battery connected to it, and adjusts the charge current<br />
accordingly to avoid overcharging the pack.<br />
The maximum charge current can be set before you<br />
connect the battery to be charged. This is done using the<br />
INC / DEC buttons; the range available is 0.1 A to 5 A, or<br />
no restriction. The charge process is terminated automatically<br />
in accordance with the values already set for<br />
„Ni-Cd Delta Peak cut-off voltage“.<br />
Ni-Cd manual program<br />
Select this program when you simply wish to recharge a<br />
battery using the set charge current.<br />
You can adjust the charge current using the INC / DEC<br />
buttons, but only before you connect the pack for<br />
charging. The range available is 0.1 A to 5 A.<br />
The charge process is terminated automatically in<br />
accordance with the values already set for „Ni-Cd Delta<br />
Peak cut-off voltage“.<br />
31
NiCd ________________<br />
balance cut<br />
off ________________<br />
volt = 1.20V<br />
NiCd ________________<br />
delta-peak-<br />
________________<br />
volt =10mV/cell<br />
32<br />
START<br />
NiCd discharge balancing program<br />
2<br />
sec.<br />
NiCd-Delta-Peak (-∆ Peak) trigger voltage<br />
+ -<br />
INC DEC<br />
+ -<br />
INC DEC<br />
**INFORMATION***<br />
________________<br />
BALANCER ________________<br />
CON.<br />
2<br />
sec.<br />
________________<br />
BLC 28:30 0<strong>14</strong>25<br />
________________<br />
NC+0.00A 07.717V<br />
The balancing program does balance up to 6 cells of a battery<br />
pack.<br />
The final discharge voltage for the balancer can be set<br />
within the range 1.20 … 1.30 V using the INC or DEC<br />
button.<br />
The individual cells in a battery should be balanced before<br />
the pack is charged, to avoid the possibility of individual<br />
cells being overcharged during the charge process. A<br />
battery should always be balanced before being charged<br />
if it has been stored for a considerable period;<br />
connect the balancer plug to the charger to carry this out.<br />
It is also essential that the voltage of each cell in the pack<br />
should be higher than the set balancer final discharge<br />
voltage.<br />
If you wish to obtain maximum battery capacity, the<br />
individual cells should be discharged to 1.20 V a few hours<br />
- but no longer than two hours - before the next charge<br />
process. If the voltage falls below 1.20 V, the battery cells<br />
lose capacity, so the pack must be charged to around<br />
60% capacity before being stored for a protracted period.<br />
The program balances the battery pack. Cells with a<br />
higher cell voltage are discharged at around 100 mA<br />
(balancing current). The charger terminates the discharge<br />
balance process once all the cells have reached the<br />
balancer final discharge voltage (+0.01 V).<br />
The automatic charge termination<br />
circuit (battery full detection) works on<br />
the proven Delta Peak principle (also<br />
known as the Delta-V process), which<br />
is already in use in millions of chargers.<br />
This process analyses the voltage peak of the charge curve, which indicates with great<br />
accuracy when the maximum charge capacity is reached.When the charge process is started<br />
the battery voltage initially rises continuously, but as the pack approaches full capacity it begins<br />
to heat up. This in turn causes the battery voltage to fall slightly (Delta-V). The charger detects<br />
and assesses the voltage decline.It is possible to adjust the sensitivity, or trigger voltage (in mV<br />
per cell!) of the automatic cut-off circuit for Ni-Cd batteries. A practical range of values has<br />
proved to be 10 … 30 mV / cell. Higher voltages often lead to overcharging of the battery,<br />
whereas a lower voltage tends to result in premature termination of the charge process. We<br />
recommend that you check the information supplied by your battery manufacturer, then carry<br />
out a series of test charges to establish the optimum value for your battery. Start with 10mV/cell<br />
to avaid overcharging the battery.<br />
cell voltage<br />
charging time
NiMH<br />
AUTOMATICprogram<br />
12. NIMH-programs<br />
A set of convenient charge programs for recharging Nickel-Metal-Hydride batteries, as<br />
commonly used for modelling purposes. When the charge program is finished, the screen<br />
displays the name of the charge program alternating with the message „END“, together with the<br />
charge time, the last charge current, the charged-in capacity and the battery voltage, and<br />
continues to do so until you disconnect the battery. This information can often give you a useful<br />
indication about the Ni-MH pack’s charge characteristics and capacity, or warn you if the<br />
charger has incorrectly assessed the pack as being „full“.<br />
________________<br />
NiMH automatic<br />
C:2.5A ________________<br />
limited<br />
+ -<br />
INC DEC<br />
NiMH<br />
MANUALprogram<br />
NiMH<br />
NiMH<br />
∆ ∆ delta-peak<br />
trigger voltage<br />
MODE MODE MODE MODE<br />
balancing<br />
program<br />
Ni-MH automatic program<br />
In this program the charger detects the type of Ni-MH<br />
battery connected to it, and adjusts the charge current<br />
accordingly to avoid overcharging the pack.<br />
The maximum charge current can be set before you<br />
connect the battery to be charged.<br />
Never use a maximum charge current higher as the value<br />
described in the battery instruction, never higher as 2C!<br />
Never charge transmitter batteries with more as 2A!<br />
f. e. a 4.2Ah battery should be limited to max. 4.2A.<br />
This is done using the INC / DEC buttons; the range<br />
available is 0.1 A to 5 A, or no restriction.<br />
The charge process is terminated auto-matically in<br />
accordance with the values already set for „Ni-MH Delta<br />
Peak cut-off voltage“.<br />
33
NiMH ________________<br />
manual<br />
34<br />
________________<br />
C:2.5A<br />
+ -<br />
INC DEC<br />
NiMH ________________<br />
balance cut<br />
off ________________<br />
volt = 1.20V<br />
START<br />
Ni-MH manual program<br />
Select this program when you simply wish to recharge a<br />
battery using the set charge current. You can adjust the<br />
charge current using the INC / DEC buttons, but only<br />
before you connect the pack for charging. The range<br />
available is 0.1 A to 5 A.<br />
Never use a maximum charge current higher as the value<br />
described in the battery instruction, never higher as 2C!<br />
Never charge transmitter batteries with more as 2A!<br />
f. e. a 4.2Ah battery should be limited to max. 4.2A.<br />
The charge process is terminated automatically in<br />
accordance with the values already set for „Ni-MH Delta<br />
Peak cut-off voltage“.<br />
Ni-MH discharge balancing program<br />
2<br />
sec.<br />
+ -<br />
INC DEC<br />
**INFORMATION***<br />
________________<br />
BALANCER ________________<br />
CON.<br />
2<br />
sec.<br />
________________<br />
BLC 28:30 0<strong>14</strong>25<br />
________________<br />
NM+0.00A 07.717V<br />
The balancing program does balance up to 6 cells of a battery<br />
pack.<br />
The final discharge voltage for the balancer can be set<br />
within the range 1.20 … 1.30 V using the INC or DEC<br />
button.<br />
The individual cells in a battery should be balanced before<br />
the pack is charged, to avoid the possibility of individual<br />
cells being overcharged during the charge process. A<br />
battery should always be balanced before being charged<br />
if it has been stored for a considerable period;<br />
connect the balancer plug to the charger to carry this out.<br />
It is also essential that the voltage of each cell in the pack<br />
should be higher than the set balancer final discharge<br />
voltage.<br />
If you wish to obtain maximum battery capacity, the<br />
individual cells should be discharged to 1.20 V a few hours<br />
- but no longer than two hours - before the next charge<br />
process. If the voltage falls below 1.20 V, the battery cells<br />
lose capacity, so the pack must be charged to around<br />
60% capacity before being stored for a protracted period.<br />
The program balances the battery pack. Cells with a<br />
higher cell voltage are discharged at around 100 mA<br />
(balancing current). The charger terminates the discharge<br />
balance process once all the cells have reached the<br />
balancer final discharge voltage (+0.01 V).
Ni-MH-Delta-Peak (-∆ Peak) trigger voltage<br />
NiMH ________________<br />
delta-peak-<br />
________________<br />
volt = 5mV/cell<br />
+ -<br />
INC DEC<br />
It is possible to adjust the trigger voltage (in mV per cell!) of<br />
the automatic termination circuit for Ni-MH batteries.<br />
However, Ni-MH batteries have a less pronounced voltage<br />
drop than Ni-Cd cells, and a practical range has proved to<br />
be 5 ... 25 mV / cell. If the trigger voltage is set higher, there<br />
is a danger of overcharging the battery; if set lower, there is<br />
a danger of premature termination.<br />
We recommend that you carry out a series of test charges<br />
to establish the ideal trigger value for your batteries. Start<br />
with 5mV / cell.<br />
35
The fundamental rule is that Lithium-based batteries may ONLY be charged using<br />
voltage<br />
special chargers, and the charge program must be set up correctly in terms of final<br />
charge voltage and capacity for the battery type in use. The charge process is<br />
current<br />
fundamentally different to that required for Ni-Cd or Ni-MH batteries, and is termed<br />
a constant current / constant voltage method. The charge current required varies<br />
charge time<br />
according to the battery capacity, and is set automatically by the charger. Lithium<br />
batteries are usually charged at the 1C rate (1C charge rate = half capacity as charge current. Example:<br />
battery capacity 1500 mAh: 1C charge current = 1500 mA = 1.5 A).<br />
Because some types can be charged with upt to 2C or 4C charging current, the charging current and<br />
the capacity of the battery must be set seperately. When the battery on charge reaches the specific final<br />
voltage which is appropriate to the battery type, the charger automatically reduces the charge current<br />
in order to prevent the battery exceeding the final permissible voltage. If the battery manufacturer states<br />
a charge current lower than the 1C rate, then the capacity (charge current) must be reduced accordingly.<br />
We recommend the use of the balancer connector, which ensures that your Lithium batteries are<br />
charged optimally, and therefore increases safety and their useful life.<br />
Problems caused by mistreating batteries:<br />
It is very dangerous to overcharge Lithium-Ion batteries, as they tend to react by gassing, overheating<br />
and even exploding. If the final charge voltage of 3.6 V / cell (LiFePO 4 ), 4.1 V / cell (Lithium-Ion) or 4.2<br />
V / cell (Lithium-Polymer and Lithium-Manganese) is exceeded by more than 1%, the lithium ions in the<br />
cell start to change into metallic lithium. This material reacts very violently with the water in the electrolyte,<br />
and this can result in the cell exploding. On the other hand it is also important to avoid terminating the<br />
charge process before the final charge voltage is reached, since this reduces the effective capacity of<br />
the Lithium-Ion cell markedly. Stopping the charge at just 0.1 V under the threshold means a capacity<br />
loss of around 7%. Lithium batteries must not be deep-discharged, as this leads to a rapid loss of<br />
capacity. This effect is irreversible; it is absolutely vital to avoid discharging the batteries to below 2.5 V<br />
/ cell.<br />
Caution: the cell type, cell capacity and cell count set on the charger must always be correct for<br />
the battery to be charged; if you make a mistake, the battery could explode and burn! Never<br />
connect a Lithium-based battery to the charger if it features an integral charge circuit! Always<br />
place your Lithium batteries on a non-flammable surface for charging.<br />
36<br />
13. Lithium programs<br />
These programs are only suitable for charging and discharging LiFePO 4 batteries with a voltage<br />
of 3.3 V / Cell, Lithium-Ion batteries with a voltage of 3.6 V / cell, and Lithium-Polymer and<br />
Lithium-Manganese batteries with a voltage of 3.7 V / cell. The outstanding feature of Lithium<br />
batteries is their much higher capacity compared to other battery types. However, this important<br />
advantage is offset by the need to adopt different handling strategies: they must be charged and<br />
discharged using specific methods, otherwise they will be damaged, and can be dangerous. The<br />
directions in these instructions must be observed at all times when handling these batteries.<br />
Specific information and safety notes will also be found in the battery manufacturer’s technical<br />
information.<br />
Lithium<br />
MANUALprogram<br />
MODE Lithium<br />
type<br />
select<br />
MODE
LiPo ________________<br />
manual<br />
________________<br />
C:4.0A 4000mAh<br />
+ -<br />
+ -<br />
INC DEC<br />
INC DEC<br />
Lithium manual program<br />
This program charges the battery using the capacity<br />
(charge current) which you set.<br />
Before you initiate the actual program you must set the<br />
charging current (range 0.1A...5.0A, left of the screen)<br />
and the capacity of the pack (range 50...8000 mAh, right<br />
on the screen) using the INC / DEC buttons. Switch<br />
between the charge current and the capacity parameters<br />
by using the ENTER button.<br />
If the charged capacity reaches 110% of the adjusted<br />
capacity, the charging process is stopped for safety<br />
reasons.<br />
The charger automatically sets the charge current of 1C based on this information.<br />
When you connect the pack to the charger and start the charge process, the charge current<br />
starts at 0.00 A and slowly rises to the set limit.However, please do not be surprised if the<br />
charger does not reach the current you have set, because the charge program constantly<br />
monitors the battery voltage in order to prevent the pack inflating, provided that the voltage of<br />
the individual cells in the pack is the same.When the charger automatically reduces the charge<br />
current, the screen displays the message END, alternating with the reduced charge current.<br />
________________<br />
***LiPo cells***<br />
________________<br />
2 cells ( 7.73V)<br />
+ -<br />
INC DEC<br />
ENTER<br />
! Caution ! Please take great<br />
care to set the correct cell<br />
count and battery type. If you<br />
make a mistake, the battery<br />
could explode and burst into<br />
flames !<br />
Lithium cell count<br />
When you have connected the battery to the charger, hold<br />
the START button pressed in for about two seconds and<br />
the screen will display the cell count of the Lithium pack. If<br />
the pack contains 1 or 2 cells, the charger detects and<br />
sets the number of cells fully automatically. If the pack<br />
contains more than two cells, you may have to adjust the<br />
cell count manually using the INC / DEC buttons, as the<br />
automatic circuit is unable to detect more than three cells<br />
reliably. On the right-hand side you will see the voltage of<br />
the pack connected to the charger. Pressing the START<br />
button again initiates the charge process.<br />
37
________________<br />
Lithium type<br />
________________<br />
LiPo<br />
+ -<br />
INC DEC<br />
38<br />
Lithium type select program<br />
This is actually the most important set-up program for<br />
Lithium batteries. In the Select program you enter the<br />
battery type and battery capacity. It is vital to enter this<br />
information with the greatest care. Check it very<br />
thoroughly, as the charger derives all the other charge<br />
parameters from the settings you enter here.The battery<br />
type you select (LiPo, LiIo or LiFe) affects the charge<br />
termination voltage. If you find that a Lithium battery has<br />
unexpectedly been charged only to the 2/3 full mark, you<br />
have probably set the incorrect battery type at this<br />
point.Caution: if you set an incorrect value at this point,<br />
the battery may be damaged irreparably, and could even<br />
explode!<br />
At charging/discharging the battery types will be displayed<br />
as followed:<br />
LiPo (LiMn) = LP<br />
LiIo = LI<br />
LiFe = LF<br />
<strong>14</strong>. Pb (lead-acid) programs<br />
Pb<br />
MANUALprogram<br />
This program is designed for charging and discharging lead / sulphuric acid and lead / gel<br />
batteries with nominal voltages of exactly 2, 4, 6 and 12 V (1, 2, 3 and 6 cells).<br />
Caution: the charger will not recognize lead-acid batteries with other nominal voltages, and<br />
such batteries must not be connected to it.<br />
Lead-acid batteries behave entirely differently to Ni-Cd and Ni-MH batteries. Lead-acid batteries<br />
can only deliver relatively low currents relative to their capacity, and similar restrictions very<br />
definitely apply to charging. Manufacturers usually state <strong>14</strong> to 16 hours for achieving nominal<br />
capacity when recharging at the normal charge current. The „normal“ charge current is defined<br />
as one tenth of the battery’s nominal capacity. Example: battery capacity = 12 Ah —> normal<br />
charge current = 1.2 A. In contrast to Ni-Cd and Ni-MH batteries, lead-acid chargers generally<br />
monitor the battery’s voltage in order to determine when it is fully charged.<br />
Caution: lead-acid batteries cannot and must not be fast-charged! Always select the<br />
charge current which the battery manufacturer recommends. Please also bear in mind that<br />
the nominal capacity (i.e. useful life) of a lead-acid battery is very quickly compromised by<br />
incorrect handling, including overcharging, repeated 100% discharges and, in particular, deep<br />
discharging. The magnitude of the charge / discharge currents is also crucial to the actual<br />
battery capacity which can be exploited, i.e. the higher the current, the lower the capacity which<br />
the battery can deliver.<br />
The values selected in the user settings for charge termination delay and safety timer have no<br />
effect in the Pb charge programs.
Pb ________________<br />
manual<br />
________________<br />
C:2.5A<br />
+ -<br />
INC DEC<br />
Pb manual program<br />
In this program you can set the maximum permissible<br />
charge current using the INC / DEC buttons, but only<br />
before you connect the lead-acid battery for charging.<br />
This setting only determines the top limit which the<br />
charger is permitted to feed to the battery.<br />
If the battery manufacturer states a low maximum charge current, then it is important to limit the<br />
charge current to that value to avoid the charger setting a higher current if the battery appears<br />
to be willing to accept charge.<br />
The battery can then be connected to the charger and the charge process started: the unit<br />
starts charging at 0.00 A and slowly raises the current until it reaches the set limit.<br />
The charger constantly assesses the state of the battery during the charge process, and<br />
adjusts the charge current to suit its condition.<br />
The charge program automatically determines the number of cells (cell count) in the battery by<br />
measuring its overall voltage.<br />
Please do not be surprised if the charger does not deliver the charge current you have selected.<br />
The charge program constantly monitors the battery’s voltage, and limits the current in order to<br />
prevent excessive gassing of the battery.<br />
The Charger now charges the battery using the maximum possible current until its voltage rises<br />
to around 2.3 to 2.35 Volts per cell. The charger then switches to a lower current to bring the<br />
battery gently up to full charge; this process reliably fills the battery „to the brim“.<br />
The unit cuts off the charge process automatically when the battery reaches a voltage of<br />
around 2.45 to 2.5 Volts per cell.<br />
The effect of the automatic charge current adjustment system is to complete a full charge safely<br />
in much less than the usual <strong>14</strong> to 16 hours.<br />
________________<br />
END 367:09 04448<br />
Pb ________________<br />
0mA 2.<strong>14</strong>7V<br />
When the charge process is terminated, the charger<br />
emits audible tones for a certain period. At the same time<br />
the screen also displays the message „END“.<br />
39
40<br />
Program<br />
Battery type<br />
15. Screen displays<br />
Chargetime (min.:sec.)<br />
CHG ________________<br />
12:56 00321<br />
NC+4.50A ________________<br />
11.985V<br />
Charge current<br />
Ready message<br />
Capacity (mAh)<br />
Battery voltage<br />
The two-line liquid-crystal screen displays in a clear form the important information generated<br />
during the charge / balancing process. The information remains visible on-screen until you<br />
disconnect the battery that is being charged. Once you connect another battery for charging, the<br />
previously displayed values are erased, and cannot be called up again.<br />
16. On-screen monitor displays<br />
The Charger incorporates a wide range of protective and monitoring systems designed to check<br />
the charger’s functions and monitor the state of its electronics. If any of the unit’s critical limit<br />
values is exceeded, the charge process is switched off. Typical triggers would be excessive<br />
voltage, excessive temperature or a depleted car battery.<br />
If any of these problems should occur, the liquid crystal screen displays the cause of the error,<br />
and the buzzer sounds to alert you.<br />
BATTERY ________________<br />
CHECK<br />
WAIT ________________<br />
PLEASE...<br />
________________<br />
END 48:32 03363<br />
NC ________________<br />
200mA 9.773V<br />
Measuring process<br />
When you hold the START button pressed in for about two<br />
seconds, the charger measures the battery connected to<br />
it. This message appears on the screen for one or two<br />
seconds before the charge process is initiated.<br />
When a charge or discharge program comes to an end,<br />
the screen displays the message END, alternating with<br />
the program name. At the same time the integral buzzer<br />
sounds for a limited period.<br />
Display with connected balancer connector<br />
BLC CHG ________________<br />
28:30 02850<br />
LP+6.00A ________________<br />
<strong>14</strong>.717V<br />
If the balancer connector of the battery is connected to the<br />
charger and the balancer is activ, on the top of the left side BLC<br />
is displayed alternating with the program name.
INC<br />
Input voltage and Battery resistance display<br />
DEC<br />
Input ________________<br />
Voltage<br />
13.62V ________________<br />
________________<br />
Battery Res.<br />
________________<br />
25m<br />
The current input voltage and battery resistance can be<br />
called up at any time by pressing the INC and DEC<br />
buttons simultaneously.<br />
Change the display with INC or DEC button to input<br />
voltage, the battery resistance display (only in NiCd- and<br />
NiMH- manual modes) and to the single cell voltages and<br />
backwards.<br />
Displaying the Input voltage can be very useful if you are<br />
using your car’s battery as energy source for charging.<br />
The battery resistance is messured 5min after starting manual charging (NiCd, NiMH), end of<br />
manual charging (NiCd, NiMH) and 2min after starting manual discharge (NiCd, NiMH).<br />
The battery resistance is one important value to determine the battery quality.<br />
Press any button to return to the menu system.<br />
INC<br />
Display the voltage of the single cells<br />
DEC<br />
Input ________________<br />
Voltage<br />
13.62V ________________<br />
________________<br />
Battery Res.<br />
________________<br />
25m<br />
1. ________________<br />
4.153V<br />
2. ________________<br />
4.168V<br />
3. ________________<br />
4.053V<br />
4. ________________<br />
0.000V<br />
5. ________________<br />
0.000V<br />
6. ________________<br />
0.000V<br />
The current input voltage and battery resistance can be<br />
called up at any time by pressing the INC and DEC<br />
buttons simultaneously.<br />
Change the display with INC or DEC button to input<br />
voltage, the battery resistance display (only in NiCd- and<br />
NiMH- manual modes) and to the single cell voltages and<br />
backwards.<br />
Displaying the single cell voltages is useful to check the<br />
single cell voltages.<br />
41
42<br />
17. Error messages and warnings<br />
The Charger incorporates a wide range of protective and monitoring systems designed to check<br />
the charger’s functions and monitor the state of its electronics. If any of the unit’s limit values are<br />
exceeded, the charger responds accordingly: in some cases the unit’s settings are automatically<br />
reduced (e.g. charge current / discharge current); in others the charge process is switched off<br />
(e.g. car battery almost flat).<br />
The liquid crystal screen displays the cause of the error. Most error messages are selfexplanatory,<br />
but you may find the following list useful when fault-finding. The warning message<br />
and the audible warning signal can be switched off by pressing the „ENTER“ button.<br />
________________<br />
*****ERROR******<br />
________________<br />
car batt. empty<br />
________________<br />
*****ERROR******<br />
________________<br />
wrong polarity<br />
________________<br />
*****ERROR******<br />
________________<br />
contact break<br />
________________<br />
*****ERROR******<br />
________________<br />
time limit over<br />
________________<br />
*****ERROR******<br />
________________<br />
bat.volt too hi.<br />
________________<br />
*****ERROR******<br />
________________<br />
bat.volt too low<br />
This warning message is displayed if the voltage of the car<br />
battery falls below the value set in the „Low voltage cutoff“<br />
section of the user settings (11.0 V).<br />
This warning message is displayed if a battery is<br />
connected to the unit’s charge outputs with incorrect<br />
polarity.<br />
If the charger detects an interruption of the connection<br />
between battery and charger during a charge process, the<br />
screen displays this error message. If you see this error<br />
message when the charger is in use, it may indicate an<br />
intermittent contact.<br />
Note: the same error message also appears if you<br />
deliberately interrupt the charge process, e.g. by disconnecting<br />
the charge lead.<br />
If the internal charge safety timer has elapsed, the current<br />
process is terminated for safety’s sake. The safety timer is<br />
set permanently to 180 minutes for Ni-Cd / Ni-MH batteries.<br />
For Lithium batteries the set period is 180 minutes.<br />
The timer is disabled when a lead-acid battery is being<br />
charged. These settings are fixed, and cannot be altered.<br />
Possible causes: charge current too low: battery cannot be<br />
fully charged; charge leads too thin and / or too long -<br />
charge current cannot rise high enough: battery capacity<br />
too high.<br />
If the charger detects an excessive voltage, e.g. incorrect<br />
setting of the cell count with a Lithium or lead-acid battery,<br />
this error message is displayed.<br />
The same error message may also appear if the cells<br />
connected to the charger are overcharged.<br />
If the charger detects too low a voltage, e.g. incorrect<br />
setting of the cell count with a Lithium or lead-acid battery,<br />
this error message is displayed.<br />
The purpose of this error message is to avoid the cells<br />
becoming deep-discharged due to an incorrect setting.
________________<br />
*****ERROR******<br />
________________<br />
bal.volt too hi.<br />
________________<br />
*****ERROR******<br />
________________<br />
bal.volt too low<br />
________________<br />
*****ERROR******<br />
________________<br />
open balancer<br />
If the charger detects an excessive cell voltage at the<br />
balancer input, this error message appears.<br />
The error message appears at the following voltages:<br />
LiPo > 4.3 V, LiIo > 4.2 V, LiFe > 3.9 V, NiCd / NiMH > 2.0 V<br />
This error message may also appear if the cells<br />
connected to the charger are overcharged.<br />
If the charger detects an excessively low cell voltage at<br />
the balancer input, this error message appears.<br />
The error message appears at the following voltages:<br />
LiPo < 2.75 V, LiIo < 2.75 V, LiFe < 2.0 V, NiCd / NiMH <<br />
0.1V<br />
If this should occur, we recommend that you give the<br />
battery an initial charge for example in the LiFe Program<br />
Mode for a few minutes (max. five minutes), which allows<br />
cell voltages down to 2.0V without connecting the<br />
balancer plug.<br />
Warning: it may be that the battery contains<br />
damaged cells, and the battery pack must therefore<br />
be monitored very closely while it is being recharged.<br />
As soon as the voltage is high enough, for safety<br />
reasons the battery must always be charged with the<br />
balancer plug connected (explosion and fire<br />
hazard!).<br />
When starting in NiCD/NiMH balance mode, if the<br />
balancing connector is not connected to the balancing<br />
port of the charger, this error should occur.<br />
While the balancing connector is connected to the<br />
balancing port of the charger, if the balancing connector is<br />
disconnected from the balancing port of the charger<br />
during charge or discharge, this error should occur.<br />
43
The charger is entirely maintenance-free in use, and requires no servicing of any kind. However,<br />
it is in your own interests to protect the unit from dust, dirt and damp.<br />
To clean the charger, disconnect it from the car battery and any other battery, and wipe it clean<br />
with a dry cloth (don’t use cleaning agents!).<br />
44<br />
18. Cleaning and maintenance<br />
19. Notes on handling rechargeable batteries<br />
Charging single Ni-Cd or Ni-MH cells, and packs consisting of 1 ... 4 cells, presents the<br />
automatic charge termination circuit with a difficult task. The voltage peak is quite small in<br />
such cases, and it cannot be guaranteed that the cut-off circuit will work reliably. In such<br />
conditions the automatic circuit may not be triggered, or may not terminate the charge at the<br />
correct time. For this reason it is important to carry out a series of monitored test charge<br />
processes with your packs in order to establish whether the charge process is terminated<br />
reliably.<br />
Warm batteries offer much higher performance than cold ones, so don’t be surprised if your batteries<br />
don’t seem so effective in the winter.<br />
Overcharging and deep-discharging batteries lead to irreparable damage to the cells, and<br />
permanently reduces their maximum performance and effective capacity.<br />
Never store batteries for a long time in an uncharged, discharged or partially charged state. Charge<br />
your batteries before storing them, and check their state of charge from time to time.<br />
When purchasing batteries we recommend that you buy good quality products exclusively. Start<br />
by charging new packs at low rates, and work up gradually towards higher currents.<br />
Batteries should not be charged until shortly before use, as they are then able to deliver their best<br />
performance.<br />
Do not solder directly to battery cells. The temperatures which occur during soldering can easily<br />
damage the seals and safety valves of the cells. If this should happen, the battery may lose<br />
electrolyte or dry out, and some of its potential performance will be lost.<br />
Charging any battery at high currents shortens the life expectancy of the pack. Don’t exceed the<br />
maximum values stated by the manufacturer.<br />
Overcharging inevitably reduces the capacity of the battery, so do not recharge a hot pack, or one<br />
which has already been charged.<br />
Charging and discharging any battery at a high current shortens the life expectancy of the pack.<br />
Don’t exceed the maximum values stated by the manufacturer.<br />
Lead-acid batteries are not capable of being charged at high currents. Never exceed the maximum<br />
charge rate stated by the battery manufacturer.<br />
Protect batteries from vibration, and do not subject them to mechanical stress or shock.<br />
Batteries can generate explosive gas (hydrogen) when on charge and when being discharged, so<br />
it is important to provide good ventilation.<br />
Do not allow batteries to come into contact with water - explosion hazard.<br />
Never short-circuit battery contacts - explosion hazard.<br />
Batteries can explode or burn, if they overheat. We suggest to use a LiPo-security hard case<br />
Order-No. 8370 or 8371 with all Li-battery types and with NiCd und NiMH-batteries for<br />
charging.<br />
Do not open battery cells - corrosion hazard.<br />
It is best to „balance“, or even up the cells in Ni-Cd and Ni-MH battery packs by first discharging<br />
all the cells separately to 0.9...1.1V and then charging up the pack.<br />
Please don’t be surprised if your batteries are not as willing to accept charge in winter as in summer.<br />
The ability of a cold cell to accept and store charge is much lower than that of a warm one.<br />
Battery disposal: exhausted batteries are not ordinary household waste, and you must not dispose<br />
of them in the domestic rubbish. The retail outlet where you purchase your batteries should have<br />
a battery recycling container for proper disposal. Trade outlets are obliged by law to accept<br />
exhausted batteries for disposal.
20. Specification<br />
Battery:<br />
Charge currents / power<br />
Ni-Cd & Ni-MH batteries:<br />
100 mA to 5.0 A / max. 50 W with internal power supply<br />
100 mA to 5.0 A / max. 50 W with external 11...15V DC power supply<br />
Cell count 1 - <strong>14</strong> cells<br />
Capacity<br />
Lithium batteries:<br />
min. 0,1 Ah to 8,0 Ah<br />
Cell count 1-6 cells<br />
Cell voltage 3,3 V (LiFe), 3,6 V (LiIo) / 3,7 V (LiPo/LiMn)<br />
Capacity<br />
Lead-acid / lead-gel batteries:<br />
min. 0,05 Ah to 8,0 Ah<br />
Cell count 1, 2, 3, 6 cells<br />
Battery voltage 2, 4, 6, 12 V<br />
Capacity min. 1 Ah<br />
General:<br />
Operating voltage range DC input 11,0 to 15 V<br />
Operating voltage range AC input 100 ~ 240V<br />
Car battery required 12 V, min. 30 Ah<br />
Mains PSU required 12-15V, min. 8,5 A stabilised 1)<br />
No-load current drain approx 0.1 A<br />
balancer connector: 1...6 NiMH/NiCd/LiPo/LiIo/LiFe cells<br />
balancing current: NiMH/NiCd: 0.1A, LiPo/LiIo/LiFe: 0.3A<br />
Low-voltage cut-off approx 11,0 V<br />
Weight approx. 600 g<br />
Dimensions approx. (WxDxH) <strong>14</strong>8 x <strong>14</strong>6 x 54 mm<br />
All data assumes a car battery voltage of 12.7 V.<br />
The stated values are guidelines, and may vary according to battery state, temperature etc.<br />
1) When powered by a mains PSU, the charger will only operate correctly if the PSU is suitable in terms of voltage,<br />
stability, maximum load capacity etc. You can avoid problems by using only the PSUs which we specifically recommend.<br />
Environnemental Protection Notes<br />
When this product comes to the end of its useful life, you must not dispose of it in the ordinary<br />
domestic waste. The correct method of disposal is to take it to your local collection point for<br />
recycling electrical and electronic equipment. The symbol shown here, which may be found on<br />
the product itself, in the operating instructions or on the packaging, indicates that this is the<br />
case.<br />
Individual markings indicate which materials can be recycled and re-used. You can make an<br />
important contribution to the protection of our common environment by re-using the product,<br />
recycling the basic materials or recycling redundant equipment in other ways.<br />
Remove batteries from your device and dispose of them at your local collection point for<br />
batteries.<br />
In case of R/C models, you have to remove electronic parts like servos, receiver, or speed<br />
controller from the product in question, and these parts must be disposed of with a<br />
corresponding collection point for electrical scrap.<br />
If you don’t know the location of your nearest disposal centre, please enquire at your local<br />
council office.<br />
45
Sommaire<br />
Chapitres Page<br />
46<br />
1. Généralités 46<br />
2. Avertissements et conseils de sécurité, à observer impérativement ! 47<br />
3. Conseils généraux d’utilisation 48<br />
4. Cordons de charge conseillés, polarités 49<br />
5. Eléments de service, utilisation, départ de la charge 49<br />
6. Programmes de charge 50<br />
7. Structure des programmes 50<br />
8. Sélection des groupes de programmes de charge 51<br />
9. Mise en service 51<br />
10. Départ des processus de charge 52<br />
11. Programme de charge Nickel-Cadium (NiCd) 53<br />
12. Programme de charge Nickel-Métal-Hybride (NiMH) 55<br />
13. Programme de charge Lithium, LiFePO 4 (Lilo/LiPo/LiMn/LiFe) 58<br />
<strong>14</strong>. Programme de charge accus au plomb (Pb) 60<br />
15. Indications de l’affichage, affichage des données de cyclage 62<br />
16. Indications de contrôle sur l’affichage, Ind. séparée de la tension des élé.62<br />
17. Avertissements d’erreur 64<br />
18. Nettoyage et entretien 66<br />
19. Conseils pour l’entretien des accus 66<br />
20. Caractéristiques techniques,<br />
Indications quant à la protection de l’environnement 67<br />
Conditions de garantie dernière page<br />
1. Généralités<br />
Veuillez lire attentivement et entièrement les descriptions qui vont suivre pour pouvoir utiliser toute<br />
les possibilités de votre nouveau chargeur avant de le mettre en service. Observez surtout les<br />
avertissements et les conseils de sécurité. Ces instructions devront être soigneusement conservées<br />
afin de pouvoir les remettre à un éventuel utilisateur suivant.<br />
Avec le chargeur <strong>ULTRAMAT</strong> <strong>14</strong> <strong>plus</strong>, vous avez fait l’acquisition d’un produit aux remarquables<br />
propriétés. Grâce à l’utilisation de semi-conducteurs d’une technologie moderne et d’un puissant<br />
micro-processeur RISC, de remarquables caractéristiques de charge, une utilisation simple et une<br />
fiabilité optimale, que l’on peut trouver seulement avec des appareils nettement <strong>plus</strong> coûteux, ont<br />
été obtenues.<br />
Avec le chargeur <strong>ULTRAMAT</strong> <strong>14</strong> <strong>plus</strong>, presque tous les accus utilisés en modélisme pourront être<br />
chargés: les accus à électrodes frittées au cadmium-Nickel (NiCd), les accus hybrides au Nickel-<br />
Métal (NiMH), les accus au Lithium-Polymer (LiPo)/LiMn, les accus au Lithium-Ion (Lilo), les accus<br />
au LiFePO 4 (LiFe) et les accus au plomb (Pb) à électrolyse liquide ou gélifiée. Ces accus étanches<br />
au gaz sont particulièrement indiqués pour une utilisation en modélisme. Ils sont mécaniquement<br />
robustes, utilisables dans toutes les positions et insensibles aux vibrations. Aucune surveillance<br />
particulière avant une décharge profonde n’est en outre nécessaire durant leur stockage. Les<br />
accus pourront de <strong>plus</strong> être déchargés et cyclés avec le chargeur <strong>ULTRAMAT</strong> <strong>14</strong> <strong>plus</strong>.<br />
Note :<br />
Il conviendra de respecter les conseils de charge du fabricant des accus, ainsi que le courant et le<br />
temps de charge prescrits. Il faudra charger uniquement des accus à charge rapide qui sont<br />
exclusivement adaptés pour ces forts courants de charge ! Veuillez noter que des accus neufs<br />
n’atteignent leur capacité totale qu’après <strong>plus</strong>ieurs cycles de charge et décharge et qu’ils peuvent<br />
aussi entraîner une coupure de charge prématurée. Assurez-vous absolument par <strong>plus</strong>ieurs essais<br />
de charge du parfait fonctionnement et de la fiabilité de la fonction de coupure de charge automatique<br />
et de la capacité emmagasinée.
2. Avertissements et conseils de sécurité<br />
Ce chargeur ne convient pas aux enfants en dessous de <strong>14</strong> ans, ce n‘est pas un jouet!<br />
Protéger le chargeur de la poussière, de l’humidité, de la pluie et de la chaleur ; par ex. sous le rayonnement<br />
solaire direct. Utilisez-le uniquement dans un endroit sec.<br />
Les ailettes sur le boîtier servent au refroidissement de l’appareil et ne devront pas être recouvertes ou<br />
obturées. L’appareil devra être placé à un endroit dégagé pour la charge, afin que l’air puisse circuler autour du<br />
boîtier.<br />
Ce chargeur est adapté pour un raccordement sur une batterie de voiture de 12 V ou sur une prise de courant secteur<br />
100 ~ 240 V. Ne jamais connecter l’appareil sur les deux sources de courant en même temps, sous peine de le détruire!<br />
Durant le fonctionnement, le chargeur et la batterie à charger devront être placés sur une surface non<br />
inflammable et non conductrice de la chaleur et de l’électricité ! Ne jamais les poser directement sur les sièges<br />
ou sur les tapis de la voiture ! Eloigner également tous les objets combustibles ou facilement inflammables de<br />
l’installation de charge ; veiller aussi à assurer une bonne aération.<br />
Les accus peuvent exploser ou prendre feu par suite d’une défection !<br />
Connecter le chargeur uniquement avec les cordons de raccordement originaux et les pinces crocodile<br />
directement sur la batterie de voiture ou sur une prise de courant secteur. Le moteur de la voiture devra être<br />
arrêté tant que le chargeur est relié à la batterie et celle-ci ne devra pas être chargée en même temps par un<br />
autre chargeur.<br />
La sortie de charge et les cordons de raccordement ne devront pas être modifiés ni reliés l’un à l’autre d’une<br />
façon quelconque. Il existe un danger de court-circuit entre la sortie de charge et la carrosserie de la voiture<br />
durant le fonctionnement sur la batterie. Les cordons de charge et de raccordement ne devront pas être enroulés<br />
durant la charge. Eviter les courts-circuits entre la sortie de charge et l’accu ou la carrosserie de la voiture ; le<br />
chargeur <strong>ULTRAMAT</strong> <strong>14</strong> <strong>plus</strong> n’est pas protégé contre cela ! Pour cette raison, ne jamais poser l’appareil<br />
directement sur la carrosserie de la voiture.<br />
Ne jamais laisser le chargeur relié aux sources d’alimentation sans surveillance.<br />
Un seul accu à charger devra être connecté sur la sortie de charge.<br />
Les batteries suivantes ne devront pas être connectées sur le chargeur :<br />
- Accus NiCd/NiMH de <strong>plus</strong> de <strong>14</strong> éléments, accus Lithium-Ion/Lithium-Polymer/Li-Mn/LiFePO 4 (LiFe) de <strong>plus</strong><br />
de 6 éléments ou batteries au plomb d’une tension nominale de <strong>plus</strong> de 12 V.<br />
- Accus nécessitant une autre technique de charge autres que NiCd, NiMH, accus au<br />
Lithium ou batteries au plomb.<br />
- Eléments ou batteries défectueux ou détériorés.<br />
- Batteries commutées en parallèle ou composées d’éléments différents.<br />
- Mélange d’éléments vieux et neufs ou éléments de fabrication différente.<br />
- Batteries non rechargeables (Piles sèches), Attention : Danger d’explosion !<br />
- Batteries ou éléments dont le fabricant n’indique pas expressément qu’ils sont adaptés pour<br />
être chargés avec les courants de charge débités par ce chargeur.<br />
- Eléments ou batteries déjà chargés, échauffés ou non totalement déchargés.<br />
- Batteries ou éléments avec dispositif de charge ou de coupure intégré.<br />
- Batteries ou éléments qui sont incorporés dans un appareil ou en liaison en même temps avec<br />
d’autres éléments électriques.<br />
Pour éviter un court-circuit entre les pinces crocodile du cordon de charge, relier toujours d’abord le cordon de<br />
charge avec le chargeur et ensuite les pinces crocodile avec l’accu. Procéder inversement pour déconnecter l’accu.<br />
Après la charge totale d’un accu, s’assurer généralement que la quantité de charge indiquée par l’appareil<br />
correspond à celle que l’on attendait. Détecter en temps opportun la raison d’une coupure prématurée. La probabilité<br />
d’une coupure prématurée dépend de nombreux facteurs dont les <strong>plus</strong> importants sont une décharge profonde,<br />
un trop faible nombre d’éléments ou avec certains types d’accus.<br />
S’assurer par <strong>plus</strong>ieurs essais de charge (surtout avec un faible nombre d’éléments), du parfait fonctionnement<br />
de la coupure automatique ; une trop faible pointe de charge totale ne sera pas détectée.<br />
Vérifier avant la charge : Si le programme de charge est adapté pour l’accu, si les courants de<br />
charge/décharge sont corrects et si les tensions de coupure avec les accus NiCd et NiMH ont été<br />
correctement réglées ?<br />
Vérifier également si toutes les liaisons sont impeccables et s’il n’y a pas de contact intermittent ?<br />
Noter que la charge rapide des batteries peut être dangereuse. Même une courte interruption en<br />
raison d’un contact intermittent conduira inévitablement à un fonctionnement erroné qui déclenchera<br />
un nouveau départ de charge qui surchargera totalement l’accu connecté.<br />
47
48<br />
3. Conseils généraux d‘ utilisation<br />
Charge des accus<br />
Pour charger un accu, il doit emmagasiner une certaine quantité de courant qui est le produit donné<br />
par Courant de charge x Temps de charge. Le courant de charge maximal admissible dépend de<br />
chaque type d’accu et il est à relever dans les données techniques du fabricant.<br />
Seuls les accus expressément désignés comme étant adaptés pour la charge rapide pourront être<br />
chargés en dépassant le courant de charge normal. Le COURANT DE CHARGE NORMAL est le<br />
courant calculé au 1/10 de la valeur nominale de la capacité (Par ex. avec une capacité de 1,7 Ah,<br />
le courant de charge normal est de 170 mAh).<br />
L’accu à charger sera connecté sur le chargeur par un cordon de charge adapté en respectant<br />
les polarités (rouge = pôle Plus, noir = pôle Moins).<br />
Il conviendra d’observer les conseils de charge du fabricant de l’accu, ainsi que le courant et le<br />
temps de charge prescrits. Il faudra mettre en charge rapide uniquement les accus qui sont<br />
exclusivement adaptés pour supporter les forts courants de charge débités par ce chargeur.<br />
Noter qu’un accu neuf n’atteint sa capacité totale qu’après <strong>plus</strong>ieurs cycles de charge et de<br />
décharge. De même qu’une coupure prématurée peut se produire, particulièrement avec les<br />
accus neufs et les accus profondément déchargés.<br />
Si l’un des éléments d’un pack d’accus NC est devenu particulièrement chaud après une charge<br />
rapide, cela peut provenir d’une défectuosité de cet élément. Ce pack d’accus ne devra alors <strong>plus</strong><br />
être utilisé (Les batteries usagées sont bonnes pour la poubelle !).<br />
Veiller à assurer un contact franc et sûr de tous les connecteurs et des pinces crocodile. Même<br />
une courte interruption en raison d’un contact intermittent conduira inévitablement à un<br />
fonctionnement erroné qui déclenchera un nouveau départ de charge qui surchargera totalement<br />
l’accu connecté.<br />
Une cause fréquente d’un fonctionnement erroné provient généralement de l’utilisation<br />
d’un cordon de charge inadapté. Comme le chargeur ne peut pas faire la différence entre<br />
la résistance interne de l’accu et la résistance du cordon de charge et des connecteurs, la<br />
première condition pour obtenir un parfait fonctionnement est d’utiliser un cordon de<br />
charge avec des fils d’une section suffisante et d’une longueur ne dépassant pas 30 cm, avec<br />
des connecteurs de haute qualité des deux côtés (Contacts dorés).<br />
Charge des batteries d’émission<br />
Une batterie d’émission incorporée pourra être rechargée par la prise de charge dont sont pourvus<br />
la plupart des émetteurs R/C.<br />
Ces prises de charge comprennent généralement une sécurité anti-retour du courant (Diode).<br />
Celle-ci empêche une détérioration de l’émetteur par une inversion de polarité ou un court-circuit<br />
entre les fiches banane du cordon de charge.<br />
La recharge d’une batterie d’émission est cependant possible avec le chargeur <strong>ULTRAMAT</strong> <strong>14</strong> <strong>plus</strong>,<br />
mais seulement après un pontage ; se référer pour cela aux indications données dans les<br />
instructions d’utilisation de l’émetteur.Le courant de charge maximum autorisé pour une batterie<br />
d’émission ne devra jamais être dépassé ! Pour empêcher une détérioration à l’intérieur de<br />
l’émetteur due à une surchauffe, la batterie devra être retirée de son logement.L’interrupteur de<br />
l’émetteur devra être placé sur ‘’OFF’’ (Coupé) durant la totalité du processus de charge ! Ne<br />
jamais mettre l’émetteur en contact tant qu’il est relié au chargeur ! Une interruption du processus<br />
de charge, même de courte durée, peut faire monter la tension de charge par le chargeur de sorte<br />
que l’émetteur sera immédiatement détruit par une sur-tension. N’effectuer aucune décharge ni<br />
programme d’entretien d’accu par la prise de charge ! Celle-ci n’est pas adaptée pour cette<br />
utilisation.Le chargeur détermine les courants de charge/décharge tant que ses possibilités<br />
techniques ne sont pas dépassées ! Lorsqu’un courant de charge/décharge sera demandé au<br />
chargeur et que techniquement il ne pourra pas le débiter, la valeur sera automatiquement réduite<br />
sur celle maximale possible. Le courant de charge/décharge réellement débité sera indiqué et<br />
l’inscription ‘’MAX’’ apparaîtra alternativement avec la valeur du courant de charge sur l’affichage.
Exclusion de responsabilité :<br />
Le respect des instructions d’utilisation, ainsi que les méthodes d’installation, de fonctionnement et<br />
d’entretien de ce chargeur ne peuvent pas être surveillés par la Firme <strong>Graupner</strong>. En conséquence,<br />
nous déclinons toute responsabilité concernant la perte, les dommages et les frais résultants d’une<br />
utilisation incorrecte ainsi que notre participation aux dédommagements d’une façon quelconque.<br />
4. Cordons de charge conseillés, polarités<br />
Il existe différents types de connecteurs sur les accus rechargeables dont les repères et les<br />
polarités varient d’un fabricant à l’autre. Pour cette raison, utiliser toujours des connecteurs de<br />
même fabrication et adaptés entre-eux.<br />
Les cordons de charge suivants d’origine <strong>Graupner</strong> sont disponibles :<br />
Prise Japonaise<br />
Réf. N° 3371<br />
Utiliser uniquement des cordons de charge originaux avec des fils d’une section suffisante.<br />
5. Eléments de service / Utilisation / Départ de la charge<br />
+<br />
Pinces crocodile<br />
pour batterie<br />
de voiture<br />
G2 (AMP/G2,5)<br />
Réf. N° 3011<br />
Affichage<br />
-<br />
Prise BEC<br />
Réf. N° 3037<br />
L‘entrée du Balancer<br />
pour batterie<br />
<strong>Graupner</strong> LiPo<br />
Prise JR<br />
Réf. N° 3021<br />
Touches de service<br />
Prise émetteur JR<br />
Best.-Nr. 3022<br />
Connecteures pour<br />
100~240V AC<br />
Raccordement<br />
de charge<br />
„Akku “<br />
L’utilisation du chargeur se fait seulement par 4 touches de service.<br />
Mises à part les touches -/DEC et +/INC avec lesquelles les valeurs de courant et de tension<br />
seront modifiées, les touches de service ont les différentes fonctions suivantes selon si un accu<br />
est connecté sur le chargeur, ou pas.<br />
Touche de service Fonction<br />
Pas d‘ accu PROGRAMM/MODE Sélection du programme de charge et des sous-groupes<br />
connecté: PROGRAMM/MODE 2 s. Sélection du groupe de programmes (Charge)<br />
ENTER/START Confirmation d’un réglage.<br />
Accu ENTER/START Fin du processus de charge, interruption du vibreur,<br />
connecté , échange dans les sousgroupes<br />
ENTER/START 2 sek. Départ du processus de charge<br />
49
50<br />
6. Programmes de charge<br />
Les différentes possibilités du chargeur sont réparties en 4 groupes de programmes qui pourront<br />
être sélectionnés dans l’ordre indiqué à la suite avec la touche MODE (pression durant 2 sec.).<br />
Programme accus NiCd : Charge, Balancer<br />
Programme accus NiMH : Charge, Balancer<br />
Programme accus LiPo/LiIo/LiFe : Charge<br />
Programme pour accus au plomb : Charge ou charge d’entretien en attente d’utilisation.<br />
NiCd<br />
Programme<br />
Automatique<br />
MODE<br />
(2 sec.)<br />
NiMH<br />
Programme<br />
Automatique<br />
MODE<br />
(2 sec.)<br />
Pb<br />
Programme<br />
Manuel<br />
MODE<br />
(2 sec.)<br />
7. Structure des programmes<br />
NiCd<br />
Programme<br />
Manuel<br />
NiMH<br />
Programme<br />
Manuel<br />
NiCd<br />
Coupure<br />
∆ ∆ ∆ delta-peak<br />
MODE MODE MODE MODE<br />
Programme du<br />
Balancer<br />
MODE (2 sec.)<br />
NiMH<br />
Coupure<br />
∆ ∆ delta-peak<br />
MODE MODE MODE MODE<br />
Programme du<br />
Balancer<br />
MODE (2 sec.)<br />
Lithium MODE Lithium MODE<br />
Programme<br />
Sélection du<br />
Manuel<br />
MODE<br />
type<br />
(2 sec.) MODE (2 sec.)<br />
NiCd<br />
NiMH
8. Sélection des groupes de programmes de charge<br />
NiCd<br />
Programme<br />
Automatique<br />
MODE (2 sec.)<br />
NiMH<br />
Programme<br />
Automatique<br />
MODE (2 sec.)<br />
Lithium<br />
Programme<br />
Manuel<br />
MODE (2 sec.)<br />
Pb<br />
Programme<br />
Manuel<br />
MODE (2 sec.)<br />
INC DEC<br />
________________<br />
LANGUAGE SELECT<br />
________________<br />
FRENCH<br />
ENTER<br />
________________<br />
<strong>Graupner</strong><br />
________________<br />
U L T R A M A T <strong>14</strong> <strong>plus</strong><br />
3 sec.<br />
________________<br />
Timer sécurité<br />
contact<br />
________________<br />
3 sec.<br />
MODE<br />
MODE<br />
MODE<br />
________________<br />
sonnerie<br />
________________<br />
contact<br />
Les possibilités de charge et de décharge de l’<strong>ULTRAMAT</strong> <strong>14</strong><br />
<strong>plus</strong> sont clairement et logiquement réparties dans les quatre<br />
groupes<br />
de programmes.Un groupe de programmes propre à chacun des<br />
différents types d’accu NiCd, NiMH, LiPo/LiPo/LiFe et<br />
Pb (Plomb) està disposition. Un autre groupe de<br />
programmes permet des possibilités de réglage Programme<br />
individuelles du chargeur.<br />
Echange de programme :<br />
• Un échange entre un groupe de programme vers le suivant<br />
n’est pas possible Programme tant que l’appareil se trouve<br />
dans un programme de charge.<br />
L’échange du groupe de programmes se fait avec la touche MODE<br />
qui doit Programme être pressée durant env. 2 secondes. Vous<br />
pourrez changer dans un groupe AUTOMATIQUE de programmes<br />
par une courte pression sur la touche MODE.<br />
9. Mise en service<br />
Le chargeur sera relié à une prise de courant secteur 100-240 V AC ou à une batterie de voiture<br />
12 V DC, ou encore à un transformateur de courant secteur 11…15 V DC d’au moins 8,5A.<br />
Pressez simultanément les touches INC et DEC pour accéder à la sélection du langage.<br />
Autrement, les informations de routine se déroulent d’abord, lesquelles donnent un rapide aperçu<br />
sur les réglages les <strong>plus</strong> importants de l’utilisateur du chargeur. Les informations suivantes<br />
apparaîtront l’une après l’autre sur l’affichage du chargeur.<br />
Pressez simultanément les touches INC et DEC pendant<br />
que l’appareil est alimenté avec la tension d’entrée pour<br />
accéder à la sélection du langage. Pressez la touche INC<br />
ou la touche DEC pour sélectionner la langue désirée<br />
ENGLISCH = ANGLAIS, GERMAN = ALLEMAND ou<br />
FRENCH = FRANÇAIS. Quittez la sélection du langage en<br />
pressant la touche ENTER.<br />
L’<strong>ULTRAMAT</strong> <strong>14</strong> <strong>plus</strong> affiche son nom.<br />
Après 3 secondes, le timer de sécurité apparaît à l’écran<br />
contact (on) ou coupé (off).Le timer de sécurité se laisse<br />
régler pendant 3 secondes avec les touches INC ou DEC.<br />
Le timer de sécurité n’est jamais en marche quand il<br />
charge les batteries au plomb.<br />
Pour tous les autres programmes de charge, le timer de<br />
sécurité est préréglé sur 180 min.<br />
Après 3 secondes, la sonnerie s’arrête ou se met en<br />
marche en appuyant sur la touche INC ou DEC.<br />
Après 3 secondes, le chargeur est maintenant prêt au<br />
service.<br />
51
LiPo-Manuel<br />
________________<br />
C:2.5A ________________<br />
2000mAh<br />
52<br />
START<br />
3 sec.<br />
2<br />
sec.<br />
**INFORMATION***<br />
________________<br />
2<br />
sec.<br />
2<br />
sec.<br />
Man. ________________<br />
23:40 00863<br />
LP+2.50A ________________<br />
<strong>14</strong>.017V<br />
10. Départ du processus de charge<br />
Pour la charge/décharge et le cyclage, sélectionnez le<br />
programme désiré comme décrit à la suite et placez les<br />
valeurs adaptées.<br />
Relier, si existante, la prise Balancer de l’accu sur l’entrée<br />
du Balancer (Balancer connector)<br />
Veiller pour cela au respect des polarités :<br />
De la droite vers la gauche : (Broche 1 (GND) : Masse =<br />
Accu -,<br />
Broche 2 (1) : + Elément 1, Broche 3 (2) : + Elément 2,<br />
Broche 4 (3) + Elément 3, Broche 5 (4) : + Elément 4,<br />
Broche 6 (5) : + Elément 5, Broche 7 (6) : + Elément 6)<br />
Relier ensuite la prise de raccordement de l’accu à la sortie<br />
du chargeur<br />
-BATTERY+ à l’aide d’un cordon de charge en respectant<br />
les polarités.<br />
Après avoir pressé la touche START durant env. 2 sec., il<br />
sera indiqué si le Balancer est connecté ou non connecté.<br />
Avec le Balancer connecté, la tension des différents<br />
éléments pourra être indiquée, voir .16.<br />
**INFORMATION***<br />
________________<br />
BALANCER ________________<br />
CON. BALANCER ________________<br />
NON CON<br />
2<br />
sec.<br />
2<br />
sec.<br />
MESURE ________________<br />
DE I`ACCU MESURE ________________<br />
DE I`ACCU<br />
ATTENDEZ ________________<br />
S.V.P.. ATTENDEZ ________________<br />
S.V.P..<br />
Si le Balancer n’est pas connecté avec<br />
des types d’accus LiPo, l’interrogation<br />
sur le nombre d’éléments apparaître et<br />
devra être confirmée avec la touche<br />
START.<br />
*éléments ________________<br />
LiPo**<br />
3élém. ________________<br />
(13.73V)<br />
+ -<br />
INC DEC<br />
START<br />
Après avoir à nouveau pressé la<br />
feu !<br />
touche START, l’accu connecté<br />
sera chargé ou déchargé.<br />
Attention ! Indiquer<br />
absolument le<br />
nombre correct<br />
d’éléments et vérifier<br />
le type de l’accu, car<br />
autrement il pourra<br />
exploser ou prendre<br />
Par une nouvelle courte pression sur la touche START, le<br />
processus de charge pourra être interrompu à tout moment.<br />
Note : Si le processus de charge est interrompu par la<br />
touche START, tous les affichages de paramètres<br />
seront définitivement effacés.
NiCd<br />
Programme<br />
Automatique<br />
11. Programme NiCd<br />
Confortable programme pour la charge des accus au Nickel-Cadmium couramment utilisés en<br />
modélisme. Lorsque le programme de charge est terminé, l’inscription ‘’ENDE’’ (FIN) apparaît sur<br />
l’affichage, avec le temps de charge, le dernier courant de charge, la capacité emmagasinée ainsi<br />
que la tension de l’accu jusqu’à la déconnexion de celui-ci. Ces données donnent dans certaines<br />
circonstances de précieuses indications sur le comportement de la charge, la capacité du pack<br />
d’accus NiCd connecté ou sur les détections pleine charge erronées.<br />
NiCd-Automatique<br />
________________<br />
C:2.5A ________________<br />
limite<br />
+ -<br />
INC DEC<br />
NiCd-Manuel<br />
________________<br />
________________<br />
C:2.5A<br />
+ -<br />
INC DEC<br />
NiCd<br />
Programme<br />
Manuel<br />
NiCd<br />
NiCd<br />
Coupure<br />
∆ ∆ delta-peak<br />
MODE MODE MODE MODE<br />
Programme du<br />
Balancer<br />
Programme automatique NiCd<br />
Dans ce programme, le chargeur détecte le type d’accu<br />
NiCd connecté et adapte le courant de charge en<br />
correspondance, de sorte qu’une surcharge du pack d’accus<br />
sera empêchée.<br />
Le courant de charge maximal pourra être réglé de 0,1 A à<br />
5 A avec les touches INC/DEC, sans limitation, avant la<br />
connexion de l’accu.<br />
La coupure de fin de charge se fera selon la valeur réglée<br />
pour la tension de coupure ’’Delta-Peak NiCd’’.<br />
Programme manuel NiCd<br />
Avec ce programme, l’accu sera chargé avec le courant de<br />
charge réglé.<br />
Le courant de charge maximal pourra être réglé de 0,1 A à<br />
5 A avec les touches INC/DEC, avant la connexion de l’accu.<br />
La coupure de fin de charge se fera selon la valeur réglée<br />
pour la tension de coupure ’’Delta-Peak-<br />
NiCd’’.<br />
53
NiCd ________________<br />
Tension de<br />
________________<br />
balancer = 1.20V<br />
54<br />
START<br />
2<br />
sec.<br />
________________<br />
BLC 28:30 0<strong>14</strong>25<br />
________________<br />
NC+0.00A 07.717V<br />
NiCd-Programme du balancer<br />
+ -<br />
INC DEC<br />
**INFORMATION***<br />
________________<br />
BALANCER ________________<br />
CON.<br />
2<br />
sec.<br />
Ce programme sert pour la coordination de la tension des<br />
différents éléments pour les packs d’accus de 2-6 éléments.<br />
Placer la tension de fin du Balance 1.20…1.30 V avec la<br />
touche INC ou DEC.<br />
Avant la charge, les différents éléments d’un accu devront<br />
être équilibrés afin qu’ils ne soient pas surchargés durant la<br />
charge. Un accu doit être équilibré, particulièrement après<br />
un long temps de charge<br />
Pour cela, prise du Balancer devra être connectée.<br />
En outre, tous les éléments doivent avoir une tension <strong>plus</strong><br />
haute que la tension de fin du Balancer.<br />
Pour obtenir la capacité maximum d’un accu, les différents<br />
éléments devront être déchargés sous 1,20 V durant<br />
quelques heures, mais au maximum pendant 24 h, avant<br />
d’être mis en charge. Avec une tension en dessous de 1,20<br />
V, les éléments de l’accu perdront de la capacité. C’est<br />
pourquoi un accu devra être chargé à peu près à 60% de sa<br />
capacité avant un long stockage.<br />
Les éléments d’une <strong>plus</strong> forte tension seront<br />
supplémentairement déchargés avec un courant d’env.<br />
100mA (équilibrés).<br />
Lorsque tous les éléments atteignent la tension de fin de<br />
décharge du Balancer (+ 0.01 V), le processus de décharge<br />
du Balancer est terminé.<br />
Coupure Delta Peak (-∆ Peak)<br />
La coupure de charge automatique<br />
NiCd ________________<br />
Delta-Peak-<br />
(Détection pleine charge de l’accu)<br />
éléments<br />
________________<br />
Tens.=10mV/elem. travaille selon le procédé Delta-Peak<br />
des<br />
des millions de fois éprouvé (appelé<br />
+ - Tension<br />
Temps de charge<br />
aussi Delta-U ou Delta-V). Ces<br />
INC DEC<br />
procédés valorisent la tension maximum de la courbe de<br />
charge, laquelle calcule exactement l’atteinte de la charge<br />
maximale.<br />
Durant la charge, la tension de l’accu monte d’abord continuellement, avec l’accu plein l’augmentation<br />
de la température assure à nouveau une légère diminution de la tension de la batterie. Cette<br />
diminution sera déterminée et revalorisée.<br />
La tension de la coupure automatique (en mV par élément) pourra être réglée pour les accus NiCd.<br />
Le réglage d’une tension de 10…30 mV/élément s’est révélé être le mieux adapté. Une tension <strong>plus</strong><br />
élevée conduit le <strong>plus</strong> souvent à une surcharge de la batterie et une tension <strong>plus</strong> faible à une<br />
coupure prématurée. La valeur la mieux adaptée pour l’accu à charger sera déterminée par des<br />
essais de charge.<br />
Pour ne pas surcharger un accu, commencer la charge avec une tension de coupure Delta-Peak<br />
de 10mV.
NiMH<br />
Programme<br />
Automatique<br />
12. Programme NiMH<br />
Confortable programme pour la charge des accus Nickel-Métal-Hybrides couramment utilisés en<br />
modélisme. Lorsque le programme de charge est terminé, l’inscription ‘’ENDE’’ (FIN) apparaît sur<br />
l’affichage, avec le temps de charge, le dernier courant de charge, la capacité emmagasinée ainsi<br />
que la tension de l’accu jusqu’à la déconnexion de celui-ci. Ces données donnent dans certaines<br />
circonstances de précieuses indications sur le comportement de la charge, la capacité du pack<br />
d’accus NiMH connecté ou sur les détections pleine charge erronées.<br />
________________<br />
NiMH-Automatique<br />
C:2.5A ________________<br />
limite<br />
+ -<br />
INC DEC<br />
NiMH<br />
Programme<br />
Manuel<br />
NiMH<br />
NiMH<br />
Coupure<br />
∆ ∆ delta-peak<br />
MODE MODE MODE MODE<br />
Programme du<br />
Balancer<br />
Programme automatique NiMH<br />
Dans ce programme, le chargeur détecte le type d’accu<br />
NiCd connecté et adapte le courant de charge en<br />
correspondance, de sorte qu’une surcharge du pack d’accus<br />
sera empêchée.<br />
Le courant de charge maximal pourra être réglé de 0,1 A à<br />
5 A avec les touches INC/DEC, sans limitation, avant la<br />
connexion de l’accu.<br />
La coupure de fin de charge se fera selon la valeur réglée<br />
pour la tension de coupure ’’Delta-Peak NiMH’’.<br />
55
NiMH-Manuel<br />
________________<br />
56<br />
________________<br />
C:2.5A<br />
+ -<br />
INC DEC<br />
NiCd ________________<br />
Tension de<br />
________________<br />
balancer = 1.20V<br />
START<br />
2<br />
sec.<br />
2<br />
sec.<br />
________________<br />
BLC 28:30 0<strong>14</strong>25<br />
________________<br />
NM+0.00A 07.717V<br />
Programme manuel NiMH<br />
Avec ce programme, l’accu sera chargé avec le courant de<br />
charge réglé.<br />
Le courant de charge maximal pourra être réglé de 0,1 A à<br />
5 A avec les touches INC/DEC, avant la<br />
connexion de l’accu.<br />
Observer les indications du fabricant des accus ! Ne charger<br />
en aucun cas les accus sous <strong>plus</strong> de 2C !<br />
Exemple : Courant de charge maximum 8,4 A pour les accus<br />
NiMH 6N-4200, courant de charge rapide 4,2 A pour les<br />
accus <strong>Graupner</strong>. Le courant de charge sera limité à 2 A au<br />
maximum pour les accus d’émission.<br />
La coupure de fin de charge se fera selon la valeur réglée<br />
pour la tension de coupure ’’Delta-Peak NiMH’’.<br />
NiMH-Programme du balancer<br />
+ -<br />
INC DEC<br />
**INFORMATION***<br />
________________<br />
BALANCER ________________<br />
CON.<br />
Ce programme sert pour la coordination de la tension des<br />
différents éléments pour les packs d’accus de 2-6 éléments.<br />
Placer la tension de fin du Balance 1.20…1.30 V avec la<br />
touche INC ou DEC.<br />
Avant la charge, les différents éléments d’un accu devront<br />
être équilibrés afin qu’ils ne soient pas surchargés durant la<br />
charge. Un accu doit être équilibré, particulièrement après<br />
un long temps de charge<br />
Pour cela, prise du Balancer devra être connectée.<br />
En outre, tous les éléments doivent avoir une tension <strong>plus</strong><br />
haute que la tension de fin du Balancer.<br />
Pour obtenir la capacité maximum d’un accu, les différents<br />
éléments devront être déchargés sous 1,20 V durant<br />
quelques heures, mais au maximum pendant 24 h, avant<br />
d’être mis en charge. Avec une tension en dessous de 1,20<br />
V, les éléments de l’accu perdront de la capacité. C’est<br />
pourquoi un accu devra être chargé à peu près à 60% de sa<br />
capacité avant un long stockage.<br />
Les éléments d’une <strong>plus</strong> forte tension seront<br />
supplémentairement déchargés avec un courant d’env.<br />
100mA (équilibrés).<br />
Lorsque tous les éléments atteignent la tension de fin de<br />
décharge du Balancer (+ 0.01 V), le processus de décharge<br />
du Balancer est terminé.
NiMH ________________<br />
Delta-Peak-<br />
________________<br />
Tens.= 5mV/elem.<br />
+ -<br />
INC DEC<br />
Coupure Delta-Peak (-∆ Peak)<br />
La tension d’intervention (en mV par élément) de la coupure<br />
automatique pour les accus NiMH pourra être réglée.<br />
Les accus NiMH ont une perte de tension <strong>plus</strong> faible par<br />
comparaison aux accus NiCd. Le réglage d’une tension de<br />
5…25 mV/élément s’est révélé être le mieux adapté. Une<br />
tension <strong>plus</strong> élevée conduit le <strong>plus</strong> souvent à une surcharge<br />
de la batterie et une tension <strong>plus</strong> faible à une coupure<br />
prématurée.<br />
La valeur la mieux adaptée pour l’accu à charger sera<br />
déterminée par des essais de charge.<br />
Pour ne pas surcharger un accu, commencer la charge avec<br />
une tension de coupure Delta-Peak de 5mV.<br />
57
En principe, les accus au Lithium devront être chargés UNIQUEMENT avec<br />
tension<br />
des chargeurs spéciaux qui sont réglés sur chaque type d’accu (Tension de<br />
courant<br />
fin de charge, capacité). La charge se fait autrement que pour les accus NiCd<br />
ou NiMH par une méthode dite Courant constant/Tension constante. Le courant<br />
Temps de charge<br />
nécessaire pour la charge est donné par la capacité de l’accu et réglé<br />
automatiquement par le chargeur. Les accus au Lithium seront habituellement chargés avec un<br />
courant 1C (Courant de charge 1C = Intensité du courant de charge. Exemple : avec une capacité<br />
par ex. de 1500 mAh, le courant de charge correspondant 1C = 1500 mA (1,5 A). En outre, la<br />
capacité de l’accu est réglée par le chargeur à la place du courant de charge. Lorsque la capacité<br />
de fin de charge spécifique à chaque type d’accu est atteinte, le chargeur réduit automatiquement<br />
le courant de charge pour empêcher qu’elle soit dépassée. Si le fabricant de l’accu indique un<br />
courant de charge <strong>plus</strong> faible que 1C, le courant de charge devra aussi être réduit en correspondance.<br />
Pour obtenir une charge optimale avec une <strong>plus</strong> longue durée de vie et une <strong>plus</strong> haute<br />
sécurité, nous conseillons vivement de connecter la prise du Balancer sur le chargeur<br />
Ultramat <strong>14</strong> <strong>plus</strong> pour la charge.<br />
Problèmes avec un mauvais traitement des accus<br />
Une surcharge des accus au Lithium est très dangereuse, car celle peut conduire à un dégagement<br />
de gaz, à une surchauffe et même à l’explosion des éléments. Si la tension de fin de charge de 3,6V<br />
/ élément (LiFe), 4,1 V/élément (Lithium-Ion) et de 4,2 V/élément (Li-Po/Li-Mn) est dépassée de <strong>plus</strong><br />
de 1%, une conversion du Lithium-Ion en Lithium métallique commence à se produire dans les<br />
éléments. Celle-ci réagit cependant en liaison avec l’eau contenue dans l’électrolyse très violente<br />
qui provoque l’explosion des éléments. D’autre part, si la tension de fin de charge est dépassée, les<br />
éléments des accus Lithium-Ion présenteront une capacité beaucoup <strong>plus</strong> faible. Une tension de<br />
0,1 V en-dessous du seuil signifie déjà une perte de capacité d’à peu près 7%. La décharge<br />
profonde des accus au Lithium conduit à une rapide perte de capacité. Cet effet n’est pas irréversible<br />
tant que l’on évitera de décharger les accus sous une tension en-dessous de 2,5 V/élément.<br />
Attention : Le type des éléments réglés, leur capacité et leur nombre devront toujours être<br />
accordés à l’accu à charger et ne devront jamais varier ; Danger d’explosion ! Aucun accu avec<br />
dispositif de charge intégré ne devra être connecté. Charger les accus au Lithium uniquement sur<br />
une base non combustible.<br />
58<br />
13. Programme Lithium<br />
Ce programme de charge est adapté uniquement pour la charge et la décharge des accus au<br />
LiFePO 4 (LiFe) avec une tension de 3,3 V/élément, des accus au Lithium-Ion avec une tension<br />
de 3,6 V/élément, des accus au Lithium-Polymer et au Lithium-Manganèse avec une tension de<br />
3,7 V/élément. Les accus au Lithium se distinguent surtout par une <strong>plus</strong> forte capacité, par<br />
comparaison aux autres types d’accus. Ce gros avantage nécessite cependant d’autres<br />
méthodes de traitement en ce qui concerne la charge et la décharge ainsi que pour une<br />
utilisation sans danger. Les prescriptions de base données ici devront être observées dans tous<br />
les cas. Les autres indications correspondantes et les conseils de sécurité sont à relever dans<br />
les données techniques du fabricant des accus.<br />
Lithium<br />
Programme<br />
Manuel<br />
Lithium<br />
Sélection du<br />
type<br />
MODE MODE
LiPo-Manuel<br />
________________<br />
________________<br />
C:4.0 A 4000mAh<br />
+ -<br />
INC DEC<br />
ENTER<br />
Programme manuel Lithium<br />
Pour la charge, nous conseillons vivement de connecter la prise du Balancer pour des<br />
raisons de sécurité !<br />
Lorsque l’accu est relié au chargeur et que le processus de charge est démarré, le courant de<br />
charge commence avec C, 00A et augmente lentement vers la limitation réglée. Cependant, ne pas<br />
s’étonner si le courant de charge que l’on a réglé n’est pas atteint, car le programme de charge<br />
surveille en permanence la tension de la batterie pour empêcher ainsi un gonflement de l’accu, tant<br />
que la tension des éléments d’un pack est égale. La diminution automatique du courant de charge<br />
sera interrompue par l’inscription ‘’FIN’’ apparaissant sur l’affichage, avec l’indication du courant de<br />
charge réduit.<br />
________________<br />
*éléments LiPo**<br />
________________<br />
2élém. ( 7.73V)<br />
+ -<br />
INC DEC<br />
+ -<br />
INC DEC<br />
Attention ! Fixer absolument le bon<br />
nombre d’éléments, car autrement<br />
l’accu pourra exploser et prendre feu !<br />
Avec ce programme, l’accu sera chargé avec le courant de<br />
charge réglé.<br />
Avant de connecter l’accu à charger, le courant de charge<br />
(0,10…5,00 A, à gauche sur l’affichage) sera réglé avec les<br />
touches INC/DEC et après avoir pressé la touche ENTER,<br />
la capacité de l’accu (50…8000 mAh, à droite sur l’affichage)<br />
sera réglé avec les touches INC/DEC. Avec un dépassement<br />
de 10% de la capacité réglée, le processus de charge sera<br />
interrompu pour des raisons de sécurité..<br />
Nombre d‘ éléments Lithium<br />
Après avoir connecté le Pack d’accus sur le charger et<br />
avoir pressé la touche START durant env. 2 sec., l’affichage<br />
avec le nombre d’éléments Lithium apparaît, lequel sera<br />
automatiquement détecté avec 1-2 éléments. A partir de 2<br />
éléments, il faudra fixer manuellement le nombre d’éléments<br />
avec les touches INC/DEC, car une détection automatique<br />
n’est <strong>plus</strong> possible à partir de 3 éléments. La tension du<br />
pack d’accus connecté est visible pour contrôle sur le côté<br />
droit de l’affichage. Le processus de charge est démarré<br />
par une autre pression sur la touche START.<br />
59
60<br />
Programme de sélection des types Lithium<br />
________________<br />
Lithium Type<br />
________________<br />
LiPo<br />
INC<br />
+ -<br />
DEC<br />
C’est le programme de réglage le <strong>plus</strong> important pour les<br />
accus au Lithium. Le type d’accu sera déterminé dans cette<br />
sélection. Celui-ci sera soigneusement réglé et vérifié, car<br />
le chargeur travaille sur tous les autres paramètres de<br />
charge pour ces réglages. Le réglage des types d’accus<br />
(LiPo, Lilo ou LiFe) influence la tension de coupure. Si un<br />
accu au Lithium n’est rechargé qu’au 2/3 de sa capacité,<br />
c’est qu’un mauvais type d’accu a été réglé.<br />
Attention : Lorsqu’une fausse valeur est réglée ici, l’accu<br />
pourra être détérioré et risquera même<br />
d’exploser !<br />
Les types d’accus seront indiqués comme suit pour la<br />
charge:<br />
LiPo (LiMn) = LP<br />
LiIo = LI<br />
LiFe = LF<br />
<strong>14</strong>. Programme Pb<br />
Pb<br />
Programme<br />
Manuel<br />
Ce programme est uniquement adapté pour la charge et la décharge des accus au plomb avec<br />
électrolyse liquide et gélifiée avec exactement 2, 4, 6 et 12 V et 1, 2, 3, 6 éléments.<br />
Attention : Les batteries au plomb avec une autre tension nominale ne seront pas détectées par le<br />
chargeur et ne devront pas être connectées sur celui-ci.<br />
Les accus au plomb se comportent très différemment des accus NiCd ou NiMH. En ce qui concerne<br />
la capacité, les accus au plomb sont seulement chargeables avec des courants relativement<br />
faibles par comparaison aux accus NiCd ou NiMH. Ceci est aussi valable surtout pour leur recharge<br />
indiquée par les fabricants d’au moins <strong>14</strong> à 16 heures pour atteindre leur capacité, avec un<br />
courant de charge normal. Le courant de charge normal se calcule au 10 ème de la capacité nominale<br />
de l’accu. Exemple : Capacité de l’accu = 12 Ah à Courant de charge normal =1,2 A. La détection<br />
pleine charge se fait (autrement qu’avec les accus NiCd ou NiMH) typiquement par la hauteur de<br />
la tension de l’accu.<br />
Attention : Las batteries au plomb ne sont pas aptes à la charge rapide. Pour cette raison, respecter<br />
toujours le courant de charge conseillé par le fabricant. Penser aussi à la capacité nominale.<br />
La durée de vie d’un accu Pb sera négativement influencée très rapidement par un mauvais<br />
entretien (Surcharges, nombreuses décharges à 100%, et particulièrement les décharges<br />
profondes). La hauteur du courant de charge/décharge sera aussi décidée par la capacité prélevable<br />
de la batterie. Plus haut sera le courant, <strong>plus</strong> faible sera le rendement de capacité.<br />
Le retardement pour la coupure de charge dans les réglages de l’utilisateur, les valeurs réglées et<br />
le Timer de sécurité n’ont aucun effet dans les programmes Pb.
Pb-Manuel<br />
________________<br />
________________<br />
C:2.5A<br />
+ -<br />
INC DEC<br />
Programme manuel Pb<br />
Avec ce programme, le courant de charge maximal<br />
admissible pour l’accu à charger sera réglé avec les touches<br />
INC/DEC, avant sa connexion sur le chargeur.<br />
Ce réglage place seulement la limite supérieure, car le<br />
chargeur doit sonder l’accu.<br />
Si le fabricant de l’accu indique un <strong>plus</strong> faible courant de charge, celui-ci devra aussi être limité, car<br />
autrement le chargeur pourrait régler un <strong>plus</strong> haut courant en raison d’une bonne docilité de charge<br />
de l’accu.<br />
Lorsque l’accu a été connecté sur le chargeur et que le processus de charge a été démarré, le<br />
courant de charge commence à monter lentement de 0,00 A jusqu’à la limitation réglée. L’accu sera<br />
à nouveau mesuré et le courant de charge sera adapté aux données. Le programme de charge<br />
détermine automatiquement le nombre d’éléments de l’accu en fonction de son état de tension.<br />
Ne pas cependant s’étonner si le courant de charge réglé n’est pas atteint, car le programme de<br />
charge surveille en permanence la tension de l’accu pour empêcher ainsi une surcharge .<br />
L’accu se chargé avec les courants maximum possibles seulement jusqu’à l’atteinte d’une tension<br />
de 2,3 à 2,35 Volts par élément. Un passage se fait ensuite sur une pleine charge ménagée. Le<br />
courant de charge sera à nouveau réduit pour atteindre un <strong>plus</strong> haut degré de remplissage possible<br />
de l’accu. La terminaison du processus de charge se fait automatiquement à l’atteinte d’une tension<br />
d’env. 2,45 à 2,5 Volts par élément.<br />
Grâce à l’adaptation automatique du courant de charge, une charge <strong>plus</strong> rapide et nettement moins<br />
longue qu’avec les <strong>14</strong> à 16 heures habituelles est possible.<br />
FIN ________________<br />
CHG 367:09 04448<br />
Pb ________________<br />
0mA 2.<strong>14</strong>7V<br />
Lorsque le processus de charge est terminé, un signal<br />
acoustique se fait entendre avec certains intervalles de<br />
temps. Parallèlement à cela, l’inscription ‘’FIN’’ apparaît<br />
sur l’affichage.<br />
61
62<br />
Programme<br />
Type d‘accu<br />
15. Indications de I‘affichage<br />
Temps de charge<br />
(min.: sec.)<br />
Man. ________________<br />
12:56 00321<br />
NC+4.50A ________________<br />
11,985V<br />
Courant de charge<br />
Advertissement de fin de charge<br />
Capacité (mAh)<br />
Tension de I‘accu<br />
Durant la charge/décharge, des données importantes seront clairement lisibles sur l’affichage à<br />
cristaux liquides à deux lignes jusqu’à la dé-connexion de l’accu. Avec la charge d’un autre accu,<br />
les valeurs précédemment affichées ne seront <strong>plus</strong> appelables.<br />
16. Indications de contrôle sur I‘affichage<br />
Le chargeur est équipé de nombreux dispositifs de protection et de surveillance pour le contrôle<br />
des différentes fonctions et de l’électronique de l’appareil. Un dépassement des valeurs limites<br />
conduit dans quelques cas à la coupure du processus de charge (Par ex. en cas de surtension, de<br />
sur-température ou d’utilisation d’une batterie de voiture vide).<br />
Ces causes d’erreur seront indiquées sur l’affichage avec l’intervention du vibreur.<br />
MESURE ________________<br />
DE I`ACCU<br />
ATTENDEZ ________________<br />
S.V.P..<br />
FIN ________________<br />
CHG 48:32 03363<br />
NC ________________<br />
200mA 9.773V<br />
Processus de mesure<br />
Après avoir pressé la touche START durant env. 2 sec.,<br />
l’accu sera mesuré de sorte que cet avertissement<br />
apparaîtra sur l’affichage durant 1 à 2 sec. avant que le<br />
processus de charge soit démarré.<br />
Lorsqu’un programme de charge/décharge est terminé,<br />
l’inscription ‘’FIN’’ s’échange avec la désignation du<br />
programme sur l’affichage. Le vibreur intégré émet en<br />
même temps un signal acoustique pour un temps limité.<br />
Indication lorsque la prise du Balancer est connectée<br />
BLC ________________<br />
Man. 28:30 02850<br />
LP+6.00A ________________<br />
<strong>14</strong>.717V<br />
Si la prise du Balancer de l’accu est reliée au chargeur et<br />
que le Balancer est ainsi activé, BLC apparaît en haut et à<br />
gauche sur l’affichage en s’échangeant avec la désignation<br />
du programme.
Affichage de la tension d‘ entrée et de rés. d‘accu<br />
INC<br />
DEC<br />
TENSION ________________<br />
D´ENTRÉE<br />
13,62V ________________<br />
________________<br />
RÉS. D ´ACCU<br />
________________<br />
25m<br />
TENSION ________________<br />
D´ENTRÉE<br />
13,62V ________________<br />
________________<br />
RÉS. D ´ACCU<br />
________________<br />
25m<br />
Le tension d’entrée et la résistance actuelles de l’accu<br />
(seulement dans le mode manuel NiCd et NiMH) pourront<br />
être appelées à tout moment en pressant simultanément<br />
les touches INC et DEC. Par la pression des touches INC<br />
ou DEC, l’affichage s’échange pour la résistance interne,<br />
les tensions séparées d’éléments ou pour la tension<br />
d’entrée.<br />
L’indication de la tension d’entrée est surtout très utile<br />
lorsqu’une batterie de voiture est utilisée comme source<br />
de courant.<br />
L’indication de la résistance interne permet le contrôle de la qualité de l’accu. La résistance<br />
interne sera mesurée durant la charge après 5 minutes et à la fin du processus de charge et<br />
durant la décharge après 2 minutes. Retournez dans le menu par une pression de touche<br />
quelconque.<br />
INC<br />
Indication des tensions séparées d’éléments<br />
DEC<br />
1. ________________<br />
4.153V<br />
2. ________________<br />
4.168V<br />
3. ________________<br />
4.053V<br />
4. ________________<br />
0.000V<br />
5. ________________<br />
0.000V<br />
6. ________________<br />
0.000V<br />
La tension d’entrée actuelle et la résistance interne de l’accu<br />
(seulement dans le mode manuel NiCd et NiMH) pourront<br />
être appelées à tout moment par la pression simultanée<br />
des touches INC et DEC. Par la pression des touches INC<br />
ou DEC, l’affichage s’échange pour la résistance interne,<br />
les tensions séparées d’éléments ou pour la tension d’entrée.<br />
L’affichage des tensions séparées d’éléments sert pour la<br />
vérification des différentes tensions d’éléments (1-6<br />
éléments).<br />
63
64<br />
17. Avertissements d‘erreur<br />
Le chargeur est équipé d’une multitude de réglages de protection et de surveillance pour<br />
le contrôle de chacune des fonctions et de l’électronique de l’appareil. Un dépassement des valeurs<br />
limites conduit dans certains cas à la réduction automatique des réglages de l’appareil (par ex.<br />
courant de charge et de décharge) ou à l’arrêt du processus de charge (par ex. batterie de voiture se<br />
vidant). En cas d’erreur, la cause sera indiquée sur l’affichage. La plupart des causes d’erreur sont<br />
auto-explicatives. Les solutions qui vont suivre seront cependant utiles pour y remédier.<br />
L’avertissement ainsi que le signal acoustique sont réglables avec la touche ‘’ENTER’’.<br />
________________<br />
*****ERREUR*****<br />
________________<br />
Batt. voit. vide<br />
________________<br />
*****ERREUR*****<br />
________________<br />
Mauv. polarité<br />
*****ERREUR*****<br />
________________<br />
________________<br />
Interruption<br />
________________<br />
*****ERREUR*****<br />
________________<br />
Tps.chg. dépassé<br />
*****ERREUR*****<br />
________________<br />
Tension ________________<br />
dépassé<br />
________________<br />
*****ERREUR*****<br />
________________<br />
Tens. trop basse<br />
Cet avertissement apparaît en cas de sous-dépassement<br />
de la tension de la batterie de voiture dans<br />
les réglages de l’utilisateur (Par es. 11,0 V).<br />
Cet avertissement apparaît lorsque l’accu a été connecté<br />
sur le chargeur avec une inversion des polarités.<br />
Cet avertissement est donné lorsqu’une interruption se<br />
produit dans la liaison entre l’accu et le chargeur durant<br />
une charge/décharge.<br />
Si cet avertissement se produit durant le fonctionnement,<br />
cela peut être dû à un contact intermittent.<br />
Note : Cet avertissement d’erreur est aussi donné lorsque<br />
la charge est interrompue par ex. en déconnectant le<br />
cordon de charge.<br />
Si le Timer interne de sécurité de charge intervient, une<br />
interruption du processus en cours se fait par sécurité.<br />
Le Timer de sécurité est réglé fixement sur 180 min. pour<br />
les accus NiCd/NiMH, sur 180 min.pour les accus au<br />
Lithium et il est désactivé pour les accus au plomb ; ces<br />
réglages ne pourront pas être modifiés.<br />
Causes possibles : Courant de charge trop faible ; l’accu<br />
ne sera pas totalement chargé, cordon de charge de trop<br />
faible section et trop long ; le courant de charge ne peut<br />
pas suffisamment passer, capacité de l’accu trop forte.<br />
Cet avertissement apparaît si le chargeur débite une tension<br />
trop élevée, par ex. par un mauvais réglage du nombre<br />
d’éléments au Lithium ou d’un accu au plomb.<br />
En outre, cet avertissement d’erreur peut apparaître en cas<br />
de surcharge des éléments connectés.<br />
Cet avertissement apparaît si le chargeur débite une<br />
tension trop faible, par ex. par un mauvais réglage du<br />
nombre d’éléments au Lithium ou d’un accu au plomb.<br />
La raison de cet avertissement d’erreur est que les<br />
éléments ont été trop profondément déchargés par<br />
un mauvais réglage.
________________<br />
*****ERREUR*****<br />
________________<br />
Tens.bal.dépassé<br />
________________<br />
*****ERREUR*****<br />
________________<br />
T.bal.trop basse<br />
________________<br />
*****ERREUR*****<br />
BALANCER ________________<br />
N. CON.<br />
Si le chargeur envoi une trop haute tension par élément sur<br />
l’entrée du Balancer, il apparaît cet avertissement d’erreur.<br />
Cet avertissement apparaît avec les tensions suivantes :<br />
LiPo > 4,3 V, Lilo > 4,2 V, LiFe > 3,9 V, NiCd/NiMH > 2,0 V<br />
Cet avertissement peut en outre apparaître avec une<br />
surcharge des éléments connectés.<br />
Si le chargeur envoi une trop faible tension par élément sur<br />
l’entrée du Balancer, il apparaît cet avertissement d’erreur.<br />
Cet avertissement apparaît avec les tensions suivantes :<br />
LiPo > 2,75 V, Lilo > 2,75 V, LiFe > 2,0 V, NiCd/NiMH > 0,1 V.<br />
Dans ce cas, il est conseillé de charger l’accu durant<br />
quelques minutes (max. 5 min.) dans le mode de programme<br />
LiFe de façon à ce qu’une tension de 2 V par élément soit<br />
obtenue, sans la connexion du Balancer.<br />
Avertissement : Ceci peut causer une détérioration des<br />
éléments et le pack d’accus devra être chargé<br />
uniquement sous une rigoureuse surveillance. Dès que<br />
la tension est à nouveau suffisamment haute, l’accu<br />
devra absolument être chargé avec la prise du Balancer<br />
connectée, pour des raisons de sécurité (danger<br />
d’explosion et d’incendie !).<br />
Si le programme de décharge NiCd/NiMH est démarré, sans<br />
que la prise du Balancer soit connectée, cet avertissement<br />
apparaîtra.<br />
Su la prise du Balancer est déconnectée durant un<br />
processus de charge ou de décharge, cet avertissement<br />
apparaîtra de même.<br />
65
Ce chargeur travaille sans entretien et nécessite aucune surveillance particulière. Dans votre<br />
propre intérêt, protégez-le cependant de la poussière, des salissures et de l’humidité !<br />
Pour nettoyer le chargeur, déconnectez-le de la batterie de voiture et de l’accu et essuyez-le avec<br />
un chiffon doux et sec (N’utilisez aucun produit de nettoyage !).<br />
66<br />
18. Nettoyage et entretien<br />
19. Conseils pour I‘entretien des accus<br />
La charge des éléments seuls NiCd ou NiMH ou des batteries avec 1…4 éléments déclenche<br />
à temps la coupure automatique, car ici la tension Peak n’est pas très nette et une fonction<br />
impeccable ne peut pas être garantie. La coupure automatique peut ne pas intervenir, ou non<br />
correctement. Pour cette raison, surveiller par <strong>plus</strong>ieurs essais de charge si une coupure peut<br />
se faire impeccablement avec l’accu à charger.<br />
Une batterie tiède délivre davantage de puissance qu’une froide ; il ne faut donc pas s’étonner qu’une<br />
batterie soit moins performante en hiver.<br />
Les surcharges comme les décharges profondes conduisent à une détérioration irréparable des<br />
éléments, elles diminuent la durée de vie et la capacité des accus.<br />
Ne jamais stocker trop longtemps des accus non chargés, vides ou seulement en partie chargés.<br />
Charger les accus avant de les stocker et vérifier leur état de charge de temps en temps.<br />
Lors de l’achat d’un accu, veiller à sa bonne qualité, charger d’abord un accu neuf seulement avec<br />
de faibles courants et ensuite peu à peu avec des courants <strong>plus</strong> forts.<br />
Charger toujours un accu juste avant son utilisation, il délivrera ainsi davantage de puissance.<br />
Ne jamais souder directement sur les accus, car l’augmentation de température détériorera<br />
l’étanchéité et la valve de sécurité des éléments, ils perdront en outre de l’électrolyse, ou elle<br />
séchera et leur capacité sera fortement diminuée.<br />
Les forts courants de charge et de décharge raccourcissent la durée de vie des accus ; respecter<br />
absolument les prescriptions du fabricant des accus.<br />
Les forts courants de charge ne conviennent pas aux accus au plomb ; ne jamais dépasser le<br />
courant de charge indiqué par le fabricant de l’accu.<br />
Protéger les accus des vibrations et ne pas les soumettre à des petites charges mécaniques.<br />
Il peut se produire un dégagement de gaz (Hydrogène) durant la charge et l’utilisation des accus;<br />
veiller à une bonne aération.<br />
Ne jamais mettre les batteries en contact avec l’eau ; Danger d’explosion<br />
Ne jamais mettre les batteries au Lithium en court-circuit ; Danger d’explosion !<br />
Note : Les accus peuvent exploser ou s’enflammer à la suite d’une défectuosité. Pour cette raison,<br />
nous conseillons de charger tous les accus LiPo ainsi que les accus NiCd et NiMH dans un coffret<br />
de sécurité, Réf. N°8370 ou 8371.<br />
Ne jamais ouvrir les éléments des batteries ; Danger de corrosion !<br />
Les packs d’accus NiCd ou NiMH seront cyclés de préférence en déchargeant d’abord séparément<br />
tous les éléments et en rechargeant ensuite le pack d’accus complet. La décharge se fera avec<br />
le chargeur (Elément après élément).<br />
Ne pas s’étonner si un pack d’accus accepte mieux la charge en été qu’en hiver ; un élément froid<br />
n’est pas aussi réceptif au courant qu’un tiède.<br />
Conseil pour le débarras des batteries : Les batteries usagées ne devront pas être jetées dans<br />
une poubelle domestique. Le détaillant chez qui la batterie a été achetée est obligé de tenir à<br />
disposition un container pour la récupération des batteries usagées en vue de leur recyclage.
20. Caractéristiques techniques<br />
Accu:<br />
Courant de charge / Puissance 100 mA jusqu à 5,0 A / max. 50 W avec courant sector 100~240V AC<br />
100 mA jusqu à 5,0 A / max. 50 W avec courant sector 11...15V DC<br />
Accus NiCd et NiMH:<br />
Nombre d‘éléments 1 - <strong>14</strong> éléments<br />
Capacité<br />
Accus au Lithium:<br />
à partir de 0,1 Ah jusqu à 8,0 Ah<br />
Nombre d‘éléments 1-6 éléments<br />
Tension des éléments 3,3 V (LiFe), 3,6 V (LiIo) et 3,7 V (LiPo/LiMn)<br />
Capacité<br />
Accus Pb:<br />
ab 0,05 Ah jusqu à 8,0Ah<br />
Nombre d‘éléments 1, 2, 3, 6<br />
Tension des accus 2, 4, 6, 12 V<br />
Capacité à partir de 1 Ah<br />
Particularités:<br />
Plage de tensions d‘alimentation DC 11,0 jusqu à 15 V<br />
Plage de tensions d‘alimentation AC 100~240V<br />
Batterie de voiture nécessaire 12 V, 30 Ah min.<br />
Batterie de voiture nécessaire 12-<strong>14</strong>V, min. 8,5 A stabilisé 1)<br />
Consommation à vide env. 0,1 A<br />
Coupure en sous-tension, env. 11,0 V<br />
Raccordement Balancer 1…6 Eléments NiMH/NiCd/LiPo/LiFe<br />
Courant max. Balancer, env. NiMH/NiCd : 0,1 A, iPo/Lilo/LiFe : 0,3 A<br />
Poids, env. 600 g<br />
Dimensions (Lxlxh) <strong>14</strong>8 x <strong>14</strong>6 x 54 mm<br />
1) Toutes les données sont calculées sur une tension de batterie de voiture de 12,7 V<br />
Les valeurs indiquées sont des valeurs indicatives qui peuvent varier en fonction de l’état de l’accu utilisé, de la température, etc…<br />
Indications quant à la protection de l’environnement<br />
Ce produit à la fin de sa durée de vie ne doit pas être mis à la poubelle, mais être remis à une<br />
collecte pour le recycle ment d’appareils électriques et électroniques. Le symbole inscrit sur le<br />
produit, dans la notice d’instructions et sur son emballage l’indique.<br />
Les matériaux selon leurs reconnaissances sont réutilisables. Avec le recyclage de matériaux et<br />
autres formes d’appareils, vous contribuez à la protection de l’environnement.<br />
Les batteries et accus doivent être retirés de l’appareil et doivent être remis à un dépôt<br />
homologué pour ce type de produits.<br />
Pour les modèles radiocommandés, les pièces électroniques, comme par exemple les servos,<br />
récepteur ou variateur de vitesse, doivent être démontés et retirés du produit et être remis à<br />
une collecte spécialisée pour produits électroniques.<br />
Veuillez s.v.p. demander auprès de votre mairie l’adresse exacte du point de récupération le <strong>plus</strong><br />
proche de chez vous.<br />
67
68<br />
INSTRUZIONI PER L`USO<br />
<strong>ULTRAMAT</strong> <strong>14</strong> <strong>plus</strong><br />
Caricabatterie di grandi prestazioni, rapido, computerizzato<br />
per la carica di celle NiCd / NiMH,<br />
LiPo / LiIo / LiMn / LiFe e al Piombo<br />
Corrente di carica fino a 5 A ,<br />
tensione d’ingresso 11...15V AC<br />
Equilibratore integrato per accumulatori<br />
al Litio ed accumulatori NiMH/NiCd<br />
Art. n. 6464<br />
tensione d’ingresso 100~240V AC<br />
G R A U P N E R GmbH & Co. KG D - 7 3 2 3 0 K I R C H H E I M / T E C K G E R M A N Y<br />
Nessuna responsabilità per errori di stampa! Ciriserviamo la possibilità di apportare modifiche!<br />
PN.MF-01
Indice<br />
Capitolo Pagina<br />
1 11.<br />
1 Generalità Generalità<br />
69<br />
69<br />
2. 2. Precauzioni Precauzioni e e avvertenze avvertenze per per per la la sicurezza sicurezza sicurezza<br />
70<br />
70<br />
3. 3. 3. Notizie Notizie Notizie generali generali per per il il funzionamento funzionamento<br />
71 71<br />
71<br />
4. 4. Cavi Cavi di di ricarica ricarica consigliati, consigliati, polarità polarità<br />
72 72<br />
72<br />
5. 5. Componenti Componenti Componenti del del caricabatterie, caricabatterie, utilizzo, utilizzo, utilizzo, avvio avvio della della della carica carica<br />
72<br />
72<br />
6. 6. 6. Programmi Programmi di di carica carica e e e scarica scarica<br />
73<br />
73<br />
7. 7. Struttura del programma<br />
programma programma<br />
73 73<br />
73<br />
8. 8. Scelta Scelta del del gruppo gruppo gruppo di di di programmi programmi di di carica carica<br />
74<br />
74<br />
9. 9. Prima Prima di di cominciare<br />
cominciare cominciare<br />
74<br />
74<br />
10. 10. Avvio Avvio del del processo processo di di di carica carica / / scarica scarica<br />
75<br />
75<br />
11. 11. Programmi Programmi Programmi di di carica carica per per accumulatori accumulatori accumulatori al al Nichel-Cadmio Nichel-Cadmio (NiCd) (NiCd) 76<br />
76<br />
12. 12. Programmi Programmi di di carica carica carica per per per accum. accum. al al Nichel-Idrato Nichel-Idrato di di metallo metallo (NiMH) (NiMH) 78<br />
78<br />
13. 13. Programmi Programmi di di carica carica carica per per accumulatori accumulatori agli agli ioni ioni di di litio litio (LiIo) (LiIo) /<br />
/<br />
<strong>14</strong>. <strong>14</strong>.<br />
polimeri polimeri di di litio litio (LiPo) (LiPo) / / LiMn LiMn / / LiFePO<br />
LiFePO (LiFe) (LiFe) (LiFe)<br />
4 4<br />
Programmi Programmi di di carica carica per per accumulatori accumulatori al al piombo piombo (Pb) (Pb)<br />
81<br />
81<br />
83<br />
83<br />
15. 15. Indicazioni Indicazioni del del del display, display, Indicazioni Indicazioni dei dei dei dati dati del del ciclo ciclo<br />
85<br />
85<br />
16. 16. Indicazioni Indicazioni di di controllo controllo sul sul display display Visualizzazione Visualizzazione delle delle tensioni<br />
tensioni<br />
delle delle singole singole celle celle<br />
85<br />
85<br />
17. 17. Segnalazioni Segnalazioni Segnalazioni di di di errore errore e e avvertenze avvertenze<br />
87<br />
87<br />
18. 18. Pulizia Pulizia e e e manutenzione manutenzione<br />
89<br />
89<br />
19. Consigli Consigli sul sul trattamento trattamento degli degli accumulatori accumulatori<br />
90<br />
90<br />
20. 20. Caratteristiche Caratteristiche tecniche tecniche<br />
67<br />
67<br />
Certificato Certificato di di garanzia garanzia<br />
copertina<br />
copertina<br />
1. Notizie generali<br />
Per Per poter poter utilizzare utilizzare il il vostro vostro nuovo nuovo caricabatterie caricabatterie al al massimo massimo massimo delle delle sue sue potenzialità,<br />
potenzialità,<br />
prima prima di di mettere mettere in in funzione funzione l’apparecchio l’apparecchio l’apparecchio leggete leggete attentamente attentamente queste queste descrizioni.<br />
descrizioni.<br />
Osservate Osservate soprattutto soprattutto le le precauzioni precauzioni e e le le avvertenze avvertenze per per la la sicurezza. sicurezza. Queste Queste istruzioni<br />
istruzioni<br />
devono devono essere essere essere conservate conservate in in un un un posto posto sicuro sicuro e e consegnate consegnate ad ad un un un eventuale eventuale eventuale successivo<br />
successivo<br />
successivo<br />
utente utente utente del del caricabatterie.<br />
caricabatterie.<br />
Con l’<strong>ULTRAMAT</strong> <strong>14</strong> <strong>plus</strong> siete venuti in possesso di un prodotto completo con caratteristiche<br />
eccezionali.<br />
Con l’utilizzo della più moderna tecnologia elettronica e di un microprocessore RISC è stato<br />
possibile ottenere eccezionali prestazioni per la ricarica, semplicità di utilizzo e una completa<br />
affidabilità, riscontrabili solo in apparecchi notevolmente più costosi.<br />
Con l’<strong>ULTRAMAT</strong> <strong>14</strong> <strong>plus</strong> potrete ricaricare quasi tutti gli accumulatori usati dai modellisti al<br />
nichel cadmio (NiCd) sinterizzati, al nichel metal idrato (NiMH), ai polimeri di litio (LiPo), ai<br />
LiFePO (LiFe), agli ioni di litio (LiIo), al litio-biossido di manganese (LiMn) e al piombo con gel o<br />
4<br />
acido. Questi accumulatori a tenuta di gas sono preferiti per l’utilizzo nel modellismo radiocomandato.<br />
Hanno una struttura robusta, non risentono della posizione e dei radiodisturbi. Per la<br />
conservazione non richiedono particolari precauzioni ad eccezione di non lasciarli scaricare<br />
completamente. Infine con l’<strong>ULTRAMAT</strong> <strong>14</strong> <strong>plus</strong> è possibile scaricare e formattare gli accumulatori.<br />
Avvertenza<br />
Avvertenza<br />
Osservate sempre le indicazioni del produttore dell’accumulatore e rispettate la corrente ed il<br />
tempo della carica. E’ possibile eseguire un carica rapida solo per gli accumulatori espressamente<br />
adatti a sopportare questa forte corrente di carica! Tenete presente che gli accumulatori<br />
nuovi raggiungono la loro piena capacità solo dopo parecchi cicli di carica / scarica ed il<br />
processo di carica può essere interrotto prima del tempo previsto. Eseguite parecchi test per<br />
monitorare la sicura ed affidabile funzione dello spegnimento automatico del processo di carica<br />
e del raggiungimento della completa capacità.<br />
69
70<br />
2. Precauzioni e avvertenze per la sicurezza<br />
Proteggete Proteggete il il caricabatterie caricabatterie caricabatterie dalla dalla sporcizia, sporcizia, dall’umidità, dall’umidità, dalla dalla pioggia, pioggia, dal dal calore calore intenso intenso (per<br />
(per<br />
es. es. dall’esposizione dall’esposizione diretta diretta ai ai raggi raggi del del sole) sole) e e dalle dalle vibrazioni. vibrazioni. vibrazioni. Usatelo Usatelo solamente solamente in in ambienti<br />
ambienti<br />
asciutti!<br />
asciutti!<br />
Il caricabatterie non è adatto a ragazzi sotto i <strong>14</strong> anni. Non è un giocattolo!<br />
Le griglie sull’involucro servono per il raffreddamento dell’apparecchio e non devono esser coperte<br />
od ostruite. Il caricabatterie durante il funzionamento dev’essere libero da ingombri in modo che l’aria<br />
possa circolare liberamente.<br />
Il caricabatterie è adatto ad essere collegato DC ad una batteria per auto a 12 V DC o tensione<br />
d’ingresso 100~240V AC . Non devono essere apportati cambiamenti di nessun tipo al caricabatterie.<br />
Durante il funzionamento, il caricabatterie deve esser posto su un ripiano di materiale non infiammabile,<br />
resistente al calore ed isolante elettrico! Non sistematelo direttamente sui sedili dell’automobile, sui<br />
tappetini o simili! Allontanate anche tutti gli oggetti infiammabili e assicurate una buona ventilazione.<br />
Accumulatori a causa di un difetto possono esplodere oppure incendiarsi!<br />
Collegate il caricabatterie alla batteria dell’automobile direttamente con il cavo di alimentazione e le<br />
pinze di collegamento originali. Il motore del veicolo, finché il caricabatterie <strong>ULTRAMAT</strong> 16 è collegato,<br />
dev’essere spento. La batteria dell’automobile, durante questo tempo, non dev’essere caricata da<br />
un altro caricabatterie!<br />
Le uscite ed i cavi per la ricarica non devono essere cambiati o collegati tra di loro in qualsiasi modo.<br />
Tra le uscite del caricabatterie e la carozzeria dell’automobile sussiste, durante il funzionamento, il<br />
pericolo di cortocircuito! Durante il processo di ricarica, i cavi di carica e di collegamento non devono<br />
essere arrotolati. Evitate cortocircuiti tra le uscite del caricabatterie o i cavi di ricarica e la carrozzeria<br />
dell’automobile. Non sistemate perciò l’apparecchio direttamente sulla carozzeria dell’automobile.<br />
Non lasciate mai il caricabatterie senza controllo mentre è collegato all’alimentazione.<br />
All’uscita del caricabatterie può essere collegato un solo accumulatore da ricaricare.<br />
Non devono essere collegati al caricabatterie i seguenti accumulatori:<br />
- Accumulatori NiCd / NiMH con più di <strong>14</strong> celle. Accumulatori agli ioni di LiFePO (LiFe) / LiMn / litio /<br />
4<br />
polimeri di litio con più di 6 celle o batterie al piombo con più di 12 V di tensione nominale.<br />
- Accumulatori che necessitano una tecnica di ricarica diversa da quella prevista per gli accumulatori<br />
NiCd / NiMH, al Litio o al Piombo.<br />
- Accumulatori o celle difettosi o danneggiati.<br />
- Accumulatori disposti in parallelo o celle di tipo diverso<br />
- Celle nuove assieme a celle usate o celle di diversa fabbricazione.<br />
- Accumulatori non ricaricabili (batterie a secco). Attenzione: possono esplodere!<br />
- Accumulatori o celle che, da indicazione del produttore, non sono adatti alla corrente di carica<br />
fornita da questo caricabatterie.<br />
- Accumulatori già carichi o caldi o non completamente scarichi.<br />
- Accumulatori o celle che hanno un dispositivo di ricarica o di disinserimento integrato.<br />
- Accumulatori o celle che sono inseriti in altri apparecchi o collegati con altri dispositivi elettrici.<br />
- Per evitare cortocircuiti con le spine a banana dei cavi di ricarica, collegate prima il cavo di ricarica<br />
con il caricabatterie e dopo con l’accumulatore. Procedimento inverso per disconnettere<br />
l’accumulatore.<br />
Accertatevi, dopo che l’accumulatore è stato completamente ricaricato, che la quantita di carica indicata<br />
dal caricabatterie corrisponda a quella da voi calcolata. Così potrete riconoscere in modo affidabile<br />
e in tempo utile uno spegnimento anticipato. Questo può dipendere da molti fattori, ma soprattutto<br />
con accumulatori completamente scarichi, con piccolo numero di celle, o con determinati tipi di<br />
accumulatori.<br />
Fate parecchi test di prova (soprattutto co un piccolo numero di celle) per assicurarvi sull’affidabilità<br />
della funzione di spegnimento automatico. Tra l’altro, un accumulatore completamente carico non è<br />
riconoscibile con un basso valore di picco.<br />
Prima di una ricarica chiedetevi: è stato impostato il programma di carica adatto all’accumulatore, la<br />
corrente di carica / scarica, e la corretta tensione di spegnimento, importante per gli accumulatri al NiCd<br />
/ NiMH? Sono affidabili, senza falsi contatti, tutti i collegamenti? La ricarica rapida di un accumulatore<br />
può essere pericolosa. Un’interruzione, anche breve, a causa di un falso contatto provoca<br />
immancabilmente un errore nella funzione, può far ripartire il processo di ricarica e sovraccaricare<br />
l’accumulatore.
3. Notizie generali per funzionamento<br />
Carica degli accumulatori<br />
Nel processo di carica, all’accumulatore viene fornita una detrminata quantità di corrente,<br />
risultante dal prodotto della corrente di carica per il tempo di carica. La massima corrente di<br />
carica ammessa dipende dal tipo di accumulatore ed è comunicata nei dati tecnici del<br />
produttore. Solamente per gli accumulatori espressamente indicati come idonei per la carica<br />
rapida può essere superata la normale corrente di carica. Come NORMALE CORRENTE DI<br />
CARICA si intende 1/10 del valore nominale della capacità (per es. per una capacità indicata di<br />
1.7 Ah, la normale corrente di carica sarà di 170 mA).<br />
L’accumulatore da ricaricare dev’essere collegato con un cavo di carica adatto alle prese del<br />
caricabatterie (rosso = polo positivo, nero = polo negativo).<br />
Seguite sempre le indicazioni per la ricarica fornite dal produttore, sia per la corrente che per il<br />
tempo di ricarica. Si può eseguire una carica rapida solo per gli accumulatori espressamente<br />
adatti alle alte correnti di carica che questo caricacabatterie può fornire.<br />
Gli accumulatori nuovi raggiungono la loro completa capacità appena dopo parecchi cicli di<br />
carica / scarica. Per questi accumulatori e per quelli completamente scarichi, si può avere uno<br />
spegnimento anticipato del processo di ricarica.<br />
Se dopo aver completato un ciclo di ricarica rapida, una cella di un accumulatore al NiCd<br />
dovesse essere particolarmente calda, può darsi che questa cella sia difettosa. Questo pacco<br />
di batterie non dev’essere più usato (dev’essere eliminato nei contenitori per rifiuti speciali!).<br />
Controllate attentamente i collegamenti di tutti gli spinotti e delle pinze. Anche una breve<br />
interruzione del processo di carica per un falso contatto può far iniziare di nuovo il processo di<br />
ricarica e quindi sovraccaricare l’accumulatore.<br />
Una frequente causa di malfunzionamento è l’uso di cavi di ricarica non appropriati. Poiché il<br />
caricabatterie non è in grado di distinguere tra la resistenza interna dell’accumulatore, quella dei<br />
cavi e quella degli spinotti di collegamento, il primo presupposto per un funzionamento senza<br />
possibilità di errori è l’uso di cavi di ricarica con una sezione sufficiente ed una lunghezza di non<br />
più di 30 cm e spinotti con contatti dorati.<br />
Ricarica di accumulatori della trasmittente<br />
Un accumulatore inserito in una trasmittente può essere ricaricato attraverso la presa integrata<br />
nella trasmittente. La presa per la ricarica sulla trasmittente è provvista, nella maggior parte dei<br />
casi, di una protezione contro le correnti inverse (diodo). Ciò impedisce alla trasmittente di<br />
danneggiarsi in caso di inversione della polarità o di cortocircuiti con i terminali scoperti degli<br />
spinotti di ricarica. La ricarica dell’accumulatore della trasmittente con l’<strong>ULTRAMAT</strong> <strong>14</strong> <strong>plus</strong> è<br />
possibile solo bypassando tali protezioni. Seguite scrupolosamente le istruzioni della trasmittente!<br />
Non dev’essere mai superata la massima corrente di ricarica permessa per la trasmittente.<br />
Per evitare che l’elettronica della trasmittente si danneggi per il forte riscaldamento ed il ristagno<br />
del calore, l’accumulatore della trasmittente dovrebbe essere estratto dal contenitore della<br />
trasmittente. Durante il processo di ricarica la trasmittente dev’essere spenta! Non accendete mai<br />
la trasmittente durante il processo di ricarica. Anche una breve interruzione del processo di<br />
ricarica può provocare un aumento della tensione di ricarica del caricabatterie, che rovina<br />
irrimediabilmente la trasmittente. Non eseguite il processo di scarica dell’accumulatore o un<br />
programma di manutenzione dell’accumulatore attraverso le prese di ricarica! Queste non sono<br />
adatte per questo impiego.<br />
Il caricabatterie imposta la corrente di carica / scarica richiesta solo se questa non supera la sua<br />
capacità tecnica! Se viene impostata una corrente di carica / scarica che il caricabatterie<br />
tecnicamente non può sopportare, questo valore viene automaticamente ridotto al massimo valore<br />
ammissibile e sul display compare, alternativamente alla corrente di carica, la scritta „MAX“.<br />
71
Esclusione della responsabilità<br />
L’osservanza delle istruzioni per il funzionamento ed il metodo d’installazione, utilizzoe manutenzione<br />
non possono essere da noi controllati. Perciò la ditta <strong>Graupner</strong> declina ogni responsabilità<br />
per perdite, danni o costi derivanti da un utilizzo o un funzionamento errato o ad essi conseguenti.<br />
72<br />
4. Cavi di ricarica consigliati, polarità<br />
Esigenze diverse nell’uso e nella connessione degli accumulatori ricaricabili richiedono anche<br />
spinotti di collegamento diversi. Fate attenzione che collegamenti, descrizioni, polarità di cavi di<br />
altri fornitori differiscono tra di loro. Utilizzate perciò solamente spinotti originali <strong>Graupner</strong> che si<br />
adattino fra di loro. Per la ricarica sono idonei i seguenti cavi:<br />
Japan<br />
Order No. 3371<br />
Usate solamente cavi di ricarica originali con sufficiente sezione.<br />
5. Componenti del caricabatterie, utilizzo, avvio della carica<br />
Pinze per<br />
tensione<br />
d‘ingresso<br />
11...15V DC<br />
Pinze per batteria<br />
automobile<br />
Prese per la carica<br />
dell‘accumulatore<br />
Il funzionamento del caricabatterie si effettua con solo quattro tasti di servizio.<br />
Oltre ai tasti –DEC e +INC, con i quali vengono variati i valori della corrente e della tensione, ci<br />
sono i tasti di servizio che, se un accumulatore è o non è collegato, svolgono ciascuno funzioni<br />
diverse:<br />
Tasto<br />
Nessun accum.<br />
collegato<br />
Accumulatore<br />
collegato<br />
+<br />
G2 (AMP/G2,5)<br />
Order No. 3011<br />
Display<br />
MODALITA´/ PROGRAMMA<br />
MODALITA´/ PROGR. 2s.<br />
ENTER / START<br />
ENTER / START<br />
-<br />
Connessione<br />
equilibratore per<br />
<strong>Graupner</strong> LiPo<br />
ENTER / START 2s.<br />
BEC<br />
Order No. 3037<br />
Funzione<br />
JR<br />
Order No. 3021<br />
Tasti per il<br />
funzionamento<br />
Scelta del programma di carica e sottogruppo<br />
Scelta del gruppo di programmi (di carica)<br />
Conferma di una impostazi<br />
Pinze per<br />
tensione d’ingresso<br />
100~240V AC<br />
Fine della carica, stop del cicalino,<br />
cambio fra sottogruppi<br />
Inizio della carica<br />
JR-Sender<br />
Order No. 3022
6. Programmi carica<br />
Le diverse possibilità del caricabatterie sono ripartite in due gruppi di programmi, che potete<br />
scegliere con il tasto MODE (tener premuto per 2 sec.) nella seguente sequenza.<br />
Programmi per accumulatori NiCd: carica, equilibratura.<br />
Programmi per accumulatori NiMH: carica, equilibratura.<br />
Programmi per accumulatori LiPo / LiIo / LiFe: carica o per la selezione delle celle.<br />
Programmi per accumulatori al piombo: carica, carica di mantenimento per il funzionamento<br />
stand by.<br />
NiCd<br />
Programma<br />
AUTOMATICC<br />
MODE<br />
(2 sec.)<br />
NiMH<br />
Programma<br />
AUTOMATICC<br />
MODE<br />
(2 sec.)<br />
Pb<br />
Programma<br />
MANUALE<br />
MODE<br />
(2 sec.)<br />
7. Struttura del programma<br />
NiCd<br />
Programma<br />
MANUALE<br />
NiMH<br />
Programma<br />
MANUALE<br />
NiCd<br />
∆ ∆ Delta-peak<br />
Tens.riferim<br />
MODE MODE MODE MODE<br />
Progr. con<br />
equilibratura<br />
MODE (2 sec.)<br />
NiMH<br />
∆ ∆ Delta-peak<br />
Tens.riferim<br />
MODE MODE MODE MODE<br />
Progr. con<br />
equilibratura<br />
MODE (2 sec.)<br />
Lithium MODE Lithium MODE<br />
Programma<br />
Scelta del tipo<br />
MANUALE<br />
MODE<br />
accumulatore<br />
(2 sec.) MODE (2 sec.)<br />
NiCd<br />
NiMH<br />
73
74<br />
NiCd<br />
Programma<br />
AUTOMATICC<br />
MODE (2 sec.)<br />
NiMH<br />
Programma<br />
AUTOMATICC<br />
MODE (2 sec.)<br />
Lithium<br />
Programma<br />
MANUALE<br />
MODE (2 sec.)<br />
Pb<br />
Programma<br />
MANUALE<br />
MODE (2 sec.)<br />
8. Scelta del gruppo del programma di carica<br />
MODE<br />
MODE<br />
MODE<br />
Le possibilità di carica e scarica dell’<strong>ULTRAMAT</strong> <strong>14</strong> <strong>plus</strong> sono<br />
suddivise in modo chiaro e logico in quattro gruppi di programmi.<br />
Per i diversi tipi di accumulatori : Nichel-Cadmio, Nichel-Metal Idrato,<br />
Ioni di litio / Polimeri di litio / LiFePO (LiFe) e Piombo c’è a<br />
4<br />
disposizione un proprio gruppo di programmi.<br />
Un ulteriore gruppo di programmi comprende le possibilità di impostazione<br />
individuali del caricabatterie.<br />
Cambio del programma:<br />
Finché l’apparecchio si trova in un gruppo di programmi di<br />
carica,non è possibile passare da un programma di carica al<br />
successivo.<br />
Per passare da un gruppo di programmi al successivo, bisogna<br />
premere il tasto MODE per ca. due secondi. Per passare da un<br />
programma al successivo all’interno del gruppo, esercitare un<br />
breve pressione sul tasto MODE.<br />
9. Prima di cominciare<br />
Dopo aver collegato l’ingresso 100 ~ 240V AC ad una presa di rete o l’ingresso 12V DC ad una<br />
batteria per auto o ad un alimentatore 11 … 15V DC di almeno 8,5 A, premete<br />
contemporaneamente i tasti INC e DEC per accedere alla scelta della lingua. Altrimenti viene<br />
visualizzata la routine di informazioni sulle principali impostazioni utente dell’apparecchio. Sul<br />
display appaiono in sequenza le seguenti indicazioni:<br />
INC DEC<br />
Mentre provvedete sull’apparecchio la tensione<br />
LANGUAGE ________________<br />
SELECT<br />
GERMAN ________________<br />
d’ingresso, premete i tasti INC e DEC per accedere alla<br />
scelta della lingua. Premete i tasti INC o DEC per<br />
scegliere la lingua INGLESE, TEDESCA o FRANCESE.<br />
ENTER<br />
Uscite da questa scelta con il tasto ENTER.<br />
________________<br />
<strong>Graupner</strong><br />
________________<br />
U L T R A M A T <strong>14</strong> <strong>plus</strong><br />
L’<strong>ULTRAMAT</strong> <strong>14</strong> <strong>plus</strong> si presenta con il suo nome.<br />
Il Timer di sicurezza è impostato , per gli accumulatori al<br />
3 sec.<br />
NiCd/NiMH e al Litio a 180 min., mentre per gli accu-<br />
Sicherheitstimer<br />
________________ mulatori al piombo è disattivato.<br />
ein ________________ Funzione on (ein = aperto) o off (aus = spento) con une<br />
3 sec.<br />
breve pressione il tasti DEC o INC.<br />
Summer ________________ Funzione cicalino on (ein = aperto) o off (aus = spento)<br />
ein ________________<br />
con une breve pressione il tasti DEC o INC.<br />
Il caricabatterie è pronto per l’impiego.
3 sec.<br />
LiPo-Manuell<br />
________________<br />
L:2.5A ________________<br />
2000mAh<br />
START<br />
2<br />
sec.<br />
VERMESSE ________________<br />
AKKU<br />
BITTE ________________<br />
WARTEN...<br />
2<br />
sec.<br />
Man. ________________<br />
23:40 00863<br />
LP+2.50A ________________<br />
<strong>14</strong>.017V<br />
10. Avvio dei processi di carica<br />
Per la carica, la scarica e la formattazione scegliete il<br />
programma desiderato come descritto in seguito e<br />
impostate i valori adatti.<br />
Informazione equilibratore collegato Equilibratore non<br />
collegato.<br />
Collegate, se presente, il connettore per l’equilibratura<br />
dell’accumulatore all’ingresso equilibratore (Input<br />
Balancer).<br />
Fate attenzione ad osservare la corretta polarità.<br />
Da destra a sinistra: (Pin 1 (GND): Massa = Accu. - ,<br />
Pin 2 (1): + Cella 1, Pin 3 (2): + Cella 2, Pin 4 (3): + Cella 3,<br />
Pin 5 (4): + Cella 4, Pin 6 (5): + Cella 5, Pin 7 (6): + Cella 6)<br />
Collegate successivamente, mediante l’impiego di un cavo<br />
per la ricarica ed osservando la corretta polarità, il<br />
connettore a 2 poli dell’accumulatore all’uscita del<br />
caricabatterie - BATTERY +.<br />
Se tenete premuto il tasto START per ca. 2 sec., vi verrà<br />
indicato se l’equilibratore risulta essere collegato o meno.<br />
Con l’equilibratore collegato è possibile visualizzare le<br />
tensioni delle singole celle, 16..<br />
**INFORMATION***<br />
________________ **INFORMATION***<br />
________________<br />
BALANCER ________________<br />
ANG. BALANCER ________________<br />
N. ANG.<br />
2<br />
sec.<br />
!Attenzione ! Dovete<br />
assolutamente<br />
impostare il numero<br />
di celle corretto e<br />
verificare il tipo di<br />
accumulatore, onde<br />
evitare che<br />
l’accumulatore<br />
possa esplodere ed<br />
incendiarsi!<br />
VERMESSE ________________<br />
AKKU<br />
BITTE ________________<br />
WARTEN...<br />
________________<br />
**LiPo Zellen**<br />
________________<br />
3 Zellen(13.73V)<br />
+ -<br />
INC DEC<br />
START<br />
2<br />
sec.<br />
2<br />
sec.<br />
Nel caso di accumulatori tipo Litio, in<br />
assenza di una connessione per<br />
l’equilibratura, verrà eseguito il<br />
rilevamento del numero di celle.<br />
Quest’ultimo dovrà essere confermato<br />
mediante pressione del tasto START.<br />
Se premete il tasto START ancora<br />
una volta, l’accumulatore collegato<br />
verrà caricato oppure scaricato.<br />
Mediante un’ulteriore breve pressione sul tasto START<br />
potete interrompere il processo di ricarica in qualsiasi<br />
momento.<br />
Nota: Se il processo di ricarica viene interrotto<br />
tramite il tasto START, tutti i parametri sul display<br />
vengono cancellati in maniera irrevocabile.<br />
75
76<br />
NiCd<br />
Programma<br />
AUTOMATICC<br />
11. Programmi NiCd<br />
Programmi semplici da usare per la carica degli accumulatori NiCd solitamente usati nel modellismo.<br />
Quando il programma di carica è concluso, sul display appare, fino allo scollegamento<br />
dell’accumulatore, alternativamente con la scritta „ENDE“ (fine), il tempo di carica, gli ultimi valori<br />
della corrente di carica, la capacità e la tensione dell’accumulatore. Questi dati danno, in questo<br />
caso, indicazioni preziose ed esaurienti sull’andamento della carica, sulla capacità<br />
dell’accumulatore NiCd collegato o su errori verificatisi.<br />
NiCd-Automatik<br />
________________<br />
L:2.5A ________________<br />
begrenzt<br />
+ -<br />
INC DEC<br />
NiCd-Manuell<br />
________________<br />
________________<br />
L:2.5A<br />
+ -<br />
INC DEC<br />
NiCd<br />
Programma<br />
MANUALE<br />
NiCd<br />
NiCd<br />
∆ ∆ Delta-peak<br />
Tens.riferim<br />
MODE MODE MODE MODE<br />
Progr. con<br />
equilibratura<br />
NiCd-Programma automatico<br />
In questo programma il caricabatterie riconosce il tipo di<br />
accumulatore collegato e adegua la corrente di carica<br />
corretta, in modo da evitare un sovraccarico<br />
dell’accumulatore. La corrente di carica massima<br />
può essere impostata con i tasti INC / DEC prima di collegare<br />
l’accumulatore da 0.1 a 5.0 A senza limitazioni.<br />
Il processo di carica termina in accordo con i valori impostati<br />
per la tensione di spegnimento del delta peak.<br />
NiCd-Programma manuale<br />
Con questo programma potete caricare il vostro accumulatore<br />
con la corrente impostata. La corrente massima<br />
può essere impostata prima di collegare l’accumulatore<br />
con i tasti INC / DEC da 0.1 a 5.0 A.<br />
Il processo di carica termina in accordo con i valori impostati<br />
per la tensione di spegnimento del delta peak.
NiCd Balancerspannung (Programma Tensione equilibratore)<br />
NiCd ________________<br />
Balancer-<br />
________________<br />
spannung = 1.20V<br />
START<br />
2<br />
sec.<br />
+ -<br />
INC DEC<br />
**INFORMATION***<br />
________________<br />
BALANCER ________________<br />
ANG.<br />
2<br />
sec.<br />
________________<br />
BLC 28:30 0<strong>14</strong>25<br />
NC+0.00A ________________<br />
07.717V<br />
NiCd ________________<br />
Delta-Peak-<br />
________________<br />
Volt =10mV/Zelle<br />
Questo programma serve per equilibrare le tensioni delle<br />
singole celle di pacchi batterie con 2-6 celle.<br />
Mediante il tasto INC oppure DEC potete impostare la<br />
tensione limite di scarica dell’equilibratore tra 1.20...1.30V.<br />
Specialmente dopo un periodo di riposo prolungato,<br />
un’accumulatore dovrebbe essere equilibrato.<br />
Per fare ciò è necessario collegare il connettore<br />
dell’equilibratore.<br />
Inoltre tutte le celle devono presentare una tensione<br />
superiore a quella impostata come soglia limite di scarica<br />
per l’equilibratore.<br />
Per ottenere la capacità mass. di un’accumulatore le<br />
singole celle dovrebbero essere scaricate fino a<br />
raggiungere una tensione di 1.20V alcune ore, ma al<br />
massimo 24h prima di una nuova ricarica. Con una<br />
tensione inferiore a 1.20V le celle perdono capacità. Per<br />
questo motivo un’accumulatore dovrebbe essere carico al<br />
60% ca. prima di essere messo a riposo per un periodo<br />
prolungato.<br />
Celle con una tensione di cella superiore, vengono<br />
scaricate con una corrente aggiuntiva di ca. 100mA<br />
(equilibratura).<br />
Se tutte le celle hanno raggiunto la soglia limite di scarica<br />
dell’equilibratore (+0.01V), il processo di equilibratura<br />
viene terminato.<br />
NiCd-Tensione di riferimento (-∆ Peak)<br />
+ -<br />
INC DEC<br />
Lo spegnimento automatico del processo di carica (riconoscimento di accumulatore completamente<br />
carico) funziona secondo il principio del delta peak, già provato milioni di volte e noto anche<br />
come delta-U o delta-V. In questo procedimento viene valutata la tensione massima della<br />
curva di carica, che indica con molta precisione la massima carica immagazzinata.<br />
Onde evitare di sovraccaricare l’accumulatore vi consigliamo di iniziare con una tensione di<br />
spegnimento Delta-Peak di 10mV.<br />
Tensiore delle celle<br />
Tempo di carica<br />
77
Programmi semplici da usare per la carica degli accumulatori NiMH solitamente usati nel modellismo.<br />
Quando il programma di carica è concluso, sul display appare, fino allo scollegamento<br />
dell’accumulatore, alternativamente con la scritta „ENDE“ (fine), il tempo di carica, gli ultimi valori<br />
della corrente di carica, la capacità e la tensione dell’accumulatore. Questi dati danno, in questo<br />
caso, indicazioni preziose ed esaurienti sull’andamento della carica, sulla capacità dell’ accumulatore<br />
NiMH collegato o su errori verificatisi.<br />
________________<br />
NiMH-Automatik<br />
L:2.5A ________________<br />
begrenzt<br />
+ -<br />
INC DEC<br />
78<br />
NiMH<br />
Programma<br />
AUTOMATICC<br />
NiMH<br />
Programma<br />
MANUALE<br />
12. Programmi NiMH<br />
NiMH<br />
NiMH<br />
∆ ∆ ∆ Delta-peak<br />
Tens.riferim<br />
MODE MODE MODE MODE<br />
Progr. con<br />
equilibratura<br />
NiMH-Programma automatico<br />
In questo programma il caricabatterie riconosce il tipo<br />
di accumulatore collegato e adegua la corrente di carica<br />
adatta, in modo da evitare una sovraccarica all’ accumulatore.<br />
La corrente di carica può essere impostata con i tasti<br />
INC / DEC da 0.1 A a 5.0 A senza limitazioni, prima di<br />
collegare l’accumulatore.<br />
Osservate le indicazioni del produttore dell’accumulatore!<br />
Evitate assolutamente di ricaricare gli accumulatori con più<br />
di 2C!<br />
Es.: NiMH 6N-4200, corrente di carica mass. 8,4A, corrente<br />
di carica veloce consigliata per accumulatori <strong>Graupner</strong> 4,2A.<br />
La corrente di carica per gli accumulatori delle trasmittenti<br />
deve essere limitata a 2A mass.!<br />
Il processo di carica termina in accordo con i valori<br />
impostati per la tensione di spegnimento del delta peak.
NiMH-Manuell<br />
________________<br />
________________<br />
L:2.5A<br />
+ -<br />
INC DEC<br />
NiMH-Programma manuale<br />
Con questo programma l’accumulatore viene<br />
caricato con la corrente di carica impostata.<br />
La corrente di carica massima può essere impostata<br />
con i tasti INC / DEC da 0.1 A a 5.0 A<br />
prima di collegare l’accumulatore.<br />
Il processo di carica termina in accordo con i valori<br />
impostati per la tensione di spegnimento del delta<br />
peak.<br />
NiMH-Balancerspannung (Programma Tensione equilibratore)<br />
NiMH ________________<br />
Balancer-<br />
________________<br />
spannung = 1.20V<br />
START<br />
2<br />
sec.<br />
+ -<br />
INC DEC<br />
**INFORMATION***<br />
________________<br />
BALANCER ________________<br />
ANG.<br />
2<br />
sec.<br />
BLC ________________<br />
28:30 0<strong>14</strong>25<br />
NM+0.00A ________________<br />
07.717V<br />
Questo programma serve per equilibrare le tensioni delle<br />
singole celle di pacchi batterie con 2-6 celle.<br />
Mediante il tasto INC oppure DEC potete impostare la<br />
tensione limite di scarica dell’equilibratore tra 1.20...1.30V.<br />
Specialmente dopo un periodo di riposo prolungato,<br />
un’accumulatore dovrebbe essere equilibrato.<br />
Per fare ciò è necessario collegare il connettore<br />
dell’equilibratore.<br />
Inoltre tutte le celle devono presentare una tensione<br />
superiore a quella impostata come soglia limite di scarica<br />
per l’equilibratore.<br />
Per ottenere la capacità mass. di un’accumulatore le<br />
singole celle dovrebbero essere scaricate fino a<br />
raggiungere una tensione di 1.20V alcune ore, ma al<br />
massimo 24h prima di una nuova ricarica. Con una<br />
tensione inferiore a 1.20V le celle perdono capacità. Per<br />
questo motivo un’accumulatore dovrebbe essere carico al<br />
60% ca. prima di essere messo a riposo per un periodo<br />
prolungato.<br />
Celle con una tensione di cella superiore, vengono<br />
scaricate con una corrente aggiuntiva di ca. 100mA<br />
(equilibratura).<br />
Se tutte le celle hanno raggiunto la soglia limite di scarica<br />
dell’equilibratore (+0.01V), il processo di equilibratura<br />
viene terminato.<br />
79
80<br />
NiMH-Tensione di riferimento del Delta-Peak (-∆ Peak)<br />
NiMH ________________<br />
Delta-Peak-<br />
________________<br />
Volt =10mV/Zelle<br />
+ -<br />
INC DEC<br />
La tensione di riferimento (in mV per cella!) dello spegnimento<br />
automatico per gli accumulatori NiMH può essere impostata.<br />
Gli accumulatori NiMH tuttavia hanno una caduta di tensione<br />
inferiore agli accumulatori NiCd. Si sono rivelati accettabili<br />
valori di impostazione della tensione di 5 … 25 mV/cella.<br />
Tensioni superiori provocano rapidamente una sovraccarica<br />
dell’accumulatore, tensioni inferiori provocano spesso un’<br />
interruzione anticipata.<br />
Il valore più adatto al vostro accumulatore dev’essere trovato<br />
con varie prove di carica.<br />
Onde evitare di sovraccaricare l’accumulatore vi<br />
consigliamo di iniziare con una tensione di spegnimento<br />
Delta-Peak di 5mV.
13. Programmi Litio<br />
Programmi sono adatti solo per la carica di accumulatori agli di LiFePO 4 (LiFe) con una<br />
tensione di 3,3 V/cella ed Ioni di litio con una tensione di 3,6 V/cella ed ai Polimeri di litio ed al<br />
Litio-Biossido di Manganese con una tensione nominale di 3,7 V/cella.<br />
Gli accumulatori al litio si distinguono dagli altri tipi di accumulatori soprattutto per la loro<br />
notevolmente maggiore capacità. Questo importante vantaggio tuttavia richiede un diverso<br />
sistema di trattamento sia per quanto concerne la carica e la scarica, sia per ottenere un<br />
funzionamento privo di pericoli.<br />
Le seguenti prescrizioni fondamentali devono essere scrupolosamente osservate. Ulteriori<br />
indicazioni ed avvertenze sulla sicurezza sono riportate nelle istruzioni tecniche del costruttore.<br />
In linea di principio gli accumulatori al litio possono essere caricati SOLO con<br />
Corrente<br />
speciali caricabatterie che siano impostati (tensione di fine carica, capacità) per<br />
ciascun tipo di accumulatore. Il processo di carica avviene in modo diverso<br />
Tempo di carica<br />
dagli<br />
accumulatori al NiCd o NiMH, mediante il cosiddetto metodo a corrente costante / tensione<br />
costante. La corrente richiesta per la carica dipende dalla capacità e viene impostata automaticamente<br />
dal caricabatterie.Gli accumulatori al litio solitamente vengono caricati con una corrente<br />
di carica 1 C (corrente di carica 1 C = corrente di carica relativa alla capacità. Esempio: per una<br />
capacità di 1500 mA, la corrispondente corrente di carica = 1500 mA = 1.5 A). Perciò sul caricabatterie<br />
viene impostata la capacità dell’accumulatore, invece che la corrente di carica. Quando<br />
viene raggiunta la tensione finale specifica per ciascun tipo di accumulatore, la corrente di carica<br />
viene automaticamente ridottaper evitare un superamento della tensione finale di carica. Se le<br />
istruzioni fornite dal costruttore dell’accumulatore indicano una corrente di carica inferiore a 1C,<br />
allora deve essere ridotta, in modo corrispondente, anche la capacità.<br />
Per una carica ottimale, una maggiore vita utile ed una maggiore sicurezza in fase di<br />
ricarica raccomandiamo assolutamente di collegare il connettore dell’equilibratore<br />
all’Ultramat <strong>14</strong> <strong>plus</strong> durante i processi di carica.<br />
Problemi con il trattamento degli accumulatori:<br />
Gli accumulatori al litio costituiscono un grosso pericolo in caso di sovraccarica, che può provocare<br />
sviluppo di gas, surriscaldamento e persino un’esplosione. Se la tensione finale di scarica<br />
di 3,6 V /cella (LiFe) o di 4,1 V/cella (Ioni di litio) o di 4,2 V/cella (Polimeri di litio/LiMn) viene superata<br />
dell’1%, allora inizia una trasformazione degli ioni di litio in litio metallico. Questo, in unione<br />
con l’acqua dell’elettrolita, reagisce violentemente e provoca l’esplosione della cella. Inoltre la<br />
tensione finale di carica non dev’essere superata, poiché in tal caso diminuisce la capacità delle<br />
celle agli ioni di litio. Una tensione di 0.1 V sotto la soglia significa già una perdita di circa il 7% di<br />
capacità. Scariche profonde degli accumulatori al litio provocano una rapida perdita di capacità.<br />
Questo fenomeno non è reversibile, perciò dev’essere in ogni caso evitato di scaricare<br />
l’accumulatore sotto i 2,5 V/cella.<br />
Attenzione: l’impostazione del tipo di accumulatore, della sua capacità e del numero di<br />
celle deve concordare sempre con l’accumulatore da caricare e non deve mai differire,<br />
pena il pericolo di esplosione! Non deve essere mai collegato un accumulatore che abbia<br />
un dispositivo di carica integrato!<br />
Caricate i vostri accumulatori solo su superfici ignifughe.<br />
Lithium<br />
Programma<br />
MANUALE<br />
MODE Lithium<br />
Scelta del tipo<br />
accumulatore<br />
MODE<br />
Voltaggio<br />
81
LiPo-Manuell<br />
________________<br />
________________<br />
L:4.0 A 4000mAh<br />
82<br />
+ -<br />
INC DEC<br />
ENTER<br />
Litio-Programma manuale<br />
Mediante questo programma l’accumulatore viene<br />
ricaricato con la corrente di carica impostata.<br />
Prima di collegare l’accumulatore da ricaricare è<br />
necessario impostare la corrente di carica (0,10...5,00A, a<br />
sinistra nel display) tramite i tasti INC / DEC. Premete<br />
successivamente il tasto ENTER ed utilizzate i tasti INC /<br />
DEC per impostare la capacità dell’accumulatore (50 ...<br />
8000mAh, a destra nel display). Un superamento del 10%<br />
della capacità impostata comporta l’interruzione del<br />
processo di ricarica per motivi di sicurezza.<br />
Durante la ricarica per motivi di sicurezza il collegamento del connettore<br />
dell’equilibratore è assolutamente raccomandato!<br />
Ora collegate l’accumulatore al caricabatterie e avviate il processo di carica. La corrente di carica<br />
inizia lentamente a salire da 0.00 A al valore limite impostato. Non meravigliatevi se la corrente<br />
di carica che avete impostato non viene raggiunta, poiché il programma di carica controlla<br />
in continuazione la tensione dell’accumulatore ed evita un suo gonfiamento, mantenendo uguale<br />
la tensione delle singole celle di un pacco. La diminuzione automatica della corrente di carica<br />
viene indicata sul display con la scritta „ENDE“ (fine), alternandola con l’indicazione della corrente<br />
di carica ridotta.<br />
**LiPo ________________<br />
Zellen**<br />
2________________ Zellen( 7.73V)<br />
+ -<br />
INC DEC<br />
+ -<br />
INC DEC<br />
Attenzione ! Impostate esattamente<br />
il numero di celle, altrimenti<br />
I‘accumulatore potrebbe<br />
esplodere ed incendiarsi!<br />
Litio-Numero di celle<br />
Quando l’accumulatore viene collegato al caricabatterie e<br />
viene premuto il tasto START per ca. 2 sec., sul display<br />
appare l’indicazione con il numero di celle, che da 1 a 2<br />
celle è riconosciuto e impostato automaticamente. Se il<br />
pacco batterie contiene più di due celle, dovete impostare<br />
manualmente, con i tasti INC / DEC, il numero di celle,<br />
poiché non è possibile il riconoscimento automatico di un<br />
pacco batterie con un numero maggiore di due celle. Sulla<br />
destra è indicato, per controllo, la tensione dell’accumulatore<br />
collegato. Con un’ulteriore pressione del tasto<br />
START, inizia il processo di carica.
Lithium ________________<br />
Typ<br />
LiPo ________________<br />
INC<br />
+ -<br />
DEC<br />
Litio-Programma di scelta del tipo<br />
Questo è il più importante programma di impostazione<br />
per i pacchi batteria al litio. In questo programma viene<br />
impostato il tipo di accumulatore. Questa impostazione va<br />
fatta con molta attenzione e verificata, poiché da essa il<br />
caricabatterie ricava tutti gli altri parametri per la carica.<br />
L’impostazione del tipo di accumulatore (LiPo o LiIo o LiFe)<br />
determina la tensione di spegnimento. Se un accumulatore<br />
al litio viene caricato solo per i 2/3 dell’aspettativa,<br />
probabilmente avete sbagliato, in questa sede,<br />
l’impostazione del tipo di accumulatore.<br />
Attenzione: Se avete impostato un valore errato, l’accumulatore,<br />
in conseguenza di ciò , può venir danneggiato<br />
irreparabilmente o addirittura può esplodere!<br />
Durante la ricarica i tipi di accumulatori vengono indicati<br />
nella seguente maniera:<br />
LiPo (LiMn) = LP<br />
LiIo = LI<br />
LiFe = LF<br />
<strong>14</strong>. Programmi Pb<br />
Pb<br />
Programma<br />
MANUALE<br />
Questi programmi servono per la carica e la scarica di un accumulatore al piombo, con acido<br />
solforico o gel, di 2, 4, 6 o 12 V precisi (1, 2, 3, 6, celle).<br />
Attenzione: Batterie al piombo con tensioni nominali diverse non vengono riconosciuti dal<br />
caricabatterie e quindi non devono essere collegati. Gli accumulatori al piombo si comportano in<br />
modo completamente diverso da quelli al NiCd o NiMH. Con riferimento alla loro capacità, gli<br />
accumulatori al piombo forniscono correnti relativamente inferiori a quelle degli accumulatori<br />
NiCd o NiMH. Ciò si riflette soprattutto sulla loro ricarica, per la quale i produttori di batterie<br />
indicano per lo più un tempo da <strong>14</strong> a 16 ore per raggiungere la capacità nominale con una<br />
corrente normale di ricarica. Per corrente normale di carica si intende 1/10 del valore nominale di<br />
capacità dell’accumulatore. Esempio: se la capacità dell’accumulatore è di 12 Ah, la corrente<br />
normale di ricarica è di 1,2 Ah. La carica completa viene riconosciuta dal caricabatterie (a<br />
differenza dagli accumulatori al NiCd o NiMH) in base alla tensione dell’accumulatore.<br />
Attenzione: le batterie al piombo non possono essere sottoposte ad un processo di<br />
carica rapida! Scegliete perciò sempre la corrente di ricarica indicata dal produttore della<br />
batteria. Fate attenzione anche che una manutenzione errata di un accumulatore al piombo<br />
(sovraccarica, molte scariche al 100% e soprattutto scariche molto profonde) incide molto<br />
negativamente sulla sua capacità nominale ( cioè sulla durata). Anche il valore della corrente di<br />
carica / scarica determina la capacità assimilabile dell’accumulatore, nel senso che tanto<br />
maggiore è la corrente, tanto minore sarà la capacità finale dell’accumulatore. I valori di ritardo<br />
dello spegnimento e del Timer di sicurezza impostati nelle impostazioni utente non hanno alcun<br />
valore nei programmi di carica degli accumulatori al piombo.<br />
83
Pb-Manuell<br />
________________<br />
________________<br />
L:2.5A<br />
+ -<br />
INC DEC<br />
84<br />
Pb-Programma-manuale<br />
Con questo programma si può impostare, prima di<br />
collegare l’accumulatore, con i tasti INC / DEC, la<br />
massima corrente di carica ammessa (corrente di carica<br />
massima).<br />
Questa impostazione fissa solamente il limite superiore,<br />
che il caricabatterie può fornire all’accumulatore.<br />
Se il produttore dell’accumulatore indica una corrente di carica inferiore, è necessario ridurre<br />
anche la corrente di carica, poiché il caricabatterie, nel tentativo di fornire una carica maggiore<br />
all’accumulatore, potrebbe impostare una corrente di carica superiore. Dopo che l’accumulatore<br />
è stato collegato ed è iniziato il processo di carica, la corrente di carica comincia a salire lentamente<br />
da 0.00 A fino al limite impostato. Durante la carica, l’accumulatore viene costantemente<br />
monitorato e la corrente di carica adattata alla nuova situazione. Il programma di carica, in base<br />
alla misura della tensione, determina automaticamente il numero di celle. Non meravigliatevi tuttavia,<br />
se la corrente di carica che avete impostato non viene raggiunta, poiché il programma di<br />
carica controlla continuamente la tensione della batteria ed evita così la formazione di gas<br />
nell’accumulatore. Ora l’accumulatore viene caricato fino al raggiungimento di circa 2.3 V … 2.35<br />
V per cella con la massima corrente di carica possibile. Quindi viene eseguito un processo più<br />
delicato per effettuare la carica completa. La corrente di carica viene ulteriormente ridotta per<br />
ottenere la massima carica possibile dell’accumulatore. La fine del processo di carica avviene<br />
automaticamente al raggiungimento di una tensione di circa 2.45 V fino a 2.5 V per cella.<br />
Con l’adattamento automatico della corrente, è possibile ottenere una carica più rapida con un<br />
tempo notevolmente inferiore alle <strong>14</strong> - 16 ore.<br />
Quando il processo di carica è completato, viene emesso<br />
ENDE ________________<br />
CHG 367:09 04448<br />
un segnale acustico per un determinato intervallo di<br />
Pb ________________<br />
0mA 2.<strong>14</strong>7V tempo. Contemporaneamente sul display lampeggia la<br />
scritta „ENDE“ (fine).
Programma<br />
Tipo accumulatore<br />
15. Indicazioni del display<br />
Tempo di carica<br />
(min.: sec.)<br />
Man. ________________<br />
12:56 00321<br />
NC+4.50A ________________<br />
11,985V<br />
Corrente di carica<br />
Indicazione di carica completata<br />
Capacità (mAh)<br />
Tensione accumulatore<br />
I dati essenziali relativi alla carica e scarica vengono visualizzati chiaramente sulle due righe del<br />
display a cristalli liquidi e sono mantenuti fino allo scollegamento dell’accumulatore. Quando viene<br />
collegato un altro accumulatore i valori precedenti non sono più richiamabili.<br />
16. Indicazioni di controllo sul display<br />
Il caricabatterie è dotato di un grande numero di protezioni e di controlli per monitorare le singole<br />
funzioni ed i circuiti elettronici. Un superamento dei valori limite provoca in certi casi l’interruzione<br />
del processo di carica (per es. in caso di sovratensione, temperatura troppo alta o batteria<br />
dell’auto scarica).<br />
Questi fattori provocano una segnalazione, sul display a cristalli liquidi, della causa dell’errore ed<br />
una segnalazione acustica del cicalino.<br />
VERMESSE ________________<br />
AKKU<br />
BITTE ________________<br />
WARTEN...<br />
ENDE ________________<br />
CHG 48:32 03363<br />
NC ________________<br />
200mA 9.773V<br />
Configurazione iniziale<br />
Dopo la pressione del tasto START per ca. 2 sec., prima<br />
che venga avviato il processo di carica, l’accumulatore<br />
viene configurato e per 1 – 2 sec. sul display appare<br />
questa indicazione.<br />
Quando un programma di carica / scarica ha completato il<br />
suo processo, sul display appare, alternativamente alla<br />
descrizione del programma, la scritta „ENDE“ (fine). Contemporaneamente<br />
viene emesso un clic del tasto o una<br />
segnalazione del cicalino in accordo.<br />
Indicazione connettore equilibratore collegato<br />
BLC ________________<br />
Man. 28:30 02850<br />
LP+6.00A ________________<br />
<strong>14</strong>.717V<br />
Se il connettore per l’equilibratore dell’accumulatore risulta<br />
essere collegato al caricabatterie e l’equilibratore è attivo,<br />
nel display appare BLC in alto a sinistra. Questa<br />
indicazione si alterna con la denominazione del<br />
programma.<br />
85
86<br />
Indicazione della tensione d‘ingresso e la resistenza interna dell‘accumulatore<br />
INC<br />
DEC<br />
Eingangsspannung<br />
________________<br />
13,62V ________________<br />
Innenwid. Batt.<br />
________________<br />
25m<br />
L’attuale tensione d’ingresso e la resistenza interna<br />
dell’accumulatore (solo nella modalità NiCd o NiMH<br />
manuale) può essere richiamata, in qualsiasi momento,<br />
con la contemporanea pressione dei tasti INC e DEC .<br />
Premendo il tasto INC o DEC passate all’indicazione della<br />
resistenza interna, delle tensioni delle singole celle oppure<br />
della tensione d’ingresso.<br />
L’indicazione della resistenza interna permette di controllare la qualità dell’accumulatore. La<br />
resistenza interna viene misurata, durante il processo di carica, dopo 5 minuti e alla fine del<br />
processo e durante il processo di scarica dopo due minuti.<br />
Con la pressione di un qualsiasi tasto si ritorna al menù.<br />
INC<br />
Indicazione delle tensioni delle singole celle<br />
DEC<br />
Eingangsspannung<br />
________________<br />
13,62V ________________<br />
Innenwid. Batt.<br />
________________<br />
25m<br />
1. ________________<br />
4.153V<br />
2. ________________<br />
4.168V<br />
3. ________________<br />
4.053V<br />
4. ________________<br />
0.000V<br />
5. ________________<br />
0.000V<br />
6. ________________<br />
0.000V<br />
La tensione d’ingresso attuale e la resistenza interna<br />
dell’accumulatore (solo nella modalità manuale NiCd e<br />
NiMH) possono essere richiamate in qualsiasi momento<br />
mediante la pressione contemporanea dei tasti INC e<br />
DEC. Premendo il tasto INC o DEC passate all’indicazione<br />
della resistenza interna, delle tensioni delle singole celle<br />
oppure della tensione d’ingresso.<br />
L’indicazione delle tensioni delle singole celle serve per la<br />
verifica delle tensioni delle singole celle (1-6 celle).
17. Segnalazioni di errore ed avvertenze<br />
Il caricabatterie è dotato di un grande numero di protezioni e di controlli per monitorare le singole<br />
funzioni ed i circuiti elettronici. Un superamento dei valori limite provoca in certi casi la riduzione<br />
automatica delle impostazioni del caricabatterie (per es. della corrente di carica / scarica) o allo<br />
spegnimento del processo di carica (per es. quando la batteria dell’auto è completamente scarica).<br />
La causa dell’errore viene visualizzata sul display a cristalli liquidi. La maggior parte delle<br />
cause di errore sono autoesplicative, tuttavia quelle contenute nella lista che segue, possono<br />
essere di aiuto per individuare gli errori. Le segnalazioni di avvertenza e acustiche possono essere<br />
cancellate con il tasto „ENTER“.<br />
________________<br />
*****FEHLER*****<br />
________________<br />
Autobatt. leer<br />
________________<br />
*****FEHLER*****<br />
________________<br />
Falschpolung<br />
________________<br />
*****FEHLER*****<br />
________________<br />
Unterbrechung<br />
________________<br />
*****FEHLER*****<br />
________________<br />
Ladezeit übersch<br />
________________<br />
*****FEHLER*****<br />
________________<br />
Spann. übersch.<br />
________________<br />
*****FEHLER*****<br />
________________<br />
Spann. untersch.<br />
Questa avvertenza viene segnalata quando la tensione<br />
della batteria dell’auto si trova al di sotto del valore impostato<br />
nel menù „Spegnimento per tensione insufficiente“<br />
nelle impostazioni utente (11.0 V ).<br />
Questa segnalazione avverte che all’uscita del carica<br />
batterie è stato collegato un accumulatore con i poli<br />
invertiti.<br />
Questa segnalazione appare quando si verifica, durante il<br />
processo di carica / scarica, un’interruzione del collegamento<br />
tra l’accumulatore ed il caricabatterie. Se questa<br />
segnalazione appare durante il funzionamento, ciò può<br />
rivelare un falso contatto.<br />
Avviso: Questa segnalazione di errore compare anche<br />
quando voi interrompe la carica, per esempio scollegando<br />
l’accumulatore.<br />
Se il processo di carica continua fino alla scadenza<br />
dell’intervallo fissato per il Timer di sicurezza, avviene<br />
un’interruzione dei processi in corso.<br />
Il Timer di sicurezza è impostato , per gli accumulatori al<br />
NiCd/NiMH e al Litio a 180 min., mentre per gli accumulatori<br />
al piombo è disattivato. Queste impostazioni non<br />
possono essere cambiate. Possibili cause: la corrente di<br />
carica é troppo bassa e quindi l’accumulatore non è<br />
carico, i cavi di collegamento sono troppo sottili o troppo<br />
lunghi e perciò la corrente di carica non può salire sufficientemente,<br />
la capacità dell’accumulatore è troppo<br />
grande.<br />
Questa segnalazione indica una tensione troppo alta a<br />
causa di un’errata impostazione del numero di celle per un<br />
accumulatore al litio oppure un’impostazione di un accumulatore<br />
al piombo errata.<br />
Questa segnalazione viene visualizzata anche per una<br />
sovraccarica delle celle collegate.<br />
Questa segnalazione indica una tensione troppo bassa a<br />
causa di un’errata impostazione del numero di celle per un<br />
accumulatore al litio oppure un’impostazione di un accumulatore<br />
al piombo errata. La causa di questa segnalazione<br />
è che le celle, per un’errata impostazione, vengono<br />
scaricate troppo profondamente.<br />
87
________________<br />
*****FEHLER*****<br />
________________<br />
Bal.Spg.übersch.<br />
________________<br />
*****FEHLER*****<br />
________________<br />
Bal.Spg.untersch<br />
________________<br />
*****FEHLER*****<br />
BALANCER ________________<br />
N. ANG.<br />
88<br />
Questo messaggio di errore appare quando il<br />
caricabatterie rileva una tensione delle celle troppo<br />
elevata in ingresso all’equilibratore.<br />
Il messaggio di errore appare in presenza delle seguenti<br />
tensioni:<br />
LiPo > 4,3V, LiIo > 4,2V, LiFe > 3,9V, NiCd/NiMH > 2,0V<br />
Inoltre l’indicazione di errore può apparire in caso di<br />
sovraccarica delle celle collegate.<br />
Questo messaggio di errore appare quando il<br />
caricabatterie rileva una tensione delle celle troppo bassa<br />
in ingresso all’equilibratore.<br />
Il messaggio di errore appare in presenza delle seguenti<br />
tensioni:<br />
LiPo < 2,75V, LiIo < 2,75V, LiFe < 2,0V, NiCd/NiMH < 0,1V<br />
In questo caso è consigliabile effettuare una prima ricarica<br />
dell’accumulatore senza collegare l’equilibratore e<br />
limitando il processo di ricarica a pochi minuti (mass. 5<br />
min.) ad esempio in modalità programma LiFe, che<br />
ammette una tensione di 2V per cella,.<br />
Attenzione: Singole celle potrebbero essere<br />
danneggiate e di conseguenza il pacco batterie deve<br />
essere ricaricato solamente sotto attenta<br />
sorveglianza. Quando la tensione è di nuovo<br />
sufficientemente alta, per motivi di sicurezza<br />
l’accumulatore deve assolutamente essere ricaricato<br />
con l’equilibratore collegato (pericolo di esplosione<br />
ed incendio)!<br />
Questo messaggio di errore appare quando si avvia il<br />
programma di scarica con equilibratura per accumulatori<br />
NiCd/NiMH senza avere collegato l’equilibratore.<br />
Questo messaggio di errore appare anche quando<br />
l’equilibratore viene scollegato durante un processo di<br />
ricarica o scarica.
18. Pulizia e manutenzione<br />
Il caricabatterie funziona senza alcuna necessità di manutenzione. Nel vostro interesse proteggetelo<br />
da polvere, sporcizia e umidità.<br />
Per pulirlo, dopo averlo scollegato dalla batteria dell’auto, passate con delicatezza un panno asciutto<br />
(non usate detersivi!).<br />
19. Indicazioni per il trattamento degli accumulatori<br />
La carica di una singola cella NiCd o NiMH o di un pacco batterie con 1…4 celle presenta un<br />
serio problema di spegnimento automatico, poiché il picco di tensione non è molto sensibile e<br />
non è garantito uno svolgimento corretto della funzione. Il funzionamento automatico non può<br />
reagire correttamente. Eseguite perciò prove ripetute, controllando se la funzione di spegnimento<br />
automatico funziona correttamente con il vostro accumulatore.<br />
Le batterie calde sono più efficienti di quelle fredde. Non meravigliatevi perciò se in inverno le vostre<br />
batterie hanno un rendimento minore.<br />
Sia la sovraccarica che la scarica profonda provocano un danno irreparabile alle celle riducendone<br />
in modo duraturo l’efficienza e la capacità.<br />
Non mettete a riposo per un lungo tempo una batteria scarica, vuota o caricata solo parzialmente.<br />
Prima di metterla a riposo, caricatela e di tanto in tanto controllate il suo stato di carica.<br />
Acquistate accumulatori di buona qualità, caricateli all’inizio con una corrente di carica piccola ed<br />
aumentatela solo gradualmente.<br />
Caricate gli accumulatori solo poco prima del loro utilizzo, così il loro rendimento sarà migliore.<br />
Non effettuate saldature direttamente sugli accumulatori. Le alte temperature della saldatura<br />
rovinano le guarnizioni e le valvole di sicurezza della cella, l’accumulatore perde elettrolita o si secca<br />
e perde le sue potenziali prestazioni.<br />
La sovraccarica riduce la capacità dell’accumulatore. Quindi non caricate un accumulatore molto<br />
caldo o già carico.<br />
Caricare e scaricare un accumulatore con correnti alte riduce le sue aspettative di durata. Non<br />
superate perciò le indicazioni fornite dal costruttore.<br />
Gli accumulatori al piombo non sopportano forti correnti di carica. Non superate perciò le indicazioni<br />
fornite dal costruttore.<br />
Proteggete l’accumulatore da vibrazioni e non sottoponetelo ad alcun carico meccanico.<br />
Durante il processo di carica e l’utilizzo di un accumulatore ci può essere emissione di idrogeno.<br />
Mantenete gli ambienti quindi ben aerati.<br />
Non portate l’accumulatore a contatto con l’acqua, potrebbe esplodere.<br />
Non cortocircuitate mai i terminali di un accumulatore, potrebbe esplodere.<br />
Accumulatori a causa di un difetto possono esplodere oppure incendiarsi. Per questo motivo noi<br />
consigliamo di ricaricare tutti gli accumulatori al Litio, oltre a quelli NiCd e NiMH all’interno di una<br />
valigetta di sicurezza LiPo (Art.-Nr. 8370 oppure 8371).<br />
Non aprite le batterie, c’è il pericolo di corrosione.<br />
Gli accumulatori NiCd/NiMH vengono formattati meglio se prima si scaricano separatamente le<br />
singole celle ed infine si carica l’intero pacco. La scarica si effettua con il caricabatterie (cella per<br />
cella).<br />
Non meravigliatevi se il vostro pacco batterie si carica di meno in inverno che d’estate. Il rendimento<br />
di una cella fredda é inferiore di quello di una calda.<br />
Avvertenza sulla regolamentazione delle batterie: Le batterie usate sono rifiuti speciali e non devono<br />
essere gettati nel cassonetto delle immondizie, ma nei contenitori appositi per la raccolta<br />
differenziata delle batterie.<br />
89
90<br />
20. Caratteristiche tecniche<br />
Accumulatore:<br />
Corrente di carica / rendimento<br />
Accumulatori Ni-Cd & Ni-MH:<br />
100 mA - 5,0 A / max. 50 W (Tensione d‘ ingresso 100~240V AC)<br />
100mA - 5,0A / max. 50W (Tensione d‘ ingresso 11...15V DC)<br />
Numero di celle 1 - <strong>14</strong> celle<br />
Capacità<br />
Accumulatori al litio:<br />
da 0,1 Ah - 8,0 Ah<br />
Numero di celle 1-6 celle<br />
Tensione delle celle 3,3 V (LiFe) / 3,6 V (LiIo) rispettiv. 3,7 V (LiPo/LiMn)<br />
Capacttà<br />
PB-Akkus:<br />
da 0,05 Ah - 8,0Ah<br />
Numero di celle 1, 2, 3, 6<br />
Tensione dell‘accumulatore 2, 4, 6, 12 V<br />
Capacità da 1 Ah<br />
Sonstiges:<br />
Tensione di funzionamento DC 11,0 fino a 15 V DC (tensione d’ingresso DC)<br />
Tensione di funzionamento AC 100~240V AC (tensione d’ingresso AC)<br />
Batteria auto necessaria 12 V, min. 30 Ah<br />
Alimentatore necessario 11-15V, min. 8,5 A stabilizzato 1)<br />
Assorbimento senza carico ca. 0,1 A<br />
Bassa tensione di spegnimento ca. 11,0 V<br />
Connessione equilibratore: 1...6 celle NiMH/NiCd/LiPo/LiIo/LiFe<br />
Corrente di equilibratura mass. ca: NiMH/NiCd: 0,1A, LiPo/LiIo/LiFe: 0,3A<br />
Peso ca. 600 g<br />
dimensioni ca. <strong>14</strong>8 x <strong>14</strong>6 x 54 mm<br />
Tutti I dati si riferiscono ad una tensione di batteria per auto di 12.7 V.<br />
Tutti i valori dichiarati sono indicativi e possono variare secondo lo stato dell’accumulatore usato, la temperatura, ecc.<br />
1) Un funzionamento corretto del caricabatterie collegato ad un alimentatore dipende da molti fattori, come per es. la forma d’onda, la<br />
stabilità, ecc. Usate solo apparecchi consigliati da noi.<br />
Indicazioni sulla protezione dell’ambiente<br />
Questo simbolo, stampato sul prodotto o indicato nelle istruzioni per l’uso o sulla<br />
confezione, avvisa che questo prodotto, alla fine del suo utilizzo, non deve essere<br />
gettato nel normale contenitore per l’immondizia, ma de v’essere portato ad un punto di raccolta<br />
per il riciclaggio di materiali elettrici ed elettronici.<br />
I materiali, ciascuno secondo le proprie caratteristiche, sono riutilizzabili. Con il riciclaggio di<br />
materiali e di vecchie apparecchiature, potrete dare un importante contributo alla protezione<br />
dell’ambiente.<br />
Batterie ed accumulatori devono essere rimossi dalle apparecchiature ed eliminati presso un<br />
centro di raccolta appositamente predisposto.<br />
Dai modelli RC devono essere smontati ed smaltiti presso un centro di raccolta di rottami<br />
elettronici tutti gli elementi elettronici come per esempio servocomandi, riceventi, regolatori.<br />
Informatevi sulla dislocazione dei centri di raccolta differenziata della vostra zona.
Konformitätserklärung / Conformity Declaration /<br />
Déclaration de conformitè / Dichiarazione di conformità<br />
EG-Konformitätserklärung<br />
Für das folgend bezeichnete Erzeugnis<br />
Ultramat <strong>14</strong> <strong>plus</strong>; Best.-Nr. 6464<br />
wird hiermit bestätigt, dass es den wesentlichen<br />
Schutzanforderungen entspricht, die in der Richtlinie<br />
des Rates zur Angleichung der Rechtsvorschriften<br />
der Mitgliedstaaten über die elektromagnetische<br />
Verträglichkeit (2004/108/CE) bzw. die<br />
elektrische Sicherheit (2006/95/CE) festgelegt<br />
sind.<br />
Zur Beurteilung des Erzeugnisses hinsichtlich<br />
elektromagnetischer Verträglichkeit wurden folgende<br />
Normen herangezogen:<br />
EMV: EN 61000-6-1 / EN 61000-6-3<br />
EN 550<strong>14</strong>-1 / EN 550<strong>14</strong>-2<br />
LVD: EN 60950-1<br />
Diese Erklärung wird verantwortlich für den<br />
Hersteller/Importeur<br />
<strong>Graupner</strong> GmbH & Co. KG<br />
Henriettenstr. 94-96<br />
73230 Kirchheim/Teck<br />
abgegeben durch<br />
73230 Kirchheim/Teck, den 18.06.08<br />
EU Conformity Declaration<br />
Hans <strong>Graupner</strong><br />
Geschäftsführer<br />
We hereby declare that the following product:<br />
Ultramat <strong>14</strong> <strong>plus</strong>; Order-No.6464<br />
conforms with the essential protective<br />
requirements as laid down in the directive for<br />
harmonising the statutory directives of the<br />
member states concerning electro-magnetic<br />
interference (2004/108/CE) and LVD (2006/95/<br />
CE).<br />
This product has been tested for electro-magnetic<br />
interference in accordance with the following<br />
norms:<br />
EMV: EN 61000-6-1 / EN 61000-6-3<br />
EN 550<strong>14</strong>-1 / EN 550<strong>14</strong>-2<br />
LVD: EN 60950-1<br />
This declaration was produced by:<br />
<strong>Graupner</strong> GmbH & Co. KG<br />
Henriettenstr. 94-96<br />
73230 Kirchheim/Teck<br />
and is valid for the manufacturer / importer of<br />
the product<br />
73230 Kirchheim/Teck, Germany, on 18.06.08<br />
Hans <strong>Graupner</strong><br />
Managing Director<br />
Déclaration de conformité EG :<br />
Pour le produits suivant<br />
Ultramat <strong>14</strong> <strong>plus</strong>; Réf. N°6464<br />
Nous confirmons que la compatibilité<br />
électronique correspond aux directives 2004/<br />
108/CE et LVD (2006/95/CE).<br />
Normes appliquées :<br />
EMV: EN 61000-6-1 / EN 61000-6-3<br />
EN 550<strong>14</strong>-1 / EN 550<strong>14</strong>-2<br />
LVD: EN 60950-1<br />
Cette déclaration est sous la responsabilité<br />
du Fabricant/Importateur<br />
<strong>Graupner</strong> GmbH & Co. KG<br />
Henriettenstr. 94-96<br />
73230 Kirchheim/Teck<br />
Fait à<br />
73230 Kirchheim/Teck, le 18.06.08<br />
Hans <strong>Graupner</strong><br />
Le Directeur d’Entreprise<br />
91
Wir gewähren auf dieses Erzeugnis eine / This product is / Sur ce produit nous accordons une<br />
Die Fa. <strong>Graupner</strong> GmbH & Co. KG, Henriettenstraße 94-96.<br />
73230 Kirchheim/Teck gewährt ab dem Kaufdatum auf<br />
dieses Produkt eine Garantie von 24 Monaten.<br />
Die Garantie gilt nur für die bereits beim Kauf des Produktes<br />
vorhandenen Material- oder Funktionsmängel. Schäden<br />
die auf Abnützung, Überlastung, falsches Zubehör<br />
oder unsachgemäße Behandlung zurückzuführen sind, sind<br />
von der Garantie ausgeschlossen.<br />
Die gesetzlichen Rechte und Gewährleistungsansprüche<br />
des Verbrauchers werden durch diese Garantie nicht berührt.<br />
Bitte überprüfen Sie vor einer Reklamation oder Rücksendung<br />
das Produkt genau auf Mängel, da wir Ihnen bei<br />
Mängelfreiheit die entstandenen Unkosten in Rechnung<br />
stellen müssen.<br />
92<br />
Garantie von<br />
warrantied for<br />
garantie de<br />
<strong>Graupner</strong> GmbH & Co. KG, Henriettenstraße 94-96, 73230<br />
Kirchheim/Teck, Germany guarantees this product for a<br />
period of 24 months from date of purchase.<br />
The guarantee applies only to such material or operational<br />
defects witch are present at the time of purchase of the<br />
product.<br />
Damage due to wear, overloading, incompetent handling<br />
or the use of incorrect accessories is not covered by the<br />
guarantee.<br />
The user´s legal rights and claims under garantee are not<br />
affected by this guarantee.<br />
Please check the product carefully for defects before you<br />
are make a claim or send the item to us, since we are<br />
obliged to make a charge for our cost if the product is<br />
found to be free of faults.<br />
La société <strong>Graupner</strong> GmbH & Co. KG, Henriettenstraße<br />
94-96, 73230 Kirchheim/Teck, Allemagne, accorde sur ce<br />
produit une garantie de 24 mois à partir de la date d´achat.<br />
La garantie prend effet uniquement sur les vices de<br />
fonctionnement et de matériel du produit acheté. Les<br />
dommages dûs à de l´usure, à de la surcharge, à de<br />
mauvais accessoires ou à d´une application inadaptée,<br />
sont exclus de la garantie.<br />
Cette garantie ne remet pas en cause les droits et<br />
prétentions légaux du consommateur.<br />
Avant toute réclamation et tout retour du prouit, veuillez<br />
s.v.p. cotrôler et noter exactement les défauts ou vices du<br />
produit, car tout autre frais relatif au produit vous sera<br />
facturé.<br />
2 4<br />
Monaten<br />
month<br />
mois<br />
Servicestellen / Service / Service après-vente<br />
<strong>Graupner</strong>-Zentralservice<br />
<strong>Graupner</strong> GmbH & Co. KG<br />
Postfach 1242<br />
D-73220 Kirchheim<br />
Espana<br />
FA - Sol S.A.<br />
C. Avinyo 4<br />
E 8240 Manresa<br />
(+34) 93 87 34 23 4<br />
EMail: fasol@olivet.com<br />
Italia<br />
GiMax s.n.c.<br />
Via Manzoni, no. 8<br />
I 25064 Gussago<br />
(+39) 3 0 25 22 73 2<br />
Schweiz<br />
<strong>Graupner</strong> Service Schweiz<br />
Wehntalerstrasse 37<br />
CH 8181 Höri<br />
(+41) 43 26 66 58 3<br />
UK<br />
GLIDERS<br />
Brunel Drive<br />
Newark, Nottinghamshire<br />
NG24 2EG<br />
(+44) 16 36 61 05 39<br />
Belgie/Nederland<br />
Jan van Mouwerik<br />
Slot de Houvelaan 30<br />
NL 3155 Maasland VT<br />
(+31)10 59 13 59 4<br />
Servicehotline<br />
(+49)(01805) 472876<br />
Montag - Freitag<br />
9 30 -11 30 und 13 00 -15 00 Uhr<br />
France<br />
<strong>Graupner</strong> Service France<br />
Gérard Altmayer<br />
86, rue ST. Antoine<br />
F 57601 Forbach-Oeting<br />
(+33) 3 87 85 62 12<br />
Sverige<br />
Baltechno Electronics<br />
Box 5307<br />
S 40227 Göteborg<br />
(+46) 31 70 73 00 0<br />
Luxembourg<br />
Kit Flammang<br />
129, route d’Arlon<br />
8009 Strassen<br />
(+35) 23 12 23 2<br />
Ceská Republika/Slovenská<br />
Republika<br />
RC Servis Z. Hnizdil<br />
Leteckà 666/22<br />
CZ-16100 Praha 6 - Ruzynè<br />
(+42) 2 33 31 30 95<br />
G a r a n t i e - U r k u n d e<br />
Warranty certificate / Certificat de garantie<br />
<strong>ULTRAMAT</strong> <strong>14</strong> <strong>plus</strong>, Best.-Nr. 6464<br />
Übergabedatum, Date of purchase/delivery, Date de remise<br />
Name des Käufers, Owner´s name, Nom de l´acheteur<br />
Strasse, Wohnort, Complete adress, Domicie et rue<br />
Firmenstempel und Unterschrift des Einzelhändlers, Stamp and<br />
signature of dealer, Cachet de la firme et signature du detailant


