
Create successful ePaper yourself
Turn your PDF publications into a flip-book with our unique Google optimized e-Paper software.
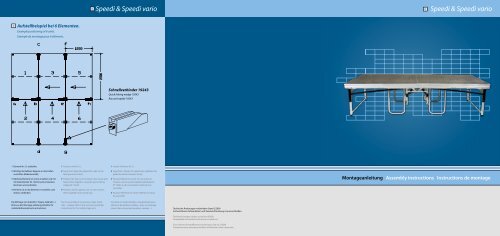
Aufstellbeispiel bei 6 Elementen.<br />
Example positioning of 6 units.<br />
Exemple de montage pour 6 éléments.<br />
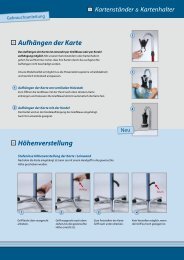
1 Element Nr. (1) aufstellen.<br />
2 Wichtig: Verstellbare Kappen an den Füßen<br />
ausrichten (Bodenkontakt).<br />
3 Nächstes Element (2) unten anstellen und mit<br />
Schnellverbinder Nr. 19243 (a+b) einstecken,<br />
klemmen und verbinden.<br />
4 Element (3) an das Element (1) anstellen und<br />
ebenso verbinden.<br />
Die Montage von Zubehör ( Treppe, Geländer... )<br />
bitte aus der Montage-anleitung Zubehör für<br />
mobile Bühnenelemente entnehmen.<br />
1 Position unit Nr. (1).<br />
2 Important: Align the adjustable caps on the<br />
feet (ground contact)<br />
3 Position the next unit (2) below: slot, clamp and<br />
fasten them together using the quick linking<br />
wedge Nr. 19243.<br />
4 Position unit (3) against unit (1) and connect<br />
them together in the same way.<br />
For the assembly of accessories (steps, handrails…)<br />
please refer to the accessory assembly<br />
instructions for the mobile stage unit.<br />
<strong>Speedi</strong> & <strong>Speedi</strong> <strong>vario</strong><br />
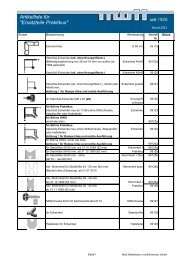
Schnellverbinder 19243<br />
Quick linking wedge 19243<br />
Raccord rapide 19243<br />
1 Insérer l’élément N° (1).<br />
2 Important : Ajuster les capuchons réglables des<br />
pieds (ils doivent toucher le sol)<br />
3 Pousser l’élément suivant (2) vers le bas et<br />
l’insérer avec le raccord rapide autobloquant<br />
N° 19243 (a+b), le maintenir enfoncé et le<br />
raccorder.<br />
4 Pousser l’élément (3) contre l’élément (1) puis<br />
les raccorder.<br />
Consulter le mode d’emploi « Equipements pour<br />
éléments de podium mobiles » pour un montage<br />
correct des accessoires (escaliers, rampes….)<br />
Technische Änderungen vorbehalten Stand 2/2009<br />
Vorhersehbares Fehlverhalten und Zweckentfremdung ist auszuschließen.<br />
Technical changes subject to revision 09/08<br />
Foreseeable misconduct and misuse is ruled out<br />
Sous réserve de modifications techniques. Etat au 2/2009<br />
Comportements erronés prévisibles et aliénation sont à proscrire.<br />
<strong>Speedi</strong> & <strong>Speedi</strong> <strong>vario</strong><br />
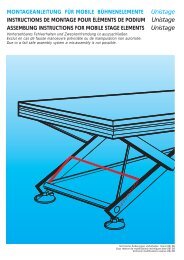
Montageanleitung Assembly instructions Instructions de montage
<strong>Speedi</strong> & <strong>Speedi</strong> <strong>vario</strong><br />
Aufbau Assembly Montage Aufbau Assembly Montage<br />
Schritt 1 Step 1 Etape 1 Schritt 2 Step 2 Etape 2<br />
Schritt 1 Step 1 Etape 1 Schritt 2 Step 2 Etape 2<br />
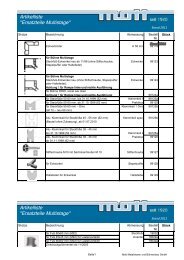
<strong>Speedi</strong> aus dem Lager rollen.<br />
Roll <strong>Speedi</strong> out of the store.<br />
Sortir <strong>Speedi</strong> de son entrepôt.<br />
<strong>Speedi</strong> an den Einsatzort stellen.<br />
Place <strong>Speedi</strong> in location.<br />
Placer <strong>Speedi</strong> à l’endroit voulu.<br />
Schritt 3 Step 3 Etape 3 Schritt 4 Step 4 Etape 4<br />
Klettverschluß öffnen.<br />
Open binder zip.<br />
Ouvrir la bande velcro.<br />
Schritt 5 Step 5 Etape 5<br />
Die zweite Seite aufklappen.<br />
Fold down the other side.<br />
Déplier le deuxième côté.<br />
Abbau<br />
1 Das Zubehör der Bühne abbauen.<br />
2 Eine Seite der <strong>Speedi</strong> hochklappen (s. Schritt 5).<br />
3 Die zweite Seite hochklappen (s. Schritt 4).<br />
4 <strong>Speedi</strong> mit Klettverschluß schließen (s. Schritt 3).<br />
5 <strong>Speedi</strong> ins Lager rollen (s. Schritt 1).<br />
To Dismantle<br />
Eine Seite der <strong>Speedi</strong> herunterklappen (Bei <strong>Speedi</strong> mit Höhe 20 muss der Steckfuß in<br />
den Eckwinkel gesteckt und mit 2 Personen aufgebaut werden).<br />
Fold down one side of the <strong>Speedi</strong> (when assembling the 20cm high <strong>Speedi</strong>, the plug<br />
in feet must be fitted in the corner angle and it must be assembled by two people).<br />
Déplier un côté du podium <strong>Speedi</strong> (pour le modèle <strong>Speedi</strong> de<br />
hauteur 20, le pied doit être introduit dans la cornière<br />
d’angle et monté par deux personnes).<br />
Schritt 6 Step 6 Etape 6<br />
1 Remove the stage’s accesories.<br />
2 Fold up one side of the <strong>Speedi</strong> (see Step 5).<br />
3 Fold up the other side (see Step 4).<br />
4 Secure <strong>Speedi</strong> with the security catch (see Step 3).<br />
5 Roll <strong>Speedi</strong> into the store (see Step 1).<br />
<strong>Speedi</strong> aufstellen (Kann mit anderen <strong>Speedi</strong>-Bühnen zusammengestellt werden,<br />
siehe „Aufstellbeispiel bei 6 Elementen“).<br />
Position <strong>Speedi</strong> (it is possible to connect many <strong>Speedi</strong>-Stages together, see<br />
“Example positioning of 6 units”).<br />
Dresser <strong>Speedi</strong> (le podium peut être dressé et assemblé<br />
à d’autres podiums <strong>Speedi</strong>,cf « Exemple de montage<br />
pour 6 éléments »).<br />
Démontage<br />
1 Démonter les accessoires du podium.<br />
2 Remonter et plier un côté du podium <strong>Speedi</strong> (cf. étape 5).<br />
3 Plier le deuxième côté du podium (cf. étape 4).<br />
4 Fermer le podium <strong>Speedi</strong> avec les crochets de sécurité<br />
(cf. étape 3).<br />
5 Pousser <strong>Speedi</strong> dans son entrepôt (cf. étape 1).<br />
<strong>Speedi</strong> <strong>vario</strong> Höhenverstellung height adjustment réglage de hauteur<br />
<strong>Speedi</strong> <strong>vario</strong> aus dem Lager rollen.<br />
Roll <strong>Speedi</strong> out of the store.<br />
Sortir <strong>Speedi</strong> de son entrepôt.<br />
<strong>Speedi</strong> <strong>vario</strong> an den Einsatzort stellen.<br />
Place <strong>Speedi</strong> in location.<br />
Placer <strong>Speedi</strong> à l’endroit voulu.<br />
Schritt 3 Step 3 Etape 3 Schritt 4 Step 4 Etape 4<br />
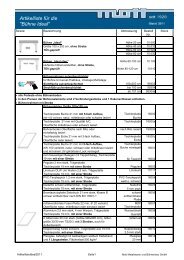
Beschlaghöhe einstellen: Drehknopf ca. 1 cm herausdrehen. Fuß auf beiden<br />
Seiten bis zur nächsten Rasterbohrung verschieben. Drehknopf handfest<br />
anziehen bis der Bolzen sichtbar ist.<br />
Setting the height: Unscrew knob approx. 1 cm. Slide foot on both sides as far<br />
as the next raster bore. Tighten knob hand-tight until the bolt is visible.<br />
Une fois la hauteur de la ferrure réglée : dévisser le bouton rotatif au<br />
maximum. Régler les pieds ou la ferrure à la hauteur voulue. Resserrer le<br />
bouton rotatif.<br />
Schritt 5 Step 5 Etape 5<br />
Klettverschluß öffnen.<br />
Open binder zip.<br />
Ouvrir la bande velcro.<br />
Schnappverschluss öffnen, Rundbügel aufklappen und in Schnappverschluss<br />
einrasten. Rundbügel auf der anderen Seite aufklappen und in Schnappverschluss<br />
einrasten.<br />
Open snap closure, fold out curved support and engaging in spring-actuated<br />
lock. Opening curved supports on the other hand and engaging in snap.<br />
Déplier les anses arrondies des deux côtés jusqu’à encliquetage du raccord<br />
autobloquant.<br />
Schritt 6 Step 6 Etape 6<br />
Eine Seite herunterklappen und auf die Rund-Bügel stellen.<br />
Fold one side down and rest it on the curved metal supports.<br />
Déplier un des côtés et le poser sur le sol avec l’anse arrondie.<br />
Schritt 7<br />
Andere Seite herunterklappen und auf die Rundbügel stellen. Mit leichtem<br />
Druck nach unten (durch eine Person) das Bühnenelement in die Endstellung<br />
bringen.<br />
Fold down the other side and rest it on the curved metal supports. Bring the<br />
stage unit into its end position with a light push (only one person necessary).<br />
Déplier l’autre côté et le poser sur le sol avec l’anse arrondie.<br />
Exercer une faible pression (une personne suffit), puis<br />
pousser les éléments de podium en position finale.<br />
Abbau To Dismantle Démontage<br />
1 Das Zubehör der <strong>Speedi</strong> <strong>vario</strong>-Bühne abbauen.<br />
Remove the stage’s accesories.<br />
Démonter les accessoires du podium <strong>Speedi</strong> <strong>vario</strong>.<br />
2 Eine Seite auf die Rundbügel stellen.<br />
Rest one side on its curved metal supports.<br />
Poser un des côtés sur les anses arrondies.<br />
3 Die andere Seite auf die Rundbügel stellen und hochklappen. (s. Schritt 6).<br />
Rest the other side on its curved metal supports and fold it up. (see Step 6).<br />
Poser également l’autre côté sur les anses arrondies et le rabattre entièrement.<br />
(cf. étape 6)<br />
4 Die andere Seite hochklappen.<br />
Fold up the other side.<br />
Rabattre l’autre côté.<br />
5 Klettverschluß der <strong>Speedi</strong> <strong>vario</strong>-Bühne schließen. (s. Schritt 5)<br />
Close Velcro fastener of the <strong>Speedi</strong> <strong>vario</strong>-platform. (see Step 5)<br />
Fermer la bande velcro du podium <strong>Speedi</strong> <strong>vario</strong>. (cf. étape 5)<br />
6 Schnappverschluss auf Press drücken und Rundbügel einklappen. Den<br />
anderen Rundbügel einklappen und in die Aufklappsicherung einrasten.<br />
Auf der anderen Seite den Vorgang wiederholen.<br />
Release the snap connection by hand and fold the curved metal support in.<br />
Do the same for the other support and clip them both into place. Repeat the<br />
procedure on the other side.<br />
Appuyer sur Press du raccord autobloquant et replier les anses arrondies.<br />
Plier l’autre anse arrondie et encliqueter la sécurité anti-dépliage. Répéter<br />
l’opération de l’autre côté.<br />
7 <strong>Speedi</strong> ins Lager rollen.<br />
Roll <strong>Speedi</strong> into the store.<br />
Pousser le podium <strong>Speedi</strong> dans son entrepôt.<br />
<strong>Speedi</strong> <strong>vario</strong><br />
Schritt 8<br />
<strong>Speedi</strong> aufstellen und mit den anderen Bühnen verbinden (siehe<br />
„Aufstellbeispiel bei 6 Elementen“).<br />
Position <strong>Speedi</strong> and connect it to the other stage units (see “Example<br />
positioning of 6 units”).<br />
Poser le podium <strong>Speedi</strong>, puis le relier à d’autres podiums<br />
(cf. « Exemple de montage pour 6 éléments »).