Tank Sprayer Safety and Operating Instructions - Gilmour
Tank Sprayer Safety and Operating Instructions - Gilmour
Tank Sprayer Safety and Operating Instructions - Gilmour

Create successful ePaper yourself
Turn your PDF publications into a flip-book with our unique Google optimized e-Paper software.
USING YOUR SPRAYER<br />
1. Remove pump <strong>and</strong> cap assembly(all models).<br />
2. Mix spray solution in a separate container, using the ratio specified on your chemical.<br />
3. Strain solution through fine cheesecloth or household strainer to remove particles that could clog nozzle.<br />
4. Use any amount of liquid up to the gallons/liters line. DO NOT fill beyond this line.<br />
5. Replace pump <strong>and</strong> cap assembly <strong>and</strong> tighten securely.<br />
6. Pressurize tank by pumping approximately 10-20 times (depending upon amount of liquid used.)<br />
7. To adjust nozzle cap. Tighten cap for fine spray or loosen for coarser spray or solid stream.<br />
WARNING Do not loosen tip more than 2-3 threads (full turns). Loosening tip too far will result in cap flying<br />
off allowing for spray to fly towards you.<br />
8. Pump occasionally to maintain tank pressure <strong>and</strong> desired spray pattern.<br />
9. Always have extension rod pointed away from you.<br />
CLEANING AND MAINTENANCE INSTRUCTIONS<br />
NOTE: A small amount of care will repay you in long life <strong>and</strong> efficient operation.<br />
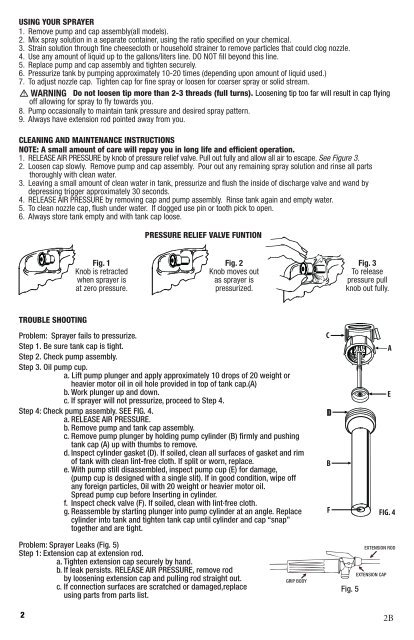
1. RELEASE AIR PRESSURE by knob of pressure relief valve. Pull out fully <strong>and</strong> allow all air to escape. See Figure 3.<br />
2. Loosen cap slowly. Remove pump <strong>and</strong> cap assembly. Pour out any remaining spray solution <strong>and</strong> rinse all parts<br />
thoroughly with clean water.<br />
3. Leaving a small amount of clean water in tank, pressurize <strong>and</strong> flush the inside of discharge valve <strong>and</strong> w<strong>and</strong> by<br />
depressing trigger approximately 30 seconds.<br />
4. RELEASE AIR PRESSURE by removing cap <strong>and</strong> pump assembly. Rinse tank again <strong>and</strong> empty water.<br />
5. To clean nozzle cap, flush under water. If clogged use pin or tooth pick to open.<br />
6. Always store tank empty <strong>and</strong> with tank cap loose.<br />
TROUBLE SHOOTING<br />
Fig. 1<br />
Knob is retracted<br />
when sprayer is<br />
at zero pressure.<br />
PRESSURE RELIEF VALVE FUNTION<br />
Fig. 2<br />
Knob moves out<br />
as sprayer is<br />
pressurized.<br />
Problem: <strong>Sprayer</strong> fails to pressurize.<br />
Step 1. Be sure tank cap is tight.<br />
Step 2. Check pump assembly.<br />
Step 3. Oil pump cup.<br />
a. Lift pump plunger <strong>and</strong> apply approximately 10 drops of 20 weight or<br />
heavier motor oil in oil hole provided in top of tank cap.(A)<br />
b. Work plunger up <strong>and</strong> down.<br />
c. If sprayer will not pressurize, proceed to Step 4.<br />
Step 4: Check pump assembly. SEE FIG. 4.<br />
a. RELEASE AIR PRESSURE.<br />
b. Remove pump <strong>and</strong> tank cap assembly.<br />
c. Remove pump plunger by holding pump cylinder (B) firmly <strong>and</strong> pushing<br />
tank cap (A) up with thumbs to remove.<br />
d. Inspect cylinder gasket (D). If soiled, clean all surfaces of gasket <strong>and</strong> rim<br />
of tank with clean lint-free cloth. If split or worn, replace.<br />
e. With pump still disassembled, inspect pump cup (E) for damage,<br />
(pump cup is designed with a single slit). If in good condition, wipe off<br />
any foreign particles, Oil with 20 weight or heavier motor oil.<br />
Spread pump cup before Inserting in cylinder.<br />
f. Inspect check valve (F). If soiled, clean with lint·free cloth.<br />
g. Reassemble by starting plunger into pump cylinder at an angle. Replace<br />
cylinder into tank <strong>and</strong> tighten tank cap until cylinder <strong>and</strong> cap “snap”<br />
together <strong>and</strong> are tight.<br />
Problem: <strong>Sprayer</strong> Leaks (Fig. 5)<br />
Step 1: Extension cap at extension rod.<br />
a. Tighten extension cap securely by h<strong>and</strong>.<br />
b. If leak persists. RELEASE AIR PRESSURE, remove rod<br />
by loosening extension cap <strong>and</strong> pulling rod straight out.<br />
c. If connection surfaces are scratched or damaged,replace<br />
using parts from parts list.<br />
GRIP BODY<br />
D<br />
Fig. 3<br />
To release<br />
pressure pull<br />
knob out fully.<br />
Fig. 5<br />
EXTENSION ROD<br />
EXTENSION CAP<br />
2 2B