4TRAK - Quickstart Guide - v1.1 - Numark
4TRAK - Quickstart Guide - v1.1 - Numark
4TRAK - Quickstart Guide - v1.1 - Numark

Create successful ePaper yourself
Turn your PDF publications into a flip-book with our unique Google optimized e-Paper software.
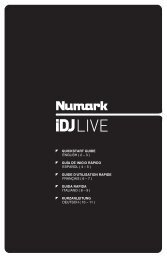
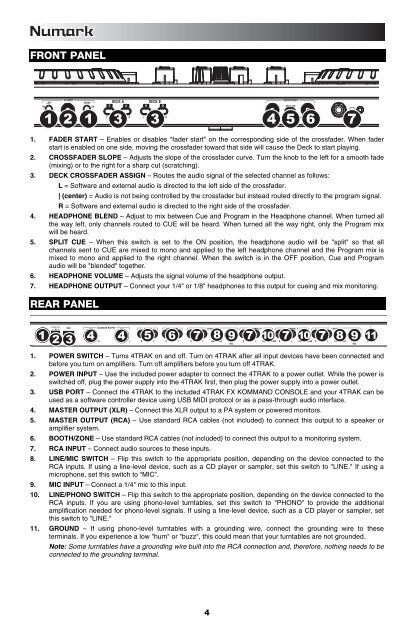
FRONT PANEL<br />
1 2 1 3 3 4 5 6 7<br />
1. FADER START – Enables or disables "fader start" on the corresponding side of the crossfader. When fader<br />
start is enabled on one side, moving the crossfader toward that side will cause the Deck to start playing.<br />
2. CROSSFADER SLOPE – Adjusts the slope of the crossfader curve. Turn the knob to the left for a smooth fade<br />
(mixing) or to the right for a sharp cut (scratching).<br />
3. DECK CROSSFADER ASSIGN – Routes the audio signal of the selected channel as follows:<br />
L = Software and external audio is directed to the left side of the crossfader.<br />
| (center) = Audio is not being controlled by the crossfader but instead routed directly to the program signal.<br />
R = Software and external audio is directed to the right side of the crossfader.<br />
4. HEADPHONE BLEND – Adjust to mix between Cue and Program in the Headphone channel. When turned all<br />
the way left, only channels routed to CUE will be heard. When turned all the way right, only the Program mix<br />
will be heard.<br />
5. SPLIT CUE – When this switch is set to the ON position, the headphone audio will be "split" so that all<br />
channels sent to CUE are mixed to mono and applied to the left headphone channel and the Program mix is<br />
mixed to mono and applied to the right channel. When the switch is in the OFF position, Cue and Program<br />
audio will be "blended" together.<br />
6. HEADPHONE VOLUME – Adjusts the signal volume of the headphone output.<br />
7. HEADPHONE OUTPUT – Connect your 1/4" or 1/8" headphones to this output for cueing and mix monitoring.<br />
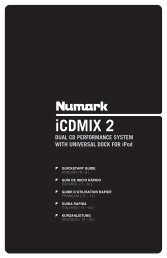
REAR PANEL<br />
1 2 3 4 4 5 6 7 8 9 7 10 7 10 7 8 9 11<br />
1. POWER SWITCH – Turns <strong>4TRAK</strong> on and off. Turn on <strong>4TRAK</strong> after all input devices have been connected and<br />
before you turn on amplifiers. Turn off amplifiers before you turn off <strong>4TRAK</strong>.<br />
2. POWER INPUT – Use the included power adapter to connect the <strong>4TRAK</strong> to a power outlet. While the power is<br />
switched off, plug the power supply into the <strong>4TRAK</strong> first, then plug the power supply into a power outlet.<br />
3. USB PORT – Connect the <strong>4TRAK</strong> to the included <strong>4TRAK</strong> FX KOMMAND CONSOLE and your <strong>4TRAK</strong> can be<br />
used as a software controller device using USB MIDI protocol or as a pass-through audio interface.<br />
4. MASTER OUTPUT (XLR) – Connect this XLR output to a PA system or powered monitors.<br />
5. MASTER OUTPUT (RCA) – Use standard RCA cables (not included) to connect this output to a speaker or<br />
amplifier system.<br />
6. BOOTH/ZONE – Use standard RCA cables (not included) to connect this output to a monitoring system.<br />
7. RCA INPUT – Connect audio sources to these inputs.<br />
8. LINE/MIC SWITCH – Flip this switch to the appropriate position, depending on the device connected to the<br />
RCA inputs. If using a line-level device, such as a CD player or sampler, set this switch to "LINE." If using a<br />
microphone, set this switch to “MIC”.<br />
9. MIC INPUT – Connect a 1/4" mic to this input.<br />
10. LINE/PHONO SWITCH – Flip this switch to the appropriate position, depending on the device connected to the<br />
RCA inputs. If you are using phono-level turntables, set this switch to "PHONO" to provide the additional<br />
amplification needed for phono-level signals. If using a line-level device, such as a CD player or sampler, set<br />
this switch to "LINE."<br />
11. GROUND – If using phono-level turntables with a grounding wire, connect the grounding wire to these<br />
terminals. If you experience a low "hum" or "buzz", this could mean that your turntables are not grounded.<br />
Note: Some turntables have a grounding wire built into the RCA connection and, therefore, nothing needs to be<br />
connected to the grounding terminal.<br />
4