Open/Close: Press to load or eject the disc - Numark
Open/Close: Press to load or eject the disc - Numark
Open/Close: Press to load or eject the disc - Numark

Create successful ePaper yourself
Turn your PDF publications into a flip-book with our unique Google optimized e-Paper software.
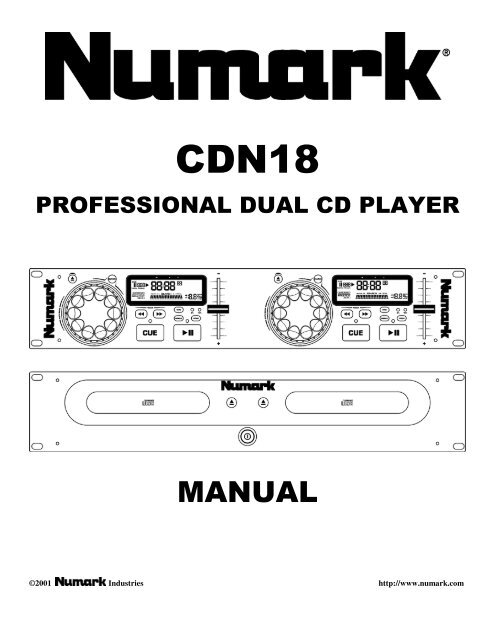
CDN18<br />
PROFESSIONAL DUAL CD PLAYER<br />
MANUAL<br />
©2001 Industries http://www.numark.com
CDN18<br />
SAFETY INSTRUCTIONS<br />
a) Read Instructions - All <strong>the</strong> safety and operating instructions should be read<br />
bef<strong>or</strong>e this product is connected and used.<br />
b) Retain Instructions - The safety and operating instructions should be kept<br />
f<strong>or</strong> future reference.<br />
c) Heed Warnings - All warnings on this product and in <strong>the</strong>se operating<br />
instructions should be followed.<br />
d) Follow Instructions - All operating and o<strong>the</strong>r instructions should be followed.<br />
e) Placement – place <strong>the</strong> unit in a clean dry location.<br />
f) Water and Moisture - This product should be kept away from direct contact<br />
with liquids. The apparatus shall not be exposed <strong>to</strong> dripping <strong>or</strong> splashing<br />
and that no objects filled with liquids, such as vases, shall be placed on <strong>the</strong><br />
apparatus.<br />
g) Temperature- Avoid placing this product <strong>to</strong> close <strong>to</strong> any high heat sources<br />
such as radia<strong>to</strong>rs. Do not use this unit at temperatures below 41°F/5°C <strong>or</strong><br />
higher than 95°F/35°C.<br />
h) Ventilation - The appliance should be situated so that it’s location <strong>or</strong><br />
position does not interfere with it’s proper ventilation. F<strong>or</strong> example, <strong>the</strong><br />
appliance should not be situated on a bed, sofa, rug, <strong>or</strong> similar surface that<br />
may block <strong>the</strong> ventilation opening; <strong>or</strong>, placed in a built-installation, such as<br />
bookcase <strong>or</strong> cabinet that may impede <strong>the</strong> flow of air through <strong>the</strong> ventilation<br />
openings.<br />
i) Power Sources - This product should be connected <strong>to</strong> a power supply only<br />
of <strong>the</strong> type described in <strong>the</strong>se operating instructions, <strong>or</strong> as marked on <strong>the</strong><br />
unit.<br />
j) Power C<strong>or</strong>d Protection - Power supply c<strong>or</strong>ds should be routed so that <strong>the</strong>y<br />
are not likely <strong>to</strong> be walked upon <strong>or</strong> pinched by items placed on <strong>or</strong> against<br />
<strong>the</strong>m. When removing <strong>the</strong> c<strong>or</strong>d from a power outlet be sure <strong>to</strong> remove it by<br />
holding <strong>the</strong> plug attachment and not by pulling on <strong>the</strong> c<strong>or</strong>d.<br />
k) Object and Liquid Entry - Take care that objects do not fall in<strong>to</strong> and that<br />
liquids are not spilled in<strong>to</strong> <strong>the</strong> inside of <strong>the</strong> mixer.<br />
l) Cleaning – The appliance should be cleaned only as recommended by <strong>the</strong><br />
manufacturer. Do not use chemical solvents <strong>to</strong> clean <strong>the</strong> unit.<br />
m) Non-use Periods – The power c<strong>or</strong>d of <strong>the</strong> appliance should be unplugged<br />
from <strong>the</strong> outlet when left unused f<strong>or</strong> long periods of time.<br />
n) Damage Requiring Service - Only qualified personnel should service this<br />
product. If you have any questions about service please contact <strong>Numark</strong> at<br />
<strong>the</strong> number(s) shown on <strong>the</strong> back cover of this manual.<br />
o) Grounding <strong>or</strong> Polarization - Precautions should be taken so that <strong>the</strong><br />
grounding <strong>or</strong> polarization means built in<strong>to</strong> <strong>the</strong> CD player is not defeated.<br />
p) Internal/External Voltage Selec<strong>to</strong>rs - Internal <strong>or</strong> external voltage selec<strong>to</strong>r<br />
switches, if any, should only be reset and re-equipped with a proper plug<br />
f<strong>or</strong> alternative voltage by a qualified service technician. Do not attempt <strong>to</strong><br />
alter this yourself.<br />
q) Carts and Stands -The appliance should be used only with a cart <strong>or</strong> stand<br />
that is recommended by <strong>the</strong> manufacturer of <strong>the</strong> cart <strong>or</strong> stand. An<br />
appliance and cart combination should be moved with care. Quick s<strong>to</strong>ps,<br />
excessive f<strong>or</strong>ce, and uneven surfaces may cause <strong>the</strong> appliance and cart<br />
combination <strong>to</strong> overturn.<br />
SERVICE INSTRUCTIONS<br />
• Disconnect power c<strong>or</strong>d bef<strong>or</strong>e servicing<br />
• Replace critical components only with fac<strong>to</strong>ry parts <strong>or</strong><br />
recommended equivalents<br />
• F<strong>or</strong> AC line powered units - Bef<strong>or</strong>e returning repaired unit <strong>to</strong> user,<br />
use an ohmmeter <strong>to</strong> measure from both AC plug blades <strong>to</strong> all exposed<br />
metallic parts. The resistance should be no m<strong>or</strong>e than 100,000ohms.<br />
DANGER: INVISIBLE LASER RADIATION WHEN OPEN AND INTERLOCK<br />
FAILED OR DEFEATED. AVOID DIRECT EXPOSURE TO BEAM.<br />
USE OF CONTROLS OR ADJUSTMENTS OTHER THAN THOSE SPECIFIED<br />
HEREIN MAY RESULT IN HAZARDOUS RADIATION EXPOSURE<br />
CAUTION: TO REDUCE THE RISK OF ELECTRIC SHOCK<br />
DO NOT REMOVE ANY COVER. NO USER-<br />
SERVICEABLE PARTS INSIDE. REFER SERVICING TO<br />
QUALIFIED SERVICE PERSONNEL ONLY.<br />
The lightning flash with arrowhead symbol within <strong>the</strong><br />
equilateral triangle is intended <strong>to</strong> alert <strong>the</strong> user <strong>to</strong> <strong>the</strong><br />
presence of un-insulated “dangerous voltage” within <strong>the</strong><br />
product’s enclosure that may be of sufficient magnitude <strong>to</strong><br />
constitute a risk of electric shock.<br />
The exclamation point within <strong>the</strong> equilateral triangle is<br />
intended <strong>to</strong> alert <strong>the</strong> user <strong>to</strong> <strong>the</strong> presence of imp<strong>or</strong>tant<br />
operating and maintenance (servicing) instructions in<br />
<strong>the</strong> literature accompanying this appliance.<br />
CAUTION<br />
FOR USA & CANADIAN MODELS ONLY<br />
TO PREVENT ELECTRIC SHOCK DO NOT USE<br />
THIS (POLARIZED) PLUG WITH AN<br />
EXTENSION CORD, RECEPTACLE OR OTHER<br />
OUTLET UNLESS THE BLADES CAN BE FULLY<br />
INSERTED TO PREVENT BLADE EXPOSURE.<br />
WARNING: To reduce <strong>the</strong> risk of fire <strong>or</strong> electrical shock, do not expose this<br />
appliance <strong>to</strong> rain <strong>or</strong> moisture. Electrical equipment should NEVER be kept <strong>or</strong><br />
s<strong>to</strong>red in damp environments.<br />
NOTICE CONCERNING FCC REGULATIONS<br />
This equipment generates and uses radio frequency energy and may cause<br />
interference <strong>to</strong> radio and television reception if you do not operate it in strict<br />
acc<strong>or</strong>dance with <strong>the</strong> procedures detailed in this OPERATING MANUAL.<br />
This unit complies with Class B computing device rules in acc<strong>or</strong>dance with<br />
<strong>the</strong> specifications in Sub-part J <strong>or</strong> Part 15 of <strong>the</strong> FCC Rules, which are<br />
designed <strong>to</strong> provide reasonable protection against such interference in a<br />
residential installation. There is no guarantee, however, that interference will<br />
not occur in a particular installation. If <strong>the</strong> unit does cause interference <strong>to</strong> any<br />
radio <strong>or</strong> television reception, try <strong>to</strong> reduce it by one <strong>or</strong> m<strong>or</strong>e of <strong>the</strong> following<br />
means:<br />
a) Reposition <strong>the</strong> o<strong>the</strong>r unit and/<strong>or</strong> its antennae<br />
b) Move this unit<br />
c) Move this unit and <strong>the</strong> o<strong>the</strong>r unit(s) fur<strong>the</strong>r apart<br />
d) Plug this unit in<strong>to</strong> a different AC outlet so that it is<br />
on a different circuit from <strong>the</strong> o<strong>the</strong>r equipment.<br />
This note is in acc<strong>or</strong>dance with Section 15.838 of <strong>the</strong> FCC Rules.<br />
This unit does not exceed <strong>the</strong> Class B limits f<strong>or</strong> radio noise emission<br />
from digital apparatus set out in <strong>the</strong> radio interference regulations of<br />
<strong>the</strong> Canadian Department of Communications.<br />
DOUBLE INSULATED - When servicing use only identical replacement parts<br />
F<strong>or</strong> 220-volt use in USA, use NEMA style 220-volt plug. F<strong>or</strong> o<strong>the</strong>r countries use proper plug f<strong>or</strong> local outlet.<br />
- The Leader in DJ Technology<br />
©2001 <strong>Numark</strong> Industries - 2 - http://www.numark.com
®<br />
CDN18<br />
CDN18<br />
PROFESSIONAL PROFESSIONAL DUAL DUAL DUAL CD CD PLAYER<br />
PLAYER<br />
CONGRATULATIONS...<br />
CDN18<br />
You have just purchased a CD player designed specifically f<strong>or</strong> <strong>the</strong> professional<br />
DJ. This unit has been designed <strong>to</strong> provide CD mixing with <strong>the</strong> same ease and<br />
creativity that you have enjoyed with rec<strong>or</strong>ds. Please take a few moments <strong>to</strong><br />
familiarize yourself with <strong>the</strong> CDN18 by reading <strong>the</strong> following inf<strong>or</strong>mation bef<strong>or</strong>e<br />
attempting <strong>to</strong> operate <strong>the</strong> unit.<br />
Once again, congratulations and thank you f<strong>or</strong> making <strong>the</strong> CDN18 your choice in<br />
professional CD players.<br />
FEATURES:<br />
• Interactive pitch wheel adjustment<br />
• Rubber but<strong>to</strong>ns<br />
• Digital Output<br />
• Frame search<br />
• Sleep mode<br />
CHECK TO BE SURE<br />
THE FOLLOWING ITEMS ARE IN THIS BOX:<br />
CD PLAYER TRANSPORT UNIT<br />
CD PLAYER CONTROL UNIT<br />
IEC POWER CORD<br />
• Rapid wheel search<br />
• Au<strong>to</strong> cue<br />
• Pitch display<br />
• CDR compatible<br />
OWNERS MANUAL (THIS BOOKLET)<br />
RCA CONNECTING CABLES (2 pair)<br />
CONTROL CABLE<br />
Please rec<strong>or</strong>d <strong>the</strong> serial number of your unit as shown on <strong>the</strong> back of <strong>the</strong> chassis as well as <strong>the</strong> name of <strong>the</strong> dealer from whom you<br />
purchased <strong>the</strong> unit. Retain this inf<strong>or</strong>mation and your <strong>or</strong>iginal purchase receipt f<strong>or</strong> your rec<strong>or</strong>ds. Please return <strong>the</strong> enclosed warranty<br />
card <strong>to</strong> register your CD player with us.<br />
MODEL: __________________________ PURCHASED FROM:_________________________<br />
SERIAL NUMBER:___________________ DATE OF PURCHASE:________________________<br />
- The Leader in DJ Technology<br />
©2001 <strong>Numark</strong> Industries - 3 - http://www.numark.com
CDN18<br />
TABLE OF CONTENTS<br />
Safety Instructions 2<br />
Introduction and Registration 3<br />
Set-up & Connections 5<br />
Description of <strong>the</strong> Features<br />
Face Panel 6<br />
Rear Panel 8<br />
Display 9<br />
Basic Operation<br />
Play, Pause and Cue Operations 11<br />
Matching <strong>the</strong> Tempo 12<br />
Beat Matching Using Pitch Bend 12<br />
Example of Mixing 13<br />
Bef<strong>or</strong>e Switching off <strong>the</strong> Power 14<br />
Troubleshooting Guide 14<br />
Inf<strong>or</strong>mation and Specifications 15<br />
Warranty 16<br />
- The Leader in DJ Technology<br />
©2001 <strong>Numark</strong> Industries - 4 - http://www.numark.com
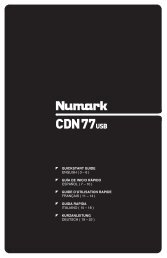
SETUP and CONNECTIONS<br />
Typical connection with a mixer is illustrated below.<br />
1. Mount <strong>the</strong> units in your console <strong>or</strong> rack with 19” EIA rails.<br />
2. The transp<strong>or</strong>t should be mounted not <strong>to</strong> exceed an angle of 15 degrees.<br />
3. Your CD player can be affected by excess vibration so mount <strong>the</strong> units in a secure<br />
environment if possible.<br />
4. Connect <strong>the</strong> supplied Control Cable between <strong>the</strong> CD Control and CD Transp<strong>or</strong>t unit.<br />
5. Connect <strong>the</strong> line output connections using <strong>the</strong> supplied audio cables from <strong>the</strong> CD<br />
Player <strong>to</strong> <strong>the</strong> line inputs of your mixer.<br />
6. Connect IEC power c<strong>or</strong>d <strong>to</strong> appropriate power source.<br />
LINE VOLTAGE SELECTION<br />
1) The desired voltage may be set with <strong>the</strong> VOLTAGE SELECTOR switch on <strong>the</strong> rear panel of <strong>the</strong> unit.<br />
2) Do not move <strong>the</strong> VOLTAGE SELECTOR switch with excessive f<strong>or</strong>ce as this may cause damage.<br />
3) If <strong>the</strong> VOLTAGE SELECTOR switch does not move smoothly contact a qualified serviceman.<br />
DIGITAL OUTPUTS: This CD player is specially equipped with digital outputs. The f<strong>or</strong>mat is type 2, f<strong>or</strong>m 1,<br />
also known as S/PDIF (Sony/Phillips Digital Interface F<strong>or</strong>mat). When <strong>the</strong> digital output is used <strong>the</strong> variable<br />
pitch slider and pitch bend but<strong>to</strong>ns <strong>or</strong> pitch wheel should not be used.<br />
Note: If digital inf<strong>or</strong>mation is allowed <strong>to</strong> change in pitch, o<strong>the</strong>r devices may not read <strong>the</strong> digital output properly.<br />
CDN18<br />
- The Leader in DJ Technology<br />
©2001 <strong>Numark</strong> Industries - 5 - http://www.numark.com<br />
115V<br />
230V
CDN18<br />
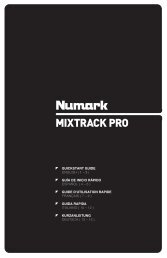
FRONT PANEL FEATURES<br />
1. <strong>Open</strong>/<strong>Close</strong>: <strong>Press</strong> <strong>to</strong> <strong>load</strong> <strong>or</strong> <strong>eject</strong> <strong>the</strong> <strong>disc</strong>. The tray will not open if a <strong>disc</strong> is in play. The tray<br />
do<strong>or</strong> will au<strong>to</strong>matic close in 30 seconds if left open. This is <strong>to</strong> protect <strong>the</strong> tray from accidental<br />
damage while open<br />
2. Single: <strong>to</strong>ggles <strong>the</strong> unit <strong>to</strong> play back just one track at a time (single) <strong>or</strong> play continuously through<br />
all tracks and <strong>the</strong>n start over repeating <strong>the</strong> CD infinitely (continuous).<br />
3. Time: switches <strong>the</strong> time modes on <strong>the</strong> display between elapsed playing time, remaining time on<br />
<strong>the</strong> track, and remaining time on <strong>the</strong> <strong>to</strong>tal CD. When <strong>to</strong>ggled <strong>to</strong> remaining time <strong>to</strong>tal <strong>the</strong> <strong>to</strong>tal<br />
number of remaining tracks will also show.<br />
4. LCD DISPLAY - Indicates all <strong>the</strong> functions, as <strong>the</strong>y are occurring, with <strong>the</strong> CD.<br />
5. Track But<strong>to</strong>ns: These but<strong>to</strong>ns are used <strong>to</strong> select <strong>the</strong> track <strong>to</strong> be played.<br />
6. Search But<strong>to</strong>n: <strong>Press</strong>ing this but<strong>to</strong>n allows you <strong>to</strong> use <strong>the</strong> wheel and rapidly scan <strong>the</strong> music <strong>to</strong><br />
find a cue point. The search function au<strong>to</strong>matically shuts off after 8 seconds of non-use <strong>or</strong> you<br />
may <strong>to</strong>ggle it off.<br />
7. Cue: Returns and pauses <strong>the</strong> music at <strong>the</strong> last set cue point. The cue point is where <strong>the</strong> music<br />
will begin when play is pressed. The cue point is set as <strong>the</strong> initial start point on a track <strong>or</strong> can be<br />
moved when play is started at a different point. F<strong>or</strong> instance if <strong>the</strong> music is paused <strong>the</strong>n play is<br />
pressed a new cue point is set. You can easily edit <strong>the</strong> cue point by turning <strong>the</strong> wheel during<br />
pause. As you rotate <strong>the</strong> wheel <strong>the</strong> music will sound. By s<strong>to</strong>pping <strong>the</strong> wheel and pressing play a<br />
new point is set. Alternately pressing <strong>the</strong> PLAY but<strong>to</strong>n and <strong>the</strong> CUE but<strong>to</strong>n allows <strong>the</strong> CD <strong>to</strong> be<br />
played from <strong>the</strong> same position any number of times.<br />
Note: <strong>Press</strong>ing cue 2 times plays music temp<strong>or</strong>arily from this point until <strong>the</strong> but<strong>to</strong>n is released.<br />
- The Leader in DJ Technology<br />
©2001 <strong>Numark</strong> Industries - 6 - http://www.numark.com
CDN18<br />
8. Play/Pause: Starts <strong>the</strong> music from <strong>the</strong> cue point <strong>or</strong> pauses it while in play. By pressing play after<br />
pause a new cue point will be set<br />
9. Jog Wheel:<br />
Cue Function: As explained under “CUE”, when <strong>the</strong> music is paused and you rotate <strong>the</strong> wheel,<br />
music will sound. By pressing play a new cue point is set.<br />
Search Function: As explained under “SEARCH BUTTON”, when search is press and you rotate<br />
<strong>the</strong> wheel, <strong>the</strong> music will rapidly scan <strong>the</strong> music <strong>to</strong> find a cue point.<br />
Pitch Bend Function: allows <strong>the</strong> user <strong>to</strong> temp<strong>or</strong>arily change <strong>the</strong> speed of <strong>the</strong> music <strong>to</strong> align<br />
beats. When <strong>the</strong> beats of <strong>the</strong> music of <strong>the</strong> CD you wish <strong>to</strong> match is fast compared <strong>to</strong> <strong>the</strong> tempo of<br />
<strong>the</strong> o<strong>the</strong>r music rotate <strong>the</strong> jog wheel counter clockwise (<strong>to</strong> <strong>the</strong> left). When <strong>the</strong> CD is behind rotate<br />
<strong>the</strong> jog wheel clockwise (<strong>to</strong> <strong>the</strong> right). The pitch changes temp<strong>or</strong>arily while <strong>the</strong> jog wheel is rotated.<br />
The faster you rotate <strong>the</strong> wheel <strong>the</strong> m<strong>or</strong>e pitch is changed. Releasing <strong>the</strong> wheel results in a<br />
return <strong>to</strong> <strong>the</strong> <strong>or</strong>iginal pitch.<br />
10. Pitch Range: actives <strong>the</strong> pitch slider and adjusts <strong>the</strong> amount of control <strong>the</strong> pitch slider has on <strong>the</strong><br />
overall speed of music. Tapping <strong>the</strong> pitch will <strong>to</strong>ggle slider between 8% and 16% pitch ranges.<br />
Holding <strong>the</strong> pitch f<strong>or</strong> 3 seconds will deactivate <strong>the</strong> pitch control.<br />
11. Pitch Range LEDs: indicate current pitch range. When both LEDs are off <strong>the</strong> pitch slider is not<br />
active<br />
12. Pitch Slider: By moving <strong>the</strong> slider in <strong>the</strong> (+) direction <strong>the</strong> speed of <strong>the</strong> music permanently speeds<br />
up. By moving <strong>the</strong> slider in <strong>the</strong> (-) direction <strong>the</strong> speed of <strong>the</strong> music permanently slows down. To<br />
match <strong>the</strong> speeds of two CDs you can adjust <strong>the</strong> pitch. When <strong>the</strong> tempo of <strong>the</strong> music of <strong>the</strong> CD<br />
you wish <strong>to</strong> match is slow compared <strong>to</strong> <strong>the</strong> tempo of <strong>the</strong> o<strong>the</strong>r music, move <strong>the</strong> slider <strong>to</strong> <strong>the</strong> (+)<br />
side and match <strong>the</strong> speed. When faster, move <strong>the</strong> pitch slider <strong>to</strong> <strong>the</strong> (-) side. By making this<br />
adjustment <strong>the</strong> speeds will be matched though <strong>the</strong> beats may not yet be aligned.<br />
13. CD Drawer – Place your CDs you wish <strong>to</strong> play in here. This unit is designed <strong>to</strong> play commercially<br />
available CD and properly burned and finalized CDR and CDRW f<strong>or</strong>mats. Due <strong>to</strong> variances on<br />
<strong>the</strong> specification of certain CD burners and CDs some <strong>disc</strong>s home made CDs may not play<br />
properly.<br />
14. Power Switch- Turn on and turn off <strong>the</strong> machine with this but<strong>to</strong>n. The unit should always be shut<br />
down with this but<strong>to</strong>n first bef<strong>or</strong>e any external power is removed.<br />
- The Leader in DJ Technology<br />
©2001 <strong>Numark</strong> Industries - 7 - http://www.numark.com
CDN18<br />
REAR PANEL FEATURES<br />
15. Control Cable Connec<strong>to</strong>r- Plug in <strong>the</strong> 8-pin cable included in here <strong>to</strong> connect <strong>the</strong> remote control<br />
and main CD unit <strong>to</strong>ge<strong>the</strong>r<br />
16. IEC Power Plug Connec<strong>to</strong>r - Plug your supplied power c<strong>or</strong>d in here.<br />
17. Voltage Selec<strong>to</strong>r - Set this switch <strong>to</strong> <strong>the</strong> voltage f<strong>or</strong> your location.<br />
18. RCA Audio Connec<strong>to</strong>rs - Connect your CD player <strong>to</strong> your mixer from this line level output.<br />
19. Digital Output - The f<strong>or</strong>mat is type 2, f<strong>or</strong>m 1, also known as S/PDIF (Sony/Phillips Digital<br />
Interface F<strong>or</strong>mat). In <strong>or</strong>der <strong>to</strong> use <strong>the</strong> digital output you should not use variable pitch slider and<br />
<strong>the</strong> pitch bend but<strong>to</strong>ns. If you adjust <strong>the</strong> pitch, o<strong>the</strong>r devices may not read <strong>the</strong> digital output<br />
properly because <strong>the</strong> sampling rate changes<br />
- The Leader in DJ Technology<br />
©2001 <strong>Numark</strong> Industries - 8 - http://www.numark.com
DISPLAY FEATURES<br />
CDN18<br />
1. CUE - Flashing when <strong>the</strong> unit is setting a cue point. Lit continuously when <strong>the</strong> unit is<br />
paused at a cue point.<br />
2. PAUSE (II)- Active when <strong>the</strong> unit is paused.<br />
3. PLAY (>)- Active while <strong>the</strong> unit is actually playing a CD.<br />
4. TRACK - Shows <strong>the</strong> track that <strong>the</strong> unit is playing.<br />
5. TOTAL – indicates when <strong>to</strong>tal CD remaining tracks are displayed.<br />
6. MINUTES - Shows <strong>the</strong> minutes elapsed <strong>or</strong> remaining depending on mode setting.<br />
7. SECONDS - Shows <strong>the</strong> seconds elapsed <strong>or</strong> remaining depending on mode setting.<br />
8. FRAMES - The CD Player breaks down a second in<strong>to</strong> 75 frames f<strong>or</strong> accurate cueing. This<br />
shows <strong>the</strong> frames elapsed <strong>or</strong> remaining depending on mode setting.<br />
9. SEARCH – indicates when <strong>the</strong> unit is searching through <strong>the</strong> music<br />
10. CONTINUOUS PLAY – Shows when <strong>the</strong> unit is set <strong>to</strong> play back <strong>the</strong> entire CD without<br />
s<strong>to</strong>pping between tracks.<br />
11. SINGLE PLAY- Shows when <strong>the</strong> unit is set <strong>to</strong> play just one track at a time.<br />
12. CD IN – indicates a standard CD is in <strong>the</strong> unit.<br />
13. TIME BAR - Shows ei<strong>the</strong>r track elapsed time, remaining track time, <strong>or</strong> remaining <strong>to</strong>tal time<br />
depending on <strong>the</strong> setting of <strong>the</strong> “time” but<strong>to</strong>n.<br />
TIME MODE -<br />
14. (Remain) indicates when track remain time is displayed.<br />
15. (Total) indicates when <strong>to</strong>tal CD remain time is displayed<br />
note: if both indications will not be lit when <strong>the</strong> unit is showing “elapsed” time<br />
16. PITCH DISPLAY – indicating current pitch<br />
- The Leader in DJ Technology<br />
©2001 <strong>Numark</strong> Industries - 9 - http://www.numark.com
CDN18<br />
- The Leader in DJ Technology<br />
©2001 <strong>Numark</strong> Industries - 10 - http://www.numark.com
DESCRIPTION OF THE PLAY/PAUSE AND CUE OPERATIONS<br />
PLAY and CUE<br />
CDN18<br />
<strong>Press</strong>ing <strong>the</strong> “PLAY/PAUSE” but<strong>to</strong>n starts <strong>the</strong> <strong>disc</strong>. <strong>Press</strong>ing <strong>the</strong> “CUE” but<strong>to</strong>n will reset <strong>the</strong> <strong>disc</strong> <strong>to</strong> <strong>the</strong> last place<br />
where <strong>the</strong> <strong>disc</strong> was started. This is called <strong>the</strong> cue point. By alternately pressing <strong>the</strong> “PLAY/PAUSE” but<strong>to</strong>n and <strong>the</strong><br />
“CUE” but<strong>to</strong>n, <strong>the</strong> <strong>disc</strong> may be returned and played from <strong>the</strong> cue point any number of times. This function is called back<br />
cue.<br />
PLAY, PAUSE and CUE<br />
point<br />
When Play is paused and <strong>the</strong>n started again, <strong>the</strong> return position f<strong>or</strong> <strong>the</strong> back cue will be updated as <strong>the</strong> new cue<br />
EDITING CUE POINT<br />
When <strong>the</strong> jog wheel is turned while a cue point is set, a new cue point can be located. The CD player will<br />
repeatedly play small parts of <strong>the</strong> CD as you move it <strong>to</strong> <strong>the</strong> desired position. By pressing “PLAY/PAUSE” <strong>the</strong>n “CUE” you<br />
can confirm that this new cue point is desirable.<br />
- The Leader in DJ Technology<br />
©2001 <strong>Numark</strong> Industries - 11 - http://www.numark.com
CDN18<br />
MATCHING THE BEATS PER MINUTE (BPM)<br />
Match <strong>the</strong> tempo by moni<strong>to</strong>ring <strong>the</strong> music of both PLAYER 1 and PLAYER 2 by ear and adjusting <strong>the</strong> pitch.<br />
When <strong>the</strong> tempo of <strong>the</strong> music of <strong>the</strong> selected CD player is slow compared <strong>to</strong> <strong>the</strong> tempo of <strong>the</strong> o<strong>the</strong>r player, move <strong>the</strong><br />
slider <strong>to</strong> <strong>the</strong> “+” side and match <strong>the</strong> tempo. When faster, move <strong>the</strong> pitch slider <strong>to</strong> <strong>the</strong> “-“ side. The following description is<br />
f<strong>or</strong> <strong>the</strong> case of matching <strong>the</strong> pitch of PLAYER 2 <strong>to</strong> <strong>the</strong> pitch of <strong>the</strong> music being played on PLAYER 1.<br />
<strong>Press</strong> PLAY/PAUSE <strong>to</strong> start PLAYER 1<br />
PLAYER 1 is playing<br />
When PLAYER 2 is slow<br />
compared <strong>to</strong> PLAYER 1<br />
speed up PLAYER 2<br />
<strong>Press</strong> PLAY/PAUSE <strong>to</strong> start PLAYER 2<br />
Both CD players are playing <strong>disc</strong>s.<br />
Listen <strong>to</strong> PLAYER 2 in your headphones<br />
When PLAYER 2 is fast<br />
compared <strong>to</strong> PLAYER 1<br />
slow down PLAYER 2<br />
MATCHING BEATS USING PITCH BEND<br />
If you find <strong>the</strong> BPM’s (Beats Per Minute <strong>or</strong> Tempos) are <strong>the</strong> same, however, <strong>the</strong> drumbeats are not matched you<br />
will need <strong>to</strong> temp<strong>or</strong>arily change <strong>the</strong> pitch. This description is f<strong>or</strong> <strong>the</strong> case of matching <strong>the</strong> beat of PLAYER 2 <strong>to</strong> <strong>the</strong> beat of<br />
<strong>the</strong> music being played on PLAYER 1. (This procedure can be done on ei<strong>the</strong>r PLAYER).<br />
After matching <strong>the</strong> BPM’s adjust <strong>the</strong> pitch temp<strong>or</strong>arily as follows:<br />
When PLAYER 2 is behind rotate <strong>the</strong> jog wheel<br />
clockwise <strong>to</strong> bend pitch faster<br />
When PLAYER 2 is ahead rotate <strong>the</strong> jog wheel counter<br />
clockwise <strong>to</strong> bend pitch slower.<br />
The pitch changes au<strong>to</strong>matically while <strong>the</strong> jog wheel is rotated. The faster you rotate <strong>the</strong> wheel <strong>the</strong> m<strong>or</strong>e you change.<br />
Releasing <strong>the</strong> wheel results in a return <strong>to</strong> <strong>the</strong> <strong>or</strong>iginal pitch. (So <strong>the</strong> BPM’s are once again <strong>the</strong> same)<br />
- The Leader in DJ Technology<br />
©2001 <strong>Numark</strong> Industries - 12 - http://www.numark.com
EXAMPLE OF MIXING USING TWO CD PLAYERS<br />
While playing a <strong>disc</strong> on PLAYER 1 <strong>load</strong> a <strong>disc</strong> in<strong>to</strong> PLAYER 2 and select your next track, match its<br />
pitch <strong>to</strong> <strong>the</strong> track playing on PLAYER1 and when you are ready use <strong>the</strong> crossfader on your mixer <strong>to</strong> fade from<br />
PLAYER 1 <strong>to</strong> PLAYER 2.<br />
Load a <strong>disc</strong> in PLAYER 1<br />
and select <strong>the</strong> track and<br />
press PLAY.<br />
Load a <strong>disc</strong> in PLAYER 2<br />
and select <strong>the</strong> track <strong>the</strong>n<br />
play.<br />
Set and edit a start cue<br />
point on PLAYER 2<br />
Check you new cue point<br />
Do a MIX!<br />
PLAYER 1<br />
Load a <strong>disc</strong> and press <strong>the</strong><br />
OPEN/CLOSE but<strong>to</strong>n.<br />
PLAYER 2<br />
Load a <strong>disc</strong> and press <strong>the</strong><br />
OPEN/CLOSE but<strong>to</strong>n.<br />
PLAYER 2<br />
<strong>Press</strong> <strong>the</strong> Pause but<strong>to</strong>n of<br />
PLAYER 2.<br />
PLAYER 2<br />
Listen with <strong>the</strong> moni<strong>to</strong>r and<br />
press <strong>the</strong> play but<strong>to</strong>n.<br />
PLAYER 2<br />
With a matching downbeat<br />
from Player 1 press <strong>the</strong><br />
play but<strong>to</strong>n.<br />
PLAYER 1<br />
Select <strong>the</strong> track <strong>to</strong> be<br />
played.<br />
PLAYER 2<br />
Select <strong>the</strong> track <strong>to</strong> be<br />
played.<br />
PLAYER 2<br />
<strong>Press</strong> search and rotate<br />
wheel <strong>to</strong> rapidly look f<strong>or</strong> a<br />
cue point.<br />
PLAYER 2<br />
<strong>Press</strong> <strong>the</strong> cue but<strong>to</strong>n <strong>the</strong>n<br />
play <strong>to</strong> be sure of <strong>the</strong> set<br />
cue point.<br />
PLAYER 2<br />
If you are beat mixing turn<br />
on your Pitch adjust and<br />
follow <strong>the</strong> directions f<strong>or</strong><br />
beat matching.<br />
PLAYER 1<br />
CDN18<br />
<strong>Press</strong> <strong>the</strong> PLAY but<strong>to</strong>n<br />
PLAYER 2<br />
<strong>Press</strong> <strong>the</strong> PLAY but<strong>to</strong>n<br />
PLAYER 2<br />
<strong>Press</strong> search <strong>to</strong> release.<br />
Slowly set <strong>the</strong> right cue<br />
point using <strong>the</strong> jog wheel.<br />
PLAYER 2<br />
Set <strong>the</strong> player <strong>to</strong> <strong>the</strong> Cue<br />
point by pressing Cue<br />
MIXER<br />
When you are happy with<br />
you mix adjust you mixer<br />
acc<strong>or</strong>dingly.<br />
- The Leader in DJ Technology<br />
©2001 <strong>Numark</strong> Industries - 13 - http://www.numark.com
CDN18<br />
BEFORE SWITCHING OFF THE POWER:<br />
When you have finished using <strong>the</strong> CD player, be sure that <strong>the</strong> <strong>disc</strong> tray is closed with <strong>the</strong> “OPEN/CLOSE” but<strong>to</strong>n bef<strong>or</strong>e<br />
switching off <strong>the</strong> power.<br />
DO NOT switch off <strong>the</strong> power when<br />
<strong>the</strong> <strong>disc</strong> holder is open.<br />
TROUBLESHOOTING:<br />
Switch off <strong>the</strong> power after <strong>the</strong><br />
<strong>disc</strong> holder has been closed<br />
with <strong>the</strong> “OPEN/CLOSE” but<strong>to</strong>n<br />
Symp<strong>to</strong>m Possible Cause C<strong>or</strong>rective Action<br />
The power fails <strong>to</strong> switch on when <strong>the</strong><br />
POWER switch is set <strong>to</strong> on<br />
Po<strong>or</strong> power plug connection at <strong>the</strong> AC<br />
outlet <strong>or</strong> IEC Power c<strong>or</strong>d loose from<br />
rear of unit<br />
Disc play does not start The <strong>disc</strong> is <strong>load</strong>ed upside down<br />
The <strong>disc</strong> is <strong>to</strong>o dirty<br />
No sound Improper output cable connections<br />
Improper amplifier operation<br />
Sound skips The CD player is subject <strong>to</strong> vibrations<br />
<strong>or</strong> physical shock<br />
The <strong>disc</strong> is <strong>to</strong>o dirty<br />
Insert <strong>the</strong> power plug firmly in<strong>to</strong> <strong>the</strong> AC<br />
outlet and make sure connection is<br />
good in unit rear<br />
Re<strong>load</strong> <strong>the</strong> <strong>disc</strong> with <strong>the</strong> label side up<br />
Clean <strong>the</strong> <strong>disc</strong><br />
Connect <strong>the</strong> output cables c<strong>or</strong>rectly<br />
Check amplifier setup<br />
Change <strong>the</strong> installation location<br />
Clean <strong>the</strong> <strong>disc</strong><br />
Hum Loose cable connections Firmly connect all audio plugs<br />
- The Leader in DJ Technology<br />
©2001 <strong>Numark</strong> Industries - 14 - http://www.numark.com
SPECIFICATIONS<br />
TECHNICAL<br />
GENERAL<br />
Disc Type Standard Compact <strong>disc</strong>s (12 cm & 8 cm)<br />
Time Display Track Elapsed, Track Remain, <strong>or</strong> Total remain<br />
Quantization 1 bit linear/Channel, 3 Beam Laser<br />
Oversampling rate 8 Times<br />
Sampling Frequency 44.1 kHz<br />
Frequency response 20 Hz <strong>to</strong> 20 kHz<br />
T.H.D. + NOISE Less Than 0.01%<br />
S/N ratio (IHF-A) > 90 dB<br />
Channel separation > 90 dB<br />
Output level 2 Volts R.M.S.<br />
Sh<strong>or</strong>t Access Time < 1.5 seconds<br />
Long Access Time < 3 seconds<br />
Start Time within 0.03 seconds<br />
Pitch control range +/- 8 and 16%<br />
Pitch bend +/-16%<br />
Digital Output type 2, f<strong>or</strong>m 1, S/PDIF (Sony/Phillips Digital Interface F<strong>or</strong>mat)<br />
Dimensions: Controller (mm): 482 X 88.5X 46<br />
Main Unit: 482 X 88.5 X 257<br />
Weight: Controller: 1.7 Kg<br />
Main Unit 4.9 Kg<br />
Power Supply: 115/230V AC, 50/60Hz<br />
Power Consumption: 24W<br />
CDN18<br />
- The Leader in DJ Technology<br />
©2000 <strong>Numark</strong> Industries - 15 - http://www.numark.com
Professional Disc Jockey Products<br />
LIMITED PRODUCT WARRANTY<br />
1. What is covered and f<strong>or</strong> how long? NUMARK INDUSTRIES LCC ("NUMARK") warrants <strong>to</strong> <strong>the</strong> <strong>or</strong>iginal purchaser that NUMARK'S DJ Mixers, Amplifiers, CD<br />
players, turntables, preamplifiers, beatkeepers, equalizers, microphones, headphones, and all o<strong>the</strong>r access<strong>or</strong>ies are free from defects in material and<br />
w<strong>or</strong>kmanship under n<strong>or</strong>mal use and service f<strong>or</strong> <strong>the</strong> period commencing upon <strong>the</strong> date of purchase from an auth<strong>or</strong>ized NUMARK dealer and continuing f<strong>or</strong> <strong>the</strong><br />
following period of time after that date f<strong>or</strong> (1) Year.<br />
2. What is not covered? This Limited Warranty is conditioned upon proper use of <strong>the</strong> product by <strong>the</strong> purchaser.<br />
This Limited Warranty does not cover: (a) defects <strong>or</strong> damage resulting from accident, misuse, abuse, neglect, unusual physical <strong>or</strong> electrical stress, modification<br />
of any part of <strong>the</strong> product, <strong>or</strong> cosmetic damage; (b) equipment that has <strong>the</strong> serial number removed <strong>or</strong> made illegible; (c) all plastic surfaces and o<strong>the</strong>r externally<br />
exposed parts that are scratched <strong>or</strong> damaged due <strong>to</strong> n<strong>or</strong>mal use; (d) defects <strong>or</strong> damage from improper testing, operation, maintenance, installation, adjustment,<br />
<strong>or</strong> service of <strong>the</strong> mixers; (e) crossfaders.<br />
3. What are NUMARK'S obligations? During <strong>the</strong> applicable warranty period, NUMARK will repair <strong>or</strong> replace, at NUMARK'S sole <strong>disc</strong>retion, without charge <strong>to</strong> <strong>the</strong><br />
purchaser, any defective component part of <strong>the</strong> mixer. To obtain service under this Limited Warranty, purchaser must first contact NUMARK and obtain a return<br />
auth<strong>or</strong>ization number ("RA#"). Purchaser must <strong>the</strong>n return <strong>the</strong> mixer <strong>to</strong> NUMARK in an adequate container f<strong>or</strong> shipping, accompanied by purchaser's sales<br />
receipt <strong>or</strong> comparable proof of sale showing <strong>the</strong> date of purchase, <strong>the</strong> serial number of <strong>the</strong> product, and <strong>the</strong> seller's name and address. To obtain an RA# and<br />
assistance on where <strong>to</strong> return <strong>the</strong> mixer, contact NUMARK cus<strong>to</strong>mer service at 401-295 9000. Upon receipt, NUMARK will repair <strong>or</strong> replace <strong>the</strong> defective<br />
products. NUMARK may, at NUMARK'S sole <strong>disc</strong>retion, use rebuilt, reconditioned, <strong>or</strong> new parts <strong>or</strong> components when repairing any product <strong>or</strong> replace a<br />
product with a rebuilt, reconditioned <strong>or</strong> new product. Repaired mixers will be warranted f<strong>or</strong> a period equal <strong>to</strong> <strong>the</strong> remainder of <strong>the</strong> <strong>or</strong>iginal Limited Warranty on<br />
<strong>the</strong> <strong>or</strong>iginal mixer <strong>or</strong> f<strong>or</strong> (90) days, whichever is longer. All replaced parts, components, boards and equipment become <strong>the</strong> property of NUMARK. If NUMARK<br />
determines that any mixer is not covered by this Limited Warranty, purchaser must pay all parts, shipping, and lab<strong>or</strong> charges f<strong>or</strong> <strong>the</strong> repair <strong>or</strong> return of such<br />
mixer.<br />
4. What are <strong>the</strong> limits on NUMARK'S liabilities? THE WARRANTIES GIVEN IN THIS LIMITED WARRANTY, TOGETHER WITH ANY IMPLIED WARRANTIES<br />
COVERING NUMARK MIXERS, INCLUDING WITHOUT LIMITATION ANY WARRANTIES OF MERCHANTABILITY OR FITNESS FOR A PARTICULAR<br />
PURPOSE, ARE LIMITED TO THE DURATION OF THIS LIMITED WARRANTY. EXCEPT TO THE EXTENT PROHIBITED BY APPLICABLE LAW, NUMARK<br />
SHALL NOT BE LIABLE FOR ANY SPECIAL, INCIDENTAL, CONSEQUENTIAL, INDIRECT OR SIMILAR DAMAGES, LOSS OF PROFITS, DAMAGES TO<br />
PURCHASER'S PROPERTY, OR INJURY TO PURCHASER OR OTHERS ARISING OUT OF THE USE, MISUSE OR INABILITY TO USE ANY NUMARK<br />
MIXER, BREACH OF WARRANTY, OR NEGLIGENCE, INCLUDING BUT NOT LIMITED TO NUMARK'S OWN NEGLIGENCE, EVEN IF NUMARK OR ITS<br />
AGENT HAS BEEN ADVISED OF SUCH DAMAGES, OR FOR ANY CLAIM BROUGHT AGAINST PURCHASER BY ANY OTHER PARTY. THIS LIMITED<br />
WARRANTY IS THE COMPLETE WARRANTY FOR NUMARK'S MIXERS, AND IS GIVEN IN LIEU OF ALL OTHER EXPRESS WARRANTIES. THIS<br />
LIMITED WARRANTY SHALL NOT EXTEND TO ANYONE OTHER THAN THE ORIGINAL PURCHASER OF THIS PRODUCT AND STATES PURCHASER'S<br />
EXCLUSIVE REMEDY. IF ANY PORTION OF THIS LIMITED WARRANTY IS ILLEGAL OR UNENFORCEABLE BY REASON OF ANY LAW, SUCH PARTIAL<br />
ILLEGALITY OR UNENFORCEABILTY SHALL NOT AFFECT THE ENFORCEABILITY OF THE REMAINDER OF THIS LIMITED WARRANTY WHICH<br />
PURCHASER ACKNOWLEDGES IS AND WILL ALWAYS BE CONSTRUED TO BE LIMITED BY ITS TERMS OR AS LIMITED AS THE LAW PERMITS.<br />
This Limited Warranty allocates risk of product failure between purchaser and NUMARK, and NUMARK'S product pricing reflects this allocation of risk and <strong>the</strong><br />
limitations of liability contained in this Limited Warranty. The agents, employees, distribu<strong>to</strong>rs, and dealers of NUMARK are not auth<strong>or</strong>ized <strong>to</strong> make modifications<br />
<strong>to</strong> this Limited Warranty, <strong>or</strong> make additional warranties binding on NUMARK. Acc<strong>or</strong>dingly, additional statements such as dealer advertising <strong>or</strong> presentation,<br />
whe<strong>the</strong>r <strong>or</strong>al <strong>or</strong> written, do not constitute warranties by NUMARK and should not be relied upon.<br />
5. How does state law apply <strong>to</strong> this warranty? SOME STATES DO NOT ALLOW THE EXCLUSION OR LIMITATIONS OF INCIDENTAL OR CONSEQUENTIAL<br />
DAMAGES OR HOW LONG AN IMPLIED WARRANTY LASTS, SO THE ABOVE LIMITATIONS OR EXCLUSIONS MAY NOT APPLY TO PURCHASER.<br />
6. This Limited Warranty gives you specific legal rights. You may also have o<strong>the</strong>r rights, which vary from one jurisdiction <strong>to</strong> ano<strong>the</strong>r.<br />
RETURN INFORMATION<br />
• A Return Auth<strong>or</strong>ization number must be obtained from <strong>Numark</strong> through <strong>the</strong> address <strong>or</strong> phone numbers below.<br />
• A copy of <strong>the</strong> <strong>or</strong>iginal sales receipt must also be included f<strong>or</strong> <strong>the</strong> equipment <strong>to</strong> be repaired under warranty.<br />
• The faulty equipment must be packed in its <strong>or</strong>iginal packaging.<br />
• One additional outer layer of packaging must be included <strong>to</strong> ensure product safety. Failures <strong>to</strong> do so may inadequately protect <strong>the</strong> equipment in transit<br />
and, <strong>the</strong>ref<strong>or</strong>e, jeopardize <strong>the</strong> cus<strong>to</strong>mer’s warranty.<br />
• <strong>Numark</strong> will not accept COD shipments and no call tags will be issued f<strong>or</strong> merchandise return.<br />
• <strong>Numark</strong> will not return repaired merchandise <strong>to</strong> cus<strong>to</strong>mers by pri<strong>or</strong>ity service, unless by written request at <strong>the</strong> cus<strong>to</strong>mer’s cost. Requests must be<br />
submitted in writing with merchandise returned.<br />
• The defective <strong>Numark</strong> equipment should be sent, FREIGHT PREPAID with Return Auth<strong>or</strong>ization number clearly printed on <strong>the</strong> outer packaging and<br />
<strong>or</strong>iginal sales receipt enclosed <strong>to</strong>:<br />
INDUSTRIES<br />
Attention: Service Department<br />
11 Helmsman Avenue<br />
N<strong>or</strong>th Kings<strong>to</strong>wn, RI 02852 USA<br />
®<br />
Phone: +1 (401) 295-9000<br />
Fax: +1 (401) 295-5200<br />
Web: www.numark.com