- Page 1: Manuel d’utilisation
- Page 4 and 5: ii Marques déposées COMPUCON a fo
- Page 6 and 7: iv A l’utilisateur : Ceci est un
- Page 8 and 9: vi Vide 51 Ouvrir 51 Réduire l’
- Page 10 and 11: viii Placez le tout dans Contour 15
- Page 12 and 13: x Editer le Texte 232 Colonne en Va
- Page 14 and 15: xii Projets 303 Ouvrir EOS 305 Conf
- Page 16 and 17: xiv Installation d’EOS 3.0: Table
- Page 18 and 19: 2 Installation d’EOS 3.0: EOS Fre
- Page 20 and 21: 4 Installation d’EOS 3.0: Install
- Page 22 and 23: 6 Installation d’EOS 3.0: Install
- Page 24 and 25: 8 Installation d’EOS 3.0: Install
- Page 26 and 27: 10 Après avoir installé le moteur
- Page 28 and 29: 12 Installation d’EOS 3.0: Instal
- Page 30 and 31: 14 Installation d’EOS 3.0: Instal
- Page 32 and 33: 16 Afin de faciliter l’introducti
- Page 34 and 35: 18 Afin de faciliter la saisie de l
- Page 36 and 37: 20 Installation d’EOS 3.0: Instal
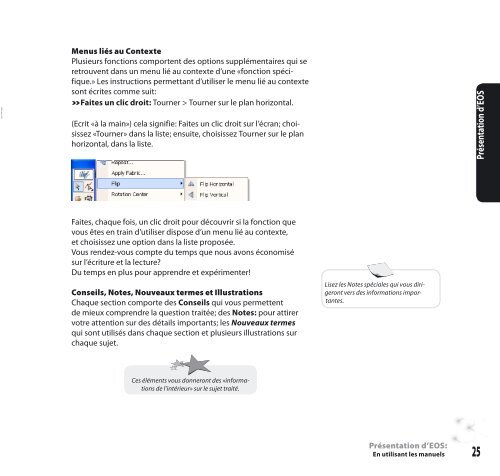
- Page 38 and 39: 22 Présentation d’EOS: EOS Frenc
- Page 42 and 43: 26 Boîte «Largeur» et «Faire Pi
- Page 44 and 45: 28 Présentation d’EOS: Comment l
- Page 46 and 47: 30 Présentation d’EOS: Comment l
- Page 48 and 49: 32 Vue d’ensemble sur l’organis
- Page 50 and 51: 34 NOUVEAU TERME PARAMETRES DU SYST
- Page 52 and 53: 36 NOUVEAU TERME MENUS DEROULANTS C
- Page 54 and 55: 38 NOUVEAU TERME MACRO-INSTRUCTION
- Page 56 and 57: 40 Vue d’ensemble sur l’organis
- Page 58 and 59: 42 Vue d’ensemble sur l’organis
- Page 60 and 61: 44 NOUVEAU TERME CADRE Utilisez-les
- Page 62 and 63: 46 Compétences en Windows: Compét
- Page 64 and 65: 48 Compétences en Windows: Fichier
- Page 66 and 67: 50 Compétences en Windows: Fichier
- Page 68 and 69: 52 Compétences en Windows: Ecrans
- Page 70 and 71: 54 Affichages d’écran: EOS Frenc
- Page 72 and 73: 56 NOUVEAU TERME BARRES D’OUTILS
- Page 74 and 75: 58 La majorité des fonctions suiva
- Page 76 and 77: 60 Affichages d’écran: Affichage
- Page 78 and 79: 62 Paramètres du Système: EOS Fre
- Page 80 and 81: 64 Paramètres du Système: Menu de
- Page 82 and 83: 66 Comportement des Outils Paramèt
- Page 84 and 85: 68 Lettrage Paramètres du Système
- Page 86 and 87: 70 Si vous utilisez la version 2.0
- Page 88 and 89: 72 Menus déroulants: EOS French3-0
- Page 90 and 91:
74 * : Disponibles uniquement si un
- Page 92 and 93:
76 Il s’agit de codes machine «
- Page 94 and 95:
78 Menus déroulants: Modifier Modi
- Page 96 and 97:
80 * : Disponible uniquement en mod
- Page 98 and 99:
82 Menus déroulants: Utilitaires U
- Page 100 and 101:
84 Menus déroulants: Aide Aide Ré
- Page 102 and 103:
86 Gestion de fichier de base: EOS
- Page 104 and 105:
88 1. Formater 2. Désignation de D
- Page 106 and 107:
90 NOUVEAU TERME CONVERTIR DES DESS
- Page 108 and 109:
92 NOUVEAU TERME BASE DE DONNEES En
- Page 110 and 111:
94 NOUVEAU TERME GESTION DES DESSIN
- Page 112 and 113:
96 NOUVEAU TERME IMPRIMER «Feuille
- Page 114 and 115:
98 NOUVEAU TERME TRANSMETTRE A LA M
- Page 116 and 117:
100 Couche Broderie / Graphique : E
- Page 118 and 119:
102 Couche Broderie: Couche Broderi
- Page 120 and 121:
104 Couche Broderie: Explications s
- Page 122 and 123:
106 1. Point de devant (droit) entr
- Page 124 and 125:
108 Couche Broderie: Configuration
- Page 126 and 127:
110 Couche Broderie - Créer: Crée
- Page 128 and 129:
112 NOUVEAUX TERMES BORDS INTELLIGE
- Page 130 and 131:
114 Couche Broderie - Créer: Forme
- Page 132 and 133:
116 1. Vous pouvez maintenir enfonc
- Page 134 and 135:
118 Vous pouvez déplacer un contou
- Page 136 and 137:
120 Vous pouvez vous exercer avec l
- Page 138 and 139:
122 NOUVEAU TERME REGLAGES DE BRODE
- Page 140 and 141:
124 NOUVEAU TERME TISSUS PREDEFINIS
- Page 142 and 143:
126 Couche Broderie - Créer: Forme
- Page 144 and 145:
128 1. Ligne Directrice : Guide en
- Page 146 and 147:
130 1. Densité : Distance (ESPACE)
- Page 148 and 149:
132 Couche Broderie - Créer: Forme
- Page 150 and 151:
134 1. Réglage par l’utilisateur
- Page 152 and 153:
136 Couche Broderie - Créer: Forme
- Page 154 and 155:
138 Dans cet exemple, les oreilles
- Page 156 and 157:
140 Type de point de broderie Pas e
- Page 158 and 159:
142 Type de point de broderie *Poin
- Page 160 and 161:
144 Type de point de broderie .Mono
- Page 162 and 163:
146 Couche Broderie - Créer: Colon
- Page 164 and 165:
148 Un bloc peut être déplacé pe
- Page 166 and 167:
150 Une branche peut être créée
- Page 168 and 169:
152 Les deux points peuvent être d
- Page 170 and 171:
154 Couche Broderie - Créer: Colon
- Page 172 and 173:
156 1.Réglages utilisateur 2. Long
- Page 174 and 175:
158 Couche Broderie - Créer: Forme
- Page 176 and 177:
160 L’icône de Formes dispose d
- Page 178 and 179:
162 Couche Broderie - Créer: Forme
- Page 180 and 181:
164 Couche Broderie - Créer: Forme
- Page 182 and 183:
166 Répétez le processus pour ajo
- Page 184 and 185:
168 Les deux points peuvent être d
- Page 186 and 187:
170 Pour utiliser l’outil Baguett
- Page 188 and 189:
172 Une fois qu’un bloc est cré
- Page 190 and 191:
174 NOUVEAU TERME POINTS MANUELS Le
- Page 192 and 193:
176 La distance ou la longueur entr
- Page 194 and 195:
178 Un “dessin en format point”
- Page 196 and 197:
180 NOUVEAU TERME LETTRAGE Réglez
- Page 198 and 199:
182 Bien qu’il ne soit pas d’un
- Page 200 and 201:
184 Utilisez des lettres de grande
- Page 202 and 203:
186 Couche Broderie - Créer: Lettr
- Page 204 and 205:
188 Couche Broderie - Créer: Lettr
- Page 206 and 207:
190 NOUVEAU TERME PROFILE DES POLIC
- Page 208 and 209:
192 NOUVEAU TERME MODE CONTOUR DE C
- Page 210 and 211:
194 Couche Broderie - Créer: Lettr
- Page 212 and 213:
196 1. Recette : *Tel que numéris
- Page 214 and 215:
198 NOUVEAU TERME POINT DE CROIX AU
- Page 216 and 217:
200 Il est possible de «faire un P
- Page 218 and 219:
202 NOUVEAU TERME AUTOPUNCH Numéri
- Page 220 and 221:
204 Couche Broderie - Créer: AutoP
- Page 222 and 223:
206 Couche Broderie - Créer: AutoP
- Page 224 and 225:
208 Pendant que vous travaillez ave
- Page 226 and 227:
210 Les valeurs sélectionnées par
- Page 228 and 229:
212 Couche Broderie - Créer: Bibli
- Page 230 and 231:
214 Couche Broderie - Créer: EOS F
- Page 232 and 233:
216 Couche Broderie - Editer: EOS F
- Page 234 and 235:
218 Couche Broderie - Editer: Barre
- Page 236 and 237:
220 Couche Broderie - Editer: Editi
- Page 238 and 239:
222 Le curseur comprend un symbole
- Page 240 and 241:
224 L’ensemble de la présente se
- Page 242 and 243:
226 Répétez aussi souvent que sou
- Page 244 and 245:
228 Couche Broderie - Editer: Editi
- Page 246 and 247:
230 Les Recettes sont éditées de
- Page 248 and 249:
232 Pour la Colonne en Vague, utili
- Page 250 and 251:
234 Formes est unique dans la fonct
- Page 252 and 253:
236 NOUVEAU TERME CONVERTIR EN COUR
- Page 254 and 255:
238 Couche Broderie - Editer: Edite
- Page 256 and 257:
240 NOUVEAU TERME EDITION DE POINTS
- Page 258 and 259:
242 Une autre manière de faire est
- Page 260 and 261:
244 NOUVEAU TERME DIVISION DE BLOC
- Page 262 and 263:
246 Cette section présuppose que v
- Page 264 and 265:
248 Vous trouverez des informations
- Page 266 and 267:
250 La fonction Reproduire effectue
- Page 268 and 269:
252 NOUVEAU TERME REPETER Utilisez
- Page 270 and 271:
254 NOUVEAU TERME CONVERTIR LES POI
- Page 272 and 273:
256 NOUVEAU TERME POINT DE ROTATION
- Page 274 and 275:
258 La connexion courante apparaît
- Page 276 and 277:
260 Couche Broderie - Editer: Liste
- Page 278 and 279:
262 Les Fonctions Post - Création:
- Page 280 and 281:
264 NOUVEAU TERME EXECUTER LE DESSI
- Page 282 and 283:
266 Les Fonctions Post - Création:
- Page 284 and 285:
268 Les Fonctions Post - Création:
- Page 286 and 287:
270 Créer avec Couche Graphique: E
- Page 288 and 289:
272 Créer avec Couche Graphique: B
- Page 290 and 291:
274 NOUVEAU TERME GRAPHIQUE VECTEUR
- Page 292 and 293:
276 NOUVEAUX TERMES CONTOUR Un bloc
- Page 294 and 295:
278 Créer avec Couche Graphique: C
- Page 296 and 297:
280 1.Cliquez sur l’icône de Sé
- Page 298 and 299:
282 Créer avec Couche Graphique: C
- Page 300 and 301:
284 1.Utilisez le Polygone à 3 cô
- Page 302 and 303:
286 Créer avec Couche Graphique: C
- Page 304 and 305:
288 Créer avec Couche Graphique: C
- Page 306 and 307:
290 Faites plusieurs clics brefs ra
- Page 308 and 309:
292 1. Sélectionnez «Fichier > Sa
- Page 310 and 311:
294 Créer avec Couche Graphique: C
- Page 312 and 313:
296 Créer avec Couche Graphique: C
- Page 314 and 315:
298 NOUVEAU TERME MOSAIQUE Créez l
- Page 316 and 317:
300 NOUVEAU TERME ETENDRE L’IMAGE
- Page 318 and 319:
302 Créer avec Couche Graphique: C
- Page 320 and 321:
304 Projets: EOS French3-01
- Page 322 and 323:
306 1. Menu Broderie 2. Choisissez
- Page 324 and 325:
308 Projets: Ouvrir une Image 1 1.
- Page 326 and 327:
310 1. Cliquez sur la croix en gras
- Page 328 and 329:
312 Projets: Ouvrir une Image 1. Cl
- Page 330 and 331:
314 Projets: Ouvrir une Image Faire
- Page 332 and 333:
316 Projets: Réglages de Broderie
- Page 334 and 335:
318 Projets: Créer une Broderie 1.
- Page 336 and 337:
320 Les lignes de décor «ressorte
- Page 338 and 339:
322 1. Choisissez Fichier > Sauvega
- Page 340 and 341:
324 Projets: Changer la Couleur de
- Page 342 and 343:
326 1. Cliquez sur la Règle de la
- Page 344 and 345:
328 1. Cliquez sur Colonne, dans la
- Page 346 and 347:
330 1. Cliquez sur Forme Libre et c
- Page 348 and 349:
332 Projets: Achever avec Colonne A
- Page 350 and 351:
334 1. Faites un clic droit et choi
- Page 352 and 353:
336 Projets: Utiliser les Tissus Pr
- Page 354 and 355:
338 La Bibliothèque de Dessins est
- Page 356 and 357:
340 Projets: Créer des Points Manu
- Page 358 and 359:
342 Je me rends compte que, en trav
- Page 360 and 361:
344 Projets: Formes : Rapidement &
- Page 362 and 363:
346 Projets: Formes : Rapidement &
- Page 364 and 365:
348 1. Choisissez le menu déroulan
- Page 366 and 367:
350 1. Choisissez Fichier > Disquet
- Page 368 and 369:
352 Projets: Editer un Dessin de St
- Page 370 and 371:
354 1. Choisissez dans le menu dér
- Page 372 and 373:
356 1. Cliquez sur l’icône Séle
- Page 374 and 375:
358 1. Cliquez sur l’icône Séle
- Page 376 and 377:
360 1. Maintenez la touche CTRL enf
- Page 378 and 379:
362 1. Cliquez et glissez pour redi
- Page 380 and 381:
364 Projets: Projet de Dessin 1. Cl
- Page 382 and 383:
366 Projets: Projet de Dessin 1. Ch
- Page 384 and 385:
368 Projets: Projet de Dessin Cadre
- Page 386 and 387:
370 Projets: Projet de Dessin 1. Cr
- Page 388 and 389:
372 Projets: Projet de Dessin 1 1.
- Page 390 and 391:
374 Projets: Créez une Borderie en
- Page 392 and 393:
376 Projets: Entrer en Mode Edition
- Page 394 and 395:
378 1. Cliquez sur Baguette Magique
- Page 396 and 397:
380 1. Cliquez sur Baguette Magique
- Page 398 and 399:
382 Annexe: Gauche Centre Droite a
- Page 400 and 401:
384 Annexe: Gauche Centre Droite a
- Page 402 and 403:
386 Chevauchement Des passages supp
- Page 404 and 405:
388 Manipulez les lettres en utilis
- Page 406 and 407:
390 A Adapter à l’écran 75 Alé
- Page 408 and 409:
392 142, 184, 254 Point de Rotation
- Page 410:
394 Mes Notes Répertoire: EOS Fren