Instruzione per l'uso Operating Manual ... - TURMIX
Instruzione per l'uso Operating Manual ... - TURMIX
Instruzione per l'uso Operating Manual ... - TURMIX

Create successful ePaper yourself
Turn your PDF publications into a flip-book with our unique Google optimized e-Paper software.
Bedienungsanleitung<br />
Mode d’emploi<br />
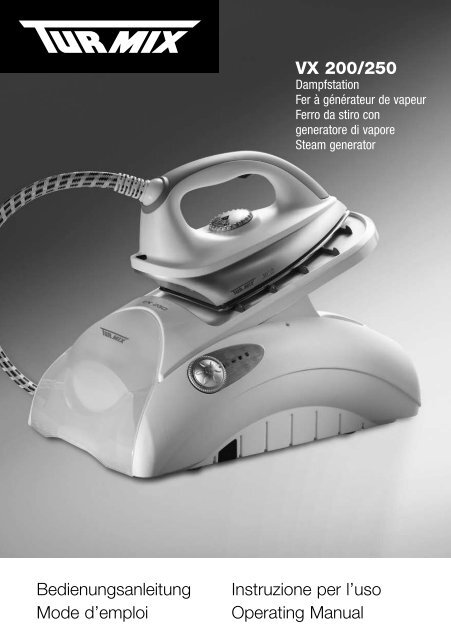
VX 200/250<br />
Dampfstation<br />
Fer à générateur de vapeur<br />
Ferro da stiro con<br />
generatore di vapore<br />
Steam generator<br />
<strong>Instruzione</strong> <strong>per</strong> l’uso<br />
O<strong>per</strong>ating <strong>Manual</strong>
Willkommen<br />
DE<br />
Sehr geehrte Damen und Herren<br />
Vielen Dank, dass Sie sich für ein <strong>TURMIX</strong>-Produkt entschieden haben.<br />
Seit 1933 arbeiten wir mit nur einem Ziel: dass Sie Freude mit Ihrem Gerät<br />
haben. Unsere Philosophie basiert auf vier Wörtern: Dauerhaft, unkompliziert,<br />
faszinierend, verlässlich.<br />
Das bedeutet, dass wir viel Wert auf Qualität, Ergonomie, Einfachheit und<br />
Service-Reparatur legen, um Ihnen die besten Produkte und Dienstleistungen<br />
anbieten zu können.<br />
Wir wünschen Ihnen viel Freude an Ihrem <strong>TURMIX</strong>-Produkt.<br />
Inhaltsverzeichnis<br />
1 Erste Inbetriebnahme<br />
Wichtige Sicherheitshinweise<br />
Inbetriebnahme<br />
4 Entsorgung<br />
5 Störungen<br />
6 Anhang<br />
1.1 Teilebeschreibung 4<br />
1.2 Kurzanleitung 6<br />
2. Sicherheitsvorschriften 7<br />
3.1 Erste Inbetriebnahme 8<br />
3.2 Aufstellen 8<br />
3.3 Antikalk-Kassetten<br />
einsetzen 8<br />
3.4 Wassertank füllen /<br />
nachfüllen 8<br />
3.5 Wasserqualität 9<br />
3.6 Thermostat einstellen 9<br />
3.7 Anschliessen 10<br />
3.8 Einschalten und<br />
Aufheizphase 10<br />
3.9 Regler für Dampfmenge 11<br />
3.10 Dampferzeugung/<br />
Dampftaste 11<br />
3.11 Geräusche 12<br />
3.12 Vertikales Bügeln 12<br />
3.13 Abnehmbare Abstellplatte 12<br />
3.14 Auto-Stopp-Funktion 13<br />
3.15 Nach dem Bügeln 13<br />
3.16 Pflege und Wartung 13<br />
3.17 EMC Electronic Mineral<br />
Control/Antikalk-Kassette 14<br />
4.1 Entsorgung 14<br />
5.1 Störungen 15<br />
6.1 Defekt-Analyse 59<br />
6.2 Garantie 60<br />
6.3 Zubehör 61<br />
D<br />
FR<br />
IT<br />
EN
1 .<br />
1 .<br />
11.<br />
1.<br />
10.<br />
9.<br />
14.<br />
8.<br />
7.<br />
.<br />
4.<br />
.<br />
5.<br />
6.<br />
15. 16. 17. 18.<br />
Bedienfeld VX 250<br />
4<br />
5<br />
1.1 Teilebeschreibung<br />
Übersicht der Bedienungsund<br />
Geräteteile<br />
Bedienfeld<br />
1 Aufheizanzeige des<br />
Bügeleisens<br />
2 Dampftaste<br />
3 Thermostat-Regler zur<br />
Regulierung der Bügeleisen-<br />
Tem<strong>per</strong>atur<br />
4 Abnehmbare Bügeleisen-<br />
Abstellplatte<br />
5 Kabelklammer<br />
6 Gehäuse des Dampfgenerators<br />
7 Bedienfeld<br />
8 Regler für Dampfmenge<br />
9 Ein-/Ausschalter<br />
10 Abnehmbarer Wassertank<br />
11 Netzkabel/-stecker<br />
12 Dampfschlauch zwischen<br />
Bügeleisen und Generator<br />
13 Antikalk-Kassette<br />
14 Kabelführung<br />
15 Betriebs-Kontrolllampe<br />
16 Dampferzeuger-Kontroll-<br />
lampe<br />
17 Kontrolllampe für das Auswech-<br />
seln der Antikalk-Kassette<br />
18 Kontrollleuchte für die Auto-<br />
Stopp-Funktion<br />
D<br />
FR<br />
IT<br />
EN
1.2 Kurzanleitung<br />
1. .<br />
. 4.<br />
5. 6.<br />
7. 8.<br />
9. 10.<br />
11. 1 .<br />
1 . 14.<br />
5 - 30 Sek.<br />
1. Das Gerät auf eine feste<br />
Unterlage stellen<br />
2. Den Wassertank herausziehen<br />
3. Nehmen Sie die Antikalk-<br />
Kassette aus ihrer Feuchtig-<br />
keitsschutzhülle<br />
4. Filterschwamm NICHT aus<br />
Antikalk-Kassette entfernen<br />
5. Füllen Sie den Wassertank bis<br />
zur oberen Kante auf<br />
6. Den Wassertank wieder fest in<br />
das Gerät einschieben<br />
7. Den Thermostat-Regler zum<br />
Dampfbügeln zwischen •• und<br />
••• stellen (= Dampfbereich)<br />
8. Netzstecker einstecken<br />
9. Gerät mit dem Ein-/Aus-Schalter<br />
einschalten<br />
10. Die grüne Betriebs- und die<br />
gelbe Dampferzeuger-<br />
Kontrolllampe des Generators<br />
leuchten auf<br />
11. Regler für Dampfmenge in die<br />
Mitte drehen<br />
12. Warten, bis das Gerät<br />
betriebsbereit ist. Wenn es<br />
soweit ist, ertönt ein Tonsignal<br />
13. Dampftaste am Bügeleisen<br />
drücken, bis Dampf austritt.<br />
Bei erster Inbetriebnahme dauert<br />
es bis zu 30 Sekunden, bis<br />
Dampf erzeugt wird. Solange die<br />
gelbe Dampferzeuger-Kontroll-<br />
lampe leuchtet, ist die Dampf-<br />
menge reduziert.<br />
Während des Betriebs hören Sie<br />
das Surren der Pumpe; dies ist<br />
normal.<br />
Ersten Dampfstoss nicht über<br />
der Wäsche austreten lassen.<br />
14. Beim Bügeln wiederholt die<br />
Dampftaste drücken<br />
6<br />
7<br />
2. Wichtige Sicherheitshinweise<br />
!<br />
!<br />
i<br />
Beim Gebrauch des Bügelsystems sollten folgende Sicherheitsvorkehrungen<br />
beachtet werden:<br />
– Nehmen Sie das Gerät nicht in Betrieb, ohne die Gebrauchsanweisung<br />
zu lesen.<br />
– Bevor das Gerät das erste Mal ans Stromnetz angeschlossen wird, muss<br />
sichergestellt sein, dass die Netzspannung (230 V) mit der Angabe auf<br />
dem Typenschild übereinstimmt.<br />
– Das Gerät nur zum Bügeln und nicht für andere Zwecke verwenden.<br />
– Das Gerät darf nie unbeaufsichtigt gelassen werden, während es ans<br />
Netz angeschlossen ist. Auch bei kurzzeitigem Verlassen des Raumes<br />
Netzstecker ziehen.<br />
– Stecker nie am Kabel aus der Steckdose ziehen.<br />
– Das Kabel von heissen Flächen fernhalten.<br />
– Das Bügelgerät nur in einwandfreiem Zustand benutzen. Wenn das Gerät<br />
oder das elektrische Kabel beschädigt sind, Gerät nicht verwenden und<br />
den Kundendienst kontaktieren.<br />
– Das Gerät kann bei Inbetriebnahme sehr heiss werden. Es gelten hier die<br />
gleichen Vorsichtsmassnahmen wie für alle anderen Bügelgeräte.<br />
– Wenn Sie die Kabelführung verwenden, achten Sie darauf, dass sie in der<br />
Station gut arretiert ist. Achten Sie auch darauf, dass das Gerät immer gut<br />
am Tisch befestigt ist.<br />
– Bei Haushalten mit Kindern darauf achten, dass das Bügeleisen nicht in<br />
Reichweite von Kindern abgestellt wird, solange es noch heiss ist.<br />
– Wenn andere Geräte mit hohem Stromverbrauch gleichzeitig ans Netz<br />
angeschlossen werden, kann dies zu einer Überlastung führen.<br />
– Zur Verlängerung des Stromkabels nur ein 10 Am<strong>per</strong>e-taugliches Kabel verwenden.<br />
Darauf achten, dass das Kabel so auf den Boden gelegt wird, dass<br />
man nicht darüber stol<strong>per</strong>n kann, oder dass man es nicht versehentlich<br />
herausziehen kann. Das Kabel muss mit einem Erdleiter ausgestattet sein.<br />
– Zur eigenen Sicherheit nur geerdete Steckdosen benutzen.<br />
– Achten Sie nach jeder Benutzung darauf, dass Ihr Bügeleisen flach<br />
auf den Silikonfüssen der Bügeleisen-Abstellplatte hingestellt wird.<br />
Stellen Sie Ihr Bügeleisen nicht senkrecht auf.<br />
– Tauchen Sie ihr Gerät niemals ins Wasser oder in jegliche andere<br />
Flüssigkeit, auch nicht teilweise.<br />
– Die heissen Flächen niemals berühren.<br />
– Nach dem Bügeln vollständig abkühlen lassen und möglichst in waagerechter<br />
Stellung aufbewahren.<br />
– Reparaturen nur vom Fachmann ausführen lassen. Bei nicht fachgerechter<br />
Reparatur entfällt der Garantieanspruch.<br />
Der Hersteller behält sich vor, die vorgestellten Modelle, ihre Kennzeichen<br />
und ihre Zubehörteile zu ändern. Das Gerät entspricht den Normen der europäischen<br />
Richtlinie für Niederspannung 73/23/CEE bezüglich der Sicherheit,<br />
und der Richtlinie CEM 89/336/CEE, abgeändert durch 93/68/CEE, bezüglich<br />
der elektromagnetischen Kompatibilität.<br />
D<br />
FR<br />
IT<br />
EN
3. Inbetriebnahme<br />
.1 Erste Inbetriebnahme<br />
. Aufstellen<br />
1<br />
. Antikalk-Kassetten einsetzen<br />
.4 Wassertank füllen / nachfüllen<br />
4<br />
5 6<br />
7 8<br />
Bevor Sie das Gerät zum ersten Mal in Betrieb nehmen, bitte die Bedienungsanleitung<br />
vollständig durchlesen.<br />
Gerät zum Bügeln auf eine feste und stabile Unterlage stellen 1, , damit<br />
eine ausreichende Luftzirkulation unter dem Gerät möglich ist.<br />
Bügelunterlagen mit einer Holzoberfläche mit einem Wachstuch oder ähnlichem<br />
Material vor Feuchtigkeit schützen.<br />
Wassertank herausziehen .<br />
Antikalk-Kassette aus ihrer Feuchtigkeitsschutzhülle nehmen 4 und in die<br />
vorgesehene Öffnung des Wassertanks setzen 5.<br />
Die Antikalk-Kassette muss gut im Wassertank eingesetzt werden, damit<br />
Dampf erzeugt werden kann. Filterschwamm nicht entfernen 6.<br />
!<br />
!<br />
i<br />
Wassertank bis zur oberen Kante mit kaltem Leitungswasser füllen 7.<br />
Wassertank wieder fest in das Gerät schieben (schnappt ein) 8.<br />
!<br />
!<br />
Der Wassertank kann während des Bügelns entnommen und nachgefüllt<br />
werden. Bei entnommenem Tank Dampftaste NICHT drücken.<br />
i<br />
Achtung! Filterschwamm nicht entfernen und<br />
Antikalk-Kassette ganz einsetzen!<br />
Achtung! Nie warmes Wasser einfüllen! Keine anderen<br />
Mittel (Bügelhilfen, Parfum, usw.) beifügen!<br />
8<br />
9<br />
.5 Wasserqualität<br />
.6 Thermostat einstellen<br />
9<br />
Verwendet werden darf: Leitungswasser, destilliertes Wasser für<br />
Bügelgeräte oder eine Mischung daraus.<br />
Nicht verwendet werden darf: Regenwasser, Kondenswasser von Wäschetrocknern,<br />
Abtauwasser vom Kühlschrank oder ähnlichen Geräten, Wasser<br />
das aus Entkalkungsanlagen und anderen Entkalkungsgeräte die mit<br />
Regenerierungssalzen arbeiten (diese sind mit dem EMC-System unvereinbar;<br />
siehe auch Seite 14).<br />
Lebensdauer der Antikalk-Kassette: Die Antikalk-Kassette muss bei einer<br />
durchschnittlichen Bügelzeit von ca. 2-3 Stunden pro Woche etwa monatlich<br />
gewechselt werden. Je nach der im Leitungswasser enthaltenen Kalkmenge<br />
und für eine Bügelzeit von 2 bis 3 Stunden pro Woche kann es wirtschaftlicher<br />
sein, handelsübliches destilliertes Wasser zu verwenden. In diesem Fall<br />
hält die Antikalk-Kassette 1 bis 2 Jahre (je nach Bügelzeit und Dampfmenge).<br />
Mit dem Thermostat-Regler die für die Bügelwäsche geeignete Tem<strong>per</strong>atur<br />
einstellen.<br />
Zum Dampfbügeln muss eine Einstellung zwischen •• und ••• auf der<br />
Skala gewählt werden 9.<br />
!<br />
!<br />
i<br />
Achtung! Zum Dampfbügeln Thermostat immer zwischen<br />
•• und ••• stellen!<br />
Wir empfehlen, die Wäsche vor dem Bügeln nach den vom Hersteller<br />
empfohlenen Tem<strong>per</strong>aturbereichen zu sortieren und mit der niedrigsten<br />
Bügeltem<strong>per</strong>atur zu beginnen.<br />
THERMOSTAT MATERIAL DAMPFMENGE<br />
• Fasern: Acetat - Polyacryl - Polyamid Kein Dampf<br />
•• Tierische Fasern: Seide - Wolle Etwas Dampf<br />
••• Naturfasern: Baumwolle - Leinen Viel Dampf<br />
D<br />
FR<br />
IT<br />
EN
.7 Anschliessen<br />
10<br />
.8 Einschalten und Aufheizphase<br />
11 1<br />
1 14<br />
15<br />
5 - 30 Sek.<br />
Schliessen Sie das Stromkabel an eine geerdete Steckdose an 10.<br />
!<br />
!<br />
i<br />
Drücken Sie den Ein-/Aus-Schalter 11.<br />
Die grüne Betriebs- und die gelbe Dampferzeuger-Kontrolllampe des<br />
Generators leuchten auf 1 .<br />
Regler für Dampfmenge in die Mitte drehen 1 .<br />
Warten, bis das Gerät betriebsbereit ist (wenn es soweit ist, ertönt ein<br />
Tonsignal) 14.<br />
Bügeleisen in die Luft halten und Dampftaste solange drücken, bis Dampf<br />
austritt. Bei der ersten Inbetriebnahme dauert dies bis zu 30 Sekunden 15.<br />
!<br />
Solange die gelbe Dampferzeuger-Kontrolllampe 1 leuchtet (ca. 2 Min.),<br />
bleibt die Dampfmenge reduziert. Nach Erlöschen der Kontrolllampe wird sie<br />
automatisch höher.<br />
!<br />
i<br />
Achtung! Strom kann tödlich sein! Im Notfall sofort<br />
Netzstecker aus der Steckdose ziehen. Stromführende<br />
Teile niemals in Verbindung mit Wasser bringen.<br />
Während des Bügelns leuchten die gelbe Dampferzeuger-<br />
Kontrolllampe und die rote Aufheizlampe des Bügeleisens<br />
regelmässig auf und erlöschen wieder: Das bedeutet, dass<br />
Generator und Bügeleisen erhitzt werden. Dies ist ein normaler<br />
Vorgang.<br />
10<br />
11<br />
.9 Regler für Dampfmenge<br />
16<br />
17<br />
18<br />
.10 Dampferzeugung/Dampftaste<br />
19<br />
Mit dem Dampfregler kann die Dampfmenge je nach Stoff stufenlos verändert<br />
werden (siehe auch Tabelle auf Seite 9).<br />
Stufenlos regelbare Dampfleistung 16:<br />
Stellen Sie den Dampfregler, je nach Wäscheart, auf die gewünschte<br />
Position. In der Tabelle auf Seite 9 finden Sie typische Anwendungen. Die<br />
Dampfmenge wird grösser, je mehr der Dampfregler im Uhrzeigersinn<br />
Richtung "+" gedreht wird.<br />
"E" = Eco-Modus 17 (nur Modell VX 50):<br />
Diese Einstellung wird für kurze Bügelarbeiten empfohlen, die wenig<br />
Dampfleistung benötigen (z.B. wenn Sie frühmorgens eine wenig zerknitterte<br />
Bluse bügeln möchten).<br />
"Maxi"-Modus / Turbodampf 18 (nur Modell VX 50):<br />
In dieser Stellung tritt für einige Sekunden lang viel Dampf aus der Sohle<br />
(= "Turbodampf"); danach reduziert sich die Dampfmenge wieder auf die<br />
normale Menge.<br />
Warten Sie einige Sekunden, bevor Sie diesen Turbo-Effekt wiederholen, da<br />
sonst Wasser aus der Sohle austreten kann (das System muss sich zuerst<br />
wieder aufheizen).<br />
Dampftaste drücken, um Dampf zu erhalten 19.<br />
Nachfolgend einige wertvolle Anwendungstipps:<br />
1. Dank der hohen Dampfleistung Dampftaste jeweils nur kurz drücken.<br />
Kurzes und wiederholtes Drücken auf die Dampftaste genügt, um ständig<br />
eine ausreichende Menge Dampf zu erhalten (langes Drücken kann zu<br />
Austreten von Wasser führen).<br />
2. Bei intensivem Gebrauch kann nach dem Loslassen der Dampftaste<br />
noch Dampf austreten. Auf der Abstellplatte für das Bügeleisen kann daher<br />
der Restdampf kondensieren und es bleiben Wasserrückstände zurück. Dies<br />
ist normal. Falls nötig, die Platte abtrocknen. Es besteht keine Gefahr, dass<br />
sie Schaden nimmt.<br />
3. Drehen Sie den Dampfregler in die Mitte 17:<br />
- bei der ersten Inbetriebnahme,<br />
- wenn der Wassertank leer ist,<br />
- bei jedem Austauschen der Antikalk-Kassette.<br />
!<br />
!<br />
Achtung! Wenn kein Wasser mehr im Tank ist, Dampftaste<br />
nicht mehr betätigen!<br />
D<br />
FR<br />
IT<br />
EN
.11 Geräusche<br />
0<br />
.1 Vertikales Bügeln<br />
1<br />
.1 Abnehmbare Abstellplatte<br />
Um eine gleichmässige Dampfleistung zu gewährleisten, ist Ihre Bügelstation<br />
mit einer Pumpe ausgestattet. Diese macht sich bemerkbar, sobald Sie die<br />
Dampftaste des Bügeleisens drücken 0.<br />
Unter gewissen Bedingungen hört man sie stärker, z.B.<br />
- bei der ersten Inbetriebnahme<br />
- wenn der Wassertank leer ist<br />
- bei jedem Austauschen der Antikalk-Kassette.<br />
Das Bügeleisen kann zum Bügeln auch senkrecht gehalten werden, um hängende<br />
Kleidung oder Gardinen zu glätten. Auf diese Weise lassen sich auch<br />
Vestons, Hosen usw. auffrischen. Die Bügelqualität hängt von der Art des<br />
Gewebes ab.<br />
Bügeleisen beim vertikalen Bügeln von oben nach unten führen und mehrmals<br />
kurz die Dampftaste drücken.<br />
Tipp: Hängen Sie den Veston oder die Hose für bequemeres Bügeln an einen<br />
Bügel.<br />
Die Abstellplatte kann entnommen werden. Sie kann so als Bügeleisen-<br />
Abstellfläche auf dem Bügeltisch benutzt werden, z.B. beim Hemden bügeln.<br />
Abstellplatte einfach nach hinten oben ziehen, um sie von der Dampfstation<br />
zu lösen . Achtung: Die Abstellplatte ist beim und nach Gebrauch heiss!<br />
Abstellplatte auf Bügeltisch legen und das Bügeleisen auf die grauen<br />
Silikonsteifen der Platte stellen. Auf guten Halt der Abstellplatte achten!<br />
Bügeleisen-Abstellplatte wieder an der Dampfstation anbringen:<br />
Abstellplatte vorsichtig in den Kufen ganz in das Gehäuse einschieben .<br />
Auf festen Sitz der Abstellplatte achten, damit das Bügeleisen nicht hinunterfallen<br />
kann.<br />
!<br />
!<br />
Achtung! Wenn Sie die Abstellplatte bei heissem Gerät<br />
anbringen oder entfernen möchten, verwenden Sie<br />
Handschuhe oder einen Topflappen.<br />
1<br />
1<br />
.14 Auto-Stopp-Funktion<br />
4<br />
.15 Nach dem Bügeln<br />
5<br />
.16 Pflege und Wartung<br />
7<br />
6<br />
Die Auto-Stopp-Funktion schaltet die Stromversorgung des Geräts automatisch<br />
ab, wenn<br />
– während ca. 20 Minuten Zeit das Bügeleisen nicht bewegt wird oder<br />
– die Dampftaste längere Zeit nicht gedrückt worden ist.<br />
Die rote "AUTO-STOP"-Kontrolllampe leuchtet auf, sobald die Funktion aktiv<br />
ist 4.<br />
Durch Drücken der Dampftaste erlischt diese Kontrolllampe und das Gerät<br />
beginnt wieder aufzuheizen. Sobald das Gerät wieder betriebsbereit ist,<br />
ertönt ein Tonsignal.<br />
Station nach dem Bügeln mit dem Ein-/Aus-Schalter 5 ausschalten. Die<br />
grüne Betriebs- und die gelbe Dampferzeuger-Kontrolllampe erlöschen.<br />
Netzstecker ziehen und Station komplett abkühlen lassen.<br />
Kabel unter der Kabelklammer 6 verstauen.<br />
Station wegräumen, ohne den Tank zu entleeren.<br />
!<br />
!<br />
i<br />
Achtung! Gerät flach aufgestellt lagern, da sonst<br />
Wasser auslaufen kann! Gerät nicht bei Tem<strong>per</strong>aturen<br />
unter 5 °C und ausser Reichweite von Kindern lagern.<br />
Die Bügeleisensohle kann durch Waschmittelrückstände oder durch die<br />
Appretur der Stoffe und Fasern verunreinigt werden und gleitet dann nicht<br />
mehr leicht über den Stoff.<br />
Deshalb Bügeleisen nach dem Bügeln mit einem nicht fuselnden Lappen<br />
abreiben. Schwer zu entfernende Flecken und Ablagerungen mit einem<br />
Bügeleisen-Reinigerstift behandeln. Auf keinen Fall alkalihaltige Produkte<br />
(z.B. Backofenreiniger), scharfe Reinigungsmittel, Scheuermittel oder Stahlwolle<br />
verwenden.<br />
D<br />
FR<br />
IT<br />
EN
.17 EMC Electronic Mineral Control<br />
8 9<br />
0<br />
Antikalk-Kassetten<br />
Cassettes anticalcires<br />
Cartuccia anticalcare<br />
Art. 60453<br />
Anti-lime cassettes<br />
VX 200/250<br />
CLASS 100 DX/ 120 PE / 150 DX<br />
SUPERJET<br />
BOOSTER 10/20/40<br />
FG 1700 / FG 3700 / FG 4700<br />
7 611584 604534 ><br />
4. Entsorgung<br />
5.1 Entsorgung<br />
Das elektronische EMC-System kontrolliert den Zustand der Antikalk-<br />
Kassette. Es misst laufend die Mineral-Element-Anteile des gefilterten<br />
Wassers. Wenn die Kassette verbraucht ist, unterbricht das EMC-System den<br />
Dampfausstoss und vermeidet so jegliche Verkalkung.<br />
Sobald die Kassette an Wirksamkeit verliert, beginnt die Kontrolllampe zu<br />
blinken. Die Kassette muss jetzt möglichst bald ausgetauscht werden 8.<br />
Wird die Antikalk-Kassette nicht ausgetauscht, unterbricht das EMC-System<br />
den Dampfaustritt, um die Station vor Verkalkungsschäden zu schützen.<br />
Es ertönt ein Warnton beim Drücken der Dampftaste. Für Notfälle kann die<br />
Station noch kurzzeitig mit destilliertem Wasser betrieben werden.<br />
Nach dem Austauschen der Antikalk-Kassette (siehe auch Seite 8), muss das<br />
Gerät aus- und wieder eingeschaltet werden. Alte Antikalk-Kassette mit dem<br />
Hausmüll entsorgen 9.<br />
Sobald das Gerät wieder Betriebsbereit ist, ertönt ein Tonsignal.<br />
Betätigen Sie dann so lange die Dampftaste, bis Dampf austritt. Der<br />
Wasserkreislauf der Station ist jetzt wieder aufgefüllt und es kann weiter<br />
gebügelt werden.<br />
!<br />
!<br />
Unter der Artikelnummer 60453 erhalten Sie bei Ihrem Händler Ersatz-<br />
Antikalk-Kassetten (Doppelpack mit 2 Antikalk-Kassetten) 0.<br />
i<br />
Nach dem Ersetzen der Antikalk-Kassette kann die Pumpe<br />
lauter tönen als gewöhnlich. Dies ist normal, da noch Luft<br />
im Wasserkreislauf ist.<br />
Ausgediente Geräte können zur Entsorgung bei einer Verkaufsstelle zur<br />
kostenlosen, fachgerechten Entsorgung abgegeben werden. Geräte mit<br />
gefährlichem Defekt sofort entsorgen und sicherstellen, dass sie nicht<br />
mehr verwendet werden können.<br />
Geräte nicht mit dem Hauskehricht entsorgen (Umweltschutz!).<br />
14<br />
15<br />
5. Störungen<br />
PROBLEM MÖGLICHE URSACHEN LÖSUNGSVORSCHLÄGE<br />
– Kontrolllampen leuchten nicht<br />
auf<br />
– Das Gerät wird nicht heiss<br />
– Das Bügeleisen wird nicht<br />
heiss<br />
– Stecker steckt nicht fest in der<br />
Steckdose<br />
– Gerät nicht an Strom angeschlossen<br />
oder Ein/Aus-Schalter nicht gedrückt<br />
– Andere Ursachen*<br />
– Thermostat steht auf "mini"<br />
– Andere Ursachen*<br />
– Es wird kein Dampf erzeugt – Gerät nicht bereit<br />
– Es kommt Dampf und Wasser<br />
aus der Sohle<br />
– Das Gerät macht ein untypisches,<br />
lautes Geräusch<br />
– Kein Wasser im Tank<br />
– Wassertank nicht richtig eingesetzt<br />
– Keine Antikalk-Kassette im Wassertank<br />
– Die Kontrolllampe blinkt<br />
– Andere Ursachen*<br />
– Bügeleisen nicht warm genug<br />
– Intensive Dampferzeugung<br />
– Kondenswasser im Verbindungsschlauch<br />
– Andere Ursachen*<br />
– Kondenswasser im Verbindungsschlauch<br />
– Kein Wasser im Behälter<br />
– Wasserbehälter nicht richtig befestigt<br />
– Andere Ursachen*<br />
– Kontrolllampe leuchtet – Auto-Stop nach 20 Minuten<br />
Nichtbenutzung<br />
– Steckverbindung und Stromversorgung<br />
kontrollieren<br />
– Netzstecker einstecken und Ein-/Aus-Schalter<br />
drücken<br />
– Thermostat auf gewünschte Tem<strong>per</strong>atur einstellen<br />
– Sobald das Gerät wieder Betriebsbereit ist<br />
ertönt ein Tonsignal<br />
– Bei Inbetriebnahme Dampftaste so lange drücken,<br />
bis das erste Mal Dampf kommt<br />
– Die Antikalk-Kassette ist neu. Das Wasser wird<br />
zuerst vom Granulat aufgesaugt, bevor es dann<br />
zum Dampferzeuger gefördert wird<br />
– Wassertank auffüllen<br />
– Wassertank fest in die Station schieben<br />
– Antikalk-Kassette in den Wassertank einsetzen<br />
– Antikalk-Kassette wechseln<br />
– Stellen Sie den Thermostat zwischen •• und<br />
••• und warten, bis die gelbe Dampferzeuger-<br />
Kontrolllampe ausgeht<br />
– Dampftaste mehrmals drücken<br />
– Dampftaste mehrmals drücken<br />
– Wassertank auffüllen<br />
– Wassertank fest in die Station schieben<br />
– Dampftaste betätigen. Kontrolllampe erlischt<br />
und das Gerät heizt wieder auf. Warten, bis der<br />
Warnton ertönt<br />
– Kontrolllampe leuchtet – Antikalk-Kassette verbraucht – Antikalk-Kassette auswechseln. Gerät aus- und<br />
wiedereinschalten. Warten, bis ein Tonsignal<br />
ertönt und dann Damptaste drücken, bis Dampf<br />
austritt<br />
* Wenden Sie sich an den Händler oder unseren Kundendienst<br />
D<br />
FR<br />
IT<br />
EN
Bienvenue<br />
FR Chers clientes, chers clients,<br />
Nous vous remercions d'avoir choisi un produit <strong>TURMIX</strong>. Depuis 1933,<br />
nous travaillons dans un seul objectif: votre entière satisfaction grâce à nos<br />
appareils. Notre philosophie est basée sur quatre concepts: Durée, simplicité,<br />
charme et confiance.<br />
Cela signifie que la qualité, l'ergonomie, la simplicité et le service réparations<br />
sont pour nous de prime importance, et nous <strong>per</strong>mettent de vous offrir des<br />
produits et des services de qualité optimale.<br />
Nous vous souhaitons de très agréables moments grâce à votre produit<br />
<strong>TURMIX</strong>.<br />
16<br />
17<br />
Sommaire<br />
1 Première mise en marche<br />
Consignes de sécurité importantes<br />
Mise en marche<br />
4 Elimination<br />
5 Que faire si...<br />
6 Appendice<br />
1.1 Description des éléments 18<br />
1.2 Bref mode d'emploi 20<br />
2. Consignes de sécurité 21<br />
3.1 1ère mise en marche 22<br />
3.2 Placement 22<br />
3.3 Changer la cassette antical -<br />
caire 22<br />
3.4 Remplir le réservoir 22<br />
3.5 Qualité de l'eau 23<br />
3.6 Réglage du thermostat 23<br />
3.7 Brancher l'appareil 24<br />
3.8 Mise en route - processus de<br />
chauffe 24<br />
3.9 Variateur de vapeur 25<br />
3.10 Débit vapeur/Gâchette de<br />
commande vapeur 25<br />
3.11 Bruit 26<br />
3.12 Défroissage vertical 26<br />
3.13 Plaque repose-fer amovible 26<br />
3.14 Fonction auto-stop 27<br />
3.15 Après le repassage 27<br />
3.16 Nettoyage et entretien 27<br />
3.17 EMC Electronic Mineral/<br />
cassette anticalcaire 28<br />
4.1 Elimination 28<br />
5.1 Que faire si... 29<br />
6.1 Analyse du problème 59<br />
6.2 Garantie 60<br />
6.3 Accessoires 61<br />
D<br />
FR<br />
IT<br />
EN
1 .<br />
1 .<br />
11.<br />
1.<br />
10.<br />
9.<br />
14.<br />
8.<br />
7.<br />
.<br />
4.<br />
.<br />
5.<br />
6.<br />
15. 16. 17. 18.<br />
Tableau de bord VX 250<br />
18<br />
19<br />
1.1 Description des éléments<br />
Description des éléments de commande<br />
et de l'appareil<br />
Tableau de bord<br />
1 Témoin de chauffe du fer à<br />
repasser<br />
2 Gâchette de commande de la<br />
vapeur<br />
3 Bouton thermostat pour régler la<br />
température du fer à repasser<br />
4 Plaque repose-fer amovible<br />
5 Pince de rangement cordon<br />
6 Logement du générateur de<br />
vapeur<br />
7 Tableau de bord<br />
8 Variateur de débit vapeur<br />
9 Interrupteur Marche/Arrêt<br />
10 Réservoir d'eau amovible<br />
11 Fiche/cordon d'alimentation<br />
12 Cordon de liaison fer et<br />
générateur<br />
13 Cassette anticalcaire<br />
14 Support câble<br />
15 Voyant de mise sous tension<br />
16 Voyant du générateur vapeur<br />
17 Voyant de changement de<br />
cassette<br />
18 Voyant indicateur d'arrêt<br />
(fonction auto-stop)<br />
D<br />
FR<br />
IT<br />
EN
1.2 Bref mode d'emploi<br />
1. 1. .<br />
. 4.<br />
5. 6.<br />
7. 8.<br />
9. 10.<br />
11. 1 .<br />
1 . 14.<br />
1. Placer le boîtier de l'appareil sur<br />
une surface stable<br />
2. Oter le réservoir d'eau<br />
3. Retirer la cassette anticalcaire<br />
de son sachet de protection<br />
4. NE PAS retirer le filtre de la<br />
cassette anticalcaire<br />
5. Remplir le réservoir d'eau au<br />
maximum<br />
6. Replacer le réservoir dans son<br />
logement jusqu'à la butée<br />
7. Pour repasser à la vapeur, régler<br />
le thermostat entre •• et<br />
••• (= plage vapeur)<br />
8. Brancher l'appareil à une prise<br />
9. Appuyer sur le bouton Marche/<br />
Arrêt<br />
10. Le voyant vert (mise sous<br />
tension) et jaune (générateur<br />
vapeur) s'allument<br />
11. Régler le variateur de débit<br />
vapeur en position centrale<br />
12. Attendre le signal sonore indi<br />
quant que l'appareil est prêt à<br />
fonctionner<br />
13. Appuyer sur la gâchette vapeur<br />
jusqu'à ce que la vapeur<br />
s'échappe. A la première utilisa<br />
tion, cela peut durer jusqu'à<br />
30 sec. Le débit vapeur est<br />
réduit tant que le voyant jaune<br />
du générateur est allumé. Il est<br />
normal d'entendre le bruit de la<br />
pompe pendant le fonctionne<br />
ment. Ne pas diriger le premier<br />
jet de vapeur vers le linge.<br />
14. En repassant, appuyer régulière-<br />
ment sur la gâchette vapeur<br />
0<br />
1<br />
2. Consignes importantes de sécurité<br />
!<br />
!<br />
i<br />
Lors de l'utilisation de l'appareil, veillez à toujours bien respecter les consignes<br />
de sécurité suivantes:<br />
– Lire le mode d'emploi avant de brancher l'appareil.<br />
– Avant de brancher l'appareil pour la première fois, s'assurer que la tension<br />
électrique (230 V) correspond aux indications de la plaquette signalétique.<br />
– Ne pas utiliser l'appareil que pour l'usage auquel il est prévu: le repassage<br />
et le défroissage.<br />
– Ne jamais laisser l'appareil branché sans surveillance. Toujours débrancher<br />
la fiche, même pour de courtes absences.<br />
– Ne jamais débrancher l'appareil en tirant sur le cordon d'alimentation<br />
mais sur la fiche.<br />
– Maintenir le cordon éloigné des sources de chaleur.<br />
– N'utiliser l'appareil que dans un endroit adapté. Si l'appareil est endommagé<br />
ou si le cordon est abîmé, ne pas utiliser l'appareil et contacter le<br />
service Après-vente.<br />
– Durant l'utilisation, l'appareil peut devenir très chaud. Les consignes à<br />
respecter sont les mêmes que pour tous les autres fers à repasser.<br />
– En cas d'utilisation du support câble, vérifier que celui-ci est bien positionné<br />
sur la centrale. Contrôler également que l'appareil soit bien fixé.<br />
– Si vous avez des enfants, ne jamais poser le fer chaud à leur portée.<br />
– Brancher plusieurs appareil de grande puissance sur la même prise peut<br />
créer une surcharge électrique.<br />
– Si une rallonge électrique est nécessaire, utiliser uniquement un cordon de<br />
10 ampères. Veillez à le placer de façon à ce qu’on ne puisse pas trébucher<br />
ou le débrancher par mégarde. Il doit être équipée d’une prise de terre.<br />
– Pour votre sécurité, utiliser obligatoirement une prise de courant avec<br />
prise de terre.<br />
– Après chaque utilisation, toujours reposer le fer à plat, sur les pieds<br />
en silicone de la plaque repose-fer. Ne pas poser le fer à la verticale.<br />
– Ne jamais plonger l'appareil, même en partie, dans l’eau ou un autre<br />
liquide<br />
– Ne pas toucher les surfaces chaudes.<br />
– Après utilisation, laisser refroidir complètement l'appareil et le conserver<br />
si possible en position horizontale.<br />
– Les réparations doivent être effectuées par une <strong>per</strong>sonne compétente.<br />
Toute intervention non conforme annule la garantie.<br />
Le fabricant se réserve le droit de modifier les modèles présentés, ainsi que<br />
leurs caractéristiques et accessoires. Cet appareil est conforme aux prescriptions<br />
de la directive européenne basse tension 73/23/CEE relative à la<br />
sécurité, et à la directive CEM 89/336/CEE relative à la compatibilité électromagnétique,<br />
amendées par 93/68/CEE.<br />
D<br />
FR<br />
IT<br />
EN
3. Mise en marche<br />
.1 Première mise en marche<br />
. Placement<br />
1<br />
. Changer la cass. anticalcaire<br />
.4 Remplir le réservoir d'eau<br />
4<br />
5 6<br />
7 8<br />
Avant la première mise en marche, lire attentivement le présent mode d'emploi.<br />
Placer l'appareil sur une surface stable et rigide 1, . L’air doit circuler librement<br />
sous l’appareil pour lui assurer une bonne ventilation.<br />
Les surfaces en bois doivent être protégées de l’humidité, en y plaçant par<br />
exemple une toile cirée .<br />
Sortir le réservoir d'eau de son logement .<br />
Retirer la cassette anticalcaire de son sachet 4 et l'introduire dans le logement<br />
prévu dans le réservoir d’eau 5.<br />
Pour <strong>per</strong>mettre la production de vapeur, insérer parfaitement la cassette anticalcaire<br />
dans le réservoir. Ne pas ôter la mousse filtrante 6.<br />
!<br />
!<br />
i<br />
Remplir le réservoir au maximum avec de l'eau du robinet froide 7.<br />
Bien replacer le réservoir dans son logement (jusqu'à la butée) 8.<br />
!<br />
!<br />
Attention! Ne pas retirer le filtre de la cassette et<br />
insérer complètement la cassette anticalcaire!<br />
Le réservoir d'eau peut être retiré et rempli durant le fonctionnement de<br />
l'appareil. NE PAS appuyer sur la gâchette de commande de vapeur si le<br />
réservoir n'est pas inséré.<br />
i<br />
Attention! Ne jamais remplir à l'eau chaude ni ajouter<br />
de produit (parfum, pr. défroissant, etc.)<br />
.5 Qualité de l'eau<br />
.6 Réglage du thermostat<br />
9<br />
Eaux acceptées: eau du robinet, eau distillée pour fers à repasser, ou un<br />
mélange des deux.<br />
Eaux non autorisées: eau de pluie, eau de récupération du sèchelinge, du<br />
réfrigérateur ou du congélateur, eau parfumée, eau fournie par votre adoucisseur<br />
si celui-ci fait appel à des sels régénérents<br />
(incompatibilité avec le système EMC; voir également page 28).<br />
Durée de la cassette anticalcaire: En cas d'utilisation moyenne de 2 à 3<br />
h. par semaine, changer la cassette anticalcaire une fois par mois. Avec un<br />
taux élevé de calcaire dans l’eau du robinet et un repassage moyen de 2<br />
à 3 h./semaine, il peut être plus économique d'utiliser l’eau déminéralisée<br />
du commerce. La cassette pourra alors être efficace de 1 à 2 ans (selon le<br />
volume de repassage et le débit de vapeur demandé).<br />
Régler le bouton du thermostat du fer selon la nature de votre linge.<br />
Pour l’utilisation de la vapeur, régler le thermostat entre •• et ••• 9.<br />
!<br />
!<br />
i<br />
Attention! Pour repasser à la vapeur, toujours régler<br />
le thermostat entre •• et ••• !<br />
Avant de repasser, il est conseillé de trier le linge suivant la température<br />
recommandée par le fabricant, et de commencer par le linge nécessitant une<br />
température plus basse.<br />
THERMOSTAT TYPE DE TISSU VAPEUR<br />
• Fibres synthétiques: acétates -<br />
polyacryliques - polyamides<br />
•• Fibres naturelles animales: Soie -<br />
Laine<br />
••• Fibres naturelles végétales: coton<br />
- Lin<br />
Pas de vapeur<br />
Légère vapeur<br />
Beaucoup de<br />
vapeur<br />
D<br />
FR<br />
IT<br />
EN
.7 Brancher l'appareil<br />
10<br />
.8 Mise en route - processus de<br />
chauffe<br />
11 1<br />
1 14<br />
15<br />
Brancher l'appareil sur une prise avec prise de terre 10.<br />
!<br />
!<br />
i<br />
Appuyer sur le bouton Marche/Arrêt. 11.<br />
Le voyant vert (mise sous tension) et le voyant jaune (générateur) s'allument 1 .<br />
Régler le bouton variateur de vapeur en position centrale 1 .<br />
Un signal sonore vous indique que l'appareil est prêt à diffuser de la vapeur 14.<br />
Appuyez sur la gâchette vapeur jusqu’à obtention de la vapeur. A la première<br />
utilisation, cela peut mettre jusqu'à 30 sec. 15.<br />
!<br />
Tant que le voyant jaune est allumé 1 (env. 2 min.), la quantité de vapeur<br />
est réduite. Ensuite, il augmente automatiquement.<br />
!<br />
i<br />
Attention! Le courant est mortel! En cas d'urgence,<br />
débrancher l'appareil! Ne jamais mettre des éléments<br />
électriques en contact avec l'eau.<br />
Pendant le repassage, les voyants lumineux jaune (générateur<br />
de vapeur) et rouge (chauffe) s’allument et s’éteignent<br />
régulièrement. C'est un phénomène normal, qui indique<br />
que le fer et le générateur chauffent continuellement.<br />
4<br />
5<br />
.9 Variateur de vapeur<br />
16<br />
17<br />
18<br />
.10 Débit vapeur/gâchette vapeur<br />
19<br />
Le bouton variateur de vapeur <strong>per</strong>met de modifier la quantité de vapeur en<br />
fonction du type de tissu (voir tableau page 23).<br />
Mode variable 16:<br />
Régler le bouton du variateur en fonction du type de linge. Des réglages<br />
sont indiqués au tableau page 23. Pour augmenter progressivement le débit<br />
vapeur, tourner le bouton variateur vers le maxi ("+").<br />
"E" = Mode Eco 17 (uniquement modèle VX 50):<br />
Pour les courtes séances de repassage, nécessitant peu de vapeur (par ex. le<br />
repassage matinal d'une chemise froissée).<br />
Mode "Maxi" / Turbo vapeur 18 (uniquement modèle VX 50):<br />
Dans la zone maxi, un grand souffle de vapeur jaillit pendant plusieurs<br />
secondes de la semelle du fer (= "turbo vapeur") avant de se stabiliser à un<br />
débit normal.<br />
Il faut attendre quelques secondes avant de répéter cet effet (le système doit<br />
d'abord se recharger), car de l'eau risquerait de s'écouler de la semelle.<br />
Pour obtenir de la vapeur, appuyer sur la gâchette de commande de vapeur 19.<br />
Quelques conseils:<br />
1. Grâce au débit important de vapeur, il est inutile d’appuyer en <strong>per</strong>manence<br />
sur la gâchette de commande de la vapeur. Des pressions brèves et<br />
successives <strong>per</strong>mettent de doser la quantité de vapeur (avec des pressions<br />
trop longues, de l'eau risquerait de s'écouler).<br />
2. De la vapeur peut être encore évacuée après le relâchement de la<br />
gâchette de commande vapeur et de l’eau risque d’apparaître sur le reposefer.<br />
Ceci est est un phénomène normal. Si nécessaire, essuyer cette eau avec<br />
un chiffon.<br />
3. Sélectionner le débit vapeur intermédiaire (mode variable) 17:<br />
- à la première utilisation,<br />
- lorsque le réservoir est vide,<br />
- à chaque changement de cassette anticalcaire.<br />
!<br />
!<br />
Attention! Ne pas appuyer sur la gâchette de vapeur<br />
lorsque le réservoir est vide!<br />
D<br />
FR<br />
IT<br />
EN
.11 Bruit de l'appareil<br />
0<br />
.1 Défroissage vertical<br />
1<br />
.1 Plaque repose-fer<br />
Pour assurer des <strong>per</strong>formances régulières en débit vapeur, votre appareil<br />
de repassage est équipé d’une pompe, que vous entendez dès que vous<br />
appuyez sur la gâchette vapeur 0.<br />
Elle est davantage audible<br />
- à la première utilisation,<br />
- lorsque le réservoir est vide,<br />
- à chaque changement de cassette anticalcaire.<br />
Ce fer à repasser peut être utilisé verticalement pour défroisser du linge<br />
pendu ou des rideaux. Cela <strong>per</strong>met donc de rafraîchir vestes, pantalons, etc.<br />
La qualité du résultat dépend du type de tissu.<br />
Passez le fer de haut en bas tout en appuyant sur la gâchette de<br />
commande de vapeur.<br />
Conseil: pendre le vêtement à un cintre.<br />
La plaque repose-fer étant amovible, elle peut donc être utilisée comme<br />
surface d'appui, par ex. pour repasser une chemise. Pour enlever le reposefer<br />
de la centrale, le glisser vers le haut et vers l'arrière . Attention: avant<br />
et après utilisation, la plaque repose-fer est chaude! Poser la plaque sur la<br />
surface de repassage, puis poser le fer sur les bandes de silicone grises. La<br />
plaque doit être bien stable!<br />
Remettre le repose-fer sur la centrale:<br />
Insérer délicatement la plaque en la glissant dans les guides . Toujours<br />
vérifier que le repose-fer est bien en place avant d’y poser le fer, car il risquerait<br />
de tomber.<br />
!<br />
!<br />
Attention! Pour ôter ou remettre la plaque lorsque le fer est<br />
chaud, utiliser des gants ou une manique.<br />
6<br />
7<br />
.14 Fonction auto-stop<br />
4<br />
.15 Après le repassage<br />
5<br />
7<br />
6<br />
.16 Nettoyage et entretien<br />
La fonction auto-stop coupe automatiquement l'arrivée de courant dans<br />
l'appareil si<br />
– le fer reste immobile pendant env. 20 minutes, ou<br />
– la gâchette vapeur n'est pas actionnée pour une durée prolongée.<br />
Le voyant rouge "AUTO-STOP" s'allume dès que la fonction est activée 4.<br />
Dès que la gâchette est actionnée, le voyant s’éteint et l’appareil se remet en<br />
chauffe. Dès que l’appareil est à nouveau prêt à fonctionner, un signal sonore<br />
retentit.<br />
Après le repassage, appuyer sur l'interrupteur Marche/Arrêt 5. Les voyants<br />
vert (mise sous tension) et jaune (générateur) s'éteignent.<br />
Débrancher l'appareil et attendre qu'il refroidisse.<br />
Replacer le câble dans le logement 6 prévu à cet effet.<br />
Ranger l'appareil sans vider le réservoir.<br />
!<br />
!<br />
i<br />
Attention! Ranger à l'horizontale (pour éviter les écoulements<br />
d'eau!), à une température supérieure à 5° C<br />
et hors de la portée des enfants.<br />
A la longue, à cause des apprêts se trouvant dans les tissus ou des résidus<br />
de produits de nettoyage, la semelle du fer peut s'encrasser et glisser moins<br />
facilement.<br />
Il faut donc la nettoyer après chaque utilisation avec un chiffon lisse. Les<br />
tâches ou dépôts tenaces se nettoient à l'aide d'un produit spécial pour fers<br />
à repasser. Ne jamais utiliser de produits décapants ou alcalins (pour four de<br />
cuisinière par ex.), ni de produits abrasifs ou tampons de laine d’acier.<br />
D<br />
FR<br />
IT<br />
EN
.17 EMC Electronic Mineral Control<br />
8 9<br />
0<br />
Antikalk-Kassetten<br />
Cassettes anticalcires<br />
Cartuccia anticalcare<br />
Art. 60453<br />
Anti-lime cassettes<br />
VX 200/250<br />
CLASS 100 DX/ 120 PE / 150 DX<br />
SUPERJET<br />
BOOSTER 10/20/40<br />
FG 1700 / FG 3700 / FG 4700<br />
7 611584 604534 ><br />
4. Elimination<br />
5.1 Elimination<br />
Le système électronique EMC contrôle l’efficacité de la cassette<br />
anticalcaire en mesurant en <strong>per</strong>manence l’absence de minéraux dans<br />
l’eau filtrée par la cassette. Ainsi le système EMC <strong>per</strong>met de<br />
supprimer tout risque d’entartrage.<br />
Lorsque la cassette anticalcaire devient moins efficace, le voyant clignote. La<br />
cassette doit alors être changée 8.<br />
Si la cassette anticalcaire n’est pas changée, le système EMC bloque l’émission<br />
de vapeur pour protéger l'appareil des dégâts dûs au calcaire. Si vous<br />
appuyez sur la gâchette vapeur, l'appareil émet un signal d'alarme. En cas de<br />
besoin, l'appareil peut encore être utilisé pour un laps de temps court avec<br />
de l'eau distillée.<br />
Une fois que la cassette a été changée (voir page 22), l'appareil doit être<br />
éteint puis remis en marche. Les cassettes anticalcaire sont éliminées avec<br />
les ordures ménagères 9.<br />
Dès que l'appareil est de nouveau prêt à fonctionner, un signal sonore<br />
retentit. Appuyer par pressions successives sur la gâchette vapeur, jusqu'à<br />
l'obtention ! de vapeur. Le circuit est à nouveau plein et le repassage peut être<br />
repris.<br />
Les cassettes anticalcaire de rechange sont disponibles auprès de votre<br />
revendeur (art. n° 60453 confection double) 0.<br />
!<br />
i<br />
Après le changement de la cassette anticalcaire, la pompe<br />
peut être plus bruyante qu'à l'accoutumée, à cause de l'air<br />
encore présent dans le circuit d'eau.<br />
En cas de non utilisation, l'appareil peut être déposé gratuitement<br />
dans un point de vente, où il sera éliminé correctement.<br />
Les appareils présentant un dégât dangereux doivent être éliminés<br />
immédiatement. Veillez à ce qu'ils ne soient plus utilisés.<br />
Ne jetez pas vos appareils en fin de vie avec vos déchets<br />
ménagers habituels (protection de l'environnement!).<br />
8<br />
9<br />
5. Que faire si...<br />
ANOMALIE CAUSE EVENTUELLE RESOLUTION POSSIBLE<br />
– Aucun voyant ne s'allume – Mauvaise alimentation électrique<br />
– L'appareil ne chauffe pas<br />
– Appareil pas branché ou interrupteur<br />
Marche/Arrêt non enclenché<br />
– Autres*<br />
– Le fer ne chauffe pas – Thermostat réglé sur "mini"<br />
– Autres*<br />
– La vapeur ne sort pas – L’appareil n’est pas prêt<br />
– Production d’eau avec la<br />
vapeur<br />
– L'appareil émet un bruit singulier<br />
– Le réservoir d'eau est vide<br />
– Le réservoir d'eau est mal inséré<br />
– Il n’y a pas de cassette anticalcaire<br />
– Le voyant clignote<br />
– Autres*<br />
– La semelle du fer n’est pas assez<br />
chaude<br />
– Demande intensive de vapeur<br />
– Eau de condensation dans le tuyau<br />
– Autres*<br />
– Eau de condensation dans le tuyau<br />
– Le réservoir d'eau est vide<br />
– Le réservoir d'eau est mal inséré<br />
– Contrôler les prises de courant et l’alimentation<br />
du secteur<br />
– Brancher l’appareil et appuyer sur le bouton<br />
Marche/Arrêt<br />
– Régler à la température voulue<br />
– Attendre le signal sonore, indiquant que l'appareil<br />
est prêt à fonctionner<br />
– Rester appuyé sur la gâchette jusqu’à obtention<br />
de la vapeur<br />
– La cassette anticalcaire est neuve. L'eau est<br />
d'abord absorbée par le granulat, et passe<br />
ensuite dans le générateur de vapeur<br />
– Remplir le réservoir d'eau<br />
– Insérer le réservoir en le poussant bien jusqu'au<br />
fond<br />
– Mettre une cassette anticalcaire dans le réservoir<br />
– Remplacer la cassette anticalcaire<br />
– Régler le thermostat entre •• et ••• et<br />
attendre que le voyant jaune (générateur)<br />
s'éteigne<br />
– Appuyer plusieurs fois sur la gâchette vapeur<br />
– Appuyer plusieurs fois sur la gâchette vapeur<br />
– Remplir le réservoir d'eau<br />
– Insérer le réservoir en le poussant bien jusqu'au<br />
fond<br />
– Voyant allumé<br />
– Autres*<br />
– Arrêt automatique (auto-stop) après – Appuyer sur la gâchette vapeur. Le voyant<br />
20 min. de non utilisation<br />
s'éteint et l'appareil se remet à chauffer.<br />
Attendre le signal sonore émis par l'appareil<br />
– Voyant allumé – La cassette anticalcaire est usée – Remplacer la cassette anticalcaire. Eteindre<br />
et remettre l'appareil en marche. Attendre le<br />
signal sonore, puis appuyer sur la gâchette<br />
vapeur jusqu'à l'obtention de vapeur<br />
* Contacter le vendeur ou le service clientèle<br />
D<br />
FR<br />
IT<br />
EN
Benvenuti<br />
IT<br />
Gentili Signore e Signori<br />
Vi ringraziamo di aver scelto di acquistare un prodotto <strong>TURMIX</strong>. Dal 1933<br />
lavoriamo con un unico obiettivo: la vostra soddisfazione con i nostri apparecchi.<br />
La nostra filosofia è basata su quattro concetti: durevolezza, semplicità,<br />
fascino e fiducia.<br />
Ciò significa che la qualità, l'ergonomia, la semplicità e il servizio riparazioni<br />
sono di fondamentale importanza <strong>per</strong> noi e ci <strong>per</strong>mettono di offrirvi i prodotti<br />
e il servizio migliori.<br />
Vi auguriamo buon divertimento e successo con il vostro prodotto <strong>TURMIX</strong>.<br />
0<br />
1<br />
Indice<br />
1 Messa in funzione iniziale<br />
Importanti avvertenze di<br />
sicurezza<br />
Messa in funzione<br />
4 Smaltimento<br />
5 Guasti<br />
6 Appendice<br />
1.1 Descrizione degli elementi 32<br />
1.2 Istruzioni brevi 34<br />
2. Avvertenze di sicurezza 35<br />
3.1 Messa in funzione iniziale 36<br />
3.2 Collocazione 36<br />
3.3 Sostituz. cart. anticalcare 36<br />
3.4 Riempire il serbatoio 36<br />
3.5 Qualità dell'acqua 37<br />
3.6 Regolazione termostato 37<br />
3.7 Allacciare alla corrente 38<br />
3.8 Accendere e fase di<br />
riscaldamento 38<br />
3.9 Regolatore quantità vapore 39<br />
3.10 Erogazione vapore/<br />
tasto vapore 39<br />
3.11 Ronzio 40<br />
3.12 Stiratura verticale 40<br />
3.13 Piastra poggiaferro amovibile 40<br />
3.14 Funzione auto-stop 41<br />
3.15 Dopo la stiratura 41<br />
3.16 Pulizia e manutenzione 41<br />
3.17 EMC Electronic Mineral<br />
Control/Cartuccia anticalcare<br />
42<br />
4.1 Smaltimento 42<br />
5.1 Guasti 43<br />
6.1 Analisi del guasto 59<br />
6.2 Garanzia 60<br />
6.3 Accessori 61<br />
D<br />
FR<br />
IT<br />
EN
1 .<br />
1 .<br />
11.<br />
1.<br />
10.<br />
9.<br />
14.<br />
8.<br />
7.<br />
.<br />
4.<br />
.<br />
5.<br />
6.<br />
15. 16. 17. 18.<br />
Elemento di comando VX 250<br />
1.1 Descrizione degli elementi<br />
Descrizione degli elementi di<br />
comando e dell'apparecchio<br />
Elemento di comando<br />
1 Spia indicante la fase di<br />
riscaldamento del ferro da stiro<br />
2 Tasto erogazione vapore<br />
3 Regolatore termostato <strong>per</strong> la<br />
regolazione della tem<strong>per</strong>atura<br />
del ferro da stiro<br />
4 Piastra poggiaferro amovibile<br />
5 Pinza di fissaggio <strong>per</strong> il cavo<br />
6 Corpo del generatore vapore<br />
7 Elemento di comando<br />
8 Regolatore quantità vapore<br />
9 Interruttore acceso/spento<br />
10 Serbatoio acqua amovibile<br />
11 Spina/cavo d'alimentazione<br />
12 Tubo vapore tra ferro da stiro<br />
e generatore vapore<br />
13 Cartuccia anticalcare<br />
14 Astina <strong>per</strong> il cavo<br />
15 Spia controllo funzionamento<br />
16 Spia controllo generazione<br />
vapore<br />
17 Spia controllo sostituzione<br />
cartuccia anticalcare<br />
18 Spia controllo funzione<br />
auto-stop<br />
D<br />
FR<br />
IT<br />
EN
4<br />
5<br />
1.2 Istruzioni brevi 2. Importanti avvertenze di sicurezza<br />
1. 1. .<br />
. 4.<br />
5. 6.<br />
7. 8.<br />
9. 10.<br />
11. 1 .<br />
1 . 14.<br />
1. Appoggiare l'apparecchio su una<br />
su<strong>per</strong>ficie stabile<br />
2. Estrarre il serbatoio dell'acqua<br />
3. Estrarre la cartuccia antical<br />
care dalla pellicola di protezione<br />
dall'umidità<br />
4. NON estrarre il filtro dalla cartuc<br />
cia anticalcare<br />
5. Riempire il serbatoio dell'acqua<br />
fino al bordo su<strong>per</strong>iore<br />
6. Ricollocare il serbatoio<br />
nell'apparecchio fino allo scatto<br />
7. Per stirare con il vapore, regolare<br />
il regolatore termostato tra •• e<br />
••• (= zona vapore)<br />
8. Inserire la spina nella presa<br />
9. Accendere l'apparecchio tramite<br />
l'interruttore acceso/spento<br />
10. La spia verde (funzionamento)<br />
e quella gialla (generazione<br />
vapore) si accendono<br />
11. Girare il regolatore quantità<br />
vapore sulla parte centrale<br />
12. Attendere fino a quando<br />
l'apparecchio è pronto <strong>per</strong> <strong>l'uso</strong><br />
ed emette un segnale acustico<br />
13. Premere il tasto vapore sul<br />
ferro da stiro fino alla fuoriuscita<br />
di vapore. La prima volta può<br />
durare fino a 30 secondi.<br />
Fintantoché la spia gialla gene-<br />
razione vapore rimane accesa, la<br />
quantità di vapore è ridotta.<br />
Durante il funzionamento è nor-<br />
male sentire il ronzio della<br />
pompa.<br />
Non rivolgere il primo getto di<br />
vapore sulla biancheria.<br />
14. Stirando premere ripetutamente<br />
il tasto erogazione vapore<br />
!<br />
!<br />
i<br />
Utilizzando questo sistema di stiro osservare sempre le seguenti disposizioni<br />
di sicurezza:<br />
– Leggere le istruzioni d'uso prima di allacciare l'apparecchio.<br />
– Prima di allacciare l'apparecchio <strong>per</strong> la prima volta alla corrente elettrica,<br />
assicurarsi che la tensione di rete (230 V) corrisponda alle indicazioni sull'apposita<br />
targhetta.<br />
– Non utilizzare l'apparecchio <strong>per</strong> altri scopi che <strong>per</strong> stirare.<br />
– Non lasciare mai l'apparecchio incustodito quando è allacciato alla corrente.<br />
Estrarre la spina anche soltanto <strong>per</strong> assenze brevi.<br />
– Mai estrarre la spina tirando il cavo.<br />
– Tenere il cavo lontano da fonti di calore.<br />
– Utilizzare l'apparecchio esclusivamente in stato ineccepibile. In caso di<br />
danni all'apparecchio o al cavo, non utilizzare l'apparecchio e contattare il<br />
servizio clienti.<br />
– Durante il funzionamento l'apparecchio può diventare molto caldo. Valgono<br />
le medesime misure precauzionali come <strong>per</strong> tutti gli altri ferri da stiro.<br />
– Utilizzando l'astina reggitubo, controllare che questa sia ben collocata nell'apparecchio<br />
base. Controllare inoltre che l'apparecchio sia sempre ben<br />
fissato.<br />
– In un'economia domestica con bambini non appoggiare mai il ferro da<br />
stiro caldo alla portata dei bambini.<br />
– Allacciare alla corrente altri apparecchi con un alto consumo di elettricità<br />
potrebbe portare a un sovraccarico.<br />
– Utilizzare come prolunga unicamente un cavo idoneo da 10 am<strong>per</strong>e.<br />
Appoggiare il cavo sul pavimento in modo che non si possa inciampare, o<br />
che non lo si possa strappare inavvertitamente. Il cavo deve essere munito<br />
di una messa a terra.<br />
– Per la propria sicurezza utilizzare unicamente prese con messa a terra.<br />
– Dopo ogni uso controllare che il ferro da stiro sia appoggiato bene in<br />
posizione orizzontale sui piedini in silicone della piastra poggiaferro.<br />
Non appoggiare il ferro in posizione verticale.<br />
– Mai immergere l'apparecchio (nemmeno parzialmente) nell'acqua o in altri<br />
liquidi.<br />
– Mai toccare le su<strong>per</strong>fici calde.<br />
– Dopo la stiratura lasciare raffreddare completamente il ferro e conservarlo<br />
possibilmente in posizione orizzontale.<br />
– Le riparazioni vanno effettuate da <strong>per</strong>sonale competente. In caso di riparazioni<br />
non effettuate a regola d'arte scade il diritto alla garanzia.<br />
Il produttore si riserva il diritto di modifica dei modelli presentati, dei rispettivi<br />
codici di identificazione e degli accessori. L'apparecchio è conforme alle<br />
prescrizioni delle direttive europee bassa tensione 73/23/CEE relative alla<br />
sicurezza, e alle direttive relative alla compatibilità elettromagnetica CEM<br />
89/336/CEE, amendate tramite 93/68/CEE.<br />
D<br />
FR<br />
IT<br />
EN
3. Messa in funzione<br />
.1 Messa in funzione iniziale<br />
. Collocazione<br />
1<br />
. Sostituz. cartuccia anticalcare<br />
4<br />
5 6<br />
.4 Riempire il serbatoio<br />
7 8<br />
Prima della messa in funzione iniziale leggere attentamente le presenti<br />
istruzioni d'uso.<br />
Appoggiare l'apparecchio su una su<strong>per</strong>ficie solida e stabile 1, , <strong>per</strong> <strong>per</strong>mettere<br />
una sufficiente circolazione dell'aria sotto l'apparecchio.<br />
Le su<strong>per</strong>fici di legno vanno protette dall'umidità con un telo cerato o simile .<br />
Estrarre il serbatoio dell'acqua .<br />
Estrarre la cartuccia anticalcare dalla pellicola di protezione dall'umidità 4 e<br />
collocarla nell'apposita a<strong>per</strong>tura del serbatoio dell'acqua 5.<br />
La cartuccia anticalcare deve essere inserita bene nel serbatoio <strong>per</strong> rendere<br />
possibile la generazione di vapore. Non estrarre il filtro 6.<br />
!<br />
!<br />
i<br />
Riempire il serbatoio dell'acqua fino al bordo su<strong>per</strong>iore con acqua da rubinetto<br />
fredda 7. Ricollocare il serbatoio nell'apparecchio fino allo scatto 8.<br />
!<br />
!<br />
i<br />
Attenzione! Non estrarre il filtro dalla cartuccia e inserire<br />
completamente la cartuccia anticalcare!<br />
Attenzione! Mai riempire con acqua calda! Non<br />
aggiungere altri prodotti (anti-pieghe, profumi, ecc.)!<br />
Il serbatoio dell'acqua può essere rimosso e riempito anche durante il funzionamento<br />
dell'apparecchio. In assenza del serbatoio NON premere il tasto<br />
erogazione vapore.<br />
6<br />
7<br />
.5 Qualità dell'acqua<br />
.6 Regolazione termostato<br />
9<br />
Si può utilizzare: acqua da rubinetto, acqua distillata <strong>per</strong> ferri da stiro o una<br />
miscela di ambedue.<br />
Non si può utilizzare: acqua piovana, acqua di condensa dall'asciugatrice,<br />
acqua da scongelamento del frigorifero o altri apparecchi, acqua proveniente<br />
da impianti di decalcificazione o altri sistemi di decalcificazione a base di sali<br />
rigeneranti (questi sono incompatibili con il sistema EMC; vedi anche pagina<br />
42).<br />
Durata della cartuccia anticalcare: con un impiego medio del ferro da stiro<br />
di ca. 2-3 ore settimanali la cartuccia anticalcare deve essere sostituita una<br />
volta al mese. Con un'acqua da rubinetto particolarmente calcarea e l'impiego<br />
settimanale di 2-3 ore potrebbe risultare più economico utilizzare acqua<br />
distillata. In tal caso la cartuccia anticalcare potrebbe durare da 1 a 2 anni (a<br />
dipendenza della durata dell'impiego e della quantità di vapore).<br />
Regolare il regolatore del termostato sulla tem<strong>per</strong>atura adeguata ai capi da<br />
stirare.<br />
Per stirare a vapore scegliere una posizione tra •• e ••• 9.<br />
!<br />
!<br />
i<br />
Attenzione! Per stirare a vapore regolare il termostato<br />
sempre tra •• e ••• !<br />
Prima della stiratura è consigliabile separare la biancheria secondo la tem<strong>per</strong>atura<br />
consigliata dal produttore e incominciare a stirare con la tem<strong>per</strong>atura<br />
più bassa.<br />
TERMOSTATO MATERIALE QUANT. VAPORE<br />
• sintetici: acetato- Polyacryl- Polyamid vapore assente<br />
•• tessuti "animali": seta - lana poco vapore<br />
••• tessuti naturali: cotone - lino molto vapore<br />
D<br />
FR<br />
IT<br />
EN
.7 Allacciare alla corrente<br />
10<br />
.8 Accendere e fase di riscaldamento<br />
11 1<br />
1 14<br />
15<br />
Allacciare l'apparecchio ad una presa di corrente con messa a terra 10.<br />
!<br />
!<br />
i<br />
Achtung! Attenzione! Strom La corrente kann tödlich può essere sein! Im letale! Notfall In sofort caso di<br />
Netzstecker emergenza estrarre aus der la Steckdose spina immediatamente. ziehen. Stromführende Mai met-<br />
Teile tere in niemals contatto in con Verbindung l'acqua mit gli elementi Wasser bringen. elettrici.<br />
Premere l'interruttore acceso/spento 11.<br />
La spia verde (funzionamento) e quella gialla (generazione vapore) si accendono<br />
1 .<br />
Girare il regolatore quantità vapore sulla parte centrale 1 .<br />
Attendere fino a quando l'apparecchio è pronto <strong>per</strong> <strong>l'uso</strong> ed emette un<br />
segnale acustico. 14.<br />
Sollevare il ferro da stiro e premere il tasto vapore fino alla fuoriuscita di<br />
vapore. La prima volta può durare fino a 30 secondi 15.<br />
!<br />
Fintantoché la spia gialla generazione vapore rimane accesa 1 (ca. 2 min.),<br />
la quantità di vapore è ridotta. In seguito aumenta automaticamente.<br />
!<br />
i<br />
Durante la stiratura la spia gialla (generazione vapore) e<br />
quella rossa (riscaldamento) si accendono regolarmente<br />
e si spengono nuovamente. Si tratta di un procedimento<br />
normale, il quale indica che il generatore e il ferro vengono<br />
continuamente riscaldati.<br />
8<br />
9<br />
.9 Regolatore quantità vapore<br />
16<br />
17<br />
18<br />
.10 Erogazione vapore/<br />
tasto vapore<br />
19<br />
Con il regolatore del vapore la quantità di vapore può essere modificata in<br />
base al tipo di tessuto (vedi tabella a pagina 37). Per il modello «VX 250» vi<br />
sono tre possibilità:<br />
Potenza vapore, regolazione continua 16:<br />
Regolare in base al tipo di tessuto. Sulla tabella a pagina 37 si trovano le<br />
posizioni più adatte. La quantità di vapore aumenta, man mano si gira il<br />
regolatore del vapore in senso orario verso il "+".<br />
"E" = modalità eco 17 (solo modello VX 50):<br />
consigliata <strong>per</strong> stirature brevi che non necessitano una grande quantità di<br />
vapore (<strong>per</strong> es. <strong>per</strong> stirare la mattina una camicetta spiegazzata).<br />
Modalità "Maxi" / vapore turbo 18 (solo modello VX 50):<br />
In questa posizione <strong>per</strong> alcuni secondi il getto vapore è forte (= "vapore<br />
turbo"); in seguito la quantità di vapore si riduce di nuovo a un livello normale.<br />
Attendere alcuni secondi prima di ripetere questo effetto turbo, altrimenti<br />
potrebbe fuoriuscire acqua dalla piastra (dapprima il sistema si deve ricaricare).<br />
Premere il tasto vapore <strong>per</strong> l'erogazione di vapore 19.<br />
Ecco alcuni validi suggerimenti:<br />
1. Grazie all'elevata potenza del vapore è sufficiente premere il tasto<br />
vapore solo brevemente. L'azione breve e ripetuta <strong>per</strong>mette di avere a<br />
disposizione una quantità sufficiente di vapore (premere troppo a lungo può<br />
causare fuoriuscite di acqua).<br />
2. In caso di utilizzo intensivo potrebbe fuoriuscire vapore anche dopo<br />
aver rilasciato il tasto. Sulla piastra poggiaferro il vapore residuo potrebbe<br />
condensare e lasciare un po' di acqua. Ciò rientra nella normalità. Se necessario<br />
asciugare con un panno. Non sussiste <strong>per</strong>icolo di danni <strong>per</strong>manenti.<br />
3. Girare il regolatore quantità vapore sulla parte centrale 17:<br />
- alla messa in funzione iniziale,<br />
- quando il serbatoio è vuoto,<br />
- ad ogni sostituzione della cartuccia anticalcare.<br />
!<br />
!<br />
Attenzione! Se il serbatoio dell'acqua è vuoto non azionare<br />
più il tasto vapore!<br />
D<br />
FR<br />
IT<br />
EN
.11 Ronzio pompa<br />
0<br />
.1 Stiratura verticale<br />
1<br />
.1 Piastra poggiaferro amovibile<br />
Onde <strong>per</strong>mettere una regolare potenza del vapore, l'apparecchio è dotato di<br />
una pompa. Questa si sente non appena viene azionato il tasto vapore 0.<br />
In alcune circostanze si sente più intensamente, <strong>per</strong> es.:<br />
- alla messa in funzione iniziale<br />
- quando il serbatoio è vuoto<br />
- ad ogni sostituzione della cartuccia.<br />
Il ferro da stiro può essere utilizzato anche in senso verticale <strong>per</strong> stirare abiti<br />
appesi o tende. In questo modo si possono stirare o rinfrescare anche giacche<br />
o pantaloni, ecc. La qualità del risultato dipende dal tipo di tessuto.<br />
Per una stiratura verticale portare il ferro da stiro dall'alto verso il basso premendo<br />
ripetutamente il tasto vapore.<br />
Suggerimento: appendere la giacca o i pantaloni a una gruccia.<br />
La piastra poggiaferro è amovibile. In tal modo può essere utilizzata come<br />
su<strong>per</strong>ficie d'appoggio, <strong>per</strong> es. stirando le camicie. Estrarre la piastra verso il<br />
retro e verso l'alto . Attenzione: durante e dopo <strong>l'uso</strong> la piastra è calda!<br />
Porre la piastra sulla su<strong>per</strong>ficie utilizzata <strong>per</strong> stirare e appoggiare il ferro sulle<br />
strisce di silicone grigie. Controllare che la piastra sia ben stabile!<br />
Ricollocare la piastra poggiaferro sull'apparecchio:<br />
delicatamente inserire la piastra nell'apparecchio seguendo le guide .<br />
Controllare che sia inserita a fondo e che sia stabile, onde evitare un'eventuale<br />
caduta del ferro da stiro.<br />
!<br />
!<br />
Attenzione! Per rimuovere o inserire la piastra ancora calda<br />
utilizzare guanti o una presina resistenti al calore.<br />
40<br />
41<br />
.14 Funzione auto-stop<br />
4<br />
.15 Dopo la stiratura<br />
5 6<br />
.16 Pulizia e manutenzione<br />
7<br />
La funzione auto-stop disinserisce automaticamente l'erogazione di corrente<br />
nel caso in cui<br />
– <strong>per</strong> ca. 20 minuti il ferro da stiro non è in movimento, oppure<br />
– se, <strong>per</strong> un tempo prolungato, il tasto vapore non viene premuto.<br />
La spia di controllo rossa "AUTO-STOP" si accende non appena la funzione<br />
è attiva 4.<br />
Premendo il tasto vapore, la spia di controllo si spegne e l'apparecchio si<br />
ricarica. Non appena l'apparecchio è nuovamente pronto <strong>per</strong> <strong>l'uso</strong> emette un<br />
segnale acustico.<br />
Dopo la stiratura spegnere l'apparecchio premendo l'interruttore acceso/<br />
spento 5. La spia di controllo verde (funzionamento) e quella gialla (generazione<br />
vapore) si spengono.<br />
Estrarre la spina e lasciare raffreddare l'apparecchio completamente.<br />
Riporre il cavo nell'apposito spazio 6.<br />
Riporre l'apparecchio senza svuotare il serbatoio.<br />
!<br />
!<br />
i<br />
Attenzione! Conservare in posizione orizzontale (<strong>per</strong><br />
evitare la fuoriuscita di acqua!) ad una tem<strong>per</strong>atura<br />
su<strong>per</strong>iore a 5 °C e fuori dalla portata dei bambini.<br />
A causa di residui di detersivo o appretto, la piastra del ferro da stiro potrebbe<br />
sporcarsi e non scivolare più facilmente sui tessuti.<br />
Di conseguenza pulire il ferro da stiro, dopo ogni stiratura, con un panno<br />
liscio. Trattare con un apposito prodotto <strong>per</strong> la pulizia dei ferri da stiro macchie<br />
e depositi difficili da rimuovere. In nessun caso utilizzare prodotti alcalini<br />
(<strong>per</strong> es. prodotti <strong>per</strong> la pulizia del forno), detergenti aggressivi o abrasivi, o<br />
lana d'acciaio.<br />
D<br />
FR<br />
IT<br />
EN
.17 EMC Electronic Mineral Control<br />
8 9<br />
0<br />
Antikalk-Kassetten<br />
Cassettes anticalcires<br />
Cartuccia anticalcare<br />
Art. 60453<br />
Anti-lime cassettes<br />
VX 200/250<br />
CLASS 100 DX/ 120 PE / 150 DX<br />
SUPERJET<br />
BOOSTER 10/20/40<br />
FG 1700 / FG 3700 / FG 4700<br />
7 611584 604534 ><br />
4. Smaltimento<br />
5.1 Smaltimento<br />
Il sistema elettronico EMC-System controlla lo stato della cartuccia anticalcare<br />
e misura costantemente la quota di elementi minerali nell'acqua filtrata.<br />
Quando la cartuccia è consumata, il sistema EMC blocca l'erogazione di<br />
vapore onde evitare una calcificazione.<br />
Non appena la cartuccia <strong>per</strong>de la sua efficacia, la spia di controllo lampeggia.<br />
La cartuccia deve essere sostituita al più presto 8.<br />
Se la cartuccia anticalcare non viene sostituita, il sistema EMC blocca l'erogazione<br />
di vapore, <strong>per</strong> proteggere l'apparecchio dai danni della calcificazione.<br />
Premendo il tasto vapore l'apparecchio emette un segnale acustico d'allarme.<br />
In caso di necessità l'apparecchio può essere azionato ancora <strong>per</strong> breve<br />
tempo con acqua distillata.<br />
Dopo la sostituzione della cartuccia anticalcare (vedi pagina 36), l'apparecchio<br />
deve essere spento e nuovamente acceso. Smaltire tra i rifiuti domestici<br />
le vecchie cartucce consumate 9.<br />
Non appena l'apparecchio è nuovamente pronto <strong>per</strong> <strong>l'uso</strong>, emette un segnale<br />
acustico. Premere ripetutamente il tasto vapore fino alla fuoriuscita di vapore.<br />
Il circuito dell'acqua è ora di nuovo pieno e si può continuare a stirare.<br />
!<br />
!<br />
Le cartucce anticalcare sono ottenibili presso il vostro punto vendita<br />
(n° art. 60453 confezione doppia) 0.<br />
i<br />
Dopo la sostituzione della cartuccia anticalcare la pompa<br />
potrebbe essere più rumorosa del solito, a causa dell'aria<br />
ancora presente nel circuito dell'acqua.<br />
Gli apparecchi non più in uso possono essere consegnati gratuitamente<br />
presso un punto vendita <strong>per</strong> <strong>per</strong>mettere uno smaltimento<br />
adeguato. Smaltire immediatamente gli apparecchi con un guasto<br />
<strong>per</strong>icoloso e assicurarsi che non possano più essere utilizzati.<br />
Non gettare gli apparecchi tra i rifiuti domestici (tutela dell'ambiente!)<br />
4<br />
4<br />
5. Guasti<br />
PROBLEMA EVENTUALI CAUSE POSSIBILE SOLUZIONE<br />
– Le spie di controllo non si<br />
accendono<br />
– L'apparecchio non si riscalda<br />
– La spina non è ben inserita nella<br />
presa<br />
– L'apparecchio non è allacciato alla<br />
corrente o non è acceso (interruttore)<br />
– Altre cause*<br />
– Il ferro da stiro non si riscalda – Il termostato è regolato al minimo<br />
– Altre cause*<br />
– Erogazione vapore assente – L'apparecchio non è pronto<br />
– Dalla piastra del ferro<br />
fuoriesce vapore e acqua<br />
– L'apparecchio emette un<br />
rumore atipico<br />
– Si illumina la spia di controllo<br />
– Il serbatoio dell'acqua è vuoto<br />
– Il serbatoio dell'acqua non è inserito<br />
correttamente<br />
– Cartuccia anticalcare assente<br />
– Spia di controllo lampeggia<br />
– Altre cause*<br />
– Il ferro da stiro non è abbastanza<br />
caldo<br />
– Generazione vapore intensa<br />
– Presenza di acqua di condensa nel<br />
tubo di collegamento<br />
– Altre cause*<br />
– Presenza di acqua di condensa nel<br />
tubo di collegamento<br />
– Il serbatoio dell'acqua è vuoto<br />
– Il serbatoio dell'acqua non è inserito<br />
correttamente<br />
– Altre cause*<br />
– Auto-stop dopo 20 minuti apparecchio<br />
inutilizzato<br />
– Controllare l'erogazione di corrente elettrica<br />
– Inserire la presa e premere l'interruttore acceso/spento<br />
– Regolare il termostato sulla tem<strong>per</strong>atura desiderata<br />
– Non appena l'apparecchio è di nuovo pronto<br />
<strong>per</strong> <strong>l'uso</strong>, emette un segnale acustico<br />
– Alla messa in funzione premere il tasto vapore<br />
fino alla prima fuoriuscita di vapore<br />
– La cartuccia anticalcare è nuova. L'acqua viene<br />
dapprima assorbita dal granulato, <strong>per</strong> poi passare<br />
al generatore di vapore<br />
– Riempire il serbatoio<br />
– Inserire bene il serbatoio premendolo fino in<br />
fondo<br />
– Inserire una cartuccia anticalcare nel serbatoio<br />
– Sostituire la cartuccia anticalcare<br />
– Regolare il termostato tra •• e ••• e attendere<br />
che la spia di controllo gialla (generazione<br />
vapore) si spenga<br />
– Premere ripetutamente il tasto vapore<br />
– Premere ripetutamente il tasto vapore<br />
– Riempire il serbatoio<br />
– Inserire bene il serbatoio premendolo fino in<br />
fondo<br />
– Premere il tasto vapore. La spia di controllo si<br />
spegne e l'apparecchio scalda nuovamente.<br />
Attendere fino a quando l'apparecchio emette<br />
un segnale acustico<br />
– Si illumina la spia di controllo – La cartuccia anticalcare è consumata – Sostituire la cartuccia anticalcare. Spegnere e<br />
riaccendere l'apparecchio. Attendere il segnale<br />
acustico, poi premere il tasto vapore fino alla<br />
fuoriuscita di vapore<br />
* Contattare il commerciante o il nostro servizio clienti<br />
D<br />
FR<br />
IT<br />
EN
Welcome<br />
EN<br />
Dear Sir or Madam,<br />
Thank you very much for having decided to buy a <strong>TURMIX</strong> product. Since<br />
1933, we have been working with only one objective: that you should have<br />
fun working with your appliance. Our philosophy is based on four words:<br />
Durable, uncomplicated, fascinating, reliable.<br />
This means that we place a lot of value on quality, ergonomics, simplicity and<br />
service repairs, to be able to offer you the best products and services.<br />
We wish you great pleasure with your <strong>TURMIX</strong> product.<br />
44<br />
45<br />
Table of Contents<br />
1 Making the Appliance<br />
O<strong>per</strong>ational the First Time<br />
Safety Specifications<br />
Commissioning<br />
4 Disposal<br />
5 Faults<br />
6 Annexe<br />
1.1 Description of Parts 46<br />
1.2 Brief Instructions 48<br />
2. Important safety notes 49<br />
3.1 Making the Appliance<br />
O<strong>per</strong>ational the First Time 50<br />
3.2 Installing 50<br />
3.3 Inserting an anti-scale<br />
cartridge 50<br />
3.4 Filling/refilling the water tank<br />
50<br />
3.5 Types of water 51<br />
3.6 Setting the thermostat 51<br />
3.7 Connecting 52<br />
3.8 Switching on and heating-up<br />
phase 52<br />
3.9 Variable steam control knob 53<br />
3.10 Generating steam/Steam<br />
trigger 53<br />
3.11 Noises 54<br />
3.12 Vertical ironing 54<br />
3.13 Detachable ironing rest 54<br />
3.14 Auto-Stop function 55<br />
3.15 After ironing 55<br />
3.16 Maintenance and Care 55<br />
3.17 EMC Electronic Mineral<br />
Control/Anti-scale cartridge 56<br />
4.1 Disposal 56<br />
5.1 Faults 57<br />
6.1 Fault Analysis 59<br />
6.2 Warranty 60<br />
6.3 Accessories 61<br />
D<br />
FR<br />
IT<br />
EN
1 .<br />
1 .<br />
11.<br />
1.<br />
10.<br />
9.<br />
14.<br />
8.<br />
7.<br />
.<br />
4.<br />
.<br />
5.<br />
6.<br />
15. 16. 17. 18.<br />
Control panel VX 250<br />
46<br />
47<br />
1.1 Description of Parts<br />
Overview of the O<strong>per</strong>ation and<br />
Appliance Parts<br />
O<strong>per</strong>ating panel<br />
1 Iron tem<strong>per</strong>ature indicator lamp<br />
2 Steam trigger<br />
3 Thermostat regulator for regula-<br />
ting the iron tem<strong>per</strong>ature<br />
4 Detachable ironing rest<br />
5 Cord clip<br />
6 Steam generator housing<br />
7 Control panel<br />
8 Variable steam control knob<br />
9 On/Off switch<br />
10 Removable water tank<br />
11 Mains cable/plug<br />
12 Steam hose between iron and<br />
generator<br />
13 Anti-scale cartridge<br />
14 Hose cable<br />
15 Power on light<br />
16 Steam generator indicator lamp<br />
17 Indicator lamp for replacing the<br />
anti-scale cartridge<br />
18 Indicator lamp for the Auto-Stop<br />
Function<br />
D<br />
FR<br />
IT<br />
EN
1.2 Brief instructions<br />
1. 1. .<br />
. 4.<br />
5. 6.<br />
7. 8.<br />
9. 10.<br />
11. 1 .<br />
1 . 14.<br />
1. Place the appliance on a firm<br />
surface<br />
2. Pull out the water tank<br />
3. Take the anti-scale cartridge out<br />
of its dehumidified cover<br />
4. Do NOT remove the filtering foam<br />
from the anti-scale cartridge<br />
5. Fill the water tank up to its up<strong>per</strong><br />
edge<br />
6. Push the water tank firmly back<br />
into the appliance<br />
7. Set the thermostat regulator for<br />
steam ironing between •• and<br />
••• (= steam range)<br />
8. Insert the power plug<br />
9. Switch on the appliance with the<br />
on/off switch<br />
10. The green power on and the<br />
yellow steam generator indicator<br />
lamp of the generator glow<br />
11. Turn the variable steam control<br />
knob to the middle<br />
12. Wait till the appliance is ready<br />
for o<strong>per</strong>ation. At that point, you<br />
will hear an audible signal<br />
13. Press the steam trigger on the<br />
iron, till steam starts to come<br />
out. When the appliance is used<br />
the first time, it can take up to<br />
30 seconds till steam is gene-<br />
rated. As long as the yellow<br />
steam generator indicator lamp<br />
glows, the steam output quantity<br />
is reduced. During o<strong>per</strong>ation,<br />
you will hear the whirring of the<br />
pump; this is normal. Do not<br />
direct the first jet of steam<br />
onto your clothes.<br />
14. When ironing, press the steam<br />
trigger repeatedly<br />
48<br />
49<br />
2. Important Safety Notes<br />
!<br />
!<br />
i<br />
When using the ironing system, the following safety measures must be complied<br />
with:<br />
– Do not make the appliance o<strong>per</strong>ational without reading the usage<br />
instructions.<br />
– Before the appliance is connected to the electrical network the first time,<br />
it must be ensured that the mains voltage (230 V) is in conformity with the<br />
specification on the rating plate.<br />
– Use the appliance only for ironing and no other purpose.<br />
– The appliance must never be left unattended while it is connected to the<br />
mains supply. Pull the supply plug even if you leave the room for a short<br />
time.<br />
– Never pull the plug out from the socket by pulling on the cable.<br />
– Keep the cable away from hot surfaces.<br />
– Use the iron only if it is in <strong>per</strong>fect and fault-free condition. If the appliance<br />
or the electrical cable are damaged, do not use the appliance and contact<br />
our customer service department.<br />
– The appliance can become very hot at the time of commissioning. The<br />
same safety precautions apply here as for all other ironing devices.<br />
– If you use the hose guide, ensure that it is securely clipped in the station.<br />
Ensure that the appliance is always well fastened to table.<br />
– In households with children, it is important to ensure that the iron is not<br />
placed within reach of children as long as it is still hot.<br />
– If other appliances with a high power consumption are connected to the<br />
supply at the same time, an overload can occur.<br />
– Use only cable with 10 A rating for extending the power cable. Ensure that<br />
the cable is laid along the floor in such a way that nobody can stumble<br />
on it, and that it cannot be pulled out by accident. The cable must be<br />
equipped with a ground conductor.<br />
– For your own safety, use only grounded power sockets.<br />
– After every time you use it, ensure that your iron is placed flat on the<br />
silicon base of the ironing rest. Do not place your iron vertically.<br />
– Never immerse your appliance in water or in any other fluid, even partially.<br />
– Never touch the hot surfaces.<br />
– After ironing, allow it to cool and as far as possible, keep it in a horizontal<br />
position.<br />
– Have repairs done only by a qualified technician. Any repair done by an<br />
unauthorized <strong>per</strong>son would render the warranty null and void.<br />
The manufacturer reserves the right to change the models presented, their<br />
features and their accessories. The appliance conforms to the standards of<br />
the European Directive for Low Voltage 73/23/CEE with regard to safety, and<br />
the Directive CEM 89/336/CEE, modified by 93/68/CEE, with regard<br />
to the electromagnetic compatibility.<br />
D<br />
FR<br />
IT<br />
EN
3. Commissioning<br />
.1 Making the Appliance<br />
O<strong>per</strong>ational the First Time<br />
. . Installation<br />
1<br />
. Inserting anti-scale cartridges<br />
.4 Filling/refilling the water tank<br />
4<br />
5 6<br />
7 8<br />
Before you make the appliance o<strong>per</strong>ational the first time, please read the<br />
o<strong>per</strong>ating manual completely.<br />
Place the appliance for ironing on a firm and stable surface 1, , so that<br />
adequate air circulation below the appliance is possible.<br />
Ironing board pads with a wooden surface should be protected with an oil<br />
cloth or similar material to protect it from moisture.<br />
Pull out the water tank .<br />
Remove the anti-scale cartridge from its anti-moisture protective covering 4<br />
and insert it in the opening of the water tank provided 5.<br />
The anti-scale cartridge must be inserted well in the water tank, so that<br />
steam can be generated. Do not remove the filtering foam 6.<br />
!<br />
!<br />
i<br />
Fill the water tank with tap water up to its up<strong>per</strong> edge 7.<br />
Push the water tank firmly back into the appliance (locks in place) 8.<br />
!<br />
!<br />
The water tank can be removed and refilled while ironing.<br />
When the tank has been removed, do NOT press the steam trigger.<br />
i<br />
Caution! Do not remove the filtering foam and<br />
insert the anti-scale cartridge completely!<br />
Caution! Never fill hot water! Do not add any other<br />
agents (ironing aids, <strong>per</strong>fume, etc)!<br />
50<br />
51<br />
.5 Types of water<br />
.6 Setting the thermostat<br />
9<br />
You can use: tap water, distilled water for irons, or a mixture of the two.<br />
Do not use: Rain water, condensed water from the washing machine dryers,<br />
defrosted water form the refrigerator or water from any evaporator appliance,<br />
water from decalcifying plants and other decalcifying devices that work with<br />
regenerating salts (incompatibility with the EMC system; also see page 56).<br />
Durability of the anti-scale cartridge: The anti-scale cartridge must be<br />
changed approximately monthly with an average ironing time of about 2-3<br />
hours <strong>per</strong> week. Depending on the quantity of lime present in the tap water<br />
and for an ironing time of 2 to 3 hours <strong>per</strong> week, it may be more economical<br />
to use commercial distilled water. In this case, the anti-scale cartridge lasts 1<br />
to 2 years (depending on the ironing time and steam quantity).<br />
Adjust the thermostat of the iron according to the fabric.<br />
For steam ironing, a setting between •• and ••• on the scale must be<br />
selected 9.<br />
!<br />
!<br />
i<br />
Caution! For using steam, always set the thermostat<br />
between •• and •••!<br />
We recommend sorting the clothes in the order indicated by the manufacturer<br />
on the iron's thermostat dial and starting with the lowest tem<strong>per</strong>ature.<br />
THERMOSTAT TYPE OF CLOTH STEAM<br />
• Synthetic fibres: Acetates -<br />
Polyacrylics - Polyamides<br />
Dry<br />
•• Natural animal fibres: Silk - Wool Light steam<br />
••• Natural plant fibres: Cotton - Linen Heavy steam<br />
D<br />
FR<br />
IT<br />
EN
.7 Connecting<br />
10<br />
.8 Switching On and Heating Up<br />
Phase<br />
11 1<br />
1 14<br />
15<br />
Connect the mains cable to a grounded mains socket 10.<br />
!<br />
!<br />
i<br />
Press the on/off switch 11.<br />
The green power on lamp and the yellow steam generator indicator lamp of<br />
the generator will glow 1 .<br />
Turn the variable steam control knob to the middle 1 .<br />
Wait till the appliance is ready for o<strong>per</strong>ation (when it is ready, an audio signal<br />
is sounded) 14.<br />
Lift the iron and hold it in the air and press the steam trigger till steam starts<br />
to come out. When the appliance is used for the first time, this takes up to 30<br />
seconds 15.<br />
!<br />
As long as the yellow steam generator indicator lamp glows 1 (about 2<br />
min.), the steam output quantity remains at a reduced level. When the indicator<br />
lamp goes off, it automatically increases.<br />
!<br />
i<br />
Caution! Electrical energy can be fatal! In an emergency,<br />
immediately pull the plug from the socket. Never<br />
allow live parts to come in contact with water!<br />
During ironing, the yellow steam generation indicator lamp<br />
and the red heating-up lamp of the iron go on and off regularly:<br />
This indicates that the generator and iron are getting<br />
heated. This is a normal feature.<br />
5<br />
5<br />
.9 Variable steam control knob<br />
16<br />
17<br />
18<br />
.10 Generating steam/Steam trigger<br />
19<br />
The flow control knob can be used to adjust the quantity of steam continuously<br />
depending on the material (also see the table on page 9).<br />
Continuous variable steam output 16:<br />
Adjust the flow control knob to suit the type of material being ironed, to the<br />
desired position. The table on page 9 shows typical applications. The more<br />
you rotate the knob clockwise"+", the greater does the quantity of steam<br />
output become.<br />
"E" = Eco-Mode 17 (only model VX 50):<br />
This setting is recommended for quick ironing jobs that need less steam (for<br />
example, when you want to straighten out a slightly creased blouse early in<br />
the morning).<br />
"Maxi"-Modus / Turbo steam 18 (only model VX 50):<br />
In this position, lots of steam comes out of the base of the iron for a few<br />
seconds (= "Turbo-steam"); thereafter, the steam output quantity is reduced<br />
back to the normal level.<br />
Wait for a few seconds before you repeat this turbo-effect, since otherwise,<br />
water can come out of the base (the steam has to get heated up again first).<br />
Press the steam trigger to get steam 19.<br />
Here are a few valuable tips for using the appliance:<br />
1. Owing to the high steam output, press the steam trigger only briefly<br />
only once. Brief and repeated pressing of the steam trigger is enough to<br />
continuously get an adequate quantity of steam (pressing it for too long can<br />
result in water being ejected).<br />
2. When use is intensive, steam can come out even after releasing the<br />
steam trigger. Therefore, the residual steam can condense on the ironing rest<br />
and water residue is left behind. This is normal. Sponge it off if necessary.<br />
There is no risk of the metal being damaged.<br />
3. Turn the flow control knob to the middle 17:<br />
- the appliance is used for the first time,<br />
- if the water tank is empty,<br />
- every time the anti-scale cartridge is replaced.<br />
!<br />
!<br />
Caution! If there is no more water in the tank do not press<br />
the steam trigger any more!<br />
D<br />
FR<br />
IT<br />
EN
.11 Noises<br />
0<br />
.1 Vertical ironing<br />
1<br />
.1 Detachable ironing rest<br />
In order to ensure a uniform steam output, your steam generator is fitted<br />
with a pump. This becomes noticeable as soon as you press the steam trigger<br />
of the iron 0.<br />
Under certain conditions, it is louder, for example<br />
- when the appliance is used for the first time<br />
- the water tank is empty<br />
- every time the anti-scale cartridge is replaced.<br />
Your iron can also be held vertically to steam clothing on hangers or curtains<br />
in situ etc. In this manner, you can also iron or freshen festons, trousers etc.<br />
The results vary according to the type of fabric.<br />
For vertical ironing, move the iron from the top to the bottom and briefly<br />
press the steam trigger several times.<br />
Tip: Hand the feston or trousers on a hanger for more convenient ironing.<br />
The ironing rest can be removed. It can thus be used as an ironing rest on<br />
the ironing table, for example, for pressing shirts.<br />
Simply pull the ironing rest upwards and backwards to release it from the<br />
steam generator . Caution: The ironing rest is wet during and after use!<br />
Place the ironing rest on the ironing table and put the iron on the grey silicon<br />
stripe of the ironing rest. Ensure firm seating of the ironing rest!<br />
Put the ironing rest back on the steam generator:<br />
Push the ironing rest carefully on the runners completely back into the housing<br />
. Ensure firm seating of the ironing rest, so that the iron cannot fall<br />
down.<br />
!<br />
!<br />
Caution! Wear gloves when removing or replacing the ironing<br />
rest when the appliance is hot!<br />
54<br />
55<br />
.14 Auto-Stop function<br />
4<br />
.15 After Ironing<br />
5<br />
.16 Maintenance and Care<br />
7<br />
6<br />
The Auto-Stop function switches off the electrical supply to the appliance<br />
automatically if<br />
– for a <strong>per</strong>iod of about 20 minutes the iron has not been moved or<br />
– the steam trigger has not been pressed for a long time.<br />
The red "AUTO-STOP"-indicator lamp glows as soon as the function is active<br />
4.<br />
Upon pressing the steam trigger, this indicator lamp goes off and the appliance<br />
starts to heat up again. As soon as the appliance is ready for o<strong>per</strong>ation,<br />
an audio signal is sounded.<br />
After the ironing, switch off the station with the on/off switch 5. The green<br />
power on and the yellow steam generator light go off.<br />
Pull the mains supply plug and let the station cool completely.<br />
Store the cord under the cord clip 6.<br />
Tidy up the station without emptying the tank.<br />
!<br />
!<br />
i<br />
Caution! Store the appliance flat, since otherwise, water<br />
can run out! Do not store the appliance at tem<strong>per</strong>atures<br />
below 5 °C and keep it out of reach of children!<br />
Detergent residues, or the apprets of the fabrics and materials can stick to<br />
the iron soleplate, so that it will not slide smoothly over the materials any<br />
more.<br />
Therefore, after ironing, rub off the iron with a non-fibrous cloth. Treat stubborn<br />
stains and deposits with an iron cleaning pencil. Do not use alkali-containing<br />
products (for example oven cleaners) like scouring powders, strong<br />
cleaners, or steel wool.<br />
D<br />
FR<br />
IT<br />
EN
.17 EMC Electronic Mineral Control<br />
8 9<br />
0<br />
Antikalk-Kassetten<br />
Cassettes anticalcires<br />
Cartuccia anticalcare<br />
Art. 60453<br />
Anti-lime cassettes<br />
VX 200/250<br />
CLASS 100 DX/ 120 PE / 150 DX<br />
SUPERJET<br />
BOOSTER 10/20/40<br />
FG 1700 / FG 3700 / FG 4700<br />
7 611584 604534 ><br />
4. Disposal<br />
5.1 Disposal<br />
The electronic EMC system checks the condition of the anti-scale cartridge. It<br />
continuously measures the mineral element components of the filtered<br />
water. If the cartridge is used up, the EMC system interrupts the steam ejection<br />
and this avoids any calcification.<br />
As soon as the cartridge starts to lose its efficacy, the indicator lamp starts<br />
flashing. The cartridge must now be replaced as soon as possible 8.<br />
If the anti-scale cartridge is not replaced, the EMC system interrupts the exit<br />
of steam to protect the station from calcification damage.<br />
A warning signal is sounded upon pressing the steam trigger. For emergencies,<br />
the station can be run for a short time with distilled water.<br />
After replacing the anti-scale cartridge (also see Page 50), the appliance<br />
must be switched off and on again. Dispose of the old anti-scale cartridge<br />
with the household trash 9.<br />
As soon as the appliance is ready for o<strong>per</strong>ation, an audio signal is sounded.<br />
Press the steam trigger till steam is ejected. The water circuit of the station<br />
is now filled once more and ironing can be continued.<br />
!<br />
You can order replacement anti-scale cartridges from your dealer under item<br />
number 60453 (double pack with 2 anti-scale cartridges) 0.<br />
!<br />
i<br />
After inserting the anti-scale cartridge, the pump can sound<br />
louder than usual. This is normal, since there is still air in<br />
the water circuit!<br />
Out-of-commission appliances should be deposited with a sales outlet for<br />
free, technically correct disposal. Dispose of appliances with dangerous faults<br />
immediately and ensure that they cannot be used any more.<br />
Do not dispose of the appliance with the household trash (protection of the<br />
environment!)<br />
56<br />
57<br />
5. Faults<br />
FAULTS POSSIBLE CAUSES SUGGESTED SOLUTIONS<br />
– Indicator lamps do not glow<br />
– The appliance does not<br />
become hot<br />
– The iron does not become hot – Thermostat is set to "mini"<br />
– Other causes*<br />
– No steam is generated – Appliance not ready<br />
– Steam and water comes out<br />
of the base<br />
– The appliance makes an<br />
unusual, loud noise<br />
– Plug is not firmly inserted in the – Check the plug connection and the power sup-<br />
power socket<br />
ply<br />
– Appliance not connected to the mains – Insert the plug and press the on/off switch<br />
supply or on/off switch not pressed<br />
– Other causes*<br />
– No water in the tank<br />
– Water tank not inserted correctly<br />
– No anti-scale cartridge in the water<br />
tank<br />
– The indicator lamp flashes<br />
– Other causes*<br />
– Iron is not hot enough<br />
– Intensive generation of steam<br />
– Condensate water in the connecting<br />
pipe<br />
– Other causes*<br />
– Condensate water in the connecting<br />
pipe<br />
– No water in the tank<br />
– Water tank not fastened correctly<br />
– Other causes*<br />
– Indicator lamp glows – Auto-Stop after 20 minutes of nonuse<br />
– Set the thermostat to the desired tem<strong>per</strong>ature<br />
– As soon as the appliance is ready for o<strong>per</strong>ation<br />
again, an audio signal sounds<br />
– When making the appliance o<strong>per</strong>ational, press<br />
the steam trigger till steam comes out the first<br />
time<br />
– The anti-scale cartridge is new. The water is<br />
first absorbed by the granulate before it is then<br />
carried on further to the steam generator<br />
– Fill up the water tank<br />
– Push the water tank firmly into the station<br />
– Insert the anti-scale cartridge in the water tank<br />
– Replace anti-scale cartridge<br />
– Set the thermostat between •• and ••• and<br />
wait till the yellow steam generator indicator<br />
lamp goes off<br />
– Press the steam trigger several times<br />
– Press the steam trigger several times<br />
– Fill up the water tank<br />
– Push the water tank firmly into the station<br />
– Press the steam trigger. The indicator lamp<br />
goes off and the appliance starts to heat up<br />
again. Wait till the warning signal sounds<br />
– Indicator lamp glows – Anti-scale cartridge used up – Replace anti-scale cartridge. Switch the appliance<br />
off and on again. Wait till an audio signal<br />
sounds and then press the steam trigger, till<br />
steam starts to come out<br />
* Please contact your dealer or our customer service department<br />
D<br />
FR<br />
IT<br />
EN
58<br />
59<br />
Bitte abtrennen / Veuillez détacher / Stacccare <strong>per</strong> favore / Please cut here<br />
✁<br />
Defekt-Analyse / Analyse du problème /<br />
Analisi del guasto / Fault analysis<br />
Persönliche Angaben / Données <strong>per</strong>sonnelles / Dati <strong>per</strong>sonali / Personal data<br />
(Bitte in Blockschrift ausfüllen / Ecrire en caractères d'imprimerie / P.f. scrivere in stampatello / Please fill out in block capitals)<br />
Name / Nom / Nome / Name<br />
Adresse / Adresse / Indirizzo / Address<br />
PLZ-Ort/Ville/Località/Post code-Place<br />
E-Mail<br />
Telefon/Téléphone/Telefono/Telephone /<br />
Funktionsstörung / Problème / Guasto / Function fault<br />
Bügelstation/Bügeleisen bleibt kalt / L'appareil/le fer reste froid /<br />
L'apparecchio/ferro da stiro rimane freddo / Steam station/iron remain cold<br />
Gerät bleibt still und macht kein Geräusch / L'appareil est à l'arrêt et ne fait aucun bruit /<br />
L'apparecchio non dà segni di vita / Appliance is at a standstill and makes no sound<br />
Defekt an Gehäuse oder Bügeleisen / Défaut au corps de l'appareil ou au fer à repasser /<br />
Difetto al corpo dell'apparecchio o al ferro da stiro / Fault in the housing or the iron<br />
Anderes / Autre / Altro / Other<br />
Eintausch-Offerte / Offre de remplacement / Offerta di <strong>per</strong>muta / Trade-in offer<br />
Ja / Oui / Si / Yes Nein / Non / No / No<br />
Datum / Date / Dato / Date<br />
Unterschrift / Signature / Signature / Signature<br />
D<br />
FR<br />
IT<br />
EN
Garantie/Garantie/Garanzia/Warranty<br />
SERVICE CENTER<br />
Grindelstrasse 3-5, 8303 Bassersdorf, Switzerland<br />
Tel. +41 (0)43 266 16 26, Fax +41 (0)43 266 16 27<br />
info@sckt.ch www.turmix.ch<br />
DE<br />
Garantie<br />
Auf <strong>TURMIX</strong> Elektro-Haushaltgeräte gewähren wir eine Garantie von 2 Jahren ab Kaufdatum. Wir<br />
verpflichten uns zum kostenlosen Ersatz derjenigen Teile des Apparates, die infolge Material- oder<br />
Fabrikationsfehler in der Garantiezeit schadhaft werden. Rücksendungen sollen in der Originalpackung<br />
oder gleichwertig verpackt erfolgen. Bei unsachgemässer Behandlung oder wenn von Dritt<strong>per</strong>sonen<br />
Eingriffe vorgenommen werden, erlischt die Garantie. Beschädigungen durch hydro-chemische<br />
Einflüsse (z.B. durch Verkalkung) sowie Teile, die einer normalen Abnützung unterworfen sind, fallen<br />
nicht unter Garantie. Ausserdem sind Schäden oder Funktionsstörungen, welche durch Wasser aus<br />
Enthärtungsanlagen entstanden sind, von der Garantie ausgeschlossen.<br />
Bitte bewahren Sie Ihre Kaufquittung sorgfältig auf, sie gilt als Garantienachweis.<br />
10 Jahre Garantie gegen Verkalkungsschäden.<br />
Alle Apparate, welche mit einer EMC (Electronic Mineral Control) ausgestattet sind, besitzen überdies<br />
eine zehnjährige Garantie gegen Verkalkungsschäden.<br />
FR Garantie<br />
<strong>TURMIX</strong> accorde une garantie de 2 ans sur ses appareils électroménagers à partir de la date d'achat.<br />
Nous remplaçons gratuitement les pièces de l'appareil qui pourraient subir, pendant la période de<br />
garantie, des dommages dûs à un défaut matériel ou de fabrication. L'appareil doit être envoyé dans<br />
son emballage d'origine ou de protection équivalente. La garantie ne peut être appliquée en cas<br />
d'utilisation non conforme de l'appareil, ni en cas de réparations effectuées par des <strong>per</strong>sonnes non<br />
autorisées. Sont exclus de la garantie les dommages dûs à des effets hydro-chimiques (par ex. dépôts<br />
calcaires), à l'usure normale de l'appareil et à l'utilisation d'eau provenant d'appareils adoucisseurs.<br />
Conserver impérativement le ticket de caisse, valable comme preuve de garantie.<br />
10 ans de garantie anticalcaire.<br />
Une garantie de 10 ans contre l'entartrage est accordée sur tous les appareils dotés du EMC<br />
(Electronic Mineral Control).<br />
IT Garanzia<br />
Sui suoi elettrodomestici <strong>TURMIX</strong> concede una garanzia <strong>per</strong> i 2 anni successivi alla data d'acquisto. Ci<br />
prendiamo a carico la sostituzione gratuita dei pezzi dell'apparecchio che durante il <strong>per</strong>iodo di garanzia<br />
hanno subito danni conseguenti a difetti di fabbrica o di materiali. L'invio dell'apparecchio deve essere<br />
effettuato nell'imballaggio originale o di pari efficienza. La garanzia decade in caso di uso improprio<br />
dell'apparecchio o se vengono effettuate riparazioni da terzi non autorizzati. Non sono co<strong>per</strong>ti dalla<br />
garanzia danni dovuti ad effetti idro-chimici (es. depositi calcarei) o alla normale usura dell'apparecchio.<br />
Inoltre sono esclusi dalla garanzia danni dovuti all'utilizzo di acqua proveniente da impianti di<br />
decalcificazione.<br />
Conservare lo scontrino d'acquisto valevole come prova di garanzia.<br />
10 anni di garanzia anticalcare.<br />
Su tutti gli apparecchi muniti di EMC (Electronic Mineral Control) concediamo una garanzia di 10 anni<br />
contro danni da calcificazione.<br />
EN<br />
Warranty<br />
Our <strong>TURMIX</strong> electrical household appliances carry a warranty of 2 years from the date of purchase. We<br />
undertake to replace, free of cost, any parts of the appliance that get damaged as a consequence of<br />
material or manufacturing defects during the warranty <strong>per</strong>iod. Return shipments should be packed<br />
in the original packing or something equivalent. In case of impro<strong>per</strong> handling or in case repairs are<br />
attempted by third parties, the warranty is rendered null and void. Damage from hydro-chemical influences<br />
(e.g. owing to calcification) as well as parts that are subjected to normal wear, do not fall under<br />
the warranty. Moreover, damage or function faults that are a consequence of water from softening<br />
plants are excluded from the warranty.<br />
Please preserve your receipt carefully, it serves as the warranty certificate as well.<br />
10 year warranty against scaling damage.<br />
Moreover, all appliances that are equipped with an EMC (Electronic Mineral Control), carry<br />
a ten-year warranty against scaling damage.<br />
SERVICE CENTER<br />
SZOT, Haushaltsgeräte-Service,<br />
Perfektastrasse 11, A-1230 Wien, Austria<br />
Tel. +43 (0)1 699 90 56, Fax +43 (0)1 699 90 57<br />
office@turmix.at<br />
60<br />
61<br />
Zubehör/Accessoires/Accessori/Accessories<br />
Art. 6045<br />
DE<br />
Antikalk-Kassetten<br />
Diese Antikalk-Kassetten wurden für <strong>TURMIX</strong>-<br />
Dampfstationen entwickelt und getestet. In<br />
Verbindung mit dem EMC-System, vermeiden<br />
Sie wirkungsvoll eine Verkalkung des<br />
Dampfkreislaufes. Ihre Dampfstation wird es<br />
Ihnen danken.<br />
FR<br />
Cassettes anticalcaires<br />
Ces cassettes anticalcaires spéciales sont<br />
produites et testées par les fers à générateur de<br />
vapeur <strong>TURMIX</strong>. Combinées au système EMC,<br />
elles sont un remède efficace contre l'entartrage<br />
du circuit vapeur. Votre appareil vous en sera<br />
reconnaissant.<br />
IT<br />
Cartucce anticalcare<br />
Queste apposite cartucce anticalcare vengono<br />
prodotte e testate <strong>per</strong> i ferri da stiro con generatore<br />
a vapore <strong>TURMIX</strong>. In combinazione con<br />
il sistema EMC esse sono un efficace rimedio<br />
contro la calcificazione del circuito di vapore. Il<br />
vostro apparecchio ve ne sarà grato.<br />
EN<br />
Anti-scale cartridges<br />
These anti-scale cartridges were developed and<br />
tested for <strong>TURMIX</strong> steam generators. In combination<br />
with the EMC system, they effectively avoid<br />
scaling of the steam circuit. Your steam generator<br />
will be grateful to you.<br />
D<br />
FR<br />
IT<br />
EN
D 600010010 / 07.2006<br />
www.turmix.com