BELLEVUE BELLEVUE BELLEVUE - Villeroy & Boch
BELLEVUE BELLEVUE BELLEVUE - Villeroy & Boch
BELLEVUE BELLEVUE BELLEVUE - Villeroy & Boch

You also want an ePaper? Increase the reach of your titles
YUMPU automatically turns print PDFs into web optimized ePapers that Google loves.
3<br />
1<br />
2<br />
2<br />
2<br />
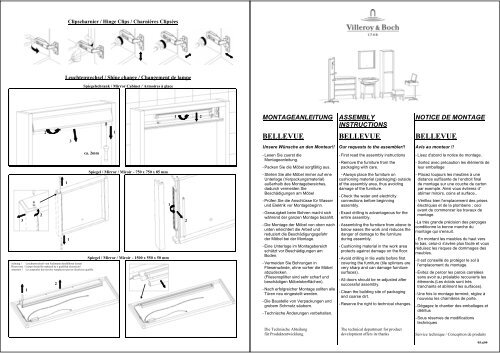
Clipscharnier / Hinge Clips / Charniéres Clipsées<br />
Leuchtenwechsel / Shine change / Changement de lampe<br />
1<br />
1<br />
3<br />
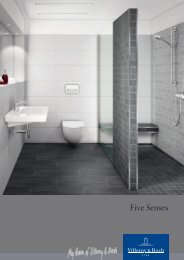
Spiegelschrank / Mirror Cabinet / Armoires à glace<br />
ca. 2mm<br />
Achtung ! Leuchtenwechsel vom Fachmann durchführen lassen!<br />
Please note ! Lamps should be replaced by a qualified electrician!<br />
Attention ! Les ampoules doivent être remplacées par un électricien qualifié.<br />
1<br />
Spiegel / Mirror / Miroir - 750 x 750 x 85 mm<br />
Spiegel / Mirror / Miroir - 1500 x 550 x 50 mm<br />
1<br />
1<br />
2<br />
2<br />
MONTAGEANLEITUNG<br />
<strong>BELLEVUE</strong><br />
Unsere Wünsche an den Monteur!!<br />
- Lesen Sie zuerst die<br />
Montageanleitung.<br />
- Packen Sie die Möbel sorgfältig aus.<br />
- Stellen Sie alle Möbel immer auf eine<br />
Unterlage (Verpackungsmaterial)<br />
außerhalb des Montagebereiches,<br />
dadurch vermeiden Sie<br />
Beschädigungen am Möbel<br />
- Prüfen Sie die Anschlüsse für Wasser<br />
und Elektrik vor Montagebeginn.<br />
- Genauigkeit beim Bohren macht sich<br />
während der ganzen Montage bezahlt.<br />
- Die Montage der Möbel von oben nach<br />
unten erleichtert die Arbeit und<br />
reduziert die Beschädigungsgefahr<br />
der Möbel bei der Montage.<br />
- Eine Unterlage im Montagebereich<br />
schützt vor Beschädigungen am<br />
Boden.<br />
- Vermeiden Sie Bohrungen in<br />
Fliesenwände, ohne vorher die Möbel<br />
abzudecken.<br />
(Fliesensplitter sind sehr scharf und<br />
beschädigen Möbeloberflächen).<br />
- Nach erfolgreicher Montage sollten alle<br />
Türen neu eingestellt werden.<br />
- Die Baustelle von Verpackungen und<br />
grobem Schmutz säubern.<br />
- Technische Änderungen vorbehalten.<br />
Die Technische Abteilung<br />
für Produktentwicklung<br />
ASSEMBLY<br />
INSTRUCTIONS<br />
<strong>BELLEVUE</strong><br />
Our requests to the assembler!!<br />
- First read the assembly instructions<br />
- Remove the furniture from the<br />
packaging with care.<br />
- Always place the furniture on<br />
cushioning material (packaging) outside<br />
of the assembly area, thus avoiding<br />
damage of the furniture.<br />
- Check the water and electricity<br />
connections before beginning<br />
assembly.<br />
- Exact drilling is advantageous for the<br />
entire assembly.<br />
- Assembling the furniture from above to<br />
below eases the work and reduces the<br />
danger of damage to the furniture<br />
during assembly.<br />
- Cushioning material in the work area<br />
protects against damage on the floor.<br />
- Avoid drilling in tile walls before first<br />
covering the furniture (tile splinters are<br />
very sharp and can damage furniture<br />
surfaces).<br />
- All doors should be re-adjusted after<br />
successful assembly.<br />
- Clean the building site of packaging<br />
and coarse dirt.<br />
- Reserve the right to technical changes.<br />
The technical department for product<br />
development offers its thanks<br />
NOTICE DE MONTAGE<br />
<strong>BELLEVUE</strong><br />
Avis au monteur !!<br />
- Lisez d'abord la notice de montage.<br />
- Sortez avec précaution les éléments de<br />
leur emballage<br />
- Placez toujours les meubles à une<br />
distance suffisante de l‘endroit final<br />
de montage sur une couche de carton<br />
par exemple. Ainsi vous éviterez d'<br />
abîmer miroirs, coins et surface..<br />
- Vérifiez bien l'emplacement des prises<br />
électriques et de la plomberie ; ceci<br />
avant de commencer les travaux de<br />
montage.<br />
-La très grande précision des perçages<br />
conditionne la bonne marche du<br />
montage qui s'ensuit.<br />
- En montant les meubles du haut vers<br />
le bas, celui-ci s'avère plus facile et vous<br />
réduisez les risques de dommages des<br />
meubles.<br />
- Il est conseillé de protéger le sol à<br />
l'emplacement du montage.<br />
- Évitez de percer les parois carrelées<br />
sans avoir au préalable recouverts les<br />
éléments.(Les éclats sont très<br />
tranchants et abîment les surfaces).<br />
- Une fois le montage terminé, réglez à<br />
nouveau les charnières de porte.<br />
- Dégagez le chantier des emballages et<br />
détritus<br />
- Sous réserves de modifications<br />
techniques<br />
Service technique / Conception de produits<br />
95-699
ABB.:1.1 ABB.:1.2<br />
1<br />
2<br />
3<br />
ca. 2mm<br />
ABB.:2.0 ABB.:3.0<br />
ABB.:4.0 ABB.:5.0<br />
ABB.:6.1 ABB.:6.2<br />
2<br />
1<br />
3<br />
1<br />
2<br />
1<br />
2<br />
2<br />
1<br />
1<br />
2<br />
ABB.:6.3 ABB.:6.4<br />
ABB.:7.1 ABB.:7.2<br />
Glasablage herausnehmen / Take out glass shelves / Enlever du plaque de verre<br />
Auszuglade aushängen<br />
Unhinge excerpt drawer<br />
Demontage du tiroir d´extrait<br />
3<br />
Auszuglade / Excerpt Drawer / Tiroir d´extrait<br />
1<br />
Einstellen der Schublade / Drawer adjustment / Réglage final du tiroir<br />
2<br />
1<br />
Auszuglade einhängen<br />
Reinsert excerpt drawer<br />
Accrochage du tiroir d´extrait<br />
2<br />
2<br />
3<br />
1<br />
4<br />
3<br />
2<br />
1
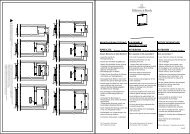
ATTENTION : l'installation et les raccordements doivent être réalisés selon les directives<br />
d'installation en vigueur dans le pays concerné et par un spécialiste agréé<br />
*<br />
ATTENTION :<br />
La pièce en céramique doit pendre librement et ne pas être en contact avec le meuble<br />
(distance environ 12 mm).<br />
N L Raccordement au réseau 220 V par rallonge<br />
Please note: Leave electrical connections to an expert.<br />
Observe the protection sherpes of the country in question.<br />
*<br />
Please note:<br />
The ceramic unit must be attached to the wall and not rest on the furniture (minimum<br />
clearance approx. 12 mm)<br />
N L<br />
220 - 240 V mains connection, loose ( protection sherps of country, Regulation 601-02-01 )<br />
ACHTUNG: Die Installation und die Anschlüsse müssen nach den gültigen Installationsvorschriften<br />
des jeweiligen Landes von einem konzessionierten Fachmann ausgeführt werden<br />
*<br />
ACHTUNG:<br />
Die Keramik muss frei hängen und darf nicht am Möbel aufliegen. (Abstand ca. 12mm)<br />
N L 220 - 240 V loser Netzanschluss ( laut VDE 0100 Teil 701 )<br />
705<br />
1000<br />
1500<br />
530<br />
750<br />
1500<br />
min. 200<br />
1050<br />
1090<br />
550<br />
630<br />
480<br />
345<br />
550<br />
630<br />
450<br />
420<br />
420<br />
400<br />
60<br />
240<br />
240<br />
50<br />
50<br />
ABB.:4.0<br />
130<br />
235<br />
160<br />
855<br />
805<br />
550 150<br />
635<br />
585 465 355 465 475<br />
*<br />
*<br />
*<br />
800<br />
550 150<br />
585 465 355 465<br />
*<br />
160 1350<br />
850<br />
635<br />
475<br />
950<br />
1030<br />
715<br />
1600<br />
460<br />
280<br />
1865<br />
280<br />
1900<br />
1895<br />
1765<br />
ABB.:6.1 - 6.4<br />
550<br />
1500<br />
1360<br />
550<br />
ABB.:2.0
ATTENTION : l'installation et les raccordements doivent être réalisés selon les directives<br />
d'installation en vigueur dans le pays concerné et par un spécialiste agréé<br />
*<br />
ATTENTION :<br />
La pièce en céramique doit pendre librement et ne pas être en contact avec le meuble<br />
(distance environ 12 mm).<br />
N L<br />
Raccordement au réseau 220 V par rallonge<br />
Please note: Leave electrical connections to an expert.<br />
Observe the protection sherpes of the country in question.<br />
*<br />
Please note:<br />
The ceramic unit must be attached to the wall and not rest on the furniture (minimum<br />
clearance approx. 12 mm)<br />
N L 220 - 240 V mains connection, loose ( protection sherps of country, Regulation 601-02-01 )<br />
ACHTUNG: Die Installation und die Anschlüsse müssen nach den gültigen Installationsvorschriften<br />
des jeweiligen Landes von einem konzessionierten Fachmann ausgeführt werden<br />
*<br />
Die Keramik muss frei hängen und darf nicht am Möbel aufliegen. (Abstand ca. 12mm)<br />
ACHTUNG:<br />
N L<br />
220 - 240 V loser Netzanschluss ( laut VDE 0100 Teil 701 )<br />
1090<br />
min. 200<br />
470<br />
650<br />
530<br />
750<br />
705<br />
1000<br />
535<br />
650<br />
505<br />
540<br />
500<br />
295 565<br />
505<br />
320<br />
220<br />
35<br />
85 130<br />
240<br />
240<br />
240<br />
550<br />
345<br />
400<br />
25<br />
ABB.:4.0 ABB.:4.0<br />
235<br />
235<br />
235<br />
235<br />
235<br />
550<br />
550<br />
550<br />
550<br />
595<br />
800<br />
800<br />
* * *<br />
150<br />
280<br />
1250<br />
415 850<br />
650<br />
150<br />
340<br />
1250<br />
405 850<br />
640<br />
805<br />
150<br />
510<br />
405 855<br />
640<br />
150<br />
575 850<br />
810<br />
890<br />
1250<br />
1905<br />
1670<br />
1965<br />
280<br />
2000<br />
1920<br />
280<br />
2000<br />
460<br />
280<br />
1950<br />
1920 2000<br />
1920<br />
ABB.:7.1 / 7.2 ABB.:7.1 / 7.2<br />
ABB.:7.1 / 7.2<br />
1760<br />
1995<br />
ABB.:7.1 / 7.2<br />
750<br />
750<br />
750<br />
58<br />
500<br />
360<br />
ABB.:2.0<br />
750<br />
540<br />
ABB.:3.0 ABB.:1.1 / 1.2<br />
750<br />
620<br />
ABB.:5.0