

IstruzIonI dI montaggIo assembly InstructIons InstructIons pour ... - Gev
IstruzIonI dI montaggIo assembly InstructIons InstructIons pour ... - Gev
IstruzIonI dI montaggIo assembly InstructIons InstructIons pour ... - Gev

You also want an ePaper? Increase the reach of your titles
YUMPU automatically turns print PDFs into web optimized ePapers that Google loves.
KIT<br />
MonTaGE-SET<br />
SaMlESæT<br />
A B C D E F G<br />
<strong>IstruzIonI</strong> <strong>dI</strong> <strong>montaggIo</strong><br />
<strong>assembly</strong> <strong>InstructIons</strong><br />
<strong>InstructIons</strong> <strong>pour</strong> l’assemblage<br />
montageanweIsungen<br />
InstruccIones para el montaje<br />
monterIngs vejlednIng<br />
KIT 9<br />
G F E D C B A<br />
I Inserire le staffe nella barra “BASE”. Inserire la vite facendo in modo che la parte terminale della barra coincida con la lettera indicata nella<br />
Tabella di adattabilità. (Esempio nel disegno le lettere sono G + G)..<br />
- Insert the stirrups in the “base” bar. Insert the screw so that the terminal part of the bar coincides with the letter shown on the Adaptability list<br />
(ex. in the drawing the letters shown are G + G).<br />
F Insérer les étriers sur la barre “base”. Insérer la vis ainsi que la partie terminale de la barre coincide avec la lettre indiquée sur la liste<br />
d’affectation (ex.: dans le dessin les lettres indiquées sont G + G).<br />
D Setzen Sie die Bügel in die Montage-Stange ein. Platzieren Sie die Schrauben und ziehen Sie die Stange mit dem Bügel an, sobald<br />
der Buchstabe, der auf dem Bügel erscheint, übereinstimmt mit dem auf der Liste zur Anpassung. Beispiel: Bei der danach folgenden<br />
Zeichnung erscheint der Buchstabe G auf einer Seite und G auf der anderen Seite.<br />
E Poner las abrazaderas en la barra “base”. Poner los tornillos y hacerlo de manera que la parte terminal de la barra corresponda con la letra<br />
indicada en la lista de adaptabilidad. (por ejemplo: en el dibujo las letras son G + G).<br />
) Indsæt adapterkittet i lastholderstængerne. Monter skruerne og fastspænd lastholderstængerne til lastholderkittet når bogstavet som er vist på<br />
lastholderkittet er sammenfaldende med det som er vist i den medfølgende kompatibilitets liste. For eksempel: i den nedenstående tegning er<br />
det viste bogstav G på den ene side og G på den anden side.<br />
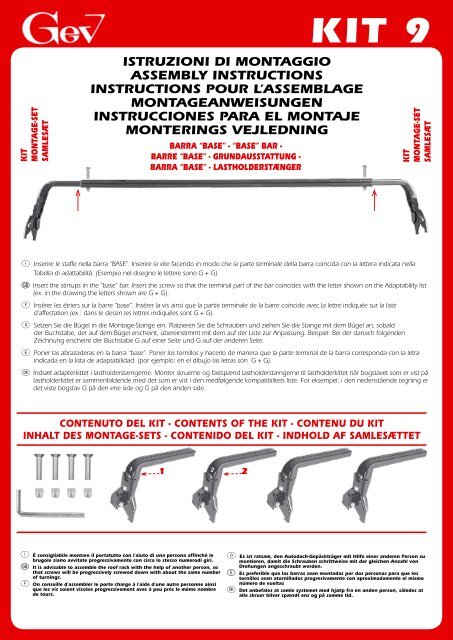
contenuto del KIt - contents of the KIt - contenu du KIt<br />
Inhalt des montage-sets - contenIdo del KIt - Indhold af samlesættet<br />
I È consigliabile montare il portatutto con l’aiuto di una persona affinché le<br />
brugole siano avvitate progressivamente con circa lo stesso numerodi giri.<br />
- It is advisable to assemble the roof rack with the help of another person, so<br />
that screws will be progressively screwed down with about the same number<br />
of turnings.<br />
F on conseille d’assembler le porte charge à l’aide d’une autre personne ainsi<br />
que les vis soient vissées progressivement avec à peu près le même nombre<br />
de tours.<br />
1<br />
Barra “BaSE” - “BaSE” Bar -<br />
BarrE “BaSE” - GrundauSSTaTTunG -<br />
Barra “BaSE” - laSTholdErSTænGEr<br />
1<br />
2<br />
2<br />
KIT<br />
MonTaGE-SET<br />
SaMlESæT<br />
D es ist ratsam, den autodach-gepäckträger mit hilfe einer anderen person zu<br />
montieren, damit die schrauben schrittweise mit der gleichen anzahl von<br />
drehungen angeschraubt werden.<br />
e es preferible que las barras sean montadas por dos personas para que los<br />
tornillos sean atornillados progresivamente con aproximadamente el mismo<br />
número de vueltas<br />
) det anbefales at samle systemet med hjælp fra en anden person, således at<br />
alle skruer bliver spændt ens og på samme tid.
I attenzIone: inserire le staffe: N.1<br />
anteriore lato guida - N.2 anteriore lato<br />
passeggero.<br />
- attentIon: insert the stirrups: N.1 front<br />
driver’s side - N.2 front passenger’s side.<br />
1 2 3<br />
1<br />
I Aprire lo sportellino e inserire la staffa come<br />
da figura 1.<br />
- Open the small covering and insert the<br />
stirrup as per drawing 1.<br />
F Ouvrir la petite pièce sur le toit et insérer<br />
l’étrier voir dessin 1.<br />
D Öffnen Sie die schmale Abdeckung und<br />
fügen Sie die Bügel gemäß Zeichnung 1ein.<br />
e Abrir la pequeña tapa y insertar la brida<br />
como en el dibujo 1.<br />
) Det smalle dække åbnes og<br />
monteringsbeslaget sættes ind som vist på<br />
tegning 1.<br />
I aVVErTEnZE<br />
La vostra sicurezza e quella degli altri in caso di incorretto utilizzo è<br />
sotto la vostra completa responsabilità. Dovete essere prudenti. Attenzione<br />
ai seguenti punti:<br />
1) Leggere e rispettare le istruzioni di montaggio.<br />
2) Ridurre la vostra velocità (max 110 km/h) particolarmente su<br />
autostrade e con avverse condizioni atmosferiche (vento...).<br />
Attenzione alle brusche frenate.<br />
3) Prima di ogni partenza assicurarsi che le parti di fissaggio siano ben<br />
bloccate.<br />
4) Non lasciate montare le vostre barre per lunghi periodi senza<br />
utilizzarle: invecchiano prematuramente.<br />
5) Utilizzare cinghie di fissaggio di sicurezza per assicurare il vostro<br />
bagaglio.<br />
- aTTEnTIon<br />
Important advIces for your safety - In case of<br />
wrong or thoughtless use your and other people safety is on your<br />
own responsibility. You have to be careful. We must draw your<br />
attention especially on the following points:<br />
a) Read and carefully follow the <strong>assembly</strong> instructions<br />
b) Gear down your speed (110 km/h max ), particularly on highways<br />
and with bad weather (wind…). Pay attention to sudden brake<br />
c) Before each departure check all the connections are properly<br />
fastened in order to avoid they could accidentally open<br />
d) Do not leave the empty bars on your car-roof. They are a useless<br />
petrol waste and they get old before time.<br />
Make use of luggage security fasteners to secure your load.<br />
F attentIon: insérer les étriers: N.1<br />
avant partie conducteur - N.2 avant partie<br />
passager.<br />
D achtung: Setzen Sie die Bügel: N.1<br />
vorne fahrerseite - N.2 vorne beifahrseite.<br />
2<br />
I Avvitare la vite come da figura 2.<br />
- Screw down as per drawing 2.<br />
F Visser la vis voir dessin 2.<br />
D Schrauben Sie sie gemäß Zeichnung 2.<br />
e Atornillar como en el dibujo 2.<br />
) Skrues ned som vist på tegning 2.<br />
F aTTEnTIon<br />
note tres Importante <strong>pour</strong> votre securIte.<br />
Votre sécurité et celle d’autrui sont engagées sous votre entière<br />
responsabilité en cas d’utilisation incorrecte ou irréfléchie. Vous devez<br />
être prudents. Votre attention est particulièrement attirée sur les points<br />
suivants.<br />
1) Lisez et respectez la notice de montage.<br />
2) Réduisez votre vitesse (110 Km/h maxi) particulièrement sur<br />
autoroutes et par mauvais temps (vent…). Attention aux freinages<br />
brusques.<br />
3) Assurez-vous avant chaque départ que les fixations soient<br />
correctement bloquées <strong>pour</strong> éviter toute ouverture accidentelle.<br />
4) Ne laissez pas à demeure vos barres porte charge montées<br />
sur votre véhicule: à vide, elles augmentent inutilement votre<br />
consommation et « vieillissent » prématurément.<br />
5) Utilisez des sangles de fixation de sécurité <strong>pour</strong> assurer votre<br />
chargement.<br />
D aChTunG<br />
wIchtIg fÜr Ihre sIcherheIt!<br />
Im Falle falscher oder gedankenloser Verwendung sind Sie<br />
verantwortlich für Ihre Sicherheit und die anderer Personen. Sie<br />
müssen achtsam sein. Wir machen besonders auf folgende Punkte<br />
aufmerksam:<br />
a) Lesen Sie die Montageanweisungen und befolgen Sie diese<br />
sorgfältig. b) Gehen Sie mit der Geschwindigkeit herunter (max.<br />
110 km/h), insbesondere auf Autobahnen und bei schlechten<br />
Wetterbedingungen (Wind ...). Vorsicht bei plötzlichen<br />
Bremsmanövern. c) Prüfen Sie vor jeder Fahrt sorgfältig, ob alle<br />
Verbindungen gut geschlossen sind, um auszuschließen, daß diese<br />
sich versehentlich öffnen können. d) Lassen Sie leere Stangen nicht<br />
auf Ihrem Autodach. Diese verursachen einen höheren, unnötigen<br />
Benzinverbrauch und altern zu schnell. e) Verwenden Sie Gepäckbefestigungselemente,<br />
um die Ladung zu sichern.<br />
e atencIÓn: insertar las bridas: N.1<br />
delantero lado del conductor - N.2<br />
delantero lado del pasajero.<br />
) vIgtIgt: monter lastholderbeslagene: N.1<br />
forside førerside - N.2 forside passagerside.<br />
3<br />
I Chiudere la vite come da figura 3 per<br />
ottenere una sicurezza maggiore e rendere<br />
il portatutto antifurto.<br />
- Screw down as per drawing 3 to make<br />
bars safer and antitheft.<br />
F Visser la vis voir dessin 3 afin d’avoir une sûreté<br />
en plus et rendre le porte - charge antivol.<br />
D Schrauben Sie sie gemäß Zeichnung 3 fest,<br />
um die Stangen sicherer zu machen und ihr<br />
Abheben zu vermeiden.<br />
e Atornillar como en el dibujo 3 para obtener una<br />
mayor seguridad y antirrobo a la barra portante.<br />
) Skrues ned som vist på tegning 3 for<br />
korrekt og tyveri sikker montering.<br />
I Fare scorrere i terminali in plastica sulle<br />
estremità della barra e chiudere.<br />
- Move the plastic terminal parts to the<br />
extremity of the bar and lock.<br />
F Déplacer les parties terminales en plastique<br />
jusqu’à extrémité des barres et serrer.<br />
D Bringen Sie die Kunststoffendstücke an<br />
den Stangenenden an und rasten Sie diese<br />
ein.<br />
e Mover los terminales de plástico hasta los<br />
extremos de las barras y cerrar.<br />
) Flyt plastik enderne til det yderste punkt på<br />
lastholderstængerne og luk dem.<br />
e adVErTEnCIaS<br />
Usted se hace responsable de su seguridad y la de los otros en caso<br />
de utilización no correcta del producto.<br />
1) Usted tiene que ser prudente, respetar el montaje y las siguientes<br />
advertencias.<br />
2) Velocidad max.110/km/h especialmente con condiciones<br />
meteorológicas adversas. No superar la velocidad indicada por el<br />
código estatal. Atención a las paradas bruscas<br />
3) Antes de partir asegurarse que las fijaciones estén bien sujetas<br />
4) No dejar las barras montadas en el techo por un periodo de<br />
tiempo demasiado largo sin utilizarlas : pueden deteriorarse prem<br />
aturamente.<br />
5) Utilizar cintas de seguridad para asegurar su equipaje<br />
) VIGTIGT<br />
vIgtIg InformatIon om sIKKerhed<br />
Ved forkert eller tankeløst brug er din og andres sikkerhed dit ansvar.<br />
Du skal være forsigtig.<br />
Der skal ofres ekstra opmærksomhed ved følgende punkter:<br />
A) Læs og følg instruktions manualen nøje<br />
B) Nedsæt din fart til max. 110 km/t, specielt på motorveje og<br />
når der er dårligt vejr (vind mm). Vær opmærksom på kraftige<br />
opbremsninger.<br />
C) Før hver køretur, tjek alle samlinger er korrekt lukket for at forhindre<br />
at de springer op ved et uheld.<br />
D) Kør aldrig med lastholdersæt uden last, det er spild af brændstof og<br />
lastholderstættet vil ældes før tid<br />
Brug bagage sikkerheds holder for at sikre bagagen.