

Upright Vacuum Cleaner Owner's Guide 4750 Series ... - Air & Water
Upright Vacuum Cleaner Owner's Guide 4750 Series ... - Air & Water
Upright Vacuum Cleaner Owner's Guide 4750 Series ... - Air & Water

You also want an ePaper? Increase the reach of your titles
YUMPU automatically turns print PDFs into web optimized ePapers that Google loves.
12<br />
FIG. 8a<br />
●G<br />
●H<br />
●B<br />
●A<br />
●F<br />
FIG. 7b<br />
●E<br />
FIG. 7a<br />
●C<br />
FIG. 7<br />
FIG. 8<br />
FIG. 9<br />
ENGLISH<br />
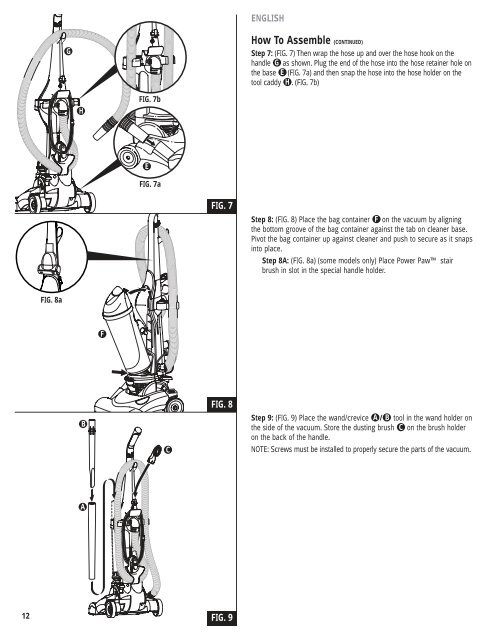
How To Assemble (CONTINUED)<br />
Step 7: (FIG. 7) Then wrap the hose up and over the hose hook on the<br />
handle ●G as shown. Plug the end of the hose into the hose retainer hole on<br />
the base ●E (FIG. 7a) and then snap the hose into the hose holder on the<br />
tool caddy ●H . (FIG. 7b)<br />
Step 8: (FIG. 8) Place the bag container ●F on the vacuum by aligning<br />
the bottom groove of the bag container against the tab on cleaner base.<br />
Pivot the bag container up against cleaner and push to secure as it snaps<br />
into place.<br />
Step 8A: (FIG. 8a) (some models only) Place Power Paw stair<br />
brush in slot in the special handle holder.<br />
Step 9: (FIG. 9) Place the wand/crevice ●A /●B tool in the wand holder on<br />
the side of the vacuum. Store the dusting brush ●C on the brush holder<br />
on the back of the handle.<br />
NOTE: Screws must be installed to properly secure the parts of the vacuum.


