

Upright Vacuum Cleaner Owner's Guide 4750 Series ... - Air & Water
Upright Vacuum Cleaner Owner's Guide 4750 Series ... - Air & Water
Upright Vacuum Cleaner Owner's Guide 4750 Series ... - Air & Water

You also want an ePaper? Increase the reach of your titles
YUMPU automatically turns print PDFs into web optimized ePapers that Google loves.
8<br />
●E<br />
●K1<br />
●G<br />
●I<br />
●K1<br />
●I<br />
●K2<br />
●H<br />
●K2<br />
●H<br />
FIG. 1<br />
FIG. 2<br />
ENGLISH<br />
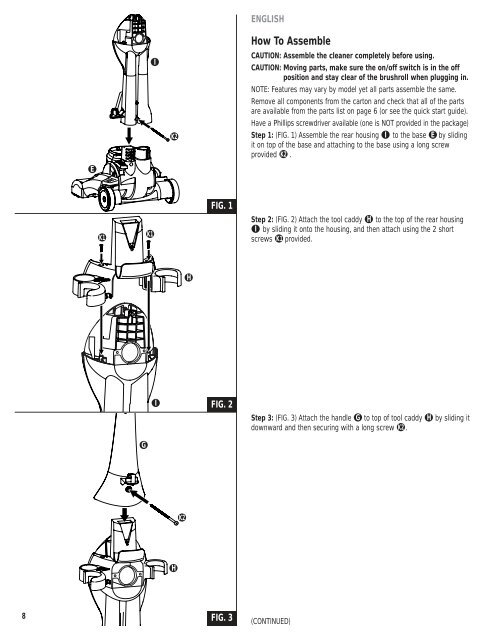
How To Assemble<br />
CAUTION: Assemble the cleaner completely before using.<br />
CAUTION: Moving parts, make sure the on/off switch is in the off<br />
position and stay clear of the brushroll when plugging in.<br />
NOTE: Features may vary by model yet all parts assemble the same.<br />
Remove all components from the carton and check that all of the parts<br />
are available from the parts list on page 6 (or see the quick start guide).<br />
Have a Phillips screwdriver available (one is NOT provided in the package)<br />
Step 1: (FIG. 1) Assemble the rear housing ●I to the base ●E by sliding<br />
it on top of the base and attaching to the base using a long screw<br />
provided ●K2 .<br />
Step 2: (FIG. 2) Attach the tool caddy ●H to the top of the rear housing<br />
●I by sliding it onto the housing, and then attach using the 2 short<br />
screws ●K1 provided.<br />
Step 3: (FIG. 3) Attach the handle ●G to top of tool caddy ●H by sliding it<br />
downward and then securing with a long screw ●K2 .<br />
FIG. 16 3 (CONTINUED)


