manuel d'utilisation - Evolution Power Tools
manuel d'utilisation - Evolution Power Tools
manuel d'utilisation - Evolution Power Tools

Create successful ePaper yourself
Turn your PDF publications into a flip-book with our unique Google optimized e-Paper software.
To remove an Abrasive Sanding Disc:<br />
• Lift the abrasive disc at any point along<br />
its edge, and gently peel upwards and<br />
away from the Backing Pad.<br />
To switch the machine ‘On’:<br />
• Press the Trigger Switch. (Fig. 5A)<br />
Note: For operator convenience the On/Off<br />
Trigger Switch can be locked in the<br />
‘On’ position.<br />
• Push in the ‘Trigger Locking Button’ (Fig. 5B)<br />
to lock the Trigger in the ‘On’ position.<br />
Fig. 5A +B<br />
To switch ‘Off’:<br />
• Press the Trigger slightly and then release.<br />
The <strong>Power</strong> Rated speed Control (Fig. 6)<br />
Rotate the thumb wheel until the required<br />
rated speed is obtained.<br />
Fig. 6<br />
A<br />
B<br />
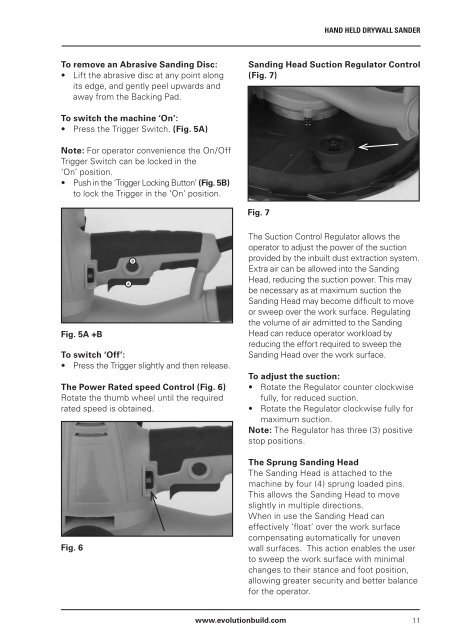
Sanding Head Suction Regulator Control<br />
(Fig. 7)<br />
Fig. 7<br />
HAND HELD DRYWALL SANDER<br />
The Suction Control Regulator allows the<br />
operator to adjust the power of the suction<br />
provided by the inbuilt dust extraction system.<br />
Extra air can be allowed into the Sanding<br />
Head, reducing the suction power. This may<br />
be necessary as at maximum suction the<br />
Sanding Head may become difficult to move<br />
or sweep over the work surface. Regulating<br />
the volume of air admitted to the Sanding<br />
Head can reduce operator workload by<br />
reducing the effort required to sweep the<br />
Sanding Head over the work surface.<br />
To adjust the suction:<br />
• Rotate the Regulator counter clockwise<br />
fully, for reduced suction.<br />
• Rotate the Regulator clockwise fully for<br />
maximum suction.<br />
Note: The Regulator has three (3) positive<br />
stop positions.<br />
The Sprung Sanding Head<br />
The Sanding Head is attached to the<br />
machine by four (4) sprung loaded pins.<br />
This allows the Sanding Head to move<br />
slightly in multiple directions.<br />
When in use the Sanding Head can<br />
effectively ‘float’ over the work surface<br />
compensating automatically for uneven<br />
wall surfaces. This action enables the user<br />
to sweep the work surface with minimal<br />
changes to their stance and foot position,<br />
allowing greater security and better balance<br />
for the operator.<br />
www.evolutionbuild.com 11