manuale tecn tetto piano 120208:manuale tettp ... - Teknoenergy
manuale tecn tetto piano 120208:manuale tettp ... - Teknoenergy
manuale tecn tetto piano 120208:manuale tettp ... - Teknoenergy

You also want an ePaper? Increase the reach of your titles
YUMPU automatically turns print PDFs into web optimized ePapers that Google loves.
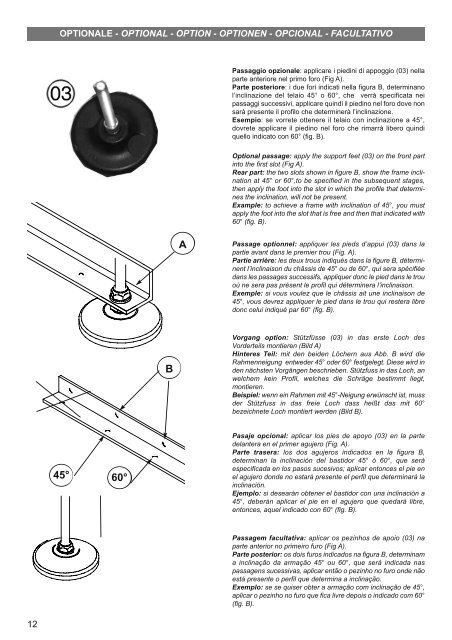
OPTIONALE - OPTIONAL - OPTION - OPTIONEN - OPCIONAL - FACULTATIVO<br />
Passaggio opzionale: applicare i piedini di appoggio (03) nella<br />
parte anteriore nel primo foro (Fig A).<br />
Parte posteriore: i due fori indicati nella figura B, determinano<br />
l’inclinazione del telaio 45° o 60°, che verrà specificata nei<br />
passaggi successivi, applicare quindi il piedino nel foro dove non<br />
sarà presente il profilo che determinerà l’inclinazione.<br />
Esempio: se vorrete ottenere il telaio con inclinazione a 45°,<br />
dovrete applicare il piedino nel foro che rimarrà libero quindi<br />
quello indicato con 60° (fig. B).<br />
Optional passage: apply the support feet (03) on the front part<br />
into the first slot (Fig A).<br />
Rear part: the two slots shown in figure B, show the frame inclination<br />
at 45° or 60°,to be specified in the subsequent stages,<br />
then apply the foot into the slot in which the profile that determines<br />
the inclination, will not be present.<br />
Example: to achieve a frame with inclination of 45°, you must<br />
apply the foot into the slot that is free and then that indicated with<br />
60° (fig. B).<br />
A<br />
Passage optionnel: appliquer les pieds d’appui (03) dans la<br />
partie avant dans le premier trou (Fig. A).<br />
Partie arrière: les deux trous indiqués dans la figure B, déterminent<br />
l’inclinaison du châssis de 45° ou de 60°, qui sera spécifiée<br />
dans les passages successifs, appliquer donc le pied dans le trou<br />
où ne sera pas présent le profil qui déterminera l’inclinaison.<br />
Exemple: si vous voulez que le châssis ait une inclinaison de<br />
45°, vous devrez appliquer le pied dans le trou qui restera libre<br />
donc celui indiqué par 60° (fig. B).<br />
B<br />
Vorgang option: Stützfüsse (03) in das erste Loch des<br />
Vorderteils montieren (Bild A)<br />
Hinteres Teil: mit den beiden Löchern aus Abb. B wird die<br />
Rahmenneigung entweder 45° oder 60° festgelegt. Diese wird in<br />
den nächsten Vorgängen beschrieben. Stützfuss in das Loch, an<br />
welchem kein Profil, welches die Schräge bestimmt liegt,<br />
montieren.<br />
Beispiel: wenn ein Rahmen mit 45°-Neigung erwünscht ist, muss<br />
der Stützfuss in das freie Loch dass heißt das mit 60°<br />
bezeichnete Loch montiert werden (Bild B).<br />
45° 60°<br />
Pasaje opcional: aplicar los pies de apoyo (03) en la parte<br />
delantera en el primer agujero (Fig. A).<br />
Parte trasera: los dos agujeros indicados en la figura B,<br />
determinan la inclinación del bastidor 45° ó 60°, que será<br />
especificada en los pasos sucesivos; aplicar entonces el pie en<br />
el agujero donde no estará presente el perfil que determinará la<br />
inclinación.<br />
Ejemplo: si desearán obtener el bastidor con una inclinación a<br />
45°, deberán aplicar el pie en el agujero que quedará libre,<br />
entonces, aquel indicado con 60° (fig. B).<br />
Passagem facultativa: aplicar os pezinhos de apoio (03) na<br />
parte anterior no primeiro furo (Fig A).<br />
Parte posterior: os dois furos indicados na figura B, determinam<br />
a inclinação da armação 45° ou 60°, que será indicada nas<br />
passagens sucessivas, aplicar então o pezinho no furo onde não<br />
está presente o perfil que determina a inclinação.<br />
Exemplo: se se quiser obter a armação com inclinação de 45°,<br />
aplicar o pezinho no furo que fica livre depois o indicado com 60°<br />
(fig. B).<br />
12