GC GRADIA GUM - GC Europe
GC GRADIA GUM - GC Europe
GC GRADIA GUM - GC Europe

Create successful ePaper yourself
Turn your PDF publications into a flip-book with our unique Google optimized e-Paper software.
▲<br />
5<br />
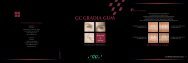
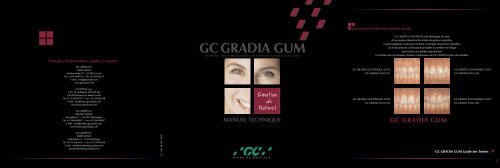
SELECTION DE TEINTES SUR LA BASE DU NATUREL<br />
<strong>GC</strong> <strong>GRADIA</strong> <strong>GUM</strong><br />
SYSTÈME PHOTOPOLYMÉRISABLE POUR FAUSSES GENCIVES<br />
<strong>GC</strong> <strong>GRADIA</strong> <strong>GUM</strong> SYSTEM a été développé à la suite<br />
d’une analyse exhaustive des teintes de gencives naturelles.<br />
Les photographies ci-dessous montrent 4 exemples de gencives naturelles.<br />
Un choix parmi les combinaisons possibles du système est indiqué<br />
pour réaliser une parfaite reproduction.<br />
En fonction des cas cliniques, d’autres combinaisons de <strong>GC</strong> <strong>GRADIA</strong> <strong>GUM</strong> sont possibles.<br />
Pour plus d'informations, veuillez contacter :<br />
<strong>GC</strong> EUROPE N.V.<br />
HEAD OFFICE<br />
Interleuvenlaan 13 • B-3001 Leuven<br />
Tel. +32.16.39.80.50 • Fax +32.16.40.02.14<br />
E-mail : info@gceurope.com<br />
www.gceurope.com<br />
<strong>GC</strong> <strong>GRADIA</strong> <strong>GUM</strong> OPAQUE: GO11<br />
<strong>GC</strong> <strong>GRADIA</strong> <strong>GUM</strong>: G21<br />
<strong>GC</strong> <strong>GRADIA</strong> <strong>GUM</strong> OPAQUE: GO13<br />
<strong>GC</strong> <strong>GRADIA</strong> <strong>GUM</strong>: G22<br />
<strong>GC</strong> FRANCE s.a.s.<br />
9 bis, AV du Bouton D’Or-BP 166<br />
F-94384 Bonneuil sur Marne Cedex<br />
Tel. +33.1.49.80.37.91 • Fax +33.1.49.80.37.90<br />
E-mail : info@france.gceurope.com<br />
www.france.gceurope.com<br />
<strong>GC</strong> EUROPE N.V.<br />
BENELUX OFFICE<br />
Tooroplaan 11 • NL-3431 Nieuwegein<br />
Tel. +31.30.604.88.87 • Fax +31.30.604.88.87<br />
E-mail : info@benelux.gceurope.com<br />
www.benelux.gceurope.com<br />
Emotion<br />
du<br />
Naturel<br />
Manuel Technique<br />
MANUEL TECHNIQUE<br />
<strong>GC</strong> <strong>GRADIA</strong> <strong>GUM</strong> OPAQUE: GO12<br />
<strong>GC</strong> <strong>GRADIA</strong> <strong>GUM</strong>: G23<br />
<strong>GC</strong> <strong>GRADIA</strong> <strong>GUM</strong><br />
<strong>GC</strong> <strong>GRADIA</strong> <strong>GUM</strong> OPAQUE: GO13<br />
<strong>GC</strong> <strong>GRADIA</strong> <strong>GUM</strong>: G24<br />
<strong>GC</strong> EUROPE N.V.<br />
SWISS OFFICE<br />
Wilerstrasse 3 • CH-9545 Wängi<br />
Tel. +41.52.366.46.46 • Fax +41.52.366.46.26<br />
E-mail : info@switzerland.gceurope.com<br />
www.switzerland.gceurope.com<br />
z L MA FR 841 09/02<br />
<strong>GC</strong> <strong>GRADIA</strong> <strong>GUM</strong> Guide des Teintes<br />
F I R S T I S Q U A L I T Y<br />
2
GUIDES des TEINTES <strong>GC</strong> <strong>GRADIA</strong> <strong>GUM</strong><br />
1<br />
3<br />
4<br />
GUIDES DES TEINTES <strong>GC</strong> <strong>GRADIA</strong> <strong>GUM</strong><br />
COMPOSANTS DU SYSTEME <strong>GC</strong> <strong>GRADIA</strong> <strong>GUM</strong><br />
<strong>GC</strong> <strong>GRADIA</strong> TABLEAU DES TEINTES<br />
2<br />
OPAQUE<br />
MODIFIER<br />
<strong>GUM</strong> OPAQUE<br />
MODIFIER<br />
TRANSLUCENT<br />
<strong>GUM</strong> OPAQUE<br />
<strong>GUM</strong> OPAQUE<br />
MODIFIER<br />
<strong>GUM</strong><br />
<strong>GUM</strong> MODIFIER<br />
<strong>GUM</strong><br />
TRANSLUCENT<br />
GO11 GO12 GO13<br />
GOM51<br />
G20 G21 G22 G23 G24<br />
GM30 GM31 GM32 GM33 GM34<br />
GT41<br />
TEMPS D’IRRADIATION – PROFONDEUR DE POLYMÉRISATION<br />
Temps d’irradiation du <strong>GC</strong> <strong>GRADIA</strong> <strong>GUM</strong> OPAQUE,<br />
Temps d’irradiation du <strong>GC</strong> <strong>GRADIA</strong> <strong>GUM</strong>:<br />
<strong>GC</strong> <strong>GRADIA</strong> <strong>GUM</strong> OPAQUE MODIFIER:<br />
<strong>GC</strong> STEPLIGHT SL-I <strong>GC</strong> LABOLIGHT LV-III<br />
Pré-polymérisation Pré-polym. Polym. Finale<br />
Unité de polymérisation Pré-polymérisation<br />
<strong>GC</strong> <strong>GRADIA</strong> <strong>GUM</strong> OPAQUE – 1 min. –<br />
<strong>GC</strong> LABOLIGHT LV-III,II 1 min.<br />
<strong>GC</strong> <strong>GRADIA</strong> <strong>GUM</strong> OPAQUE MODIFIER – 1 min. –<br />
<strong>GC</strong> LABOLIGHT LV-I<br />
3 min.<br />
<strong>GC</strong> <strong>GRADIA</strong> <strong>GUM</strong> BODY 10 sec. 30 sec. –<br />
<strong>GC</strong> <strong>GRADIA</strong> <strong>GUM</strong> MODIFIER 10 sec. 30 sec. 3 min.<br />
<strong>GC</strong> <strong>GRADIA</strong> <strong>GUM</strong> TRANSLUCENT 10 sec. 30 sec. –<br />
Temps d’irradiation du <strong>GC</strong> <strong>GRADIA</strong> <strong>GUM</strong>,<br />
<strong>GC</strong> <strong>GRADIA</strong> <strong>GUM</strong> MODIFIER, <strong>GC</strong> <strong>GRADIA</strong> <strong>GUM</strong> TRANSLUCENT:<br />
Unité de polymérisation Pré-polymérisation Polymérisation finale<br />
<strong>GC</strong> LABOLIGHT LV-III,II 30 sec. 3 min.<br />
<strong>GC</strong> LABOLIGHT LV-I 1 min. 5 min.<br />
<strong>GC</strong> STEPLIGHT SL-I 10 sec. –<br />
<strong>GUM</strong> FIBER<br />
GM35<br />
GF71<br />
GM36<br />
Profondeur de polymérisation:<br />
<strong>GC</strong> STEPLIGHT SL-I <strong>GC</strong> LABOLIGHT LV-III<br />
Pré-polym.<br />
Pré-polym. Polym. Finale<br />
10s 1 min 3 min<br />
<strong>GC</strong> <strong>GRADIA</strong> <strong>GUM</strong> OPAQUE – 0.2 mm –<br />
<strong>GC</strong> <strong>GRADIA</strong> <strong>GUM</strong> OPAQUE MODIFIER – 0.2 mm –<br />
<strong>GC</strong> <strong>GRADIA</strong> <strong>GUM</strong> BODY 1.1 mm – 2.5 mm<br />
<strong>GC</strong> <strong>GRADIA</strong> <strong>GUM</strong> MODIFIER 0.8 mm – 1.5 mm<br />
<strong>GC</strong> <strong>GRADIA</strong> <strong>GUM</strong> TRANSLUCENT 3.0 mm – 5.0 mm<br />
Le système est constitué de 3 types de composite, ayant pour objectif de restituer parfaitement<br />
les formes et les teintes du tissu gingival.<br />
Type Liquide :<br />
Type Pâte:<br />
Type Gel:<br />
<strong>GC</strong> <strong>GRADIA</strong> <strong>GUM</strong> OPAQUE<br />
<strong>GC</strong> <strong>GRADIA</strong> <strong>GUM</strong> BODY<br />
<strong>GC</strong> <strong>GRADIA</strong> <strong>GUM</strong> MODIFIER, <strong>GC</strong> <strong>GRADIA</strong> <strong>GUM</strong> TRANSLUCENT<br />
Type Description du Produit<br />
<strong>GC</strong> <strong>GRADIA</strong> <strong>GUM</strong> OPAQUE Liquide Un composite type liquide en 3 teintes.<br />
Facile à appliquer avec des propriétés de masquage exceptionnelles.<br />
<strong>GC</strong> <strong>GRADIA</strong> <strong>GUM</strong> OPAQUE MODIFIER Liquide Un composite type liquide en 1 teinte.<br />
• Peut être utilisé pour ajuster et individualiser <strong>GC</strong> <strong>GRADIA</strong> <strong>GUM</strong> OPAQUE.<br />
<strong>GC</strong> <strong>GRADIA</strong> <strong>GUM</strong> BODY Pâte Un composite type pâte en 5 teintes.<br />
Les couleurs ont été choisies à la suite d’analyses sur<br />
de nombreux tissus gingivaux naturels.<br />
• S’utilise seule, mélangée ou en combinaison<br />
avec d’autres teintes de pâtes <strong>GC</strong> <strong>GRADIA</strong> <strong>GUM</strong>.<br />
<strong>GC</strong> <strong>GRADIA</strong> <strong>GUM</strong> MODIFIER Gel Un composite type gel en 7 teintes.<br />
Grâce à sa basse viscosité, les Modifiers sont faciles à appliquer dans les espaces<br />
étroits et en fines couches.<br />
Les couleurs varient de la teinte translucide (GM30) vers 5 “rouges” différents<br />
et une couleur additionnelle pour montrer les effets de couleurs dans les secteurs<br />
osseux (GM35)<br />
• Peut s’utiliser pour modifier <strong>GC</strong> <strong>GRADIA</strong> <strong>GUM</strong>, combiné les uns avec les autres ou<br />
appliqué sur les pâtes pour une teinte individuelle.<br />
<strong>GC</strong> <strong>GRADIA</strong> <strong>GUM</strong> TRANSLUCENT Gel Un composite type liquide en 1 teinte.<br />
Du fait de sa composition spéciale, ce matériau translucide (GT41) est facile à<br />
appliquer dans des espaces étroits et en fines couches.<br />
• Peut s’utiliser pour couvrir <strong>GC</strong> <strong>GRADIA</strong> <strong>GUM</strong> FIBER.<br />
<strong>GC</strong> <strong>GRADIA</strong> FIBER Fibre Veinules rouge pour reproduire les vaisseaux.<br />
<strong>GC</strong> <strong>GRADIA</strong> <strong>GUM</strong> FIBER est facile à appliquer sur la couche d’inhibition et doit être<br />
recouverte, par exemple, de <strong>GC</strong> <strong>GRADIA</strong> <strong>GUM</strong> TRANSLUCENT (GT41)<br />
Pour le montage<br />
FOUNDATION<br />
OPAQUE<br />
MARGIN<br />
OPAQUE<br />
OPAQUE<br />
OPAQUS DENTIN,<br />
OPAQUS DENTIN,<br />
INTENSIVE *1<br />
OPAQUES DENTIN<br />
DENTIN<br />
ENAMEL<br />
ENAMEL<br />
INTENSIVE<br />
CERVICAL<br />
TRANSUCENT<br />
Pour la caractérisation<br />
SHOULDER<br />
DENTIN<br />
OPAQUS<br />
DENTIN<br />
INTENSIVE<br />
HALO<br />
ENAMEL<br />
PEARL<br />
ENAMEL<br />
ENAMEL<br />
INTENSIVE<br />
TRANSLUCENT<br />
CERVICAL<br />
TRANSLUCENT<br />
MAMELON<br />
STAIN<br />
INTENSIVE<br />
COLOR<br />
A1 A2 A3 A3.5 A4 B1 B2 B3 B4 C1 C2 C3 C4 D2 D3 D4<br />
OA1 OA2 OA3 OA3.5 OA4 OB1 OB2 OB3 OB4 OC1 OC2 OC3 OC4 OD2 OD3 OD4<br />
ODA2 ODA3 ODA3.5 ODA4 ODI3 ODB2 ODB3 ODB4 ODI2 ODC2 ODC3 ODC4 ODI5 ODD3 ODD4 ODI6<br />
ODA1 ODA2 ODA3 ODA3.5 ODA4 ODB1 ODB2 ODB3 ODB4 ODC1 ODC2 ODC3 ODC4 ODD2 ODD3 ODD4<br />
DA1 DA2 DA3 DA3.5 DA4 DB1 DB2 DB3 DB4 DC1 DC2 DC3 DC4 DD2 DD3 DD4<br />
E2 E3 E4 E1 E2 E3 E2 E3 E4 E2 E3<br />
*2 *2 *2<br />
CT2 CT4 CT3 CT2 CT4 CT2 CT3 CT2<br />
SD2 SD3 SD4 SD5 SD7 SD8<br />
ODI1 ODI2 ODI3 ODI4 ODI5 ODI6<br />
HE1<br />
PE1<br />
PE3<br />
EI1 EI3 EI5<br />
T0 T1 T2 T4 T5<br />
CT2<br />
MS2<br />
IC0<br />
CT3<br />
MS3<br />
IC1<br />
CT4<br />
MS5<br />
NOUVEAU<br />
FO<br />
MO<br />
EI1<br />
NOUVEAU<br />
*1: En utilisant OPAQUES DENTIN et OPAQUS<br />
DENTINE INTENSIVE (OD1) en couleurs<br />
cervicales<br />
*2: ENAMEL INTENSIVE (EI1) donnera les même<br />
effets que CERVICAL TRANSLUCENT<br />
IC2 IC3 IC4 IC5 IC6 IC7 IC8 IC9 IC10 IC11 IC12 IC13 IC14<br />
CT4<br />
<strong>GC</strong> <strong>GRADIA</strong><br />
Système Composite Micro-Céramique<br />
<strong>GC</strong> <strong>GRADIA</strong> est un système composite<br />
micro-hybride complet pour un grand nombre<br />
d’indication à la fois pour les régions antérieures<br />
et postérieures.<br />
Quelle que soit l’indication: couronne complète,<br />
couronne à base de métal avec ou sans support<br />
dans la zone incisale, facette, inlays et onlays des<br />
dents postérieures et inférieures ou suprastructures,<br />
<strong>GC</strong> <strong>GRADIA</strong> offre d’excellentes propriétés de manipulation<br />
et un résultat esthétique de très haut niveau<br />
Les restaurations en <strong>GC</strong> <strong>GRADIA</strong> ont une tonalité<br />
proche de la dent naturelle. Cette similitude a été<br />
obtenue grâce au développement de teintes de résine<br />
en coordination avec son application technique.<br />
La technique par couche est similaire à celle utilisée<br />
dans les cas de préparation des restaurations<br />
céramique.<br />
Ce manuel décrit uniquement la technique de montage. Avant toute utilisation, lire attentivement le mode d’emploi inclus dans les coffrets.<br />
3 4<br />
17
Introduction<br />
Les résines composites micro-chargées sont désormais reconnues comme matériaux de<br />
restauration de haute qualité. Prenant en compte les avantages de cette technologie, <strong>GC</strong> a<br />
développé un système de composite photopolymérisable pour la reproduction du tissu<br />
gingival manquant avec un haut niveau d’esthétique.<br />
<strong>GC</strong> <strong>GRADIA</strong> <strong>GUM</strong> est particulièrement indiqué pour les superstructures sur implants et<br />
autres réalisations prothétiques fixes ou mobiles.<br />
Les prothésistes dentaires souhaitent travailler avec un système de teintes naturelles. Ainsi<br />
<strong>GC</strong> a analysé de façon exhaustive les teintes des gencives naturelles. La technique d’application<br />
par couches de <strong>GC</strong> <strong>GRADIA</strong> <strong>GUM</strong> associée à une variété de modifieurs offre des<br />
possibilités illimitées de reproduction des tissus gingivaux.<br />
« Il n’y a pas d’esthétique blanche sans esthétique rouge »<br />
<strong>GC</strong> <strong>GRADIA</strong> <strong>GUM</strong><br />
L’esthétique « Rouge » des gencives est tout simplement aussi importante que l’esthétique<br />
« Blanche » des dents pour la satisfaction et le bien être du patient. L’apparence naturelle du<br />
tissu gingival doit être respectée ainsi que sa forme, le contour et la teinte de la dent restaurée<br />
à tous les âges. Ceci impose notamment une proportion précise entre la dimension<br />
de la couronne et la restauration du tissu parodontal et gingival manquant.<br />
Avec <strong>GC</strong> Gradia Gum, cette proportion peut être facilement respectée par l’emploi de<br />
matériaux photopolymérisables de différentes viscosités.<br />
"Il n'y a pas d'esthétique blanche sans esthétique rouge"<br />
Une nouvelle référence esthétique a été introduite avec <strong>GC</strong> Gradia pour C&B. Sur la base<br />
de ce matériau, <strong>GC</strong> <strong>GRADIA</strong> <strong>GUM</strong> procure les mêmes propriétés physiques incomparables,<br />
l’apparence naturelle et la facilité de mise en oeuvre.<br />
Utilisé avec <strong>GC</strong> <strong>GRADIA</strong> et n’importe quel métal compatible, Primers pour composite ou<br />
céramique, <strong>GC</strong> <strong>GRADIA</strong> <strong>GUM</strong> offre l’avantage d’un système de matériaux parfaitement<br />
compatible et bien adapté.<br />
<strong>GC</strong> <strong>GRADIA</strong> <strong>GUM</strong> 5
Index -<br />
Contenu<br />
Sélection de teintes sur la base du Naturel . . . . . . . . . . . . . . . . . . . . . . . . . . . . . . . . . . . . .2<br />
Guide des teintes <strong>GC</strong> <strong>GRADIA</strong> <strong>GUM</strong> . . . . . . . . . . . . . . . . . . . . . . . . . . . . . . . . . . . . . . . . .3<br />
Temps et Profondeurs de Polymérisation . . . . . . . . . . . . . . . . . . . . . . . . . . . . . . . . . . . . . .3<br />
Les composants du <strong>GC</strong> <strong>GRADIA</strong> <strong>GUM</strong> . . . . . . . . . . . . . . . . . . . . . . . . . . . . . . . . . . . . . . . .4<br />
Introduction . . . . . . . . . . . . . . . . . . . . . . . . . . . . . . . . . . . . . . . . . . . . . . . . . . . . . . . . . . . . . . .5<br />
Index . . . . . . . . . . . . . . . . . . . . . . . . . . . . . . . . . . . . . . . . . . . . . . . . . . . . . . . . . . . . . . . . . . . . .6<br />
Indications . . . . . . . . . . . . . . . . . . . . . . . . . . . . . . . . . . . . . . . . . . . . . . . . . . . . . . . . . . . . . . . . .7<br />
<strong>GC</strong> <strong>GRADIA</strong> <strong>GUM</strong> Avantages et Caractéristiques . . . . . . . . . . . . . . . . . . . . . . . . . . . . . . .7<br />
Synoptique pour le montage par couche . . . . . . . . . . . . . . . . . . . . . . . . . . . . . . . . . . . . . .8<br />
Procédure de montage étape par étape . . . . . . . . . . . . . . . . . . . . . . . . . . . . . . . . . . . . . . .9<br />
Notes . . . . . . . . . . . . . . . . . . . . . . . . . . . . . . . . . . . . . . . . . . . . . . . . . . . . . . . . . . . . . . . . . . . .13<br />
Systèmes d’adhésion <strong>GC</strong> . . . . . . . . . . . . . . . . . . . . . . . . . . . . . . . . . . . . . . . . . . . . . . . . . . .14<br />
Conditionnement . . . . . . . . . . . . . . . . . . . . . . . . . . . . . . . . . . . . . . . . . . . . . . . . . . . . . . . . .15<br />
Produits complèmentaires de la gamme . . . . . . . . . . . . . . . . . . . . . . . . . . . . . . . . . . . . . .16<br />
Palette des teintes <strong>GC</strong> <strong>GRADIA</strong> . . . . . . . . . . . . . . . . . . . . . . . . . . . . . . . . . . . . . . . . . . . . . 17<br />
6<br />
<strong>GC</strong> <strong>GRADIA</strong> <strong>GUM</strong>
Indications<br />
Caractéristiques<br />
Avantages<br />
Indications du <strong>GC</strong> <strong>GRADIA</strong> <strong>GUM</strong>:<br />
• Reproduction des zones gingivales dans les cas de:<br />
• Suprastructure implantaire<br />
• Technique combinée<br />
• Couronne et bridges<br />
• Selles de châssis métallique<br />
<strong>GC</strong> <strong>GRADIA</strong> <strong>GUM</strong> Caractéristiques et Avantages<br />
CARACTÉRISTIQUES<br />
AVANTAGES<br />
• Teintier <strong>GC</strong> <strong>GRADIA</strong> <strong>GUM</strong> basé sur • Apparence Naturelle<br />
les teintes des gencives naturelles<br />
• Grande variété de teintes de pâtes • Adaptation individuelle aux teintes naturelles gingivales<br />
et différents Modifiers • Teintes parfaites pour une demande esthétisque élevée<br />
• Possibilités illimitées d’adaptation du tissu gingival<br />
• Composition basée sur <strong>GC</strong> <strong>GRADIA</strong> • Application et montage faciles<br />
• Composite MFR - Solide et résistant à l’usure • Facile à polir<br />
• S’adapte parfaitement au système composite <strong>GRADIA</strong><br />
• Texture non collante • Facile à nettoyer avec une brosse à dent<br />
• Stabilité des teintes<br />
• Résistance et durabilité à long terme<br />
• Système spécialement développé en seringue • Présentation respectueuse de l’environnement<br />
<strong>GC</strong> <strong>GRADIA</strong> <strong>GUM</strong> 7
1<br />
Synoptique pour le montage par couches de <strong>GC</strong> <strong>GRADIA</strong> <strong>GUM</strong><br />
Systèmes de collage utilisés avec <strong>GC</strong> <strong>GRADIA</strong> et <strong>GC</strong> <strong>GRADIA</strong> <strong>GUM</strong> - Montage Gingival<br />
• <strong>GC</strong> METALPRIMER II est utilisé sur la surface du métal pour coller le métal avec le composite.<br />
• <strong>GC</strong> COMPOSITE PRIMER est utilisé pour recréer une couche d’inhibition lorsque l’on ajoute du composite.<br />
• <strong>GC</strong> CERAMIC PRIMER est utilisé pour le collage de la céramique avec le composite.<br />
Montage classique (en utilisant le “gum block”)<br />
GM30- G20<br />
GO11 – GO13*<br />
G21 – G24*<br />
Un « Gum Block » est monté en utilisant <strong>GC</strong> <strong>GRADIA</strong> <strong>GUM</strong> G20 (type gel).<br />
Le « gum block est pré-polymérisé séparément et fixé avec une fine couche<br />
de <strong>GC</strong> <strong>GRADIA</strong> <strong>GUM</strong> MODIFIER*.<br />
2 teintes mélangées de <strong>GC</strong> <strong>GRADIA</strong> <strong>GUM</strong> Opaque en couche.<br />
2 teintes mélangées de Pâtes <strong>GC</strong> <strong>GRADIA</strong> <strong>GUM</strong> en couche.<br />
* Voir notice p. 3 et p. 13<br />
Montage multi-couches (en utilisant un “gum block”)<br />
Technique individuelle et créative par l’utilisation de plusieurs pâtes, modifiers et fibres.<br />
GM30<br />
Un « Gum Block » est monté en utilisant <strong>GC</strong> <strong>GRADIA</strong> <strong>GUM</strong> G20 (type gel).<br />
G20* Le « gum block est pré-polymérisé séparément et fixé avec une fine couche<br />
de <strong>GC</strong> <strong>GRADIA</strong> <strong>GUM</strong> MODIFIER*.<br />
GOM51<br />
<strong>GC</strong> <strong>GRADIA</strong> <strong>GUM</strong> OPAQUE MODIFIER.<br />
GO11-GO13*<br />
2 teintes mélangées de <strong>GC</strong> <strong>GRADIA</strong> <strong>GUM</strong> OPAQUE en couche.<br />
G21-G24*<br />
2 teintes mélangées de Pâtes <strong>GC</strong> <strong>GRADIA</strong> <strong>GUM</strong> en couche.<br />
GF71<br />
<strong>GC</strong> <strong>GRADIA</strong> <strong>GUM</strong> FIBER.<br />
GM35<br />
<strong>GC</strong> <strong>GRADIA</strong> <strong>GUM</strong> MODIFIER pour reproduire les zones osseuses qui sont légèrement visibles.<br />
GM36<br />
<strong>GC</strong> <strong>GRADIA</strong> <strong>GUM</strong> pour un rouge plus intensif des tissus.<br />
GT41-GM30*<br />
Le mélange est appliqué comme touche finale sur la totalité de la zone de la gencive,<br />
pour donner au tissu un ton plus «léger».<br />
A chaque étape il est nécessaire de pré-polymériser selon le tableau d ’irradiation.<br />
*Les pâtes <strong>GC</strong> <strong>GRADIA</strong> peuvent être appliquées seules ou mélangées entre-elles<br />
(Pour plus de détails, se référer à la procédure « étape par étape »)<br />
*Voir notice p. 3 et p. 13<br />
8<br />
<strong>GC</strong> <strong>GRADIA</strong> <strong>GUM</strong>
Procédure de montage “Etape par Etape” avec <strong>GC</strong> <strong>GRADIA</strong> <strong>GUM</strong> 2<br />
1. Wax-up<br />
1. Appliquer <strong>GC</strong> MULTISEP (séparateur de cire) sur le die en<br />
plâtre réalisé en <strong>GC</strong> FUJIROCK EP.<br />
Monter et sculpter en cire la couronne et les parties gingivales<br />
1.1 Vue linguale de la situation.<br />
1.2 Préparer une clé en silicone avec <strong>GC</strong> EXAFLEX Type PUTTY.<br />
2. Armature métallique<br />
2. Retirer la clé et appliquer une fine couche de <strong>GC</strong> ADHESIVE<br />
II pour les perles de rétention (<strong>GC</strong> RETENTION BEADS II SSS)<br />
sur la zone de rétention. Laisser sécher la surface qui devient<br />
collante. Projeter une couche de <strong>GC</strong> RETENTION BEADS II<br />
SSS uniformément sur la cire. Placer les tiges de coulée, mettre<br />
en revêtement et couler de façon traditionnelle.<br />
L’armature métallique est finie et polie de façon classique.<br />
2.1 Vue linguale 2.2 Sabler la zone de rétention avec de l ’oxyde d ’alumine<br />
propre (50 –110 µm).<br />
Nettoyer la surface à l’air sec et propre et appliquer aussitôt<br />
une ou deux couches de <strong>GC</strong> METAL PRIMER avec un pinceau<br />
propre.<br />
3. Adhésion<br />
4. Montage de couronne facette avec <strong>GC</strong> <strong>GRADIA</strong><br />
3. Appliquer une ou deux couches de <strong>GC</strong> METALPRIMER II sur<br />
la zone de rétention à l’aide d’un pinceau propre.<br />
Laisser sécher quelques secondes.<br />
4. Appliquer une couche de <strong>GC</strong> <strong>GRADIA</strong> FOUNDATION<br />
OPAQUE soigneusement sur la zone de rétention avec un pinceau<br />
propre et plat.<br />
A ce stade, la forme des couronnes doit être plus longue que<br />
prévue dans la mesure ou il faut prendre en compte le contact<br />
progressif avec le tissu gingival à reproduire.<br />
4.1. Appliquer <strong>GC</strong> <strong>GRADIA</strong> OPAQUE, en considérant la taille des<br />
couronnes.<br />
Photopolymérisation: 1 min. <strong>GC</strong> LABOLIGHT LV-III. Photopolymérisation: 1 min. <strong>GC</strong> LABOLIGHT LV-III.<br />
* Voir notices p.3 et p. 13<br />
<strong>GC</strong> <strong>GRADIA</strong> <strong>GUM</strong> 9
3<br />
Procedure de montage “Etape par Etape” avec <strong>GC</strong> <strong>GRADIA</strong> <strong>GUM</strong><br />
4.2. Appliquer deux fines couches de matériaux <strong>GC</strong> <strong>GRADIA</strong><br />
Opaque.<br />
Photopolymérisation: 1 min.<br />
<strong>GC</strong> LABOLIGHT LV-III.<br />
5.En Option:<strong>GC</strong> <strong>GRADIA</strong> <strong>GUM</strong> – préparation d’un “gum block” séparé<br />
4.3. Repositionner une clé en silicone sur la face linguale pour<br />
contrôler l’épaisseur de la couche.<br />
Monter les couronnes avec le composite micro-céramique<br />
<strong>GC</strong> <strong>GRADIA</strong> selon les techniques standards.<br />
Photopolymériser chaque couche en respectant les temps<br />
d’irradiation du <strong>GC</strong> <strong>GRADIA</strong>.<br />
4.4. Vue linguale<br />
(Pour plus de détails sur le montage du composite <strong>GC</strong><br />
Gradia, se référer à son mode d’emploi).<br />
5. Préalablement à la réalisation du tissu gingival, presser la pâte<br />
translucide <strong>GC</strong> <strong>GRADIA</strong> <strong>GUM</strong> (G20) entre deux films<br />
transparents de polyéthylène. *<br />
5.1. Adhésion :<br />
Appliquer <strong>GC</strong> METALPRIMER II sur l’armature métallique de<br />
la partie à reproduire. Appliquer ensuite soigneusement sur<br />
la zone de rétention, une fine couche de <strong>GC</strong> <strong>GRADIA</strong> <strong>GUM</strong><br />
MODIFIER translucent (GM30)*.<br />
5.2. Appliquer <strong>GC</strong> COMPOSITE PRIMER en couche fine sur le<br />
“gum block”.<br />
Photopolymérisation: 1 min. <strong>GC</strong> LABOLIGHT LV-III.<br />
Positionner, presser puis photopolymériser le gum block.*<br />
Photopolymérisation: 3 min. <strong>GC</strong> LABOLIGHT LV-III. Photopolymérisation: 3 min. <strong>GC</strong> LABOLIGHT LV-III.<br />
6. Montage du <strong>GC</strong> <strong>GRADIA</strong> <strong>GUM</strong><br />
6. Appliquer deux fines couches de <strong>GC</strong> <strong>GRADIA</strong> <strong>GUM</strong><br />
OPAQUE sur la surface entière du tissu gingival.<br />
6.1. Accentuer avec <strong>GC</strong> <strong>GRADIA</strong> <strong>GUM</strong> OPAQUE MODIFIER<br />
(GOM51) si nécessaire.<br />
Ceci, pour exprimer la teinte et les dégradés progressifs du<br />
<strong>GRADIA</strong> <strong>GUM</strong> en contact avec les muqueuses buccale.<br />
6.2. Après application du <strong>GC</strong> <strong>GRADIA</strong> <strong>GUM</strong> OPAQUE.<br />
Photopolymérisation: 1 min.<br />
<strong>GC</strong> LABOLIGHT LV-III.<br />
10<br />
<strong>GC</strong> <strong>GRADIA</strong> <strong>GUM</strong><br />
* Voir notice p. 3 et p. 13
Procedure de montage “Etape par Etape” avec <strong>GC</strong> <strong>GRADIA</strong> <strong>GUM</strong> 4<br />
1 3 2<br />
6.3. Appliquer <strong>GC</strong> <strong>GRADIA</strong> <strong>GUM</strong> (Masse). 6.4. Appliquer <strong>GC</strong> COMPOSITE PRIMER sur la zone cervicale de<br />
la couronne pour obtenir le recouvrement souhaité.<br />
Puis monter le “corps” <strong>GC</strong> <strong>GRADIA</strong> <strong>GUM</strong> pour reproduire<br />
une zone progressive de contact d’apparence naturelle entre<br />
les couronnes et le tissu gingival.<br />
6.5. Monter et pré-polymériser <strong>GC</strong> <strong>GRADIA</strong> <strong>GUM</strong> (Masse). En<br />
appliquant par sections, commencer par monter les parties<br />
opposées (No.1, 2) pour éviter les craquelures dues à la<br />
rétraction de polymérisation. Puis monter la partie centrale<br />
(No.3) et photopolymériser pendant 30 secondes* pour les<br />
réunir (1. 3. 2)<br />
Photopolymérisation: 30 sec.* <strong>GC</strong> LABOLIGHT LV-III. Photopolymérisation: 1 min. <strong>GC</strong> LABOLIGHT LV-III. Photopolymérisation: 30 sec.* <strong>GC</strong> LABOLIGHT LV-III.<br />
6.6. Après application du <strong>GC</strong> <strong>GRADIA</strong> <strong>GUM</strong> BODY.<br />
6.7. Appliquer <strong>GC</strong> <strong>GRADIA</strong> <strong>GUM</strong> MODIFIER, en prenant en<br />
considération la forme de l'os alvéolaire sous le tissu gingival<br />
et la teinte de zone de transition en contact avec la muqueuse<br />
buccale.<br />
6.8. Application du <strong>GC</strong> <strong>GRADIA</strong> <strong>GUM</strong> MODIFIER GM35.<br />
Photopolymérisation: 30 sec.*<br />
<strong>GC</strong> LABOLIGHT LV-III.<br />
6.9. Application du <strong>GC</strong> <strong>GRADIA</strong> <strong>GUM</strong> MODIFIER GM32.* 6.10 Après application du <strong>GC</strong> <strong>GRADIA</strong> <strong>GUM</strong> MODIFIER*. 6.11 Afin de créer une teinte plus profonde du tissu gingival,<br />
appliquer une teinte «translucide». Si vous désirez donner au<br />
tissu gingival une couleur plus «légère», appliquez <strong>GC</strong> GRA-<br />
DIA <strong>GUM</strong> TRANSLUCENT (GT41). Si vous souhaitez que le<br />
<strong>GC</strong> <strong>GRADIA</strong> <strong>GUM</strong> MODIFIER apparaisse dans une teinte<br />
plus claire, utiliser une teinte translucide (G20, GM30).<br />
Photopolymérisation: 30 sec.* <strong>GC</strong> LABOLIGHT LV-III. Photopolymérisation: 30 sec.* <strong>GC</strong> LABOLIGHT LV-III. Photopolymérisation: 30 sec.* <strong>GC</strong> LABOLIGHT LV-III.<br />
* Voir notice p. 3 et p. 13<br />
<strong>GC</strong> <strong>GRADIA</strong> <strong>GUM</strong> 11
5<br />
Procedure de montage “Etape par Etape” avec <strong>GC</strong> <strong>GRADIA</strong> <strong>GUM</strong><br />
7. Photopolymérisation Complète finale:<br />
8. Ajustage et polissage:<br />
7. <strong>GC</strong> <strong>GRADIA</strong> AIR BARRIER est appliqué avant la polymérisation<br />
finale.<br />
8. Ajuster et polir selon les techniques habituelles avec des<br />
pâtes à polir pour composite.<br />
8.1. Il n’est pas nécessaire d’utiliser une pâte spéciale comme le<br />
<strong>GC</strong> <strong>GRADIA</strong> DIA POLISHER.<br />
Photopolymérisation: 30 min.*<br />
<strong>GC</strong> LABOLIGHT LV-III.<br />
12<br />
<strong>GC</strong> <strong>GRADIA</strong> <strong>GUM</strong><br />
* Voir notice p. 3 et p. 13
Notes<br />
Notes concernant l’utilisation de <strong>GC</strong> <strong>GRADIA</strong> <strong>GUM</strong><br />
* Voir notice p. 3 et p. 13<br />
1. <strong>GUM</strong> BLOCK • Si le “gum block” excède 5mm d’épaisseur, réaliser des sections puis réunir les<br />
blocks ensemble.<br />
Insérer et relier le premier block comme décrit précédemment.<br />
Puis préparer la seconde section et photopolymériser pendant 3 minutes*.<br />
Enduire les surfaces à coller de la première et la seconde section avec du <strong>GC</strong><br />
COMPOSITE PRIMER.<br />
Photopolymériser chacune d’entre-elle pendant 1 minute*.<br />
Appliquer GM30 sur la surface et presser la seconde pour les réunir.<br />
Photopolymériser : 3 min. dans <strong>GC</strong> LABOLIGHT LV-III.<br />
L’utilisation d’un “gum block” va minimiser la rétraction de polymérisation et<br />
donner une épaisseur au <strong>GC</strong> <strong>GRADIA</strong> <strong>GUM</strong>, permettant un travail plus facile<br />
dans la procédure suivante.<br />
2. <strong>GC</strong> <strong>GRADIA</strong> <strong>GUM</strong> BODY • En cas d’application dans des zones d’extension, réaliser un montage par<br />
<strong>GC</strong> <strong>GRADIA</strong> <strong>GUM</strong> TRANSLUCENT sections de 2-3 dents chacune et les photopolymériser respectivement pen-<br />
(GT41, G20, G30)<br />
dant 30 secondes.<br />
<strong>GC</strong> <strong>GRADIA</strong> <strong>GUM</strong> MODIFIER<br />
3. <strong>GC</strong> <strong>GRADIA</strong> <strong>GUM</strong> FIBER • Lorsque vous ajoutez <strong>GC</strong> <strong>GRADIA</strong> <strong>GUM</strong> FIBER, les placer sur la couche d’inhibition<br />
par l’air pour les fixer. Couvrir d’une couche de <strong>GC</strong> <strong>GRADIA</strong> <strong>GUM</strong><br />
TRANSLUCENT (GT41) et photopolymériser.<br />
4. <strong>GC</strong> <strong>GRADIA</strong> <strong>GUM</strong> MODIFIER • <strong>GC</strong> <strong>GRADIA</strong> <strong>GUM</strong> MODIFIER peut être mélangé avec une autre teinte de<br />
Modifier pour obtenir, en fonction des cas individuels, un résultat esthétique parfait.<br />
5. Temps d’irradiation • Le <strong>GC</strong> STEPLIGHT SL-I ne peut pas être utilisé pour polymériser les Gum Opaques.<br />
• Lorsque vous utilisez une unité mobile de photopolymérisation*, appliquez la<br />
lumière dans toutes les directions pour une polymérisation complète.<br />
• Le <strong>GC</strong> STEPLIGHT SL-I ne peut pas être utilisé pour la polymérisation finale.<br />
• Lorsque vous utilisez une unité mobile de photopolymérisation*, appliquez la<br />
lumière dans toutes les directions pour une polymérisation complète.<br />
• Voir page 3 pour plus d’informations sur le temps d’irradiation.<br />
6. <strong>GC</strong> <strong>GRADIA</strong> <strong>GUM</strong> FIBER • Lorsque vous utilisez <strong>GC</strong> <strong>GRADIA</strong> <strong>GUM</strong> FIBER, couvrir d’une couche de <strong>GC</strong><br />
<strong>GRADIA</strong> <strong>GUM</strong> TRANSLUCENT (GT41) ou <strong>GC</strong> <strong>GRADIA</strong> <strong>GUM</strong> (G20).<br />
7. Polissage • Le polissage peut être obtenu sans matériau de polissage spécifique pour<br />
obtenir une surface lisse et brillante.<br />
<strong>GC</strong> <strong>GRADIA</strong> <strong>GUM</strong> 13
Système<br />
de collage<br />
Système de collage pour <strong>GC</strong> <strong>GRADIA</strong> et <strong>GC</strong> <strong>GRADIA</strong> <strong>GUM</strong> : Etape par Etape<br />
<strong>GC</strong> METALPRIMER II:<br />
Agent Composite de collage pour Interface Métal/Résine<br />
1. Les perles de rétention (<strong>GC</strong> RETENTION BEADS II SSS) sont projetées uniformément sur la cire pour<br />
améliorer le mécanisme de rétention.<br />
La mise en revêtement et la coulée sont réalisées de façon habituelle.<br />
2. Sabler la surface du métal avec de l’oxyde d’alumine propre (50 à 110 µm)<br />
3. Nettoyer la surface à l’air sec et propre, sans trace d’huile.<br />
4. Appliquer aussitôt <strong>GC</strong> METALPRIMER II une à deux fois en utilisant un pinceau plat et propre.<br />
5. Laissez sécher quelques secondes.<br />
6. Appliquer FOUNDATION OPAQUE – lorsque vous utilisez <strong>GC</strong> <strong>GRADIA</strong> composite.<br />
Si une couche Opaque n’est pas nécessaire, (voir montage du “gum block”), appliquer une fine<br />
couche de <strong>GC</strong> <strong>GRADIA</strong> <strong>GUM</strong> MODIFIER (GM30).<br />
Le montage qui suit se fait de façon classique.<br />
<strong>GC</strong> COMPOSITE PRIMER:<br />
Un agent de collage photopolymérisable pour les applications additionnelles de couches sur composite<br />
déjà polymérisé<br />
1. Pour ajouter de composite sur une facette réalisée en <strong>GC</strong> <strong>GRADIA</strong> ou <strong>GC</strong> <strong>GRADIA</strong> <strong>GUM</strong>,<br />
rendre préalablement rugueuse la surface avec une fraise et / ou sabler avec de l’oxyde d’alumine.<br />
2. Enduire la surface rugueuse de <strong>GC</strong> COMPOSITE PRIMER.<br />
3. Photopolymériser 1 min. dans <strong>GC</strong> LABOLIGHT LV-III.<br />
4. Des pâtes composite complémentaires peuvent être appliquées et photopolymérisées en<br />
respectant les temps d’irradiation.<br />
14<br />
<strong>GC</strong> CERAMIC PRIMER<br />
Système de collage à 2 composants pour le collage de céramique.<br />
1. Rendre rugueuse la surface à coller de la céramique sur métal en utilisant une pointe au<br />
carborundum, etc … Nettoyer à l ’air sec et propre.<br />
2. Sabler la surface à coller avec de l’oxyde d’alumine (110µ) ou appliquer un gel de mordançage<br />
fluoroacide.<br />
3. Nettoyer en rinçant à l’eau et sécher.<br />
4. Mélanger <strong>GC</strong> CERAMIC PRIMER A & B. Appliquer sur la surface à coller et sécher soigneusement<br />
à l’air sec et propre.<br />
5. Appliquer <strong>GC</strong> COMPOSITE PRIMER sur la surface à coller et étaler par un jet d'air.<br />
Photopolymériser 1 minute avec LABOLIGHT LVIII.<br />
6. Appliques <strong>GC</strong> <strong>GRADIA</strong> sur les surfaces à coller<br />
(Pour chaque produit, nous vous conseillons de vous référez à leur mode d’emploi spécifique)<br />
<strong>GC</strong> <strong>GRADIA</strong> <strong>GUM</strong>
<strong>GC</strong><br />
<strong>GRADIA</strong><br />
<strong>GUM</strong><br />
Présentation<br />
Présentation des teintes du <strong>GC</strong> <strong>GRADIA</strong> <strong>GUM</strong><br />
<strong>GC</strong> <strong>GRADIA</strong> <strong>GUM</strong> Starter Kit<br />
2 teintes <strong>GC</strong> <strong>GRADIA</strong> <strong>GUM</strong> Opaque – 2.4 ml GO11, GO13<br />
4 teintes Pâtes <strong>GC</strong> Gradia Gum Body - 2,9 ml -<br />
G 21 - G 22 - G 23 - G 24<br />
1 <strong>GC</strong> <strong>GRADIA</strong> <strong>GUM</strong> Translucent Gel – 2.4 ml<br />
GT41<br />
Accessoires:<br />
5 Palettes jetables<br />
1 Couvercle de protection lumineuse<br />
1 Bloc de mélange No.22<br />
1 Pinceau No.7<br />
1 Tableau des teintes <strong>GC</strong> <strong>GRADIA</strong> <strong>GUM</strong><br />
1 Teintier <strong>GC</strong> <strong>GRADIA</strong><br />
<strong>GC</strong> <strong>GRADIA</strong> <strong>GUM</strong> Recharges:<br />
3 <strong>GC</strong> <strong>GRADIA</strong> <strong>GUM</strong> OPAQUE - 2.4 ml<br />
GO11, GO12, GO13<br />
1 <strong>GC</strong> <strong>GRADIA</strong> <strong>GUM</strong> OPAQUE MODIFIER - 2.4 ml<br />
GOM51<br />
5 <strong>GC</strong> <strong>GRADIA</strong> <strong>GUM</strong> BODY - 2.9 ml<br />
G20, G21, G22, G23, G24<br />
7 <strong>GC</strong> <strong>GRADIA</strong> <strong>GUM</strong> MODIFIER - 2.4 ml<br />
GM30, GM31, GM32, GM33, GM34, GM35, GM36<br />
1 <strong>GC</strong> <strong>GRADIA</strong> <strong>GUM</strong> TRANSLUCENT - 2.4 ml<br />
GT41<br />
1 <strong>GC</strong> <strong>GRADIA</strong> <strong>GUM</strong> FIBER - 0.4 g<br />
GF71<br />
<strong>GC</strong> <strong>GRADIA</strong> <strong>GUM</strong> 15
PRODUITS<br />
COMPLE-<br />
MENTAIRES<br />
Autres produits de la gamme <strong>GC</strong> <strong>GRADIA</strong>:<br />
<strong>GC</strong> <strong>GRADIA</strong> Système Composite Micro Céramique :<br />
<strong>GC</strong> <strong>GRADIA</strong> Standard Set (6 teintes), Chaque set contient en plus, tous les systèmes<br />
<strong>GC</strong> <strong>GRADIA</strong> Master Set (10 teintes) de collage nécessaires pour coller métal et<br />
composite ainsi que les accessoires<br />
1 <strong>GC</strong> METALPRIMER II,<br />
1 <strong>GC</strong> COMPOSITE PRIMER,<br />
1 <strong>GC</strong> <strong>GRADIA</strong> DIE HARDNER,<br />
1 <strong>GC</strong> <strong>GRADIA</strong> SEPARATOR<br />
<strong>GC</strong> <strong>GRADIA</strong> AIR BARRIER<br />
Pour réduire la couche d’inhibition par l’air<br />
après polymérisation.<br />
<strong>GC</strong> <strong>GRADIA</strong> SEPARATOR<br />
Un séparateur Composite/Résine.<br />
<strong>GC</strong> <strong>GRADIA</strong> SHADE GUIDE KIT<br />
Pour fabriquer un teintier individuel avec le<br />
<strong>GC</strong> <strong>GRADIA</strong> original et le composite <strong>GC</strong><br />
<strong>GRADIA</strong> <strong>GUM</strong>.<br />
<strong>GC</strong> <strong>GRADIA</strong> PLUNGER<br />
Système de seringue fonctionnel et<br />
«agréable».<br />
La partie de la seringue qui se visse peut être<br />
réutilisée en remplaçant simplement la barrette<br />
contenant la pâte.<br />
Unités de polymérisation:<br />
<strong>GC</strong> STEPLIGHT SL- I<br />
<strong>GC</strong> LABOLIGHT LV III<br />
Pour la pré-polymérisation du <strong>GC</strong> <strong>GRADIA</strong> et<br />
du <strong>GC</strong> <strong>GRADIA</strong> <strong>GUM</strong> au cours de la procédure<br />
de montage. (Sauf matériaux Opaques).<br />
Pour la polymérisation finale du <strong>GC</strong> <strong>GRADIA</strong><br />
et <strong>GC</strong> <strong>GRADIA</strong> <strong>GUM</strong>.<br />
Pour la polymérisation des couches Opaques<br />
du <strong>GC</strong> <strong>GRADIA</strong> et du <strong>GC</strong> <strong>GRADIA</strong> <strong>GUM</strong>.*<br />
16<br />
<strong>GC</strong> <strong>GRADIA</strong> <strong>GUM</strong><br />
* Voir notice p.3