

Concept/Ocean/Capstan 1, 2 & 3 Windlass Range - L-36 Fleet
Concept/Ocean/Capstan 1, 2 & 3 Windlass Range - L-36 Fleet
Concept/Ocean/Capstan 1, 2 & 3 Windlass Range - L-36 Fleet

You also want an ePaper? Increase the reach of your titles
YUMPU automatically turns print PDFs into web optimized ePapers that Google loves.
INSTALLATION • INSTALLATION • INSTALLATION • INSTALACION • INSTALLATION<br />
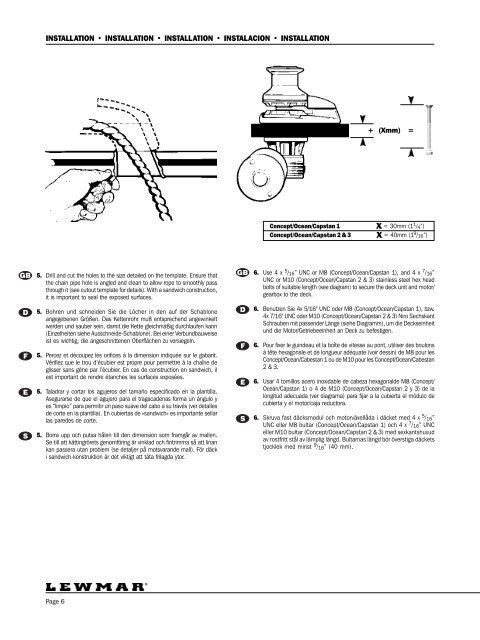
+ (Xmm) =<br />
<strong>Concept</strong>/<strong>Ocean</strong>/<strong>Capstan</strong> 1 x = 30mm (1 1 / 4”)<br />
<strong>Concept</strong>/<strong>Ocean</strong>/<strong>Capstan</strong> 2 & 3 x = 40mm (1 9 /16”)<br />
5. Drill and cut the holes to the size detailed on the template. Ensure that<br />
the chain pipe hole is angled and clean to allow rope to smoothly pass<br />
through it (see cutout template for details). With a sandwich construction,<br />
it is important to seal the exposed surfaces.<br />
5. Bohren und schneiden Sie die Löcher in den auf der Schablone<br />
angegebenen Größen. Das Kettenrohr muß entsprechend angewinkelt<br />
werden und sauber sein, damit die Kette gleichmäßig durchlaufen kann<br />
(Einzelheiten siehe Ausschneide-Schablone). Bei einer Verbundbauweise<br />
ist es wichtig, die angeschnittenen Oberflächen zu versiegeln.<br />
5. Percez et découpez les orifices à la dimension indiquée sur le gabarit.<br />
Vérifiez que le trou d’écubier est propre pour permettre à la chaîne de<br />
glisser sans gène par l’écubier. En cas de construction en sandwich, il<br />
est important de rendre étanches les surfaces exposées.<br />
5. Taladrar y cortar los agujeros del tamaño especificado en la plantilla.<br />
Asegurarse de que el agujero para el tragacadenas forma un ángulo y<br />
es “limpio” para permitir un paso suave del cabo a su través (ver detalles<br />
de corte en la plantilla). En cubiertas de «sandwich» es importante sellar<br />
las paredes de corte.<br />
5. Borra upp och putsa hålen till den dimension som framgår av mallen.<br />
Se till att kättingrörets genomföring är vinklad och fintrimma så att linan<br />
kan passera utan problem (se detaljer på motsvarande mall). För däck<br />
i sandwich-konstruktion är det viktigt att täta frilagda ytor.<br />
6. Use 4 x 5 / 16” UNC or M8 (<strong>Concept</strong>/<strong>Ocean</strong>/<strong>Capstan</strong> 1), and 4 x 7 / 16”<br />
UNC or M10 (<strong>Concept</strong>/<strong>Ocean</strong>/<strong>Capstan</strong> 2 & 3) stainless steel hex head<br />
bolts of suitable length (see diagram) to secure the deck unit and motor/<br />
gearbox to the deck.<br />
6. Benutzen Sie 4x 5/16" UNC oder M8 (<strong>Concept</strong>/<strong>Ocean</strong>/<strong>Capstan</strong> 1), bzw.<br />
4x 7/16" UNC oder M10 (<strong>Concept</strong>/<strong>Ocean</strong>/<strong>Capstan</strong> 2 & 3) Niro Sechskant<br />
Schrauben mit passender Länge (siehe Diagramm), um die Deckseinheit<br />
und die Motor/Getriebeeinheit an Deck zu befestigen.<br />
6. Pour fixer le guindeau et la boîte de vitesse au pont, utiliser des boulons<br />
à tête hexagonale et de longueur adéquate (voir dessin) de M8 pour les<br />
<strong>Concept</strong>/<strong>Ocean</strong>/Cabestan 1 ou de M10 pour les <strong>Concept</strong>/<strong>Ocean</strong>/Cabestan<br />
2 & 3.<br />
6. Usar 4 tornillos acero inoxidable de cabeza hexagonalde M8 (<strong>Concept</strong>/<br />
<strong>Ocean</strong>/<strong>Capstan</strong> 1) o 4 de M10 (<strong>Concept</strong>/<strong>Ocean</strong>/<strong>Capstan</strong> 2 y 3) de la<br />
longitud adecuada (ver diagrama) para fijar a la cubierta el módulo de<br />
cubierta y el motor/caja reductora.<br />
6. Skruva fast däcksmodul och motorväxellåda i däcket med 4 x 5 / 16”<br />
UNC eller M8 bultar (<strong>Concept</strong>/<strong>Ocean</strong>/<strong>Capstan</strong> 1) och 4 x 7 / 16” UNC<br />
eller M10 bultar (<strong>Concept</strong>/<strong>Ocean</strong>/<strong>Capstan</strong> 2 & 3) med sexkantshuvud<br />
av rostfritt stål av lämplig längd. Bultarnas längd bör överstiga däckets<br />
tjocklek med minst 9 / 16” (40 mm).<br />
Page 6


