tomas®-pin Gebrauchsanweisung - DENTAURUM
tomas®-pin Gebrauchsanweisung - DENTAURUM
tomas®-pin Gebrauchsanweisung - DENTAURUM

You also want an ePaper? Increase the reach of your titles
YUMPU automatically turns print PDFs into web optimized ePapers that Google loves.
<strong>Gebrauchsanweisung</strong> für den tomas ® -<strong>pin</strong><br />
1. Hersteller<br />
Dentaurum GmbH & Co. KG<br />
Turnstraße 31 · 75228 Ispringen · Deutschland<br />
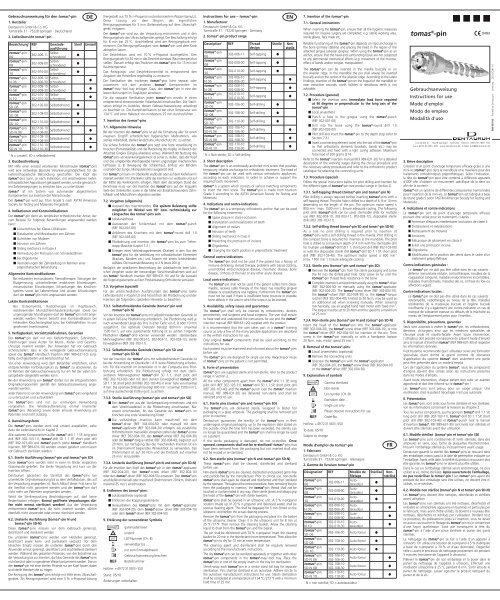
2. Lieferübersicht tomas ® -<strong>pin</strong><br />
DE<br />
Bezeichnung 1 REF Gewindeausführung<br />
Steril Unsteril<br />
tomas ® -<strong>pin</strong><br />
302-006-11 Selbstschneidend<br />
06<br />
●<br />
tomas ® -<strong>pin</strong><br />
302-008-00 Selbstschneidend<br />
08<br />
●<br />
tomas ® -<strong>pin</strong><br />
302-010-00 Selbstschneidend<br />
10<br />
●<br />
tomas ® -<strong>pin</strong> 302-006-10 Selbstschneidend<br />
N 06 302-006-30<br />
●<br />
tomas ® -<strong>pin</strong> 302-008-10 Selbstschneidend<br />
N 08 302-008-30<br />
●<br />
tomas ® -<strong>pin</strong> 302-010-10 Selbstschneidend<br />
N 10 302-010-30<br />
●<br />
tomas ® -<strong>pin</strong><br />
SD 06<br />
302-106-00 Selbst bohrend ●<br />
tomas ® -<strong>pin</strong><br />
SD 08<br />
302-108-00 Selbst bohrend ●<br />
tomas ® -<strong>pin</strong><br />
SD 10<br />
302-110-00 Selbst bohrend ●<br />
tomas ® -<strong>pin</strong> 302-106-10<br />
Selbst bohrend<br />
SD-N 06 302-106-30<br />
●<br />
tomas ® -<strong>pin</strong> 302-108-10<br />
Selbst bohrend<br />
SD-N 08 302-108-30<br />
●<br />
tomas ® -<strong>pin</strong> 302-110-10<br />
Selbst bohrend<br />
SD-N 10 302-110-30<br />
●<br />
1<br />
N = unsteril; SD = selbstbohrend<br />
3. Kurzbeschreibung<br />
Mit Hilfe einer enossal verankerten Minischraube (tomas ® -<strong>pin</strong>)<br />
wird eine zeitweilige absolute Verankerungsmöglichkeit für die<br />
kieferorthopädische Behandlung geschaffen. Der Kopf des<br />
tomas ® -<strong>pin</strong>s kann, je nach Indikation, mit verschiedenen kieferorthopädischen<br />
Apparaturen gekoppelt werden, um die gewünschten<br />
Zahnbewegungen zu erreichen bzw. zu unterstützen.<br />
tomas ® ist ein System von aufeinander abgestimmten<br />
Komponenten zur Insertion der Minischraube.<br />
Der tomas ® -<strong>pin</strong> wird aus Titan Grade 5 nach ASTM (American<br />
Society for Testing and Materials) hergestellt.<br />
4. Indikationen und Kontraindikationen<br />
Der tomas ® -<strong>pin</strong> dient als temporärer orthodontischer Anker, der<br />
zum Beispiel für folgende Behandlungen angewendet werden<br />
kann:<br />
■ Lückenschluss bei Klasse-I-Okklusion<br />
■ Distalisation und Mesialisation von Zähnen<br />
■ Aufrichten von Molaren<br />
■ Intrusion von Zähnen<br />
■ Sliding mechanics in Klasse II<br />
■ Vermeidung der Protrusion von Schneidezähnen<br />
■ bei Oligodontie<br />
■ Veränderungen der Zahnstellung im Rahmen einer<br />
präprothetischen Behandlung<br />
Allgemeine Kontraindikationen<br />
Bei reduzierter Immunabwehr, Steroidtherapie, Störungen der<br />
Blutgerinnung, unkontrollierten endokrinen Er kran kun gen,<br />
rheumatischen Erkrankungen, Erkrankungen des Kno chensystems<br />
sowie bei Leberzirrhose und akuten Er kran kungen<br />
darf der tomas ® -<strong>pin</strong> nicht angewendet werden.<br />
Lokale Kontraindikationen<br />
Bei Osteomyelitis, Radiotherapie im Kopfbereich,<br />
rezidi vierenden Mundschleim hauterkrankungen sowie bei<br />
ungenügender Mundhygiene darf der tomas ® -<strong>pin</strong> nicht angewendet<br />
werden. Ferner besteht eine Kontraindika tion bei<br />
fehlendem Knochenangebot bzw. bei Kieferdefekten im vorgesehenen<br />
Insertionsareal.<br />
5. Verfügbarkeit, Vorsichtsmaßnahmen, Garantien<br />
Der tomas ® -<strong>pin</strong> darf nur von Kieferorthopäden, Zahnärzten,<br />
Oralchirurgen sowie Ärzten für Mund-, Kiefer- und Gesichtschirurgie<br />
inseriert werden. Der Anwender hat vor Gebrauch<br />
sicherzustellen, dass er die vorliegende <strong>Gebrauchsanweisung</strong><br />
sowie das tomas ® Handbuch Insertion (REF 989-631-10) sorgfältig<br />
durchgearbeitet und berücksichtigt hat.<br />
Vor einer Anwendung wird dem Behandler empfohlen, einen<br />
entsprechenden Fortbildungs kurs zu tomas ® zu absolvieren, da<br />
im Rahmen der <strong>Gebrauchsanweisung</strong> nur ein Teil der vielen Einsatzgebiete<br />
dargestellt werden kann.<br />
Bei der Anwendung von tomas ® dürfen nur die entsprechenden<br />
Originalkomponenten gemäß der <strong>Gebrauchsanweisung</strong> angewendet<br />
werden.<br />
Jeder Patient ist vor der Anwendung von tomas ® -<strong>pin</strong>s eingehend<br />
zu untersuchen und aufzuklären!<br />
Die tomas ® -<strong>pin</strong>s sind nur zur einmaligen Verwendung<br />
vorgesehen. Die Wiederaufbereitung einmal inserierter<br />
tomas ® -<strong>pin</strong>s (Recycling) sowie deren erneute Anwendung am<br />
Patienten sind nicht zulässig.<br />
6. Darreichungsform<br />
Die tomas ® -<strong>pin</strong>s werden steril und unsteril ausgeliefert, siehe<br />
dazu die Lieferübersicht im Kapitel 2.<br />
Alle weiteren Komponenten außer tomas ® -drill 1.1 SP, long pilot<br />
drill (REF 302-103-11), tomas ® -drill SD 1.1 SP, short pilot drill<br />
(REF 302-103-40) und tomas ® -punch (siehe tomas ® Handbuch<br />
Insertion, REF 989-631-10) werden unsteril geliefert und müssen<br />
vor Gebrauch sterilisiert werden.<br />
6.1. Sterile Ausführung (tomas ® -<strong>pin</strong> und tomas ® -<strong>pin</strong> SD)<br />
Diese tomas ® -<strong>pin</strong>s werden steril in einer im Blister verpackten<br />
Glasampulle geliefert. Die sterile Verpackung erst kurz vor der<br />
Insertion öffnen.<br />
Dentaurum garantiert die Sterilität des tomas ® -<strong>pin</strong>s bei<br />
un verletzter Orginalverpackung bis zu dem Verfallsdatum, das auf<br />
der Verpackung angegeben ist. Nach Ablauf dieser Frist kann für<br />
die Sterilität nicht garantiert werden und der tomas ® -<strong>pin</strong> darf<br />
nicht mehr am Patienten angewendet werden.<br />
Weist die Sterilverpackung Beschädigungen auf, darf keine<br />
Resterilisation erfolgen. Einmal geöffnete Verpackungen dürfen<br />
nicht erneut sterilisiert werden! Aus der Verpackung<br />
entnommene tomas ® -<strong>pin</strong>s, die nicht inseriert wurden, dürfen<br />
ebenfalls nicht verwendet oder erneut sterilisiert werden.<br />
6.2. Unsterile Ausführung (tomas ® -<strong>pin</strong> N und<br />
tomas ® -<strong>pin</strong> SD-N)<br />
Diese tomas ® -<strong>pin</strong>s müssen vor dem Gebrauch gereinigt,<br />
desinfiziert und sterilisiert werden.<br />
Die unsterilen tomas ® -<strong>pin</strong>s werden vom Hersteller gereinigt,<br />
des infiziert sowie keim- und partikelarm verpackt. Vor dem<br />
klinischen Einsatz müssen die unsterilen tomas ® -<strong>pin</strong>s durch den<br />
Anwender erneut gereinigt, desinfiziert und anschließend sterilisiert<br />
werden. Während des gesamten Prozesses, von der Entnahme aus<br />
der Verpackung bis zur Insertion, darf das Gewinde des tomas ® -<strong>pin</strong>s<br />
nicht berührt oder in irgendeiner Weise kontaminiert werden. Darum<br />
den tomas ® -<strong>pin</strong> mit einer sterilen Pinzette nur am Kopf fassen, dabei<br />
sind sterile Handschuhe zu tragen.<br />
Die Reinigung des tomas ® -<strong>pin</strong>s erfolgt mit Hilfe eines Ultraschallgerätes.<br />
Als Reinigungsmittel wird eine 5 % n-Propanol-Lösung<br />
(hergestellt aus 70 % n-Propanol und entionisiertem Wasser) benutzt.<br />
Diese Lösung vor dem Beginn des eigentlichen<br />
Reinigungsprozesses für 5 min (Zeiteinstellung auf dem Ultraschallgerät)<br />
entgasen.<br />
Der tomas ® -<strong>pin</strong> wird aus der Verpackung entnommen und in den<br />
Reinigungskorb des Ultraschallgerätes gelegt. Die Beschallung erfolgt<br />
für 8 min bei 25 °C. Anschließend wird der Reinigungskorb entnommen.<br />
Die Reinigungsflüssigkeit vom tomas ® -<strong>pin</strong> und dem Korb<br />
abtropfen lassen.<br />
Die Desinfektion wird mit 70 % n-Propanol durchgeführt. Den<br />
Reinigungskorb für 20 min in das Desinfektionsbad (Raum temperatur)<br />
stellen. Danach erfolgt das Trocknen des tomas ® -<strong>pin</strong>s für 15 min bei<br />
Raumtemperatur.<br />
Das Reinigungs- und Desinfektionsmittel ist entsprechend den<br />
Angaben des Herstellers regelmäßig zu erneuern.<br />
Die Sterilisation des trockenen tomas ® -<strong>pin</strong>s kann separat oder<br />
zusammen mit den anderen tomas ® Komponenten im<br />
tomas ® -tray/-tool tray erfolgen. Dazu den tomas ® -<strong>pin</strong> in eine der<br />
leeren Bohrungen im Traykörper einsetzen.<br />
Für die separate Sterilisation jeden tomas ® -<strong>pin</strong> einzeln in einen<br />
entsprechend dimensionierten Folienbeutel einschweißen. Die Sterilisation<br />
erfolgt im Autoklav, dessen Ge brauchs anweisung unbedingt<br />
zu beachten ist. Die Dampfsterilisation ist bei einer Temperatur von<br />
134 °C und einer Haltezeit von mindestens 25 min durchzuführen.<br />
7. Insertion des tomas ® -<strong>pin</strong>s<br />
7.1. Allgemeine Hinweise<br />
Bei der Insertion des tomas ® -<strong>pin</strong>s ist auf die Einhaltung aller für einen<br />
invasiven Eingriff erforderlichen hygienischen Maßnahmen, wie<br />
steriles Arbeitsfeld, sterile Handschuhe, Mundschutz etc. zu achten.<br />
Die sichere Funktion des tomas ® -<strong>pin</strong>s setzt eine feste Verankerung im<br />
Knochen (Primärstabilität) und die Platzierung des Kopfes im Bereich der<br />
Attached Gingiva (Gingiva alveolaris) voraus. Während der Nutzung des<br />
tomas ® -<strong>pin</strong>s als Verankerungselement ist sicher zu stellen, dass der Kopf<br />
und das umgebende Weich gewebe keinen ungünstigen mechanischen<br />
Einflüssen (z. B. Bewegung der Schleimhaut, Einfluss von Bändern<br />
und / oder der Zunge, Manipulationen) ausgesetzt sind.<br />
Der tomas ® -<strong>pin</strong> kann im Oberkiefer vestibulär oder auf dem Kieferkamm<br />
inseriert werden. Im Unterkiefer sollte die Insertion nur vestibulär und auf<br />
der Mitte des Kieferkamms erfolgen. Nach dem derzeitigen Stand der<br />
Kenntnisse muss von der Inser tion des tomas ® -<strong>pin</strong>s auf der lingualen<br />
Seite des Unterkiefers sowie in der Nähe von Extraktions wunden, Zahnfollikeln<br />
und Milchzähnen abgeraten werden.<br />
7.2. Vorgehen (allgemein)<br />
■ Auswahl des Insertionsortes. Die spätere Belastung sollte<br />
möglichst im Winkel von 90° bzw. rechtwinkelig zur<br />
Längsachse des tomas ® -<strong>pin</strong>s sein<br />
■ Lokalanästhesie<br />
■ Ausstanzen der Schleimhaut mit dem tomas ® -punch<br />
(REF 302-001-00)<br />
■ Ankörnen des Knochens mit dem tomas ® -round drill 1.0<br />
(REF 302-003-00)<br />
■ Pilotbohrung und Insertion des tomas ® -<strong>pin</strong>s bis zum Tiefenstopp<br />
(Beachte Kapitel 7.3.)<br />
■ Einlegen eines Verbindungselementes (Drahtes) in den Slot des<br />
tomas ® -<strong>pin</strong>s für die Verbindung mit orthodontischen Elementen<br />
(Brackets, Bändern etc.) und Fixieren mit einem lichthärtenden<br />
Adhäsiv. Die maximale Belastung ist 2 N (etwa 200 g)<br />
Bezüglich der detaillierten Beschreibung der Arbeitsschritte beim klinischen<br />
Vorgehen sowie der notwendigen Vorsichtsmaßnahmen wird auf<br />
das tomas ® Handbuch Insertion (REF 989-631-10) und für die Auswahl<br />
der Kopplungselemente auf den Produktkatalog Orthodontie verwiesen.<br />
7.3. Vorgehen (speziell)<br />
Für die unterschiedlichen Ausführungen des tomas ® -<strong>pin</strong>s (siehe<br />
Lieferübersicht in Kapitel 2) sind hinsichtlich der Pilotbohrung und der<br />
Insertion die folgenden, speziellen Hinweise zu beachten.<br />
7.3.1. Selbstschneidendes Gewinde (tomas ® -<strong>pin</strong> und<br />
tomas ® -<strong>pin</strong> N)<br />
Vor der Insertion der tomas ® -<strong>pin</strong>s mit selbstschneidendem Gewinde ist<br />
in jedem Fall eine Pilotbohrung erforderlich. Die Pilotbohrung wird je<br />
nach verwendeter Länge des Pins in einer Tiefe von 6, 8 oder 10 mm<br />
ausgeführt. Die optimale Drehzahl beträgt 800 min -1 (maximal<br />
1500 min -1 ), auf eine ausreichende Kühlung ist zu achten. Folgende<br />
Pilotbohrer (tomas ® -drill) können verwendet werden: sterilisierbare<br />
Mehrwegbohrer (REF 302-003-10, 302-003-11, 302-003-12), sterile<br />
Einwegbohrer (REF 302-103-11).<br />
7.3.2. Selbstbohrendes Gewinde (tomas ® -<strong>pin</strong> SD und<br />
tomas ® -<strong>pin</strong> SD-N)<br />
Vor der Insertion der tomas ® -<strong>pin</strong>s mit selbstbohrendem Gewinde ist<br />
bei der Anwendung im Oberkiefer i. d. R. keine Pilotbohrung erforderlich.<br />
Für die Insertion im Unterkiefer ist in der Compacta eine Pilotbohrung<br />
erforderlich. Die Pilotbohrung erfolgt mit dem sterilisierbaren<br />
Mehrwegbohrer tomas ® -drill SD 1.1, short pilot drill<br />
(REF 302-103-00) oder mit dem sterilen Einwegbohrer tomas ® -drill<br />
SD 1.1 SP, short pilot drill (REF 302-103-40) in einer Tiefe von maximal<br />
4 mm. Die optimale Drehzahl beträgt 800 min -1 (maximal 1500 min -1 ),<br />
auf eine aus reichende Kühlung ist zu achten.<br />
7.3.3. Sterile Ausführung (tomas ® -<strong>pin</strong> und tomas ® -<strong>pin</strong> SD)<br />
■ Den tomas ® -<strong>pin</strong> aus der Sterilverpackung entnehmen und mit<br />
dem Verschlussdeckel in die Pilotbohrung einschrauben. Nur<br />
soweit einschrauben, bis das Gewinde des tomas ® -<strong>pin</strong>s im<br />
Knochen eine erste Verankerung findet<br />
■ Die vollständige Insertion kann maschinell mit dem<br />
tomas ® -driver (REF 302-004-50) oder manuell mit dem<br />
tomas ® -ap pli cator (REF 302-004-20) erfolgen. Als zusätzliche<br />
Hilfsmittel beim manuellen Vorgehen stehen der tomas ® -screw<br />
driver (REF 302-004-10), das tomas ® -wheel (REF 302-004-30)<br />
oder die tomas ® -torque ratchet (REF 302-004-40), begrenzt auf<br />
20 Ncm, zur Verfügung. Bei der maschinellen Insertion ist ein<br />
im Drehmoment begrenztes Winkelstück zu verwenden. Das<br />
Drehmoment ist auf 20 Ncm und die Drehzahl auf maximal<br />
25 min -1 einzustellen<br />
7.3.4. Unsterile Ausführung (tomas ® -<strong>pin</strong> N und tomas ® -<strong>pin</strong> SD-N)<br />
Für die Insertion den Kopf des tomas ® -<strong>pin</strong> in den tomas ® -applicator<br />
(REF 302-004-20), den tomas ® -screw driver (REF 302-004-10)<br />
oder den tomas ® -driver (REF 302-004-50) einsetzen. Den tomas ® -<strong>pin</strong><br />
anschließend manuell oder maschinell (Drehmoment 20 Ncm, Drehzahl<br />
maximal 25 min -1 ) einschrauben.<br />
8. Entfernen des tomas ® -<strong>pin</strong>s:<br />
■ Lokalanästhesie (optional)<br />
■ Entfernen der Kopplungselemente<br />
■ Herausdrehen des tomas ® -<strong>pin</strong>s mit dem tomas ® -applicator<br />
(REF 302-004-20), dem tomas ® -screw driver (REF 302-004-10)<br />
oder dem tomas ® -driver (REF 302-004-50)<br />
9. Erklärung der verwendeten Symbole<br />
REF<br />
gammasterilisiert<br />
unsteril<br />
LOT-Nummer (Ch.-B)<br />
verwendbar bis ...<br />
nur zum Einmalgebrauch<br />
<strong>Gebrauchsanweisung</strong> beachten<br />
Bestellnummer<br />
Hotline: + 49 72 31 / 803 - 550<br />
Stand: 05/10<br />
Änderungen vorbehalten<br />
Instructions for use – tomas ® -<strong>pin</strong><br />
1. Manufacturer<br />
Dentaurum GmbH & Co. KG<br />
Turnstraße 31 · 75228 Ispringen · Germany<br />
2. tomas ® -<strong>pin</strong> product range<br />
EN<br />
Description 1 REF Thread<br />
design<br />
Sterile Nonsterile<br />
tomas ® -<strong>pin</strong><br />
06<br />
302-006-11 Self-tap<strong>pin</strong>g ●<br />
tomas ® -<strong>pin</strong><br />
08<br />
302-008-00 Self-tap<strong>pin</strong>g ●<br />
tomas ® -<strong>pin</strong><br />
10<br />
302-010-00 Self-tap<strong>pin</strong>g ●<br />
tomas ® -<strong>pin</strong> 302-006-10<br />
N 06<br />
302-006-30<br />
Self-tap<strong>pin</strong>g<br />
●<br />
tomas ® -<strong>pin</strong> 302-008-10<br />
N 08<br />
302-008-30<br />
Self-tap<strong>pin</strong>g<br />
●<br />
tomas ® -<strong>pin</strong> 302-010-10<br />
N 10<br />
302-010-30<br />
Self-tap<strong>pin</strong>g<br />
●<br />
tomas ® -<strong>pin</strong><br />
SD 06<br />
302-106-00 Self-drilling ●<br />
tomas ® -<strong>pin</strong><br />
SD 08<br />
302-108-00 Self-drilling ●<br />
tomas ® -<strong>pin</strong><br />
SD 10<br />
302-110-00 Self-drilling ●<br />
tomas ® -<strong>pin</strong> 302-106-10<br />
SD-N 06 302-106-30<br />
Self-drilling<br />
●<br />
tomas ® -<strong>pin</strong> 302-108-10<br />
SD-N 08 302-108-30<br />
Self-drilling<br />
●<br />
tomas ® -<strong>pin</strong> 302-110-10<br />
SD-N 10 302-110-30<br />
Self-drilling<br />
●<br />
1<br />
N = Non-sterile; SD = Self-drilling<br />
3. Short description<br />
The tomas ® -<strong>pin</strong> is an endosteally anchored mini screw that provides<br />
temporary, reliable anchorage for orthodontic treatment. The head of<br />
the tomas ® -<strong>pin</strong> can be used with various orthodontic appliances,<br />
according to each indication, in order to achieve or support the<br />
required tooth movement.<br />
tomas ® is a system which consists of various matching components<br />
to insert the mini screw. The tomas ® -<strong>pin</strong> is made from titanium<br />
Grade 5 according to the ASTM (American Society for Testing and<br />
Materials).<br />
4. Indications and contra-indications<br />
The tomas ® -<strong>pin</strong> is a temporary orthodontic anchor that can be used<br />
for the following treatments:<br />
■ Space closure in class-I-occlusion<br />
■ Distalization and mesialization of teeth<br />
■ Alignment of molars<br />
■ Intrusion of teeth<br />
■ Sliding mechanics in Class II<br />
■ Preventing the protrusion of incisors<br />
■ Oligodontia<br />
■ Changing the tooth position in preprosthetic treatment<br />
General contra-indications<br />
The tomas ® -<strong>pin</strong> shall not be used if the patient has a history of<br />
immune deficiency, steroid therapy, problems with blood clotting,<br />
uncontrolled endocrinological disease, rheumatic disease, bone<br />
disease, cirrhosis of the liver or any other acute disease.<br />
Local contra-indications:<br />
The tomas ® -<strong>pin</strong> shall not be used if the patient suffers from osteomyelitis,<br />
receives radio therapy of the head, has receding gingival<br />
disease or unsatisfactory oral hygiene. Furthermore the tomas ® -<strong>pin</strong><br />
must not be used if there is insufficient bone structure or possible<br />
bone defects in the area in which the screw is to be inserted.<br />
5. Availability, safety issues and guarantees<br />
The tomas ® -<strong>pin</strong> shall only be inserted by orthodontists, dentists<br />
perio dontists, oral surgeons and facial surgeons. The user shall ensure<br />
to have read and understood the instructions for use and the tomas ®<br />
insertion manual (REF 989-631-20) supplied with the product.<br />
It is recommended that the user takes part in a tomas ® training<br />
course as only a few of the many possible applications are described<br />
in the written instructions for use.<br />
Only original tomas ® components shall be used according to the<br />
instructions for use.<br />
Each patient must be examined and informed about the tomas ® -<strong>pin</strong>s<br />
before use.<br />
The tomas ® -<strong>pin</strong>s are designed for single use only. Recycling or reuse<br />
of tomas ® -<strong>pin</strong>s on the patient is not permitted.<br />
6. Form of presentation<br />
tomas ® -<strong>pin</strong>s are supplied sterile and non-sterile; refer to the product<br />
range in Section 2.<br />
All the other components apart from the tomas ® -drill 1.1 SP, long<br />
pilot drill (REF 302-103-11), tomas ® -drill SD 1.1 SP, short pilot drill<br />
(REF 302-103-40) and the tomas ® -punch (see the tomas ® insertion<br />
manual, REF 989-631-20) are delivered non-sterile and shall be<br />
sterilized prior to use.<br />
6.1. Sterile <strong>pin</strong>s (tomas ® -<strong>pin</strong> and tomas ® -<strong>pin</strong> SD)<br />
The tomas ® -<strong>pin</strong>s are delivered sterile, wrapped in blister foil<br />
packaging in a glass ampoule. The packaging shall be removed just<br />
prior to insertion.<br />
Dentaurum guarantees the sterility of the tomas ® -<strong>pin</strong>s in their<br />
undamaged, original packaging, up to the expiration date stated on<br />
the outside. Once the time limit has been exceeded, the sterility can<br />
no longer be guaranteed and the tomas ® -<strong>pin</strong> shall no longer be used<br />
on a patient.<br />
If the sterile packaging is damaged, do not re-sterilize. Once<br />
opened, components shall not be re-sterilized! tomas ® -<strong>pin</strong>s that<br />
have been removed from the packaging but not inserted shall also<br />
not be reused or re-sterilized.<br />
6.2. Non-sterile <strong>pin</strong>s (tomas ® -<strong>pin</strong> N and tomas ® -<strong>pin</strong> SD-N)<br />
These tomas ® -<strong>pin</strong>s shall be cleaned, disinfected and sterilized<br />
before use.<br />
Non-sterile tomas ® -<strong>pin</strong>s are cleaned, disinfected and packed germ-free<br />
and particle-free by the manufacturer. Prior to clinical use, non-sterile<br />
tomas ® -<strong>pin</strong>s shall again be cleaned and disinfected and then sterilized<br />
by the operator. Throughout the entire procedure, from removing the <strong>pin</strong><br />
from the packaging to insertion, the tomas ® -<strong>pin</strong> thread shall not be<br />
touched or contaminated in any way. Wear sterile gloves and always grip<br />
the head of the tomas ® -<strong>pin</strong> with sterile tweezers.<br />
tomas ® -<strong>pin</strong>s shall be cleaned in an ultrasonic unit. A 5 % n-propanol<br />
solution (made up of 70 % n-propanol and deionised water) shall be<br />
used as cleaning agent. This shall be degassed for 5 min (timed on the<br />
ultrasonic unit) before the actual cleaning process.<br />
Remove the tomas ® -<strong>pin</strong> from the packaging and place it in the basket<br />
of the ultrasonic cleaner. Clean it in the ultrasonic unit for 8 min at<br />
25 °C / 77 °F. Then remove the cleaning basket. Allow the cleaning<br />
liquid to drain from the tomas ® -<strong>pin</strong> and the basket.<br />
The <strong>pin</strong> shall be disinfected with 70 % n-propanol. Insert the cleaning<br />
basket for 20 min in the disinfectant (room temperature). Then allow the<br />
tomas ® -<strong>pin</strong> to dry for 15 min at room temperature.<br />
The cleaning agent and disinfectant shall be regularly renewed<br />
according to the manufacturer’s instructions.<br />
The dry tomas ® -<strong>pin</strong> can be sterilized separately or together with other<br />
tomas ® -<strong>pin</strong> components in the tomas ® -tray/-tool tray. Place the<br />
tomas ® -<strong>pin</strong> in one of the empty inserts in the tray for sterilization.<br />
Shrink-wrap each tomas ® -<strong>pin</strong> in a similar sized foil bag for separate<br />
sterilization. Pins shall be sterilized in an autoclave. Adhere strictly to<br />
the autoclave manufacturer’s instructions for use. Steam sterilization<br />
shall be completed at a temperature of 134 °C / 273 °F with a minimum<br />
hold time of 25 min.<br />
7. Insertion of the tomas ® -<strong>pin</strong><br />
7.1. General instructions<br />
When inserting the tomas ® -<strong>pin</strong>, ensure that all the hygienic measures<br />
required for invasive surgery are completed, e.g. sterile working area,<br />
sterile gloves, face mask etc.<br />
Reliable functioning of the tomas ® -<strong>pin</strong> depends on rigid anchorage in<br />
the bone (primary stability) and placing the head in the region of the<br />
attached gingiva (alveolar gingiva). When using the tomas ® -<strong>pin</strong> as an<br />
anchor, ensure that the head and surrounding tissue are not subjected<br />
to any detrimental mechanical effects (e.g. movement of the mucosa,<br />
effect of bands and/or tongue, manipulation).<br />
The tomas ® -<strong>pin</strong> can be inserted in the maxilla buccally or on<br />
the alveolar ridge. In the mandible the <strong>pin</strong> shall always be inserted<br />
buccally and on the centre of the alveolar ridge. According to the latest<br />
findings, insertion of the tomas ® -<strong>pin</strong> on the lingual of the mandible or<br />
near extraction wounds, tooth follicles or deciduous teeth is not<br />
advisable.<br />
7.2. Procedure (general)<br />
■ Select the insertion area. Immediate load force required<br />
at 90 degrees or perpendicular to the long axis of the<br />
tomas ® -<strong>pin</strong><br />
■ Local anaesthetic<br />
■ Punch a hole in the gingiva using the tomas ® -punch<br />
(REF 302-001-00)<br />
■ Drill into the bone using the tomas ® -round drill 1.0<br />
(REF 302-003-00)<br />
■ Pilot drill and insert the tomas ® -<strong>pin</strong> to the depth stop (refer to<br />
Section 7.3.)<br />
■ Insert a connecting element (wire) into the slot of the tomas ® -<strong>pin</strong><br />
so that orthodontic elements (brackets, bands etc.) may be<br />
connected and fixed with a light curing adhesive. Maximum<br />
force load of 200 grams (2 N)<br />
Refer to the tomas ® insertion manual (REF 989-631-20) for a detailed<br />
description of the working stages during the clinical procedure and<br />
the necessary safety procedures and refer to the orthodontic product<br />
catalogue for selecting the connecting units.<br />
7.3. Procedure (special)<br />
Follow the special instructions below for pilot drilling and insertion for<br />
the different types of tomas ® -<strong>pin</strong> (see product range in Section 2).<br />
7.3.1. Self-tap<strong>pin</strong>g thread (tomas ® -<strong>pin</strong> and tomas ® -<strong>pin</strong> N)<br />
Pilot drilling is always required before inserting tomas ® -<strong>pin</strong>s with a<br />
self-tap<strong>pin</strong>g thread. The pilot hole is drilled to a depth of 6, 8 or 10 mm<br />
depending on the length of the <strong>pin</strong>. The optimum motor speed is<br />
800 min -1 (max. 1500 min -1 ). Ensure adequate cooling. The following<br />
pilot drills (tomas ® -drill) can be used: sterilizable drills for multiple<br />
use (REF 302-003-10, 302-003-11, 302-003-12), disposable sterile<br />
drills (REF 302-103-11).<br />
7.3.2. Self-drilling thread (tomas ® -<strong>pin</strong> SD and tomas ® -<strong>pin</strong> SD-N)<br />
As a rule no pilot drilling is required prior to insertion of<br />
tomas ® -<strong>pin</strong>s with a self-drilling thread in the maxilla. Pilot drilling in<br />
the compact bone is required for insertion in the mandible. The pilot<br />
hole is drilled to a maximum depth of 4 mm with the sterilizable drill<br />
for multiple use tomas ® -drill SD 1.1, short pilot drill (REF 302-103-00)<br />
or with the disposable sterile drill tomas ® -drill SD 1.1 SP, short pilot<br />
drill (REF 302-103-40). The optimum motor speed is 800 min -1<br />
(max. 1500 min -1 ). Ensure adequate cooling.<br />
7.3.3. Sterile <strong>pin</strong>s (tomas ® -<strong>pin</strong> und tomas ® -<strong>pin</strong> SD)<br />
■ Remove the tomas ® -<strong>pin</strong> from the sterile packaging and screw<br />
the lid into the drilled pilot hole. Only screw so far until the<br />
tomas ® -<strong>pin</strong> thread finds resistance in the bone<br />
■ Complete insertion is achieved mechanically using the tomas ® -driver<br />
(REF 302-004-50) or manually using the tomas ® -ap pli cator<br />
(REF 302-004-20). The tomas ® -screw driver (REF 302-004-10),<br />
the tomas ® -wheel (REF 302-004-30) or the tomas ® -torque<br />
ratchet (REF 302-004-40), limited to 20 Ncm, may be used as<br />
an additional aid when screwing manually. When screwing<br />
mechanically, use an angled hand held motor with fixed min -1 .<br />
The torque must be set to 20 Ncm and the speed to a maximum<br />
of 25 min -1<br />
7.3.4. Non-sterile <strong>pin</strong>s (tomas ® -<strong>pin</strong> N and tomas ® -<strong>pin</strong> SD-N)<br />
Insert the head of the tomas ® -<strong>pin</strong> into the tomas ® -applicator<br />
(REF 302-004-20), the tomas ® -screw driver (REF 302-004-10), or into<br />
the tomas ® -driver (REF 302-004-50) for inser tion of the <strong>pin</strong>. Then<br />
screw in the tomas ® -<strong>pin</strong> manually or with a handpiece (torque<br />
20 Ncm, max. motor speed 25 min -1 ).<br />
8. Removal of the tomas ® -<strong>pin</strong>s:<br />
■ Local anaesthetic (optional)<br />
■ Remove the connecting units<br />
■ Unscrew the tomas ® -<strong>pin</strong> with the tomas ® -applicator<br />
(REF 302-004-20), the tomas ® -screw driver (REF 302-004-10)<br />
or the tomas ® -driver (REF 302-004-50)<br />
9. Explanation of symbols<br />
REF<br />
Gamma sterilized<br />
Non-sterile<br />
Lot-number (CH.-B)<br />
Expiration date…<br />
Single use only<br />
Please observe instructions for use<br />
Order-No.<br />
Hotline: + 49 72 31 / 803 - 550<br />
To date: 05/10<br />
Subject to change<br />
Mode d’emploi du tomas ® -<strong>pin</strong><br />
1. Fabricant<br />
Dentaurum GmbH & Co. KG<br />
Turnstraße 31 · 75228 Ispringen · Allemagne<br />
2. Gamme de livraison tomas ® -<strong>pin</strong><br />
FR<br />
Désignation 1 REF Modèle de<br />
filetage<br />
Stérilisé Nonstérilisé<br />
tomas ® -<strong>pin</strong><br />
Auto-<br />
302-006-11<br />
06<br />
taraudeur<br />
●<br />
tomas ® -<strong>pin</strong><br />
Auto-<br />
302-008-00<br />
08<br />
taraudeur<br />
●<br />
tomas ® -<strong>pin</strong><br />
Auto-<br />
302-010-00<br />
10<br />
taraudeur<br />
●<br />
tomas ® -<strong>pin</strong> 302-006-10 Auto-<br />
N 06<br />
302-006-30 taraudeur<br />
●<br />
tomas ® -<strong>pin</strong> 302-008-10 Auto-<br />
N 08<br />
302-008-30 taraudeur<br />
●<br />
tomas ® -<strong>pin</strong> 302-010-10 Auto-<br />
N 10<br />
302-010-30 taraudeur<br />
●<br />
tomas ® -<strong>pin</strong><br />
SD 06<br />
302-106-00 Auto-foreur ●<br />
tomas ® -<strong>pin</strong><br />
SD 08<br />
302-108-00 Auto-foreur ●<br />
tomas ® -<strong>pin</strong><br />
SD 10<br />
302-110-00 Auto-foreur ●<br />
tomas ® -<strong>pin</strong> 302-106-10<br />
SD-N 06 302-106-30<br />
Auto-foreur<br />
●<br />
tomas ® -<strong>pin</strong> 302-108-10<br />
SD-N 08 302-108-30<br />
Auto-foreur<br />
●<br />
tomas ® -<strong>pin</strong> 302-110-10<br />
SD-N 10 302-110-30<br />
Auto-foreur<br />
●<br />
1<br />
N = non stérilisé; SD = autotaraudeur<br />
tomas ® -<strong>pin</strong><br />
<strong>Gebrauchsanweisung</strong><br />
Instructions for use<br />
Mode d’emploi<br />
Modo de empleo<br />
Modalità d'uso<br />
Turnstraße 31 · 75228 Ispringen · Germany · Telefon + 497231 / 803 - 550<br />
Fax + 497231 / 803 - 295 · www.dentaurum.de · E-Mail: info@dentaurum.de<br />
3. Brève description<br />
Création d’un point d’ancrage temporaire efficace grâce à une<br />
mini-vis (tomas ® -<strong>pin</strong>) dans la mandibule et le maxillaire pour des<br />
traitements orthodontiques préprothétiques. Selon l’indication,<br />
la tête du tomas ® -<strong>pin</strong> peut être combiné à différents appareils<br />
d’ODF afin d’obtenir un mouvement spécifique de la dent ou<br />
afin de la soutenir.<br />
tomas ® est un système de différentes composantes harmonisées<br />
pour l’insertion de la mini-vis. Le tomas ® -<strong>pin</strong> est fabriqué à base<br />
de titane grade 5 selon l’ASTM (American Society for Testing and<br />
Materials).<br />
4. Indications et contre-indications<br />
Le tomas ® -<strong>pin</strong> sert de point d’ancrage temporaire efficace<br />
pouvant être utilisé pour les traitements ci-après :<br />
■ Fermeture d’espaces interdentaires (occlusions de classe I)<br />
■ Distalisations et mésialisations<br />
■ Redressement de molaires<br />
■ Intrusions<br />
■ Mécanique de glissement en classe II<br />
■ Eviter une protrusion incisive<br />
■ Oligodontie<br />
■ Modification de la position des dents dans le cadre d’un<br />
traitement préprothétique<br />
Contre-indications générales :<br />
Le tomas ® -<strong>pin</strong> ne doit pas être utilisé dans les cas suivants :<br />
défense immunitaire réduite, corticothérapie, troubles de la<br />
coagulation sanguine, maladies endocriniennes incontrôlées,<br />
maladies rhumatismales, maladies des os, cirrhose du foie ou<br />
affections aiguës.<br />
Contre-indications locales :<br />
L e tomas ® -<strong>pin</strong> ne doit pas être utilisé dans les cas suivants :<br />
ostéomyélite, radiothérapie au niveau de la tête, maladies<br />
récidivantes de la muqueuse buccale et hygiène buccale<br />
insuffisante. Il y a également une contre-indication en cas de<br />
manque de substance osseuse ou défauts de la mâchoire au<br />
niveau de l‘emplacement prévu pour l‘insertion.<br />
5. Disponibilité, précautions, garanties<br />
Seuls sont autorisés à insérer le tomas ® -<strong>pin</strong>, les orthodontistes,<br />
dentistes, chirurgiens ainsi que les médecins spécialistes de<br />
chirurgie orale et maxillo-faciale. Avant toute intervention,<br />
l’utilisateur doit prendre connaissance du présent mode d’emploi<br />
ainsi le manuel d‘insertion tomas ® (REF 989-631-30) et respecter<br />
les informations données.<br />
Il est toutefois recommandé que l’utilisateur suive une forma tion<br />
spécialisée étant donné le grand nombre de domaines<br />
d’application du système tomas ® dont seulement une partie<br />
peut être présentée dans un mode d’emploi.<br />
Lors de l’application du système tomas ® , seuls les composants<br />
d’origine doivent être utilisés selon les instructions prescrites<br />
dans les modes d’emploi.<br />
Avant toute intervention, chaque patient doit subir un examen<br />
approfondi et doit être informé sur le tomas ® -<strong>pin</strong> !<br />
Les tomas ® -<strong>pin</strong>s sont prévus pour un usage unique. Une<br />
réutilisation chez le patient (recyclage) n’est pas autorisée.<br />
6. Présentation<br />
Les tomas ® -<strong>pin</strong>s sont livrés sous forme stérilisée et non stérilisée,<br />
voir les informations concernant la livraison au chapitre 2.<br />
Tous les autres composants, sauf le poinçon tomas ® -drill 1.1 SP,<br />
long pilot drill (REF 302-103-11), tomas ® -drill SD 1.1 SP, short<br />
pilot drill (REF 302-103-40) et tomas ® -punch (voir le manuel<br />
d‘insertion tomas ® , REF 989-631-30) sont livrés non stérilisés et<br />
doivent être stérilisés avant leur utilisation.<br />
6.1. Modèle stérilisé (tomas ® -<strong>pin</strong> et tomas ® -<strong>pin</strong> SD)<br />
Les tomas ® -<strong>pin</strong>s sont conditionnés et livrés stérilisés, dans des<br />
ampoules en verre, sous forme de plaquettes thermoformées.<br />
N‘ouvrir l’emballage stérilisé qu‘incessamment avant usage.<br />
Dentaurum garantit la stérilité des tomas ® -<strong>pin</strong>s se trouvant dans<br />
des emballages intacts jusqu’à la date de péremption indiquée sur<br />
l’emballage. Après cette date, la stérilité du produit ne pouvant plus<br />
être garantie, les tomas ® -<strong>pin</strong>s ne doivent plus être utilisés.<br />
Dans le cas où l’emballage stérilisé serait endommagé, ne plus<br />
utiliser la vis, même stérilisée. Après ouverture de l’emballage,<br />
ne pas restériliser le tomas ® -<strong>pin</strong> ! Les tomas ® -<strong>pin</strong>s ayant été<br />
prélevés de leur emballage sans être utilisés, ne doivent être ni<br />
utilisés, ni re-stérilisés.<br />
6.2. Modèle non stérilisé (tomas ® -<strong>pin</strong> N et tomas ® -<strong>pin</strong> SD-N)<br />
Les tomas ® -<strong>pin</strong>s doivent être nettoyés, désinfectés et stérilisés<br />
avant utilisation.<br />
Les tomas ® -<strong>pin</strong>s non stérilisés ont été nettoyés, désinfectés et<br />
emballés en atmosphère appauvrie en bactéries et particules par<br />
le fabricant, mais avant d’être utilisés, ils doivent à nouveau être<br />
nettoyés, désinfectés et stérilisés par l’utilisateur. Pendant tout<br />
ce processus, du prélèvement jusqu’à l’insertion, vous ne devez<br />
en aucun cas toucher le filetage du tomas ® -<strong>pin</strong> ou le contaminer<br />
d’une façon quelconque. Saisir par conséquent la tête du<br />
tomas ® -<strong>pin</strong> à l’aide d’une <strong>pin</strong>ce stérilisée et porter des gants<br />
stérilisés.<br />
Le nettoyage du tomas ® -<strong>pin</strong> se fait à l’aide d’un appareil à<br />
ultrasons. On utilise une solution de n-propanol à 5 % (fabriquée<br />
à base de n-propanol à 70 % et d’eau déionisée). Dégazifier<br />
celle-ci avant le processus de nettoyage proprement dit pendant<br />
5 minutes (minuterie de l’appareil à ultrasons).<br />
Prélever le tomas ® -<strong>pin</strong> de son emballage et la poser dans le<br />
panier de nettoyage de l’appareil à ultrasons. Effectuer une<br />
irradiation ultrasonore à 25 °C pendant 8 min. Sortir ensuite le<br />
panier de nettoyage. Laisser égoutter le produit nettoyant du<br />
panier et de la vis.<br />
989-593-00 Printed by Dentaurum Germany 05/10/C/R1-10
La désinfection se fait avec du n-propanol à 70 %. Poser le panier<br />
pendant 20 min dans la solution de désinfection (température<br />
ambiante). Ensuite, laisser sécher le tomas ® -<strong>pin</strong> pendant 15 min<br />
à température ambiante.<br />
Les produits de nettoyage et de désinfection doivent être renouvelés<br />
de façon régulière. Suivre les indications du fabricant.<br />
La stérilisation du tomas ® -<strong>pin</strong> après séchage peut être effectuée<br />
séparément ou avec d’autres composantes tomas ® dans le<br />
tomas ® -tray / -tool tray. Poser le tomas ® -<strong>pin</strong> dans un des endroits<br />
forés dans le tray prévus à cet effet.<br />
Pour une stérilisation individuelle, positionner chaque tomas ® -<strong>pin</strong><br />
dans un sachet individuel de dimension appropriée d’une vis et<br />
fermer le sachet par soudage. La stérilisation s’effectue dans<br />
l’autoclave. Il faut absolument respecter son mode d’emploi. La<br />
stérilisation à la vapeur se fait à une température de 134 °C<br />
pendant au moins 25 min.<br />
7. Insertion des tomas ® -<strong>pin</strong>s<br />
7.1. Remarques d’ordre général<br />
Lors de l’insertion du tomas ® -<strong>pin</strong>, respecter toutes les mesures<br />
hygiéniques qu’exige une intervention invasive comme un lieu de<br />
travail et des gants stériles, port d’un masque etc.<br />
Veiller à bien fixer la vis dans l’os pour une bonne stabilité primaire<br />
et à placer la tête dans la Attached Gingiva (Gingiva alveolaris)<br />
pour assurer un bon maintien et garantir un fonctionnement en<br />
sécurité. Pendant l’utilisation de la vis comme point d’ancrage,<br />
s’assurer que la tête de la vis et les tissus mous l’entourant ne<br />
soient pas soumis à des influences mécaniques défavorables<br />
(comme par exemple le mouvement de la muqueuse, l’influence<br />
de bagues ou de la langue, des manipulations).<br />
Le tomas ® -<strong>pin</strong> peut être inséré dans le maxillaire vestibulaire ou sur<br />
la crête alvéolaire. D’après les informations dont nous disposons à<br />
l’heure actuelle, nous déconseillons l’insertion du tomas ® -<strong>pin</strong> coté<br />
lingual de la mandibule, proche d’une plaie d’extraction, de follicules<br />
ou proche de dents de lait.<br />
7.2. Étapes générales<br />
■ Sélection de l’endroit de l’insertion. La charge ultérieure<br />
devrait si possible être perpendiculaire à l‘axe<br />
longitudinal du tomas ® -<strong>pin</strong><br />
■ Anesthésie locale<br />
■ Perforation de la muqueuse à l’aide du poinçon<br />
tomas ® -punch (REF 302-001-00)<br />
■ Marquage de l’os à l’aide de la fraise tomas ® -round<br />
drill 1.0 (REF 302-003-00)<br />
■ Forage pilote et insertion des tomas ® -<strong>pin</strong>s jusqu’à la butée<br />
(Voir chapitre 7.3.)<br />
■ Positionnement du fil servant d’attache pour un raccord<br />
d’éléments orthodontiques (brackets, bagues etc.) dans la<br />
gorge du tomas ® -<strong>pin</strong> et pour la fixation à l’aide d’un adhésif<br />
photo-polymérisable. La charge maximale s‘élève à<br />
2 N (environ 200 g)<br />
En ce qui concerne la description détaillée des étapes de travail<br />
cliniques et des mesures de précaution indispensables, nous<br />
vous conseillons de consulter le manuel d‘insertion tomas ®<br />
(REF 989-631-30) ainsi que le catalogue Orthodontie pour les<br />
éléments de raccord.<br />
7.3. Étapes spécifiques<br />
Respecter les indications ci-après selon le modèle du tomas ® -<strong>pin</strong><br />
(voir la gamme de livraison, chapitre 2) concernant le forage<br />
pilote et l’insertion.<br />
7.3.1. Filetage autotaraudeur (tomas ® -<strong>pin</strong> et tomas ® -<strong>pin</strong> N)<br />
Avant l’insertion d’un tomas ® -<strong>pin</strong> autotaraudant, il est nécessaire<br />
d’effectuer un forage pilote de 6, 8 ou 10 mm, en fonction de la<br />
longueur du tomas ® -<strong>pin</strong> qui sera utilisé. Le nombre de tours<br />
optimal est de 800 min -1 (1500 min -1 max). S’assurer d’un refroidissement<br />
suffisant. Les forets pilotes suivants (tomas ® -drill)<br />
peuvent être utilisés : forets stérilisables à usage mutiple<br />
(REF 302-003-10, 302-003-11, 302-003-12), forets stériles<br />
jetables (REF 302-103-11).<br />
7.3.2. Filetage autoforeur (tomas ® -<strong>pin</strong> SD et tomas ® -<strong>pin</strong> SD-N)<br />
Avant l’insertion des tomas ® -<strong>pin</strong>s à filetage autoforeur, aucun<br />
forage pilote n’est en règle générale nécessaire dans le maxillaire.<br />
L’insertion dans la mandibule nécessite un forage pilote dans le<br />
tissu compact de l’os. Le forage pilote, d’une profondeur de<br />
4 mm max., s’effectue à l’aide du foret stérilisable à usage multiple,<br />
tomas ® -drill SD 1.1, short pilot drill (REF 302-103-00) ou avec<br />
du foret stérile jetable tomas ® -drill SD 1.1 SP, short pilot drill<br />
(REF 302-103-40). Le nombre de tours optimal est de 800 min -1<br />
(1500 min -1 max). S’assurer d’un refroidissement suffisant.<br />
7.3.3. Modèle stérilisé (tomas ® -<strong>pin</strong> et tomas ® -<strong>pin</strong> SD)<br />
■ Prélever le tomas ® -<strong>pin</strong> de son emballage stérilisé et la visser<br />
avec son couvercle d’obturation dans le forage pilote.<br />
Visser seulement jusqu’à ce que le filetage du tomas ® -<strong>pin</strong><br />
soit légèrement ancré<br />
■ L’insertion complète peut se faire mécaniquement à l’aide<br />
du tomas ® -driver (REF 302-004-50) ou bien manuellement<br />
à l’aide du tomas ® -applicator (REF 302-004-20). Si<br />
l’insertion se fait manuellement, le tomas ® -screw driver<br />
(REF 302-004-10), le tomas ® -wheel (REF 302-004-30) ou le<br />
dispositif à rochet tomas ® -torque ratchet (REF 302-004-40),<br />
limité à 20 Ncm, sont à votre disposition. Si l’insertion se<br />
fait de façon mécanique, il convient d’utiliser une visseuse<br />
coudée à limitation de couple. Régler le couple à 20 Ncm<br />
et la vitesse de rotation maximale à 25 min -1<br />
7.3.4. Modèle non stérilisé (tomas ® -<strong>pin</strong> N et<br />
tomas ® -<strong>pin</strong> SD-N)<br />
Pour insérer le tomas ® -<strong>pin</strong>, positionner la tête du <strong>pin</strong> dans le<br />
tomas ® -applicator (REF 302-004-20), le tomas ® -screw driver<br />
(REF 302-004-10) ou le tomas ® -driver (REF 302-004-50). Ensuite,<br />
visser le tomas ® -<strong>pin</strong> manuellement ou mécaniquement (couple<br />
20 Ncm, tours max 25 min -1 ).<br />
8. Dépose :<br />
■ Anesthésie locale (optional)<br />
■ Retirer les éléments de raccord<br />
■ Dévisser les tomas ® -<strong>pin</strong>s à l’aide du tomas ® -applicator<br />
(REF 302-004-20), tomas ® -screw driver (REF 302-004-10) ou<br />
du tomas ® -driver (REF 302-004-50)<br />
9. Explication des symboles utilisés<br />
REF<br />
stérilisé par irradiation gamma<br />
non stérilisé<br />
Numéro de lot (CH.-B)<br />
A utiliser avant le ...<br />
A usage unique<br />
Respecter le mode d’emploi<br />
Numéro de commande<br />
Support technique ODF : + 49 72 31 / 803 - 550<br />
Date de rédaction : 05/10<br />
Sous réserve de modifications<br />
Modo de empleo abreviado del perno o tomas ® -<strong>pin</strong><br />
1. Fabricante<br />
Dentaurum GmbH & Co. KG<br />
Turnstraße 31 · 75228 Ispringen · Alemania<br />
2. Cuadro sinóptico de suministro del tomas ® -<strong>pin</strong><br />
Esterilizado<br />
●<br />
●<br />
●<br />
●<br />
●<br />
●<br />
ES<br />
1<br />
N = No esterilizado; SD = Autoperforante<br />
3. Breve descripción<br />
Con ayuda de un minitornillo (tomas ® -<strong>pin</strong>) fijado en el hueso<br />
(endo-óseo) se crea la posibilidad de un anclaje temporal absoluto<br />
para el tratamiento de ortodoncia. Según la indicación, la cabeza del<br />
tomas ® -<strong>pin</strong> puede ser acoplada a diferentes aparatos<br />
orto dóncicos para conseguir o apoyar los movimientos dentarios<br />
deseados. tomas ® es un sistema de componentes coordinados entre<br />
sí para la inserción del minitornillo.<br />
El tomas ® -<strong>pin</strong> está hecho de titanio clase 5 según la ASTM<br />
(American Society for Testing and Materials).<br />
4. Indicaciones y contraindicaciones<br />
El tomas ® -<strong>pin</strong> sirve como anclaje temporal, pudiendo ser empleado<br />
por ejemplo en los siguientes tratamientos:<br />
■ Cierre de espacios en oclusión de la clase I<br />
■ Distalización y mesialización de dientes<br />
■ Enderezamiento de molares<br />
■ Intrusión de dientes<br />
■ Sliding mechanics en clase II o mecánica de clase II<br />
■ Evitar la protrusión de incisivos<br />
■ En oligodoncia<br />
■ Cambio de posiciones dentarias en el transcurso<br />
de un tratamiento preprotésico<br />
Contraindicaciones generales<br />
El tomas ® -<strong>pin</strong> no debe ser empleado en el caso de escasa<br />
resistencia inmune o inmunodeficiencia, terapia esteroídica,<br />
trastornos en la coagulación de la sangre, afecciones endocrinas<br />
incontroladas, enfermedades reumáticas, endermedades del<br />
sistema óseo, así como enfermedades hepáticas o enfermedades<br />
agudas.<br />
Contraindicaciones locales<br />
El tomas ® -<strong>pin</strong> no debe ser empleado en caso de osteomielitis,<br />
radioterapia en la zona craneofacial, enfermedades recidivantes<br />
de la mucosa bucal, asi como en higiene oral deficiente. Además<br />
existe una contraindicación en caso de faltar el hueso necesario o<br />
con maxilar o mandíbula defectuosos en la zona de la inserción.<br />
5. Disponibilidad, medidas de precaución, garantías<br />
El tomas ® -<strong>pin</strong> sólo debe ser insertado por ortodoncistas, odontólogos,<br />
cirujanos bucales, así como médicos especialistas en cirugía oral y<br />
maxilofacial. El profesional debe asegurarse antes del empleo de que<br />
ha estudiado a fondo y observado este modo de empleo, así como el<br />
manual de inserción tomas ® (REF 989-631-40).<br />
Antes del empleo se recomienda al profesional tomar parte en un<br />
curso sobre tomas ® , ya que en el modo de empleo sólo se puede<br />
presentar una parte de los muchos ámbitos de aplicación.<br />
Al emplear tomas ® deberán utilizarse únicamente los respectivos<br />
componentes originales según el modo de empleo.<br />
Antes del empleo de los tomas ® -<strong>pin</strong>s cada paciente deberá ser<br />
minuciosamente examinado y detalladamente informado.<br />
Los tomas ® -<strong>pin</strong>s están previstos para un solo empleo. No está<br />
permitido el reprocesamiento o recuperación (reciclaje) de tomas ® -<strong>pin</strong>s<br />
que ya hayan estado insertados, ni su reutilización en pacientes.<br />
6. Presentación<br />
Los tomas ® -<strong>pin</strong>s se suministran esterilizados y no esterilizados, véase<br />
al respecto el cuadro sinóptico de suministro del capítulo 2.<br />
Todos los otros componentes, excepto el tomas ® -drill 1.1 SP, long<br />
pilot drill (REF 302-103-11), tomas ® -drill SD 1.1 SP, short pilot drill<br />
(REF 302-103-40) ó el tomas ® -punch (ver manual de inserción<br />
tomas ® , REF 989-631-40) se suministran en estado no estéril y tienen<br />
que ser esterilizados antes de utilizarlos.<br />
6.1. Tipo esterilizado (tomas ® -<strong>pin</strong> y tomas ® -<strong>pin</strong> SD)<br />
Los tomas ® -<strong>pin</strong>s se suministran en estado estéril en una ampolla de<br />
vidrio protegida a su vez por otro protector plástico. El embalaje<br />
estéril sólo abrir poco antes de la inserción.<br />
Dentaurum garantiza la esterilidad del tomas ® -<strong>pin</strong> en el embalaje original<br />
intacto hasta la fecha de caducidad indicada en el embalaje. Después de<br />
la fecha de vencimiento no se puede garantizar más la esterilidad y el<br />
tomas ® -<strong>pin</strong> no deberá ser empleado más en pacientes.<br />
Si el embalaje estéril muestra deterioros, no deberá realizarse<br />
re esterilización del mismo. Una vez abiertos los embalajes, no<br />
deben ser esterilizados de nuevo. Los tomas ® -<strong>pin</strong>s sacados de su<br />
envase, que no fueron insertados, tampoco deberán ser empleados<br />
ni esterilizados de nuevo.<br />
6.2. Tipo no esterilizado (tomas ® -<strong>pin</strong> N y tomas ® -<strong>pin</strong> SD-N)<br />
Estos tomas ® -<strong>pin</strong>s tienen que ser limpiados, desinfectados y<br />
esterilizados antes de su uso.<br />
Los tomas ® -<strong>pin</strong>s no esterilizados son limpiados por el fabricante,<br />
desinfectados, así como embalados en envase aséptico y sin partículas.<br />
Antes de su aplicación clínica los tomas ® -<strong>pin</strong>s no esterilizados deben ser<br />
limpiados de nuevo por el usuario, desinfectados y seguidamente<br />
esterilizados. Durante todo el proceso, desde la toma del envase hasta su<br />
inserción no debe tocarse la rosca del tomas ® -<strong>pin</strong> ni contaminarse de<br />
ninguna manera. Por eso agarrar el tomas ® -<strong>pin</strong> sólo por la cabeza con<br />
unas <strong>pin</strong>zas esterilizadas y llevar puestos guantes esterilizados.<br />
La limpieza del tomas ® -<strong>pin</strong> se efectúa con ayuda de un aparato<br />
ultrasónico. Como producto depurador se utiliza una solución con<br />
5 % de n-propanol (hecha con 70 % de n-propanol y agua<br />
desionizada). La misma debe ser desgasificada durante 5 minutos<br />
(regulación del tiempo con el aparato de ultrasonido) antes del<br />
comienzo del proceso de limpieza propiamente dicho.<br />
●<br />
●<br />
●<br />
●<br />
●<br />
●<br />
El tomas ® -<strong>pin</strong> se saca de su envase y se pone en el cesto de limpieza<br />
del aparato de ultrasonido. La exposición ultrasónica se realiza<br />
durante 8 minutos a 25 °C. Seguidamente se saca el cesto. Escurrir el<br />
líquido limpiador del tomas ® -<strong>pin</strong> y del cesto.<br />
La desinfección se realiza con 70 % de n-propanol. Colocar el cesto<br />
de limpieza en el baño de desinfección durante 20 minutos (a la<br />
temperatura ambiente). A continuación sigue el secado del<br />
tomas ® -<strong>pin</strong> durante 15 minutos a temperatura ambiente.<br />
Hay que renovar los detergentes y desinfectantes regularmente según<br />
especificaciones del fabricante de los mismos.<br />
La esterilización del tomas ® -<strong>pin</strong> seco puede efectuarse por separado<br />
o junto con otros componentes tomas ® en la tomas ® -tray/ -tool tray.<br />
Para ello colocar el tomas ® -<strong>pin</strong> en el orificio o receptáculo situado en<br />
el cuerpo de la bandeja.<br />
Para la esterilización separada plastificar cada tomas ® -<strong>pin</strong> en una<br />
bolsa de plástico de tamaño correspondiente. La esterilización se lleva<br />
a cabo en un autoclave, cuyo modo de empleo habrá que respetar<br />
indispensablemente. La esterilización de vapor hay que realizarla a la<br />
temperatura de 134 °C con un tiempo de retención de al menos<br />
25 minutos.<br />
7. Inserción del tomas ® -<strong>pin</strong><br />
7.1. Indicaciones generales<br />
En la inserción del tomas ® -<strong>pin</strong> hay que observar todas las medidas<br />
higiénicas necesarias en una intervención, como zona de trabajo estéril,<br />
guantes estériles, mascarilla protecora, etc.<br />
Condición indispensable para una función segura del tomas ® -<strong>pin</strong> es un<br />
anclaje fijo en el hueso (estabilidad primaria) y la colocación de la<br />
cabeza del perno (<strong>pin</strong>) en la zona de la encia adherida (Attached<br />
Gingiva), encia alveolar. Durante el uso del tomas ® -<strong>pin</strong> como elemento<br />
de anclaje haay que asegurarse de que la cabeza y el tejido blando<br />
cercano no estén expuestos a influencias mecánicas desfavorables (p. ej.<br />
movimiento de la mucosa, influencia de bandas y/o de la lengua,<br />
manipulaciones).<br />
En el maxilar el tomas ® -<strong>pin</strong> puede ser insertado por vestibular o en la<br />
cresta maxilar. En la mandíbula la inserción debe realizarse sólo por<br />
vestibular o sobre el centro de la cresta mandibular. Según los<br />
conocimientos actuales no se aconseja efectuar con el tomas ® -<strong>pin</strong> la<br />
inserción por el lado lingual en la mandíbula, así como cerca de heridas<br />
de extracciones, de folículos dentarios y de dientes de leche.<br />
7.2. Manera de proceder (general)<br />
■ Elección del lugar de inserción. La carga posterior sebería ser<br />
en un ángulo de 90° o bien rectangular al eje longitudinal<br />
del tomas ® -<strong>pin</strong><br />
■ Anestesia local<br />
■ Estampar la mucosa con el perforador tomas ® -punch<br />
(REF 302-001-00)<br />
■ Punzonar el hueso con la fresa de roseta tomas ® -round<br />
drill 1.0 (REF 302-003-00)<br />
■ Perforación piloto e inserción del tomas ® -<strong>pin</strong> hasta el tope de<br />
seguridadf (observar el capítulo 7.3.)<br />
■ Incorporar un elemento de conexión (alambre) en el slot del<br />
tomas ® -<strong>pin</strong> para unirlo a los elementos ortodóncicos (brackets,<br />
bandas, etc.) y fijarlo con un adhesivo fotocurable. La carga<br />
máxima es de 2 N (aprox. 200 g)<br />
En cuanto a la descripción detallada de los pasos de trabajo en el<br />
proceso clínico, así como a las medidas de precaución necesarias,<br />
hacemos referencia al manual de inserción tomas ® (REF 989-631-40)<br />
y para la elección de los elementos de acoplamiento o de conexión al<br />
Catálogo de productos de Ortodoncia.<br />
7.3. Manera de proceder (especial)<br />
Referente a la perforación piloto y a la inserción de los diferentes tipos<br />
del tomas ® -<strong>pin</strong> (véase cuadro sinóptico de suministro capítulo 2) hay que<br />
tener en cuenta las siguientes indicaciones especiales.<br />
7.3.1. Rosca autoenrosante (tomas ® -<strong>pin</strong> y tomas ® -<strong>pin</strong> N)<br />
Antes de la inserción de los tomas ® -<strong>pin</strong>s con rosca autoenroscante es<br />
necesaria en todo caso una perforación piloto. De acuerdo con la<br />
longitud del <strong>pin</strong> empleado la perforación piloto se efctúa a una<br />
profundidad de 6, 8 o de 10 mm. El número de revoluciones óptimo<br />
es de 800 min -1 (máx. 1500 min -1 ), con suficiente refrigeración. Las<br />
siguientes (tomas ® -drill), fresas piloto, pueden ser empleadas:<br />
fresas esterilizables de multiuso (REF 302-003-10, 302-003-11,<br />
302-003-12), fresas esterilizadas desechables (REF 302-103-11).<br />
7.3.2. Rosca autoperforante (tomas ® -<strong>pin</strong> SD y tomas ® -<strong>pin</strong> SD-N)<br />
Antes de la inserción de los tomas ® -<strong>pin</strong>s con rosca autoperforante si<br />
se aplica al maxilar por regla general no es necesaria una perforación<br />
piloto. Para la inserción en la mandíbula es necesaria una perforación<br />
piloto en hueso compacto. La perforación piloto se efectua con<br />
tomas ® -drill SD 1.1, short pilot drill (esterilizable, REF 302-103-00) ó<br />
con el tomas ® -drill SD 1.1 SP, short pilot drill (estéril, para uso único<br />
REF 302-103-40) a una profundidad máxima de 4 mm. El número<br />
óptimo de revoluciones es de 800 min -1 (máx. 1500 min -1 ), cuidar de<br />
que haya suficiente refrigeración.<br />
7.3.3. Tipo esterilizado (tomas ® -<strong>pin</strong> y tomas ® -<strong>pin</strong> SD)<br />
■ Sacar el tomas ® -<strong>pin</strong> del embalaje estéril y atornillarlo con la<br />
tapa de cierre en la perforación piloto. Atornillar sólo hasta que<br />
la rosca del tomas ® -<strong>pin</strong> haya encontrado en el hueso el primer<br />
anclaje.<br />
■ La inserción completa puede realizarse de forma mecánica con<br />
el tomas ® -driver (REF 302-004-50) ó manual con el tomas ® -<br />
applicator (REF 302-004-20). Como implementos adicionales en<br />
el procedimiento manual hay disponibles el destornillador<br />
tomas ® -screw driver (REF 302-004-10), la tomas ® -wheel<br />
(REF 302-004-30) o la tomas ® torque ratchet (REF 302-004-40),<br />
limitadas a 20 Ncm. En la inserción mecánica hay que utilizar un<br />
contrángulo con par de giro limitado. Habrá que ajustar el par<br />
de giro a 20 Ncm y el número de revoluciones a 25 min -1 máximo<br />
7.3.4. Tipo no esterilizado (tomas ® -<strong>pin</strong> N y tomas ® -<strong>pin</strong> SD-N)<br />
Para la inserción colocar la cabeza del tomas ® -<strong>pin</strong> en el<br />
tomas ® -applicator (REF 302-004-20), en el destornillador<br />
tomas ® -screw driver (REF 302-004-10) ó en el tomas ® -driver<br />
(REF 302-004-50). Seguidamente el tomas ® -<strong>pin</strong> es atornillado de forma<br />
manual o mecánica (par de giro 20 Ncm, número de revoluciones<br />
máximo 25 min -1 ).<br />
8. Remoción del tomas ® -<strong>pin</strong>:<br />
■ Anestesia local (opicional)<br />
■ Quitar los elementos de acoplamiento o conexión.<br />
■ Desatornillar el tomas ® -<strong>pin</strong> con el tomas ® -applicator<br />
(REF 302-004-20), con el tomas ® -screw driver (REF 302-004-10)<br />
ó con el tomas ® -driver (REF 302-004-50)<br />
9. Explicación de los símbolos utilizados<br />
REF<br />
esterilizado gamma<br />
no esterilizado<br />
número de lote (CH.-B)<br />
utilizable hasta...<br />
sólo para emplear una vez<br />
observar el modo de empleo<br />
número / código para pedidos<br />
Hotline: + 497231 / 803 - 550<br />
Fecha de la impresión: 05/10<br />
Nos reservamos el derecho de efectuar ambios<br />
Istruzioni per l‘uso dei tomas ® -<strong>pin</strong><br />
1. Produttore<br />
Dentaurum GmbH & Co. KG<br />
Turnstraße 31 · 75228 Ispringen · Germania<br />
2. Fornitura tomas ® -<strong>pin</strong><br />
No esterilizado<br />
Denominación 1 REF Tipo de<br />
rosca<br />
tomas ® -<strong>pin</strong><br />
Autoenroscante<br />
302-006-11<br />
06<br />
tomas ® -<strong>pin</strong><br />
Autoenroscante<br />
302-008-00<br />
08<br />
tomas ® -<strong>pin</strong><br />
Autoenroscante<br />
302-010-00<br />
10<br />
tomas ® -<strong>pin</strong> 302-006-10 Autoenroscante<br />
N 06<br />
302-006-30<br />
tomas ® -<strong>pin</strong> 302-008-10 Autoenroscante<br />
N 08<br />
302-008-30<br />
tomas ® -<strong>pin</strong> 302-010-10 Autoenroscante<br />
N 10<br />
302-010-30<br />
tomas ® -<strong>pin</strong><br />
Autoperforante<br />
302-106-00<br />
SD 06<br />
tomas ® -<strong>pin</strong><br />
Autoperforante<br />
302-108-00<br />
SD 08<br />
tomas ® -<strong>pin</strong><br />
Autoperforante<br />
302-110-00<br />
SD 10<br />
tomas ® -<strong>pin</strong> 302-106-10 Autoperforante<br />
SD-N 06 302-106-30<br />
tomas ® -<strong>pin</strong> 302-108-10 Autoperforante<br />
SD-N 08 302-108-30<br />
tomas ® -<strong>pin</strong> 302-110-10 Autoperforante<br />
SD-N 10 302-110-30<br />
Descrizione 1 REF Versione<br />
filettatura<br />
Sterile<br />
tomas ® -<strong>pin</strong><br />
Autofilettante<br />
302-006-11<br />
06<br />
●<br />
tomas ® -<strong>pin</strong><br />
Autofilettante<br />
302-008-00<br />
08<br />
●<br />
tomas ® -<strong>pin</strong><br />
Autofilettante<br />
302-010-00<br />
10<br />
●<br />
tomas ® -<strong>pin</strong> 302-006-10 Autofilettante<br />
N 06<br />
302-006-30<br />
tomas ® -<strong>pin</strong> 302-008-10 Autofilettante<br />
N 08<br />
302-008-30<br />
tomas ® -<strong>pin</strong> 302-010-10 Autofilettante<br />
N 10<br />
302-010-30<br />
tomas ® -<strong>pin</strong><br />
SD 06<br />
302-106-00 Auto fresante ●<br />
tomas ® -<strong>pin</strong><br />
SD 08<br />
302-108-00 Auto fresante ●<br />
tomas ® -<strong>pin</strong><br />
SD 10<br />
302-110-00 Auto fresante ●<br />
tomas ® -<strong>pin</strong> 302-106-10<br />
SD-N 06 302-106-30<br />
Auto fresante<br />
tomas ® -<strong>pin</strong> 302-108-10<br />
SD-N 08 302-108-30<br />
Auto fresante<br />
tomas ® -<strong>pin</strong> 302-110-10<br />
SD-N 10 302-110-30<br />
Auto fresante<br />
1<br />
N = Non sterile; SD = Autofresante<br />
IT<br />
Non<br />
Sterile<br />
3. Breve descrizione<br />
Con l‘ausilio di una mini vite d‘ancoraggio endoosseo (tomas ® -<strong>pin</strong>) è<br />
possibile realizzare un ancoraggio temporaneo assoluto utile per la<br />
terapia ortodontica. La testa del tomas ® -<strong>pin</strong> può essere accoppiata a<br />
diverse apparecchiature ortodontiche, in funzione della specifica<br />
indicazione terapeutica, al fine di ottenere o favorire il desiderato<br />
movimento dentale. tomas ® è un sistema completo di elementi<br />
costruiti uno in funzione dell‘altro per il montaggio della minivite.<br />
Il tomas ® -<strong>pin</strong> viene fabbricato in titanio di grado 5 sec. ASTM<br />
(American Society for Testing and Materials).<br />
4. Indicazioni e controindicazioni<br />
Il tomas ® -<strong>pin</strong> funge da ancoraggio ortodontico temporaneo, che può<br />
essere impiegato ad esempio per i seguenti trattamenti:<br />
■ Chiusura degli spazi in occlusione di I Classe<br />
■ Distalizzazioni e mesializzazioni dentarie<br />
■ Raddrizzamento dei molari<br />
■ Intrusioni dentali<br />
■ “Sliding mechanics“ nelle classi II<br />
■ Evitare la protrusione degli incisivi<br />
■ Nei casi di agenesia<br />
■ Modifica del posizionamento dentale nell‘ambito di un<br />
trattamento preprotesico<br />
Controindicazioni generali<br />
In situazioni di ridotte difese immunitarie, terapie a base di<br />
steroidi, problemi di coagulazione, malattie endocrine non<br />
controllate, disturbi reumatici, malattie del sistema osseo nonché<br />
cirrosi epatica o altre malattie gravi, il tomas ® -<strong>pin</strong> non deve essere<br />
impiegato.<br />
Controindicazioni locali<br />
In caso di osteomielite, radioterapia del cranio, malattie recidivanti<br />
della mucosa nonché in caso di insufficiente igiene orale, il<br />
tomas ® -<strong>pin</strong> non deve essere impiegato. Inoltre sussiste una<br />
controindicazione specifica per i soggetti con insufficienza ossea o<br />
difetti mascellari nella sede dell‘impianto.<br />
5. Disposizioni, avvertenze di sicurezza, garanzie<br />
Il tomas ® -<strong>pin</strong> può essere impiantato solamente da ortodontisti,<br />
odontoiatri, chirurghi orali, medici orali, chirurghi maxillo-facciali.<br />
Prima dell‘impiego, l‘utilizzatore deve aver studiato attentamente e<br />
preso in considerazione le presenti istruzioni nonchè al manuale<br />
d‘inserzione tomas ® (REF 989-631-51).<br />
Prima dell‘uso si consiglia la frequenza di un corso introduttivo<br />
specifico sul sistema tomas ® in quanto nelle modalità d‘uso sono<br />
descritti solo alcuni dei possibili impieghi di questo dispositivo.<br />
Avvertiamo gli utilizzatori di usare solo ed esclusivamente i<br />
componenti originali tomas ® così come vengono descritti nelle<br />
modalità d‘uso.<br />
Prima dell‘impianto del tomas ® -<strong>pin</strong> è necessario eseguire un‘accurata<br />
visita del paziente e fornigli l‘adeguata informazione in merito<br />
all‘intervento!<br />
I tomas ® -<strong>pin</strong> sono stati concepiti per essere impiegati una sola volta.<br />
La rigenerazione dei tomas ® -<strong>pin</strong> (riciclo) nonchè il loro<br />
riutilizzo su pazienti non è consentito.<br />
6. Presentazione<br />
I tomas ® -<strong>pin</strong> vengono forniti in versione sterile e non sterile, vedi<br />
paragrafo 2 “Fornitura“.<br />
Tutti gli altri componenti, eccetto il tomas ® -drill 1.1 SP, long pilot<br />
drill (REF 302-103-11), tomas ® -drill SD 1.1 SP, short pilot drill<br />
(REF 302-103-40) e tomas ® -punch (vedi manuale d‘inserzione<br />
tomas ® , REF 989-631-51), vengono forniti non sterili e quindi devono<br />
essere sterilizzati prima dell‘uso.<br />
6.1. Versione sterile (tomas ® -<strong>pin</strong> e tomas ® -<strong>pin</strong> SD)<br />
I tomas ® -<strong>pin</strong> vengono forniti in un contenitore trasparente sterile a<br />
sua volta imballato in blister. Aprire la confezione sterile poco prima<br />
dell‘inserzione.<br />
La Dentaurum garantisce la sterilità dei tomas ® -<strong>pin</strong> in confezione<br />
originale integra fino alla data di scadenza esposta. Al raggiungimento<br />
del termine di scadenza non si garantisce più la sterilità ed il<br />
tomas ® -<strong>pin</strong> non deve più essere utilizzato sul paziente.<br />
Se la confezione sterile dovesse presentare dei danneggiamenti,<br />
raccomandiamo di non risterilizzarla. Una volta aperta, la<br />
confezione non deve essere risterilizzata! Eventuali tomas ® -<strong>pin</strong><br />
prelevati dalla confezione e non impiantati sul paziente, non devono<br />
essere utilizzati o risterilizzati.<br />
6.2. Versione non sterile (tomas ® -<strong>pin</strong> N e tomas ® -<strong>pin</strong> SD-N)<br />
Prima dell‘uso i tomas ® -<strong>pin</strong> devono essere puliti, disinfettati e<br />
sterilizzati.<br />
I tomas ® -<strong>pin</strong> non sterili vengono puliti e disinfettati dal produttore<br />
nonché confezionati senza particelle. Prima dell‘impiego clinico i<br />
tomas ® -<strong>pin</strong> non sterili devono essere nuovamente puliti, disinfettati e<br />
sterilizzati dall‘utilizzatore. Durante l‘intero processo, dall‘estrazione<br />
dalla confezione all‘inserzione, la filettatura del tomas ® -<strong>pin</strong> non deve<br />
essere toccata o contaminata in qualche maniera. Afferrare il<br />
tomas ® -<strong>pin</strong> dalla testa con delle <strong>pin</strong>zette sterili, usando guanti<br />
sterili.<br />
La pulitura dei tomas ® -<strong>pin</strong> avviene con un bagno ad ultrasuoni e con<br />
una soluzione detergente di n-propanolo al 5 % (preparata con 70 %<br />
di n-propanolo e acqua deionizzata). Prima dell‘inizio del processo di<br />
pulitura vero e proprio, sgasare la soluzione per 5 min (impostare il<br />
tempo nell‘apparecchio ad ultrasuoni).<br />
●<br />
●<br />
●<br />
●<br />
●<br />
●<br />
Il tomas ® -<strong>pin</strong> viene prelevato dalla confezione e adagiato nel<br />
cestello dell‘apparecchio ad ultrasuoni. Il trattamento con<br />
ultrasuoni avviene per 8 min a 25 °C. Al termine viene estratto il<br />
cestello dall’apparecchio lasciando gocciolare il tomas ® -<strong>pin</strong> ed il<br />
cestello.<br />
La disinfezione avviene con n-propanolo al 70 %. Immergere il<br />
cestello per 20 min nel bagno disinfettante (a temperatura<br />
ambiente). Successivamente asciugare il tomas ® -<strong>pin</strong> per 15 min a<br />
temperatura ambiente.<br />
La soluzione di pulitura e quella disinfettante dove essere<br />
sostituita secondo le indicazioni del produttore.<br />
La sterilizzazione del tomas ® -<strong>pin</strong> asciutto può essere fatta<br />
assieme con altri componenti tomas ® nel tomas ® -tray / -tool tray.<br />
Inserire il tomas ® -<strong>pin</strong> in un foro libero del tray.<br />
Per la sterilizzazione separata, ciascun tomas ® -<strong>pin</strong> deve essere<br />
sigillato in una singola busta di appropriate dimensioni. La<br />
sterilizzazione avviene in autoclave, di cui è assolutamente<br />
necessario seguire le modalità d‘uso. La sterilizzazione a vapore<br />
deve essere fatta alla temperatura di 134 °C e per la durata di<br />
almeno 25 min.<br />
7. Inserzione del tomas ® -<strong>pin</strong><br />
7.1. Avvertenze generali<br />
Nell‘inserzione del tomas ® -<strong>pin</strong> devono essere osservate tutte le<br />
misure igieniche previste per un intervento invasivo, quali campo<br />
operativo sterile, guanti sterili, mascherina ecc.<br />
La sicura funzione del tomas ® -<strong>pin</strong> stabilisce un stabile ancoraggio<br />
nell‘osso (stabilità primaria) ed il posizionamento della testa in<br />
prossimità della gengiva aderente (gingiva alveolaris). Durante<br />
l‘impiego del tomas ® -<strong>pin</strong> come elemento d‘ancoraggio ci si deve<br />
assicurare che la testa ed il tessuto molle circostante non subiscano<br />
alcun effetto meccanico sfavorevole (ad es. movimento della<br />
mucosa, influenza delle bande e/o della lingua, manipolazioni).<br />
Superiormente il tomas ® -<strong>pin</strong> può essere posizionato vestibolarmente<br />
o sulla cresta. Inferiormente l‘inserzione dovrebbe essere<br />
esclusivamente vestibolare e al centro della cresta. Secondo le<br />
attuali conoscenze e sconsigliata l‘inserzione del tomas ® -<strong>pin</strong> sul<br />
lato linguale dell‘arcata inferiore così come nelle vicinanze di ferite<br />
da estrazione, follicoli dentar e denti decidui.<br />
7.2. Procedura operativa (generalità)<br />
■ Scelta della posizione d‘inserimento. Il carico dovesse<br />
avere und angolo di 90° o piuttosto perpendicolarmente<br />
a l´asse logitudinale del tomas ® -<strong>pin</strong><br />
■ Anestesia locale<br />
■ Mucotomia con il tomas ® -punch (REF 302-001-00)<br />
■ Osteotomia con fresa tomas ® -round drill 1.0 (REF 302-003-00)<br />
■ Fresaggio pilota ed inserzione del tomas ® -<strong>pin</strong>s fino allo<br />
stop (si osservi il paragrafo 7.3.)<br />
■ Inserire nello slot del tomas ® -<strong>pin</strong> un elemento di collegamento<br />
(filo) alla apparecchiatura ortodontica (brackets,<br />
bande ecc.) e fissarlo con collante fotopolimerizzabile. Il<br />
carico massimo è 2 N (circa 200 g)<br />
Per la descrizione dettagliata dei vari passaggi operativi clinici<br />
nonché per le necessarie misure precauzionali si rimanda al<br />
manuale d‘inserzione tomas ® (REF 989-631-51), mentre per la<br />
scelta degli elementi di accoppiamento si consiglia la consultazione<br />
del catalogo generaledi ortodonzia.<br />
7.3. Procedura operativa (particolarità)<br />
Per le differenti versioni di tomas ® -<strong>pin</strong> (vedi paragrafo 2<br />
„Fornitura“) si devono osservare le seguenti avvertenze relative<br />
al fresaggio pilota ed all‘inserzione.<br />
7.3.1. Avvitamento autofilettante (tomas ® -<strong>pin</strong> e tomas ® -<strong>pin</strong> N)<br />
Prima dell‘inserzione del tomas ® -<strong>pin</strong> autofilettante e comunque<br />
necessario effettuare un fresaggio pilota. La profondità del<br />
fresaggio pilota dipende dalla lunghezza della vite impiegata, a<br />
scelta tra 6, 8 o 10 mm. Il numero di giri ottimale è di<br />
800 min -1 (max. 1500 min -1 ), con un adeguato raffreddamento.<br />
Possono essere impiegate le seguenti frese pilota (tomas ® -drill):<br />
frese sterilizzabili pluriuso (REF 302-003-10, 302-003-11,<br />
302-003-12), frese sterili monouso (REF 302-103-11).<br />
7.3.2. Avvitamento autofresante (tomas ® -<strong>pin</strong> SD e<br />
tomas ® -<strong>pin</strong> SD-N)<br />
Prima dell‘inserzione del tomas ® -<strong>pin</strong> autofresante nell‘arcata<br />
superiore non è necessario, in genere, effettuare il fresaggio pilota<br />
che invece si rende necessario nell‘arcata inferiore (corticale). Il<br />
fresaggio pilota viene eseguito con la fresa sterilizzabile pluriuso<br />
tomas ® -drill SD 1.1, short pilot drill (REF 302-103-00) o con la<br />
fresa sterile monouso tomas ® -drill SD 1.1 SP, short pilot drill<br />
(REF 302-103-40) con una profondità di max. 4 mm. L‘ottimale<br />
numero di giri è di 800 min -1 (max. 1500 min -1 ), con un adeguato<br />
raffreddamento.<br />
7.3.3. Versione sterile (tomas ® -<strong>pin</strong> e tomas ® -<strong>pin</strong> SD)<br />
■ Estrarre il tomas ® -<strong>pin</strong> dalla confezione sterile ed avvitarlo<br />
nel foro pilota utilizzando il tappo del contenitore<br />
trasparente. Avvitare fino a quando si avverte un iniziale<br />
ancoraggio del tomas ® -<strong>pin</strong> all‘osso<br />
■ L‘avvitamento viene poi completato meccanicamente con<br />
il tomas ® -driver (REF 302-004-50) o manualmente con<br />
il tomas ® -applicator (REF 302-004-20). In questo secondo<br />
caso può risultare di grande aiuto, il cacciavite tomas ® -<br />
screw driver (REF 302-004-10), il tomas ® -wheel<br />
(REF 302-004-30) oppure il tomas ® -torque ratchet<br />
(REF 302-004-40), limitato a 20 Ncm. L‘inserimento<br />
meccanico deve avvenire con l‘ausilio di un contrangolo<br />
con limitatore del momento di rotazione da impostare a<br />
20 Ncm e numero di giri max. a 25 min -1<br />
7.3.4. Versione non sterile (tomas ® -<strong>pin</strong> N e tomas ® -<strong>pin</strong> SD-N)<br />
Per l‘inserzione, inserire la testa del tomas ® -<strong>pin</strong> nel tomas ® -<br />
applicator (REF 302-004-20), nel cacciavite tomas ® -screw driver<br />
(REF 302-004-10) o nel tomas ® -driver (REF 302-004-50).<br />
Successivamente avvitare il tomas ® -<strong>pin</strong> manualmente o<br />
meccanicamente (momento di rotazione 20 Ncm, numero di giri<br />
max. 25 min -1 ).<br />
8. Rimozione del tomas ® -<strong>pin</strong>:<br />
■ Anestesia locale (facoltativo)<br />
■ Rimuovere l‘elemento di accoppiamento<br />
■ Svitare il tomas ® -<strong>pin</strong> con il tomas ® -applicator<br />
(REF 302-004-20), il tomas ® -screw driver (REF 302-004-10)<br />
o con il tomas ® -driver (REF 302-004-50)<br />
9. Spiegazione dei simboli utilizzati<br />
REF<br />
sterilizzato per irraggiamento con sorgenti gamma<br />
non sterile<br />
numero di lotto (CH.-B)<br />
scade il ...<br />
da usarsi solo una volta (monouso)<br />
attenersi alle modalità d‘uso<br />
numero d‘ordine<br />
Per le Vs. domande è a disposizione il ns. servizio di assistenza<br />
tecnica al numero: 051/86.25.80<br />
Data dell‘informazione: 05/10<br />
Con riserva di apportare modifiche