Dimplex_LIH 22-26TE 3-sprachig D-GB-F.book - enrdd.com
Dimplex_LIH 22-26TE 3-sprachig D-GB-F.book - enrdd.com
Dimplex_LIH 22-26TE 3-sprachig D-GB-F.book - enrdd.com

You also want an ePaper? Increase the reach of your titles
YUMPU automatically turns print PDFs into web optimized ePapers that Google loves.
6.3<br />
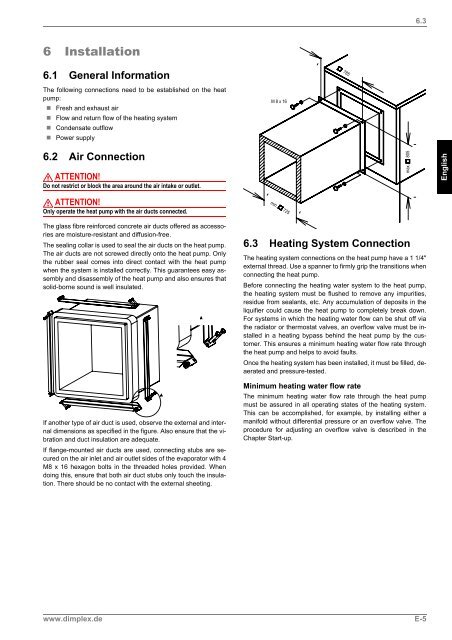
6 Installation<br />
6.1 General Information<br />
<br />
The following connections need to be established on the heat<br />
pump:<br />
• Fresh and exhaust air<br />
• Flow and return flow of the heating system<br />
• Condensate outflow<br />
• Power supply<br />
<br />
6.2 Air Connection<br />
ATTENTION!<br />
Do not restrict or block the area around the air intake or outlet.<br />
<br />
English<br />
ATTENTION!<br />
Only operate the heat pump with the air ducts connected.<br />
The glass fibre reinforced concrete air ducts offered as accessories<br />
are moisture-resistant and diffusion-free.<br />
The sealing collar is used to seal the air ducts on the heat pump.<br />
The air ducts are not screwed directly onto the heat pump. Only<br />
the rubber seal <strong>com</strong>es into direct contact with the heat pump<br />
when the system is installed correctly. This guarantees easy assembly<br />
and disassembly of the heat pump and also ensures that<br />
solid-borne sound is well insulated.<br />
If another type of air duct is used, observe the external and internal<br />
dimensions as specified in the figure. Also ensure that the vibration<br />
and duct insulation are adequate.<br />
If flange-mounted air ducts are used, connecting stubs are secured<br />
on the air inlet and air outlet sides of the evaporator with 4<br />
M8 x 16 hexagon bolts in the threaded holes provided. When<br />
doing this, ensure that both air duct stubs only touch the insulation.<br />
There should be no contact with the external sheeting.<br />
<br />
6.3 Heating System Connection<br />
The heating system connections on the heat pump have a 1 1/4"<br />
external thread. Use a spanner to firmly grip the transitions when<br />
connecting the heat pump.<br />
Before connecting the heating water system to the heat pump,<br />
the heating system must be flushed to remove any impurities,<br />
residue from sealants, etc. Any accumulation of deposits in the<br />
liquifier could cause the heat pump to <strong>com</strong>pletely break down.<br />
For systems in which the heating water flow can be shut off via<br />
the radiator or thermostat valves, an overflow valve must be installed<br />
in a heating bypass behind the heat pump by the customer.<br />
This ensures a minimum heating water flow rate through<br />
the heat pump and helps to avoid faults.<br />
Once the heating system has been installed, it must be filled, deaerated<br />
and pressure-tested.<br />
Minimum heating water flow rate<br />
The minimum heating water flow rate through the heat pump<br />
must be assured in all operating states of the heating system.<br />
This can be ac<strong>com</strong>plished, for example, by installing either a<br />
manifold without differential pressure or an overflow valve. The<br />
procedure for adjusting an overflow valve is described in the<br />
Chapter Start-up.<br />
www.dimplex.de E-5