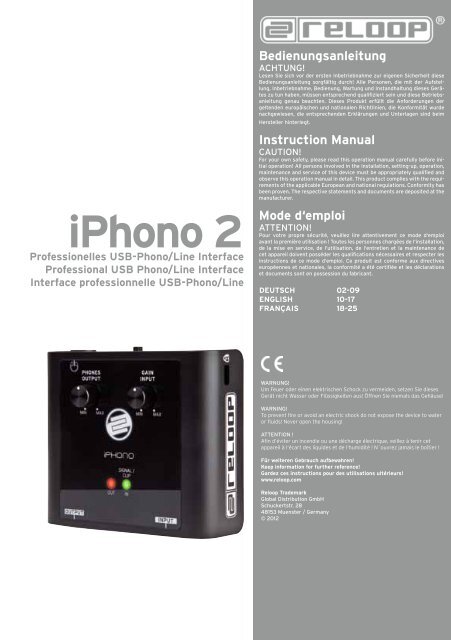
iPhono 2 - Reloop
iPhono 2 - Reloop
iPhono 2 - Reloop

Create successful ePaper yourself
Turn your PDF publications into a flip-book with our unique Google optimized e-Paper software.
DEUTSCH 2<br />
<strong>iPhono</strong> 2<br />
Professionelles USB-Phono/Line Interface<br />
Professional USB Phono/Line Interface<br />
Interface professionnelle USB-Phono/Line<br />
Sicherheitshinweise 2<br />
Bedienungsanleitung<br />
Bestimmungsgemäße Verwendung 3<br />
Wartung 3<br />
ACHTUNG!<br />
Bedienoberfläche 4<br />
Bezeichnungen 5<br />
Anschlüsse 5<br />
Bedienung 5<br />
Computer- & Softwareeinstellungen 6<br />
Beispiel Aufnahme mit Audacity: 6<br />
Hersteller hinterlegt.<br />
Albumaufnahmen mit Audacity 7<br />
Technische Daten 8<br />
Lesen Sie sich vor der ersten Inbetriebnahme zur eigenen Sicherheit diese<br />
Bedienungsanleitung sorgfältig durch! Alle Personen, die mit der Aufstellung,<br />
Inbetriebnahme, Bedienung, Wartung und Instandhaltung dieses Gerätes<br />
zu tun haben, müssen entsprechend qualifiziert sein und diese Betriebsanleitung<br />
genau beachten. Dieses Produkt erfüllt die Anforderungen der<br />
geltenden europäischen und nationalen Richtlinien, die Konformität wurde<br />
nachgewiesen, die entsprechenden Erklärungen und Unterlagen sind beim<br />
Instruction Manual<br />
CAUTION!<br />
Operation Manual 10<br />
SAFETY INSTRUCTIONS 10<br />
For your own safety, please read this operation manual carefully before initial<br />
operation! All persons involved in the installation, setting-up, operation,<br />
maintenance and service of this device must be appropriately qualified and<br />
observe this operation manual in detail. This product complies with the requirements<br />
of the applicable European and national regulations. Conformity has<br />
been proven. The respective statements and documents are deposited at the<br />
manufacturer.<br />
APPLICATION IN ACCORDANCE 11<br />
WITH REGULATIONS 11<br />
Mode MAINTENANCE d‘emploi 11<br />
ATTENTION!<br />
Controls 12<br />
Designation 13<br />
Connections 13<br />
Operation 13<br />
Computer & Software Settings 14<br />
et Example documents Recordings sont en possession with du fabricant. Audacity 14<br />
RECORDING ALBUMS WITH AUDACITY 15<br />
Deutsch Technical information 02-09 16<br />
ENGLISh 10-17<br />
FRANçAIS Mode d‘emploi 18-25<br />
Pour votre propre sécurité, veuillez lire attentivement ce mode d‘emploi<br />
avant la première utilisation ! Toutes les personnes chargées de l‘installation,<br />
de la mise en service, de l‘utilisation, de l‘entretien et la maintenance de<br />
cet appareil doivent posséder les qualifications nécessaires et respecter les<br />
instructions de ce mode d‘emploi. Ce produit est conforme aux directives<br />
européennes et nationales, la conformité a été certifiée et les déclarations<br />
Consignes de sécurité 18<br />
DEUTSCH<br />
Utilisation conforme 19<br />
Entretien 19<br />
Panneau de commande 20<br />
Désignation: 21<br />
Connexions WARNUNG!<br />
21<br />
Utilisation Um Feuer oder einen 21 elektrischen Schock zu vermeiden, setzen Sie dieses<br />
Gerät nicht Wasser oder Flüssigkeiten aus! Öffnen Sie niemals das Gehäuse!<br />
Configuration ordinateur et logiciels 22<br />
Exemple WARNING! d‘enregistrement avec Audacity: 22<br />
Enregistrement To prevent fire or avoid d‘album an electric shock avec do Audacity not expose the device 23to water<br />
or fluids! Never open the housing!<br />
Caractéristiques 24<br />
ATTENTION !<br />
Afin d‘éviter un incendie ou une décharge électrique, veillez à tenir cet<br />
appareil à l‘écart des liquides et de l‘humidité ! N´ouvrez jamais le boîtier !<br />
Für weiteren Gebrauch aufbewahren!<br />
Keep information for further reference!<br />
Gardez ces instructions pour des utilisations ultérieurs!<br />
www.reloop.com<br />
<strong>Reloop</strong> Trademark<br />
Global Distribution GmbH<br />
Schuckertstr. 28<br />
48153 Muenster / Germany<br />
© 2012<br />
1
Bedienungsanleitung<br />
ACHTUNG! Lesen Sie sich vor der ersten Inbetriebnahme zur eigenen Sicherheit diese Bedienungsanleitung<br />
sorgfältig durch! Alle Personen, die mit der Aufstellung, Inbetriebnahme, Bedienung, Wartung<br />
und Instandhaltung dieses Gerätes zu tun haben, müssen entsprechend qualifiziert sein und diese Betriebsanleitung<br />
genau beachten. Dieses Produkt erfüllt die Anforderungen der geltenden europäischen<br />
und nationalen Richtlinien, die Konformität wurde nachgewiesen, die entsprechenden Erklärungen und<br />
Unterlagen sind beim Hersteller hinterlegt.<br />
Wir gratulieren Ihnen zum Kauf des <strong>Reloop</strong> <strong>iPhono</strong> 2. Vielen Dank, dass Sie unserer Technologie Ihr<br />
Vertrauen schenken. Vor Inbetriebnahme bitten wir Sie, alle Anweisungen sorgfältig zu studieren und<br />
zu befolgen.<br />
Nehmen Sie das <strong>Reloop</strong> <strong>iPhono</strong> 2 aus der Verpackung. Bitte überprüfen Sie vor der ersten Inbetriebnahme,<br />
ob kein offensichtlicher Transportschaden vorliegt. Sollten Sie Schäden am USB-Kabel oder am Gehäuse<br />
entdecken, nehmen Sie das Gerät nicht in Betrieb und setzen Sie sich bitte mit Ihrem Fachhändler<br />
in Verbindung.<br />
Sicherheitshinweise<br />
DEUTSCH<br />
ACHTUNG! Seien Sie besonders vorsichtig beim Umgang mit Netzspannung. Bei dieser Spannung<br />
können Sie einen lebensgefährlichen elektrischen Schlag erhalten! Bei Schäden, die durch Nichtbeachtung<br />
dieser Bedienungsanleitung verursacht werden, erlischt jeder Gewährleistungsanspruch. Bei<br />
Sach- oder Personenschäden, die durch unsachgemäße Handhabung oder Nichtbeachtung der Sicherheitshinweise<br />
verursacht werden, übernimmt der Hersteller keine Haftung.<br />
- Dieses Gerät hat das Werk in einwandfreiem Zustand verlassen. Um diesen Zustand zu erhalten und<br />
einen gefahrlosen Betrieb sicherzustellen, muss der Anwender unbedingt die Sicherheitshinweise<br />
und die Warnvermerke beachten, die in dieser Gebrauchsanleitung enthalten sind.<br />
- Aus Sicherheits- und Zulassungsgründen (CE) ist das eigenmächtige Umbauen und/oder Verändern<br />
des Gerätes nicht gestattet. Beachten Sie bitte, dass Schäden, die durch manuelle Veränderungen<br />
an diesem Gerät verursacht werden, nicht unter den Gewährleistungsanspruch fallen.<br />
- Im Geräteinneren befinden sich keine zu wartenden Teile, ausgenommen die von außen austauschbaren<br />
Verschleißteile. Die Wartung darf nur von fachkundigem Personal durchgeführt werden, ansonsten<br />
verfällt die Gewährleistung!<br />
- Stellen Sie sicher, dass die Stromversorgung erst nach dem Aufbau des Gerätes erfolgt. Den USB-<br />
Stecker immer als letztes einstecken.<br />
- Benutzen Sie nur vorschriftsmäßige Kabel. Achten Sie darauf, dass alle Stecker und Buchsen fest<br />
angeschraubt und richtig angeschlossen sind. Bei Fragen wenden Sie sich bitte an Ihren Händler.<br />
- Stellen Sie sicher, dass beim Aufstellen des Produktes das USB-Kabel nicht gequetscht oder durch<br />
scharfe Kanten beschädigt wird.<br />
- Lassen Sie das USB-Kabel nicht mit anderen Kabeln in Kontakt kommen! Seien Sie vorsichtig beim<br />
Umgang mit USB-Kabeln und -Anschlüssen. Fassen Sie diese Teile nie mit nassen Händen an!<br />
- Trennen Sie das Gerät bei Nichtbenutzung und vor jeder Reinigung vom Netz! Fassen Sie dazu den<br />
USB-Stecker an der Grifffläche an und ziehen Sie niemals an der USB-Leitung!<br />
- Stellen Sie das Gerät auf einer horizontalen und stabilen, schwerentflammbaren Unterlage auf.<br />
- Vermeiden Sie Erschütterungen und jegliche Gewaltanwendung bei der Installation oder Inbetriebnahme<br />
des Gerätes.<br />
- Achten Sie bei der Wahl des Installationsortes darauf, dass das Gerät nicht zu großer Hitze, Feuchtigkeit<br />
und Staub ausgesetzt wird. Vergewissern sie sich, dass keine Kabel frei herumliegen. Sie<br />
gefährden Ihre und die Sicherheit Dritter!<br />
2
- Stellen Sie keine Flüssigkeitsbehälter, die leicht umfallen können, auf dem Gerät oder in dessen<br />
Nähe ab. Falls doch einmal Flüssigkeit in das Geräteinnere gelangen sollte, sofort den USB-Stecker<br />
ziehen. Lassen Sie das Gerät von einem qualifizierten Servicetechniker prüfen, bevor es erneut<br />
genutzt wird. Beschädigungen, die durch Flüssigkeiten im Gerät hervorgerufen wurden, sind von der<br />
Gewährleistung ausgeschlossen.<br />
- Betreiben Sie das Gerät nicht in extrem heißen (über 35° C) oder extrem kalten (unter 5° C) Umgebungen.<br />
Halten Sie das Gerät von direktem Sonnenlicht und von Wärmequellen wie Heizkörpern,<br />
Öfen, usw. (auch beim Transport in geschlossenen Wagen) fern.<br />
- Das Gerät darf nicht in Betrieb genommen werden, wenn es von einem kalten Raum in einen warmen<br />
Raum gebracht wurde. Das dabei entstehende Kondenswasser kann unter Umständen Ihr Gerät zerstören.<br />
Lassen Sie das Gerät solange uneingeschaltet, bis es Zimmertemperatur erreicht hat!<br />
- Regler und Schalter sollten niemals mit Sprühreinigungsmitteln und Schmiermitteln behandelt werden.<br />
Dieses Gerät sollte nur mit einem feuchten Tuch gereinigt werden, verwenden Sie niemals Lösungsmittel<br />
oder Waschbenzin zum Reinigen.<br />
- Bei Umzügen sollte das Gerät im ursprünglichen Versandkarton transportiert werden.<br />
- Geräte, die an Netzspannung betrieben werden, gehören nicht in Kinderhände. Lassen Sie deshalb in<br />
Anwesenheit von Kindern besondere Vorsicht walten.<br />
- In gewerblichen Einrichtungen sind die Unfallverhütungsvorschriften des Verbandes der gewerblichen<br />
Berufsgenossenschaft zu beachten.<br />
- In Schulen, Ausbildungseinrichtungen, Hobby- oder Selbsthilfewerkstätten ist das Betreiben des Gerätes<br />
durch geschultes Personal verantwortlich zu überwachen.<br />
- Heben Sie diese Bedienungsanleitung für spätere Fragen und Probleme gut auf.<br />
BestimmungsgemäSSe Verwendung<br />
- Bei diesem Gerät handelt es sich um ein professionelles Interface mit dem sich analoge Signale, wie<br />
beispielsweise von einem Plattenspieler oder einem Kassettendeck, via USB auf einen Computer<br />
digital übertragen lassen. Der <strong>iPhono</strong> 2 ist also dafür prädestiniert alte Schallplatten oder Kassetten<br />
auf einem Computer zu archivieren und/oder auf ein beschreibbares Medium wie eine CD zu brennen.<br />
Das Gerät wird dabei zwischen einer Signalquelle und einem Computer angeschlossen.<br />
- Dieses Produkt ist für den Anschluss an Computer USB-Buchsen zugelassen und wurde ausschließlich<br />
zur Verwendung in Innenräumen konzipiert.<br />
- Wird das Gerät anders verwendet als in dieser Bedienungsanleitung beschrieben, kann dies zu Schäden<br />
am Produkt führen und der Gewährleistungsanspruch erlischt. Außerdem ist jede andere Verwendung<br />
mit Gefahren wie z.B. Kurzschluss, Brand, elektrischem Schlag, etc. verbunden.<br />
Wartung<br />
- Überprüfen Sie regelmäßig die technische Sicherheit des Gerätes auf Beschädigungen des Netzkabels<br />
oder des Gehäuses, sowie auf die Abnutzung von Verschleißteilen wie Dreh- und Schiebereglern.<br />
- Wenn anzunehmen ist, dass ein gefahrloser Betrieb nicht mehr möglich ist, so ist das Gerät außer<br />
Betrieb zu setzen und gegen unbeabsichtigten Betrieb zu sichern. USB-Stecker aus dem Computer<br />
ziehen.<br />
- Es ist anzunehmen, dass ein gefahrloser Betrieb nicht mehr möglich ist, wenn das Gerät sichtbare<br />
Beschädigungen aufweist, das Gerät nicht mehr funktioniert, nach längerer Lagerung unter ungünstigen<br />
Verhältnissen oder nach schweren Transportbeanspruchungen.<br />
3DEUTSCH
DEUTSCH<br />
Bedienoberfläche<br />
1<br />
2 3<br />
4<br />
5<br />
6<br />
7<br />
8<br />
9<br />
10 12<br />
11<br />
4
Bezeichnungen<br />
1. Diebstahlsicherung: Kensington Sicherheits Slot<br />
2. Lautstärkeregler (Kopfhörer)<br />
3. Signal Eingansgverstärkung (Gain)<br />
4. USB-Status Anzeige<br />
5. Status-LED (Signal Ausgang)<br />
6. Status-LED (Signal Input & Clip)<br />
7. USB-Anschluss<br />
8. Phono/Line Wahlschalter<br />
9. Kopfhöreranschluss<br />
10. Audio Ausgangsbuchsen (Cinch)<br />
11. Erdungsschraube<br />
12. Phono/Line Eingangsbuchsen (Cinch)<br />
Anschlüsse<br />
1. Schließen Sie zunächst die Signalquelle, die sie aufnehmen wollen (beispielsweise einen Plattenspieler<br />
oder ein Kassettendeck), an die Phono/Line Eingangsbuchsen -12-. Je nachdem ob die Signalquelle<br />
noch vorverstärkt und entzerrt werden muss (Phono) oder nicht (Line), stellen Sie nun mit dem<br />
Eingangswahlschalter -8- die entsprechende Quelle ein. Falls Sie einen Plattenspieler anschließen,<br />
verbinden Sie noch das Erdungskabel mit der Erdungsschraube -11-.<br />
2. Verbinden Sie nun einen freien USB-Port Ihres Computers (PC/Mac ab Version 1.0 / 2.0 kompatibel)<br />
mit dem USB-Anschluss -7- vom <strong>iPhono</strong> 2. Verwenden Sie dazu das beiliegende USB-Kabel.<br />
3. Falls Sie das Eingangssignal akustisch überwachen möchten, haben Sie die Möglichkeit per Cinch an<br />
den Line-Ausgangsbuchsen -10- eine Abhöranlage, wie beispielsweise eine Stereoanlage anzuschließen.<br />
4. Kopfhöreranschluss<br />
Um die spätere Aufnahme zu kontrollieren, können Sie am Kopfhöreranschluss -9- einen Kopfhörer<br />
anschließen. Hier wird ausschließlich das Ausgangssignal vom Computer abgehört.<br />
Bedienung<br />
1. Eingangswahlschalter<br />
Mit dem Eingangswahlschalter -8- wählen Sie für ein Plattenspieler-Eingangssignal „Phono“ aus.<br />
Für sonstige Quellen stellen Sie den Schalter auf „Line“.<br />
2. Eingangslautstärkeregler<br />
Mit dem Eingangslautstärkeregler (Gain) -3- können Sie das Eingangssignal auspegeln. Beachten Sie<br />
dabei die Signal/Clip-LED -6-.<br />
3. Signal/Clip-LED<br />
Zur Überprüfung des Eingangssignals steht Ihnen im Zusammenhang mit dem Eingangslautstärkeregler<br />
-3- die Signal/Clip-LED -6- zur Verfügung. Wird das Signal übersteuert, leuchtet die LED<br />
-6- orange auf. So können Sie auf einfache Weise mit dem Eingangslautstärkeregler -3- das Signal<br />
optisch aussteuern.<br />
4. Kopfhörerlautstärkeregelung<br />
Stellen Sie mit der Kopfhörerlautstärkeregelung -2- die gewünschte Lautstärke des Kopfhörers ein.<br />
5DEUTSCH
Computer- & Softwareeinstellungen<br />
1. Empfohlene Systemanforderung:<br />
- aktueller Prozessor (ab 1 GHz)<br />
- Windows XP © / Windows Vista © / Windows 7 © / Mac OS X ©<br />
- ab USB 1.0 Schnittstelle<br />
- 512 MB RAM<br />
2. Computer und <strong>iPhono</strong> 2 verbinden<br />
Fahren Sie Ihren Computer wie gewohnt hoch. Verbinden Sie danach das <strong>iPhono</strong> 2 USB-Kabel mir Ihrem<br />
Computer und dem USB-Anschluss -7- am <strong>iPhono</strong> 2. Ihr Computer sollte nun automatisch, ohne<br />
Installation von speziellen Treibern, das <strong>iPhono</strong> 2 erkennen. Falls keine automatische Erkennung<br />
erfolgt, schauen Sie in die Dokumentation Ihres Computers nach generellen USB-Einstellungen nach<br />
oder konsultieren Sie den technischen Support.<br />
3. Softwareeinstellung<br />
Nun da Ihr <strong>iPhono</strong> 2 als externe Soundkarte registriert wurde, müssen Sie in den Systemeinstellungen<br />
Ihres Betriebssystemes das <strong>iPhono</strong> 2 als Standardgerät für die Soundaufnahme einstellen.<br />
Beispiel Windows XP ©:<br />
DEUTSCH<br />
- Starten Sie „Systemsteuerung“<br />
- Wählen Sie „Sounds und Audiogeräte“<br />
- Reiter „Audio“<br />
- Punkt „Soundaufnahme“<br />
- Unter „Standardgerät“ stellen Sie hier das <strong>iPhono</strong> ein und bestätigen mit „Übernehmen“<br />
- Im darunter liegenden Menü „Lautstärke“ können Sie noch eine Pegelanpassung vornehmen<br />
Hinweis: Ihr Computer erkennt den <strong>iPhono</strong> USB-Codec als „USB Audio CODEC“.<br />
Nun sind Sie bereit mit einem Audio Aufnahmeprogramm Ihrer Wahl das Eingangssignal aufzuzeichnen<br />
und ggf. zu bearbeiten oder zu brennen. Beispielsweise können Sie für einfache Aufnahmen unter<br />
Windows © den „Audio Recorder“ verwenden oder das Freeware-Programm Audacity [http://audacity.<br />
sourceforge.net/]<br />
Beispiel Aufnahme mit Audacity:<br />
1. Schließen Sie zunächst die Signalquelle, die sie aufnehmen wollen (beispielsweise einen Plattenspieler<br />
oder ein Kassettendeck), an die Phono/Line Eingangsbuchsen -12-. Je nachdem ob die Signalquelle<br />
noch vorverstärkt und entzerrt werden muss (Phono) oder nicht (Line), stellen Sie nun mit dem<br />
Eingangswahlschalter -8- die entsprechende Quelle ein. Falls Sie einen Plattenspieler anschließen,<br />
verbinden Sie noch das Erdungskabel mit der Erdungsschraube -11-.<br />
2. Verbinden Sie nun einen freien USB-Port Ihres Computers (PC/Mac ab Version 1.0 / 2.0 kompatibel)<br />
mit dem USB-Anschluss -7- vom <strong>iPhono</strong> 2. Verwenden Sie dazu das beiliegende USB-Kabel.<br />
3. Starten Sie das Audacity Programm.<br />
4. Wählen Sie „Preference“ aus der Edit Registerkarte im Audacity Menü aus.<br />
6
5. Wählen Sie die Audio I/O Registerkarte aus.<br />
- wählen Sie unter Playback > Device „USB Audio Codec“<br />
- wählen Sie unter Recording > Device „USB Audio Codec“<br />
- wählen Sie unter Recording > Channels „2 (Stereo)“<br />
- setzen Sie ein Häkchen bei „Play other tracks while recording new one“<br />
- setzen Sie ein Häkchen bei „Software playthrough“<br />
Albumaufnahmen mit Audacity<br />
1. Speichern eines Projektes<br />
- Audacity speichert alle geänderten und aufgenommenen Audiodateien in ein Verzeichnis namens<br />
„Projectname_data“, dass sich dort befindet, wo Sie das Projekt selbst abgespeichert haben.<br />
- Wählen Sie „Save project as“ aus der Audacity Ordnerregisterkarte und wählen Sie einen Speicherort<br />
und Namen für Ihr Projekt.<br />
HINWEIS! Bitte beachten Sie, dass bei einer Erstinbetriebnahme von Audacity lediglich die „Save<br />
as...“ Option verfügbar ist.<br />
2. Aufnahme<br />
- schließen Sie Ihren Plattenspieler, wie oben beschrieben, an den <strong>iPhono</strong> 2 an.<br />
- klicken Sie auf das Record Symbol und die Aufnahme beginnt.<br />
- spielen Sie nun die Passage, die Sie aufnehmen möchten, mit Ihrem Plattenspieler ab.<br />
- klicken Sie auf das Pause Symbol, um die Aufnahme zu pausieren.<br />
- klicken Sie auf das Stopp Symbol, um die Aufnahme zu beenden.<br />
Nun können Sie die verschiedenen Editiermöglichkeiten von Audacity ausprobieren. Beachten Sie, dass<br />
Sie die „Undo Funktion“ fast unbegrenzt verwenden können, während Sie Ihr Projekt noch geöffnet haben.<br />
7DEUTSCH
HINWEIS! CDs können nicht direkt aus Audacity gebrannt werden. Verwenden Sie dazu eine andere<br />
Anwendung.<br />
HINWEIS! Bei der Verwendung eines Plattenspielers muss dieser mittels Erdungskabel geerdet werden.<br />
Wenn Sie einen CD-Player mit sehr hohem Ausganspegel verwenden, ist es möglich, dass der<br />
Aufnahmepegel 1V RMS überschritten wird. Dies kann zu leichtem Digitalrauschen und Verzerrungen<br />
führen. Ist dies der Fall, wechselt die LED ihre Farbe von grün zu orange. Drehen Sie die Signal Eingansgverstärkung<br />
(Gain) -3- entgegen dem Uhrzeigersinn, bis die LED wieder grün leuchtet.<br />
Technische Daten<br />
Folgende Daten des Herstellers werden von der Global Distribution GmbH nicht auf Plausibilität und<br />
Richtigkeit geprüft:<br />
Eingänge:<br />
Phono 5 mV/47 kOhm +1/-3dB<br />
Line 200 mV/10 kOhm +1/-2dB<br />
Ausgänge:<br />
Master Normal 0.77V/600 Ohm<br />
Kopfhörer Normal 1.1V/32 Ohm<br />
Frequenzgang:<br />
20 Hz - 20KHz, +/-1 dB (RIAA +/- 3 dB)<br />
Klirrfaktor: > 0.1 %<br />
Stereo Trennung:<br />
< 65 dB<br />
Rauschabstand:<br />
Phono 70 dB<br />
Line 75 dB<br />
DEUTSCH<br />
USB:<br />
A/D & D/A Wandler 16-bit<br />
Interface USB 1.1 oder USB 2.0 mit FullDuplex Unterstützung<br />
Stromversorgung:<br />
5 V DC<br />
Abmessungen:<br />
80 x 74 x 33 mm<br />
Gewicht:<br />
0,094 kg ohne Netzteil<br />
<strong>Reloop</strong> wünscht Ihnen nun viel SpaSS!<br />
<strong>Reloop</strong> - Solution for DJs<br />
Global Distribution GmbH<br />
Schuckertstraße 28<br />
48153 Muenster<br />
Germany<br />
Fax +49.251.6099368<br />
www.reloop.com<br />
8
9DEUTSCH
Operation Manual<br />
ATTENTION! For your own safety, please read this operation manual carefully before initial operation!<br />
All persons involved in the installation, setting-up, operation, maintenance and service of this device<br />
must be appropriately qualified and observe this operation manual in detail. This product complies<br />
with the requirements of the applicable European and national regulations. Conformity has been proven.<br />
The respective statements and documents are deposited at the manufacturer.<br />
Congratulations on purchasing your <strong>Reloop</strong> <strong>iPhono</strong> 2. Thank you for placing your trust in our disc jockey<br />
technology. Before operating this equipment we ask you to carefully study and observe all instructions.<br />
Please remove the <strong>iPhono</strong> 2 from its packaging. Check before initial operation to make sure that the<br />
device has not been visibly damaged during transport. If you detect any damage to the USB cable or the<br />
casing, do not operate the device. Contact your specialised dealer.<br />
SAFETY INSTRUCTIONS<br />
CAUTION! Please exercise particular caution when handling power voltage. This voltage rating may<br />
lead to a critical electrical shock! Any damage caused by the non-observance of this operation manual<br />
excludes any warranty claims. The manufacturer is not liable for any damage to property or for personal<br />
injury caused by improper handling or non-observance of the safety instructions.<br />
ENGLISH<br />
- This device left the factory in perfect condition. To maintain this condition and to ensure a risk-free operation<br />
the user must observe the safety instructions and warnings contained in this operation manual.<br />
- For reasons of safety and certification (CE) the unauthorised conversion and/or modification of the<br />
device is prohibited. Please note that in the event of damage caused by the manual modification to this<br />
device any warranty claims are excluded.<br />
- The inside of the device does not contain any parts which require maintenance, with the exception of<br />
wear parts that can be exchanged from the outside. Qualified staff must carry out maintenance, otherwise<br />
the warranty does not apply!<br />
- Ensure that the power will only be supplied after the device has been fully set up. Always plug in the<br />
USB plug last.<br />
- Only use cables that comply with regulations. Observe that all jacks and bushes are tightened and correctly<br />
hooked up. Refer to your dealer if you have any questions.<br />
- Ensure that when setting up the product the USB cable is not squashed or damaged by sharp edges.<br />
- Prevent the USB cable from coming into contact with other cables! Exercise great care when handling<br />
USB cables and connections. Never touch these parts with wet hands!<br />
- Disconnect the device when not in use and before cleaning! Be sure to hold the USB plug by the body.<br />
Never pull the USB cord!<br />
- Position the device on a horizontal and stable low-flame base.<br />
- Avoid any concussions or violent impact when installing or operating the device.<br />
- When selecting the location of installation make sure that the device is not exposed to excessive heat,<br />
humidity, and dust. Be sure that no cables lie around openly. You will endanger your own safety and<br />
that of others!<br />
- Do not rest any containers filled with liquid that could easily spill onto the device or in its immediate<br />
vicinity. If, however, fluids should access the inside of the device, immediately disconnect the USB plug.<br />
Have the device checked by a qualified service technician before re-use. Damage caused by fluids inside<br />
the device is excluded from the warranty.<br />
10
- Do not operate the device under extremely hot (in excess of 35° C) or extremely cold (below 5° C) conditions.<br />
Keep the device away from direct exposure to the sun and heat sources such as radiators, ovens,<br />
etc. (even during transport in a closed vehicle). Always ensure sufficient ventilation.<br />
- The device must not be operated after being taken from a cold environment into a warm environment.<br />
The condensation caused hereby may destroy your device. Do not switch on or operate the device until<br />
it has reached ambient temperature!<br />
- Controls and switches should never be treated with spray-on cleaning agents and lubricants. This device<br />
should only be cleaned with a damp cloth. Never use solvents or cleaning fluids with a petroleum<br />
base for cleaning.<br />
- When relocating, the device should be transported in its original packaging.<br />
- Devices supplied by voltage should not be left in the hands of children. Please exercise particular care<br />
when in the presence of children.<br />
- At commercial facilities the regulations for the prevention of accidents as stipulated by the organization<br />
of professional associations must be observed.<br />
- At schools, training facilities, hobby and self-help workshops the operation of the device must be monitored<br />
with responsibility by trained staff.<br />
- Keep this operation manual in a safe place for later reference in the event of questions or problems.<br />
APPLICATION IN ACCORDANCE<br />
WITH REGULATIONS<br />
- This device is a professional interface to digitally transmit analogue signals such as, for example, from<br />
a turntable or a tape deck via USB to a computer. The <strong>iPhono</strong> 2 is ideal for archiving old vinyl or tapes<br />
on a computer and/or for burning onto a writable medium like a CD. The device is hooked up between a<br />
signal source and a computer.<br />
- This product is authorised for connection to computer USB ports and is designed exclusively for indoor<br />
application.<br />
- If the device is used for any other purposes than those described in the operation manual, damage can<br />
be caused to the product, leading to exclusion of warranty rights. Moreover, any other application that<br />
does not comply with the specified purpose harbours risks such as short circuit, fire, electrical shock,<br />
etc.<br />
ENGLISH<br />
MAINTENANCE<br />
- Check the technical safety of the device regularly for damage to the mains line or the casing, as well as<br />
for wearout of wear parts such as rotary and sliding switches.<br />
- If it is to be assumed that a safe operation is no longer feasible then the device must be disconnected<br />
and secured against accidental use. Always disconnect the mains plug from the outlet!<br />
- Disconnect the USB cable from your computer.<br />
- It must be assumed that a safe operation is no longer feasible if the device bears visible defects, if<br />
the device no longer functions, following longer storage under unfavourable conditions or after major<br />
transport stress.<br />
11
ENGLISH<br />
Controls<br />
1<br />
2 3<br />
4<br />
5<br />
6<br />
7<br />
8<br />
9<br />
10 12<br />
11<br />
12
Designation<br />
1. Theft Protection: Kensington Safety Slot<br />
2. Volume Dial (Headphones)<br />
3. Gain Dial<br />
4. USB Status Display<br />
5. Status LED (Signal Output)<br />
6. Status LED (Signal Input & Clip)<br />
7. USB Port<br />
8. Phono/Line Switch<br />
9. Headphones Connection<br />
10. Audio Output (RCA)<br />
11. Grounding Screw<br />
12. Phono/Line Input (RCA)<br />
Connections<br />
1. First connect the sound source from which you would like to record (i.e. turntable, tape deck) to the<br />
Phono/Line Input -12-. Depending on whether the signal source has to be amplified and equalised<br />
(Phono) or not (Line), adjust the corresponding source via the Phono/Line Switch -8-. If you want to<br />
connect a turntable please also connect the grounding cable to the Grounding Screw -11-.<br />
2. Now connect a free USB port of your computer (PC/Mac version 1.0/2.0 compatible) to the <strong>iPhono</strong><br />
2‘s USB connection -7-. To do so please use the included USB cable.<br />
3. If you want to monitor the input signal you can connect a stereo system via RCA for example to the<br />
Line Output -10-.<br />
4. Headphones Connection<br />
In order to control a recording, you can connect your headphones to the corresponding connection<br />
-9-. Here you can solely monitor the output signal of your computer.<br />
Operation<br />
1. Input Select<br />
With the Phono/Line Switch -8- you can select “Phono” for a turntable input signal. For other sources<br />
put the switch in the “Line” position.<br />
2. Input Volume Dial<br />
With the Gain Dial -3- you can level the input signal. Please also consider the Signal/Clip LED -6-.<br />
3. Signal/Clip LED<br />
To check the input signal, besides the Gain Dial -3-, you can also use the Signal/Clip LED -6-. If the<br />
signal is overmodulated the LED -6- will be illuminated orange. This way you can easily level the<br />
signal optically via the Gain Dial -3-.<br />
4. Headphones Volume<br />
With the volume Dial -2- it is possible to adjust the headphones volume.<br />
13ENGLISH
Computer & Software Settings<br />
1. Recommended System Requirements:<br />
- Current processor (1 GHz or better)<br />
- Windows XP © / Windows Vista © / Windows 7 © / Mac OS X ©<br />
- USB 1.0 port or better<br />
- 512 MB RAM<br />
2. Connection of Computer and <strong>iPhono</strong> 2<br />
Boot up your computer as usual. Then connect the <strong>iPhono</strong> 2‘s USB cable to your computer and the<br />
USB Port -7- of the <strong>iPhono</strong> 2. Your computer should recognize the <strong>iPhono</strong> 2 automatically without<br />
the need to install special drivers. If this is not the case please check your computer‘s instruction<br />
manual regarding general USB adjustments or contact technical support.<br />
3. Software Settings<br />
Now that your <strong>iPhono</strong> 2 has been registered as external sound card you have to adjust the <strong>iPhono</strong> 2<br />
as standard device for sound recordings in the system settings of your operating system.<br />
Example Windows XP©:<br />
ENGLISH<br />
- “Control Panel”<br />
- “Sounds and Audio Devices”<br />
- Tab “Audio”<br />
- Item “Sound Recording”<br />
- Under “Standard Device” select the <strong>iPhono</strong> 2 and confirm with “Resume“<br />
- In the menu beneath “volume” you can carry out a volume level adjustment.<br />
NOTE! Your computer recognized the <strong>iPhono</strong> USB codec as “USB Audio CODEC”.<br />
Now you are ready to record and, if desired, work on and burn the input signal with a recording software<br />
of your choice. For example you can use the “Audio Recorder” under Windows© for simple recordings. Or<br />
you can use the freeware program Audacity. [http://audacity.sourceforge.net/]<br />
Example Recordings with Audacity<br />
1. First connect the sound source from which you would like to record (i.e. turntable, tape deck) to the<br />
Phono/Line Input -12-. Depending on whether the signal source has to be amplified and equalised<br />
(Phono) or not (Line), adjust the corresponding source via the Phono/Line Switch -8-. If you want to<br />
connect a turntable please also connect the grounding cable to the Grounding Screw -11-.<br />
2. Now connect a free USB port of your computer (PC/Mac version 1.0/2.0 compatible) to the <strong>iPhono</strong><br />
2‘s USB connection -7-. To do so please use the included USB cable.<br />
3. Start the Audacity software.<br />
4. Select “Preference“ from the Edit tab in the Audacity menu.<br />
14
5. Select Audio I/O tab.<br />
- Under Playback, Device, select “USB AUDIO CODEC“<br />
- Under Recording, Device, select “USB AUDIO CODEC<br />
- Under Recording, Channels, select 2(Stereo)<br />
- Check the box marked “Play other tracks while recording new one“<br />
- Check the box marked “Software Playthrough“<br />
RECORDING ALBUMS WITH AUDACITY<br />
1. Saving a project<br />
- Audacity writes all the changed and recorded audio to a directory called Projectname_data, which<br />
is located right where you saved the project file itself<br />
- Thus, select Save project as from your Audacity File tab and choose a location and filename for<br />
your project<br />
NOTE! Please note that when you startup Audacity fresh, only the “Save As...” menu option is available<br />
2. How to record<br />
- Set your turntable up to play the song or album you want to record<br />
- Click on the red Record button to beto begin recording.<br />
- Play the track you want to record.<br />
- Click on the blue Pause button to pause the recording. Press it again to continue.<br />
- Click on the yellow Stop button to stop recording.<br />
You can now play around with your recording and explore the editing capabilities of Audacity.<br />
Remember that you can use the Undo function almost without limits while the project is open.<br />
15ENGLISH
NOTE! If a CD player with a very high output is used, the input recording level can exceed 1V rms, this<br />
will result in slight digital noise and distortion. And the LED will turn from green to orange. To find<br />
the correct signal location rotate the Gain Dial -3- counterclockwise until the LED returns to green.<br />
Technical information<br />
Global Distribution GmbH GmbH did not test the following manufacturers’ specification for plausibility<br />
and accuracy:<br />
Inputs:<br />
Phono 5 mV/47 kOhm +1/-3dB<br />
Line 200 mV/10 kOhm +1/-2dB<br />
Outputs:<br />
Master Normal 0.77V / 600 Ohm<br />
Headphones Normal 1.1V / 32 Ohm<br />
Frequency range: 20 Hz - 20KHz, +/-1 dB (RIAA +/- 3 dB)<br />
Distortion: > 0.1 %<br />
Stereo separation: < 65 dB<br />
S/N ratio:<br />
Phono 70 dB<br />
Line 75 dB<br />
USB:<br />
A/D & D/A converter 16 bit<br />
Interface USB 1.1 or USB 2.0 with FullDuplex support<br />
Power supply: 5 V DC<br />
Dimensions: 80 x 74 x 33 mm<br />
Weight:<br />
0.094 kg (without mains adapter)<br />
ENGLISH<br />
Have fun with your <strong>Reloop</strong>!<br />
<strong>Reloop</strong> - Solution for DJs<br />
Global Distribution GmbH<br />
Schuckertstraße 28<br />
48153 Muenster<br />
Germany<br />
Fax +49.251.6099368<br />
www.reloop.com<br />
16
17ENGLISH
Mode d‘emploi<br />
ATTENTION ! Pour votre propre sécurité, veuillez lire attentivement ce mode d‘emploi avant la première<br />
utilisation ! Toutes les personnes chargées de l‘installation, de la mise en service, de l‘utilisation,<br />
de l‘entretien et la maintenance de cet appareil doivent posséder les qualifications nécessaires et<br />
respecter les instructions de ce mode d‘emploi. Ce produit est conforme aux directives européennes<br />
et nationales, la conformité a été certifiée et les déclarations et documents sont en possession du<br />
fabricant.<br />
Nous vous félicitons d‘avoir choisi la console de mixage <strong>Reloop</strong> <strong>iPhono</strong> 2, preuve de la confiance que<br />
vous accordez à notre technologie pour Disc Jockey. Avant la mise en service, nous vous prions de lire<br />
attentivement ce mode d‘emploi et de respecter les instructions pendant l‘utilisation.<br />
Retirez le <strong>Reloop</strong> <strong>iPhono</strong> 2 de son emballage. Avant la première mise en service, vérifiez le bon état de<br />
l‘appareil. Si le boîtier ou le cordon USB sont endommagés, n‘utilisez pas l‘appareil et contactez votre<br />
revendeur.<br />
Consignes de sécurité<br />
FRANÇAIS<br />
Soyez particulièrement vigilant lors des branchements avec la tension secteur. Une décharge électrique<br />
à cette tension peut être mortelle ! La garantie exclue tous les dégâts dus au non-respect des<br />
instructions de ce mode d‘emploi. Le fabricant décline toute responsabilité pour les dégâts matériels<br />
et personnels dus à un usage incorrect ou au non-respect des consignes de sécurité.<br />
- Cet appareil a quitté l‘usine de fabrication en parfait état. Afin de conserver cet état et assurer la<br />
sécurité de fonctionnement, l‘utilisateur doit absolument respecter les consignes de sécurité et les<br />
avertissements indiqués dans ce mode d‘emploi.<br />
- Pour des raisons de sécurité et de certification (CE), il est interdit de transformer ou modifier cet<br />
appareil. Tous les dégâts dus à une modification de cet appareil ne sont pas couverts par la garantie.<br />
- Le boîtier ne contient aucune pièce nécessitant un entretien, à l‘exception de pièces d‘usure pouvant<br />
être remplacées de l‘extérieur. La maintenance doit exclusivement être effectuée par du personnel<br />
qualifié afin de conserver les droits de garantie !<br />
- Veillez à n‘effectuer le raccordement secteur qu‘une fois l‘installation terminée. Branchez toujours le<br />
cordon USB secteur en dernier.<br />
- Utilisez uniquement des câbles conformes. Veillez à ce que toutes les fiches et douilles soient bien vissées<br />
et correctement connectées. Si vous avez des questions, contactez votre revendeur.<br />
- Veillez à ne pas coincer ou endommager le cordon USB par des arêtes tranchantes lorsque vous installez<br />
l‘appareil.<br />
- Prenez garde à ce que le cordon USB n‘entre pas en contact avec d‘autres câbles et soyez prudent<br />
lorsque vous manipulez le cordon USB. Ne touchez jamais ces éléments avec des mains humides !<br />
- Débranchez l‘appareil lorsque vous ne l‘utilisez pas ou pour le nettoyer ! Pour débrancher l‘appareil,<br />
tirez toujours sur la prise, jamais sur le câble !<br />
- Placez l‘appareil sur une surface plane, stable et difficilement inflammable. En cas de larsen, éloignez<br />
les enceintes de l‘appareil.<br />
- Évitez tous les chocs et l‘emploi de la force lors de l‘installation et l‘utilisation de l‘appareil.<br />
- Installez l‘appareil dans un endroit à l‘abri de la chaleur, de l‘humidité et de la poussière. Ne laissez pas<br />
traîner les câbles pour votre sécurité personnelle et celle de tiers !<br />
18<br />
- Ne placez jamais des récipients de liquides susceptibles de se renverser sur l‘appareil ou à proximité<br />
directe. En cas d‘infiltration de liquides dans le boîtier, retirez immédiatement le cordon USB. Faites<br />
contrôler l‘appareil par un technicien qualifié avant de le réutiliser. La garantie exclue tous les dégâts<br />
dus aux infiltrations de liquides.
- N‘utilisez pas l‘appareil dans un environnement extrêmement chaud (plus de 35°C) ou froid (sous 5° C).<br />
N‘exposez pas l‘appareil directement aux rayons solaires ou à des sources de chaleur telles que radiateurs,<br />
fours, etc. (également valable lors du transport). Veillez à ne pas obstruer les ventilateurs ou les<br />
fentes de ventilation. Assurez toujours une ventilation convenable.<br />
- N‘utilisez pas l‘appareil lorsqu‘il est amené d‘une pièce froide dans une pièce chaude. L‘eau de condensation<br />
peut détruire votre appareil. Laissez l‘appareil hors tension jusqu‘à ce qu‘il ait atteint la<br />
température ambiante !<br />
- Ne nettoyez jamais les touches et curseurs avec des produits aérosols ou gras. Utilisez uniquement un<br />
chiffon légèrement humide, jamais de solvants ou d‘essence.<br />
- Utilisez l‘emballage original pour transporter l‘appareil.<br />
- Réglez d‘abord les curseurs de réglage et de volume de votre ampli au minimum et les interrupteurs<br />
des enceintes sur „OFF“. Attendez 8 à 20 secondes avant d‘augmenter le volume afin d‘éviter l‘effet de<br />
Schottky, susceptible d‘endommager les enceintes et le diviseur de fréquence.<br />
- Les appareils électriques ne sont pas des jouets. Soyez particulièrement vigilants en présence d‘enfants.<br />
- Les directives de prévention des accidents de l‘association des fédérations professionnelles doivent<br />
être respectées dans les établissements commerciaux.<br />
- Dans les écoles, instituts de formation, ateliers de loisirs etc. l‘utilisation de l‘appareil doit être effectuée<br />
sous la surveillance de personnel qualifié.<br />
- Conservez ce mode d‘emploi pour le consulter en cas de questions ou de problèmes.<br />
Utilisation conforme<br />
- Cet appareil est une interface professionnelle permettant la transmission de signaux analogiques, par<br />
exemple d‘une platine vinyle ou cassette, vers un ordinateur via USB. Iphono 2 est donc tout spécialement<br />
indiqué pour l‘archivage numérique de disques vinyles ou de cassettes sur un ordinateur ou sur<br />
un support enregistrable tel qu‘un CD. Cet appareil doit pour cela être branché entre une source de<br />
signal et un ordinateur.<br />
- Ce produit est certifié pour le branchement sur des ports USB d‘ordinateurs et est exclusivement conçu<br />
pour être utilisé dans un local fermé.<br />
- Toute utilisation non conforme peut endommager le produit et annuler les droits de garantie. En outre,<br />
toute utilisation autre que celle décrite dans ce mode d‘emploi peut être source de court-circuits, incendies,<br />
décharge électrique, etc.<br />
- Le numéro de série attribué par le fabriquant ne doit jamais être effacé sous peine d‘annuler les droits<br />
de garantie.<br />
Entretien<br />
- Contrôlez régulièrement le bon état de l‘appareil (boîtier, cordon) et l‘usure éventuelle des molettes et<br />
curseurs.<br />
- Si vous supposez que l‘appareil ne peut plus être utilisé en toute sécurité, mettez l‘appareil hors-service<br />
et assurez-le contre toute réutilisation involontaire. Débranchez la fiche électrique de la prise de courant !<br />
- Débrancher la fiche USB de l‘ordinateur.<br />
- La sécurité d‘emploi est susceptible d‘être affectée lorsque l‘appareil est visiblement endommagé, ne<br />
fonctionne plus correctement, après un stockage prolongé dans des conditions défavorable ou après<br />
une forte sollicitation de transport.<br />
19FRANÇAIS
FRANÇAIS<br />
Panneau de commande<br />
1<br />
2 3<br />
4<br />
5<br />
6<br />
7<br />
8<br />
9<br />
10 12<br />
11<br />
20
Désignation:<br />
1. Protection antivol : fente de sécurité Kensington<br />
2. Régleur de volume (casque)<br />
3. Amplification d‘entrée du signal (gain)<br />
4. Témoin d‘état USB<br />
5. DEL d‘état (sortie du signal)<br />
6. DEL d‘état (entrée du signal & clip)<br />
7. Port USB<br />
8. Sélecteur Phono/Line<br />
9. Connecteur de casque<br />
10. Prises de sortie audio (coaxiales)<br />
11. Vis de mise à la terre<br />
12. Prises d‘entrée Phono/Line (coaxiales)<br />
Connexions<br />
1. Commencer par brancher la source de signal devant être enregistrée (par exemple platine vinyle ou<br />
lecteur de cassettes), aux prises d‘entrée Phono/Line -12-. Si la source de signal doit être préamplifiée<br />
et déparasitée, régler le sélecteur de source -8- sur (Phono), sinon sur (Line). Si vous désirez<br />
brancher une platine vinyle, il faut également relier le câble de terre à la vis de mise à la terre -11-.<br />
2. Vous pouvez à présent connecter un port USB libre de votre ordinateur (PC/MAC compatible pour<br />
version 1.0/2.0) au port USB -7- de l‘interface <strong>iPhono</strong>. Utilisez pour cela le câble USB livré avec<br />
l‘interface.<br />
3. Si vous désirez écouter le signal d‘entrée, vous pouvez brancher un équipement audio, par exemple<br />
une chaîne stéréo, sur les prises d‘entrée Line coaxiales -10-.<br />
4. Connecteur de casque<br />
Pour contrôler l‘enregistrement ultérieur, vous pouvez raccorder un casque au connecteur de casque<br />
-9-. Celui-ci reproduit exclusivement le signal de sortie de l‘ordinateur.<br />
Utilisation<br />
1. Sélecteur de source<br />
Positionner le sélecteur de source -8- sur „Phono“ si le signal d‘entrée provient d‘une platine vinyle.<br />
Pour toutes les autres sources, placer le sélecteur sur „Line“.<br />
FRANÇAIS<br />
2. Régleur du volume d‘entrée<br />
Le régleur du volume d‘entrée (gain) -3- permet de contrôler le niveau du signal d‘entrée. Observer<br />
la DEL Signal/Clip -6-.<br />
3. DEL Signal/Clip<br />
Combiné au régleur du volume d‘entrée -3-, la DEL Signal/Clip -6- permet de contrôler le signal<br />
d‘entrée. Si le signal sature, la DEL -6- s‘éclaire en orange. Ceci facilite le contrôle optique du signal<br />
avec le régleur du volume d‘entrée -3-.<br />
4. Réglage du volume du casque<br />
Le réglage du volume du casque -2- permet d‘ajuster le volume du casque.<br />
21
Configuration ordinateur et logiciels<br />
1. Système recommandé :<br />
- Processeur récent (1 GHz min.)<br />
- Windows XP ©/Windows Vista ©/Windows 7 ©/Mac OS X ©<br />
- Interface USB 1.0 min.<br />
- RAM 512 MO<br />
2. Branchement ordinateur et <strong>iPhono</strong> 2<br />
Démarrer votre ordinateur selon la méthode usuelle. Brancher ensuite le câble USB <strong>iPhono</strong> 2 sur<br />
votre ordinateur et le port USB -7- sur l‘<strong>iPhono</strong> 2. Normalement, votre ordinateur devrait détecter<br />
automatiquement l‘interface <strong>iPhono</strong> sans requérir l‘installation de pilotes spéciaux. Si la détection<br />
automatique échoue, reportez-vous à la documentation de votre ordinateur pour les paramétrages<br />
généraux USB ou consultez l‘assistance technique.<br />
3. Configuration logicielle<br />
Étant donné que votre interface <strong>iPhono</strong> 2 est enregistrée en tant que carte de son externe, vous devez<br />
la spécifier en tant qu‘équipement par défaut dans la configuration de votre système d‘exploitation.<br />
Exemple Windows XP ©:<br />
FRANÇAIS<br />
„Configuration“<br />
- „Sons et périphériques audio“<br />
- Onglet „Audio“<br />
- Paramètre „Enregistrement“<br />
- Régler <strong>iPhono</strong> en tant que „Périphérique par défaut“ et valider avec „Appliquer“<br />
- Dans le menu „Volume“ situé plus bas, vous pouvez régler le niveau de sortie<br />
Note : votre ordinateur détecte le codec USB <strong>iPhono</strong> en tant que „CODEC audio USB“.<br />
Vous pouvez à présent enregistrer le signal d‘entrée avec un logiciel d‘enregistrement audio de votre<br />
choix et ensuite l‘éditer ou le graver. Ainsi, pour de simples enregistrements sous Windows ©, vous pouvez<br />
utiliser „Audio Recorder“ ou le gratuiciel Audacity [http://audacity.sourceforge.net/]<br />
Exemple d‘enregistrement avec Audacity:<br />
1. Commencer par brancher la source de signal devant être enregistrée (par exemple platine vinyle ou<br />
lecteur de cassettes), aux prises d‘entrée Phono/Line -12-. Si la source de signal doit être préamplifiée<br />
et déparasitée, régler le sélecteur de source -8- sur (Phono), sinon sur (Line). Si vous désirez<br />
brancher une platine vinyle, il faut également relier le câble de terre à la vis de mise à la terre -11-.<br />
2. Vous pouvez à présent connecter un port USB libre de votre ordinateur (PC/MAC compatible pour version<br />
1.0/2.0) au port USB -7- de l‘interface <strong>iPhono</strong>. Utilisez pour cela le câble USB livré avec l‘interface.<br />
3. Lancer le programme Audacity.<br />
4. Sélectionner „Preference“ dans la carte de registre Edit du menu Audacity.<br />
22
5. Sélectionner la carte de registre Audio I/O.<br />
- Sélectionner „USB Audio Codec“ dans Playback > Device<br />
- Sélectionner „USB Audio Codec“ dans Recording > Device<br />
- Sélectionner „2 (Stereo)“ dans Recording > Channels<br />
- Cocher la case „Play other tracks while recording new one“<br />
- Cocher la case „Software playthrough“<br />
Enregistrement d‘album avec Audacity<br />
1. Enregistrer un projet<br />
- Audacity enregistre tous les fichiers audio modifiés et enregistrés dans le dossier „Projectname_data“,<br />
situé dans le répertoire d‘enregistrement du projet.<br />
- Sélectionner „Save project as“ dans la carte de registre de dossiers Audacity et définir un emplacement<br />
d‘enregistrement et le nom de votre projet.<br />
NOTE! Veuillez tenir compte qu‘à la première utilisation d‘Audacity, seule l‘option „Save as...“ est disponible.<br />
2. Enregistrement<br />
- Raccorder la platine vinyle à l‘<strong>iPhono</strong> 2 comme décrit plus haut.<br />
- Cliquer sur le symbole Record pour lancer l‘enregistrement.<br />
- À présent, lire les passages que vous désirez enregistrer avec votre platine vinyle.<br />
- Cliquer sur le symbole Pause pour interrompre l‘enregistrement.<br />
- Cliquer sur le symbole Stop pour terminer l‘enregistrement.<br />
Vous pouvez maintenant essayer les différentes possibilités d‘édition d‘Audacity. Tenir compte que la<br />
fonction „Undo“ peut être utilisée de manière quasi illimitée tant que le projet reste ouvert.<br />
23FRANÇAIS
NOTE! Il n‘est pas possible de graver directement un cédérom avec Audacity. Veuillez pour cela utiliser<br />
un autre programme.<br />
NOTE! Si vous utilisez une platine vinyle, elle doit être mise à la terre au moyen d‘un câble adéquat.<br />
Si vous utilisez un lecteur de CD avec un niveau de sortie très élevé, il se peut que le niveau<br />
d‘enregistrement 1V RMS soit dépassé. Ceci peut causer un léger bruit numérique et des distorsions.<br />
Dans ce cas, la DEL passe du vert à l‘orange. Tourner alors l‘amplification d‘entrée du signal (gain) -3-<br />
vers la gauche jusqu‘à ce que la DEL repasse au vert.<br />
Caractéristiques<br />
La plausibilité et l‘exactitude des données suivantes du fabriquant ne sont pas contrôlées par la société<br />
Global Distribution GmbH :<br />
FRANÇAIS<br />
Entrées :<br />
Phono 5 mV/47 kOhm +1/-3dB<br />
Line 200 mV/10 kOhm +1/-2dB<br />
Sorties :<br />
Master normal 0.77V/600 ohms<br />
Casque normal 1.1V/32 ohms<br />
Réponse en fréquence : 20 Hz - 20KHz, +/-1 dB (RIAA +/- 3 dB)<br />
Distorsion : > 0.1 %<br />
Séparation stéréo :<br />
< 65 dB<br />
Rapport signal/bruit :<br />
Phono 70 dB<br />
Line 75 dB<br />
USB :<br />
A/D & transducteur D/A 16 bits<br />
Interface USB 1.1 ou USB 2.0 avec prise en charge FullDuplex<br />
Alimentation électrique : 5 V DC<br />
Dimensions :<br />
80 x 74 x 33 mm<br />
Poids :<br />
0,094 kg sans bloc d‘alimentation<br />
<strong>Reloop</strong> vous souhaite beaucoup<br />
de plaisir avec votre console !<br />
<strong>Reloop</strong> - Solution for DJs<br />
Global Distribution GmbH<br />
Schuckertstraße 28<br />
48153 Muenster<br />
Germany<br />
Fax +49.251.6099368<br />
www.reloopdj.de<br />
24
25FRANÇAIS
notes<br />
26
notes<br />
27
FRANÇAIS<br />
28