HB589, HB588 Sunstudio - Philips
HB589, HB588 Sunstudio - Philips
HB589, HB588 Sunstudio - Philips
Create successful ePaper yourself
Turn your PDF publications into a flip-book with our unique Google optimized e-Paper software.
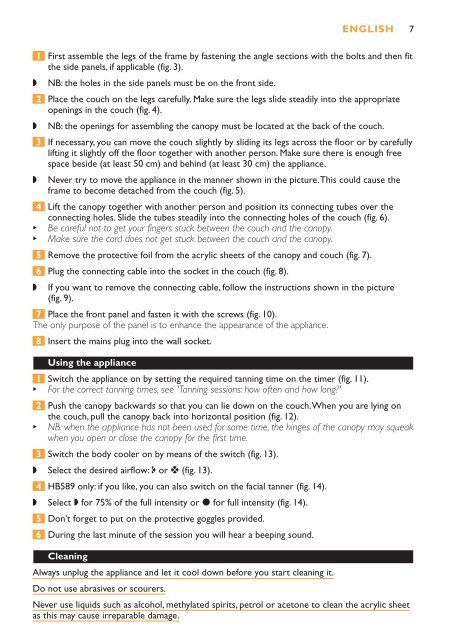
1 First assemble the legs of the frame by fastening the angle sections with the bolts and then fit<br />
the side panels, if applicable (fig. 3).<br />
◗ NB: the holes in the side panels must be on the front side.<br />
2 Place the couch on the legs carefully. Make sure the legs slide steadily into the appropriate<br />
openings in the couch (fig. 4).<br />
◗ NB: the openings for assembling the canopy must be located at the back of the couch.<br />
3 If necessary, you can move the couch slightly by sliding its legs across the floor or by carefully<br />
lifting it slightly off the floor together with another person. Make sure there is enough free<br />
space beside (at least 50 cm) and behind (at least 30 cm) the appliance.<br />
◗ Never try to move the appliance in the manner shown in the picture.This could cause the<br />
frame to become detached from the couch (fig. 5).<br />
4 Lift the canopy together with another person and position its connecting tubes over the<br />
connecting holes. Slide the tubes steadily into the connecting holes of the couch (fig. 6).<br />
B Be careful not to get your fingers stuck between the couch and the canopy.<br />
B Make sure the cord does not get stuck between the couch and the canopy.<br />
5 Remove the protective foil from the acrylic sheets of the canopy and couch (fig. 7).<br />
6 Plug the connecting cable into the socket in the couch (fig. 8).<br />
◗ If you want to remove the connecting cable, follow the instructions shown in the picture<br />
(fig. 9).<br />
7 Place the front panel and fasten it with the screws (fig. 10).<br />
The only purpose of the panel is to enhance the appearance of the appliance.<br />
8 Insert the mains plug into the wall socket.<br />
Using the appliance<br />
1 Switch the appliance on by setting the required tanning time on the timer (fig. 11).<br />
B For the correct tanning times, see 'Tanning sessions: how often and how long?'<br />
2 Push the canopy backwards so that you can lie down on the couch.When you are lying on<br />
the couch, pull the canopy back into horizontal position (fig. 12).<br />
B NB: when the appliance has not been used for some time, the hinges of the canopy may squeak<br />
when you open or close the canopy for the first time.<br />
3 Switch the body cooler on by means of the switch (fig. 13).<br />
◗ Select the desired airflow: n or b (fig. 13).<br />
4 <strong>HB589</strong> only: if you like, you can also switch on the facial tanner (fig. 14).<br />
◗ Select , for 75% of the full intensity or m for full intensity (fig. 14).<br />
5 Don't forget to put on the protective goggles provided.<br />
6 During the last minute of the session you will hear a beeping sound.<br />
Cleaning<br />
Always unplug the appliance and let it cool down before you start cleaning it.<br />
Do not use abrasives or scourers.<br />
ENGLISH<br />
Never use liquids such as alcohol, methylated spirits, petrol or acetone to clean the acrylic sheet<br />
as this may cause irreparable damage.<br />
7


