Descrizione quadro comando Quadro elettrico per ... - Intekom
Descrizione quadro comando Quadro elettrico per ... - Intekom
Descrizione quadro comando Quadro elettrico per ... - Intekom

You also want an ePaper? Increase the reach of your titles
YUMPU automatically turns print PDFs into web optimized ePapers that Google loves.
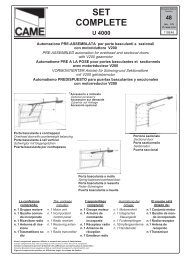
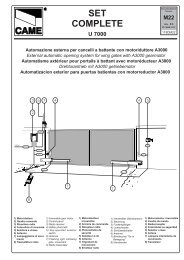
ENGLISH<br />
TO USE THE REMOTE CONTROL SYSTEM,<br />
PROCEED AS FOLLOWS:<br />
A) Insert an AF radiofrequency board<br />
(*),see table pag.12<br />
B) Code the transmitter(**). See the<br />
relative instruction sheet.<br />
C) Store the code on circuit card.<br />
Proceed as follows:<br />
-While holding down key "CH1", press<br />
the control key on the transmitter after<br />
the signal LED lights up. When the key<br />
is pressed, the LED will flash briefly to<br />
signal that the command has been<br />
stored (figure 1).<br />
-Perform the same procedure with the<br />
CH2 key, associating it with another<br />
transmitter key (figure 2).<br />
CH1 = Channel for direct control of one<br />
function <strong>per</strong>formed by the control unit on<br />
the gear motor ("open only" / "openclose-reverse"<br />
or "open-stop-closestop",<br />
depending on the position of dip<br />
switches 2 and 3).<br />
CH2 = Channel for direct control of an<br />
accessory connected across B1-B2.<br />
N.B. If you wish to change the code on<br />
your transmitters in the future, simply<br />
repeat the procedure described above.<br />
(*) Warning: disconnect power supply<br />
from control board before inserting or<br />
removing the AF radio-frequency<br />
card from the socket.<br />
FRANÇAIS<br />
POUR UTILISER LA COMMANDE RADIO, IL FAUT:<br />
A) Brancher une carte de radiofréquence<br />
AF (*), voir tableau p.12<br />
B) Coder l'emetteur (**). Voir feuille<br />
d'instructions correspondante.<br />
C)Mémoriser le code sur la carte de la<br />
manière suivante:<br />
-En maintenant appuyée la touche<br />
"CH1" et aprés que le led de<br />
signalisation s'est allumé, envoyer une<br />
commande avec la touche de l'émetteur:<br />
un bref clignotement du led signalera<br />
que la mémorisation a été exécutée.<br />
(fig.1).<br />
-Suivre la même procédure avec la<br />
touche "CH2" en l'associant avec une<br />
autre touche du emetteur (fig.2).<br />
CH1 = Canal pour obtenir la commande<br />
directe d'une fonction du boîtier du<br />
motoréducteur ( commande "uniquement<br />
ouverture" / "ouverture-fermetureinversion"<br />
ou "ouverte-stop-ferme-stop"<br />
en fonction de la sélection effectuée sur<br />
les dip-switchs 2 et 3).<br />
CH2 = Canal pour obtenir la commande<br />
directe d'un dispositif accessoire<br />
branché sur B1-B2.<br />
Remarque: si, successivement, on veut<br />
changer le code des émetteur, il suffit de<br />
répéter la séquence décrite ci-dessus.<br />
(*) Attention: cou<strong>per</strong> la tension du<br />
tableau avant d'introduire ou<br />
d'extraire la carte de fréquence radio<br />
AF de la connexion.<br />
-27-