soft-form™férula soft-form™ example - Invotec International, Inc.
soft-form™férula soft-form™ example - Invotec International, Inc.
soft-form™férula soft-form™ example - Invotec International, Inc.

Create successful ePaper yourself
Turn your PDF publications into a flip-book with our unique Google optimized e-Paper software.
SOFT-FORMFÉRULA<br />
NASAL TERMO-PLÁSTICA EXTERNA<br />
EXAMPLE<br />
SOFT-FORM<br />
EXTERNAL THERMO PLASTIC SPLINT<br />
Por Favor Leer Atentamente:<br />
NOTA: EL PROFESIONAL MÉDICO ES RESPONSABLE DE LAS ADECUADAS<br />
TÉCNICAS Y PROCEDIMIENTOS QUIRÚRGICOS. LAS SIGUIENTES<br />
INSTRUCCIONES SÓLO SON DE INFORMACIÓN. EL CIRUJANO, DEBERÁ<br />
EVALUAR LA APROBACIÓN DEL PROCEDIMIENTO BASANDOSE EN SU<br />
PROPIA FORMACIÓN Y EXPERIENCIA PROFESIONAL.<br />
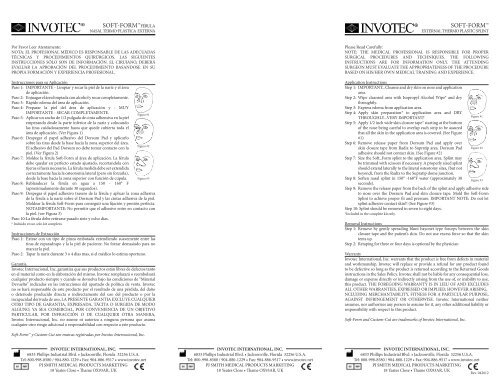
Instrucciones para su Aplicación<br />
Paso 1: IMPORTANTE - Limpiar y secar la piel de la nariz y el área<br />
de aplicación.<br />
Paso 2: Enjuagar el área limpiada con alcohol y secar completamente.<br />
Paso 3: Rápido edema del área de aplicación.<br />
Paso 4: Preparar la piel del área de aplicación y - MUY<br />
IMPORTANTE - SECAR COMPLETAMENTE.<br />
Figura #1<br />
Paso 5: Aplicar un ancho de 1/2 pulgada de cinta adhensiva en la piel<br />
empezando desde la parte inferior de la nariz y colocando<br />
las tiras cuidadosamente hasta que quede cubierta toda el<br />
área de aplicación. (Ver Figura 1)<br />
Paso 6: Despegar el papel adhesivo del Dorsum Pad y aplicarlo<br />
sobre las tiras desde la base hacia la zona superior del área.<br />
Figura #2<br />
El adhesivo del Pad Dorsum no debe tomar contacto con la<br />
piel. (Ver Figura 2)<br />
Paso 7: Moldee la férula Soft-Form al área de aplicación. La férula<br />
debe quedar en perfecto estado ajustado, recortandola con<br />
tijeras si fuera necesario. La férula medida debe ser extendida<br />
correctamente hacia la osteotomia lateral (pero sin forzarla),<br />
desde la base hacia la zona superior con función de cupula. Figura #3<br />
Paso 8: Reblandecer la férula en agua a 150 - 160° F<br />
(aproximadamente durante 30 segundos).<br />
Paso 9: Despegar el papel adhesivo trasero de la férula y aplicar la zona adhesiva<br />
de la férula a la nariz sobre el Dorsum Pad y las cintas adhesiva de la piel.<br />
Moldear la férula Soft-Form para conseguir una fijación y presión perfecta.<br />
NOTAIMPORTANTE: No permitir que el adhesivo entre en contacto con<br />
la piel. (ver Figura 3)<br />
Paso 10: La férula debe retirarse pasado siete y ocho dias.<br />
* <strong>Inc</strong>luido en un solo kit completo.<br />
Instrucciones de Extracción<br />
Paso 1: Extrae con un tipo de pinza embotada extendiendo suavemente entre las<br />
tiras de esparadrapo y la la piel de paciente. No forzar demasiado para no<br />
marcar la piel.<br />
Paso 2: Tapar la nariz durante 3 o 4 dias mas, si el médico lo estima oportuno.<br />
Garantia<br />
<strong>Invotec</strong> Internacional, <strong>Inc</strong>. garantiza que sus productos están libres de defectos tanto<br />
en el material como en la elaboración del mismo. <strong>Invotec</strong> remplazará o reembolsará<br />
cualquier producto siempre y cuando se devuelva bajo las condiciones de “Material<br />
Devuelto” indicadas en las intrucciones del apartado de politica de venta. <strong>Invotec</strong><br />
no se hará responsable de este producto por el resultado de una pérdida, del daño<br />
o deteriodo producido directa o indirectamente del uso del producto o por la<br />
incapacidad derivada de uso, LA PRESENTE GARANTIA EXCLUYE CUALQUIER<br />
OTRO TIPO DE GARANTIA, EXPRESADA, TÁCITA O SURGIDA DE MODO<br />
ALGUNO, YA SEA COMERCIAL, POR CONVENIENCIA DE UN OBJETIVO<br />
PARTICULAR, POR INFRACCIÓN O DE CUALQUIER OTRA MANERA,<br />
<strong>Invotec</strong> Internacional, <strong>Inc</strong>. no asume ni autoriza a ninguna persona que asuma<br />
cualquier otro riesgo adicional o responsabilidad con respecto a este producto.<br />
Soft-Form y Custom Cut son marcas registradas por <strong>Invotec</strong> Internacional, <strong>Inc</strong>.<br />
Please Read Carefully:<br />
NOTE: THE MEDICAL PROFESSIONAL IS RESPONSIBLE FOR PROPER<br />
SURGICAL PROCEDURES AND TECHNIQUES. THE FOLLOWING<br />
INSTRUCTIONS ARE FOR INFORMATION ONLY. THE ATTENDING<br />
SURGEON MUST EVALUATE THE APPROPRIATENESS OF THE PROCEDURE<br />
BASED ON HIS/HER OWN MEDICAL TRAINING AND EXPERIENCE.<br />
Application Instructions<br />
Step 1: IMPORTANT...Cleanse and dry skin on nose and application<br />
area.<br />
Step 2: Wipe cleansed area with Isopropyl Alcohol Wipe* and dry<br />
throughtly.<br />
Step 3: Express edema from application area.<br />
Step 4: Apply skin preparation* to application area and DRY<br />
Figure #1<br />
THROUGHLY...VERY IMPORTANT!<br />
Step 5: Apply 1/2 inch wide skin closure tape* starting at the bottom<br />
of the nose being careful to overlap each strip to be assured<br />
that all the skin in the application area is covered. (See Figure<br />
#1)<br />
Step 6: Remove release paper from Dorsum Pad and apply over<br />
skin closure tape from Radix to Supratip area. Dorsum Pad Figure #2<br />
adhesive should not contact skin. (See Figure #2)<br />
Step 7: Size the Soft_Form splint to the application area. Splint may<br />
be trimmed with scissors if necessary. A properly sized splint<br />
should extend laterally to the lateral osteotomy sites, (but not<br />
beyond), from the Radix to the Supratip dome junction.<br />
Step 8: Soften nasal splint in 150° -160°F water (approximately 30 Figure #3<br />
seconds).<br />
Step 9: Remove the release paper from the back of the splint and apply adhesive side<br />
to nose over the Dorsum Pad and skin closure tape. Mold the Soft-Form<br />
Splint to achieve proper fit and pressure. IMPORTANT NOTE: Do not let<br />
splint adhesive contact skin!! (See Figure #3)<br />
Step 10: Splint should be removed in seven to eight days.<br />
*<strong>Inc</strong>luded in the complete kit only.<br />
Removal Instructions<br />
Step 1: Remove by gently spreading blunt bayonet type forceps between the skin<br />
closure tape and the patient’s skin. Do not use excess force so that the skin<br />
tents up.<br />
Step 2: Retaping for three or four days is optional by the physician<br />
Warranty<br />
<strong>Invotec</strong> <strong>International</strong>, <strong>Inc</strong>. warrants that the product is free from defects in material<br />
and workmanship. <strong>Invotec</strong> will replace or provide a refund for any product found<br />
to be defective so long as the product is returned according to the Returned Goods<br />
instructions in the Sales Policy. <strong>Invotec</strong> shall not be liable for any consequential loss,<br />
damage or expense directly or indirectly arising from the use of, or inability to use,<br />
this product. THE FOREGOING WARRANTY IS IN LIEU OF AND EXCLUDES<br />
ALL OTHER WARRANTIES, EXPRESSED OR IMPLIED, HOWEVER ARISING,<br />
NCLUDING MERCHANTABILITY, FITNESS FOR A PARTICULAR PURPOSE,<br />
AGAINST INFRINGEMENT OR OTHERWISE. <strong>Invotec</strong> <strong>International</strong> neither<br />
assumes, nor authorizes any person to assume for it, any other additional liability or<br />
responsibility with respect to this product.<br />
Soft-Form and Custom-Cut are trademarks of <strong>Invotec</strong> <strong>International</strong>, <strong>Inc</strong>.<br />
INVOTEC INTERNATIONAL, INC.<br />
6833 Phillips Industrial Blvd. • Jacksonville, Florida 32256 U.S.A.<br />
Tel: 800-998-8580 / 904-880-1229 • Fax: 904-886-9517 • www.invotec.net<br />
PJ SMITH MEDICAL PRODUCTS MARKETING<br />
18 Yeates Close • Thame OX93AR, UK<br />
INVOTEC INTERNATIONAL, INC.<br />
6833 Phillips Industrial Blvd. • Jacksonville, Florida 32256 U.S.A.<br />
Tel: 800-998-8580 / 904-880-1229 • Fax: 904-886-9517 • www.invotec.net<br />
PJ SMITH MEDICAL PRODUCTS MARKETING<br />
18 Yeates Close • Thame OX93AR, UK<br />
INVOTEC INTERNATIONAL, INC.<br />
6833 Phillips Industrial Blvd. • Jacksonville, Florida 32256 U.S.A.<br />
Tel: 800-998-8580 / 904-880-1229 • Fax: 904-886-9517 • www.invotec.net<br />
PJ SMITH MEDICAL PRODUCTS MARKETING<br />
18 Yeates Close • Thame OX93AR, UK<br />
Rev. 042012
ATTELLE EXTERNE THERMO-<br />
PLASTIQUE SOFT-FORM<br />
SOFT-FORM<br />
EXTERNAL TERMO PLASTIK SPLINT<br />
SOFT-FORM<br />
EXTERNE THERMO-NASENSCHIENE<br />
NOTE: LE CHIRURGIEN EST RESPONSABLE DE LA MISE EN PLACE<br />
SELON SA PROPRE TECHNIQUE. LES INSTRUCTIONS SUIVANTES SONT<br />
UNIQUEMENT POUR INFORMATION.<br />
Indications:<br />
1. IMPORTANT. Nettoyer et sécher la zone d’application.<br />
2. Bien nettoyer cette zone avec la compresse d’isopropyl alcool* et<br />
sécher complètement.<br />
3. Exprimer l’oedème de la zone D’application.<br />
4. Appliquer la préparation de le peau* sur le zone du nez et sécher<br />
complètement. TRES IMPORTANT.<br />
Figure #1<br />
5. Mettre le steristrip d’environ 1,5cm de large en commencant<br />
par la partie supérieure du nez en appliquant chaque strip<br />
soigneusement en s’assurant que la peau est bien couverte dans la<br />
zone d’application. (voir Figure 1)<br />
6. Enlever le papier de l’attelle Dorsum et l’appliquer sur les steristrip<br />
de la pointe du nez jusqu’ à la partie supérieure. L’attelle adhesive<br />
du dorsum ne doit pas toucher la peau. (voir Figure 2)<br />
Figure #2<br />
7. Choisir le taille de l’attelle desirée; elle peut être taillée avec<br />
ciseaux si nécessaire. La taille correcte doit descendre jusqu’au<br />
site d’osteotomie (pas en dessous) et aller de la pointe du nez a la<br />
partie supérieure.<br />
8. Assoupler l’attelle nasal en la trempant dans de l’eau à 65-75°C<br />
(approximativement pendant 30 seconds).<br />
Figure #3<br />
9. Enlever le papier du dos de l’attelle et appliquer le côté adhesif<br />
ur le nez par dessus l’attelle dorsum et contre le steristrip. Modeler l’attelle pour<br />
completer une bonne adheisence. IMPORTANT: il ne faut pas que l’attelle soit en<br />
contact avec la peau. (voir Figure 3)<br />
10. L’attelle doit être enlevée au bout de 7 ou 8 jours.<br />
*Compris seulement dans le kit complet.<br />
Instructions Pour Enlever L’Attelle<br />
1. Pour retirer l’attelle écarter doucement avéc une pince en baionette mousse entre<br />
les steristrip et la peau du patient. Ne pas utiliser une force excessive pour ne pas<br />
relever la peau.<br />
2. Remettre le steristrip trois ou quatre jours si c’est necessaire.<br />
Garantie<br />
<strong>Invotec</strong> <strong>International</strong> <strong>Inc</strong> garantie que le produit ne présente aucun défaut de<br />
fabrication ou de matière première. <strong>Invotec</strong> remplacera ou remboursera tout produit<br />
avec defaut à condition que le produit soit retourné en accord avec le règlement de<br />
retour de marchandise des conditions de ventes. <strong>Invotec</strong> n’est pas responsable des<br />
conséquences dues a la perte, la detérioration, les frais provenant directement ou<br />
indirectement de l’usage ou de non usage du produit. LA PRESENTE GARANTIE<br />
REMPLACE ET EXCLUT TOUTES AUTRES GARANTIES EXPRIMEES OU<br />
IMPLIQUEES SURVENANT DE QUELQUES MANIERES QUE CE SOIT ET<br />
COMPRENANT LE COMMERCIAL, UN ACCORD POUR UNE INTENTION<br />
PARTICULIERE CONTRE INFRACTION OU AUTRES. <strong>Invotec</strong> <strong>International</strong><br />
n’assume ni n’autorise quelques personnes que ce soit pour assurer cela ni quelques<br />
autres responsabilités additionnelles concernant ce produit.<br />
Soft-Form et Custom-Cut sont des marques déposées par <strong>Invotec</strong> <strong>International</strong>, <strong>Inc</strong>.<br />
Lütfen Dikkatle Okuyunuz:<br />
NOT: TIBBİ UZMAN, UYGUN CERRAHİ PROSEDÜR VE TEKNİKLERİ<br />
UYGULAMAKTAN SORUMLUDUR. AŞAĞIDA VERİLEN TALİMATLAR<br />
YALNIZCA BİLGİ AMAÇLIDIR. UYGULAMA ESNASINDA HAZIR BULU-<br />
NAN CERRAH PROSEDÜRÜN UYGUNLUĞUNU KENDİ TIP EĞİTİMİNE VE<br />
DENEYİMİNE DAYANARAK DEĞERLENDİRMELİDİR.<br />
Uygulama Talimatları<br />
Adım 1: ÖNEMLİ… Burnun üzerindeki ve uygulanacak bölgedeki<br />
deriyi temizleyip kurulayınız.<br />
Adım 2: Temizlenmiş bölgeyi İzopropil Alkol Wipe* ile siliniz ve<br />
iyice kurulayınız.<br />
Adım 3: Uygulanacak bölgedeki ödemi sıkarak çıkarınız.<br />
Adım 4: Deri preparatını* uygulanacak bölgeye uygulayınız ve<br />
şekil 1<br />
İYİCE KURULAYINIZ… ÇOK ÖNEMLİ!<br />
Adım 5: Uygulanacak bölgedeki derinin tamamı kapanmış olacak<br />
şekilde şeritleri birbirinin üzerine getirmeye dikkat ederek<br />
burnun alt kısmından itibaren ½ inç genişliğindeki deri<br />
kapama şeridini* uygulayınız (Bkz şekil 1).<br />
Adım 6: Dorsum Ped üzerindeki kağıdı çekiniz ve istenirse<br />
Radiks’ten Supratip bölgesine kadar deri kapama şeridi şekil 2<br />
üzerine uygulayınız. Dorsum Ped’in yapışkan maddesi deri<br />
ile temas etmemelidir (Bkz şekil 2).<br />
Adım 7: Yumuşak-Yapılı Splintin boyutunu uygulanacak bölgeye<br />
göre ayarlayınız. Gerekirse splint makasla kesilebilir. İdeal<br />
boydaki splint lateral osteotomi bölgelere kadar (Radiksten<br />
Supratip tepe birleşme yerine kadar) yanlamasına şekil 3<br />
uzanmalıdır (ancak geçmemelidir).<br />
Adım 8: 150o - 160 oF suda burun splinti yumuşatınız (yaklaşık 30 saniye)<br />
Adım 9: Splintin arkasındaki kağıdı çıkarınız ve yapışkan tarafını deri kapama<br />
şeridi ve Dorsum Ped üzerinden buruna uygulayınız. Gerekli şekli alacak<br />
ve uygun bir biçimde sıkacak şekilde Yumuşak splinti biçimlendiriniz.<br />
ÖNEMLİ NOT: Splintin yapışkan tarafını cilde temas ettirmeyiniz!! (Bkz<br />
şekil 3)<br />
Adım 10: Splint 7–8 gün içerisinde çıkarılmalıdır.<br />
*Yalnızca komple kit içindir.<br />
Çıkarma Talimatları<br />
Adım 1: Bayonet Blunt tipi Forsepsi deri kapama şeridi ve hastanın derisi<br />
arasında nazikçe açarak çıkarınız. Derinin kalkmaması için aşırı kuvvet<br />
uygulamayınız.<br />
Adım 2: Cerrah tarafından üç ya da 4 gün süreyle tekrar şerit uygulanabilir.<br />
Garanti<br />
<strong>Invotec</strong> <strong>International</strong>, <strong>Inc</strong>. bu ürünün malzeme ve yapımında bir kusur olmadığını<br />
garanti eder. <strong>Invotec</strong>, Satış Politikası bölümünde yer alan Ürün İadesi talimatlarına<br />
göre geri gönderildiği takdirde kusurlu bulunan ürünü değiştirecek veya para<br />
iadesi yapacaktır. <strong>Invotec</strong>, bu ürünün kullanımından veya kullanılamamasından<br />
dolaylı veya dolaysız olarak doğan hiçbir kayıp, hasar ve masrafın mesuliyetini<br />
kabul etmeyecektir. BU GARANTİ PAZARLANABİLİRLİK, ÖZEL BİR AMA-<br />
CA UYGUNLUK, HAK İHLALİNE KARŞI OLMAK DAHİL OLMAK ÜZERE<br />
BAŞKA TÜRDE DİĞER TÜM GARANTİLERİN YERİNE GEÇER VE HER NE<br />
TÜRDE İFADE VEYA İMA EDİLMİŞ OLURSA OLSUN ONLARI GEÇERSİZ KI-<br />
LAR. <strong>Invotec</strong> <strong>International</strong> ürünle ilgili ek yükümlülük ve sorumlulukları üstlenmemektedir<br />
ve hiçbir kişiyi de bunu üstlenmekte yetkili kılmamaktadır.<br />
Soft-Form ve Custom-Cut <strong>Invotec</strong> <strong>International</strong>, <strong>Inc</strong>. ticari markasıdır.<br />
Anwendung<br />
Zur Schienung der äuBeren Nase nach Trauma oder nach operativen Eingriffen der<br />
Nase, die eine postoperative Stützung verlangen.<br />
Material<br />
Poly-Urethan<br />
Applikation<br />
1. Die Nase reinigen und trocknen (sehr wichtig!).<br />
2. Die gereinige Stelle mit Isopropyl Alkohl-Tupfer* abwischen und<br />
sorgfálting trocken.<br />
3. Ein evrtl. oedem der Nase manuell ausstreichen.<br />
4. Skin-Prep* auftragen und anschließend unbendingt sorgfälting<br />
trocknen.<br />
Figur 1<br />
5. Hautfreundliches Pflaster von der Nasenwurzel bis zur<br />
Nasenspitze dachziegeförmig aufbringen. (nur auf trockene<br />
Haut!).<br />
6. Die Schutzfolie auf der Klebefläche des Polstersteges entfernen.<br />
7. Den Polstersteg längs auf den Nasenwücken kleben (zur<br />
vermeidung von Druckstellen). (Figur 2)<br />
8. Wählen Sie eine Schiene in der entsprechenden Größe: wenn Figur 2<br />
notwendig, kann diese mit einer Schere zurechtgeschnitten<br />
werden.<br />
9. Um das spätere Entfernen der Klebefolie zu erleichtern, lösen<br />
Sie diese an einer Ecke von der Schiene, bevor Sie sie in ein<br />
Wasserbad (65-71°C) legen. Nehmen Sie die Schiene aus dem<br />
Wasser, wenn sie transparent erscheint; dies zeigt an, daß das Figur 3<br />
Material modellierbar ust.<br />
10. Die Schutzfolie von den seitlichen Klebeflächen entfermen und die Schiene auf<br />
die vorbereitele Nase geben und zwar mit der schmalen Seite zur Nasenwurzel<br />
hin. Die Schiene exakt anmodellieren, dabei Zwischenräume vermeiden (somit<br />
wird einer Oedembildung vorgebeugt). (Figur 3)<br />
Achtung<br />
Niemals die Externe Nasenschiene oder den Polstersteg direkt auf die Haut kleben!!!<br />
Entfernung<br />
Entfernen Sie die Nasenschiene nach ca. 5-8 Tegen, indem Sie eine stumpfe<br />
Bayonett-Pinzette vorsichtig zwischen Haut und Pflaster schieben und spreizen. Auf<br />
keinen Fall darf die Schiene einfach nach oben abgezogen werden!<br />
Vorteile<br />
- Zeitersparnis gegenüber konventionellen Methoden.<br />
- Einer Oedembildung kann vorgebeugt werden.<br />
- Die Schiene ist aufgrund ihrer hautähnlichen Farbe kosmetisch verhältnismäßig<br />
unauffällig.<br />
*ur im Set enthalten<br />
Garantie<br />
<strong>Invotec</strong> <strong>International</strong>, <strong>Inc</strong>. garantiert, daß das Produkt frei von Material - und<br />
Herstellungsfehlern ist. Sollte sich ein Produkt als fehlerhaft erweisen, wird es von<br />
<strong>Invotec</strong> ersetzt bzw. Gutgeschrieben, insofern das Produkt gemäß den Hinweisen<br />
zur Waren-Rücksendung in den Verkaufsbedingungen retourniert wurde. <strong>Invotec</strong><br />
st nicht haftbar für jegliche Art von Verlust, Schaden oder Kosten, die aufgrund<br />
der Anwendung des Produktes entstehen. DIESE GARANTIE ERSETZT BZW.<br />
SCHLIEßT ALLE ANDEREN FORMEN VON GARANTIEN AUS. <strong>Invotec</strong><br />
<strong>International</strong> übernimmt keinerlei darüber hinausgehende Haftung oder<br />
Verantwortung bezüglich des Produktes.<br />
INVOTEC INTERNATIONAL, INC.<br />
6833 Phillips Industrial Blvd. • Jacksonville, Florida 32256 U.S.A.<br />
Tel: 800-998-8580 / 904-880-1229 • Fax: 904-886-9517 • www.invotec.net<br />
PJ SMITH MEDICAL PRODUCTS MARKETING<br />
18 Yeates Close • Thame OX93AR, UK<br />
INVOTEC INTERNATIONAL, INC.<br />
6833 Phillips Industrial Blvd. • Jacksonville, Florida 32256 U.S.A.<br />
Tel: 800-998-8580 / 904-880-1229 • Fax: 904-886-9517 • www.invotec.net<br />
PJ SMITH MEDICAL PRODUCTS MARKETING<br />
18 Yeates Close • Thame OX93AR, UK<br />
INVOTEC INTERNATIONAL, INC.<br />
6833 Phillips Industrial Blvd. • Jacksonville, Florida 32256 U.S.A.<br />
Tel: 800-998-8580 / 904-880-1229 • Fax: 904-886-9517 • www.invotec.net<br />
PJ SMITH MEDICAL PRODUCTS MARKETING<br />
18 Yeates Close • Thame OX93AR, UK