Istruzioni per l'uso Operating Instructions Mode d'emploi ... - Indesit
Istruzioni per l'uso Operating Instructions Mode d'emploi ... - Indesit
Istruzioni per l'uso Operating Instructions Mode d'emploi ... - Indesit

You also want an ePaper? Increase the reach of your titles
YUMPU automatically turns print PDFs into web optimized ePapers that Google loves.
GB<br />
MAX<br />
WATER LEVEL<br />
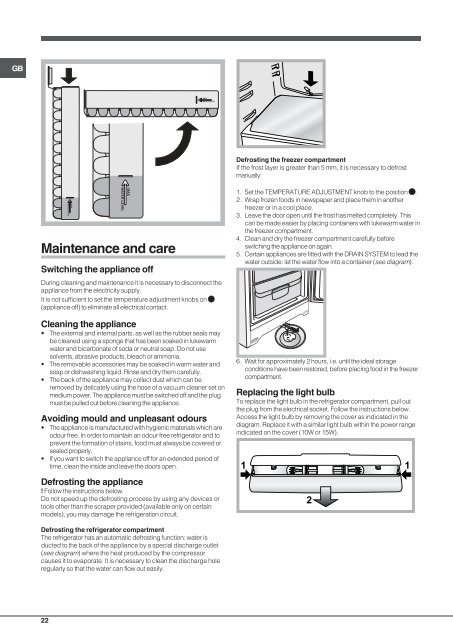
Defrosting the freezer compartment<br />
If the frost layer is greater than 5 mm, it is necessary to defrost<br />
manually:<br />
MAX<br />
WATER LEVEL<br />
Maintenance and care<br />
Switching the appliance off<br />
WATER LEVEL<br />
MAX<br />
During cleaning and maintenance it is necessary to disconnect the<br />
appliance from the electricity supply.<br />
It is not sufficient to set the tem<strong>per</strong>ature adjustment knobs on<br />
(appliance off) to eliminate all electrical contact.<br />
1. Set the TEMPERATURE ADJUSTMENT knob to the position .<br />
2. Wrap frozen foods in newspa<strong>per</strong> and place them in another<br />
freezer or in a cool place.<br />
3. Leave the door open until the frost has melted completely. This<br />
can be made easier by placing containers with lukewarm water in<br />
the freezer compartment.<br />
4. Clean and dry the freezer compartment carefully before<br />
switching the appliance on again.<br />
5. Certain appliances are fitted with the DRAIN SYSTEM to lead the<br />
water outside: let the water flow into a container (see diagram).<br />
Cleaning the appliance<br />
• The external and internal parts, as well as the rubber seals may<br />
be cleaned using a sponge that has been soaked in lukewarm<br />
water and bicarbonate of soda or neutral soap. Do not use<br />
solvents, abrasive products, bleach or ammonia.<br />
• The removable accessories may be soaked in warm water and<br />
soap or dishwashing liquid. Rinse and dry them carefully.<br />
• The back of the appliance may collect dust which can be<br />
removed by delicately using the hose of a vacuum cleaner set on<br />
medium power. The appliance must be switched off and the plug<br />
must be pulled out before cleaning the appliance.<br />
Avoiding mould and unpleasant odours<br />
• The appliance is manufactured with hygienic materials which are<br />
odour free. In order to maintain an odour free refrigerator and to<br />
prevent the formation of stains, food must always be covered or<br />
sealed pro<strong>per</strong>ly.<br />
• If you want to switch the appliance off for an extended <strong>per</strong>iod of<br />
time, clean the inside and leave the doors open.<br />
Defrosting the appliance<br />
! Follow the instructions below.<br />
Do not speed up the defrosting process by using any devices or<br />
tools other than the scra<strong>per</strong> provided (available only on certain<br />
models), you may damage the refrigeration circuit.<br />
6. Wait for approximately 2 hours, i.e. until the ideal storage<br />
conditions have been restored, before placing food in the freezer<br />
compartment.<br />
Replacing the light bulb<br />
To replace the light bulb in the refrigerator compartment, pull out<br />
the plug from the electrical socket. Follow the instructions below.<br />
Access the light bulb by removing the cover as indicated in the<br />
diagram. Replace it with a similar light bulb within the power range<br />
indicated on the cover (10W or 15W).<br />
1 1<br />
2<br />
Defrosting the refrigerator compartment<br />
The refrigerator has an automatic defrosting function: water is<br />
ducted to the back of the appliance by a special discharge outlet<br />
(see diagram) where the heat produced by the compressor<br />
causes it to evaporate. It is necessary to clean the discharge hole<br />
regularly so that the water can flow out easily.<br />
22