FiltoMatic CWS 7000 / 14000 / 25000 - Oase Teichbau
FiltoMatic CWS 7000 / 14000 / 25000 - Oase Teichbau
FiltoMatic CWS 7000 / 14000 / 25000 - Oase Teichbau

Create successful ePaper yourself
Turn your PDF publications into a flip-book with our unique Google optimized e-Paper software.
<strong>FiltoMatic</strong> <strong>CWS</strong> <strong>7000</strong> / <strong>14000</strong> / <strong>25000</strong>
Pos: 1 /Filter/<strong>FiltoMatic</strong> <strong>CWS</strong>/Grafik_mon1_<strong>FiltoMatic</strong>_<strong>CWS</strong> @ 9\mod_1225900315094_0.doc @ 55281 @ @ 1<br />
Pos: 2 /Filter/<strong>FiltoMatic</strong> <strong>CWS</strong>/Grafik_mon2_<strong>FiltoMatic</strong>_<strong>CWS</strong> @ 9\mod_1228948908636_0.doc @ 58191 @ @ 1<br />
2
Pos: 3 /Filter/<strong>FiltoMatic</strong> <strong>CWS</strong>/Grafik_mon3_FiltoMatik_<strong>CWS</strong> @ 9\mod_1228949046309_0.doc @ 58218 @ @ 1<br />
3
Pos: 4 /Filter/<strong>FiltoMatic</strong> <strong>CWS</strong>/Grafik_mon4_<strong>FiltoMatic</strong>_<strong>CWS</strong> @ 14\mod_1259942269701_0.doc @ 85258 @ @ 1<br />
4
Pos: 5 /Filter/<strong>FiltoMatic</strong> <strong>CWS</strong>/Grafik_mon5_<strong>FiltoMatic</strong>_<strong>CWS</strong> @ 9\mod_1228949238169_0.doc @ 58272 @ @ 1<br />
5
Pos: 6 /Alle Produkte/Länderkennzeichen/00===LEER=== @ 0\mod_1126786111024_0.doc @ 5631 @ @ 1<br />
Pos: 7 /Alle Produkte/Dummy_module/===== Seitenwechsel ===== @ 0\mod_1125648978015_0.doc @ 1630 @ @ 1<br />
6
Pos: 8 /Alle Produkte/Länderkennzeichen/01===DE===1.Sprache @ 7\mod_1197635778796_0.doc @ 42184 @ @ 1<br />
Pos: 9 /Alle Produkte/Überschriften/H1 INH Vorwort @ 6\mod_1196355497538_6.doc @ 41061 @ @ 1<br />
Pos: 11 /Alle Produkte/Dummy_module/Abstand 18 pt @ 6\mod_1196355593257_0.doc @ 41087 @ @ 1<br />
Pos: 17 /Alle Produkte/Dummy_module/===== Seitenwechsel ===== @ 0\mod_1125648978015_0.doc @ 1630 @ @ 1<br />
- DE -<br />
- DE -<br />
Vorwort<br />
Pos: 10 /Alle Produkte/Einleitung/Hinweise zur Anleitung @ 22\mod_1297351575088_6.doc @ 130532 @ @ 1<br />
Willkommen bei OASE Living Water. Mit dem Kauf des Produkts <strong>FiltoMatic</strong> <strong>CWS</strong> haben Sie eine gute<br />
Wahl getroffen.<br />
Lesen Sie vor der ersten Benutzung des Gerätes die Anleitung sorgfältig und machen Sie sich mit dem<br />
Gerät vertraut. Alle Arbeiten an und mit diesem Gerät dürfen nur gemäß der vorliegenden Anleitung<br />
durchgeführt werden.<br />
Beachten Sie unbedingt die Sicherheitshinweise für den richtigen und sicheren Gebrauch.<br />
Bewahren Sie diese Anleitung sorgfältig auf. Bei Besitzerwechsel geben Sie bitte die Anleitung weiter.<br />
Pos: 12 /Alle Produkte/Überschriften/H1 INH Inhaltsverzeichnis @ 6\mod_1196352696480_6.doc @ 40823 @ @ 1<br />
Inhaltsverzeichnis<br />
Pos: 13 /Alle Produkte/Verzeichnisse/INH Inhaltsverzeichnis @ 6\mod_1196426354681_6.doc @ 41247 @ @ 1<br />
1. Lieferumfang ...................................................................................................................................... 8<br />
2. Übersicht ............................................................................................................................................ 8<br />
3. Rechtliche Bestimmungen ................................................................................................................. 8<br />
3.1 Bestimmungsgemäße Verwendung........................................................................................... 8<br />
3.2 Erweiterte Garantiebedingungen für das OASE ClearWaterSystem......................................... 8<br />
4. Sicherheitshinweise............................................................................................................................ 9<br />
4.1 Gefahren durch die Kombination von Wasser und Elektrizität .................................................. 9<br />
4.2 Vorschriftsmäßige elektrische Installation ................................................................................. 9<br />
4.3 Sicherer Betrieb ......................................................................................................................... 9<br />
5. Aufstellen.......................................................................................................................................... 10<br />
6. Montage ........................................................................................................................................... 11<br />
7. Inbetriebnahme ................................................................................................................................ 12<br />
8. Bedienung ........................................................................................................................................ 13<br />
8.1 Übersicht Controller ................................................................................................................. 13<br />
8.2 Schmutzwasserpumpe einstellen ............................................................................................ 14<br />
8.3 UVC-Vorklärer einstellen ......................................................................................................... 15<br />
9. Störungsbeseitigung......................................................................................................................... 16<br />
10. Reinigung und Wartung ................................................................................................................... 17<br />
10.1 Filterschäume reinigen............................................................................................................. 17<br />
10.2 Reinigungskomponenten entnehmen und voneinander lösen ................................................ 17<br />
10.3 Schmutzwasserpumpe reinigen............................................................................................... 18<br />
10.4 UVC-Lampe im UVC-Vorklärer wechseln................................................................................ 18<br />
10.5 Reinigungsrotor kontrollieren ................................................................................................... 19<br />
10.6 Filterschäume wechseln .......................................................................................................... 19<br />
10.7 Komplettreinigung durchführen................................................................................................ 20<br />
11. Verschleißteile.................................................................................................................................. 21<br />
12. Lagern/Überwintern.......................................................................................................................... 21<br />
13. Entsorgung ....................................................................................................................................... 21<br />
Pos: 14 /Alle Produkte/Verzeichnisse/INH_Technische Daten @ 7\mod_1196634026593_6.doc @ 42013 @ @ 1<br />
Technische Daten................................................................................................................................... 337<br />
Pos: 15 /Alle Produkte/Verzeichnisse/INH Symbole auf dem Gerät @ 7\mod_1196634527018_6.doc @ 42066 @ @ 1<br />
Symbole auf dem Gerät.......................................................................................................................... 341<br />
Pos: 16 /Alle Produkte/Verzeichnisse/INH Ersatzteile @ 7\mod_1196634640409_6.doc @ 42092 @ @ 1<br />
Ersatzteile............................................................................................................................................... 342<br />
7
Pos: 19 /Filter/<strong>FiltoMatic</strong> <strong>CWS</strong>/Lieferumfang <strong>FiltoMatic</strong> <strong>CWS</strong> @ 14\mod_1260184604492_6.doc @ 85457 @ @ 1<br />
Pos: 20 /Alle Produkte/Dummy_module/Abstand 18 pt @ 6\mod_1196355593257_0.doc @ 41087 @ @ 1<br />
Pos: 22 /Filter/<strong>FiltoMatic</strong> <strong>CWS</strong>/Übersicht_<strong>FiltoMatic</strong>_<strong>CWS</strong> @ 9\mod_1225798040370_6.doc @ 55197 @ @ 1<br />
Pos: 23 /Alle Produkte/Dummy_module/Abstand 18 pt @ 6\mod_1196355593257_0.doc @ 41087 @ @ 1<br />
Pos: 25 /Alle Produkte/Überschriften/H2 Bestimmungsgemäße Verwendung @ 7\mod_1204017558273_6.doc @ 44538 @ @ 1<br />
Pos: 27 /Filter/<strong>FiltoMatic</strong> <strong>CWS</strong>/Garantiebedingungen_<strong>FiltoMatic</strong>_<strong>CWS</strong> @ 9\mod_1228834658609_6.doc @ 58071 @ @ 1<br />
Pos: 28 /Alle Produkte/Dummy_module/===== Seitenwechsel ===== @ 0\mod_1125648978015_0.doc @ 1630 @ @ 1<br />
- DE -<br />
Pos: 18 /Alle Produkte/Überschriften/H1 Lieferumfang @ 6\mod_1196355702321_6.doc @ 41113 @ @ 1<br />
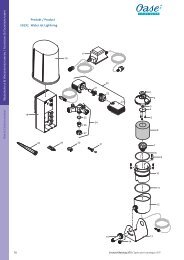
1. Lieferumfang<br />
►<br />
Öffnen Sie den Deckel (1) mit dem Drehgriff (2) um die Montageteile zu entnehmen (Bild A).<br />
Bild B Anzahl Beschreibung<br />
3 1 Behälter <strong>FiltoMatic</strong> <strong>CWS</strong><br />
4 1 Auslauf DN70<br />
5 1 Flachdichtung DN70<br />
6 1 Flachdichtung 1 ½“<br />
7 1 O-Ring DN40<br />
8 1 Auslauftülle DN40<br />
9 1 Einlauftülle 1 ½“<br />
10 2 Überwurfmutter<br />
11 1 Schlauchschelle<br />
1 Gebrauchsanweisung<br />
1 Schnellaufbauanleitung<br />
1 Garantieheft<br />
1 Klarwasser-Garantiekarte<br />
1 Garantieverlängerungskarte 2+1<br />
Pos: 21 /Alle Produkte/Überschriften/H1 Übersicht @ 9\mod_1225798428891_6.doc @ 55223 @ @ 1<br />
2. Übersicht<br />
Bild C Bezeichnung Beschreibung siehe Kapitel …<br />
3 Behälter Montage, Reinigung und Wartung<br />
4 Auslauf DN70 Montage<br />
8 Schmutzwasserauslauf DN40 Montage<br />
9 Einlauf 1 ½“ Montage<br />
12 Verschmutzungsgradanzeige Reinigung und Wartung<br />
13 Schaumhalter Reinigung und Wartung<br />
14 Schmutzwasserpumpe Reinigung und Wartung<br />
15 Controller Bedienung<br />
16 UVC-Vorklärgerät Reinigung und Wartung<br />
17 Sperrschieber für Einlauf Inbetriebnahme, Reinigung und Wartung<br />
18 Kontrollfenster UVC-Lampe Reinigung und Wartung<br />
19 Rasthaken Reinigung und Wartung<br />
20 Einfüllöffnung Biokick <strong>CWS</strong> Inbetriebnahme<br />
Pos: 24 /Alle Produkte/Überschriften/H1 Rechtliche Bestimmungen @ 6\mod_1196352859169_6.doc @ 40849 @ @ 1<br />
3. Rechtliche Bestimmungen<br />
3.1 Bestimmungsgemäße Verwendung<br />
Pos: 26 /Filter/<strong>FiltoMatic</strong> <strong>CWS</strong>/Bestimmungsgemäße Verwendung <strong>FiltoMatic</strong> <strong>CWS</strong> @ 9\mod_1225447393150_6.doc @ 55051 @ @ 1<br />
Der <strong>FiltoMatic</strong> <strong>CWS</strong> ist als Filtersystem zur mechanischen und biologischen Reinigung von<br />
Gartenteichen mit einer Wassertemperatur von +4 °C bis +35 °C zu verwenden. Das Gerät ist nur für<br />
den privaten Einsatz geeignet und darf ausschließlich zur Reinigung von Gartenteichen mit oder ohne<br />
Fischbesatz verwendet werden.<br />
3.2 Erweiterte Garantiebedingungen für das OASE ClearWaterSystem<br />
Ansprüche aus der Garantie können nur gegenüber der OASE GmbH, Tecklenburger Straße 161,<br />
D-48477 Hörstel, Deutschland, dadurch geltend gemacht werden, dass Sie an uns frachtfrei und auf Ihr<br />
Transportrisiko das beanstandete Gerät oder Geräteteil mit dem Originalverkaufsbeleg des OASE-<br />
Fachhändlers, dieser Garantieurkunde sowie der schriftlichen Angabe des beanstandeten Fehlers<br />
senden. Im Falle eines Defektes an Schmutzwasserpumpe, UVC-Vorklärer oder Controller ist<br />
ausschließlich die einzelne defekte Komponente (Schmutzwasserpumpe, UVC-Vorklärer, Controller)<br />
einzusenden und nicht das komplette Gerät.<br />
8
Pos: 32 /Alle Produkte/Sicherheit/Einleitung/SIC 3 Gefahr durch Kombination von Wasser und Elektrizität @ 11\mod_1253173630836_6.doc @ 74186 @ @ 1<br />
Pos: 33 /Alle Produkte/Überschriften/H2 Vorschriftsmäßige elektrische Installation @ 7\mod_1204019051664_6.doc @ 44617 @ @ 1<br />
Pos: 34 /Filter/<strong>FiltoMatic</strong> <strong>CWS</strong>/SIC_Elektrische Installation_<strong>FiltoMatic</strong> <strong>CWS</strong> @ 9\mod_1225446401080_6.doc @ 54991 @ @ 1<br />
Pos: 35 /Alle Produkte/Überschriften/H2 Sicherer Betrieb @ 7\mod_1204022429287_6.doc @ 44669 @ @ 1<br />
Pos: 36 /Filter/<strong>FiltoMatic</strong> <strong>CWS</strong>/SIC_Sicherer Betrieb <strong>FiltoMatic</strong> <strong>CWS</strong> @ 9\mod_1225446564801_6.doc @ 55017 @ @ 1<br />
Pos: 37 /Filter/<strong>FiltoMatic</strong> <strong>CWS</strong>/SIC_UVC-Lampe_<strong>FiltoMatic</strong>_<strong>CWS</strong> @ 9\mod_1226926376657_6.doc @ 55801 @ @ 1<br />
Pos: 38 /Filter/<strong>FiltoMatic</strong> <strong>CWS</strong>/SIC_Überspannung_im_Netz_<strong>FiltoMatic</strong>_<strong>CWS</strong> @ 9\mod_1229504617720_6.doc @ 58771 @ @ 1<br />
Pos: 39 /Alle Produkte/Dummy_module/Abstand 18 pt @ 6\mod_1196355593257_0.doc @ 41087 @ @ 1<br />
Pos: 40 /Alle Produkte/Dummy_module/===== Seitenwechsel ===== @ 0\mod_1125648978015_0.doc @ 1630 @ @ 1<br />
- DE -<br />
Pos: 29 /Alle Produkte/Überschriften/4. H1 Sicherheitshinweise @ 6\mod_1196353926316_6.doc @ 40979 @ @ 1<br />
4. Sicherheitshinweise<br />
Pos: 30 /Alle Produkte/Sicherheit/Einleitung/SIC 1 Sicherheitshinweise Einleitung @ 7\mod_1205310799730_6.doc @ 45452 @ @ 1<br />
Die Firma OASE hat dieses Gerät nach dem aktuellen Stand der Technik und den bestehenden<br />
Sicherheitsvorschriften gebaut. Trotzdem können von diesem Gerät Gefahren für Personen und<br />
Sachwerte ausgehen, wenn das Gerät unsachgemäß bzw. nicht dem Verwendungszweck entsprechend<br />
eingesetzt wird oder wenn die Sicherheitshinweise nicht beachtet werden.<br />
Pos: 31 /Alle Produkte/Sicherheit/Einleitung/SIC 2 Kinder und Jugendliche unter 16 Jahren @ 13\mod_1259074357193_6.doc @ 83214 @ @ 1<br />
Aus Sicherheitsgründen dürfen Kinder und Jugendliche unter 16 Jahren sowie Personen, die<br />
mögliche Gefahren nicht erkennen können oder nicht mit dieser Gebrauchsanleitung vertraut<br />
sind, dieses Gerät nicht benutzen. Kinder müssen beaufsichtigt werden, um sicherzustellen,<br />
dass sie nicht mit dem Gerät spielen.<br />
4.1 Gefahren durch die Kombination von Wasser und Elektrizität<br />
► Die Kombination von Wasser und Elektrizität kann bei nicht vorschriftsmäßigem Anschluss oder<br />
unsachgemäßer Handhabung zum Tod oder zu schweren Verletzungen durch Stromschlag führen.<br />
► Bevor Sie in das Wasser greifen, immer alle im Wasser befindlichen Geräte spannungsfrei schalten.<br />
4.2 Vorschriftsmäßige elektrische Installation<br />
► Bei Fragen und Problemen wenden Sie sich zu Ihrer eigenen Sicherheit an eine zugelassene<br />
Elektrofachkraft.<br />
► Elektrische Installationen an Gartenteichen müssen den internationalen und nationalen<br />
Errichterbestimmungen entsprechen. Beachten Sie insbesondere die DIN VDE 0100 und<br />
DIN VDE 0702.<br />
► Vergleichen Sie die elektrischen Daten der Stromversorgung mit dem Typenschild auf dem UVC-<br />
Vorklärer.<br />
► Betreiben Sie den <strong>FiltoMatic</strong> <strong>CWS</strong> nur an einer vorschriftsmäßig installierten Steckdose.<br />
► Beachten Sie, dass die Stromversorgung durch eine Fehlerstrom-Schutzeinrichtung mit einem<br />
Bemessungsstrom von maximal 30 mA abgesichert sein muss.<br />
► Installieren Sie den <strong>FiltoMatic</strong> <strong>CWS</strong> so, dass keine Verletzungsgefahr für Personen besteht.<br />
► Verwenden Sie Leitungen nur im abgewickelten Zustand.<br />
► Verlängerungsleitungen müssen für den Außeneinsatz zugelassen sein und der DIN VDE 0620<br />
genügen.<br />
► Verlegen Sie die Anschlussleitung geschützt, so dass Beschädigungen ausgeschlossen sind.<br />
► Halten Sie alle Anschlussstellen trocken. Es besteht Gefahr elektrischer Stromschläge.<br />
4.3 Sicherer Betrieb<br />
►<br />
►<br />
►<br />
►<br />
►<br />
►<br />
►<br />
►<br />
►<br />
Betreiben Sie den <strong>FiltoMatic</strong> <strong>CWS</strong> nur, wenn sich keine Personen im Wasser aufhalten.<br />
Tragen oder ziehen Sie den UVC-Vorklärer und die Schmutzwasserpumpe des <strong>FiltoMatic</strong> <strong>CWS</strong><br />
nicht an den Anschlussleitungen.<br />
Betreiben sie keine defekten Geräte. Bei defekten elektrischen Anschlussleitungen darf der<br />
Filtomatic <strong>CWS</strong> nicht betrieben werden. Ziehen Sie sofort den Netzstecker. Reparaturen an den<br />
Anschlussleitungen des UVC-Vorklärers bzw. der Schmutzwasserpumpe sind nicht möglich.<br />
Tauschen Sie die Komponenten aus. Entsorgen Sie die defekten Komponenten fachgerecht.<br />
Öffnen Sie niemals die Gehäuse des UVC-Vorklärers, der Schmutzwasserpumpe, der Steuerung<br />
oder dessen zugehörige Teile, wenn nicht ausdrücklich in dieser Gebrauchsanweisung darauf<br />
hingewiesen wird.<br />
Verwenden Sie nur Original-Ersatzteile und -Zubehör.<br />
Filtern Sie niemals andere Flüssigkeiten als Wasser.<br />
Die Strahlung der UVC-Lampe ist auch in geringen Dosierungen gefährlich für Augen und Haut.<br />
Betreiben Sie die UVC-Lampe niemals in einem defekten Gehäuse oder ausserhalb des Gehäuses.<br />
Betreiben Sie die UVC-Lampe niemals ohne Reinigungsrotor, da dieser auch ein Sichtschutz vor der<br />
UVC-Strahlung ist.<br />
Überspannung im Netz kann zu Betriebsstörungen des Gerätes führen. Informationen hierzu finden<br />
Sie im Kapitel "Störungsbeseitigung".<br />
9
Pos: 43 /Alle Produkte/Dummy_module/===== Seitenwechsel ===== @ 0\mod_1125648978015_0.doc @ 1630 @ @ 1<br />
- DE -<br />
Pos: 41 /Alle Produkte/Überschriften/6. H1 Aufstellen @ 7\mod_1202907856718_6.doc @ 43932 @ @ 1<br />
5. Aufstellen<br />
Pos: 42 /Filter/<strong>FiltoMatic</strong> <strong>CWS</strong>/Aufstellen <strong>FiltoMatic</strong>_<strong>CWS</strong>_<strong>7000</strong>-<strong>25000</strong> @ 24\mod_1311156480859_6.doc @ 136651 @ @ 1<br />
Damit der <strong>FiltoMatic</strong> <strong>CWS</strong> von Beginn an nahezu wartungsfrei betrieben werden kann, sollten Sie den<br />
Gartenteich zuvor gründlich reinigen. Für diese Reinigung empfiehlt OASE den Teichschlammsauger<br />
Pondovac. Kommt der <strong>FiltoMatic</strong> <strong>CWS</strong> bei einem neu angelegten Gartenteich zum Einsatz, kann diese<br />
Reinigung in der Regel entfallen.<br />
<strong>FiltoMatic</strong> <strong>CWS</strong> aufstellen (Bild D, E)<br />
Planen Sie die Aufstellung des <strong>FiltoMatic</strong> <strong>CWS</strong>. Durch eine sorgfältige Planung und Berücksichtigung<br />
der Umgebungsbedingungen erreichen Sie optimale Betriebsbedingungen für den <strong>FiltoMatic</strong> <strong>CWS</strong>. Die<br />
folgenden Punkte sind eine Hilfestellung für Ihre Planungen.<br />
► Eine optimale Wasserrückführung vom <strong>FiltoMatic</strong> <strong>CWS</strong> zum Gartenteich wird durch einen Bachlauf<br />
gewährleistet. So wird das gefilterte Teichwasser mit Sauerstoff angereichert, bevor es in den Teich<br />
zurückfließt. Lassen die örtlichen Gegebenheiten den Aufbau eines Bachlaufes nicht zu, ist der<br />
Auslauf mit einem DN70-Rohr entsprechend zu verlängern, so dass das gefilterte Teichwasser über<br />
das Rohr in den Teich zurückfließt. Die Montage eines DN70-Rohres wird im Kapitel Montage<br />
beschrieben.<br />
► Der <strong>FiltoMatic</strong> <strong>CWS</strong> muss unbedingt waagerecht ausgerichtet werden, um bei Überlauf eine<br />
Teichentleerung zu vermeiden. Benutzen Sie zum Ausrichten eine Wasserwaage.<br />
► Berücksichtigen Sie das große Volumen des <strong>FiltoMatic</strong> <strong>CWS</strong> und das daraus resultierende Gewicht<br />
im gefüllten Zustand. Wählen Sie einen geeigneten Untergrund bzw. eine Bodenplatte in der<br />
Erdgrube, um ein Nachsacken des <strong>FiltoMatic</strong> <strong>CWS</strong> zu vermeiden.<br />
► Planen Sie ausreichend Bewegungsfreiraum ein, um Reinigungs- und Wartungsarbeiten<br />
durchführen zu können.<br />
► Heben Sie eine ausreichend dimensionierte Erdgrube zur Aufstellung des <strong>FiltoMatic</strong> <strong>CWS</strong><br />
aus (Bild D). Beachten Sie hierbei, dass der <strong>FiltoMatic</strong> <strong>CWS</strong> bis zum oberen Absatz eingegraben<br />
werden kann (Bild E, Höhe c). Orientieren Sie sich für die Maße der Aushebung an der folgenden<br />
Tabelle:<br />
Modell a b c (+ Höhe Bodenplatte)<br />
<strong>FiltoMatic</strong> <strong>CWS</strong> <strong>7000</strong> ca. 50 cm ca. 50 cm ca. 30 cm<br />
<strong>FiltoMatic</strong> <strong>CWS</strong> <strong>14000</strong> ca. 50 cm ca. 50 cm ca. 50 cm<br />
<strong>FiltoMatic</strong> <strong>CWS</strong> <strong>25000</strong> ca. 50 cm ca. 70 cm ca. 50 cm<br />
►<br />
►<br />
Befüllen Sie den Behälter (3) mit Wasser, bevor Sie das Erdreich anfüllen, damit der Behälter nicht<br />
zusammengedrückt wird.<br />
Führen Sie das DN40-Rohrende für den Schmutzwasserauslauf so weit vom Teich entfernt, dass<br />
das abgepumpte Schmutzwasser nicht in den Teich zurückfließen kann.<br />
10
Pos: 46 /Alle Produkte/Dummy_module/===== Seitenwechsel ===== @ 0\mod_1125648978015_0.doc @ 1630 @ @ 1<br />
- DE -<br />
Pos: 44 /Alle Produkte/Überschriften/5. H1 Montage @ 7\mod_1202907725390_6.doc @ 43906 @ @ 1<br />
6. Montage<br />
Pos: 45 /Filter/<strong>FiltoMatic</strong> <strong>CWS</strong>/Montage <strong>FiltoMatic</strong> <strong>CWS</strong> @ 9\mod_1225186907843_6.doc @ 54837 @ @ 1<br />
<strong>FiltoMatic</strong> <strong>CWS</strong> montieren<br />
Der <strong>FiltoMatic</strong> <strong>CWS</strong> wird vormontiert ausgeliefert. Sie müssen lediglich den Auslauf und die Anschlüsse<br />
für Einlauf und Schmutzwasserauslauf montieren.<br />
Die Auslauftülle (8) für den Schmutzwasserauslauf ist transparent. Dadurch wird beim späteren<br />
Reinigungsprozess der Verschmutzungsgrad des ausströmenden Wassers angezeigt. Fließt sichtbar<br />
sauberes Wasser aus dem Schmutzauslauf, kann der Abpumpvorgang gestoppt werden. Die Reinigung<br />
ist abgeschlossen.<br />
Auslauf montieren (Bild F)<br />
1.1. Flachdichtung (5) über die am Gehäuse vormontierte Auslaufschraube (25) legen.<br />
1.2. Auslauf (4) auf die Auslaufschraube (25) schrauben.<br />
1.3. Ggf. ein DN70-Rohr (26) zur Verlängerung an den Auslauf (4) anschließen, damit das gefilterte<br />
Teichwasser zurück in den Teich fließen kann. Das Gefälle im DN70-Rohr muss mindestens 1,5 %<br />
betragen.<br />
OASE empfiehlt als Verlängerung für den Auslauf:<br />
− DN70-Rohr, 480 mm, schwarz (OASE Best.-Nr. 55034)<br />
− DN70-Rohrwinkel, 45°, schwarz (OASE Best.-Nr. 55044)<br />
− DN70-Rohrwinkel, 87°, schwarz (OASE Best.-Nr. 55045)<br />
− DN70-Rohrwinkel, T, schwarz (OASE Best.-Nr. 55046)<br />
Einlauf montieren (Bild F)<br />
1.1. Einlauftülle (9) und Flachdichtung (6) in die Überwurfmutter (10) stecken und am Gewinde (21) des<br />
Sperrschiebers festschrauben.<br />
1.2. Schlauchschelle (11) über den von der Pumpe Aquamax kommenden Schlauch (24) schieben.<br />
Schlauch auf die Einlauftülle (9) stecken und mit der Schlauchschelle fixieren.<br />
OASE empfiehlt als Schlauch: Spiralschlauch, grün (OASE Best.-Nr. 52981)<br />
Legen Sie das Schlauchende vor der Montage für zwei Minuten in heißes Wasser, damit sich der<br />
Schlauch leichter auf die Einlauftülle (9) schieben lässt.<br />
Schmutzwasserauslauf montieren (Bild F)<br />
1.1. O-Ring (7) auf die Auslauftülle (8) montieren und in die Überwurfmutter (10) stecken. Danach am<br />
Gewinde des vormontierten Schmutzwasserauslaufes (22) festschrauben.<br />
1.2. Ein DN40-Rohr (23) auf die Auslauftülle (8) stecken. Das Ende des DN40-Rohres bis zu einer Stelle<br />
legen, wo das abzupumpende Schmutzwasser versickern kann. Das Gefälle im DN40-Rohr muss<br />
1,5 % … 2 % betragen.<br />
OASE empfiehlt als Verlängerung für den Schmutzwasserauslauf:<br />
− DN40-Rohr, 480 mm, schwarz (OASE Best.-Nr. 50307)<br />
− DN40-Rohrwinkel, 45°, schwarz (OASE Best.-Nr. 50308)<br />
11
Pos: 48 /Alle Produkte/Warnhinweise/7.2 ACHTUNG - Gerät nicht dimmen, nicht an Zeitschaltuhr @ 13\mod_1259920518051_6.doc @ 84816 @ @ 1<br />
Pos: 49 /Alle Produkte/Dummy_module/Abstand 3 pt @ 11\mod_1251901846864_0.doc @ 72824 @ @ 1<br />
Pos: 50 /Filter/<strong>FiltoMatic</strong> <strong>CWS</strong>/Inbetriebnahme <strong>FiltoMatic</strong> <strong>CWS</strong> @ 9\mod_1225196867060_6.doc @ 54863 @ @ 1<br />
Pos: 51 /Alle Produkte/Dummy_module/===== Seitenwechsel ===== @ 0\mod_1125648978015_0.doc @ 1630 @ @ 1<br />
- DE -<br />
Pos: 47 /Alle Produkte/Überschriften/7. H1 Inbetriebnahme @ 7\mod_1196625111244_6.doc @ 41415 @ @ 1<br />
7. Inbetriebnahme<br />
Achtung! Empfindliche elektrische Bauteile.<br />
Mögliche Folge: Das Gerät wird zerstört.<br />
Schutzmaßnahme:<br />
► Gerät nicht an eine dimmbare Stromversorgung anschließen.<br />
► Gerät nicht an einer Zeitschaltuhr betreiben.<br />
Achtung! Gefährliche elektrische Spannung.<br />
Mögliche Folgen: Tod oder schwere Verletzungen.<br />
Schutzmaßnahmen: Bevor Sie ins Wasser greifen und vor Arbeiten am Gerät Netzstecker (Bild G)<br />
ziehen.<br />
Beachten Sie die Sicherheitshinweise!<br />
Der <strong>FiltoMatic</strong> <strong>CWS</strong> schaltet sich automatisch ein, wenn die Stromverbindung hergestellt ist.<br />
Einschalten (Bild G): Netzstecker (27) in die Steckdose stecken.<br />
Ausschalten (Bild G): Netzstecker (27) ziehen.<br />
Behälter mit Wasser befüllen (Bild C)<br />
► Schalten Sie vor Inbetriebnahme des <strong>FiltoMatic</strong> <strong>CWS</strong> die Pumpe Aquamax ein. Der Behälter (3)<br />
wird mit Wasser gefüllt.<br />
Für das Befüllen des Behälters muss der Sperrschieber (17) geöffnet sein. Drücken Sie dazu den<br />
Sperrschieber (17) bis zum Anschlag herunter.<br />
Erreicht der Wasserpegel im Behälter (3) den Auslauf (4), fließt das gefilterte Teichwasser über den<br />
Auslauf (4) zurück in den Teich.<br />
Für die weiteren Einstellungen des <strong>FiltoMatic</strong> <strong>CWS</strong> lesen Sie das folgende Kapitel Bedienung.<br />
Biologischen Filterstarter einfüllen (Bild C)<br />
Für den schnellen Aufbau von Bakterienpopulationen wird der OASE Filterstarter Biokick <strong>CWS</strong><br />
empfohlen (OASE Best.-Nr. 50295). Mikroorganismen siedeln sich im Filtersystem an, vermehren sich<br />
und sorgen durch den Abbau von überflüssigen Nährstoffen für eine bessere Teichwasserqualität.<br />
► Die für das Teichvolumen benötigte Menge Biokick <strong>CWS</strong> in die Einfüllöffnung (20) füllen.<br />
12
Pos: 53 /Filter/<strong>FiltoMatic</strong> <strong>CWS</strong>/Bedienung_<strong>FiltoMatic</strong>_<strong>CWS</strong>_Controller @ 13\mod_1259921096539_6.doc @ 84964 @ @ 1<br />
Pos: 54 /Alle Produkte/Dummy_module/===== Seitenwechsel ===== @ 0\mod_1125648978015_0.doc @ 1630 @ @ 1<br />
- DE -<br />
Pos: 52 /Alle Produkte/Überschriften/H1 Bedienung @ 7\mod_1196625148604_6.doc @ 41441 @ @ 1<br />
8. Bedienung<br />
8.1 Übersicht Controller<br />
C1<br />
C2<br />
C3<br />
C4<br />
C5<br />
C6<br />
Display<br />
LED-Anzeige für Funktion der<br />
Schmutzwasserpumpe<br />
LED-Anzeige für UVC-Funktion<br />
Taste für manuellen Betrieb der<br />
Schmutzwasserpumpe<br />
Taste zur Einstellung eines<br />
Reinigungsprogramms für die<br />
Schmutzwasserpumpe<br />
Taste zur Einstellung eines<br />
Betriebsprogramms für den<br />
UVC-Vorklärer<br />
Anzeigen am Controller<br />
Das Display (C1) zeigt<br />
− standardmäßig die Wassertemperatur an.<br />
− automatisch 2 Sekunden nach dem letztem Tastendruck wieder die Wassertemperatur an.<br />
− bei entsprechender Auswahl die Reinigungsprogramme.<br />
− bei Betätigung einer Taste die gespeicherten Einstellungen.<br />
− die verbleibende Lebensdauer (h × 100) der UVC-Lampe.<br />
Meldungen im Display (C1)<br />
− "LA" blinkt im 8-s-Rhytmus 1×: UVC-Lampe hat 7500 Betriebsstunden geleistet; es verbleiben noch 500 Betriebsstunden.<br />
− "LA" blinkt im 8-s-Rhytmus 2×: UVC-Lampe hat 8000 Betriebsstunden geleistet und sollte gewechselt werden.<br />
− "PS" leuchtet im 4-s-Rhytmus auf: Schmutzwasserpumpe hat die max. Laufzeit erreicht und ist für 1,5 Stunden gesperrt.<br />
LED für Schmutzwasserpumpe (C2)<br />
− LED blinkt grün: Teilentleerung des Behälters.<br />
− LED leuchtet grün: komplette Entleerung des Behälters.<br />
− LED leuchtet rot: Pumpe blockiert.<br />
− LED aus: Pumpe nicht aktiv.<br />
LED für UVC-Vorklärer (C3)<br />
− LED leuchtet blau: UVC-Vorklärer ist eingeschaltet.<br />
− LED blinkt im 8-s-Rhytmus blau: UVC-Vorklärer befindet sich im Betriebsprogramm Automatik (AU).<br />
− LED aus: UVC-Vorklärer ist ausgeschaltet.<br />
Hinweis:<br />
Das integrierte Thermometer misst permanent die Wassertemperatur und damit die Basisgröße für die Betriebsprogramme.<br />
Die Silikonabdeckung schützt den Controller vor Verschmutzungen und beeinträchtigt weder das Ablesen des Displays noch die<br />
Funktionsfähigkeit der Tasten. Der Controller ist wasserdicht und kann auch ohne Silikonabdeckung betrieben werden.<br />
13
Pos: 55 /Filter/<strong>FiltoMatic</strong> <strong>CWS</strong>/Bedienung_<strong>FiltoMatic</strong>_<strong>CWS</strong>_Schmutzwasserpumpe_einstellen @ 13\mod_1259926492646_6.doc @ 85052 @ @ 1<br />
Pos: 56 /Alle Produkte/Dummy_module/===== Seitenwechsel ===== @ 0\mod_1125648978015_0.doc @ 1630 @ @ 1<br />
- DE -<br />
8.2 Schmutzwasserpumpe einstellen<br />
Der Verschmutzungsgrad des Teichwassers wird neben der Wassertemperatur maßgeblich vom<br />
Fischbesatz bestimmt. Die Schmutzwasserpumpe pumpt den Schmutz am Boden des Behälters in<br />
Intervallen ab. Durch die vier verschiedenen Reinigungsprogramme lässt sich das Intervall zum<br />
Abpumpen des Schmutzwassers individuell an den Verschmutzungsgrad anpassen. Eine Reinigung<br />
dauert ca. 9 s. Ein Reinigungszyklus verbraucht ca. 4 Liter Wasser. Die Tabelle zeigt die Auswahlmöglichkeiten<br />
der Reinigungsprogramme. Das Reinigungsprogramm INTERVAL 1 beinhaltet die<br />
meisten Reinigungsintervalle, INTERVAL 4 die wenigsten. Wählen Sie ein Programm, das für den<br />
Verschmutzungsgrad des Teichwassers am Besten geeignet ist. Im Auslieferungszustand ist das<br />
Reinigungsprogramm INTERVAL 2 voreingestellt.<br />
Wassertemperatur<br />
Reinigungsprogramme Schmutzwasserpumpe<br />
+ Intervalle − Intervalle<br />
INTERVAL 1 INTERVAL 2 INTERVAL 3 INTERVAL 4 OF<br />
< 5 °C aus aus aus aus aus<br />
< 8 °C 1 × pro Tag alle 2 Tage alle 3 Tage alle 3 Tage aus<br />
8 °C - 14 °C 2 × pro Tag 1 × pro Tag alle 2 Tage alle 3 Tage aus<br />
15 °C - 21 °C 4 × pro Tag 2 × pro Tag 1 × pro Tag alle 2 Tage aus<br />
≥ 22 °C 8 × pro Tag 4 × pro Tag 2 × pro Tag 1 × pro Tag aus<br />
Bei Wassertemperaturen 35 °C sind die Reinigungsprogramme inaktiv. Die Pumpe kann nur<br />
noch von Hand betätigt werden. Zum kompletten Abpumpen müssen Sie die Taste PUMP (C4)<br />
dauerhaft gedrückt halten.<br />
Reinigungsprogramm für Schmutzwasserpumpe einstellen<br />
1.1. Taste INTERVAL (C5) drücken. Das Reinigungsprogramm INTERVAL 2 wird im Display (C1) angezeigt.<br />
1.2. Sooft die Taste INTERVAL (C5) drücken, bis gewünschtes Reinigungsprogramm angezeigt wird.<br />
1.3. Die Taste INTERVAL (C5) loslassen, wenn das gewünschte Reinigungsprogramm angezeigt wird.<br />
− Die Einstellung ist gespeichert, wenn im Display (C1) nach ca. 2 s die Wassertemperatur angezeigt<br />
wird.<br />
Schmutzwasser manuell abpumpen<br />
Das Schmutzwasser lässt sich jederzeit auch manuell abpumpen.<br />
► Drücken Sie die Taste PUMP (C4)<br />
− Die LED (C2) blinkt grün. Der Schmutzaustrag beginnt sofort.<br />
►<br />
►<br />
Wenn Sie die Taste PUMP (C4) länger als 10 Sekunden drücken, beginnt die komplette Entleerung<br />
des Behälters. Die grüne LED (C2) leuchtet. Die Schmutzwasserpumpe läuft maximal 4 Minuten.<br />
Sie können die Entleerung stoppen, indem Sie die Taste PUMP (C4) einmal drücken.<br />
Zur Vermeidung von Überhitzungsschäden ist die max. Laufzeit der Schmutzwasserpumpe auf<br />
12 Minuten pro 1,5 Stunden begrenzt. Bei starker Verschmutzung kann die Laufzeit auch auf<br />
8 Minuten begrenzt sein. Nach Erreichen der max. Laufzeit lässt sich die Pumpe von Hand nicht<br />
mehr betätigen. Im Display wird "PS" angezeigt. Nach 1,5 Stunden ist die Schmutzwasserpumpe<br />
wieder betriebsbereit.<br />
14
Pos: 57 /Filter/<strong>FiltoMatic</strong> <strong>CWS</strong>/Bedienung_<strong>FiltoMatic</strong>_<strong>CWS</strong>_Vorklaerer_einstellen @ 15\mod_1261489931765_6.doc @ 89282 @ @ 1<br />
Pos: 58 /Alle Produkte/Dummy_module/===== Seitenwechsel ===== @ 0\mod_1125648978015_0.doc @ 1630 @ @ 1<br />
- DE -<br />
8.3 UVC-Vorklärer einstellen<br />
Der Verschmutzungsgrad des Teichwassers durch Algenbildung wird maßgeblich von der<br />
Wassertemperatur bestimmt. Der UVC-Vorklärer beseitigt mit UV-Licht Grün- und Schwebealgen im<br />
Unterwasserbetrieb und ist somit eine wichtige Komponente für die Reinigung des Teichwassers. In<br />
Abhängigkeit von der Wassertemperatur wird mit dem Betriebsprogramm AU die UVC-Lampe des UVC-<br />
Vorklärers in Intervallen ein- und ausgeschaltet und somit individuell an den Verschmutzungsgrad<br />
angepasst. Die folgende Tabelle zeigt das Betriebsprogramm AU (Automatik) des UVC-Vorklärers und<br />
die Betriebszustände ON (Ein) und OF (Aus).<br />
Wassertemperatur<br />
UVC-Lampe ist<br />
eingeschaltet<br />
Betriebsprogramme UVC-Vorklärer<br />
AU ON OF<br />
UVC-Lampe ist<br />
ausgeschaltet<br />
< 8 °C 8 h 16 h<br />
8 °C - 14 °C 48 h 24 h<br />
15 °C - 21 °C 72 h 24 h<br />
≥ 22 °C 96 h 24 h<br />
UVC-Lampe ist<br />
permanent<br />
eingeschaltet<br />
UVC-Lampe ist<br />
permanent<br />
ausgeschaltet<br />
Im Auslieferungszustand ist das Betriebsprogramm AU voreingestellt.<br />
► Beim Netzeinschalten startet das Betriebsprogramm AU mit dem Aus-Intervall. Die UVC-Lampe<br />
leuchtet für min. 16 Stunden nicht. Wenn Sie bei der Inbetriebnahme Biokick <strong>CWS</strong> einsetzen,<br />
werden dadurch die Bakterienkulturen im Biokick <strong>CWS</strong> geschützt.<br />
► Wird das Betriebsprogramm AU manuell angewählt, startet der UVC-Vorklärer mit dem Ein-Intervall.<br />
Betriebsprogramm für den UVC-Vorklärer einstellen<br />
1.1. Die Taste UVC (C6) drücken. Das Betriebsprogramm AU wird auf dem Display (C1) angezeigt.<br />
1.2. Sooft die Taste UVC (C6) drücken, bis gewünschtes Betriebsprogramm angezeigt wird.<br />
1.3. Die Taste UVC (C6) loslassen, wenn das gewünschte Betriebsprogramm angezeigt wird.<br />
− Die Einstellung ist gespeichert, wenn im Display (C1) nach ca. 2 Sekunden die Wassertemperatur<br />
angezeigt wird.<br />
Betriebsstundenzähler UVC-Vorklärer abfragen<br />
Die Lebensdauer einer UVC-Lampe für den UVC-Vorklärer beträgt ca. 8000 Stunden. Der integrierte<br />
Betriebsstundenzähler zählt nach dem Countdown-Prinzip ab diesem Wert abwärts.<br />
► Die Taste UVC (C6) 5 Sekunden gedrückt halten. Im Display (C1) wird eine Zahl angezeigt.<br />
− Multiplizieren Sie die Zahl mit 100, um die verbleibenden Betriebsstunden zu ermitteln.<br />
− Beispiel: angezeigter Wert '45' 100 = 4500 verbleibende Betriebsstunden.<br />
Betriebsstundenzähler UVC-Vorklärer zurücksetzen<br />
Nach dem Wechsel einer UVC-Lampe müssen Sie den Betriebsstundenzähler zurücksetzen.<br />
1.1. Die Taste UVC (C6) 12 Sekunden permanent gedrückt halten!<br />
− Nach 5 Sekunden wird die verbleibende Lebensdauer auf dem Display (C1) angezeigt.<br />
Anschließend blinkt die Anzeige. Wird im Display (C1) die Wassertemperatur angezeigt, ist der<br />
Betriebsstundenzähler auf 8000 Stunden zurückgesetzt.<br />
1.2. Die Taste UVC (C6) loslassen.<br />
15
Pos: 61 /Alle Produkte/Dummy_module/===== Seitenwechsel ===== @ 0\mod_1125648978015_0.doc @ 1630 @ @ 1<br />
- DE -<br />
Pos: 59 /Alle Produkte/Überschriften/H1 Störungsbeseitigung @ 7\mod_1196625290699_6.doc @ 41519 @ @ 1<br />
9. Störungsbeseitigung<br />
Pos: 60 /Filter/<strong>FiltoMatic</strong> <strong>CWS</strong>/Störungstabelle_<strong>FiltoMatic</strong>_<strong>CWS</strong> @ 14\mod_1259929430129_6.doc @ 85202 @ @ 1<br />
Störung Ursache Abhilfe<br />
Der Controller schaltet nicht ein<br />
Netzspannung fehlt<br />
Netzspannung überprüfen<br />
Zuleitungen kontrollieren<br />
Controller sitzt nicht korrekt auf UVC-<br />
Vorklärer<br />
Sitz des Controllers kontrollieren<br />
Aus dem Auslauf DN70 fließt kein Wasser<br />
zurück in den Teich<br />
Schmutzwasserpumpe schaltet nicht ein<br />
UVC-Lampe schaltet nicht ein<br />
Pumpe Aquamax nicht eingeschaltet<br />
Bei geöffnetem Deckel Sperrschieber<br />
geschlossen<br />
Pumpenrotor blockiert<br />
Behälter bereits entleert<br />
Behälter teilweise entleert,<br />
Schmutzwasserpumpe kann nicht ansaugen<br />
Bei Wassertemperaturen 35 °C<br />
sind die Reinigungsprogramme inaktiv<br />
Schmutzwasserpumpe hat die max. Laufzeit<br />
erreicht. Im Display wird "PS" angezeigt.<br />
UVC-Lampe defekt<br />
Aufgrund von Überspannung im Netz hat die<br />
Sicherheitseinrichtung im UVC-Vorklärer<br />
ausgelöst<br />
Pumpe Axuamax einschalten<br />
Sperrschieber öffnen<br />
Pumpenrotor reinigen<br />
Behälter befüllen<br />
Behälter befüllen<br />
Schmutzwasserpumpe kann nur noch von<br />
Hand betätigt werden.<br />
− Zum kompletten Abpumpen die Taste<br />
PUMP dauerhaft gedrückt halten.<br />
1,5 Stunden warten. Danach ist die<br />
Schmutzwasserpumpe wieder betriebsbereit<br />
UVC-Lampe wechseln<br />
Netzspannung ausschalten und wieder<br />
einschalten, um die Sicherheitseinrichtung<br />
zurückzusetzen<br />
− Im Kontrollfenster prüfen, ob die UVC-<br />
Lampe leuchtet (blaues Licht)<br />
− Zur Prüfung gegebenenfalls mit der Taste<br />
UVC die UVC-Lampe einschalten<br />
(Betriebszustand ON)<br />
16
Pos: 63 /Alle Produkte/Warnhinweise/E-ACHTUNG - Netzspannung absch. (vor Arbeitsbeginn/vor Griff ins Wasser)# @ 13\mod_1259760934607_6.doc @ 84729 @ @ 1<br />
Pos: 64 /Alle Produkte/Dummy_module/Abstand 3 pt @ 11\mod_1251901846864_0.doc @ 72824 @ @ 1<br />
Pos: 65 /Filter/<strong>FiltoMatic</strong> <strong>CWS</strong>/Reinigung_Wartung_<strong>FiltoMatic</strong>_<strong>CWS</strong>_Filterschaeume_reinigen @ 14\mod_1259928464654_6.doc @ 85108 @ @ 1<br />
Pos: 66 /Filter/<strong>FiltoMatic</strong> <strong>CWS</strong>/Reinigung_Wartung_<strong>FiltoMatic</strong>_<strong>CWS</strong>_Reinigungskomponenten_entnehmen @ 9\mod_1228741070856_6.doc @ 57790 @ @ 1<br />
1.6.<br />
Pos: 67 /Alle Produkte/Dummy_module/===== Seitenwechsel ===== @ 0\mod_1125648978015_0.doc @ 1630 @ @ 1<br />
- DE -<br />
Pos: 62 /Alle Produkte/Überschriften/8. H1 Reinigung und Wartung @ 7\mod_1196625212761_6.doc @ 41467 @ @ 1<br />
10. Reinigung und Wartung<br />
Achtung! Gefährliche elektrische Spannung!<br />
Mögliche Folgen: Tod oder schwere Verletzungen.<br />
Schutzmaßnahmen:<br />
► Bevor Sie ins Wasser greifen, Netzspannung aller im Wasser befindlichen Geräte abschalten.<br />
► Vor Arbeiten am Gerät Netzspannung abschalten.<br />
10.1 Filterschäume reinigen<br />
Die Reinigungsintervalle sind abhängig vom Verschmutzungsgrad der Filterschäume. Ein erhöhter<br />
Wasserstand in der Verschmutzungsgradanzeige (Bild C, 12) im Innendeckel signalisiert, dass die<br />
Reinigungsleistung der Filterschäume nachlässt. Eine Reinigung wird ab einem Verschmutzungsgrad<br />
von 75 % oder spätestens bei Überlauf notwendig.<br />
So reinigen Sie die Filterschäume (Bild H, I, J)<br />
1.1. Deckel (1) mit Drehgriff (2) öffnen und vom Behälter (3) nehmen.<br />
1.2. Sperrschieber (17) durch Hochziehen schließen.<br />
− Es fließt kein Teichwasser mehr in den Behälter.<br />
− Hinweis: Beim Schließen des Sperrschiebers (17) spritzt Wasser aus dem Luftansaugstutzen.<br />
1.3. Schaumhalter (13) mehrmals hochziehen.<br />
− Die Filterschäume werden zusammengepresst. Die Verschmutzungen werden ausgewaschen.<br />
1.4. Die Taste PUMP (C4) am Controller (15) länger als 10 Sekunden drücken.<br />
− Die LED (C2) leuchtet grün. Das Schmutzwasser im Behälter wird komplett abgepumpt.<br />
1.5. Sperrschieber (17) durch Herunterdrücken öffnen.<br />
− Der Behälter wird wieder mit Teichwasser gefüllt.<br />
Wiederholen Sie den Reinigungsvorgang bei starker Verschmutzung der Filterschäume.<br />
10.2 Reinigungskomponenten entnehmen und voneinander lösen<br />
Für die Reinigung und Wartung der Reinigungskomponenten Schmutzwasserpumpe (14) und UVC-<br />
Vorklärer (16) ist es notwendig, diese aus dem Behälter zu entnehmen. Der Controller (15) ist am UVC-<br />
Vorklärer aufgesteckt. Die Reinigungskomponenten sind nicht fest mit dem Innendeckel (47) verbunden,<br />
sondern liegen in den Führungen des Innendeckels (47) bzw. des Sperrschiebers (17).<br />
So entnehmen Sie die Reinigungskomponenten (Bild K)<br />
1.1. Deckel (1) mit Drehgriff (2) öffnen und vom Behälter (3) nehmen (Bild H).<br />
1.2. Sperrschieber (17) durch Hochziehen schließen.<br />
− Es fließt kein Teichwasser mehr in den Behälter.<br />
− Hinweis: Beim Schließen des Sperrschiebers spritzt Wasser aus dem Luftansaugstutzen.<br />
1.3. Reinigungskomponenten Schmutzwasserpumpe (14) und UVC-Vorklärer (16) als Einheit aus dem<br />
Innendeckel (47) heben.<br />
So lösen Sie die Reinigungskomponenten und den Controller voneinander (Bild L)<br />
1.1. Rasthaken (30) am UVC-Vorklärer (16) gedrückt halten.<br />
1.2. Controller (15) mit Kraft vom UVC-Vorklärer abziehen.<br />
1.3. Anschlusskabel (28) der Schmutzwasserpumpe mit Kraft vom Controller (15) abziehen.<br />
1.4. Die Silikonschutzkappen zum Schutz der offenen Buchsen aufstecken.<br />
1.5. Reinigungskomponenten und Controller in umgekehrter Reihenfolge zusammenbauen (Bild M).<br />
− Beim Zusammenbau des Controllers und des UVC-Vorklärers darauf achten, dass die Pfeile auf<br />
beiden Komponenten aufeinander zeigen.<br />
Kontrollieren Sie beim Zusammenbau den Sitz der O-Ringe (29) an den Anschlusstellen des Controllers<br />
und des UVC-Vorklärers! Reinigen Sie die O-Ringe (29) bei Bedarf. Fehlen die O-Ringe oder sitzen<br />
nicht korrekt, korrodieren die elektrischen Kontakte. Die Komponenten werden irreparabel beschädigt!<br />
17
Pos: 68 /Filter/<strong>FiltoMatic</strong> <strong>CWS</strong>/Reinigung_Wartung_<strong>FiltoMatic</strong>_<strong>CWS</strong>_Schmutzwasserpumpe_reinigen @ 14\mod_1259928823735_6.doc @ 85136 @ @ 1<br />
Pos: 69 /Filter/<strong>FiltoMatic</strong> <strong>CWS</strong>/Reinigung_Wartung_<strong>FiltoMatic</strong>_<strong>CWS</strong>_UVC-Lampe_Vorklaerer_wechseln @ 9\mod_1228741316733_6.doc @ 57846 @ @ 1<br />
1.1.<br />
Pos: 70 /Alle Produkte/Dummy_module/===== Seitenwechsel ===== @ 0\mod_1125648978015_0.doc @ 1630 @ @ 1<br />
- DE -<br />
10.3 Schmutzwasserpumpe reinigen<br />
Eine Reinigung der Schmutzwasserpumpe wird notwendig, wenn der Rotor des Pumpenmotors (33)<br />
stark verschmutzt oder blockiert ist. Dies kann aufgrund größerer Verschmutzungsteile, wie z. B. Steine,<br />
passieren. Ist die Schmutzwasserpumpe stark verschmutzt oder blockiert, leuchtet die LED-Anl<br />
zeige (C2) am Controller (15) rot.<br />
So reinigen Sie die Schmutzwasserpumpe (Bild N)<br />
1.1. Motorgehäuse (33) drehen, bis das Symbol mit "Schloss auf" auf den Pfeil am Oberrohr (31) zeigt.<br />
1.2. Motorgehäuse (33) abnehmen und reinigen.<br />
1.3. In umgekehrter Reihenfolge zusammenbauen.<br />
− Wichtig: Das Motorgehäuse (33) ist erst arretiert, wenn das Symbol "Schloss zu" auf den Pfeil am<br />
Oberrohr (31) zeigt (Bild N).<br />
1.4. Taste PUMP (C4) einmal drücken.<br />
− Die LED (C2) wechselt von rot auf grün. Die Schmutzwasserpumpe (14) läuft an. Andernfalls läuft<br />
die Schmutzwasserpumpe (14) aufgrund einer Störung nicht an. Siehe hierzu Kapitel<br />
Störungsbeseitigung.<br />
1.5. Wenn notwendig, den Überlauf am Oberrohr (31) reinigen. Hierzu Schmutzrohrabdeckung (32)<br />
öffnen.<br />
10.4 UVC-Lampe im UVC-Vorklärer wechseln<br />
Achtung! Gefährliche ultraviolette Strahlung.<br />
Mögliche Folgen: Schwere Verletzungen der Augen und der Haut.<br />
Schutzmaßnahmen: Das Gerät nur mit montiertem Gehäuse einschalten.<br />
Eine defekte UVC-Lampe wird nicht am Controller (15) angezeigt. Kontrollieren Sie die Funktion der<br />
UVC-Lampe, indem Sie in regelmäßigen Abständen durch das Kontrollfenster (18) schauen (Bild O).<br />
Die UVC-Lampe hat eine begrenzte Lebensdauer und muss nach Ablauf der Lebensdauer gewechselt<br />
werden (siehe auch Kapitel Betriebsstundenzähler UVC-Vorklärer abfragen).<br />
1.1. Wassergehäuse (35) drehen, bis das Symbol mit "Schloss auf" auf den Pfeil am UVC-Oberteil (34)<br />
zeigt (Bild O).<br />
1.2. Wassergehäuse (35) abziehen (Bild O).<br />
1.3. Reinigungsrotor (37) vom Quarzglasrohr (45) abziehen (Bild P).<br />
1.4. Schraube (40) an Überwurfmutter (39) lösen und Überwurfmutter (39) abschrauben (Bild Q).<br />
1.5. Quarzglasrohr (45) mit O-Ring (46) mit einer Drehbewegung abziehen (Bild R).<br />
1.6. UVC-Lampenschutz (44) abziehen (Bild R).<br />
1.7. UVC-Lampe (43) aus Steckplatz am UVC-Oberteil (34) ziehen und auswechseln (Bild R).<br />
1.8. UVC-Vorklärer in umgekehrter Reihenfolge zusammenbauen.<br />
− Wichtig: Das Wassergehäuse (35) ist erst geschlossen, wenn das Symbol "Schloss zu" auf den<br />
Pfeil am UVC-Oberteil (34) zeigt (Bild O).<br />
► Achten Sie beim Zusammenbau darauf, dass der Anschlag (41) der Überwurfmutter (39) gegen den<br />
Anschlag (42) am UVC-Oberteil (34) stößt. Die Schraube (40) kann erst dann eingedreht<br />
werden (Bild Q).<br />
► Der O-Ring (36) am Verschluss des Wassergehäuses (35) ist fest aufgespannt. Nehmen Sie den O-<br />
Ring (36) nur dann ab, wenn dieser ausgewechselt werden muss, z. B. wenn er porös ist (Bild O).<br />
► Im Quarzglasrohr (45) kommt es zur Kondenswasserbildung. Dieses Kondenswasser ist<br />
unvermeidbar und hat keinen Einfluss auf Funktion und Sicherheit.<br />
► Das Quarzglasrohr (45) kann im Laufe der Zeit verkratzen oder blind werden. In diesem Fall ist eine<br />
ausreichende Reinigungsleistung der UVC-Lampe (43) nicht mehr gegeben. Das Quarzglasrohr (45)<br />
muss ausgewechselt werden.<br />
18
Pos: 71 /Filter/<strong>FiltoMatic</strong> <strong>CWS</strong>/Reinigung_Wartung_<strong>FiltoMatic</strong>_<strong>CWS</strong>_Reinigungsrotor_kontrollieren @ 9\mod_1228741419030_6.doc @ 57874 @ @ 1<br />
Pos: 72 /Filter/<strong>FiltoMatic</strong> <strong>CWS</strong>/Reinigung_Wartung_<strong>FiltoMatic</strong>_<strong>CWS</strong>_Filterschaeume_wechseln @ 14\mod_1259929379754_6.doc @ 85174 @ @ 1<br />
Pos: 73 /Alle Produkte/Dummy_module/===== Seitenwechsel ===== @ 0\mod_1125648978015_0.doc @ 1630 @ @ 1<br />
- DE -<br />
10.5 Reinigungsrotor kontrollieren<br />
Der Reinigungsrotor (37) reinigt das Quarzglasrohr (45). Er wird durch die Wasserströmung im<br />
Wassergehäuse angetrieben (Bild P).<br />
Die ständige Rotationsbewegung des Reinigungsrotors (37) führt langfristig zum Verschleiß der<br />
Lagerbuchse (38). Der Reinigungsrotor (37) muss dann gewechselt werden (Bild P).<br />
1.1. Wassergehäuse (35) drehen, bis das Symbol "Schloss auf" auf den Pfeil am UVC-Oberteil (34)<br />
zeigt (Bild O).<br />
1.2. Wassergehäuse (35) abziehen (Bild O).<br />
1.3. Verschleißgrenze der Lagerbuchse (38) prüfen.<br />
− Wenn die Lagerbuchse (38) bis auf 0 mm verschlissen ist, müssen Sie den Reinigungsrotor (37)<br />
austauschen (Bild P).<br />
1.4. UVC-Vorklärer in umgekehrter Reihenfolge zusammenbauen.<br />
− Wichtig: Das Wassergehäuse (35) ist erst geschlossen, wenn das Symbol "Schloss zu" auf den<br />
Pfeil am UVC-Oberteil (34) zeigt (Bild O).<br />
10.6 Filterschäume wechseln<br />
Die Filterschäume (49) sollten jährlich gewechselt werden.<br />
So wechseln Sie die Filterschäume:<br />
1.1. Deckel (1) mit Drehgriff (2) öffnen und vom Behälter (3) nehmen (Bild H).<br />
1.2. Sperrschieber (17) durch Hochziehen schließen (Bild S).<br />
− Es fließt kein Teichwasser mehr in den Behälter.<br />
− Hinweis: Beim Schließen des Sperrschiebers (17) spritzt Wasser aus dem Luftansaugstutzen.<br />
1.3. Schaumhalter (13) im Innendeckel (47) mehrmals hochziehen. Das Wasser in den<br />
Filterschäumen (49) wird ausgepresst (Bild I).<br />
1.4. Die Taste PUMP (C4) am Controller (15) länger als 10 Sekunden drücken (Bild J).<br />
− Die LED (C2) leuchtet grün. Das Schmutzwasser im Behälter wird abgepumpt.<br />
1.5. Reinigungskomponenten Schmutzwasserpumpe (14) und UVC-Vorklärer (16) aus dem Innendeckel<br />
(47) heben (Bild K).<br />
1.6. Blaue Rasthaken (19) auf beiden Seiten lösen und Innendeckel (47) mit Schaumhaltern (13) aus<br />
dem Behälter nehmen (Bild S).<br />
1.7. Schaumhalter (13) leicht hochziehen, beide blauen Rasthaken (48) an Schaumhaltern (13) zusammendrücken<br />
und nach unten aus dem Innendeckel (47) schieben (Bild T).<br />
1.8. Die vier schwarzen Rasthaken (54) am Schaumoberteil eindrücken und Schaumhalter (13) mitsamt<br />
der Filterpatrone (49) nach unten herausnehmen (Bild T).<br />
− Hinweis: Nacheinander jeweils die beiden gegenüberliegenden Rasthaken (54) zusammendrücken<br />
und nach unten aus dem Innendeckel (47) schieben.<br />
1.9. Gebrauchte Filterpatrone (49) und Schaumunterteil (55) vom Schaumhalter (13) abziehen (Bild U).<br />
− Filterpatrone fachgerecht entsorgen.<br />
1.10. Erst neues Schaumunterteil (55), dann neue Filterpatrone (49) auf den Schaumhalter (13)<br />
stecken (Bild U).<br />
− Darauf achten, dass die Filterpatrone (49) passgenau im Schaumunterteil (55) sitzt.<br />
1.11. Schaumhalter (13) mit neuer Filterpatrone (49) von unten in den Innendeckel einsetzen. Dabei<br />
den Schaumhalter soweit hochziehen, dass die beiden blauen Rasthaken (48) und die vier<br />
schwarzen Rasthaken (54) im Innendeckel einrasten (Bild T).<br />
− Wichtig: Nur wenn alle vier schwarzen Rasthaken (54) eingerastet sind, ist ein einwandfreier Sitz<br />
der Filterpatrone (49) gewährleistet.<br />
19
Pos: 74 /Filter/<strong>FiltoMatic</strong> <strong>CWS</strong>/Reinigung_Wartung_<strong>FiltoMatic</strong>_<strong>CWS</strong>_Komplettreinigung_durchfuehren @ 9\mod_1228741615703_6.doc @ 57930 @ @ 1<br />
Pos: 75 /Alle Produkte/Dummy_module/===== Seitenwechsel ===== @ 0\mod_1125648978015_0.doc @ 1630 @ @ 1<br />
- DE -<br />
10.7 Komplettreinigung durchführen<br />
Leichte Schwebeteilchen werden von den Filterschäumen mechanisch gefiltert und ggf. biologisch<br />
abgebaut. Schwebeteilchen, die schwerer als Wasser sind, lagern sich am Behälterboden ab und<br />
verschmutzen ihn. Führen Sie einmal jährlich eine Komplettreinigung durch, vorzugsweise dann, wenn<br />
Sie den <strong>FiltoMatic</strong> <strong>CWS</strong> winterfest machen.<br />
Behälter vollständig entleeren<br />
Eine vollständige Entleerung dauert maximal 4 Minuten.<br />
1.1. Pumpe Aquamax ausschalten.<br />
1.2. Deckel (1) mit Drehgriff (2) öffnen und vom Behälter (3) nehmen (Bild H).<br />
1.3. Schaumhalter (13) dreimal hochziehen (Bild J).<br />
− Die Filterschäume werden zusammengepresst. Die Verschmutzungen werden ausgewaschen.<br />
1.4. Die Taste PUMP (C4) länger als 10 Sekunden drücken.<br />
− Die LED (C2) leuchtet grün. Der Behälter wird entleert.<br />
− Sie können die Entleerung stoppen, indem Sie die Taste PUMP (C4) einmal drücken. Der Behälter<br />
ist komplett entleert, wenn die Schmutzwasserpumpe abschaltet und durch die transparente<br />
Auslauftülle (6) kein Wasser mehr ausfließt.<br />
Gerät reinigen<br />
Hierzu sind der Lamellenabscheider (51) und die Schmutzpyramide (52) zu entnehmen. Dazu müssen<br />
Sie den Behälter komplett leerpumpen und den Innendeckel (47) herausnehmen. Lesen Sie hierzu die<br />
vorangestellten Kapitel.<br />
So entnehmen und reinigen Sie den Lamellenabscheider<br />
1.1. Rasthaken (50) herunterdrücken und Lamellenabscheider (51) aus der Führung am Behälter (3)<br />
nach oben herausziehen (Bild V).<br />
1.2. Rasthaken (52) oben am Lamellenabscheider (51) eindrücken und die beiden Teile des<br />
Lamellenabscheiders (51) auseinanderklappen (Bild W).<br />
1.3. Beide Teile mit Wasser und weicher Bürste reinigen.<br />
1.4. Lamellenabscheider (51) in umgegehrter Reihenfolge zusammenbauen<br />
1.5. Lamellenabscheider (51) in den Behälter (3) einsetzen (Bild Y).<br />
− Der Rasthaken (50) muss am Sperrschieber (17) einrasten.<br />
So entnehmen und reinigen Sie die Schmutzpyramide (Bild X)<br />
Entnehmen Sie die Schmutzpyramide (53) nur bei Bedarf. Der Aus- und Einbau ist mit deutlichem<br />
Kraftaufwand verbunden.<br />
1.1. Unter die Schmutzpyramide (53) greifen und durch kräftiges Hochziehen von den drei Halterungen<br />
am Behälterboden lösen.<br />
1.2. Schmutzpyramide (53) mit Wasser und weicher Bürste reinigen.<br />
1.3. Behälterboden auswaschen.<br />
1.4. Schmutzpyramide (53) mit kräftigem Druck auf die Halterungen aufstecken.<br />
− Das Einrasten in die Halterungen ist deutlich zu hören ("Click").<br />
Zwischen Schmutzpyramide (53) und dem Behälterboden ist ein Abstand von ca. 8 mm vorgesehen.<br />
Durch diesen Abstand kann die Schmutzwasserpumpe den Schmutz am Behälterboden abpumpen.<br />
Achten Sie beim Zusammenbauen darauf, dass dieser Abstand eingehalten wird. Versuchen Sie nicht,<br />
die Schmutzpyramide (53) mit zu großem Kraftaufwand bis auf den Behälterboden zu drücken!<br />
20
Pos: 78 /Alle Produkte/Dummy_module/Abstand 18 pt @ 6\mod_1196355593257_0.doc @ 41087 @ @ 1<br />
Pos: 81 /Alle Produkte/Dummy_module/Abstand 18 pt @ 6\mod_1196355593257_0.doc @ 41087 @ @ 1<br />
Pos: 84 /Alle Produkte/Dummy_module/===== Seitenwechsel ===== @ 0\mod_1125648978015_0.doc @ 1630 @ @ 1<br />
- DE -<br />
Pos: 76 /Alle Produkte/Überschriften/H1 Verschleißteile @ 8\mod_1223247075102_6.doc @ 53882 @ @ 1<br />
11. Verschleißteile<br />
Pos: 77 /Filter/<strong>FiltoMatic</strong> <strong>CWS</strong>/Verschleissteile_<strong>FiltoMatic</strong>_<strong>CWS</strong>_<strong>7000</strong>-<strong>25000</strong> @ 24\mod_1311156621953_6.doc @ 136679 @ @ 1<br />
Verschleißteil Modell Ident-Nr.<br />
UVC-Lampe<br />
<strong>FiltoMatic</strong> <strong>CWS</strong> <strong>7000</strong> 56112<br />
<strong>FiltoMatic</strong> <strong>CWS</strong> <strong>14000</strong> 56237<br />
<strong>FiltoMatic</strong> <strong>CWS</strong> <strong>25000</strong> 56237<br />
Quarzglasrohr<br />
<strong>FiltoMatic</strong> <strong>CWS</strong> <strong>7000</strong> 13312<br />
<strong>FiltoMatic</strong> <strong>CWS</strong> <strong>14000</strong> 13332<br />
<strong>FiltoMatic</strong> <strong>CWS</strong> <strong>25000</strong> 13332<br />
Reinigungsrotor<br />
<strong>FiltoMatic</strong> <strong>CWS</strong> <strong>7000</strong> 12703<br />
<strong>FiltoMatic</strong> <strong>CWS</strong> <strong>14000</strong> 12705<br />
<strong>FiltoMatic</strong> <strong>CWS</strong> <strong>25000</strong> 12705<br />
Filterpatronen<br />
<strong>FiltoMatic</strong> <strong>CWS</strong> <strong>7000</strong> 50901 (1×)<br />
<strong>FiltoMatic</strong> <strong>CWS</strong> <strong>14000</strong> 50904 (1×)<br />
<strong>FiltoMatic</strong> <strong>CWS</strong> <strong>25000</strong> 50904 (2×)<br />
Pos: 79 /Alle Produkte/Überschriften/10. H1 Lagern / Überwintern @ 7\mod_1196625251745_6.doc @ 41493 @ @ 1<br />
12. Lagern/Überwintern<br />
Pos: 80 /Filter/<strong>FiltoMatic</strong> <strong>CWS</strong>/Lagern/Ueberwintern FitoMatic <strong>CWS</strong>_<strong>7000</strong>-<strong>25000</strong> @ 24\mod_1311156831812_6.doc @ 136707 @ @ 1<br />
Vor der Frostperiode müssen die Reinigungskomponenten Schmutzwasserpumpe (14), Controller (15)<br />
und UVC-Vorklärer (16) frostfrei gelagert werden.<br />
1.1. Führen Sie eine Komplettreinigung durch (siehe Kapitel Komplettreinigung durchführen) und<br />
prüfen Sie die Komponenten auf Beschädigung.<br />
− Behälter (3) und Filterschäume (49) brauchen nicht frostfrei gelagert zu werden. Pumpen Sie den<br />
Behälter (3) jedoch vorher vollständig leer.<br />
1.2. Decken Sie den Behälter (3) ab, so dass kein Wasser eindringen kann.<br />
− Der aufgesetzte Deckel (1) reicht nicht aus, da durch die Aussparung für den Controller Wasser in<br />
den Behälter fließt.<br />
OASE empfiehlt als Abdeckung:<br />
− <strong>FiltoMatic</strong> Cap, Größe L, für <strong>FiltoMatic</strong> <strong>CWS</strong> <strong>7000</strong> und <strong>CWS</strong> <strong>14000</strong> (OASE Best.-Nr. 50268)<br />
− <strong>FiltoMatic</strong> Cap, Größe XL, für <strong>FiltoMatic</strong> <strong>CWS</strong> <strong>25000</strong> (OASE Best.-Nr. 50269)<br />
Pos: 82 /Alle Produkte/Überschriften/9. H1 Entsorgung @ 7\mod_1196625583904_6.doc @ 41545 @ @ 1<br />
13. Entsorgung<br />
Pos: 83 /Alle Produkte/Entsorgung/Entsorgung - gem. Bestimmungen @ 8\mod_1223247321369_6.doc @ 53909 @ @ 1<br />
Entsorgen Sie das Gerät gemäß den nationalen gesetzlichen Bestimmungen.<br />
21
Pos: 85 /Alle Produkte/Länderkennzeichen/02===GB===1. Sprache @ 4\mod_1155109065198_0.doc @ 23181 @ @ 1<br />
Pos: 86 /Alle Produkte/Überschriften/H1 INH Vorwort @ 6\mod_1196355497538_121.doc @ 41063 @ @ 1<br />
- GB -<br />
Pos: 88 /Alle Produkte/Dummy_module/Abstand 18 pt @ 6\mod_1196355593257_0.doc @ 41089 @ @ 1<br />
Pos: 94 /Alle Produkte/Dummy_module/===== Seitenwechsel ===== @ 0\mod_1125648978015_0.doc @ 1631 @ @ 1<br />
- GB -<br />
Foreword<br />
Pos: 87 /Alle Produkte/Einleitung/Hinweise zur Anleitung @ 22\mod_1297351575088_121.doc @ 130533 @ @ 1<br />
Welcome to OASE Living Water. You made a good choice with the purchase of this product<strong>FiltoMatic</strong><br />
<strong>CWS</strong> .<br />
Prior to commissioning the unit, please read the instructions of use carefully and fully familiarise yourself<br />
with the unit. Ensure that all work on and with this unit is only carried out in accordance with these<br />
instructions.<br />
Adhere to the safety information for the correct and safe use of the unit.<br />
Keep these instructions in a safe place! Please also hand over the instructions when passing the unit on<br />
to a new owner.<br />
Pos: 89 /Alle Produkte/Überschriften/H1 INH Inhaltsverzeichnis @ 6\mod_1196352696480_121.doc @ 40825 @ @ 1<br />
Table of Contents<br />
Pos: 90 /Alle Produkte/Verzeichnisse/INH Inhaltsverzeichnis @ 6\mod_1196426354681_121.doc @ 41249 @ @ 1<br />
1. Scope of delivery...............................................................................................................................23<br />
2. Overview ...........................................................................................................................................23<br />
3. Legal conditions ................................................................................................................................23<br />
3.1 Intended use .............................................................................................................................23<br />
3.2 Extended guarantee conditions for the OASE ClearWaterSystem ..........................................23<br />
4. Safety information .............................................................................................................................24<br />
4.1 Hazards encountered by the combination of water and electricity ...........................................24<br />
4.2 Correct electrical installation.....................................................................................................24<br />
4.3 Safe operation...........................................................................................................................24<br />
5. Installation .........................................................................................................................................25<br />
6. Installation .........................................................................................................................................26<br />
7. Start-up..............................................................................................................................................27<br />
8. Operation...........................................................................................................................................28<br />
8.1 Controller overview ...................................................................................................................28<br />
8.2 Setting the dirty water pump .....................................................................................................29<br />
8.3 Setting the UVC clarifying unit ..................................................................................................30<br />
9. Remedy of faults ...............................................................................................................................31<br />
10. Maintenance and cleaning ................................................................................................................32<br />
10.1 Cleaning foam filters .................................................................................................................32<br />
10.2 Remove and separate the cleaning components from each other...........................................32<br />
10.3 Cleaning the dirty water pump ..................................................................................................33<br />
10.4 Changing the UVC lamp in the UVC clarifying unit ..................................................................33<br />
10.5 Checking the cleaning rotor ......................................................................................................34<br />
10.6 Changing the foam filters..........................................................................................................34<br />
10.7 Thorough cleaning of the unit ...................................................................................................35<br />
11. Wear parts.........................................................................................................................................36<br />
12. Storage/Over-wintering .....................................................................................................................36<br />
13. Disposal.............................................................................................................................................36<br />
Pos: 91 /Alle Produkte/Verzeichnisse/INH_Technische Daten @ 7\mod_1196634026593_121.doc @ 42015 @ @ 1<br />
Technical data .........................................................................................................................................337<br />
Pos: 92 /Alle Produkte/Verzeichnisse/INH Symbole auf dem Gerät @ 7\mod_1196634527018_121.doc @ 42068 @ @ 1<br />
Symbols on the unit.................................................................................................................................341<br />
Pos: 93 /Alle Produkte/Verzeichnisse/INH Ersatzteile @ 7\mod_1196634640409_121.doc @ 42094 @ @ 1<br />
Spare parts..............................................................................................................................................344<br />
22
Pos: 96 /Filter/<strong>FiltoMatic</strong> <strong>CWS</strong>/Lieferumfang <strong>FiltoMatic</strong> <strong>CWS</strong> @ 14\mod_1260184604492_121.doc @ 85458 @ @ 1<br />
Pos: 97 /Alle Produkte/Dummy_module/Abstand 18 pt @ 6\mod_1196355593257_0.doc @ 41089 @ @ 1<br />
Pos: 99 /Filter/<strong>FiltoMatic</strong> <strong>CWS</strong>/Übersicht_<strong>FiltoMatic</strong>_<strong>CWS</strong> @ 9\mod_1225798040370_121.doc @ 55199 @ @ 1<br />
Pos: 100 /Alle Produkte/Dummy_module/Abstand 18 pt @ 6\mod_1196355593257_0.doc @ 41089 @ @ 1<br />
Pos: 102 /Alle Produkte/Überschriften/H2 Bestimmungsgemäße Verwendung @ 7\mod_1204017558273_121.doc @ 44540 @ @ 1<br />
Pos: 104 /Filter/<strong>FiltoMatic</strong> <strong>CWS</strong>/Garantiebedingungen_<strong>FiltoMatic</strong>_<strong>CWS</strong> @ 9\mod_1228834658609_121.doc @ 58073 @ @ 1<br />
Pos: 105 /Alle Produkte/Dummy_module/===== Seitenwechsel ===== @ 0\mod_1125648978015_0.doc @ 1631 @ @ 1<br />
- GB -<br />
Pos: 95 /Alle Produkte/Überschriften/H1 Lieferumfang @ 6\mod_1196355702321_121.doc @ 41115 @ @ 1<br />
1. Scope of delivery<br />
►<br />
Open the lid (1) using the rotary handle (2) to remove the assembly components (Figure A).<br />
Figure B Number Description<br />
3 1 Container <strong>FiltoMatic</strong> <strong>CWS</strong><br />
4 1 Outlet DN70<br />
5 1 Flat sealing DN70<br />
6 1 Flat sealing 1 ½“<br />
7 1 O ring DN40<br />
8 1 Outlet sheath DN40<br />
9 1 Inlet sheath 1 ½“<br />
10 2 Union nut<br />
11 1 Hose clip<br />
1 Instructions for use<br />
1 Fast assembly instruction manual<br />
1 Guarantee brochure<br />
1 Clear water guarantee card<br />
1 Guarantee extension card 2+1<br />
Pos: 98 /Alle Produkte/Überschriften/H1 Übersicht @ 9\mod_1225798428891_121.doc @ 55225 @ @ 1<br />
2. Overview<br />
Figure C Designation<br />
For a description, please refer to Chapter …<br />
3 Container Assembly, cleaning and maintenance<br />
4 Outlet DN70 Installation<br />
8 Dirty water outlet DN40 Installation<br />
9 Inlet 1 ½“ Installation<br />
12 Soiling indicator Maintenance and cleaning<br />
13 Foam holder Maintenance and cleaning<br />
14 Dirty water pump Maintenance and cleaning<br />
15 Controller Operation<br />
16 UVC clarifying unit Maintenance and cleaning<br />
17 Stop valve for inlet Starting up, cleaning and maintenance<br />
18 UVC lamp control window Maintenance and cleaning<br />
19 Engagement hooks Maintenance and cleaning<br />
20 Biokick <strong>CWS</strong> infill opening Start-up<br />
Pos: 101 /Alle Produkte/Überschriften/H1 Rechtliche Bestimmungen @ 6\mod_1196352859169_121.doc @ 40851 @ @ 1<br />
3. Legal conditions<br />
3.1 Intended use<br />
Pos: 103 /Filter/<strong>FiltoMatic</strong> <strong>CWS</strong>/Bestimmungsgemäße Verwendung <strong>FiltoMatic</strong> <strong>CWS</strong> @ 9\mod_1225447393150_121.doc @ 55053 @ @ 1<br />
The <strong>FiltoMatic</strong> <strong>CWS</strong> is intended as a filter system for the mechanical and biological cleaning of garden<br />
ponds having a water temperature of between +4 °C and +35 °C. The unit is exclusively suited for<br />
private use and may only be employed for cleaning garden ponds with or without fish population.<br />
3.2 Extended guarantee conditions for the OASE ClearWaterSystem<br />
Guarantee claims can only be brought forward to us, OASE GmbH, Tecklenburger Straße 161 in<br />
D-48477 Hörstel, by returning to us the unit or part of the unit subject to complaint, freight free, at your<br />
own risk, accompanied by the original purchase receipt from the OASE specialist dealer, this guarantee<br />
document and written information of the fault encountered. Should the dirty water pump, UVC clarifying<br />
unit or controller be defective, only return the individual defective component (dirty water pump, UVC<br />
clarifying unit, controller), not the complete unit.<br />
23
Pos: 109 /Alle Produkte/Sicherheit/Einleitung/SIC 3 Gefahr durch Kombination von Wasser und Elektrizität @ 11\mod_1253173630836_121.doc @ 74187 @ @ 1<br />
Pos: 110 /Alle Produkte/Überschriften/H2 Vorschriftsmäßige elektrische Installation @ 7\mod_1204019051664_121.doc @ 44619 @ @ 1<br />
Pos: 111 /Filter/<strong>FiltoMatic</strong> <strong>CWS</strong>/SIC_Elektrische Installation_<strong>FiltoMatic</strong> <strong>CWS</strong> @ 9\mod_1225446401080_121.doc @ 54993 @ @ 1<br />
Pos: 112 /Alle Produkte/Überschriften/H2 Sicherer Betrieb @ 7\mod_1204022429287_121.doc @ 44671 @ @ 1<br />
Pos: 113 /Filter/<strong>FiltoMatic</strong> <strong>CWS</strong>/SIC_Sicherer Betrieb <strong>FiltoMatic</strong> <strong>CWS</strong> @ 9\mod_1225446564801_121.doc @ 55019 @ @ 1<br />
Pos: 114 /Filter/<strong>FiltoMatic</strong> <strong>CWS</strong>/SIC_UVC-Lampe_<strong>FiltoMatic</strong>_<strong>CWS</strong> @ 9\mod_1226926376657_121.doc @ 55803 @ @ 1<br />
Pos: 115 /Filter/<strong>FiltoMatic</strong> <strong>CWS</strong>/SIC_Überspannung_im_Netz_<strong>FiltoMatic</strong>_<strong>CWS</strong> @ 9\mod_1229504617720_121.doc @ 58773 @ @ 1<br />
Pos: 116 /Alle Produkte/Dummy_module/Abstand 18 pt @ 6\mod_1196355593257_0.doc @ 41089 @ @ 1<br />
Pos: 117 /Alle Produkte/Dummy_module/===== Seitenwechsel ===== @ 0\mod_1125648978015_0.doc @ 1631 @ @ 1<br />
- GB -<br />
Pos: 106 /Alle Produkte/Überschriften/4. H1 Sicherheitshinweise @ 6\mod_1196353926316_121.doc @ 40981 @ @ 1<br />
4. Safety information<br />
Pos: 107 /Alle Produkte/Sicherheit/Einleitung/SIC 1 Sicherheitshinweise Einleitung @ 7\mod_1205310799730_121.doc @ 45453 @ @ 1<br />
The company OASE has built this unit according to the state of the art and the valid safety regulations.<br />
Despite the above, hazards for persons and assets can emanate from this unit if it is used in an<br />
improper manner or not in accordance with its intended use, or if the safety instructions are ignored.<br />
Pos: 108 /Alle Produkte/Sicherheit/Einleitung/SIC 2 Kinder und Jugendliche unter 16 Jahren @ 13\mod_1259074357193_121.doc @ 83215 @ @ 1<br />
For safety reasons, children and young persons under 16 years of age as well as persons who<br />
cannot recognise possible danger or who are not familiar with these operating instructions, are<br />
not permitted to use the unit. Keep children under supervision to ensure that they do not play<br />
with the unit.<br />
4.1 Hazards encountered by the combination of water and electricity<br />
► The combination of water and electricity can lead to death or severe injury from electrocution, if the<br />
unit is incorrectly connected or misused.<br />
► Prior to reaching into the water, always switch off the mains voltage to all units used in the water.<br />
4.2 Correct electrical installation<br />
►<br />
►<br />
►<br />
►<br />
►<br />
►<br />
►<br />
►<br />
►<br />
►<br />
For your own safety, consult a qualified electrician when you have questions or encounter problems.<br />
Electrical installations at garden ponds must meet the international and national regulations valid for<br />
installers. Especially adhere to DIN VDE 0100 and DIN VDE 0702.<br />
Compare the electrical data of the power supply with those indicated on the type plate on the UVC<br />
clarifying unit.<br />
Only operate the <strong>FiltoMatic</strong> <strong>CWS</strong> when plugged into a correctly fitted socket.<br />
Please note that the power supply must be fused via a fault current protection system with a<br />
maximum reference fault current of 30 mA.<br />
Install the <strong>FiltoMatic</strong> <strong>CWS</strong> such that any risk of injury to persons is excluded.<br />
Only use cables that are uncoiled.<br />
Extension cables must be approved for outdoor use and meet DIN VDE 0620 standards.<br />
Route the connection cable so that damage is excluded.<br />
Keep all connection points dry. Risk of electrocution.<br />
4.3 Safe operation<br />
►<br />
►<br />
►<br />
►<br />
►<br />
►<br />
►<br />
►<br />
►<br />
Only operate the <strong>FiltoMatic</strong> <strong>CWS</strong> if no persons are in the water.<br />
Never carry or pull the UVC clarifying unit and the dirty water pump of the <strong>FiltoMatic</strong> <strong>CWS</strong> by holding<br />
on the connection cables.<br />
Do not operate defective units. Do not operate the <strong>FiltoMatic</strong> <strong>CWS</strong> if the electrical connection cables<br />
are defective. Pull the power plug immediately. The connection cables of the UVC clarifying unit and<br />
of the dirty water pump cannot be repaired. Replace the components. Dispose of the defective<br />
components in compliance with the environmental regulations.<br />
Never open the housing of the UVC clarifying unit, dirty water pump, control system or their<br />
attendant components, unless this is explicitly mentioned in these instructions of use.<br />
Only use original spare parts and accessories.<br />
Never use the system for filtering fluids other than water.<br />
The radiation of the UVC lamp, even in small doses, is dangerous for eyes and skin. Never operate<br />
the UVC lamp in a defective housing or outside of the housing.<br />
Never operate the UVC lamp without cleaning rotor, as this also acts as an eye protection against<br />
UVC radiation.<br />
Overvoltage in the mains could lead to operating malfunctions of the unit. For information, please<br />
refer to chapter "Remedy of faults".<br />
24
Pos: 120 /Alle Produkte/Dummy_module/===== Seitenwechsel ===== @ 0\mod_1125648978015_0.doc @ 1631 @ @ 1<br />
- GB -<br />
Pos: 118 /Alle Produkte/Überschriften/6. H1 Aufstellen @ 7\mod_1202907856718_121.doc @ 43934 @ @ 1<br />
5. Installation<br />
Pos: 119 /Filter/<strong>FiltoMatic</strong> <strong>CWS</strong>/Aufstellen <strong>FiltoMatic</strong>_<strong>CWS</strong>_<strong>7000</strong>-<strong>25000</strong> @ 24\mod_1311156480859_121.doc @ 136652 @ @ 1<br />
We recommend to thoroughly clean the garden pond to ensure almost maintenance-free operation of<br />
the <strong>FiltoMatic</strong> <strong>CWS</strong> from the very beginning. OASE's recommendation for this cleaning work is the use<br />
of the pond sludge suction unit Pondovac. In general, cleaning work can be omitted when the <strong>FiltoMatic</strong><br />
<strong>CWS</strong> is used in a newly installed garden pond.<br />
Installing the <strong>FiltoMatic</strong> <strong>CWS</strong> (Figure D,E)<br />
Plan the installation of the <strong>FiltoMatic</strong> <strong>CWS</strong>. Careful planning and taking the environmental conditions<br />
into account will lead to optimum operating conditions for the <strong>FiltoMatic</strong> <strong>CWS</strong>. The following points can<br />
help you with your planning.<br />
► A water course guarantees optimum water return from the <strong>FiltoMatic</strong> <strong>CWS</strong> to the garden pond. In<br />
this manner, the filtered pond water is enriched with oxygen prior to returning to the pond. Should<br />
the local situation not allow the installation of a water course, extend the outlet using a DN70 pipe for<br />
the filtered water to return to the pond via the pipe. Please refer to the Installation chapter for the<br />
installation of a DN70 pipe.<br />
► Horizontal alignment of the <strong>FiltoMatic</strong> <strong>CWS</strong> is crucial to prevent drainage of the pond in the event of<br />
an overflow. Carry out the alignment using a spirit level.<br />
► Take the large volume of the <strong>FiltoMatic</strong> <strong>CWS</strong> as well as the resulting weight when filled into account.<br />
Select a suitable ground or a bottom slab in the pit to prevent the <strong>FiltoMatic</strong> <strong>CWS</strong> from sagging.<br />
► Plan sufficient space for movement to be able to carry out cleaning and maintenance work.<br />
► Dig a suitably dimensioned pit for the installation of <strong>FiltoMatic</strong> <strong>CWS</strong> (Figure D). Take into<br />
consideration that the <strong>FiltoMatic</strong> <strong>CWS</strong> can be buried up to the top recess (Figure E, height c).<br />
Please use the following table as a basis for the pit dimensions:<br />
Model a b c (+ bottom slab height)<br />
<strong>FiltoMatic</strong> <strong>CWS</strong> <strong>7000</strong> approx. 50 cm approx. 50 cm approx. 30 cm<br />
<strong>FiltoMatic</strong> <strong>CWS</strong> <strong>14000</strong> approx. 50 cm approx. 50 cm approx. 50 cm<br />
<strong>FiltoMatic</strong> <strong>CWS</strong> <strong>25000</strong> approx. 50 cm approx. 70 cm approx. 50 cm<br />
►<br />
►<br />
Fill the container (3) with water prior to backfilling the soil to avoid compressing the container.<br />
Route the DN40 pipe end for the dirty water outlet at a distance from the pond that prevents the<br />
pumped out dirty water from flowing back into the pond.<br />
25
Pos: 123 /Alle Produkte/Dummy_module/===== Seitenwechsel ===== @ 0\mod_1125648978015_0.doc @ 1631 @ @ 1<br />
- GB -<br />
Pos: 121 /Alle Produkte/Überschriften/5. H1 Montage @ 7\mod_1202907725390_121.doc @ 43908 @ @ 1<br />
6. Installation<br />
Pos: 122 /Filter/<strong>FiltoMatic</strong> <strong>CWS</strong>/Montage <strong>FiltoMatic</strong> <strong>CWS</strong> @ 9\mod_1225186907843_121.doc @ 54839 @ @ 1<br />
Installation of the <strong>FiltoMatic</strong> <strong>CWS</strong><br />
The <strong>FiltoMatic</strong> <strong>CWS</strong> is delivered pre-assembled. Assembly is reduced to the outlet and the inlet and<br />
dirty water outlet connections.<br />
The outlet sheath (8) for the dirty water outlet is transparent. In this manner, the degree of soiling of the<br />
outflowing water is visible during future cleaning. Pumping can be stopped as soon as visibly clean<br />
water flows out of the dirt outlet. Cleaning is then completed.<br />
Installation of the outlet (Figure F)<br />
1.1. Place the flat sealing (5) over the outlet screw (25) pre-fitted on the housing.<br />
1.2. Screw the outlet (4) on the outlet screw (25).<br />
1.3. If necessary, connect a DN70 pipe (26) to the outlet (4) as an extension to allow the filtered pond<br />
water to return into the pond. Ensure a minimum incline of 1.5 % for the DN70 pipe.<br />
As an extension for the outlet, OASE recommends the following:<br />
− DN70 pipe, 480 mm, black (OASE Order No. 55034)<br />
− DN70 pipe elbow, 45°, black (OASE Order No. 55044)<br />
− DN70 pipe elbow, 87°, black (OASE Order No. 55045)<br />
− DN70 pipe elbow, T, black (OASE Order No. 55046)<br />
Installation of the inlet (Figure F)<br />
1.1. Plug the inlet sheath (9) and the flat sealing (6) into the union nut (10) and tighten at the stop valve<br />
thread (21).<br />
1.2. Slide the hose clip (11) over the hose (24) arriving from the Aquamax. Push the hose on the inlet<br />
sheath (9) and fasten with the hose clip.<br />
Hose recommended by OASE: Spiral hose, green (OASE Order No. 52981)<br />
Prior to the assembly, place the hose end in hot water for two minutes. It will then be easier to slide the<br />
hose onto the inlet sheath (9).<br />
Installation of the dirty water outlet (Figure F)<br />
1.1. Fit the O ring (7) on the outlet sheath (8) and into the union nut (10). Then tighten to the thread of<br />
the pre-assembled dirty water outlet (22).<br />
1.2. Plug a DN40 pipe (23) onto the outlet sheath (8). Route the end of the DN40 pipe to a point where<br />
the dirty water to be pumped out can trickle into the ground. Ensure a gravity of 1.5 % to 2 % for the<br />
DN40 pipe.<br />
As an extension for the dirty water outlet, OASE recommends the following:<br />
− DN40 pipe, 480 mm, black (OASE Order No. 50307)<br />
− DN40 pipe elbow, 45°, black (OASE Order No. 50308)<br />
26
Pos: 125 /Alle Produkte/Warnhinweise/7.2 ACHTUNG - Gerät nicht dimmen, nicht an Zeitschaltuhr @ 13\mod_1259920518051_121.doc @ 84817 @ @ 1<br />
Pos: 126 /Alle Produkte/Dummy_module/Abstand 3 pt @ 11\mod_1251901846864_0.doc @ 72826 @ @ 1<br />
Pos: 127 /Filter/<strong>FiltoMatic</strong> <strong>CWS</strong>/Inbetriebnahme <strong>FiltoMatic</strong> <strong>CWS</strong> @ 9\mod_1225196867060_121.doc @ 54865 @ @ 1<br />
Pos: 128 /Alle Produkte/Dummy_module/===== Seitenwechsel ===== @ 0\mod_1125648978015_0.doc @ 1631 @ @ 1<br />
- GB -<br />
Pos: 124 /Alle Produkte/Überschriften/7. H1 Inbetriebnahme @ 7\mod_1196625111244_121.doc @ 41417 @ @ 1<br />
7. Start-up<br />
Attention! Sensitive electrical components.<br />
Possible consequence: The unit will be destroyed.<br />
Protective measure:<br />
► Do not connect the unit to a dimmable power supply.<br />
► Do not operate the unit with a timer.<br />
Attention! Dangerous electrical voltage.<br />
Possible consequences: Death or severe injury.<br />
Protective measures: Disconnect the power plug (Figure G) prior to reaching into the water and<br />
commencing work.<br />
Follow the safety information!<br />
The <strong>FiltoMatic</strong> <strong>CWS</strong> switches on automatically when the power connection is established.<br />
Switching on (Fig. G): Plug the power plug (27) into the socket.<br />
Switching off (Fig. G): Disconnect the power plug (27).<br />
Fill the container with water (Figure C)<br />
► Switch the Aquamax pump on prior to commissioning the <strong>FiltoMatic</strong> <strong>CWS</strong>. Container (3) has to be<br />
filled with water.<br />
Stop valve (17) needs to be open to enable the container to be filled. For this purpose, press the stop<br />
valve (17) down against the stop.<br />
As soon as the water level in the container (3) reaches the outlet (4), the filtered pond water returns into<br />
the pond via the outlet (4).<br />
For further settings of the <strong>FiltoMatic</strong> <strong>CWS</strong>, please read the following Chapter Operation.<br />
Filling with biological filter starter (Figure C)<br />
We recommend the OASE filter starter Biokick <strong>CWS</strong> (OASE Order No. 50295) for a fast growth of<br />
bacteria populations. Micro-organisms colonise the filter system, multiply and ensure an enhanced<br />
quality of the pond water by the decomposition of excess nutrients.<br />
► Fill the quantity of Biokick <strong>CWS</strong> sufficient for the volume of your pond into the infill opening (20).<br />
27
Pos: 130 /Filter/<strong>FiltoMatic</strong> <strong>CWS</strong>/Bedienung_<strong>FiltoMatic</strong>_<strong>CWS</strong>_Controller @ 13\mod_1259921096539_121.doc @ 84965 @ @ 1<br />
Pos: 131 /Alle Produkte/Dummy_module/===== Seitenwechsel ===== @ 0\mod_1125648978015_0.doc @ 1631 @ @ 1<br />
- GB -<br />
Pos: 129 /Alle Produkte/Überschriften/H1 Bedienung @ 7\mod_1196625148604_121.doc @ 41443 @ @ 1<br />
8. Operation<br />
8.1 Controller overview<br />
C1 Display<br />
C2 LED displaying the dirty water<br />
pump function<br />
C3 LED displaying the UVC<br />
function<br />
C4 Key for manual dirty water<br />
pump operation<br />
C5 Key for setting a cleaning<br />
program for the dirty water<br />
pump<br />
C6 Key for setting an operating<br />
program for the UVC clarifying<br />
unit<br />
Displays on the controller<br />
The display (C1) shows<br />
− the water temperature as standard.<br />
− automatically the water temperature again 2 seconds after the last key operation.<br />
− the cleaning programs if selected accordingly.<br />
− the saved settings when pressing a key.<br />
− the remaining operating life (h × 100) of the UVC lamp.<br />
Displayed messages (C1)<br />
− "LA" flashes in an 8 sec. interval 1×: The UVC lamp was active for 7500 operating hours; remaining operating life: 500<br />
operating hours<br />
− "LA" flashes in an 8 sec. interval 2×: The UVC lamp has operated for 8000 hours and should be replaced.<br />
− "PS" lights up in a 4 sec. interval: The dirty water pump has reached its max. running time and is blocked for 1.5 hours.<br />
LED for dirty water pump (C2)<br />
− LED flashes green: Partial container drainage.<br />
− LED is lit green: complete container drainage.<br />
− LED is lit red: Pump blocked.<br />
− LED off: Pump not active.<br />
LED for UVC clarifying unit (C3)<br />
− LED is lit blue: UVC clarifying unit is switched on.<br />
− The LED flashes in an 8 sec. interval blue: The UVC clarifying unit is integrated in the Automatic (AU) operating program.<br />
− LED off: UVC clarifying unit is switched off.<br />
Note:<br />
The integrated thermometer permanently measures the water temperature, thereby forming the reference value for the operating<br />
programs.<br />
The silicone cover protects the controller from soiling; it impairs neither the display reading nor the functionality of the keys. The<br />
controller is water tight and can also be operated without the silicone cover.<br />
28
Pos: 132 /Filter/<strong>FiltoMatic</strong> <strong>CWS</strong>/Bedienung_<strong>FiltoMatic</strong>_<strong>CWS</strong>_Schmutzwasserpumpe_einstellen @ 13\mod_1259926492646_121.doc @ 85053 @ @ 1<br />
Pos: 133 /Alle Produkte/Dummy_module/===== Seitenwechsel ===== @ 0\mod_1125648978015_0.doc @ 1631 @ @ 1<br />
- GB -<br />
8.2 Setting the dirty water pump<br />
In addition to the water temperature, the degree of soiling of the pond water greatly depends on the fish<br />
population. The dirty water pump pumps out the dirt from the container bottom in intervals. The four<br />
different cleaning programs allow individual adaptation of the interval for pumping off the dirty water<br />
according to the degree of soiling. One cleaning cycle takes approx. 9 sec. and requires approx. 4 litres<br />
of water. The table shows the cleaning program selection options. The cleaning program INTERVAL 1<br />
includes the majority of cleaning intervals, INTERVAL 4 the smallest number of intervals. Select a<br />
program that is best suited for the degree of soiling of the pond water. When delivered, cleaning<br />
program INTERVAL 2 is set as a default.<br />
Water temperature<br />
Cleaning programs, dirty water pump<br />
+ Intervals − Intervals<br />
INTERVAL 1 INTERVAL 2 INTERVAL 3 INTERVAL 4 OFF<br />
< 5 °C off off off off off<br />
< 8 °C 1 × per day every 2 days every 3 days every 3 days off<br />
8 °C - 14 °C 2 × per day 1 × per day every 2 days every 3 days off<br />
15 °C - 21 °C 4 × per day 2 × per day 1 × per day every 2 days off<br />
≥ 22 °C 8 × per day 4 × per day 2 × per day 1 × per day off<br />
The cleaning programs are inactive at water temperatures between 35 °C. The pump can<br />
then only be actuated manually. For fully pumping out, keep the PUMP (C4) key permanently pressed.<br />
Setting the cleaning program for the dirty water pump<br />
1.1. Press the INTERVAL (C5) key. The cleaning program INTERVAL 2 appears in the display (C1).<br />
1.2. Press the INTERVAL (C5) key until the desired cleaning program appears.<br />
1.3. Release the INTERVAL (C5) key when the desired cleaning program is displayed.<br />
− The setting is saved when the water temperature appears in the display (C1) after a period of<br />
approx. 2 seconds.<br />
Manual pumping out of the dirty water<br />
The dirty water can also be removed by pumping manually.<br />
► Press the PUMP (C4) key<br />
− The LED (C2) flashes green. Soiling removal starts immediately.<br />
► Complete container emptying starts when you keep the PUMP (C4) key pressed for longer than 10<br />
seconds. The green LED (C2) is lit. The dirty water pump runs for a maximum of 4 minutes. You can<br />
stop the drainage cycle by pressing the PUMP (C4) key once.<br />
► The maximum running time of the dirty water pump is limited to 12 minutes per 1.5 hours in order to<br />
avoid damage resulting from overheating. With heavy soiling, the running time can also be limited to<br />
8 minutes. Once the max. running time is reached; the pump can no longer be operated manually.<br />
The display shows "PS". After 1.5 hours the dirty water pump is once again operational.<br />
29
Pos: 134 /Filter/<strong>FiltoMatic</strong> <strong>CWS</strong>/Bedienung_<strong>FiltoMatic</strong>_<strong>CWS</strong>_Vorklaerer_einstellen @ 15\mod_1261489931765_121.doc @ 89283 @ @ 1<br />
Pos: 135 /Alle Produkte/Dummy_module/===== Seitenwechsel ===== @ 0\mod_1125648978015_0.doc @ 1631 @ @ 1<br />
- GB -<br />
8.3 Setting the UVC clarifying unit<br />
The degree of soiling of the pond water by the formation of algae is notably determined by the water<br />
temperature. With its UV light, the UVC clarifying unit operating under water removes green algae, as<br />
such forming a significant component for pond water cleaning. Depending on the water temperature, the<br />
UVC lamp of the UVC clarifying unit is switched on and off in intervals with the AU operating program. In<br />
this manner it can be individually adapted to the degree of soiling. The following table shows the<br />
operating program AU (Automatic) of the UVC clarifying unit as well as the operating statuses ON and<br />
OFF.<br />
Water temperature<br />
UVC clarifying unit operating programs<br />
AU ON OFF<br />
UVC lamp is switched UVC lamp is switched UVC lamp is<br />
on<br />
off<br />
permanently switched<br />
on<br />
< 8 °C 8 h 16 h<br />
8 °C - 14 °C 48 h 24 h<br />
15 °C - 21 °C 72 h 24 h<br />
≥ 22 °C 96 h 24 h<br />
UVC lamp is<br />
permanently switched<br />
off<br />
When delivered, the operating program AU is set as a default.<br />
► With Power ON, the operating program AU starts with the OFF interval. The UVC lamp does not lit<br />
up for a minimum of 16 hours. The use of Biokick <strong>CWS</strong> during start-up protects the bacteria cultures<br />
in the Biokick <strong>CWS</strong>.<br />
► The UVC clarifying unit starts with the ON interval when the AU operating program is manually<br />
selected.<br />
Setting the operating program for the UVC clarifying unit<br />
1.1. Press the UVC (C6) key. The AU operating program appears on the display (C1).<br />
1.2. Press the UVC (C6) key until the desired operating program is displayed.<br />
1.3. Release the UVC (C6) key when the desired operating program is displayed.<br />
− The setting is saved when the water temperature appears in the display (C1) after a period of<br />
approx. 2 seconds.<br />
Inquiry of the operating hour counter reading of the UVC clarifying unit<br />
The operating life of a UVC lamp for the UVC clarifying unit is approx. 8000 hours. The integrated<br />
operating hour counter counts down from this value.<br />
► Keep the UVC (C6) key pressed for 5 seconds. A number appears in the display (C1).<br />
− Multiply this number by 100 to calculate the remaining number of operating hours.<br />
− Example: displayed value '45' × 100 = 4500 remaining operating hours.<br />
Resetting the operating hour counter reading of the UVC clarifying unit<br />
Reset the operating hour counter after changing a UVC lamp.<br />
1.1. Keep the UVC (C6) key pressed for 12 seconds!<br />
− The remaining operating life appears on the display (C1) after 5 seconds. Following this, the<br />
display flashes. The operating hour counter is reset to 8000 hours, when the water temperature<br />
appears in the display (C1).<br />
1.2. Release the UVC (C6) key.<br />
30
Pos: 138 /Alle Produkte/Dummy_module/===== Seitenwechsel ===== @ 0\mod_1125648978015_0.doc @ 1631 @ @ 1<br />
- GB -<br />
Pos: 136 /Alle Produkte/Überschriften/H1 Störungsbeseitigung @ 7\mod_1196625290699_121.doc @ 41521 @ @ 1<br />
9. Remedy of faults<br />
Pos: 137 /Filter/<strong>FiltoMatic</strong> <strong>CWS</strong>/Störungstabelle_<strong>FiltoMatic</strong>_<strong>CWS</strong> @ 14\mod_1259929430129_121.doc @ 85203 @ @ 1<br />
Malfunction Cause Remedy<br />
The controller does not switch on<br />
No mains voltage<br />
Check mains voltage<br />
Check supply lines<br />
Controller incorrectly positioned on the UVC Check the controller seating<br />
clarifying unit<br />
Water from the DN70 outlet does not return Aquamax pump not switched on<br />
Switch on Aquamax pump<br />
to the pond Stop valve closed with the lid open Open stop valve<br />
Dirty water pump does not switch on Pump rotor blocked<br />
Clean pump rotor<br />
Container already empty<br />
Fill container<br />
Container partly emptied, dirty water pump<br />
cannot prime<br />
Fill container<br />
UVC lamp does not switch on<br />
The cleaning programs are inactive at water<br />
temperatures between35 °C<br />
The dirty water pump has reached its max.<br />
running time. The display shows "PS".<br />
UVC lamp defective<br />
The safety system in the UVC clarifying unit<br />
has tripped as a result of overvoltage in the<br />
mains<br />
Now the dirty water pump can only be<br />
operated manually.<br />
− Keep the PUMP key pressed for complete<br />
drainage.<br />
Wait for 1.5 hours. Once this time has<br />
elapsed, the dirty water pump is operational<br />
again.<br />
Changing the UVC lamp<br />
Switch of the mains voltage and on again to<br />
reset the safety system<br />
− Check that the UVC lamp is lit in the<br />
control window (blue light)<br />
− To test, we suggest to switch on the UVC<br />
lamp using the UVC key (operating status<br />
ON)<br />
31
Pos: 140 /Alle Produkte/Warnhinweise/E-ACHTUNG - Netzspannung absch. (vor Arbeitsbeginn/vor Griff ins Wasser)# @ 13\mod_1259760934607_121.doc @ 84730 @ @ 1<br />
Pos: 141 /Alle Produkte/Dummy_module/Abstand 3 pt @ 11\mod_1251901846864_0.doc @ 72826 @ @ 1<br />
Pos: 142 /Filter/<strong>FiltoMatic</strong> <strong>CWS</strong>/Reinigung_Wartung_<strong>FiltoMatic</strong>_<strong>CWS</strong>_Filterschaeume_reinigen @ 14\mod_1259928464654_121.doc @ 85109 @ @ 1<br />
Pos: 143 /Filter/<strong>FiltoMatic</strong> <strong>CWS</strong>/Reinigung_Wartung_<strong>FiltoMatic</strong>_<strong>CWS</strong>_Reinigungskomponenten_entnehmen @ 9\mod_1228741070856_121.doc @ 57791 @ @ 1<br />
1.6.<br />
Pos: 144 /Alle Produkte/Dummy_module/===== Seitenwechsel ===== @ 0\mod_1125648978015_0.doc @ 1631 @ @ 1<br />
- GB -<br />
Pos: 139 /Alle Produkte/Überschriften/8. H1 Reinigung und Wartung @ 7\mod_1196625212761_121.doc @ 41469 @ @ 1<br />
10. Maintenance and cleaning<br />
Attention! Dangerous electrical voltage.<br />
Possible consequences: Death or severe injury.<br />
Protective measures:<br />
► Prior to reaching into the water, switch off the mains voltage to all units used in the water.<br />
► Switch off the mains voltage prior to carrying out work on the unit.<br />
10.1 Cleaning foam filters<br />
Cleaning intervals depend on the degree of soiling of the foam filters. A higher water level in the soiling<br />
indicator (Figure C, 12) in the inner cover signals that the foam filter cleaning capacity has decreased.<br />
Cleaning is due from a degree of soiling of 75 % or in the event of an overflow at the latest.<br />
How to clean the foam filters (Fig. H, I, J)<br />
1.1. Open lid (1) with the rotary handle (2) and remove lid from the container (3).<br />
1.2. Close the stop valve (17) by pulling it up.<br />
− Pond water no longer flows into the container.<br />
− Note: Water will spurt out of the air intake socket when closing the stop valve (17).<br />
1.3. Pull foam filters (13) up several times.<br />
− The foam filters will be compressed. The soiling will be washed out.<br />
1.4. Press the PUMP key (C4) on the controller (15) for longer than 10 seconds.<br />
− The LED (C2) is lit green. All of the dirty water in the container will be pumped out.<br />
1.5. Open the stop valve (17) by pressing it down.<br />
− The container fills up with pond water again.<br />
Repeat the cleaning cycle if the foam filters are heavily soiled.<br />
10.2 Remove and separate the cleaning components from each other<br />
For cleaning and maintenance of the cleaning components of the dirty water pump (14) and the UVC<br />
clarifying unit (16) it is necessary to take both out of the container. The controller (15) is fitted to the UVC<br />
clarifying unit. The cleaning components are not permanently connected to the inner cover (47) but rest<br />
in the guides of the inner cover (47) or of the stop valve (17) respectively.<br />
This is how to remove the cleaning components (Figure K)<br />
1.1. Open lid (1) with the rotary handle (2) and remove lid from the container (3) (Figure H).<br />
1.2. Close the stop valve (17) by pulling it up.<br />
− Pond water no longer flows into the container.<br />
− Note: Water will spurt out of the air intake socket when closing the stop valve.<br />
1.3. Lift the cleaning components of the dirty water pump (14) and of the UVC clarifying unit (16) out of<br />
the inner cover (47) as one unit.<br />
This is now the cleaning components and the controller are separated from one another (Figure<br />
L)<br />
1.1. Keep the engagement hook (30) on the UVC clarifying unit (16) pressed.<br />
1.2. Remove the controller (15) from the UVC clarifying unit by applying force.<br />
1.3. Pull the connection cable (28) of the dirty water pump off the controller (15) by applying force.<br />
1.4. Plug in the silicone caps to protect the open sockets.<br />
1.5. Reassemble the cleaning components and the controller in the reverse order (Figure M).<br />
− When assembling the controller and the UVC clarifying unit, ensure that the arrows on both<br />
components point to one another.<br />
During assembly, check the seating of the O rings (29) at the connection points of the controller and of<br />
the UVC clarifying unit! Clean the O rings (29) as required. The electrical contacts will corrode if the O<br />
rings are missing or incorrectly seated. This will lead to irreparable damage to the components!<br />
32
Pos: 145 /Filter/<strong>FiltoMatic</strong> <strong>CWS</strong>/Reinigung_Wartung_<strong>FiltoMatic</strong>_<strong>CWS</strong>_Schmutzwasserpumpe_reinigen @ 14\mod_1259928823735_121.doc @ 85137 @ @ 1<br />
Pos: 146 /Filter/<strong>FiltoMatic</strong> <strong>CWS</strong>/Reinigung_Wartung_<strong>FiltoMatic</strong>_<strong>CWS</strong>_UVC-Lampe_Vorklaerer_wechseln @ 9\mod_1228741316733_121.doc @ 57847 @ @ 1<br />
1.1.<br />
Pos: 147 /Alle Produkte/Dummy_module/===== Seitenwechsel ===== @ 0\mod_1125648978015_0.doc @ 1631 @ @ 1<br />
- GB -<br />
10.3 Cleaning the dirty water pump<br />
Cleaning of the dirty water pump becomes due when the rotor of the pump motor (33) is heavily soiled<br />
or blocked. This can happen as a result of larger soiling, such as, e.g. stones. The LED indicator (C2) on<br />
the controller (15)<br />
How to clean the dirty water pump (Fig. N)<br />
1.1. Turn the motor housing (33) until the symbol showing " Lock open" points to the arrow on the top<br />
pipe (31).<br />
1.2. Remove and clean the motor housing (33).<br />
1.3. Reassemble in the reverse order.<br />
− Important: The motor housing (33) is only arrested when the "Lock closed" symbol points to the<br />
arrow on the top pipe (31) (Figure N).<br />
1.4. Press the PUMP button (C4) once.<br />
− The LED (C2) changes from red to green. The dirty water pump (14) starts up. Otherwise, the dirty<br />
water pump (14) will not start up because of a malfunction. In this context, please refer to Chapter<br />
Remedy of faults.<br />
1.5. If necessary, clean the overflow on the top pipe (31). To this effect, open the soiling pipe cover (32).<br />
10.4 Changing the UVC lamp in the UVC clarifying unit<br />
Attention! Dangerous ultra-violet radiation.<br />
Possible consequences: Severe injury to the eyes and the skin.<br />
Protective measures: Only switch the unit on with the housing fitted.<br />
The controller (15) does not show when the UVC lamp is defective. Check the function of the UVC lamp<br />
by looking into the control window (18) at regular intervals (Figure O).<br />
The operating life of the UVC lamp being limited, it has to be replaced once its useful life has elapsed<br />
(please also refer to Chapter Checking the reading of the UVC clarifying unit operating counter).<br />
1.1. Turn the water housing (35) until the symbol showing " Lock open" points to the arrow at the UVC top<br />
pipe (34) (Figure O).<br />
1.2. Pull off the water housing (35) (Figure O).<br />
1.3. Remove the cleaning rotor (37) from the quartz glass tube (45) (Figure P).<br />
1.4. Loosen the screw (40) from the union nut (39), then unscrew the union nut (39) (Figure Q).<br />
1.5. Pull off the quartz glass tube (45) including the O ring (46) by a rotary movement (Figure R).<br />
1.6. Pull off the UVC lamp protection (44) (Figure R).<br />
1.7. Pull the UVC lamp (43) out of its position in the UVC top section (34) and replace (Figure R).<br />
1.8. Reassemble the UVC clarifying unit in the reverse order.<br />
− Important: The water housing (35) is only closed when the "Lock closed" symbol points to the<br />
arrow on the UVC top section (34) (Figure O).<br />
► During assembly ensure that the stop (41) of the union nut (39) butts against the stop (42) on the<br />
UVC top section (34). Only then can the screw (40) be turned in (Figure Q).<br />
► The O ring (36) on the water housing closure (35) is firmly clamped on. Only remove the O ring (36)<br />
if it needs replacing, e.g. has become brittle (Figure O).<br />
► Condensate forms in the quartz glass tube (45). This condensate cannot be avoided, however, it<br />
does not impair function and safety.<br />
► The quartz glass tube (45) can become scratched or blind over time. In this case, sufficient cleaning<br />
performance of the UVC lamp (43) is no longer guaranteed. The quartz glass tube (45) must be<br />
replaced.<br />
33
Pos: 148 /Filter/<strong>FiltoMatic</strong> <strong>CWS</strong>/Reinigung_Wartung_<strong>FiltoMatic</strong>_<strong>CWS</strong>_Reinigungsrotor_kontrollieren @ 9\mod_1228741419030_121.doc @ 57875 @ @ 1<br />
Pos: 149 /Filter/<strong>FiltoMatic</strong> <strong>CWS</strong>/Reinigung_Wartung_<strong>FiltoMatic</strong>_<strong>CWS</strong>_Filterschaeume_wechseln @ 14\mod_1259929379754_121.doc @ 85175 @ @ 1<br />
Pos: 150 /Alle Produkte/Dummy_module/===== Seitenwechsel ===== @ 0\mod_1125648978015_0.doc @ 1631 @ @ 1<br />
- GB -<br />
10.5 Checking the cleaning rotor<br />
The cleaning rotor (37) cleans the quartz glass tube (45). The rotor is driven by the water flow in the<br />
water housing (Figure P).<br />
The constant rotational movement of the cleaning rotor (37) causes wear of the bearing bush (38). In<br />
this case, the cleaning rotor (37) needs replacing (Figure P).<br />
1.1. Turn the water housing (35) until the symbol showing " Lock open" points to the arrow at the UVC top<br />
pipe (34) (Figure O).<br />
1.2. Pull off the water housing (35) (Figure O).<br />
1.3. Check the wearing condition of the bearing bush (38).<br />
− When the bearing bush (38) has worn down to 0 mm, the cleaning rotor (37) needs to be<br />
replaced (Figure P).<br />
1.4. Reassemble the UVC clarifying unit in the reverse order.<br />
− Important: The water housing (35) is only closed when the "Lock closed" symbol points to the<br />
arrow on the UVC top section (34) (Figure O).<br />
10.6 Changing the foam filters<br />
We recommend to change the foam filters (49) once per year.<br />
How to change the foam filters:<br />
1.1. Open lid (1) with the rotary handle (2) and remove lid from the container (3) (Figure H).<br />
1.2. Close stop valve (17) by pulling it up (Figure S).<br />
− Pond water no longer flows into the container.<br />
− Note: Water will spurt out of the air intake socket when closing the stop valve (17).<br />
1.3. Pull up the foam holder (13) in the inner cover (47) several times. The water in the foam filters (49) is<br />
pressed out (Figure I).<br />
1.4. Press the PUMP key (C4) on the controller (15) for longer than 10 seconds (Figure J).<br />
− The LED (C2) is lit green. The dirty water in the container will be pumped out.<br />
1.5. Lift the cleaning components of the dirty water pump (14) and of the UVC clarifying unit (16) out of<br />
the inner cover (47)(Figure K).<br />
1.6. Release the blue engagement hooks (19) on both sides, and then remove the inner cover (47)<br />
including the foam holders (13) out of the container (Figure S).<br />
1.7. Slightly lift the foam holder (13), press together the two blue engagement hooks (48) at the foam<br />
holders (13), then push the foam holders downward and out of the inner cover (47) (Fig. T).<br />
1.8. Press in the four black engagement hooks (54) at the upper part of the foam and take out the foam<br />
holder (13) downward including the filter cartridge (49) (Fig. T).<br />
− Note: Press together the engagement hooks (54) arranged opposite of each other one after<br />
another and push the hooks downward and out of the inner cover (47).<br />
1.9. Remove the used filter cartridge (49) as well as the bottom part of the foam (55) from the foam<br />
holder (13) (Fig. U).<br />
− Dispose of the filter cartridge in accordance with the regulations.<br />
1.10. Start by placing a new bottom foam part (55), on the foam holder (13), followed by a new filter<br />
cartridge (49) (Fig. U).<br />
− Ensure that the filter cartridge (49) fits exactly into the bottom foam part (55).<br />
1.11. Insert the new foam holder (13) together with the new filter cartridge (49) into the inner cover<br />
from below. While inserting, pull up the foam holder until the two blue engagement hooks (48) and<br />
the four black engagement hooks (54) engage in the inner cover (Fig. T).<br />
− Important: Perfect seating of the filter cartridge (49) is not guaranteed unless all four black<br />
engagement hooks (54) are engaged.<br />
34
Pos: 151 /Filter/<strong>FiltoMatic</strong> <strong>CWS</strong>/Reinigung_Wartung_<strong>FiltoMatic</strong>_<strong>CWS</strong>_Komplettreinigung_durchfuehren @ 9\mod_1228741615703_121.doc @ 57931 @ @ 1<br />
Pos: 152 /Alle Produkte/Dummy_module/===== Seitenwechsel ===== @ 0\mod_1125648978015_0.doc @ 1631 @ @ 1<br />
- GB -<br />
10.7 Thorough cleaning of the unit<br />
Light-weight suspended matter is mechanically filtered by the foam filters and, if necessary, biologically<br />
broken down. Suspended matter heavier than water will sediment out and soil the container bottom.<br />
Thoroughly clean the unit once per year, preferably when you prepare the <strong>FiltoMatic</strong> <strong>CWS</strong> for the winter.<br />
Fully drain the container<br />
Full drainage takes a maximum of 4 minutes.<br />
1.1. Switch off the Aquamax pump.<br />
1.2. Open lid (1) with the rotary handle (2) and remove lid from the container (3) (Figure H).<br />
1.3. Pull up the foam holder (13) three times (Figure J).<br />
− The foam filters will be compressed. The soiling will be washed out.<br />
1.4. Press the PUMP (C4) key for longer than 10 seconds.<br />
− The LED (C2) is lit green. The container is emptied.<br />
− You can stop the drainage cycle by pressing the PUMP (C4) key once. Once the container if fully<br />
drained, when the dirty water pump switches off no water flows through the transparent outlet<br />
sheath (6).<br />
Cleaning the unit<br />
For this purpose, remove the lamella separator (51) and the dirt pyramide (52). To this effect, completely<br />
empty the container and remove the inner cover (47). Please refer to the chapters above.<br />
How to remove and clean the lamella separator<br />
1.1. Press down the engagement hook (50) and pull the lamella separator (51) upward and out of the the<br />
guide on the container (3) (Figure V).<br />
1.2. Press in the engagement hook (52) at the lamella separator top (51) and fold out both sections of<br />
the lamella separator (51) (Figure W).<br />
1.3. Clean both parts using clean water and a soft brush.<br />
1.4. Reassemble the lamella separator (51) in the reverse order<br />
1.5. Insert the lamella separator (51) in the container (3) (Figure Y).<br />
− Ensure that the engagement hook (50) engages at the stop valve (17).<br />
How to remove and clean the dirt pyramid (Figure X)<br />
Only remove the dirt pyramid (53) if necessary. A great deal of force is required for disassembly and reassembly.<br />
1.1. Reach beneath the dirt pyramid (53) and detach the pyramid from the three holders at the container<br />
bottom by vigorously pulling up.<br />
1.2. Clean the dirt pyramid (53) using water and a soft brush.<br />
1.3. Wash out the container bottom.<br />
1.4. Plug the dirt pyramid (53) onto the holders by applying a large amount of pressure.<br />
− The engagement in the holders is audible by a click.<br />
An approx. 8 mm spacing is provided between the dirt pyramid (53) and the container bottom. This gap<br />
allows the dirty water pump to pump off the dirt gathered at the container bottom. Take this spacing into<br />
account during assembly. Do not attempt to press the dirt pyramid (53) fully down to the container<br />
bottom by applying excessive force!<br />
35
Pos: 155 /Alle Produkte/Dummy_module/Abstand 18 pt @ 6\mod_1196355593257_0.doc @ 41089 @ @ 1<br />
Pos: 158 /Alle Produkte/Dummy_module/Abstand 18 pt @ 6\mod_1196355593257_0.doc @ 41089 @ @ 1<br />
Pos: 161 /Alle Produkte/Dummy_module/===== Seitenwechsel ===== @ 0\mod_1125648978015_0.doc @ 1630 @ @ 1<br />
- GB -<br />
Pos: 153 /Alle Produkte/Überschriften/H1 Verschleißteile @ 8\mod_1223247075102_121.doc @ 53883 @ @ 1<br />
11. Wear parts<br />
Pos: 154 /Filter/<strong>FiltoMatic</strong> <strong>CWS</strong>/Verschleissteile_<strong>FiltoMatic</strong>_<strong>CWS</strong>_<strong>7000</strong>-<strong>25000</strong> @ 24\mod_1311156621953_121.doc @ 136680 @ @ 1<br />
Wear part Model Ident No.<br />
UVC lamp<br />
<strong>FiltoMatic</strong> <strong>CWS</strong> <strong>7000</strong> 56112<br />
<strong>FiltoMatic</strong> <strong>CWS</strong> <strong>14000</strong> 56237<br />
<strong>FiltoMatic</strong> <strong>CWS</strong> <strong>25000</strong> 56237<br />
Quartz glass tube<br />
<strong>FiltoMatic</strong> <strong>CWS</strong> <strong>7000</strong> 13312<br />
<strong>FiltoMatic</strong> <strong>CWS</strong> <strong>14000</strong> 13332<br />
<strong>FiltoMatic</strong> <strong>CWS</strong> <strong>25000</strong> 13332<br />
Cleaning rotor<br />
<strong>FiltoMatic</strong> <strong>CWS</strong> <strong>7000</strong> 12703<br />
<strong>FiltoMatic</strong> <strong>CWS</strong> <strong>14000</strong> 12705<br />
<strong>FiltoMatic</strong> <strong>CWS</strong> <strong>25000</strong> 12705<br />
Filter cartridges<br />
<strong>FiltoMatic</strong> <strong>CWS</strong> <strong>7000</strong> 50901 (1×)<br />
<strong>FiltoMatic</strong> <strong>CWS</strong> <strong>14000</strong> 50904 (1×)<br />
<strong>FiltoMatic</strong> <strong>CWS</strong> <strong>25000</strong> 50904 (2×)<br />
Pos: 156 /Alle Produkte/Überschriften/10. H1 Lagern / Überwintern @ 7\mod_1196625251745_121.doc @ 41495 @ @ 1<br />
12. Storage/Over-wintering<br />
Pos: 157 /Filter/<strong>FiltoMatic</strong> <strong>CWS</strong>/Lagern/Ueberwintern FitoMatic <strong>CWS</strong>_<strong>7000</strong>-<strong>25000</strong> @ 24\mod_1311156831812_121.doc @ 136708 @ @ 1<br />
Prior to the period of frost starting, store the cleaning units dirty water pump (14), controller (15) and<br />
UVC clarifying unit (16) in a frost-free place.<br />
1.1. Thoroughly clean all components (see chapter Carry out complete cleaning) and check all<br />
components for damage.<br />
− The container (3) and the foam filters (49) need not be stored frost-free. However, completely<br />
empty the container (3) prior to storing using the pump.<br />
1.2. Cover the container (3) to prevent the ingress of water.<br />
− The lid (1) being closed is not sufficient, as water can enter the container through the recess<br />
provided for the controller.<br />
OASE recommends the following cover:<br />
− <strong>FiltoMatic</strong> Cap, size L, for <strong>FiltoMatic</strong> <strong>CWS</strong> <strong>7000</strong> and <strong>CWS</strong> <strong>14000</strong> (OASE Order No. 50268)<br />
− <strong>FiltoMatic</strong> Cap, size XL, for <strong>FiltoMatic</strong> <strong>CWS</strong> <strong>25000</strong> (OASE Order No. 50269)<br />
Pos: 159 /Alle Produkte/Überschriften/9. H1 Entsorgung @ 7\mod_1196625583904_121.doc @ 41547 @ @ 1<br />
13. Disposal<br />
Pos: 160 /Alle Produkte/Entsorgung/Entsorgung - gem. Bestimmungen @ 8\mod_1223247321369_121.doc @ 53910 @ @ 1<br />
Dispose of the unit in accordance with the national legal regulations.<br />
36
Pos: 162 /Alle Produkte/Länderkennzeichen/03===FR===1.Sprache @ 7\mod_1197636154970_0.doc @ 42210 @ @ 1<br />
Pos: 163 /Alle Produkte/Überschriften/H1 INH Vorwort @ 6\mod_1196355497538_200.doc @ 41064 @ @ 1<br />
Pos: 165 /Alle Produkte/Dummy_module/Abstand 18 pt @ 6\mod_1196355593257_0.doc @ 41090 @ @ 1<br />
Pos: 171 /Alle Produkte/Dummy_module/===== Seitenwechsel ===== @ 0\mod_1125648978015_0.doc @ 1632 @ @ 1<br />
- FR -<br />
- FR -<br />
Préface<br />
Pos: 164 /Alle Produkte/Einleitung/Hinweise zur Anleitung @ 22\mod_1297351575088_200.doc @ 130534 @ @ 1<br />
Bienvenue chez OASE Living Water. Avec l'acquisition du produit, <strong>FiltoMatic</strong> <strong>CWS</strong> vous avez fait le<br />
bon choix.<br />
Avant la première utilisation de l'appareil, lire attentivement cette notice d'emploi et se familiariser avec<br />
l'appareil. Tous les travaux effectués avec et sur cet appareil devront être exécutés conformément aux<br />
directives ci-jointes.<br />
Respecter impérativement les consignes de sécurité relatives à une utilisation correcte et en toute<br />
sécurité.<br />
Conserver soigneusement cette notice d'emploi. Lors d'un changement de propriétaire, prière de<br />
transmettre également cette notice d'emploi.<br />
Pos: 166 /Alle Produkte/Überschriften/H1 INH Inhaltsverzeichnis @ 6\mod_1196352696480_200.doc @ 40826 @ @ 1<br />
Table des matières<br />
Pos: 167 /Alle Produkte/Verzeichnisse/INH Inhaltsverzeichnis @ 6\mod_1196426354681_200.doc @ 41250 @ @ 1<br />
1. Pièces faisant partie de la livraison.................................................................................................. 38<br />
2. Vue d'ensemble................................................................................................................................ 38<br />
3. Dispositions juridiques...................................................................................................................... 38<br />
3.1 Utilisation conforme à la finalité ............................................................................................... 38<br />
3.2 Conditions de garantie élargies pour le système OASE ClearWater ...................................... 38<br />
4. Consignes de sécurité...................................................................................................................... 39<br />
4.1 Dangers dus à la combinaison d'eau et d'électricité................................................................ 39<br />
4.2 Installation électrique correspondant aux prescriptions........................................................... 39<br />
4.3 Exploitation sécurisée .............................................................................................................. 39<br />
5. Mise en place ................................................................................................................................... 40<br />
6. Montage ........................................................................................................................................... 41<br />
7. Mise en service ................................................................................................................................ 42<br />
8. Exploitation....................................................................................................................................... 43<br />
8.1 Vue d'ensemble contrôleur ...................................................................................................... 43<br />
8.2 Réglage de la pompe à eau sale ............................................................................................. 44<br />
8.3 Réglage de l'appareil de préclarification à UVC ...................................................................... 45<br />
9. Élimination des dérangements......................................................................................................... 46<br />
10. Nettoyage et entretien...................................................................................................................... 47<br />
10.1 Nettoyage des mousses filtrantes............................................................................................ 47<br />
10.2 Retirer les composants de nettoyage et les séparer les uns des autres................................. 47<br />
10.3 Nettoyage de la pompe à eau sale .......................................................................................... 48<br />
10.4 Remplacement de la lampe UVC dans l'appareil de préclarification à UVC ........................... 48<br />
10.5 Contrôle du rotor de nettoyage ................................................................................................ 49<br />
10.6 Remplacement des mousses filtrantes.................................................................................... 49<br />
10.7 Effectuer un nettoyage complet ............................................................................................... 50<br />
11. Pièces d'usure.................................................................................................................................. 51<br />
12. Stockage/entreposage pour l'hiver................................................................................................... 51<br />
13. Recyclage......................................................................................................................................... 51<br />
Pos: 168 /Alle Produkte/Verzeichnisse/INH_Technische Daten @ 7\mod_1196634026593_200.doc @ 42016 @ @ 1<br />
Caractéristiques techniques ................................................................................................................... 337<br />
Pos: 169 /Alle Produkte/Verzeichnisse/INH Symbole auf dem Gerät @ 7\mod_1196634527018_200.doc @ 42069 @ @ 1<br />
Symboles sur l'appareil .......................................................................................................................... 341<br />
Pos: 170 /Alle Produkte/Verzeichnisse/INH Ersatzteile @ 7\mod_1196634640409_200.doc @ 42095 @ @ 1<br />
Pièces de rechange................................................................................................................................ 342<br />
37
Pos: 173 /Filter/<strong>FiltoMatic</strong> <strong>CWS</strong>/Lieferumfang <strong>FiltoMatic</strong> <strong>CWS</strong> @ 14\mod_1260184604492_200.doc @ 85459 @ @ 1<br />
Pos: 174 /Alle Produkte/Dummy_module/Abstand 18 pt @ 6\mod_1196355593257_0.doc @ 41090 @ @ 1<br />
Pos: 176 /Filter/<strong>FiltoMatic</strong> <strong>CWS</strong>/Übersicht_<strong>FiltoMatic</strong>_<strong>CWS</strong> @ 9\mod_1225798040370_200.doc @ 55200 @ @ 1<br />
Pos: 177 /Alle Produkte/Dummy_module/Abstand 18 pt @ 6\mod_1196355593257_0.doc @ 41090 @ @ 1<br />
Pos: 178 /Alle Produkte/Überschriften/H1 Rechtliche Bestimmungen @ 6\mod_1196352859169_200.doc @ 40852 @ @ 1<br />
Pos: 179 /Alle Produkte/Überschriften/H2 Bestimmungsgemäße Verwendung @ 7\mod_1204017558273_200.doc @ 44541 @ @ 1<br />
Pos: 181 /Filter/<strong>FiltoMatic</strong> <strong>CWS</strong>/Garantiebedingungen_<strong>FiltoMatic</strong>_<strong>CWS</strong> @ 9\mod_1228834658609_200.doc @ 58074 @ @ 1<br />
Pos: 182 /Alle Produkte/Dummy_module/===== Seitenwechsel ===== @ 0\mod_1125648978015_0.doc @ 1632 @ @ 1<br />
- FR -<br />
Pos: 172 /Alle Produkte/Überschriften/H1 Lieferumfang @ 6\mod_1196355702321_200.doc @ 41116 @ @ 1<br />
1. Pièces faisant partie de la livraison<br />
►<br />
Ouvrir le couvercle (1) avec la poignée rotative (2) pour retirer les pièces de montage (figure A).<br />
Figure B Quantité Description<br />
3 1 Récipient <strong>FiltoMatic</strong> <strong>CWS</strong><br />
4 1 Écoulement DN70<br />
5 1 Joint plat DN70<br />
6 1 Joint plat 1 ½“<br />
7 1 Joint torique DN40<br />
8 1 Douille d'écoulement DN40<br />
9 1 Douille d'entrée 1 ½“<br />
10 2 Écrou d’accouplement<br />
11 1 Collier de serrage<br />
1 Notice d'emploi<br />
1 Instructions de montage rapide<br />
1 Livret de garantie<br />
1 Carte de garantie eau claire<br />
1 Carte de prolongation de garantie 2+1<br />
Pos: 175 /Alle Produkte/Überschriften/H1 Übersicht @ 9\mod_1225798428891_200.doc @ 55226 @ @ 1<br />
2. Vue d'ensemble<br />
Figure C Désignation<br />
Description, voir chapitre …<br />
3 Récipient Montage, nettoyage et entretien<br />
4 Écoulement DN70 Montage<br />
8 Écoulement d'eau sale DN40 Montage<br />
9 Entrée 1 ½“ Montage<br />
12 Affichage du taux d'encrassement Nettoyage et entretien<br />
13 Porte-mousse Nettoyage et entretien<br />
14 Pompe à eau sale Nettoyage et entretien<br />
15 Contrôleur Exploitation<br />
16 Appareil de préclarification à UVC Nettoyage et entretien<br />
17 Coulisseau de blocage pour l'entrée Mise en service, nettoyage et entretien<br />
18 Fenêtre de contrôle, lampe UVC Nettoyage et entretien<br />
19 Crochets Nettoyage et entretien<br />
20 Ouverture de remplissage Biokick<br />
<strong>CWS</strong><br />
Mise en service<br />
3. Dispositions juridiques<br />
3.1 Utilisation conforme à la finalité<br />
Pos: 180 /Filter/<strong>FiltoMatic</strong> <strong>CWS</strong>/Bestimmungsgemäße Verwendung <strong>FiltoMatic</strong> <strong>CWS</strong> @ 9\mod_1225447393150_200.doc @ 55054 @ @ 1<br />
Le <strong>FiltoMatic</strong> <strong>CWS</strong> est à utiliser en tant que système de filtration pour le nettoyage mécanique et<br />
biologique d'étangs/de bassins de jardin à une température de +4°C à +35°C. L’appareil est<br />
exclusivement prévu à des fins privées et seulement pour le nettoyage des étangs/bassins de jardin<br />
avec ou sans poissons.<br />
3.2 Conditions de garantie élargies pour le système OASE ClearWater<br />
Il n’est possible de faire valoir vos droits à la garantie vis-à-vis de OASE GmbH, Tecklenburger Straße<br />
161, D-48477 Hörstel, Allemagne, qu'en nous envoyant, franco de port et dans un transport à vos<br />
risques, l’appareil ou la partie de l’appareil faisant l'objet de la réclamation, ainsi que le bordereau de<br />
vente d'origine du revendeur spécialisé OASE, ce document de garantie et un document écrit spécifiant<br />
l’erreur sujette à réclamation. Dans le cas d'une panne au niveau de la pompe à eau sale, de l'appareil<br />
de préclarification à UVC ou du contrôleur, envoyer uniquement le seul composant défectueux (pompe à<br />
eau sale, appareil de préclarification à UVC, contrôleur), et pas l'appareil complet.<br />
38
Pos: 183 /Alle Produkte/Überschriften/4. H1 Sicherheitshinweise @ 6\mod_1196353926316_200.doc @ 40982 @ @ 1<br />
Pos: 184 /Alle Produkte/Sicherheit/Einleitung/SIC 1 Sicherheitshinweise Einleitung @ 7\mod_1205310799730_200.doc @ 45454 @ @ 1<br />
Pos: 186 /Alle Produkte/Sicherheit/Einleitung/SIC 3 Gefahr durch Kombination von Wasser und Elektrizität @ 11\mod_1253173630836_200.doc @ 74188 @ @ 1<br />
Pos: 187 /Alle Produkte/Überschriften/H2 Vorschriftsmäßige elektrische Installation @ 7\mod_1204019051664_200.doc @ 44620 @ @ 1<br />
Pos: 188 /Filter/<strong>FiltoMatic</strong> <strong>CWS</strong>/SIC_Elektrische Installation_<strong>FiltoMatic</strong> <strong>CWS</strong> @ 9\mod_1225446401080_200.doc @ 54994 @ @ 1<br />
Pos: 189 /Alle Produkte/Überschriften/H2 Sicherer Betrieb @ 7\mod_1204022429287_200.doc @ 44672 @ @ 1<br />
Pos: 190 /Filter/<strong>FiltoMatic</strong> <strong>CWS</strong>/SIC_Sicherer Betrieb <strong>FiltoMatic</strong> <strong>CWS</strong> @ 9\mod_1225446564801_200.doc @ 55020 @ @ 1<br />
Pos: 191 /Filter/<strong>FiltoMatic</strong> <strong>CWS</strong>/SIC_UVC-Lampe_<strong>FiltoMatic</strong>_<strong>CWS</strong> @ 9\mod_1226926376657_200.doc @ 55804 @ @ 1<br />
Pos: 192 /Filter/<strong>FiltoMatic</strong> <strong>CWS</strong>/SIC_Überspannung_im_Netz_<strong>FiltoMatic</strong>_<strong>CWS</strong> @ 9\mod_1229504617720_200.doc @ 58774 @ @ 1<br />
Pos: 193 /Alle Produkte/Dummy_module/Abstand 18 pt @ 6\mod_1196355593257_0.doc @ 41090 @ @ 1<br />
Pos: 194 /Alle Produkte/Dummy_module/===== Seitenwechsel ===== @ 0\mod_1125648978015_0.doc @ 1632 @ @ 1<br />
- FR -<br />
4. Consignes de sécurité<br />
La sociétè OASE a construit cet appareil selon l'état actuel des connaissances techniques et les<br />
consignes de sécurité en vigueur. Toutefois des dangers pour les personnes et les biens peuvent<br />
émaner de cet appareil lorsque celui-ci est utilisé de manière non appropriée voire non conforme à sa<br />
finalité ou lorsque les informations de sécurité ne sont pas respectées.<br />
Pos: 185 /Alle Produkte/Sicherheit/Einleitung/SIC 2 Kinder und Jugendliche unter 16 Jahren @ 13\mod_1259074357193_200.doc @ 83216 @ @ 1<br />
Pour des raisons de sécurité, les enfants et les mineurs de moins de 16 ans ainsi que les<br />
personnes n'étant pas en mesure de reconnaître les dangers ou n'ayant pas pris connaissance<br />
de cette notice d'emploi ne sont pas autorisés à utiliser cet appareil ! Les enfants doivent être<br />
sous surveillance pour s'assurer qu'ils ne jouent pas avec l'appareil.<br />
4.1 Dangers dus à la combinaison d'eau et d'électricité<br />
► La combinaison d'eau et d'électricité peut entraîner des blessures graves ou la mort par<br />
électrocution en présence de raccordements non conformes ou d'une utilisation inappropriée.<br />
► Toujours mettre hors tension tous les appareils se trouvant dans l'eau avant tout contact avec l'eau.<br />
4.2 Installation électrique correspondant aux prescriptions<br />
►<br />
►<br />
►<br />
►<br />
►<br />
►<br />
►<br />
►<br />
►<br />
►<br />
En cas de questions et de problèmes, prière de s'adresser à un électricien agréé et ce, pour votre<br />
propre sécurité.<br />
Les installations électriques des étangs/bassins de jardin doivent correspondre aux règlements<br />
d'installation internationaux et nationaux. Tenir particulièrement compte des directives<br />
DIN VDE 0100 et DIN VDE 0702.<br />
Comparer les données électriques de l'alimentation en courant avec celles indiquées sur la plaque<br />
signalétique de l'appareil de préclarification à UVC.<br />
Utiliser le <strong>FiltoMatic</strong> <strong>CWS</strong> uniquement sur une prise de courant installée conformément à la<br />
réglementation.<br />
Veiller à ce que le réseau d’alimentation soit absolument protégé par fusible par le biais d’une<br />
protection différentielle avec un courant assigné de 30 mA maximum.<br />
Installer le <strong>FiltoMatic</strong> <strong>CWS</strong> de manière à exclure tout risque de blessure pour les personnes.<br />
N'employer que des câbles déroulés.<br />
Les câbles de rallonge doivent être homologués pour l’utilisation en extérieur et être conformes aux<br />
critères de la norme DIN VDE 0620.<br />
Protéger le câble de raccordement afin qu'il ne soit pas endommagé.<br />
Maintenir au sec tous les points de raccordement. Il y a risque d’électrocution.<br />
4.3 Exploitation sécurisée<br />
►<br />
►<br />
►<br />
►<br />
►<br />
►<br />
►<br />
►<br />
►<br />
Ne pas utiliser le <strong>FiltoMatic</strong> <strong>CWS</strong> lorsque des personnes se trouvent dans l'eau.<br />
Ne pas porter, ni tirer l'appareil de préclarification à UVC, ni la pompe à eau sale du <strong>FiltoMatic</strong> <strong>CWS</strong><br />
par les câbles de raccordement.<br />
Ne pas faire fonctionner d’appareils défectueux. Le <strong>FiltoMatic</strong> <strong>CWS</strong> ne peut pas être exploité en<br />
présence de câbles de raccordement électriques défectueux. Débrancher aussitôt la prise de<br />
secteur. Il n'est pas possible d'effectuer des réparations au niveau des câbles de raccordement de<br />
l'appareil de préclarification à UVC, ou bien de la pompe à eau sale. Remplacer les composants.<br />
Recycler les composants défectueux conformément à la législation en vigueur.<br />
Ne jamais ouvrir le carter de l'appareil de préclarification à UVC, de la pompe à eau sale, de la<br />
commande ou des parties y appartenant si cela n'est pas expressément indiqué dans cette notice<br />
d'emploi.<br />
N’utiliser que des pièces de rechange et des accessoires d’origine.<br />
Ne jamais filtrer d'autres liquides que de l'eau.<br />
Le rayonnement de la lampe UVC est dangereux pour les yeux et la peau même à faibles doses. Ne<br />
jamais utiliser la lampe UVC dans un boîtier défectueux ou en dehors du boîtier.<br />
Ne jamais utiliser la lampe UVC sans rotor de nettoyage car celui-ci protège également la vue<br />
contre le rayonnement UVC.<br />
Une surtension dans le réseau peut causer des dérangements de l'appareil. Vous trouverez des<br />
informations à ce sujet dans le chapitre "Élimination des dérangements".<br />
39
Pos: 197 /Alle Produkte/Dummy_module/===== Seitenwechsel ===== @ 0\mod_1125648978015_0.doc @ 1632 @ @ 1<br />
- FR -<br />
Pos: 195 /Alle Produkte/Überschriften/6. H1 Aufstellen @ 7\mod_1202907856718_200.doc @ 43935 @ @ 1<br />
5. Mise en place<br />
Pos: 196 /Filter/<strong>FiltoMatic</strong> <strong>CWS</strong>/Aufstellen <strong>FiltoMatic</strong>_<strong>CWS</strong>_<strong>7000</strong>-<strong>25000</strong> @ 24\mod_1311156480859_200.doc @ 136653 @ @ 1<br />
Pour que le <strong>FiltoMatic</strong> <strong>CWS</strong> puisse être exploité dès le départ pratiquement sans entretien, il est<br />
conseillé de nettoyer l'étang/le bassin à fond préalablement. Pour ce nettoyage, OASE vous conseille<br />
l'aspirateur de boue d'étang Pondovac. Si le <strong>FiltoMatic</strong> <strong>CWS</strong> est utilsé pour la première fois dans un<br />
étang/bassin qui vient d'être aménagé, ce nettoyage n'est en règle générale pas nécessaire.<br />
Mise en place du <strong>FiltoMatic</strong> <strong>CWS</strong> (figures D, E)<br />
Planifier la mise en place du <strong>FiltoMatic</strong> <strong>CWS</strong>. Une planification minutieuse et une prise en considération<br />
des conditions environnantes permettront d'obtenir des conditions de fonctionnement optimales pour le<br />
<strong>FiltoMatic</strong> <strong>CWS</strong>. Les points mentionnés ci-après vous aideront dans votre planification.<br />
► Un petit cours d'eau permet de garantir une reconduite optimale de l'eau du <strong>FiltoMatic</strong> <strong>CWS</strong> vers<br />
l'étang/le bassin. Ceci permet d'oxygéner l'eau filtrée du bassin avant qu'elle ne revienne dans<br />
l'étang/le bassin. Si le contexte environnemental local ne permet pas l'aménagement d'un petit cours<br />
d'eau, allonger l'écoulement à l'aide d'un tuyau DN70 afin que l'eau de bassin filtrée puisse refluer<br />
dans le bassin par le biais du tuyau. Le montage d'un tuyau DN70 est décrit au chapitre Montage.<br />
► Le <strong>FiltoMatic</strong> <strong>CWS</strong> doit être absolument aligné à l'horizontale et ceci, afin d'éviter que le bassin ne<br />
se vide en cas de débordement. Utiliser un niveau à bulle pour effectuer l'alignement.<br />
► Tenir compte de l'important volume du <strong>FiltoMatic</strong> <strong>CWS</strong> et du poids qui en résulte lorsqu'il est rempli.<br />
Choisir une surface adéquate ou un panneau de sol dans la fosse pour éviter que le <strong>FiltoMatic</strong> <strong>CWS</strong><br />
ne s'affaisse.<br />
► Prévoir suffisamment d'espace autour des appareils, pour pouvoir exécuter les travaux de nettoyage<br />
et d'entretien.<br />
► Creuser une fosse de dimensions suffisantes pour la mise en place du <strong>FiltoMatic</strong> <strong>CWS</strong> (figure D).<br />
Bien veiller à ce que le <strong>FiltoMatic</strong> <strong>CWS</strong> puisse être enterré jusqu'à la partie supérieure (figure E,<br />
hauteur C). Le tableau suivant contient des dimensions que nous vous conseillons pour la fosse :<br />
Modèle a b c (+ hauteur du panneau de<br />
sol)<br />
<strong>FiltoMatic</strong> <strong>CWS</strong> <strong>7000</strong> env. 50 cm env. 50 cm env. 30 cm<br />
<strong>FiltoMatic</strong> <strong>CWS</strong> <strong>14000</strong> env. 50 cm env. 50 cm env. 50 cm<br />
<strong>FiltoMatic</strong> <strong>CWS</strong> <strong>25000</strong> env. 50 cm env. 70 cm env. 50 cm<br />
►<br />
►<br />
Remplir le récipient (3) d'eau avant de remblayer la fosse avec la terre pour éviter que le récipient<br />
ne soit écrasé.<br />
Placer l'extrémité du tuyau DN40 pour l'écoulement de l'eau sale le plus loin possible du bassin pour<br />
éviter que l'eau sale pompée ne puisse refluer dans le bassin.<br />
40
Pos: 200 /Alle Produkte/Dummy_module/===== Seitenwechsel ===== @ 0\mod_1125648978015_0.doc @ 1632 @ @ 1<br />
- FR -<br />
Pos: 198 /Alle Produkte/Überschriften/5. H1 Montage @ 7\mod_1202907725390_200.doc @ 43909 @ @ 1<br />
6. Montage<br />
Pos: 199 /Filter/<strong>FiltoMatic</strong> <strong>CWS</strong>/Montage <strong>FiltoMatic</strong> <strong>CWS</strong> @ 9\mod_1225186907843_200.doc @ 54840 @ @ 1<br />
Montage du <strong>FiltoMatic</strong> <strong>CWS</strong><br />
Le <strong>FiltoMatic</strong> <strong>CWS</strong> est livré pré-assemblé. Il ne vous reste plus qu'à monter l'écoulement et les<br />
raccordements pour l'entrée et l'écoulement de l'eau sale.<br />
La douille d'écoulement (8) pour l'écoulement de l'eau sale est transparente. Ceci permet, lors d'un<br />
processus de nettoyage, de contrôler le taux d'encrassement de l'eau d'écoulement. Dès que de l'eau<br />
visiblement propre sort de l'écoulement de saletés, le processus de pompage peut être arrêté. Le<br />
nettoyage est terminé.<br />
Montage de l'écoulement (figure F)<br />
1.1. Placer le joint plat (5) sur la vis d'écoulement pré-montée sur le carter (25).<br />
1.2. Visser l'écoulement (4) sur la vis d'écoulement (25).<br />
1.3. Le cas échéant, raccorder un tuyau DN70-Rohr (26) au niveau de l'écoulement (4) pour allonger afin<br />
que l'eau de bassin filtrée puisse revenir dans le bassin. La pente dans le tuyau DN70 doit être d'au<br />
moins 1,5 % .<br />
OASE conseille comme rallonge pour l'écoulement :<br />
− le tuyau DN70, 480 mm, noir (N° commande OASE 55034)<br />
− le coude de tuyau DN70, 45°, noir (N° commande OASE 55044)<br />
− le coude de tuyau DN70, 87°, noir (N° commande OASE 55045)<br />
− le coude de tuyau DN70, T, noir (N° commande OASE 55046)<br />
Montage de l'entrée (figure F)<br />
1.1. Insérer la douille d'entrée (9) et le joint plat (6) dans l'écrou d'accouplement (10) et visser fixement<br />
au niveau du filetage (21) du coulisseau de blocage.<br />
1.2. Faire glisser le collier de serrage (11) sur le tuyau flexible venant de la pompe Aquamax (24).<br />
Insérer le flexible sur la douille d'entrée (9) et le fixer avec le collier de serrage.<br />
OASE conseille le tuyau spiralé, vert (n° de commande OASE 52981)<br />
Avant le montage, immerger l'extrémité du tuyau flexible dans de l'eau très chaude pendant deux<br />
minutes, il en sera dès lors plus facile de l'insérer sur la douille d'entrée (9).<br />
Montage de l'écoulement de l'eau sale (figure F)<br />
1.1. Monter le joint torique (7) sur la douille d'écoulement (8) et insérer dans l'écrou d'accouplement (10).<br />
Ensuite, visser fixement au niveau du filetage de l'écoulement de l'eau sale prémonté (22).<br />
1.2. Insérer un tuyau DN40 (23) sur la douille d'écoulement (8). Placer l'extrémité du tuyau DN40 à un<br />
endroit permettant à l'eau sale pompée de s'infiltrer dans le sol. La pente dans le tuyau DN40 doit<br />
être de 1,5 ... 2 %.<br />
OASE conseille comme rallonge pour l'écoulement de l'eau sale :<br />
− le tuyau DN40, 480 mm, noir (N° commande OASE 50307)<br />
− le coude de tuyau DN40, 45°, noir (N° commande OASE 50308)<br />
41
Pos: 202 /Alle Produkte/Warnhinweise/7.2 ACHTUNG - Gerät nicht dimmen, nicht an Zeitschaltuhr @ 13\mod_1259920518051_200.doc @ 84818 @ @ 1<br />
Pos: 203 /Alle Produkte/Dummy_module/Abstand 3 pt @ 11\mod_1251901846864_0.doc @ 72827 @ @ 1<br />
Pos: 204 /Filter/<strong>FiltoMatic</strong> <strong>CWS</strong>/Inbetriebnahme <strong>FiltoMatic</strong> <strong>CWS</strong> @ 9\mod_1225196867060_200.doc @ 54866 @ @ 1<br />
Pos: 205 /Alle Produkte/Dummy_module/===== Seitenwechsel ===== @ 0\mod_1125648978015_0.doc @ 1632 @ @ 1<br />
- FR -<br />
Pos: 201 /Alle Produkte/Überschriften/7. H1 Inbetriebnahme @ 7\mod_1196625111244_200.doc @ 41418 @ @ 1<br />
7. Mise en service<br />
Attention ! Composants électriques fragiles.<br />
Conséquence éventuelle : l'appareil est détruit.<br />
Mesure de protection :<br />
► raccorder l'appareil à une alimentation en courant avec variateur.<br />
► Ne pas utiliser l'appareil avec une minuterie.<br />
Attention ! Tension électrique dangereuse.<br />
Conséquences éventuelles : mort ou blessures graves.<br />
Mesures de protection : Toujours retirer la fiche de secteur (figure G) avant tout contact avec l'eau et<br />
avant de procéder à des travaux sur l'appareil.<br />
Respecter les consignes de sécurité !<br />
Le <strong>FiltoMatic</strong> <strong>CWS</strong> se met automatiquement en marche dès que la connexion avec le courant est<br />
établie.<br />
Mise en circuit (figure G) : brancher la fiche de secteur (27) dans la prise de courant.<br />
Mise hors circuit (figure G) : retirer la fiche de secteur (27).<br />
Remplir le récipient d'eau (figure C)<br />
► Mettre la pompe Aquamax en circuit avant la mise en service du <strong>FiltoMatic</strong> <strong>CWS</strong>. Le récipient (3) se<br />
remplit d'eau.<br />
Le coulisseau de blocage (17) doit être ouvert pour permettre le remplissage du récipient. À cet effet,<br />
faire glisser le coulisseau de blocage (17) vers le bas jusqu'à la butée.<br />
Dès que le niveau d'eau dans le récipient (3) atteint l'écoulement (4), l'eau de bassin filtrée reflue dans<br />
le bassin via l'écoulement (4).<br />
Lire le chapitre suivant Exploitation pour les autres réglages du <strong>FiltoMatic</strong> <strong>CWS</strong>.<br />
Remplir l'activateur de filtration biologique (figure C)<br />
Nous conseillons d'utiliser l'activateur de filtration Biokick <strong>CWS</strong> OASE (n° de commande OASE 50295)<br />
pour la prolifération rapide des bactéries. Des microorganismes s'installent dans le système de filtration,<br />
se multiplient et assurent une meilleure qualité de l'eau du bassin en décomposant les substances<br />
nutritives superflues.<br />
► Remplir la quantité de Biokick <strong>CWS</strong> nécessaire pour le volume du bassin par l'ouverture de<br />
remplissage (20).<br />
42
Pos: 207 /Filter/<strong>FiltoMatic</strong> <strong>CWS</strong>/Bedienung_<strong>FiltoMatic</strong>_<strong>CWS</strong>_Controller @ 13\mod_1259921096539_200.doc @ 84966 @ @ 1<br />
Pos: 208 /Alle Produkte/Dummy_module/===== Seitenwechsel ===== @ 0\mod_1125648978015_0.doc @ 1632 @ @ 1<br />
- FR -<br />
Pos: 206 /Alle Produkte/Überschriften/H1 Bedienung @ 7\mod_1196625148604_200.doc @ 41444 @ @ 1<br />
8. Exploitation<br />
8.1 Vue d'ensemble contrôleur<br />
C1<br />
C2<br />
C3<br />
C4<br />
C5<br />
Affichage<br />
Affichage DEL pour le<br />
fonctionnement de la pompe à<br />
eau sale<br />
Affichage DEL pour la fonction<br />
UVC<br />
Touche pour l'exploitation<br />
manuelle de la pompe à eau<br />
sale<br />
Touche pour le réglage d'un<br />
programme de nettoyage pour<br />
la pompe à eau sale<br />
C6 Touche pour le réglage d'un<br />
programme d'exploitation pour<br />
l'appareil de préclarification à<br />
UVC<br />
Affichages au niveau du contrôleur<br />
L'affichage (C1) indique<br />
− de manière standard la température de l'eau.<br />
− commute automatiquement 2 secondes après la dernière activation d'une touche pour revenir à l'affichage de la température<br />
de l'eau.<br />
− les programmes de nettoyage lors de la sélection correspondante.<br />
− les réglages enregistrés lors de l'actionnement d'une touche.<br />
− la durée de vie restante (h × 100) de la lampe UVC.<br />
Messages dans l'affichage (C1)<br />
− "LA" clignote 1× toutes les 8 secondes : la lampe UVC fonctionne depuis 7.500 heures; il lui reste encore 500 heures de<br />
service.<br />
− "LA" clignote 2× toutes les 8 secondes : la lampe UVC fonctionne depuis 8000 heures et elle doit être remplacée.<br />
− "PS" clignote toutes les 4 secondes : la pompe à eau sale a atteint la durée de marche max. et elle est bloquée pour 1,5 heure.<br />
DEL pour la pompe à eau sale (C2)<br />
− La DEL clignote en vert : vidange partielle du récipient.<br />
− La DEL est allumée en vert : vidange totale du récipient.<br />
− La DEL est allumée en rouge : la pompe est bloquée.<br />
− DEL arrêt : la pompe n'est pas active.<br />
DEL pour l'appareil de préclarification à UVC (C3)<br />
− La DEL est allumée en bleu : l'appareil de préclarification à UVC est en circuit.<br />
− DEL clignote en bleu toutes les 8 secondes : l'appareil de préclarification à UVC se trouve en mode d'exploitation Automatique<br />
(AU).<br />
− DEL arrêt : l'appareil de préclarification à UVC est hors circuit.<br />
Remarque :<br />
Le thermomètre intégré mesure en permanence la température de l'eau et ainsi, la dimension de base pour les programmes<br />
d'exploitation.<br />
La couverture en silicone protège le contrôleur contre les salissures et n'entrave ni la lecture de l'affichage, ni la fonctionnalité<br />
des touches. Le contrôleur est étanche à l'eau et peut aussi être exploité sans couvercle en silicone.<br />
43
Pos: 209 /Filter/<strong>FiltoMatic</strong> <strong>CWS</strong>/Bedienung_<strong>FiltoMatic</strong>_<strong>CWS</strong>_Schmutzwasserpumpe_einstellen @ 13\mod_1259926492646_200.doc @ 85054 @ @ 1<br />
Pos: 210 /Alle Produkte/Dummy_module/===== Seitenwechsel ===== @ 0\mod_1125648978015_0.doc @ 1632 @ @ 1<br />
- FR -<br />
8.2 Réglage de la pompe à eau sale<br />
Le taux d'encrassement de l'eau du bassin/de l'étang est déterminé de manière décisive par la quantité<br />
de poissons, outre la température de l'eau. La pompe à eau sale pompe les saletés au fond du récipient<br />
par intervalles. Les quatre différents programmes de nettoyage permettent d'adapter l'intervalle de<br />
pompage de l'eau sale au taux d'encrassement de manière individuelle. Un nettoyage dure env. 9<br />
secondes. Un cycle de nettoyage consomme env. 4 litres d'eau. Le tableau indique les possibilités de<br />
sélection des programmes de nettoyage. Le programme de nettoyage INTERVAL 1 contient la plupart<br />
des intervalles de nettoyage, INTERVAL 4 en contient le plus petit nombre. Choisir un programme qui<br />
soit au mieux adapté au taux d'encrassement de l'eau du bassin/de l'étang. Le programme de nettoyage<br />
INTERVAL 2 est préprogrammé à la livraison.<br />
Température de<br />
l’eau<br />
Programmes de nettoyage de la pompe à eau sale<br />
+ Intervalles − Intervalles<br />
INTERVALLE 1 INTERVALLE 2 INTERVALLE 3 INTERVALLE 4 OFF<br />
< 5 °C Arrêt Arrêt Arrêt Arrêt Arrêt<br />
< 8 °C 1 × par jour tous les 2 jours tous les 3 jours tous les 3 jours Arrêt<br />
8 °C - 14 °C 2 × par jour 1 × par jour tous les 2 jours tous les 3 jours Arrêt<br />
15 °C - 21 °C 4 × par jour 2 × par jour 1 × par jour tous les 2 jours Arrêt<br />
≥ 22 °C 8 × par jour 4 × par jour 2 × par jour 1 × par jour Arrêt<br />
Les programmes de nettoyage sont inactifs lorsque les températures de l'eau sont 35 °C. La<br />
pompe ne peut alors être actionnée que manuellement. Appuyer impérativement et continuellement sur<br />
la touche PUMP (C4) pour un pompage complet.<br />
Réglage du programme de nettoyage pour la pompe à eau sale<br />
1.1. Appuyer sur la touche INTERVALLE (C5) . Le programme de nettoyage INTERVALLE 2 est indiqué<br />
sur l'affichage (C1) .<br />
1.2. Appuyer plusieurs fois sur la touche INTERVALLE (C5) jusqu'à ce que le programme de nettoyage<br />
souhaité soit affiché.<br />
1.3. Relâcher la touche INTERVALLE (C5) dès que le programme de nettoyage souhaité est affiché.<br />
− Le réglage est enregistré lorsque l'affichage (C1) indique la température de l'eau après env. 2<br />
secondes.<br />
Pompage manuelle de l'eau sale<br />
L'eau sale peut également être pompée manuellement à tout moment.<br />
► Appuyer sur la touche PUMP (C4)<br />
− La DEL (C2) clignote en vert. Le transport des saletés commence automatique.<br />
►<br />
►<br />
Si vous appuyez sur la touche PUMP (C4) pendant plus de 10 secondes, la vidange complète du<br />
récipient commence. La DEL verte (C2) s'allume. La pompe à eau sale fonctionne pendant un<br />
maximum de 4 minutes. Vous pouvez arrêter la vidange en appuyant une fois sur la touche<br />
PUMP (C4).<br />
Pour éviter des dommages liés à une surchauffe, la durée de marche max. de la pompe à eau sale<br />
est limitée à 12 minutes toutes les 1,5 heure. En cas d'encrassement important, la durée de marche<br />
peut être également limitée à 8 minutes. Une fois la durée de marche max. atteinte, il n'est plus<br />
possible d'actionner manuellement la pompe. L'affichage indique "PS". Au bout de 1,5 heure, la<br />
pompe à eau sale est de nouveau opérationnelle.<br />
44
Pos: 211 /Filter/<strong>FiltoMatic</strong> <strong>CWS</strong>/Bedienung_<strong>FiltoMatic</strong>_<strong>CWS</strong>_Vorklaerer_einstellen @ 15\mod_1261489931765_200.doc @ 89284 @ @ 1<br />
Pos: 212 /Alle Produkte/Dummy_module/===== Seitenwechsel ===== @ 0\mod_1125648978015_0.doc @ 1632 @ @ 1<br />
- FR -<br />
8.3 Réglage de l'appareil de préclarification à UVC<br />
Le taux d'encrassement de l'eau du bassin/de l'étang par la formation d'algues dépend de manière<br />
déterminante de la température de l'eau. L'appareil de préclarification à UVC élimine avec la lumière<br />
ultraviolette les algues vertes et les algues en suspension en exploitation immergée et constitue ainsi un<br />
composant important pour le nettoyage de l'eau du bassin/de l'étang. En fonction de la température de<br />
l'eau, avec le programme d'exploitation AU, la lampe UVC de l'appareil de préclarification à UVC est<br />
mise en et hors circuit à intervalles et est ainsi adaptée individuellement au taux d'encrassement. Le<br />
tableau suivant montre le programme d'exploitation AU (automatique) de l'appareil de préclarification à<br />
UVC et les états opératoires ON (Marche) et OFF (Arrêt).<br />
Température de l’eau<br />
La lampe UVC est en<br />
circuit<br />
Programmes d'exploitation de l'appareil de préclarification à UVC<br />
AU ON OFF<br />
La lampe UVC est hors<br />
circuit<br />
< 8 °C 8 h 16 h<br />
8 °C - 14 °C 48 h 24 h<br />
15 °C - 21 °C 72 h 24 h<br />
≥ 22 °C 96 h 24 h<br />
La lampe UVC est en<br />
circuit en permanence<br />
La lampe UVC est hors<br />
circuit en permanence<br />
Le programme d'exploitation AU est préprogrammé à la livraison.<br />
► Le programme d'exploitation AU démarre avec l'intervalle Arrêt lors de la mise sur secteur. La<br />
lampe UVC ne s'allume pas. Si vous utilisez Biokick <strong>CWS</strong> lors de la mise en service, les cultures de<br />
bactéries seront ainsi protégées dans le Biokick <strong>CWS</strong>.<br />
► Si le programme d'exploitation AU est sélectionné manuellement, l'appareil de préclarification à<br />
UVC démarre avec l'intervalle Marche.<br />
Réglage du programme d'exploitation pour l'appareil de préclarification à UVC<br />
1.1. Appuyer sur la touche UVC (C6). Le programme d'exploitation AU est indiqué sur l'affichage (C1).<br />
1.2. Appuyer plusieurs fois sur la touche UVC (C6) jusqu'à ce que le programme d'exploitation souhaité<br />
soit affiché.<br />
1.3. Relâcher la touche UVC (C6) dès que le programme d'exploitation souhaité est affiché.<br />
− Le réglage est enregistré dès que la température de l'eau est indiquée dans l'affichage (C1) après<br />
env. 2 secondes.<br />
Interroger le compteur d'heures de service de l'appareil de préclarification à UVC<br />
La durée de vie d'une lampe UVC pour l'appareil de préclarification à UVC est d'env. 8 000 heures. Le<br />
compteur d'heures de service intégré décompte les heures à partir de cette valeur selon le principe du<br />
compte à rebours.<br />
► Maintenir la touche UVC (C6) appuyée pendant 5 secondes. Un nombre apparaît dans<br />
l'affichage (C1).<br />
− Multiplier ce nombre par 100 pour déterminer les heures de service restantes.<br />
− Exemple : valeur affichée '45' 100 = 4 500 heures de service restantes.<br />
Remise à zéro du compteur d'heures de service de l'appareil de préclarification à UVC<br />
Le compteur d'heures de service doit être remis à zéro après le remplacement d'une lampe UVC.<br />
1.1. Maintenir la touche UVC (C6) appuyée en permanence pendant 12 secondes !<br />
− Après 5 secondes, la durée de vie restante est affichée à l'indicateur (C1) . Ensuite, l'affichage<br />
clignote. Dès que la température de l'eau est affichée à l'indicateur (C1), le compteur d'heures de<br />
service est remis à 8 000 heures.<br />
1.2. Relâcher la touche UVC (C6).<br />
45
Pos: 215 /Alle Produkte/Dummy_module/===== Seitenwechsel ===== @ 0\mod_1125648978015_0.doc @ 1632 @ @ 1<br />
- FR -<br />
Pos: 213 /Alle Produkte/Überschriften/H1 Störungsbeseitigung @ 7\mod_1196625290699_200.doc @ 41522 @ @ 1<br />
9. Élimination des dérangements<br />
Pos: 214 /Filter/<strong>FiltoMatic</strong> <strong>CWS</strong>/Störungstabelle_<strong>FiltoMatic</strong>_<strong>CWS</strong> @ 14\mod_1259929430129_200.doc @ 85204 @ @ 1<br />
Dérangement Cause Remède<br />
Le contrôleur ne se met pas en circuit Aucune tension du réseau électrique Vérifier la tension de réseau électrique<br />
Contrôler les conduites d’amenée<br />
Le contrôleur n'est pas placé correctement<br />
sur l'appareil de préclarification à UVC<br />
Contrôler la bonne position du contrôleur<br />
Le tuyau d'écoulement DN70 ne transporte<br />
pas d'eau, pas de reflux d'eau dans le<br />
bassin/l'étang<br />
La pompe à eau sale ne se met pas en<br />
circuit<br />
La lampe UVC ne se met pas en circuit<br />
La pompe Aquamax n’est pas en circuit Mettre la pompe Aquamax en circuit<br />
Coulisseau de blocage fermé alors que le Ouvrir le coulisseau de blocage<br />
couvercle est ouvert<br />
Le rotor de la pompe est bloqué<br />
Nettoyer le rotor de la pompe<br />
Le récipient est déjà vidé<br />
Remplir le récipient<br />
Le récipient est partiellement vidé, la pompe Remplir le récipient<br />
à eau sale ne peut pas commencer à aspirer<br />
Les programmes de nettoyage sont inactifs La pompe à eau sale ne peut alors être<br />
lorsque les températures de l'eau sont 35 °C.<br />
− Appuyer continuellement sur la touche<br />
PUMP pour un pompage complet.<br />
La pompe à eau sale a atteint la durée de<br />
marche max. L'affichage indique "PS".<br />
La lampe UVC est défectueuse<br />
Le dispositif de sécurité dans l'appareil de<br />
préclarification à UVC s'est déclenché à la<br />
suite d'une surtension dans le réseau<br />
Attendre 1,5 heure. Ensuite, la pompe à eau<br />
sale est de nouveau opérationnelle<br />
Remplacement de la lampe UVC<br />
Mettre la tension de réseau hors circuit et la<br />
remettre en circuit afin de réinitialiser le<br />
dispositif de sécurité<br />
− Vérifier dans la fenêtre de contrôle si la<br />
lampe UVC est allumée (lumière bleue)<br />
− Pour la vérification, le cas échéant, mettre<br />
la lampe UVC en circuit avec la touche<br />
UVC (état d'exploitation°ON/MARCHE)<br />
46
Pos: 217 /Alle Produkte/Warnhinweise/E-ACHTUNG - Netzspannung absch. (vor Arbeitsbeginn/vor Griff ins Wasser)# @ 13\mod_1259760934607_200.doc @ 84731 @ @ 1<br />
Pos: 218 /Alle Produkte/Dummy_module/Abstand 3 pt @ 11\mod_1251901846864_0.doc @ 72827 @ @ 1<br />
Pos: 219 /Filter/<strong>FiltoMatic</strong> <strong>CWS</strong>/Reinigung_Wartung_<strong>FiltoMatic</strong>_<strong>CWS</strong>_Filterschaeume_reinigen @ 14\mod_1259928464654_200.doc @ 85110 @ @ 1<br />
Pos: 220 /Filter/<strong>FiltoMatic</strong> <strong>CWS</strong>/Reinigung_Wartung_<strong>FiltoMatic</strong>_<strong>CWS</strong>_Reinigungskomponenten_entnehmen @ 9\mod_1228741070856_200.doc @ 57792 @ @ 1<br />
1.6.<br />
Pos: 221 /Alle Produkte/Dummy_module/===== Seitenwechsel ===== @ 0\mod_1125648978015_0.doc @ 1632 @ @ 1<br />
- FR -<br />
Pos: 216 /Alle Produkte/Überschriften/8. H1 Reinigung und Wartung @ 7\mod_1196625212761_200.doc @ 41470 @ @ 1<br />
10. Nettoyage et entretien<br />
Attention ! Tension électrique dangereuse !<br />
Conséquences éventuelles : mort ou blessures graves.<br />
Mesures de protection :<br />
► Toujours couper l'alimentation électrique de tous les appareils se trouvant dans l'eau avant tout<br />
contact avec l’eau.<br />
► Avant d'exécuter des travaux sur l'appareil, couper la tension du secteur.<br />
10.1 Nettoyage des mousses filtrantes<br />
Les intervalles de nettoyage dépendent du taux d'encrassement des mousses filtrantes. Un niveau<br />
d'eau élevé dans l'affichage du taux d'encrassement (figure C, 12) dans le couvercle intérieur signale<br />
que la puissance de nettoyage des mousses filtrantes diminue. Un nettoyage est nécessaire en<br />
présence d'un taux d'encrassement de 75 % ou, au plus tard, en cas de débordement.<br />
Procédure pour le nettoyage des mousses filtrantes (fig. H, I, J)<br />
1.1. Ouvrir le couvercle (1) avec la poignée rotative (2) et l'enlever du récipient (3).<br />
1.2. Fermer le coulisseau de blocage (17) en le déplaçant vers le haut.<br />
− L'eau du bassin/de l'étang ne s'écoule plus dans le récipient.<br />
− Remarque : lors de la fermeture du coulisseau de blocage (17), de l'eau gicle hors de la tubulure<br />
d'aspiration d'air.<br />
1.3. Tirer le porte-mousse (13) plusieurs fois vers le haut.<br />
− Exercer une pression sur les mousses filtrantes pour les dégorger. Les saletés sont rincées.<br />
1.4. Maintenir la touche PUMP (C4) sur le contrôleur (15) appuyée pendant plus de 10 secondes.<br />
− La DEL (C2) s'allume en vert. L'eau sale dans le récipient est totalement pompée.<br />
1.5. Ouvrir le coulisseau de blocage (17) en le déplaçant vers le bas.<br />
− Le récipient est à nouveau rempli d'eau du bassin/de l'étang.<br />
Répéter le processus de nettoyage en présence d'un encrassement important des mousses filtrantes.<br />
10.2 Retirer les composants de nettoyage et les séparer les uns des autres<br />
Il est nécessaire de retirer du récipient les composants de nettoyage que sont la pompe à eau sale (14)<br />
et l'appareil de préclarafication à UVC (16) pour pouvoir en effectuer le nettoyage et l'entretien. Le<br />
contrôleur (15) est inséré au niveau de l'appareil de préclarification à UVC. Les composants de<br />
nettoyage ne sont pas raccordés fixement au couvercle intérieur (47) mais ils sont placés dans les<br />
guigades du couvercle intérieur (47) ou bien du coulisseau de blocage (17).<br />
Comment retirer les composants de nettoyage (figure K)<br />
1.1. Ouvrir le couvercle (1) avec la poignée rotative (2) et l'enlever du récipient (3) (figure H).<br />
1.2. Fermer le coulisseau de blocage (17) en le déplaçant vers le haut.<br />
− L'eau du bassin/de l'étang ne s'écoule plus dans le récipient.<br />
− Remarque : Lors de la fermeture du coulisseau de blocage, de l'eau gicle hors de la tubulure<br />
d'aspiration d'air.<br />
1.3. Sortir les composants de nettoyage, la pompe à eau sale (14) et l'appareil de préclarification à<br />
UVC (16) du couvercle intérieur (47).<br />
Comment séparer les composants de nettoyage et le contrôleur les uns des autres (figure L)<br />
1.1. Maintenir appuyé le crochet (30) sur l'appareil de préclarification à UVC (16).<br />
1.2. Retirer le contrôleur (15) avec force hors de l'appareil de préclarification à UVC.<br />
1.3. Débrancher le câble de raccordement (28) de la pompe à eau sale du contrôleur (15) avec force.<br />
1.4. Placer les capsules de protection en silicone pour la protection des fiches ouvertes.<br />
1.5. Rassembler les composants de nettoyage et le contrôleur dans l'ordre inverse (figure M).<br />
− Lors de l'assemblage du contrôleur avec l'appareil de préclarification à UVC, veiller à ce que les<br />
flèches se trouvant sur les deux composants coïncident.<br />
Lors de l'assemblage, contrôler le bon positionnement des joints toriques (29) au niveau des points de<br />
raccordement du contrôleur et de l'appareil de préclarification à UVC ! Nettoyer les joints toriques (29) si<br />
nécessaire. Si les joints toriques manquent ou s'ils ne sont pas placés correctement, les contacts<br />
électriques peuvent être corrodés. Les composants seront alors endommagés de manière irréparable !<br />
47
Pos: 222 /Filter/<strong>FiltoMatic</strong> <strong>CWS</strong>/Reinigung_Wartung_<strong>FiltoMatic</strong>_<strong>CWS</strong>_Schmutzwasserpumpe_reinigen @ 14\mod_1259928823735_200.doc @ 85138 @ @ 1<br />
Pos: 223 /Filter/<strong>FiltoMatic</strong> <strong>CWS</strong>/Reinigung_Wartung_<strong>FiltoMatic</strong>_<strong>CWS</strong>_UVC-Lampe_Vorklaerer_wechseln @ 9\mod_1228741316733_200.doc @ 57848 @ @ 1<br />
1.1.<br />
Pos: 224 /Alle Produkte/Dummy_module/===== Seitenwechsel ===== @ 0\mod_1125648978015_0.doc @ 1632 @ @ 1<br />
- FR -<br />
10.3 Nettoyage de la pompe à eau sale<br />
Un nettoyage de la pompe à eau sale est nécessaire lorsque le rotor du moteur de la pompe (33) est<br />
très encrassé ou bloqué. Ceci peut être causé par des éléments d'encrassement assez grands, comme<br />
p.ex. des pierres. Lorsque la pompe à eau sale est fortement encrassée ou bloquée, la DEL (C2) sur le<br />
contrôleur (15) s'éclaire en rouge.<br />
Procédure de nettoyage de la pompe à eau sale (figure N)<br />
1.1. Tourner le carter du moteur (33) jusqu'à ce que le symbole "Fermeture ouverte" coïncide avec la<br />
flèche sur le tuyau supérieur (31).<br />
1.2. Retirer et nettoyer le carter du moteur (33).<br />
1.3. Réassembler dans l’ordre inverse.<br />
− Important : le carter du moteur (33) n'est bloqué que si le symbole "Fermeture fermée" coïncide<br />
avec la flèche sur le tuyau supérieur (31) (figure N).<br />
1.4. Appuyer une fois sur la touche PUMP (C4).<br />
− La DEL (C2) passe du rouge au vert. La pompe à eau sale (14) démarre. Dans le cas contraire, la<br />
pompe à eau sale (14) ne démarre pas à cause d'un dérangement. Voir à cet effet le chapitre<br />
Élimination des dérangements.<br />
1.5. Si nécessaire, nettoyer le trop-plein au niveau du tuyau supérieur (31). À cet effet, ouvrir le<br />
recouvrement du tuyau à encrassement (32).<br />
10.4 Remplacement de la lampe UVC dans l'appareil de préclarification à UVC<br />
Attention ! Rayonnement ultraviolet dangereux.<br />
Conséquences éventuelles : blessures graves au niveau des yeux et de la peau.<br />
Mesures de protection : ne mettre l'appareil en circuit que si le carter est monté.<br />
Une lampe UVC défectueuse n'est pas affichée au niveau du contrôleur (15). Contrôler le bon<br />
fonctionnement de la lampe UVC en jetant un coup d'oeil par la fenêtre de contrôle (18) à des<br />
intervalles réguliers (figure O).<br />
La lampe UVC a une durée de vie limitée et doit être remplacée à la fin de cette durée de vie (voir<br />
également le chapitre Interroger le compteur d'heures de service de l'appareil de préclarification à<br />
UVC).<br />
1.1. Tourner le carter d'eau (35) jusqu'à ce que le symbole avec "Fermeture ouverte" coïncide avec la<br />
flèche sur la partie supérieur de l'UVC (34) (figure O).<br />
1.2. Retirer le carter d'eau (35)(figure O).<br />
1.3. Retirer le rotor de nettoyage (37) du tube de verre à quartz (45) (figure P).<br />
1.4. Desserrer la vis (40) au niveau de l'écrou d'accouplement (39) et dévisser l'écrou<br />
d'accouplement (39) (figure Q).<br />
1.5. Retirer le tube de verre à quartz (45) avec le joint torique (46) avec un mouvement de<br />
rotation (figure R).<br />
1.6. Retirer la protection de la lampe UVC (44) (figure R).<br />
1.7. Retirer la lampe UVC (43) de son point d'insertion au niveau de la partie supérieur de l'UVC (34) et<br />
la remplacer (figure R).<br />
1.8. Remonter l'appareil de préclarification à UVC dans l’ordre inverse.<br />
− Important : Le carter d'eau (35) n'est fermé que si le symbole "Fermeture fermée" coïncide avec la<br />
flèche sur la partie supérieure de l'UVC (34) (figure O).<br />
►<br />
►<br />
►<br />
►<br />
Lors de l'assemblage, veiller à ce que la butée (41) de l'écrou d'accouplement (39) entre en contact<br />
avec la butée (42) au niveau de la partie supérieur de l'UVC-Oberteil (34). Ce n'est alors que la<br />
vis (40) pourra être tournée (figure Q).<br />
Le joint torique (36) au niveau de la fermeture du carter d'eau (35) est serré fixement. Ne retirer le<br />
joint torique (36) que s'il doit être remplacé, p.ex. s'il est poreux (figure O).<br />
De l'eau de condensation peut apparaître dans le tube de verre à quartz (45). Cette eau de<br />
condensation est inévitable et n'a aucune influence sur le fonctionnement et la sécurité.<br />
Le tube de verre à quartz (45) peut être égratigné ou devenir opaque avec le temps. Dans ce cas, la<br />
lampe UVC (43) n'est plus en mesure de garantir un nettoyage suffisant. Le tube de verre à<br />
quartz (45) doit être remplacé.<br />
48
Pos: 225 /Filter/<strong>FiltoMatic</strong> <strong>CWS</strong>/Reinigung_Wartung_<strong>FiltoMatic</strong>_<strong>CWS</strong>_Reinigungsrotor_kontrollieren @ 9\mod_1228741419030_200.doc @ 57876 @ @ 1<br />
Pos: 226 /Filter/<strong>FiltoMatic</strong> <strong>CWS</strong>/Reinigung_Wartung_<strong>FiltoMatic</strong>_<strong>CWS</strong>_Filterschaeume_wechseln @ 14\mod_1259929379754_200.doc @ 85176 @ @ 1<br />
Pos: 227 /Alle Produkte/Dummy_module/===== Seitenwechsel ===== @ 0\mod_1125648978015_0.doc @ 1632 @ @ 1<br />
- FR -<br />
10.5 Contrôle du rotor de nettoyage<br />
Le rotor de nettoyage (37) nettoie le tube de verre à quartz (45). Il est entraîné par le courant de l'eau<br />
dans le carter d'eau (figure P).<br />
Le mouvement constant de rotation du rotor de nettoyage (37) entraîne à long terme l'usure du<br />
coussinet (38). Le rotor de nettoyage (37) doit alors être remplacé (figure P).<br />
1.1. Tourner le carter d'eau (35) jusqu'à ce que le symbole "Fermeture ouverte" coïncide avec la flèche<br />
sur la partie supérieur de l'UVC (34) (figure O).<br />
1.2. Retirer le carter d'eau (35)(figure O).<br />
1.3. Vérifier la limite d'usure du coussinet (38).<br />
− Lorsque le coussinet (38) est usé jusqu'à 0 mm, le rotor de nettoyage (37) doit être<br />
remplacé (figure P).<br />
1.4. Remonter l'appareil de préclarification à UVC dans l’ordre inverse.<br />
− Important : Le carter d'eau (35) n'est fermé que si le symbole "Fermeture fermée" coïncide avec la<br />
flèche sur la partie supérieure de l'UVC (34) (figure O).<br />
10.6 Remplacement des mousses filtrantes<br />
Il convient de remplacer les mousses filtrantes (49) chaque année.<br />
Comment remplacer les mousses filtrantes :<br />
1.1. Ouvrir le couvercle (1) avec la poignée rotative (2) et l'enlever du récipient (3) (figure H).<br />
1.2. Fermer le coulisseau de blocage (17) en le déplaçant vers le haut (figure S).<br />
− L'eau du bassin/de l'étang ne s'écoule plus dans le récipient.<br />
− Remarque : Lors de la fermeture du coulisseau de blocage (17), de l'eau gicle hors de la tubulure<br />
d'aspiration d'air.<br />
1.3. Tirer le porte-mousse (13) dans le couvercle intérieur (47) plusieurs fois vers le haut. L'eau dans les<br />
mousses filtrantes (49) est évacuée (figure I).<br />
1.4. Appuyer sur la touche PUMP (C4) au niveau du contrôleur (15) pendant plus de 10<br />
secondes (figure J).<br />
− La DEL (C2) s'allume en vert. L'eau sale dans le récipient est pompée.<br />
1.5. Sortir les composants de nettoyage, la pompe à eau sale (14) et l'appareil de préclarification à<br />
UVC (16) du couvercle intérieur (47) (figure K).<br />
1.6. Desserrer les crochets bleus (19) des deux côtés et retirer du récipient le couvercle intérieur (47)<br />
avec les porte-mousses (13) (figure S).<br />
1.7. Tirer le porte-mousse (13) légèrement vers le haut, exercer une pression sur les deux crochets<br />
bleus (48) sur les porte-mousses (13) et les retirer par le bas hors du couvercle intérieur (47)<br />
(figure T).<br />
1.8. Enfoncer les quatre crochets noirs (54) de la partie supérieure de la mousse et retirer le portemousse<br />
(13) y compris la cartouche filtrante (49) par le bas (figure T).<br />
− Remarque : appuyer sur chacun des deux crochets opposés, l'un après l'autre (54) et pousser<br />
vers le bas hors du couvercle intérieur (47).<br />
1.9. Retirer la cartouche filtrante usée (49) et la partie inférieure de la mousse (55) du porte-mousse (13)<br />
(figure U).<br />
− Recycler conformément la cartouche filtrante.<br />
1.10. Placer tout d'abord la nouvelle partie inférieure de la mousse (55), puis la nouvelle cartouche<br />
filtrante (49) sur le porte-mousse (13) (figure U).<br />
− Veiller à ce que la cartouche filtrante (49) passe exactement dans la partie inférieure de<br />
mousse (55).<br />
1.11. Introduire par le bas le porte-mousse (13) avec la nouvelle cartouche filtrante (49) dans le<br />
couvercle intérieur. Pour cela, tirer le porte-mousse vers le haut aussi loin que possible de telle sorte<br />
que les deux crochets bleus (48) et les quatre crochets noirs (54) s'emboîtent dans le couvercle<br />
intérieur (figure T).<br />
− Important : le positionnement correct de la cartouche filtrante (49) est assuré uniquement lorsque<br />
tous les quatre crochets noirs (54) sont emboîtés.<br />
49
Pos: 228 /Filter/<strong>FiltoMatic</strong> <strong>CWS</strong>/Reinigung_Wartung_<strong>FiltoMatic</strong>_<strong>CWS</strong>_Komplettreinigung_durchfuehren @ 9\mod_1228741615703_200.doc @ 57932 @ @ 1<br />
Pos: 229 /Alle Produkte/Dummy_module/===== Seitenwechsel ===== @ 0\mod_1125648978015_0.doc @ 1632 @ @ 1<br />
- FR -<br />
10.7 Effectuer un nettoyage complet<br />
De légères particules en suspension sont filtrées mécaniquement ou, le cas échéant, décomposées<br />
biologiquement par les mousses filtrantes. Des particules en suspension, qui sont plus lourdes que<br />
l'eau, se déposent au fond du récipient et l'encrassent. Effectuer une fois par an un nettoyage complet,<br />
de préférence au moment où vous préparez le <strong>FiltoMatic</strong> <strong>CWS</strong> pour l'hiver.<br />
Vidange complète du récipient<br />
Une vidange complète dure 4 minutes au maximum.<br />
1.1. Mettre la pompe Aquamax hors circuit.<br />
1.2. Ouvrir le couvercle (1) avec la poignée rotative (2) et l'enlever du récipient (3) (figure H).<br />
1.3. Déplacer les trois porte-mousses (13) vers le haut (figure J).<br />
− Exercer une pression sur les mousses filtrantes pour les dégorger. Les saletés sont rincées.<br />
1.4. Appuyer sur la touche PUMP (C4)pendant plus de 10 secondes.<br />
− La DEL (C2) s'allume en vert. Le récipient est vidé.<br />
− Vous pouvez arrêter la vidange en appuyant une fois sur la touche PUMP (C4). Le récipient est<br />
complètement vidé lorsque la pompe à eau sale est mise hors circuit et lorsque plus aucun liquide<br />
ne s'écoule par la douille d'écoulement transparente (6).<br />
Nettoyage de l'appareil<br />
À cet effet, retirer le séparateur à lamelles (51) et la pyramide à impuretés (52). À cet effet, vider le<br />
récipient complètement avec la pompe et retirer le couvercle intérieur (47). Lire à cet effet les chapitres<br />
précédents.<br />
Comment retirer et nettoyer le séparateur à lamelles<br />
1.1. Appuyer sur le crochet (50) vers le bas et sortir le séparateur à lamelles (51) du guidage au niveau<br />
du récipient (3) en le tirant vers le haut (figure V).<br />
1.2. Appuyer vers le bas sur le crochet (52) se trouvant dans la partie supérieur du séparateur à<br />
lamelles (51) et "ouvrir" les deux parties du séparateur à lamelles (51) (figure W).<br />
1.3. Nettoyer les deux pièces à l'eau et avec une brosse douce.<br />
1.4. Réassembler le séparateur à lamelles (51) dans l’ordre inverse<br />
1.5. Placer le séparateur à lamelles (51) dans le récipient (3) (figure Y).<br />
− Le crochet (50) doit s'encliqueter sur le coulisseau de blocage (17).<br />
Comment retirer et nettoyer la pyramide à impuretés (figure X)<br />
Ne retirer la pyramide à impuretés (53) que si c'est nécessaire. Le montage et le démontage nécessitent<br />
une force importante.<br />
1.1. Saisir le récipient par le bas sous la pyramide (53) et la détacher des trois fixations au fond du<br />
récipient en tirant avec force vers le haut.<br />
1.2. Nettoyer la pyramide à impuretés (53) à l'eau et avec une brosse douce.<br />
1.3. Rincer le fond du récipient.<br />
1.4. Insérer la pyramide à impuretés (53) dans les supports de fixation en exerçant une forte pression.<br />
− L'encliquetage dans les supports de fixation est clairement audible ("clic").<br />
Une distance d'env. 8 mm est prévue entre la pyramide à impuretés (53) et le fond du récipient. Cette<br />
distance permet à la pompe à eau sale de pomper les impuretés sur le fond du récipient. Lors de<br />
l'assemblage, veiller à ce que cette distance soit maintenue. Ne pas essayer d'appuyer sur la pyramide<br />
à impuretés (53) avec une pression trop importante pour lui faire atteindre le fond du récipient !<br />
50
Pos: 232 /Alle Produkte/Dummy_module/Abstand 18 pt @ 6\mod_1196355593257_0.doc @ 41090 @ @ 1<br />
Pos: 235 /Alle Produkte/Dummy_module/Abstand 18 pt @ 6\mod_1196355593257_0.doc @ 41090 @ @ 1<br />
Pos: 236 /Alle Produkte/Überschriften/9. H1 Entsorgung @ 7\mod_1196625583904_200.doc @ 41548 @ @ 1<br />
Pos: 237 /Alle Produkte/Entsorgung/Entsorgung - gem. Bestimmungen @ 8\mod_1223247321369_200.doc @ 53911 @ @ 1<br />
Pos: 238 /Alle Produkte/Dummy_module/===== Seitenwechsel ===== @ 0\mod_1125648978015_0.doc @ 1630 @ @ 1<br />
- FR -<br />
Pos: 230 /Alle Produkte/Überschriften/H1 Verschleißteile @ 8\mod_1223247075102_200.doc @ 53884 @ @ 1<br />
11. Pièces d'usure<br />
Pos: 231 /Filter/<strong>FiltoMatic</strong> <strong>CWS</strong>/Verschleissteile_<strong>FiltoMatic</strong>_<strong>CWS</strong>_<strong>7000</strong>-<strong>25000</strong> @ 24\mod_1311156621953_200.doc @ 136681 @ @ 1<br />
Pièce d'usure Modèle N° d’ident.<br />
Lampe UVC<br />
<strong>FiltoMatic</strong> <strong>CWS</strong> <strong>7000</strong> 56112<br />
<strong>FiltoMatic</strong> <strong>CWS</strong> <strong>14000</strong> 56237<br />
<strong>FiltoMatic</strong> <strong>CWS</strong> <strong>25000</strong> 56237<br />
Tube de verre à quartz<br />
<strong>FiltoMatic</strong> <strong>CWS</strong> <strong>7000</strong> 13312<br />
<strong>FiltoMatic</strong> <strong>CWS</strong> <strong>14000</strong> 13332<br />
<strong>FiltoMatic</strong> <strong>CWS</strong> <strong>25000</strong> 13332<br />
Rotor de nettoyage<br />
<strong>FiltoMatic</strong> <strong>CWS</strong> <strong>7000</strong> 12703<br />
<strong>FiltoMatic</strong> <strong>CWS</strong> <strong>14000</strong> 12705<br />
<strong>FiltoMatic</strong> <strong>CWS</strong> <strong>25000</strong> 12705<br />
Cartouches filtrantes<br />
<strong>FiltoMatic</strong> <strong>CWS</strong> <strong>7000</strong> 50901 (1×)<br />
<strong>FiltoMatic</strong> <strong>CWS</strong> <strong>14000</strong> 50904 (1×)<br />
<strong>FiltoMatic</strong> <strong>CWS</strong> <strong>25000</strong> 50904 (2×)<br />
Pos: 233 /Alle Produkte/Überschriften/10. H1 Lagern / Überwintern @ 7\mod_1196625251745_200.doc @ 41496 @ @ 1<br />
12. Stockage/entreposage pour l'hiver<br />
Pos: 234 /Filter/<strong>FiltoMatic</strong> <strong>CWS</strong>/Lagern/Ueberwintern FitoMatic <strong>CWS</strong>_<strong>7000</strong>-<strong>25000</strong> @ 24\mod_1311156831812_200.doc @ 136709 @ @ 1<br />
Stocker impérativement les composants de nettoyage que sont la pompe à eau sale (14), le<br />
contrôleur (15) et l'appareil de préclarification à UVC (16) à l'abri du gel avant le début de la période de<br />
gel.<br />
1.1. Effectuer le nettoyage complet (voir le chapitre Effectuer le nettoyage complet) et contrôler la<br />
présence éventuelle de détériorations au niveau des composants.<br />
− Le récipient (3) et les mousses filtrantes (49) n'ont pas besoin d'être stockés à l'abri du gel.<br />
Pomper néanmoins préalablement le récipient (3) pour qu'il soit complètement vide.<br />
1.2. Couvrir le récipient (3) de telle sorte que l'eau ne puisse pas y pénétrer.<br />
− Le couvercle placé dessus (1) ne suffit pas car l'eau peut s'infiltrer dans le récipient par l'encoche<br />
prévue pour le contrôleur.<br />
OASE conseille pour le recouvrement :<br />
− <strong>FiltoMatic</strong> Cap (couvercle), taille L, pour <strong>FiltoMatic</strong> <strong>CWS</strong> <strong>7000</strong> et <strong>CWS</strong> <strong>14000</strong> (n° commande<br />
OASE 50268)<br />
− <strong>FiltoMatic</strong> Cap (couvercle), taille XL, pour <strong>FiltoMatic</strong> <strong>CWS</strong> <strong>25000</strong> (n° commande OASE 50269)<br />
13. Recyclage<br />
Recycler l’appareil conformément aux réglementations nationales légales en vigueur.<br />
51
Pos: 1702 /Alle Produkte/Länderkennzeichen/00===LEER=== @ 0\mod_1126786111024_0.doc @ 5631 @ @ 1<br />
Pos: 1703 /Filter/<strong>FiltoMatic</strong> <strong>CWS</strong>/TEC_Daten_<strong>FiltoMatic</strong>_<strong>CWS</strong>_<strong>7000</strong>-<strong>25000</strong> @ 24\mod_1311161943500_0.doc @ 136735 @ @ 1<br />
DE Technische<br />
Daten<br />
Anschlussspannung Leistungsaufnahme UVC-<br />
Vorklärer<br />
GB Technical data Connection voltage Power consumption UVC<br />
clarifying unit<br />
FR Caractéristiques<br />
techniques<br />
NL Technische<br />
gegevens<br />
Tension de<br />
raccordement<br />
Consommation Appareil<br />
de préclarification à UVC<br />
Aansluitspanning Stroomverbruik UVCvoorzuiveringsapparaat<br />
ES Datos técnicos Tensión de conexión Consumo de potencia<br />
Preclarificador UVC<br />
PT Dados técnicos Tensão eléctrica Consumo de energia<br />
Aparelho de prétratamento<br />
UVC<br />
IT Caratteristiche<br />
tecniche<br />
Tensione di attacco Potenza assorbita<br />
Predepuratore UVC<br />
DK Tekniske data Tilslutningsspænding Strømforbrug<br />
UVC-forrenseenhed<br />
NO Tekniske data Nettspenning Inngangseffekt<br />
UV-forrenser<br />
SE Tekniska data Anslutningsspänning Effekt<br />
UVC-förrening<br />
FI Tekniset tiedot Liitäntä-jännite Ottoteho<br />
UVC-esipuhdistaja<br />
HU<br />
Műszaki adatok Csatlakoztatási<br />
feszültség<br />
PL Dane techniczne Napięcie<br />
przyłączeniowe<br />
Teljesítményfelvétel<br />
UVC előtisztító<br />
Pobór mocy<br />
Osadnik wstępny z lampą<br />
UV<br />
CZ Technické údaje Připojovací napětí Příkon<br />
Předčišťovač UVC<br />
SK Technické údaje Napájacie napätie Príkon<br />
UVBC-odkalovač<br />
SI Tehnični<br />
podatki<br />
Priključna napetost Nazivna moč<br />
UVC predčistilna naprava<br />
HR<br />
Tehnički podaci Priključni napon Prijemna snaga<br />
UVC-razbistrivač<br />
RO Date tehnice Tensiune de<br />
conexiune<br />
BG Технически<br />
данни<br />
Напрежение в<br />
точката на<br />
свързване<br />
Putere consumatã<br />
Dispozitivul de prelimpezire<br />
cu raze<br />
ultraviolete<br />
Потребявана мощност<br />
UVC-устройство за<br />
предварителна очистка<br />
Leistungsaufnahme<br />
Schmutzwasserpumpe<br />
Power consumption<br />
Dirty water pump<br />
Consommation<br />
Pompe à eau sale<br />
Stroomverbruik<br />
Afvalwaterpomp<br />
Consumo de potencia<br />
Bomba de agua sucia<br />
Consumo de energia<br />
Bomba de água suja<br />
Potenza assorbita<br />
Pompa dell'acqua sporca<br />
Strømforbrug<br />
Spildevandspumpe<br />
Inngangseffekt<br />
Spillvannspumpe<br />
Effekt<br />
Smutsvattenpump<br />
Ottoteho<br />
Likavesipumppu<br />
Teljesítményfelvétel<br />
Szennyvíz szivattyú<br />
Pobór mocy<br />
Pompa brudnej wody<br />
Příkon<br />
Kalové čerpadlo<br />
Príkon<br />
Čerpadlo znečistenej<br />
vody<br />
Nazivna moč<br />
Črpalka za onesnaženo<br />
vodo<br />
Prijemna snaga<br />
Crpka za prljavu vodu<br />
Putere consumatã<br />
Pompa de apă murdară<br />
Потребявана мощност<br />
Помпа за мръсна вода<br />
Leistungsaufnahme<br />
Steuerung<br />
Control system power<br />
consumption<br />
Puissance absorbée,<br />
commande<br />
Vermogensopname<br />
besturing<br />
Consumo de potencia<br />
del control<br />
Consumo de energia<br />
sistema de controlo<br />
Wassertemperatur Gewicht Länge Anschlussleitung<br />
Water temperature Weight Length of connection cable<br />
Température de l’eau Poids Conduite de raccordement<br />
longue<br />
Watertemperatuur Gewicht Lengte aansluitleiding<br />
Temperatura del agua Peso Longitud del cable de<br />
conexión<br />
Temperatura de água Peso Comprimento do cabo de<br />
alimentação<br />
Potenza assorbita<br />
comando<br />
Strømforbrug af<br />
styring<br />
Temperatura<br />
dell'acqua<br />
Peso Lunghezza cavo di<br />
collegamento<br />
Vandtemperatur Vægt Længde på tilslutningsledning<br />
Inngangseffekt styring Vanntemperatur Vekt Lengde stikkledninger<br />
Effektförbrukning<br />
styrning<br />
Vattentemperatur Vikt Längd anslutningsledning<br />
Ottoteho ohjaus Veden lämpötila Paino Liitäntäjohdonpituus<br />
Vezérlő<br />
teljesítményfelvétel<br />
Pobór mocy<br />
sterowania<br />
Vízhõmérséklet Súly Csatlakozóvezeték hossza<br />
Temperatura wody Masa Długość przewodu<br />
przyłączeniowego<br />
Řízení příkonu Teplota vody Hmotnost Délka připojovacího vedení<br />
Príkon riadenia Teplota vody Hmotnost’ Dĺžka prípojného vedenia<br />
Moč krmilnega<br />
sistema<br />
Temperatura vode Teža Dolžina priključne vrvice<br />
Potrošnja energije<br />
upravljača<br />
Puterea consumată de<br />
sistemul de comandă<br />
Temperatura vode Težina Duljina priključne cijevi<br />
Temperatura apei Greutate Lungimea cablului de<br />
conexiune<br />
Консумация на<br />
мощност управление<br />
Температурата на<br />
водата<br />
Тегло Дължина свързващ<br />
проводник<br />
337
DE Technische<br />
Daten<br />
GB Technical<br />
data<br />
FR Caractéristiqu<br />
es techniques<br />
Abmessungen Messgenauigkeit<br />
Temperaturfühler<br />
Dimensions Measuring accuracy<br />
of the temperature<br />
sensor<br />
Dimensions Précision de mesure<br />
du thermostat<br />
NL Technische<br />
gegevens<br />
ES Datos<br />
técnicos<br />
PT Dados<br />
técnicos<br />
IT Caratteristich<br />
e tecniche<br />
Afmetingen Meetnauwkeurigheid<br />
temperatuursensor<br />
Dimensiones Exactitud de medición<br />
sensor de<br />
temperatura<br />
Dimensões Precisão de medição<br />
do sensor de<br />
temperatura<br />
Dimensioni Precisione di<br />
misurazione sonda<br />
termica<br />
DK Tekniske data Dimensioner Temperatursensors<br />
målenøjagtighed<br />
NO Tekniske data Dimensjoner Målepresisjon<br />
Temperaturføler<br />
SE Tekniska data Mått Mätprecision<br />
temperaturgivare<br />
FI Tekniset<br />
tiedot<br />
HU Műszaki<br />
adatok<br />
PL Dane<br />
techniczne<br />
CZ Technické<br />
údaje<br />
Mitoitus Mittaustarkkuus<br />
lämpötilatunnistin<br />
Méretek Hőmérsékletérzékelő<br />
mérési pontossága<br />
Wymiary Dokładność<br />
pomiarowa czujnika<br />
temperatury<br />
Rozměry<br />
Přesnost měření<br />
snímače teploty<br />
SK Technické<br />
údaje<br />
Rozmery<br />
Presnosť merania<br />
snímača teploty<br />
SI Tehnični<br />
podatki<br />
Velikosti Merilna natančnost<br />
temperaturnega tipala<br />
HR Tehnički<br />
podaci<br />
Dimenzije<br />
Točnost mjerenja<br />
pipka za temperaturu<br />
Teichvolumen<br />
ohne Fischbesatz<br />
Pond volume w/o<br />
fish population<br />
Volume de<br />
bassin/de l'étang<br />
sans poissons<br />
Vijvervolume<br />
zonder visbestand<br />
Volumen del<br />
estanque sin<br />
peces<br />
Volume do lago<br />
sem peixes<br />
Volume laghetto<br />
senza patrimonio<br />
ittico<br />
Dammens<br />
volumen, uden<br />
fiskebestand<br />
Damstørrelse uten<br />
fiskebestand<br />
Dammvolym utan<br />
fisk<br />
Lammen tilavuus<br />
ilman kalajoukkoa<br />
Tótérfogat<br />
halállomány nélkül<br />
Pojemność stawu<br />
bez zarybienia<br />
Objem jezírka<br />
bez rybí obsádky<br />
Objem záhradnej<br />
nádrže bez<br />
zarybnenia<br />
Prostornina ribnika<br />
brez ribjega<br />
staleža<br />
Obujam jezerca<br />
bez oribljenosti<br />
Teichvolumen<br />
mittlerer Fischbesatz<br />
Pond volume,<br />
medium fish<br />
population<br />
Volume de bassin/de<br />
l'étang avec quantité<br />
moyenne de poissons<br />
Vijvervolume<br />
gemiddeld visbestand<br />
Volumen del<br />
estanque con<br />
algunos peces<br />
Volume do lago,<br />
número médio de<br />
peixes<br />
Volume laghetto<br />
patrimonio ittico<br />
medio<br />
Dammens volumen,<br />
mellem fiskebestand<br />
Damstørrelse middels<br />
fiskebestand<br />
Dammvolym med<br />
medelstor mängd fisk<br />
Lammen tilavuus<br />
keski-kalajoukolla<br />
Tótérfogat közepes<br />
halállománnyal<br />
Pojemność stawu ze<br />
średnim zarybieniem<br />
Objem jezírka<br />
se střední velká rybí<br />
sádkou<br />
Objem záhradnej<br />
nádrže s priemerným<br />
zarybnením<br />
Prostornina ribnika s<br />
srednje velikim ribjim<br />
staležem<br />
Obujam jezerca s<br />
osrednjom oribljenosti<br />
Teichvolumen hoher<br />
Fischbesatz<br />
Pond volume, high<br />
fish population<br />
Volume de bassin/de<br />
l'étang avec quantité<br />
importante de<br />
poissons<br />
Vijvervolume hoog<br />
visbestand<br />
Volumen del<br />
estanque con muchos<br />
peces<br />
Volume do lago, alto<br />
número de peixes<br />
Volume laghetto<br />
notevole patrimonio<br />
ittico<br />
Dammens volumen,<br />
stor fiskebestand<br />
Damstørrelse tett<br />
fiskebestand<br />
Dammvolym med stor<br />
mängd fisk<br />
Lammen tilavuus<br />
korkealla kalajoukolla<br />
Tótérfogat magas<br />
halállománnyal<br />
Pojemność stawu z<br />
wysokim zarybieniem<br />
Objem jezírka<br />
s velkou rybí sádkou<br />
Objem záhradnej<br />
nádrže s vysokým<br />
zarybnením<br />
Prostornina ribnika z<br />
velikim ribjim<br />
staležem<br />
Obujam jezerca s<br />
velikom oribljenosti<br />
Wasseraufnahme<br />
Behälter<br />
Container water<br />
volume<br />
Betriebsdruck Max.<br />
Durchfluss<br />
Operating<br />
pressure<br />
Min.<br />
Durchfluss<br />
Max. flow Min. flow<br />
Volume du<br />
récipient<br />
Pression de<br />
service<br />
Débit<br />
maximal<br />
Débit minimal<br />
Wateropname<br />
bak<br />
Volumen de agua<br />
del recipiente<br />
Bedrijfsdruk max.<br />
doorstroming<br />
Presión de<br />
servicio<br />
min.<br />
doorstroming<br />
Paso máx. Paso mín.<br />
Capacidade do<br />
depósito<br />
Pressão de<br />
serviço<br />
Caudal<br />
máximo<br />
Caudal<br />
mínimo<br />
Capacità<br />
recipiente<br />
Pressione<br />
d'esercizio<br />
Portata max. Portata min.<br />
Beholders<br />
vandoptagelse<br />
Driftstryk maks.<br />
gennemløb<br />
min.<br />
gennemløb<br />
Tømme beholder Driftstrykk maks. gjenn<br />
omstrømmin<br />
g<br />
Vattenvolym i<br />
behållare<br />
min. gjennom<br />
strømming<br />
Drifttryck Max. flöde Min. flöde<br />
Vedenotto säiliö Käyttöpaine Maks.<br />
läpivirtaus<br />
Tartály vízfelvétel Üzemi nyomás max.<br />
átáramlás<br />
Pobór wody<br />
zbiornika<br />
Napouštění<br />
nádrže<br />
Ciśnienie<br />
robocze<br />
Prevádzkový<br />
tlak<br />
maks. natęż<br />
enie<br />
przepływu<br />
Min.<br />
läpivirtaus<br />
min.<br />
átáramlás<br />
min. natężeni<br />
e przepływu<br />
max. průtok min. průtok<br />
Zásobník prítoku Prevádzkový<br />
tlak<br />
max. prietok min. prietok<br />
Posoda za vodo Delovni tlak Maks. pretok Min. pretok<br />
Potrošnja vode u<br />
spremniku<br />
Radni tlak maks.<br />
protjecanje<br />
min.<br />
protjecanje<br />
339
Pos: 1705 /Filter/<strong>FiltoMatic</strong> <strong>CWS</strong>/Symbole_<strong>FiltoMatic</strong>_<strong>CWS</strong>_<strong>7000</strong>-<strong>25000</strong> @ 24\mod_1311163106687_0.doc @ 136763 @ @ 1<br />
DE Staubdicht. Wasserdicht bis 2 m<br />
Tiefe.<br />
GB Dust tight. Submersible to 2 m<br />
depth.<br />
FR Imperméable aux poussières.<br />
Etanche à l'eau jusqu'à une<br />
profondeur de 2 m.<br />
NL Stofdicht. Waterdicht tot een diepte<br />
van 2 m.<br />
ES A prueba de polvo. Impermeable al<br />
agua hasta 2 m de profundidad.<br />
PT À prova de pó. À prova de água até<br />
2 m de profundidade.<br />
IT A tenuta di polvere. Impermeabile<br />
all'acqua fino a 2 m di profondità.<br />
DK Støvtæt. Vandtæt ned til 2 m<br />
dybde.<br />
NO Støvtett. Vanntett ned til<br />
2 m dyp.<br />
SE Dammtät. Vattentät till<br />
2 m djup.<br />
FI Pölytiivis. Vesitiivis 2 m syvyyteen<br />
asti<br />
HU Portömített. Vízálló 2 m-es<br />
mélységig.<br />
Achtung!<br />
Gefährliche UVC-Strahlung!<br />
Attention!<br />
Dangerous UVC radiation!<br />
Attention !<br />
Rayonnement UVC dangereux !<br />
Let op!<br />
Gevaarlijke UVC-straling!<br />
¡Atención!<br />
Radiación UVC peligrosa.<br />
Atenção!<br />
Radiação UVC perigosa!<br />
Attenzione!<br />
Pericolosa radiazione UVC!<br />
Fare!<br />
Farlig UVC-stråling!<br />
NB!<br />
Farlig UV-stråling!<br />
Varning!<br />
Farlig UVC-strålning!<br />
Huomio!<br />
Vaarallinen UVC-säteily!<br />
Figyelem!<br />
Veszélyes UVC-sugárzás!<br />
PL Pyłoszczelny. Wodoszczelny do<br />
2 m głębokości.<br />
CZ Prachotěsný. Vodotěsný do hloubky<br />
2 m.<br />
SK Prachotesný. Vodotesný do hĺbky<br />
2 m.<br />
SI Ne prepušča prahu. Ne prepušča<br />
vode do globinen 2 m.<br />
HR Ne propušta prašinu. Ne propušta<br />
vodu do 2 m dubine.<br />
RO Etanş la praf. Etanş la apă, până la<br />
o adâncime de 2 m.<br />
BG Защитено от прах. Водоустойчив<br />
до дълбочина 2 м.<br />
UA Пилонепроникний.<br />
Водонепроникний до 2 м.<br />
RU Пыленепрониц. Водонепрониц.<br />
на глубине до 2 м.<br />
Uwaga!<br />
Niebezpieczne promieniowanie<br />
ultrafioletowe!<br />
Pozor!<br />
Nebezpečné ultrafialové záření.<br />
Pozor!<br />
Nebezpečné ultrafialové žiarenie.<br />
Pozor!<br />
Nevarno UVC-sevanje!<br />
Pažnja!<br />
Opasno UVC zračenje!<br />
Atenţie!<br />
Radiaţii ultraviolete periculoase!<br />
Внимание!<br />
Опасно ултравиолетово лъчение!<br />
Увага!<br />
Небезпечне ультрафіолетове<br />
випромінювання!<br />
Внимание!<br />
Опасное коротковолновое<br />
УФ-излучение!<br />
CN 防 尘 。 至 2 米 深 防 水 。 注 意 !<br />
危 险 的 紫 外 线 照 射 !<br />
Pos: 1706 /Alle Produkte/Dummy_module/===Querformat -> Hochformat=== @ 0\mod_1127735629838_0.doc @ 6912 @ @ 1<br />
Vor direkter Sonneneinstrahlung schützen<br />
Bei Frost das Gerät deinstallieren! Nicht mit normalem Hausmüll<br />
entsorgen!<br />
Protect from direct sun radiation. Remove the unit at temperatures Do not dispose of together with<br />
below zero (centigrade)!.<br />
household waste!<br />
Protéger contre les rayons directs Retirer l’appareil en cas de gel ! Ne pas recycler dans les ordures<br />
du soleil.<br />
ménagères !<br />
Achtung!<br />
Lesen Sie die Gebrauchsanleitung<br />
Attention!<br />
Read the operating instructions<br />
Attention !<br />
Lire la notice d'emploi<br />
Beschermen tegen direct zonlicht. Bij vorst moet het apparaat<br />
gedeïnstalleerd worden!<br />
Niet bij het normale huisvuil doen! Let op!<br />
Lees de gebruiksaanwijzing<br />
Protéjase contra la radiación Desinstale el equipo en caso de ¡No deseche el equipo en la ¡Atención!<br />
directa del sol.<br />
heladas.<br />
basura doméstica!<br />
Lea las instrucciones de uso<br />
Proteger contra radiação solar Em caso de geada, desinstalar o Não deitar ao lixo doméstico! Atenção!<br />
directa.<br />
aparelho!<br />
Leia as instruções de utilização<br />
Proteggere contro i raggi solari In caso di gelo disinstallare<br />
Non smaltire con normali rifiuti Attenzione!<br />
diretti.<br />
l'apparecchio!<br />
domestici!<br />
Leggete le istruzioni d'uso!<br />
Beskyt mod direkte sollys. Afinstaller enheden ved frostvejr! Må ikke bortskaffes med det OBS!<br />
almindelige husholdningsaffald. Læs brugsanvisningen<br />
Beskytt mot direkte sollys. Demonter apparatet ved frost! Ikke kast i alminnelig<br />
NB!<br />
husholdningsavfall!<br />
Les bruksanvisningen<br />
Skydda mot direkt solstrålning. Demontera apparaten innan första Får inte kastas i hushållssoporna! Varning!<br />
frosten!<br />
Läs igenom bruksanvisningen<br />
Suojattava suoralta<br />
Laite on purettava ennen pakkasta. Älä hävitä laitetta tavallisen Huomio!<br />
auringonvalolta.<br />
talousjätteen kanssa!<br />
Lue käyttöohje<br />
Óvja közvetlen napsugárzástól. Fagy esetén a készüléket szerelje A készüléket nem a normál Figyelem!<br />
le!<br />
háztartási szeméttel együtt kell Olvassa el a használati útmutatót<br />
megsemmisíteni!<br />
Chronić przed bezpośrednim<br />
nasłonecznieniem.<br />
W razie mrozu zdeinstalować<br />
urządzenie!<br />
Nie wyrzucać wraz ze śmieciami<br />
domowymi!<br />
Uwaga!<br />
Przeczytać instrukcję użytkowania!<br />
Chránit před přímým slunečním<br />
zářením.<br />
Chránit’ pred priamym slnečným<br />
žiarením.<br />
Zaščitite pred neposrednimi<br />
sončnimi žarki.<br />
Zaštitite od izravnog sunčevog<br />
zračenja.<br />
Protejaţi împotriva razelor directe<br />
ale soarelui.<br />
Při mrazu přístroj odinstalovat! Nelikvidovat v normálním<br />
komunálním odpadu!<br />
Pri mraze prístroj odinštalovať! Nelikvidovať v normálnom<br />
komunálnom odpade!<br />
Ob zmrzali demontirajte aparat! Ne zavrzite skupaj z<br />
gospodinjskimi odpadki!<br />
U slučaju mraza deinstalirajte<br />
uređaj!<br />
Да се пази от слънчеви лъчи. При опасност от измръзване<br />
деинсталирайте уреда!<br />
Пристрій повинен бути<br />
захищений від прямого<br />
сонячного випромінювання.<br />
Защищать от прямого<br />
воздействия солнечных лучей.<br />
防 止 阳 光 直 射 。 在 霜 冻 时<br />
拆 卸 设 备 !<br />
Nemojte ga bacati u običan kućni<br />
otpad!<br />
Pozor!<br />
Přečtěte Návod k použití!<br />
Pozor!<br />
Prečítajte si Návod na použitie<br />
Pozor!<br />
Preberite navodila za uporabo!<br />
Pažnja!<br />
Pročitajte upute za upotrebu!<br />
La îngheţ dezinstalaţi aparatul ! Nu aruncaţi în gunoiul menajer ! Atenţie !<br />
Citiţi instrucţiunile de utilizare !<br />
Перед морозами пристрій<br />
необхідно демонтувати<br />
При наступлении морозов прибор<br />
демонтировать!<br />
Не изхвърляйте заедно с<br />
обикновения домакински боклук!<br />
Не викидайте разом із<br />
побутовим сміттям!<br />
Не утилизировать вместе с<br />
домашним мусором!<br />
Внимание!<br />
Прочетете упътването<br />
Увага!<br />
Читайте інструкцію.<br />
Внимание!<br />
Прочитайте инструкцию по<br />
использованию<br />
不 要 与 普 通 的 家 庭 垃 圾 一 起 丢 弃 ! 注 意 !<br />
请 阅 读 使 用 说 明 书 。<br />
341
Pos: 1707 /Filter/<strong>FiltoMatic</strong> <strong>CWS</strong>/Ersatzteile 1 <strong>FiltoMatic</strong> <strong>CWS</strong> 7500-<strong>25000</strong> @ 24\mod_1311169556859_0.doc @ 136820 @ @ 1<br />
342
Pos: 1708 /Filter/<strong>FiltoMatic</strong> <strong>CWS</strong>/Ersatzteile 2 <strong>FiltoMatic</strong> <strong>CWS</strong> 7500-<strong>25000</strong> @ 24\mod_1311169665468_0.doc @ 136847 @ @ 1<br />
343
Pos: 1709 /Filter/<strong>FiltoMatic</strong> <strong>CWS</strong>/Ersatzteile 3 <strong>FiltoMatic</strong> <strong>CWS</strong> 7500-<strong>25000</strong> @ 24\mod_1311169729875_0.doc @ 136874 @ @ 1<br />
=== Ende der Liste für Textmarke Inhalt ===<br />
344