Digital-Lokdecoder (DCC) Digital Locomotive Decoder (DCC ... - Roco
Digital-Lokdecoder (DCC) Digital Locomotive Decoder (DCC ... - Roco
Digital-Lokdecoder (DCC) Digital Locomotive Decoder (DCC ... - Roco

You also want an ePaper? Increase the reach of your titles
YUMPU automatically turns print PDFs into web optimized ePapers that Google loves.
GB<br />
We recommend, in addition to the specific locomotive installation instructions, the following procedure:<br />
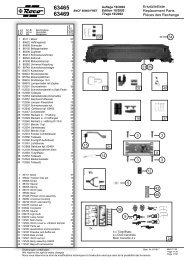
1. Remove housing and detach the Bridge connector or the already installed decoder from the interface.<br />
2. Insert the decoder plug into the interface (Fig. 1) so that side of the decoder plug with red/orange<br />
wire at the side of the interface marked with + or (polarity according to NMRA/NEM rules, i.e. the<br />
locomotive moves with the driver’s cab no.1 facing forward).<br />
3. Install the decoder in a suitable location within the locomotive. No part of the decoder must be<br />
touching metal parts of the locomotive! If necessary the location of the decoder must be insulated<br />
with insulation tape to protect the decoder. The insulation must be attached to the metal parts of<br />
the locomotive, but NOT to the decoder (e.g. by winding the insulation tape around the decoder!).<br />
This could lead to failure of the decoder due to overheating. Damage claims caused by such failures<br />
cannot be acceptet!<br />
The possible factory used heat shrink tubing around the decoder ensures a sufficient heat dissipation<br />
and should not be removed.<br />
4. If necessary the decoder can be secured in the desired location with double-sided tape.<br />
<strong>Locomotive</strong> address<br />
The factory-set default address of the decoder is 03. To program a new address please refer to the Lokmaus<br />
manuals or the Instruction Sheet of your digital system.<br />
Only local addresses from 1 – 99 can be stored in CV1. The programming of so-called long addresses is not<br />
possible.<br />
Operational test<br />
If the locomotive lights do not operate, the decoder was inserted incorrectly into the interface. Reinsert<br />
decoder turned by 180° in the interface.<br />
If there is a problem with the headlight, the decoder was used in the 28 speed-step mode. In this case you<br />
have to reprogram the CV29 (see table at the other side. By using the Lokmaus ® 2 proceed as follows: press<br />
“P” + “Stop” simultaneously, change the displayed “06” to “04” and confirm with “P”.)<br />
Operation on analog layouts<br />
A ROCO locomotive equipped with a decoder can also be run on a conventional layout. To change direction<br />
of travel the control knob of the controller must first be set to zero. Only then can the direction of<br />
travel be selected.<br />
The brightness of the lamps depends on the speed of the train. The lights can not be turned off. Reprogramming<br />
of previously set addresses and functions is not possible while in analog operation.<br />
List of important CVs<br />
The following list informs about the most important programming capabilities of the decoder. We recommend<br />
to test your locomotive / railcar with regard to starting voltage, acceleration, braking and maximum<br />
speed during operations to check if these characteristics are set conforming to your wishes BEFORE changing<br />
the factory-set default settings.<br />
6<br />
8010746920 III_2009.indd 6 09.02.2009 07:26:31