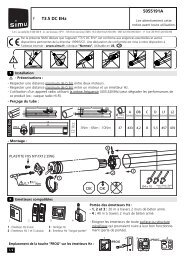
Commande SIMU RSA Hz
Commande SIMU RSA Hz
Commande SIMU RSA Hz

Create successful ePaper yourself
Turn your PDF publications into a flip-book with our unique Google optimized e-Paper software.
4.2 Safety input function: parameters<br />
When using a resistive sensor bar, the latter must be wired onto safety input 1. The opening safety device<br />
stops then recloses partially (non configurable action).<br />
Configuration of safety input 1 (sensor bar*): parameter (plant value = 00)<br />
No accessories connected to safety input 1 (default mode)<br />
Accessory connected to safety input 1 enabled when opening the door<br />
Accessory connected to safety input 1 enabled when closing the door<br />
ADMAP** safety: active upon closing + forbids starting at opening<br />
Contact for connecting an emergency stop device<br />
Configuration of safety input 2 (photocell*): parameter (plant value = 00)<br />
No accessories connected to safety input 2 (default mode)<br />
Self-testing safety input 3: parameter ((plant value = 00)<br />
No self-test of the accessory connected (default mode)<br />
Self-test for photocells by power supply cutting. Caution : the transmitting cell<br />
must be supplied on terminals 10/12 and the receiver cells on terminals 10/11) :<br />
Self-test for accessory fitted with a TEST input (cells or sensor bar).<br />
4.5 Programming remote controls: parameter<br />
According to the type of operation chosen in chapter 3.1, the value of the P8 parameter does not produce<br />
the same effects.<br />
Sequential mode<br />
Opening / Closing Command (default mode).<br />
Auxiliary output control (driving the accessory<br />
connected to the AUX output).<br />
Openning<br />
Stop<br />
Closing<br />
Configuring the operating mode: parameters<br />
Motor operating time (default value 80)<br />
to (Increment of 1 sec.)<br />
Adjust a time slightly longer than the actual operating<br />
time.<br />
Time for reclosing the door<br />
(default value 05)<br />
à (Increment of 1 sec.)<br />
Enabled in automatic operating modes (§ 4.1).<br />
Delay time before motor reversion<br />
(default value 01)<br />
to (Increment of 1 sec.)<br />
Particular case of motors not accepting reversion of<br />
the rotation direction without stopping phase.<br />
Area lighting time after cycle end<br />
(default value 02)<br />
to (Increment of 1 min.)<br />
To return to the menu, press the or jkeys to return to value C1 (or any other value indicating<br />
the product’s operation: see § 5) or after a one-minute waiting time.<br />
to<br />
Accessory connected to safety input 2 enabled when opening the door<br />
Accessory connected to safety input 2 enabled when closing the door<br />
3-button mode<br />
Open command<br />
Openning<br />
Stop<br />
Closing<br />
5 Operating information<br />
List of operating information displayed by <strong>RSA</strong> <strong>Hz</strong> used to view and an easy diagnostic of the facility’s status.<br />
ADMAP** safety: active upon closing + forbids starting at opening<br />
Contact for connecting an emergency stop device<br />
Configuration of safety input 3: parameter (plant value = 00)<br />
Close command<br />
Stop command<br />
Auxiliary output control (driving the accessory<br />
connected to the AUX output).<br />
Openning<br />
Closing<br />
Stop<br />
Auxilliary<br />
Event codes<br />
<strong>RSA</strong> <strong>Hz</strong> waiting for a command<br />
Opening door<br />
ADMAP* cell hidden<br />
Door movement forced by keypad<br />
No accessories connected to safety input 3 (default mode)<br />
Accessory connected to safety input 3 enabled when opening the door<br />
Accessory connected to safety input 3 enabled when closing the door<br />
ADMAP** safety: active upon closing + forbids starting at opening<br />
Contact for connecting an emergency stop device<br />
1. Choose the remote control key's function to program.<br />
DIsplay the value of the function to program using<br />
and keys on the <strong>RSA</strong> <strong>Hz</strong>.<br />
2. Save the code (<strong>RSA</strong> <strong>Hz</strong> can save maximum 32 channels)<br />
Opening door<br />
Closing door<br />
Open cell hidden<br />
Close cell hidden<br />
Emergency stop triggered<br />
Self-testing safety<br />
Permanent contact on “START" input<br />
Wait before motor reversion<br />
4.3 Safety action upon closing: parameter (plant value = 01)<br />
The safety action at opening (P1, P2, or P3 = 01) is not configurable (stopage followed with partial door reopening).<br />
However, safety actions upon closing (P1, P2, or P3 = 02) can be configured:<br />
Stop the door<br />
Stop, then total reopening of the door (default mode)<br />
Stop then partial reopening of the door(2 seconds operation)<br />
Ensure you configure the safety input used for the appropriate self-test:<br />
safety 1: P1+P5, safety 2: P2+P6, safety 3: P3+P7<br />
Once the safety accessories are connected and the safety inputs configured, check manually the<br />
proper operation of the accessories before the final start up of the facility.<br />
4.4 Configuration of the self-testing function: parameters<br />
The self-test function is used to check proper operation of the safety accessories automatically at the end of<br />
closing..<br />
Self-testing safety input 1: parameter (plant value = 03)<br />
No self-test of the accessory connected (default mode)<br />
Self-test for photocells by power supply cutting. Caution : The transmitting cell<br />
must be supplied on terminals 10/12 and the receiver cells on terminals 10/11).<br />
Self-test for accessory fitted with a TEST input (cells or sensor bar).<br />
ASelf-test for resistive sensor bar (value comprised between 4 and 12 K (default mode)<br />
Self-testing safety input 2: parameter (plant value = 00)<br />
No self-test of the accessory connected (default mode)<br />
Self-test for photocells by power supply cutting. Caution : the transmitting cell<br />
must be supplied on terminals 10/12 and the receiver cells on terminals 10/11).<br />
Self-test for accessory fitted with a TEST input (cells or sensor bar).<br />
Press simultaneously the remote control key to program<br />
and the key on the <strong>RSA</strong> <strong>Hz</strong> for three<br />
seconds until dashes appear<br />
The <strong>RSA</strong> <strong>Hz</strong> can be controlled in the three-button mode using a reverter with three keys wired onto the<br />
START,SEC2, and SEC3 inputs (if the latter are configured “non wired”: chapter 4.2).<br />
4.6 Clearing remote controls: parameter (plant value = 04)<br />
Clearing all remote controls is performed by pressing<br />
and holding for 3 seconds the key until dashes<br />
appear<br />
4.7 Configuration of auxiliary accessories: paramete (plant value = 04)<br />
The auxiliary contact is a dry contact. A single accessory can be connected and power supplied according to<br />
the use configured.<br />
Contact to drive an electric latch<br />
(The latch must be supplied with an outside power supply)<br />
Contact to drive an electromagnetic latch<br />
Contact to drive an Orange flashlight without notice<br />
(only during the door's operation)<br />
Contact to drive an Orange flashlight with notice<br />
(before starting and during the door's operation)<br />
Contact to drive a zone lighting<br />
(default mode, automatic switch off after timeout T3 - §4.8)<br />
Contact to drive an open door indicator<br />
Contact of the stable mono relay type to drive an automation system<br />
Contact of the bi-stable relay type to drive an automation system<br />
3s.<br />
3s.<br />
Default codes<br />
Safety fault at opening<br />
(contact always open)<br />
Safety fault at closing<br />
(contact always open)<br />
ADMAP* safety fault<br />
ADMAP* safety fault<br />
Self-test failed on safety input 1<br />
Log of the last 10 faults<br />
…<br />
See fault code above.<br />
* If the connection of accessories matches the diagram in chapter 1.<br />
**Area Dangerous forMovement Accessible to the Public.<br />
Self-test failed on safety input 2<br />
Self-test failed on safety input 3<br />
Intensity exceeded on 24V power supply<br />
(too many accessories connected)<br />
Operating time “T0” too short<br />
or motor endstop not reached<br />
Cycles counter<br />
Tens and units. Thousands and hundreds. Hundred and tens of thousands.<br />
Accessories consumption<br />
power consumed in Watts to .<br />
Reinitialise the <strong>RSA</strong> <strong>Hz</strong> after a fault<br />
To clear the fault codes, select the parameter and press and holding the pendant 3 secondes key<br />
for 3 seconds until dashes appear<br />
- For the fault codes from to :<br />
Once the fault is corrected, it is not required to clear the fault code of the log to return to normal operation.<br />
- For the fault codes from to :<br />
Once the fault is corrected, you must clear the defect code for the log to return to normal operation.<br />
2/2