1999 SID Rear Shock Owner's Manual - Fahrrad Kaiser Gmbh
1999 SID Rear Shock Owner's Manual - Fahrrad Kaiser Gmbh
1999 SID Rear Shock Owner's Manual - Fahrrad Kaiser Gmbh

You also want an ePaper? Increase the reach of your titles
YUMPU automatically turns print PDFs into web optimized ePapers that Google loves.
Tuning Your <strong>Rear</strong> <strong>Shock</strong><br />
By adjusting the air pressure, the RockShox Sid rear shock can be tuned to your particular weight, riding style<br />
and terrain.This shock is designed to be tuned for the soft, plush downhill ride or the long climbs, or a<br />
combination of both.<br />
When tuning suspension, always make one change at a time and write it down. This takes patience, but allows<br />
you to understand how each change affects your ride. Use a familiar trail to make small adjustments at a time.<br />
To understand the tuning range it may also help if you ride one extreme to the other (low vs. high pressure or<br />
maximum vs. minimum rebound). Keeping a record lets you know what changes you have tried that work<br />
and suggests what changes you might try. Ask a shop or local riders what they have found works well. These<br />
resources are typically your best bet, but don’t hesitate to call RockShox about specific tuning needs when<br />
necessary. A list of phone numbers is on page 12.<br />
Selecting Air Pressure (Spring Rates)<br />
The air pressure you run in the shock varies depending on<br />
weight and riding style. Air pressure can be changed in either<br />
the positive or negative air chamber (see fig. 1). The following<br />
sections will explain the differences between the positive and<br />
negative air pressure as well as how to adjust both features.<br />
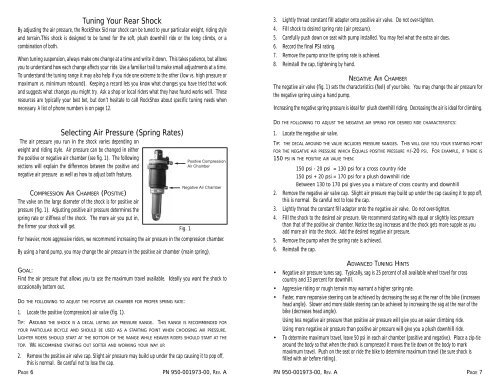
COMPRESSION AIR CHAMBER (POSITIVE)<br />
The valve on the large diameter of the shock is for positive air<br />
pressure (fig. 1). Adjusting positive air pressure determines the<br />
spring rate or stiffness of the shock. The more air you put in,<br />
the firmer your shock will get.<br />
Fig. 1<br />
For heavier, more aggressive riders, we recommend increasing the air pressure in the compression chamber.<br />
By using a hand pump, you may change the air pressure in the positive air chamber (main spring).<br />
GOAL:<br />
Find the air pressure that allows you to use the maximum travel available. Ideally you want the shock to<br />
occasionally bottom out.<br />
DO THE FOLLOWING TO ADJUST THE POSITIVE AIR CHAMBER FOR PROPER SPRING RATE:<br />
1. Locate the positive (compression) air valve (fig. 1).<br />
TIP: AROUND THE SHOCK IS A DECAL LISTING AIR PRESSURE RANGE. THIS RANGE IS RECOMMENDED FOR<br />
YOUR PARTICULAR BICYCLE AND SHOULD BE USED AS A STARTING POINT WHEN CHOOSING AIR PRESSURE.<br />
LIGHTER RIDERS SHOULD START AT THE BOTTOM OF THE RANGE WHILE HEAVIER RIDERS SHOULD START AT THE<br />
TOP. WE RECOMMEND STARTING OUT SOFTER AND WORKING YOUR WAY UP.<br />
2. Remove the positive air valve cap. Slight air pressure may build up under the cap causing it to pop off,<br />
this is normal. Be careful not to lose the cap.<br />
3. Lightly thread constant fill adapter onto positive air valve. Do not over-tighten.<br />
4. Fill shock to desired spring rate (air pressure).<br />
5. Carefully push down on seat with pump installed. You may feel what the extra air does.<br />
6. Record the final PSI rating.<br />
7. Remove the pump once the spring rate is achieved.<br />
8. Reinstall the cap, tightening by hand.<br />
NEGATIVE AIR CHAMBER<br />
The negative air valve (fig. 1) sets the characteristics (feel) of your bike. You may change the air pressure for<br />
the negative spring using a hand pump.<br />
Increasing the negative spring pressure is ideal for plush downhill riding. Decreasing the air is ideal for climbing.<br />
DO THE FOLLOWING TO ADJUST THE NEGATIVE AIR SPRING FOR DESIRED RIDE CHARACTERISTICS:<br />
1. Locate the negative air valve.<br />
TIP: THE DECAL AROUND THE VALVE INCLUDES PRESSURE RANGES. THIS WILL GIVE YOU YOUR STARTING POINT<br />
FOR THE NEGATIVE AIR PRESSURE WHICH EQUALS POSITIVE PRESSURE +/-20 PSI. FOR EXAMPLE, IF THERE IS<br />
150 PSI IN THE POSITIVE AIR VALVE THEN:<br />
150 psi - 20 psi = 130 psi for a cross country ride<br />
150 psi + 20 psi = 170 psi for a plush downhill ride<br />
Between 130 to 170 psi gives you a mixture of cross country and downhill<br />
2. Remove the negative air valve cap. Slight air pressure may build up under the cap causing it to pop off,<br />
this is normal. Be careful not to lose the cap.<br />
3. Lightly thread the constant fill adapter onto the negative air valve. Do not over-tighten.<br />
4. Fill the shock to the desired air pressure. We recommend starting with equal or slightly less pressure<br />
than that of the positive air chamber. Notice the sag increases and the shock gets more supple as you<br />
add more air into the shock. Add the desired negative air pressure.<br />
5. Remove the pump when the spring rate is achieved.<br />
6. Reinstall the cap.<br />
ADVANCED TUNING HINTS<br />
• Negative air pressure tunes sag. Typically, sag is 25 percent of all available wheel travel for cross<br />
country and 33 percent for downhill.<br />
• Aggressive riding or rough terrain may warrant a higher spring rate.<br />
• Faster, more responsive steering can be achieved by decreasing the sag at the rear of the bike (increases<br />
head angle). Slower and more stable steering can be achieved by increasing the sag at the rear of the<br />
bike (decreases head angle).<br />
Using less negative air pressure than positive air pressure will give you an easier climbing ride.<br />
Using more negative air pressure than positive air pressure will give you a plush downhill ride.<br />
• To determine maximum travel, leave 50 psi in each air chamber (positive and negative). Place a zip-tie<br />
around the body so that when the shock is compressed it moves the tie down on the body to mark<br />
maximum travel. Push on the seat or ride the bike to determine maximum travel (be sure shock is<br />
filled with air before riding).<br />
PAGE 6 PN 950-001973-00, REV. A PN 950-001973-00, REV. A PAGE 7