Manual de instrucciones - Triton Tools
Manual de instrucciones - Triton Tools
Manual de instrucciones - Triton Tools

Create successful ePaper yourself
Turn your PDF publications into a flip-book with our unique Google optimized e-Paper software.
Oscillating<br />
Spindle San<strong>de</strong>r<br />
450W / 3.5A<br />
TSP S450<br />
Operating and<br />
Safety Instructions<br />
Gebrauchs- und<br />
Sicherheitsanweisung<br />
Bedienings- en veiligheidsvoorschriften<br />
Istruzioni per l'uso e la<br />
sicurezza<br />
Instructions d’utilisation et<br />
consignes <strong>de</strong> sécurité<br />
Instrucciones <strong>de</strong> funcionamiento<br />
y seguridad<br />
www.tritontools.com
Thank you for purchasing this <strong>Triton</strong> tool. Please read these instructions: they contain information necessary for safe and<br />
effective operation of this product. This product has a number of unique features and, even if you are familiar with similar<br />
products, reading the instructions will help you get the full benefit of its unique <strong>de</strong>sign. Keep these instructions close to hand<br />
and ensure all users of this tool have read and fully un<strong>de</strong>rstand them.<br />
CONTENTS<br />
Specifications 2<br />
Symbols 2<br />
Know your product 3<br />
Safety 4<br />
Assembly 6<br />
Operation 7<br />
Service & maintenance 7<br />
Warranty 8<br />
Declaration of Conformity 40<br />
SPECIFICATIONS<br />
Mo<strong>de</strong>l no:<br />
TSPS450<br />
Voltage:<br />
220V - 240V (450W)<br />
No load speed:<br />
2,000 RPM<br />
Oscillations:<br />
58 OPM<br />
Stroke length: 15mm ( 5 ⁄8")<br />
Sanding sleeve sizes:<br />
13mm, 19mm, 26mm, 38mm, 51mm, 76mm dia<br />
( 1 ⁄2", 3 ⁄4", 1", 1 1 ⁄2", 2", 3")<br />
Dust extraction port: 38mm (1 1 ⁄2")<br />
Table size: 370mm (14 1 ⁄2") x 295mm (11 1 ⁄2")<br />
Spindle dimensions:<br />
12.7mm ( 1 ⁄2") x 1.5mm ( 1 ⁄16") thread<br />
Insulation:<br />
Double insulated<br />
Net weight:<br />
14.6 kg (32.1 lbs)<br />
SYMBOLS<br />
GB<br />
ENVIRONMENTAL PROTECTION<br />
Waste electrical products should not be<br />
disposed of with household waste.<br />
Please recycle where facilities exist.<br />
Check with your local authority or<br />
retailer for recycling advice.<br />
Always wear ear, eye and respiratory<br />
protection.<br />
Conforms to relevant legislation<br />
and safety standards.<br />
WARNING. To reduce the<br />
risk of injury, user must read instruction<br />
manual<br />
Instruction warning.<br />
Double insulated for additional<br />
protection.<br />
Contents / Specifications / Symbols
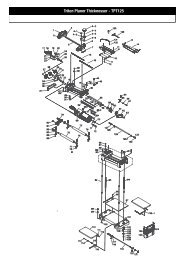
KNOW YOUR PRODUCT<br />
6<br />
5<br />
4<br />
7<br />
3<br />
2<br />
8<br />
1<br />
14<br />
9<br />
10<br />
12<br />
11<br />
13<br />
1. On-Board Table Insert Storage<br />
2. On/Off Switch<br />
3. Motor Housing<br />
4. Table Top<br />
5. Spindle<br />
6. Spindle Lock Nut<br />
7. Lower Spindle Washer<br />
8. On-Board Spindle Storage<br />
9. Upper Spindle Washers (x3)<br />
10. Table Insert (x6)<br />
11. Sanding Sleeve (x6)<br />
12. Rubber Drum (x5)<br />
13. Dust Extraction Port<br />
14. Wrench<br />
GB<br />
Know your Product<br />
3
GB<br />
SAFETY INSTRUCTIONS<br />
WARNING Read all safety warnings and all<br />
instructions. Failure to follow the warnings and<br />
instructions may result in electric shock, fire and/<br />
or serious injury.<br />
Save all warnings and instructions for future<br />
reference.<br />
The term "power tool" in the warnings refers to your<br />
mains-operated (cor<strong>de</strong>d) power tool or batteryoperated<br />
(cordless) power tool.<br />
1) Work area safety<br />
a) Keep work area clean and well lit. Cluttered or dark<br />
areas invite acci<strong>de</strong>nts.<br />
b) Do not operate power tools in explosive<br />
atmospheres, such as in the presence of<br />
flammable liquids, gases or dust. Power tools<br />
create sparks which may ignite the dust or fumes.<br />
c) Keep children and bystan<strong>de</strong>rs away while<br />
operating a power tool. Distractions can cause you<br />
to lose control.<br />
2) Electrical safety<br />
a) Power tool plugs must match the outlet. Never<br />
modify the plug in any way. Do not use any<br />
adapter plugs with earthed (groun<strong>de</strong>d) power<br />
tools. Unmodified plugs and matching outlets will<br />
reduce risk of electric shock.<br />
b) Avoid body contact with earthed or groun<strong>de</strong>d<br />
surfaces, such as pipes, radiators, ranges and<br />
refrigerators. There is an increased risk of electric<br />
shock if your body is earthed or groun<strong>de</strong>d.<br />
c) Do not expose power tools to rain or wet<br />
conditions. Water entering a power tool will increase<br />
the risk of electric shock.<br />
d) Do not abuse the cord. Never use the cord for<br />
carrying, pulling or unplugging the power tool.<br />
Keep cord away from heat, oil, sharp edges or<br />
moving parts. Damaged or entangled cords increase<br />
the risk of electric shock.<br />
e) When operating a power tool outdoors, use an<br />
extension cord suitable for outdoor use. Use of<br />
a cord suitable for outdoor use reduces the risk of<br />
electric shock.<br />
f) If operating a power tool in a damp location is<br />
unavoidable, use a residual current <strong>de</strong>vice (RCD)<br />
protected supply. Use of an RCD reduces the risk of<br />
electric shock.<br />
NOTE: The term “residual current <strong>de</strong>vice (RCD)”<br />
may be replaced by the term “ground fault circuit<br />
interrupter (GFCI)” or “earth leakage circuit breaker<br />
(ELCB)”.<br />
3) Personal safety<br />
a) Stay alert, watch what you are doing and use<br />
common sense when operating a power tool. Do<br />
not use a power tool while you are tired or un<strong>de</strong>r<br />
the influence of drugs, alcohol or medication. A<br />
moment of inattention while operating power tools<br />
may result in serious personal injury.<br />
b) Use personal protective equipment. Always wear<br />
eye protection. Protective equipment such as dust<br />
mask, non-skid safety shoes, hard hat, or hearing<br />
protection used for appropriate conditions will reduce<br />
personal injuries.<br />
c) Prevent unintentional starting. Ensure the switch<br />
is in the off-position before connecting to power<br />
source and/or battery pack, picking up or carrying<br />
the tool. Carrying power tools with your finger on the<br />
switch or energising power tools that have the switch<br />
on invites acci<strong>de</strong>nts.<br />
d) Remove any adjusting key or wrench before<br />
turning the power tool on. A wrench or a key left<br />
attached to a rotating part of the power tool may result<br />
in personal injury.<br />
e) Do not overreach. Keep proper footing and balance<br />
at all times. This enables better control of the power<br />
tool in unexpected situations.<br />
f) Dress properly. Do not wear loose clothing or<br />
jewellery. Keep your hair, clothing and gloves<br />
away from moving parts. Loose clothes, jewellery or<br />
long hair can be caught in moving parts.<br />
g) If <strong>de</strong>vices are provi<strong>de</strong>d for the connection of dust<br />
extraction and collection facilities, ensure these<br />
are connected and properly used. Use of dust<br />
collection can reduce dust-related hazards.<br />
4) Power tool use and care<br />
a) Do not force the power tool. Use the correct power<br />
tool for your application. The correct power tool will<br />
do the job better and safer at the rate for which it was<br />
<strong>de</strong>signed.<br />
b) Do not use the power tool if the switch does not<br />
turn it on and off. Any power tool that cannot be<br />
controlled with the switch is dangerous and must be<br />
repaired.<br />
c) Disconnect the plug from the power source and/<br />
or the battery pack from the power tool before<br />
making any adjustments, changing accessories,<br />
or storing power tools. Such preventive safety<br />
measures reduce the risk of starting the power tool<br />
acci<strong>de</strong>ntally.<br />
d) Store idle power tools out of the reach of children<br />
and do not allow persons unfamiliar with the<br />
power tool or these instructions to operate the<br />
power tool.Power tools are dangerous in the hands of<br />
untrained users.<br />
4<br />
Safety Instructions
e) Maintain power tools. Check for misalignment or<br />
binding of moving parts, breakage of parts and<br />
any other condition that may affect the power<br />
tool’s operation. If damaged, have the power tool<br />
repaired before use. Many acci<strong>de</strong>nts are caused by<br />
poorly maintained power tools.<br />
f) Keep cutting tools sharp and clean. Properly<br />
maintained cutting tools with sharp cutting edges are<br />
less likely to bind and are easier to control.<br />
g) Use the power tool, accessories and tool bits etc.<br />
in accordance with these instructions, taking into<br />
account the working conditions and the work to<br />
be performed. Use of the power tool for operations<br />
different from those inten<strong>de</strong>d could result in a<br />
hazardous situation.<br />
5) Service<br />
a) Have your power tool serviced by a qualified repair<br />
person using only i<strong>de</strong>ntical replacement parts.<br />
This will ensure that the safety of the power tool is<br />
maintained.<br />
ADDITIONAL SAFETY WARNINGS FOR SPINDLE<br />
SANDERS<br />
Even when used as prescribed it is not possible to<br />
eliminate all residual risk factors. Use with caution. If you<br />
are at all unsure of the correct and safe manner in which to<br />
use this tool, do not attempt to use it.<br />
Do not operate the spindle san<strong>de</strong>r until it is fully assembled<br />
and you have read and un<strong>de</strong>rstood the following<br />
instructions and the warning labels on the spindle san<strong>de</strong>r.<br />
1. Check the condition of the spindle san<strong>de</strong>r. If any part is<br />
missing, bent, or does not operate properly, replace the<br />
part before using the san<strong>de</strong>r.<br />
2. Determine the type of work you are going to be doing<br />
before operating the spindle san<strong>de</strong>r.<br />
3. Secure your work. Support the workpiece securely on<br />
the table, and hold it with both hands.<br />
WARNING: Feed the workpiece gradually, AGAINST<br />
the direction of rotation, onto the sanding sleeve.<br />
Failure to do this could force the workpiece away from<br />
the sanding sleeve with risk of injury. Do not apply<br />
excessive pressure.<br />
5. Always keep your hands out of the path of the san<strong>de</strong>r<br />
and away from the sanding sleeves. Avoid hand<br />
positions where a sud<strong>de</strong>n slip could cause your hand<br />
to move into the spindle. Do not reach un<strong>de</strong>rneath<br />
the workpiece or around the sanding sleeve while the<br />
spindle is rotating.<br />
6. On completion of task, turn off the machine and<br />
disconnect from mains power. Wait for the spindle<br />
to stop rotating before performing maintenance. The<br />
san<strong>de</strong>r must be disconnected when not in use or<br />
when changing insert plates, sanding sleeves, rubber<br />
spindles, or other items.<br />
7. Make sure there are no nails or other foreign objects in<br />
the area of the workpiece to be san<strong>de</strong>d.<br />
8. Never use this san<strong>de</strong>r for wet sanding. Failure to comply<br />
may result in electrical shock, causing serious injury or<br />
worse.<br />
9. Use only i<strong>de</strong>ntical replacement parts when servicing<br />
this spindle san<strong>de</strong>r.<br />
10. Make sure the spindle has come to a complete<br />
stop before touching the workpiece.<br />
11. Take precautions when sanding painted surfaces.<br />
Sanding lead-based paint is NOT RECOMMENDED. The<br />
contaminated dust is too difficult to control, and could<br />
cause lead poisoning.<br />
When sanding paint:<br />
• Protect your lungs. Wear a dust mask or respirator<br />
• Do not allow children or pregnant women in the work<br />
area until the paint sanding job is finished and the<br />
clean-up is completed<br />
• Do not eat, drink, or smoke in an area where painted<br />
surfaces are being san<strong>de</strong>d<br />
• Use a dust collection system when possible. Seal the<br />
work area with plastic. Do not track paint dust outsi<strong>de</strong><br />
of the work area<br />
• Thoroughly clean the area when the paint sanding<br />
project is completed<br />
GB<br />
Safety Instructions<br />
5
GB<br />
ASSEMBLY<br />
Always ensure that the tool is switched off and<br />
disconnected from the power supply before making<br />
any adjustments or installing or removing spindles.<br />
BENCH MOUNTING<br />
When mounting the spindle san<strong>de</strong>r in a permanent<br />
position ensure that is secured to a rigid work surface.<br />
• Use the holes in the base of the spindle san<strong>de</strong>r as a<br />
template to mark and drill four holes in your inten<strong>de</strong>d<br />
mounting surface (ie. workbench). Secure the spindle<br />
san<strong>de</strong>r into position using large bolts, washers and<br />
nuts (not supplied)<br />
• If the spindle san<strong>de</strong>r is inten<strong>de</strong>d to be portable, fix a<br />
board to the base which can be easily clamped and<br />
removed from various<br />
mounting surfaces<br />
• Ensure bolts are long<br />
enough to penetrate<br />
the workbench or board<br />
sufficiently for a secure fix<br />
DUST EXTRACTION<br />
It is recommen<strong>de</strong>d that the<br />
spindle san<strong>de</strong>r is used with a dust extraction system for a<br />
cleaner and safer work environment.<br />
1. Attach the hose from the dust extraction system to the<br />
Dust Extraction Port (13) and ensure it is secure<br />
2. For greater efficiency, activate the dust extraction<br />
system before turning on the spindle san<strong>de</strong>r<br />
SELECTING A TABLE INSERT<br />
Failure to use the correct table insert with its matching<br />
sanding sleeve could result in pinched fingers or the<br />
workpiece being pulled down between the table insert and<br />
the sanding sleeve.<br />
Use the below chart as a gui<strong>de</strong> to choosing table inserts<br />
and sanding sleeves.<br />
Sanding Sleeve<br />
Dia<br />
Table Insert<br />
Size<br />
Upper Spindle<br />
Washer Size<br />
13mm ( 1 ⁄2") 13mm ( 1 ⁄2") Small<br />
19mm ( 3 ⁄4") 19mm ( 3 ⁄4") Medium<br />
26mm (1") 26mm (1") Medium<br />
38mm (1 1 ⁄2") 38mm (1 1 ⁄2") Large<br />
51mm (2") 51mm (2") Large<br />
76mm (3") 76mm (3") Large<br />
The sanding sleeve should fit snugly into the central<br />
cutout of the table insert.<br />
FITTING A SANDING SLEEVE<br />
Note: All of the sanding sleeves, except the smallest<br />
13mm ( 1 ⁄2") sanding sleeve fit over a matching Rubber<br />
Drum (12).<br />
1. Fit the lower Spindle Washer<br />
(7) over the Spindle (5) with<br />
the fin si<strong>de</strong> facing down<br />
2. Select the correct Sanding<br />
Sleeve (11) for the<br />
inten<strong>de</strong>d job. Select the<br />
corresponding Rubber Drum<br />
(12), (except when using the<br />
13mm sanding sleeve)<br />
Do not use a sanding drum with the 13mm ( 1 ⁄2") sanding<br />
sleeve.<br />
3. Select the appropriate Table<br />
Insert (10) in accordance<br />
with table above (see<br />
'SELECTING A TABLE<br />
INSERT')<br />
4. Fit the Table Insert (10) over<br />
the Spindle (5) and onto<br />
the lower spindle washer.<br />
Ensure the table insert is<br />
flush with the table<br />
5. Fit the Rubber Drum (12)<br />
over the spindle<br />
6. Sli<strong>de</strong> the Sanding Sleeve (11)<br />
over the Rubber Drum (12)<br />
7. Fit the upper Spindle Washer<br />
(9) over the Spindle (5)<br />
• Use the large washer with<br />
75mm (3"), 51mm (2"), and<br />
38mm (1 1 ⁄2") rubber drums.<br />
• Use the medium washer with 26mm (1") and 19mm<br />
( 3 ⁄4") rubber drums<br />
6<br />
Assembly
• Use the small washer with<br />
13mm ( 1 ⁄2") sanding sleeve<br />
8. Fit the Spindle Lock Nut (6)<br />
on the Spindle (5). Tighten<br />
the nut just enough to<br />
expand the Rubber Drum<br />
(12) against the Sanding<br />
Sleeve (11). Do not overtighten<br />
OPERATION<br />
Switching On and Off<br />
• The On/Off Switch (2) is<br />
located on the front of the<br />
spindle san<strong>de</strong>r<br />
• To turn the spindle san<strong>de</strong>r<br />
ON: Press the green button<br />
marked (-)<br />
• To turn the spindle san<strong>de</strong>r<br />
OFF: Press the red button<br />
marked (O)<br />
Sanding<br />
• WARNING: Do not sand metal with this san<strong>de</strong>r.<br />
Sanding metal will cause sparks that may ignite wood<br />
and dust particles on the san<strong>de</strong>r or in the workshop<br />
• NOTE: The spindle rotates in an anti-clockwise<br />
direction<br />
To maximise the service life<br />
of the sanding sleeve, turn<br />
it upsi<strong>de</strong> down to use any<br />
remaining serviceable grit.<br />
Do not use a sanding sleeve<br />
that is too worn. This can lead<br />
to excessive heat build up<br />
and damage the rubber drum.<br />
Damaged rubber drums due to<br />
worn sanding sleeves will not<br />
be covered un<strong>de</strong>r warranty.<br />
1. Check the machine is mounted securely on the<br />
workbench and the Spindle Lock Nut (6) is fastened<br />
correctly with appropriate sanding sleeve and table<br />
insert, in accordance with guidance in ‘Assembly’<br />
2. Wear appropriate safety equipment, including face<br />
mask and safety glasses, then switch on the dust<br />
extraction system (if available)<br />
3. Turn the san<strong>de</strong>r ON and allow the motor to reach full<br />
speed<br />
WARNING: Feed the workpiece gradually, AGAINST the<br />
direction of rotation, onto the sanding sleeve. Failure<br />
to do this could force the workpiece away from the<br />
sanding sleeve with risk of injury. Do not force the<br />
workpiece or apply excessive pressure<br />
4. On completion of task, turn off the machine and<br />
disconnect from mains power.<br />
SERVICE & MAINTENANCE<br />
WARNING! Ensure the tool is switched off and<br />
the plug is removed from the power point before<br />
making any adjustments or carrying out maintenance.<br />
• Any damage to this tool should be repaired and<br />
carefully inspected before use, by qualified repair<br />
technician.<br />
• Have your power tool serviced by a qualified repair<br />
technician using only i<strong>de</strong>ntical replacement parts.<br />
This will ensure that the safety of the power tool is<br />
maintained.<br />
GENERAL INSPECTION<br />
Regularly check that all the fixing screws are tight. They<br />
may vibrate loose over time.<br />
POWER CORD MAINTENANCE<br />
If the supply cord needs replacing, the task must be<br />
carried out by the manufacturer, the manufacturer’s<br />
agent, or an authorised service centre in or<strong>de</strong>r to avoid a<br />
safety hazard.<br />
CLEANING<br />
1. Remove dust and dirt regularly. Frequently blow or<br />
vacuum dust away from all san<strong>de</strong>r parts and the motor<br />
housing.<br />
2. Periodically remove the table insert and lower washer<br />
from the spindle and remove any dust accumulation in<br />
the table insert area.<br />
3. Re-lubricate all moving parts at regular intervals.<br />
4. Never use caustic agents to clean plastic parts.<br />
Do not use cleaning agents to clean the plastic parts<br />
of the tool. A mild <strong>de</strong>tergent on a damp cloth is<br />
recommen<strong>de</strong>d. Water must never come into contact with<br />
the tool.<br />
GB<br />
Assembly / Operation / Service & Maintenance<br />
7
GB<br />
WARRANTY<br />
To register your guarantee visit our web site at<br />
www.tritontools.com* and enter your <strong>de</strong>tails.<br />
Your <strong>de</strong>tails will be inclu<strong>de</strong>d on our mailing list (unless<br />
indicated otherwise) for information on future releases.<br />
Details provi<strong>de</strong>d will not be ma<strong>de</strong> available to any third party.<br />
PURCHASE RECORD<br />
Date of Purchase: ___ / ___ / ____<br />
Mo<strong>de</strong>l: TSPS450<br />
Serial Number: __________________<br />
Retain your receipt as proof of purchase<br />
<strong>Triton</strong> Precision Power <strong>Tools</strong> guarantees to the<br />
purchaser of this product that if any part proves to<br />
be <strong>de</strong>fective due to faulty materials or workmanship<br />
within 12 MONTHS from the date of original<br />
purchase, <strong>Triton</strong> will repair, or at its discretion<br />
replace, the faulty part free of charge.<br />
This guarantee does not apply to commercial use<br />
nor does it extend to normal wear and tear or<br />
damage as a result of acci<strong>de</strong>nt, abuse or misuse.<br />
* Register online within 30 days.<br />
Terms & conditions apply.<br />
This does not affect your statutory rights<br />
8<br />
Warranty
Hartelijk dank voor <strong>de</strong> aanschaf van dit <strong>Triton</strong>-gereedschap. Deze instructies bevatten informatie die u nodig hebt voor een<br />
veilige en doeltreffen<strong>de</strong> bediening van dit product.<br />
Dit product heeft een aantal unieke eigenschappen. Lees daarom <strong>de</strong>ze handleiding altijd door, ook als u al bekend bent met<br />
bandschuurmachine, zodat u alle voor<strong>de</strong>len van dit unieke ontwerp kunt benutten<br />
Houd <strong>de</strong>ze handleiding bij <strong>de</strong> hand en zorg ervoor dat alle gebruikers van dit gereedschap <strong>de</strong> handleiding hebben gelezen en<br />
volledig hebben begrepen.<br />
INHOUD<br />
Specificaties 9<br />
On<strong>de</strong>r<strong>de</strong>lenlijst 9<br />
Veiligheidsinstructies 10<br />
Symbolen 12<br />
Montage 12<br />
Bediening 13<br />
Service en on<strong>de</strong>rhoud 13<br />
Garantie 14<br />
Specificaties<br />
Mo<strong>de</strong>l nr.:<br />
Spanning:<br />
Onbelaste snelheid<br />
Oscillaties:<br />
Slag lengte:<br />
Schuur koker maten:<br />
Stofpoort:<br />
Tafel afmetingen:<br />
Rotatie as:<br />
Isolatie:<br />
Gewicht:<br />
TSPS450<br />
220V - 240V (450W)<br />
2.000 rpm<br />
58 rpm<br />
16 mm<br />
13, 19, 26, 38, 51 en 76 mm diameter<br />
38 mm<br />
370 x 295 mm<br />
12,7 mm x 1,5 mm draad<br />
Dubbel geïsoleerd<br />
14,6 kg<br />
On<strong>de</strong>r<strong>de</strong>lenlijst<br />
1. Tafel ring opslag<br />
2. Aan-/uitschakelaar<br />
3. Motor behuizing<br />
4. Tafelblad<br />
5. Rotatie as<br />
6. Rotatie as blokkeringmoer<br />
7. Lage as sluitring<br />
8. Rotatie as opslag<br />
9. Hoge as sluitring (x3)<br />
10. Tafel ring (x6)<br />
11. Schuur koker (x6)<br />
12. Rubberen cilin<strong>de</strong>r (x5)<br />
13. Stofpoort<br />
14. Moersleutel<br />
NL<br />
Inhoud / Specificaties / On<strong>de</strong>r<strong>de</strong>lenlijst 9
NL<br />
Algemene veiligheid<br />
WAARSCHUWING Lees alle bediening- en<br />
veiligheidsvoorschriften. Het niet opvolgen van<br />
alle voorschriften die hieron<strong>de</strong>r vermeld staan,<br />
kan resulteren in een elektrische schok, brand en/of<br />
ernstig letsel.<br />
Bewaar <strong>de</strong>ze voorschriften voor toekomstig<br />
gebruik. De term “elektrisch gereedschap” in alle<br />
hieron<strong>de</strong>r vermel<strong>de</strong> waarschuwingen heeft betrekking<br />
op uw elektrische gereedschap dat op <strong>de</strong> stroom is<br />
aangesloten (met een snoer) of met een accu wordt<br />
gevoed (snoerloos).<br />
1) Veiligheid in <strong>de</strong> werkruimte<br />
a) Houd <strong>de</strong> werkruimte schoon en zorg voor een<br />
goe<strong>de</strong> verlichting. Rommelige en donkere ruimtes<br />
lei<strong>de</strong>n vaak tot ongelukken.<br />
b) Werk niet met elektrisch gereedschap in<br />
explosieve omgevingen, bijvoorbeeld in <strong>de</strong><br />
aanwezigheid van ontvlambare vloeistoffen,<br />
gassen of stof. Elektrisch gereedschap brengt vonken<br />
teweeg die stof of dampen kunnen doen ontbran<strong>de</strong>n.<br />
c) Houd kin<strong>de</strong>ren en omstan<strong>de</strong>rs uit <strong>de</strong> buurt<br />
wanneer u elektrisch gereedschap bedient. Door<br />
afleiding kunt u <strong>de</strong> controle over het gereedschap<br />
verliezen.<br />
2) Elektrische veiligheid<br />
a) De stekkers van het elektrische gereedschap<br />
moeten passen bij het stopcontact. Pas <strong>de</strong><br />
stekker niet aan. Gebruik geen adapterstekkers<br />
bij geaard elektrisch gereedschap. Het gebruik van<br />
ongewijzig<strong>de</strong> stekkers en passen<strong>de</strong> stopcontacten<br />
vermin<strong>de</strong>rt het risico op een elektrische schok.<br />
b) Vermijd lichamelijk contact met geaar<strong>de</strong><br />
oppervlakken zoals pijpen, radiatoren, fornuizen<br />
en koelkasten. Het risico op een elektrische schok<br />
neemt toe als uw lichaam geaard wordt.<br />
c) Laat elektrisch gereedschap niet nat wor<strong>de</strong>n.<br />
Wanneer elektrisch gereedschap nat wordt, neemt het<br />
risico op een elektrische schok toe.<br />
d) Beschadig het snoer niet. Gebruik het snoer<br />
nooit om het elektrisch gereedschap te dragen,<br />
te trekken of om <strong>de</strong> stekker uit het stopcontact<br />
te trekken. Houd het snoer uit <strong>de</strong> buurt van hitte,<br />
olie, scherpe ran<strong>de</strong>n of bewegen<strong>de</strong> <strong>de</strong>len. Een<br />
beschadigd of in <strong>de</strong> knoop geraakt snoeren verhoogt<br />
het risico op een elektrische schok toe.<br />
e) Wanneer u elektrisch gereedschap buiten<br />
gebruikt, maak dan gebruik van een verlengsnoer<br />
dat geschikt is voor gebruik buitenshuis. Gebruik<br />
een verlengsnoer dat geschikt is voor gebruik<br />
buitenshuis om het risico op een elektrische schok te<br />
vermin<strong>de</strong>ren.<br />
f) Indien het onvermij<strong>de</strong>lijk is elektrisch gereedschap<br />
te gebruiken in een vochtige omgeving, gebruik<br />
dan een energiebron met een aardlek beveiliging<br />
(Residual Currency Device). Het gebruik van een<br />
RCD vermin<strong>de</strong>rt het risico op een elektrische schok.<br />
3) Persoonlijke veiligheid<br />
a) Blijf alert en gebruik uw gezon<strong>de</strong> verstand<br />
wanneer u elektrisch gereedschap bedient.<br />
Gebruik het elektrisch gereedschap niet wanneer<br />
u vermoeid bent of on<strong>de</strong>r invloed van drugs,<br />
alcohol of medicijnen. Onoplettendheid tij<strong>de</strong>ns het<br />
bedienen van elektrisch gereedschap kan lei<strong>de</strong>n tot<br />
ernstig letsel.<br />
b) Maak gebruik van persoonlijke bescherming.<br />
Draag altijd een veiligheidsbril. Passen<strong>de</strong><br />
bescherming voor <strong>de</strong> omstandighe<strong>de</strong>n, zoals een<br />
stofmasker, niet-slippen<strong>de</strong> veiligheidsschoenen een<br />
helm of gehoorbescherming, vermin<strong>de</strong>rt het risico op<br />
persoonlijk letsel.<br />
c) Zorg ervoor dat het apparaat niet per ongeluk<br />
wordt gestart. Controleer of <strong>de</strong> schakelaar in<br />
<strong>de</strong> ‘uit’ stand staat voordat u <strong>de</strong> stekker in het<br />
stopcontact steekt. Het dragen van elektrisch<br />
gereedschap met uw vinger op <strong>de</strong> schakelaar of het<br />
aansluiten op <strong>de</strong> stroom van elektrisch gereedschap<br />
met <strong>de</strong> schakelaar ingeschakeld kan tot ongelukken<br />
lei<strong>de</strong>n.<br />
d) Verwij<strong>de</strong>r alle stel- of moersleutels voordat u het<br />
elektrische gereedschap inschakelt. Een moer- of<br />
stelsleutel die zich op een draaiend on<strong>de</strong>r<strong>de</strong>el van het<br />
elektrische gereedschap bevindt, kan lei<strong>de</strong>n tot letsel.<br />
e) Reik niet te ver. Blijf altijd stevig en in balans<br />
staan. Zo houdt u meer controle over het elektrische<br />
gereedschap in onverwachte situaties.<br />
f) Draag geschikte kleding. Draag geen loshangen<strong>de</strong><br />
kleding of siera<strong>de</strong>n. Houd haren, kleding en<br />
handschoenen uit <strong>de</strong> buurt van bewegen<strong>de</strong> <strong>de</strong>len.<br />
Loshangen<strong>de</strong> kleding, siera<strong>de</strong>n en los hangen<strong>de</strong> haren<br />
kunnen vast komen te zitten in bewegen<strong>de</strong> <strong>de</strong>len.<br />
g) Als er on<strong>de</strong>r<strong>de</strong>len voor stofafvoer- en<br />
stofverzameling wor<strong>de</strong>n meegeleverd, sluit<br />
<strong>de</strong>ze dan aan en gebruik <strong>de</strong>ze op <strong>de</strong> juiste wijze.<br />
Het gebruik van <strong>de</strong>ze on<strong>de</strong>r<strong>de</strong>len kan het risico op<br />
stofgerelateer<strong>de</strong> ongelukken vermin<strong>de</strong>ren.<br />
4) Gebruik en verzorging van elektrisch gereedschap<br />
a) Forceer elektrisch gereedschap niet. Gebruik<br />
elektrisch gereedschap dat geschikt is voor het<br />
werk dat u wilt uitvoeren. Geschikt elektrisch<br />
gereedschap werkt beter en veiliger op een passen<strong>de</strong><br />
snelheid.<br />
b) Gebruik het elektrische gereedschap niet als <strong>de</strong><br />
schakelaar het apparaat niet in- en uitschakelt.<br />
Elektrisch gereedschap dat niet bediend kan wor<strong>de</strong>n<br />
met <strong>de</strong> schakelaar is gevaarlijk en moet gerepareerd<br />
wor<strong>de</strong>n.<br />
10<br />
Algemene veiligheid
c) Haal <strong>de</strong> stekker uit het stopcontact voordat u<br />
instellingen aanpast, toebehoren verwisselt of<br />
het elektrische gereedschap opbergt. Dergelijke<br />
voorzorgsmaatregelen vermin<strong>de</strong>ren het risico op het<br />
per ongeluk starten van het elektrische gereedschap.<br />
d) Berg elektrisch gereedschap dat niet in gebruik is<br />
op buiten bereik van kin<strong>de</strong>ren en laat mensen die<br />
niet bekend zijn met het elektrische gereedschap<br />
of met <strong>de</strong>ze instructies het elektrische<br />
gereedschap niet bedienen. Elektrisch gereedschap<br />
is gevaarlijk in <strong>de</strong> han<strong>de</strong>n van onervaren gebruikers.<br />
e) On<strong>de</strong>rhoud uw elektrisch gereedschap. Controleer<br />
op foutieve uitlijning of het vastslaan van<br />
bewegen<strong>de</strong> <strong>de</strong>len, gebroken on<strong>de</strong>r<strong>de</strong>len en<br />
elke an<strong>de</strong>re afwijking die <strong>de</strong> werking van het<br />
elektrische gereedschap zou kunnen beïnvloe<strong>de</strong>n.<br />
Indien het elektrische gereedschap beschadigd<br />
is, moet u het laten repareren voordat u het weer<br />
gebruikt. Veel ongelukken wor<strong>de</strong>n veroorzaakt door<br />
slecht on<strong>de</strong>rhou<strong>de</strong>n elektrisch gereedschap.<br />
f) Houd snijwerktuigen scherp en schoon. Goed<br />
on<strong>de</strong>rhou<strong>de</strong>n snijwerktuigen met scherpe messen<br />
slaan min<strong>de</strong>r snel vast en zijn gemakkelijker te<br />
bedienen.<br />
g) Gebruik het elektrische gereedschap, toebehoren<br />
en on<strong>de</strong>r<strong>de</strong>len, etc. volgens <strong>de</strong>ze instructies en<br />
volgens bestemming voor het specifieke type<br />
elektrisch gereedschap, en houd daarbij rekening<br />
met <strong>de</strong> werkomstandighe<strong>de</strong>n en het uit te voeren<br />
werk. Gebruik van elektrisch gereedschap voor<br />
werkzaamhe<strong>de</strong>n die verschillen van die waarvoor<br />
het apparaat bestemd is, kan lei<strong>de</strong>n tot gevaarlijke<br />
situaties.<br />
5) On<strong>de</strong>rhoud<br />
a) Laat uw elektrische gereedschap on<strong>de</strong>rhou<strong>de</strong>n<br />
door een gekwalificeer<strong>de</strong> vakman en gebruik<br />
alleen i<strong>de</strong>ntieke vervangstukken. Zo bent u er zeker<br />
van dat <strong>de</strong> veiligheid van het elektrische gereedschap<br />
gewaarborgd blijft.<br />
4. Voedt het werkstuk tegen <strong>de</strong> rotatierichting van <strong>de</strong><br />
schuurkoker in.<br />
5. Houdt uw han<strong>de</strong>n uit <strong>de</strong> buurt van <strong>de</strong> schuurkoker<br />
tij<strong>de</strong>ns het schuren. Voorkom handposities waarbij uw<br />
han<strong>de</strong>n plotseling weg kunnen slippen wat kan lei<strong>de</strong>n<br />
tot ongelukken. Reik niet on<strong>de</strong>r het werkstuk of om <strong>de</strong><br />
schuurkoker heen wanneer <strong>de</strong>ze roteert.<br />
6. Verwij<strong>de</strong>r <strong>de</strong> stekker uit het stopcontact nadat u <strong>de</strong><br />
schuurmachine heet uitgeschakeld. Wacht tot <strong>de</strong><br />
schuurkoker tot stilstand is gekomen voordat u enig<br />
on<strong>de</strong>rhoud uitvoert. Bij het vervangen van on<strong>de</strong>r<strong>de</strong>len<br />
hoort <strong>de</strong> stekker niet aangesloten te zijn op een<br />
stopcontact.<br />
7. Zorg ervoor dat u spijkers en an<strong>de</strong>re<br />
bevestigingsmid<strong>de</strong>len rondom <strong>de</strong> machine verwij<strong>de</strong>rt<br />
voordat u begint met schuren.<br />
8. Gebruik <strong>de</strong>ze schuurmachine niet voor natschuren waar<br />
dit kan resulteren in het krijgen van een elektrische<br />
schok en ernstige verwondingen.<br />
9. Gebruik i<strong>de</strong>ntieke on<strong>de</strong>r<strong>de</strong>len voor het vervangen van <strong>de</strong><br />
beschadig<strong>de</strong> on<strong>de</strong>r<strong>de</strong>len.<br />
10. Laat <strong>de</strong> schuurkoker volledig tot stilstand komen voor<br />
het neerleggen van <strong>de</strong> machine.<br />
11. Neem voorzorgsmaatregelen bij het schuren van<br />
geverf<strong>de</strong> oppervlakken. Het schuren van geverf<strong>de</strong><br />
oppervlakken IS NIET AAN TE RADEN.<br />
Het schuren van verfoppervlakken:<br />
• Bescherm uw longen en draag een stofmasker<br />
• Laat kin<strong>de</strong>ren en zwangere vrouwen het werkgebied<br />
niet betre<strong>de</strong>n tot u klaar bent met schuren, en het<br />
schoonmaken is voltooid<br />
• Eet, drink en rook niet in een omgeving waar<br />
verfoppervlakken wor<strong>de</strong>n geschuurd<br />
• Gebruik wanneer mogelijk een stofopvangsysteem en<br />
be<strong>de</strong>k <strong>de</strong> werkplaats<br />
• Maak <strong>de</strong> ruimte goed schoon na het schuren van<br />
verfoppervlakken<br />
Veiligheid voor oscilleren<strong>de</strong> schuurmachines<br />
De waarschuwingen, voorzorgsmaatregelen en instructies<br />
in <strong>de</strong>ze handleiding <strong>de</strong>kken niet alle situaties die zich<br />
mogelijk kunnen voordoen bij het gebruik van <strong>de</strong>ze<br />
schuurmachine. Gezond verstand en oplettendheid zijn<br />
factoren die door u toegevoegd wor<strong>de</strong>n.<br />
Gebruik <strong>de</strong>ze schuurmachine niet voordat <strong>de</strong>ze volledig<br />
gemonteerd is en u <strong>de</strong> instructies volledig heeft<br />
doorgelezen en begrijpt.<br />
1. Controleer <strong>de</strong> on<strong>de</strong>r<strong>de</strong>len van <strong>de</strong> schuurmachine en<br />
vervang missen<strong>de</strong> en beschadig<strong>de</strong> <strong>de</strong>len voordat <strong>de</strong><br />
machine wordt gebruikt.<br />
2. Stel het type werk vast voor u enig schuurwerk uitvoert.<br />
3. On<strong>de</strong>rsteun het werkstuk door dit met bei<strong>de</strong> han<strong>de</strong>n<br />
goed vast te hou<strong>de</strong>n.<br />
NL<br />
Algemene veiligheid 11
Symbolen<br />
BESCHERMING VAN HET MILIEU<br />
Elektrische producten mogen niet wor<strong>de</strong>n<br />
afgevoerd met het normale huisvuil. Indien<br />
<strong>de</strong> mogelijkheid bestaat, dient u het product<br />
te recyclen. Vraag <strong>de</strong> plaatselijke autoriteiten<br />
of winkelier om advies betreffen<strong>de</strong> recyclen.<br />
WAARSCHUWING. Vermin<strong>de</strong>r het risico op<br />
ongelukken en lees <strong>de</strong> handleiding voor<br />
gebruik geheel door<br />
Instructie waarschuwing<br />
Draag altijd gehoor-, oog- en<br />
luchtwegenbescherming<br />
MONTAGE<br />
Voldoet aan <strong>de</strong> relevante wetgeving en<br />
veiligheidsstandaards<br />
Zorg er te allen tij<strong>de</strong> voor dat het gereedschap is<br />
uitgeschakeld en verwij<strong>de</strong>rt van <strong>de</strong> stroombron<br />
voor het maken van aanpassingen en het verwij<strong>de</strong>ren of<br />
installeren van accessoires<br />
Dubbel geïsoleerd<br />
HET SELECTEREN VAN EEN TAFELRING<br />
NL<br />
MONTEREN OP EEN TAFEL<br />
Wanneer u <strong>de</strong> machine op één en <strong>de</strong>zelf<strong>de</strong> positie gebruikt<br />
is het aan te ra<strong>de</strong>n <strong>de</strong>ze op een stevige werkbank te<br />
monteren.<br />
• Gebruik <strong>de</strong> vier gaten in <strong>de</strong> basisplaat van <strong>de</strong><br />
schuurmachine voor het markeren en boren van <strong>de</strong><br />
montagegaten in <strong>de</strong> werkbank. Monteer <strong>de</strong> machine op<br />
<strong>de</strong> werkbank met gebruik van lange bouten, sluitringen<br />
en moeren (niet inbegrepen)<br />
• Wanneer u <strong>de</strong> machine op verschillen<strong>de</strong> plaatsen/<br />
locaties gebruikt is het aan te ra<strong>de</strong>n een houten blad op<br />
<strong>de</strong> basisplaat te monteren.<br />
Het blad kan gemakkelijk<br />
gemonteerd en verwij<strong>de</strong>rd<br />
wor<strong>de</strong>n op en van<br />
verschillen<strong>de</strong> oppervlakten<br />
• Zorg ervoor dat <strong>de</strong> bouten<br />
lang genoeg zijn voor het<br />
veilig monteren van <strong>de</strong><br />
basisplaat of het houten<br />
blad<br />
ZAAGSEL/STOF ONTGINNING<br />
Het is aan te ra<strong>de</strong>n gebruik te maken van een<br />
stofopvangsysteem voor een schonere werkomgeving en<br />
een veiliger gebruik.<br />
1. Sluit <strong>de</strong> slang van het opvangsysteem aan op<br />
<strong>de</strong> stofpoort (13) aan <strong>de</strong> achterzij<strong>de</strong> van <strong>de</strong><br />
schuurmachine.<br />
2. Voor <strong>de</strong> grootste efficiëntie schakelt u het<br />
stofopvangsysteem in voordat u <strong>de</strong> schuurmachine<br />
inschakelt<br />
Selecteer altijd <strong>de</strong> juiste tafelring met passen<strong>de</strong> cilin<strong>de</strong>r<br />
en schuurkoker. De schuurkoker hoort in het centrale gat<br />
te passen en minimaal te bewegen.<br />
Gebruik <strong>de</strong> on<strong>de</strong>rstaan<strong>de</strong> tabel voor het vast stellen van<br />
<strong>de</strong> juiste tafelring en <strong>de</strong> juiste boven sluitring bij elke<br />
schuurkoker.<br />
Schuurkoker<br />
diameter<br />
Tafelring<br />
grootte<br />
HET PLAATSEN VAN EEN SCHUURKOKER<br />
Let op: Alle kokers, behalve <strong>de</strong><br />
kleinste 13 mm koker, passen<br />
op een bijbehoren<strong>de</strong> cilin<strong>de</strong>r<br />
(12)<br />
1. Plaats <strong>de</strong> lage as sluitring<br />
(7) over <strong>de</strong> as (5) met <strong>de</strong><br />
vinzij<strong>de</strong> naar on<strong>de</strong>r wijzend<br />
Boven sluitring<br />
grootte<br />
13 mm 13 mm Klein<br />
19 mm 19 mm Medium<br />
26 mm 26 mm Medium<br />
38 mm 38 mm Groot<br />
51 mm 51 mm Groot<br />
76 mm 76 mm Groot<br />
12<br />
Symbolen / Montage
2. Selecteer <strong>de</strong> juiste schuur<br />
koker (11) met <strong>de</strong> passen<strong>de</strong><br />
cilin<strong>de</strong>r (12). Gebruik geen<br />
cilin<strong>de</strong>r bij <strong>de</strong> 13 mm koker<br />
3. Selecteer nu <strong>de</strong> bijpassen<strong>de</strong><br />
tafelring (10) met behulp<br />
van <strong>de</strong> tabel hier boven<br />
4. Plaats <strong>de</strong> tafelring over <strong>de</strong><br />
as op <strong>de</strong> lage sluitring.<br />
5. Plaats <strong>de</strong> rubberen cilin<strong>de</strong>r<br />
(12) over <strong>de</strong> as<br />
6. Schuif <strong>de</strong> schuurkoker (11)<br />
over <strong>de</strong> cilin<strong>de</strong>r<br />
7. Plaats <strong>de</strong> hoge as sluitring<br />
(9) over <strong>de</strong> as (5)<br />
• Gebruik <strong>de</strong> grote sluitring<br />
voor <strong>de</strong> 75 mm, 51 mm en<br />
38 mm cilin<strong>de</strong>rs<br />
• Gebruik <strong>de</strong> medium sluitring voor <strong>de</strong> 26 mm en <strong>de</strong> 19<br />
mm cilin<strong>de</strong>rs<br />
BEDIENING<br />
IN- EN UITSCHAKELEN<br />
• De aan-/uitschakelaar (2)<br />
is aan <strong>de</strong> voorzij<strong>de</strong> van <strong>de</strong><br />
schuurmachine te vin<strong>de</strong>n<br />
• Om <strong>de</strong> machine in te<br />
schakelen drukt u <strong>de</strong> groene<br />
‘AAN’ knop in, gemarkeerd<br />
met (-)<br />
• Om <strong>de</strong> machine uit te<br />
schakelen drukt u <strong>de</strong> ro<strong>de</strong><br />
‘UIT’ knop in, gemarkeerd met (O)<br />
SCHUREN<br />
• WAARSCHUWING: Bewerk geen metaal met <strong>de</strong>ze<br />
machine waar <strong>de</strong> vonken stof en zaagsel op <strong>de</strong><br />
machine en in <strong>de</strong> werkplaats kan ontsteken<br />
• LET OP: De as roteert linksom<br />
• Gebruik <strong>de</strong> kleine sluitring<br />
voor <strong>de</strong> 13 mm cilin<strong>de</strong>r<br />
8. Schroef <strong>de</strong> blokkeringmoer<br />
(6) op <strong>de</strong> as. Draai <strong>de</strong> moer<br />
strak genoeg vast zodat <strong>de</strong><br />
cilin<strong>de</strong>r (12) uitzet tegen <strong>de</strong><br />
schuurkoker (11). Draai <strong>de</strong><br />
moer niet te strak vast.<br />
Wanneer <strong>de</strong> schuurkoker aan<br />
één helft versleten is, kunt u<br />
<strong>de</strong>ze omdraaien en <strong>de</strong> min<strong>de</strong>r<br />
versleten helft gebruiken. Zo<br />
maximaliseert u <strong>de</strong> levensduur<br />
van <strong>de</strong> koker.<br />
Gebruik geen totaal versleten<br />
kokers. Dit kan lei<strong>de</strong>n tot een<br />
extreme hitte wat <strong>de</strong> cilin<strong>de</strong>rs<br />
kan beschadigen. Beschadig<strong>de</strong><br />
rubberen cilin<strong>de</strong>rs, veroorzaakt<br />
door versleten schuurkokers,<br />
valt niet on<strong>de</strong>r <strong>de</strong> garantie.<br />
1. Controleer dat <strong>de</strong> machine juist en stevig op het<br />
tafelblad/<strong>de</strong> werkbank gemonteerd is en dat <strong>de</strong><br />
blokkeringmoer (6) met <strong>de</strong> juiste schuurkoker en<br />
sluitring.<br />
2. Draag <strong>de</strong> juiste beschermingskleding, inclusief<br />
gezichtsmasker en veiligheidsbril voordat u <strong>de</strong> machine<br />
aan zet en schakel het stofopvang systeem in (wanneer<br />
nodig).<br />
3. Schakel <strong>de</strong> schuurmachine in en laat <strong>de</strong> motor zijn volle<br />
snelheid bereiken<br />
4. Voed het werkstuk langzaam tegen <strong>de</strong> schuurkoker.<br />
• Forceer het werkstuk niet en oefen geen extreme druk<br />
uit tij<strong>de</strong>ns het voe<strong>de</strong>n<br />
• Voed het werkstuk alleen tegen <strong>de</strong> rotatierichting in.<br />
De schuurkoker kan het werkstuk van zich afslaan<br />
wanneer u met <strong>de</strong> richting me voedt.<br />
5. Schakel <strong>de</strong> machine na gebruik uit en verwij<strong>de</strong>r <strong>de</strong><br />
stekker van het stopcontact<br />
SERVICE EN ONDERHOUD<br />
WAARSCHUWING: De schuurmachine hoort te<br />
allen tij<strong>de</strong> uitgeschakeld te zijn voordat u enige<br />
aanpassingen maakt en/of on<strong>de</strong>rhoud uitvoert<br />
• Beschadigingen aan <strong>de</strong> schuurmachine horen door een<br />
gekwalificeerd persoon on<strong>de</strong>rzocht en gerepareerd te<br />
wor<strong>de</strong>n<br />
• Het vervangen van beschadig<strong>de</strong> on<strong>de</strong>r<strong>de</strong>len door<br />
i<strong>de</strong>ntieke on<strong>de</strong>r<strong>de</strong>len behoud <strong>de</strong> veiligheid<br />
ALGEMENE INSPECTIE<br />
Controleer <strong>de</strong> bouten en moeren regelmatig. Deze kunnen<br />
losraken door <strong>de</strong> vibratie tij<strong>de</strong>ns het gebruik van <strong>de</strong><br />
schuurmachine<br />
STROOMKABEL ONDERHOUD<br />
Het vervangen van stroomkabels hoort gedaan te wor<strong>de</strong>n<br />
door <strong>de</strong> fabrikant, <strong>de</strong> leverancier of een service center, om<br />
gevaar risico’s te vermij<strong>de</strong>n<br />
NL<br />
Montage / Bediening / Service en On<strong>de</strong>rhoud 13
SCHOON MAKEN<br />
1. Verwij<strong>de</strong>r stof en vuil regelmatig van <strong>de</strong> machine.<br />
Gebruik wanneer mogelijk perslucht<br />
2. Verwij<strong>de</strong>r <strong>de</strong> tafelring en on<strong>de</strong>r sluitring van <strong>de</strong> as en<br />
verwij<strong>de</strong>r het stof en vuil<br />
3. Smeer alle bewegen<strong>de</strong> on<strong>de</strong>r<strong>de</strong>len goed in<br />
4. Gebruik geen bijten<strong>de</strong> stoffen voor het schoonmaken<br />
van plastic on<strong>de</strong>r<strong>de</strong>len<br />
Gebruik lichte schoonmaakmid<strong>de</strong>len en een vochtige<br />
doek. Het gereedschap mag niet in contact komen met<br />
water.<br />
NL<br />
Garantie<br />
Om uw garantie te registreren, gaat u naar onze website op<br />
www.tritontools.com* en voert u uw gegevens in.<br />
Uw gegevens wor<strong>de</strong>n opgeslagen in onze mailinglist (tenzij u<br />
an<strong>de</strong>rs aangeeft) voor informatie over nieuwe producten. De<br />
ingevul<strong>de</strong> gegevens wor<strong>de</strong>n aan geen enkele an<strong>de</strong>re partij<br />
beschikbaar gesteld.<br />
AANKOOPGEGEVENS<br />
Datum van aankoop: ___ / ___ / ____<br />
Mo<strong>de</strong>l: TSPS450<br />
Serienummer: __________________<br />
Bewaar uw aankoopbon als aankoopbewijs<br />
<strong>Triton</strong> Precision Power <strong>Tools</strong> garan<strong>de</strong>ert <strong>de</strong> koper<br />
van dit product dat indien een on<strong>de</strong>r<strong>de</strong>el <strong>de</strong>fect is<br />
vanwege fouten in materiaal of uitvoering binnen<br />
12 MAANDEN na <strong>de</strong> datum van <strong>de</strong> oorspronkelijke<br />
aankoop,<br />
<strong>Triton</strong> het <strong>de</strong>fecte on<strong>de</strong>r<strong>de</strong>el gratis repareert of, naar<br />
eigen inzicht, vervangt.<br />
Deze garantie heeft geen betrekking op<br />
commercieel gebruik en strekt zich niet uit tot<br />
normale slijtage of scha<strong>de</strong> ten gevolge van een<br />
ongeluk, verkeerd gebruik of misbruik.<br />
* Registreer online binnen 30 dagen.<br />
Algemene voorwaar<strong>de</strong>n van toepassing.<br />
14<br />
Service en On<strong>de</strong>rhoud / Garantie
Nous vous remercions d’avoir choisi cet équipement <strong>Triton</strong>. Ces instructions contiennent les informations nécessaires au<br />
fonctionnement efficace et sûr <strong>de</strong> ce produit. Veuillez lire attentivement ce manuel pour vous assurer <strong>de</strong> tirer pleinement<br />
avantage <strong>de</strong>s caractéristiques uniques <strong>de</strong> votre nouvel équipement.<br />
Gar<strong>de</strong>z ce manuel à portée <strong>de</strong> main et assurez-vous que tous les utilisateurs l’aient lu et bien compris avant toute utilisation.<br />
TABLE DES MATIERES<br />
Caractéristiques techniques 15<br />
Nomenclature 15<br />
Consignes <strong>de</strong> sécurité 16<br />
Symboles 18<br />
Assemblage 18<br />
Fonctionnement 19<br />
Révision et entretien 20<br />
Garantie 20<br />
CARACTÉRISTIQUES TECHNIQUES<br />
Numéro <strong>de</strong> produit :<br />
Tension :<br />
Vitesse à vi<strong>de</strong> :<br />
Fréquence d’oscillation :<br />
Course d’oscillation :<br />
Diamètre <strong>de</strong>s manchons :<br />
Tubulure d’extraction poussières :<br />
Dimensions du plateau :<br />
Cotes <strong>de</strong> l’arbre :<br />
Isolation :<br />
Poids net :<br />
TSPS450<br />
220V - 240V (450W)<br />
2.000 tr/min<br />
58/min<br />
16 mm<br />
13 mm, 19 mm, 26 mm, 38 mm, 51 mm et 76 mm<br />
38 mm<br />
370 mm x 295 mm<br />
12,7 mm, filetage 1,5 mm<br />
Double isolation<br />
14,6 kg<br />
NOMENCLATURE<br />
1. Fentes <strong>de</strong> rangement<br />
2. Interrupteur<br />
3. Bloc moteur<br />
4. Plateau<br />
5. Arbre<br />
6. Écrou <strong>de</strong> blocage d’arbre<br />
7. Ron<strong>de</strong>lle inférieure d’arbre<br />
8. Rangement d’arbre<br />
9. Ron<strong>de</strong>lles supérieures d’arbre (x3)<br />
10. Insert <strong>de</strong> plateau (x6)<br />
11. Manchon <strong>de</strong> ponçage (x6)<br />
12. Tambour <strong>de</strong> caoutchouc (x5)<br />
13. Tubulure d’extraction<br />
14. Clé<br />
F<br />
Table <strong>de</strong>s matières / Caractéristiques techniques / Nomenclature<br />
15
F<br />
CONSIGNES DE SECURITE<br />
AVERTISSEMENT Veuillez lire l’intégralité <strong>de</strong>s<br />
consignes <strong>de</strong> sécurité et <strong>de</strong>s instructions. Le<br />
non-respect <strong>de</strong> ces consignes et instructions peut<br />
entraîner un risque <strong>de</strong> choc électrique, d’incendie et/<br />
ou se traduire par <strong>de</strong>s blessures graves.<br />
Veuillez conserver ces instructions et consignes<br />
<strong>de</strong> sécurité pour référence ultérieure. L’expression<br />
« appareil électrique » employée dans les présentes<br />
consignes recouvre aussi bien les appareils filaires<br />
à brancher sur le secteur que les appareils sans fils<br />
fonctionnant sous batterie.<br />
1) Sécurité sur la zone <strong>de</strong> travail<br />
a) Maintenir une zone <strong>de</strong> travail propre et bien<br />
éclairée. Des zones encombrées et mal éclairées sont<br />
sources d’acci<strong>de</strong>nts.<br />
b) Ne pas utiliser d’outils électriques dans <strong>de</strong>s<br />
environnements explosifs, tels qu’à proximité <strong>de</strong><br />
liqui<strong>de</strong>s, <strong>de</strong> gaz ou <strong>de</strong> poussières inflammables.<br />
Les appareils électriques produisent <strong>de</strong>s étincelles<br />
susceptibles d’enflammer la poussière ou les vapeurs<br />
présentes.<br />
c) Eloigner les enfants et les passants pendant<br />
l’utilisation d’un appareil électrique. Ceux-ci<br />
peuvent provoquer une perte d’attention et faire<br />
perdre la maîtrise <strong>de</strong> l’appareil.<br />
2) Sécurité électrique<br />
a) La prise d’un appareil électrique doit être adaptée<br />
à la prise du secteur. Ne jamais modifier la prise<br />
en aucune façon. Ne jamais utiliser d’adaptateur<br />
sur la prise électrique d’appareil mis à la terre.<br />
Des prises non modifiées, adaptées aux boîtiers <strong>de</strong><br />
prise <strong>de</strong> courant, réduiront le risque <strong>de</strong> décharge<br />
électrique.<br />
b) Eviter le contact corporel avec les surfaces mises<br />
à la terre telles que tuyaux, radiateurs, cuisinières<br />
et réfrigérateurs. Le risque <strong>de</strong> décharge électrique<br />
est plus important si le corps est mis à la terre.<br />
c) Ne pas exposer l’appareil électrique à la pluie ou<br />
à l’humidité. L’infiltration d’eau dans un appareil<br />
électrique accroît le risque <strong>de</strong> décharge électrique.<br />
d) Ne pas maltraiter le cordon électrique. Ne<br />
jamais utiliser le cordon électrique pour porter,<br />
tirer ou débrancher l’appareil. Protéger le<br />
cordon électrique <strong>de</strong> la chaleur, du contact<br />
avec l’essence, <strong>de</strong>s bords tranchants et pièces<br />
rotatives. Un cordon électrique endommagé ou<br />
entortillé accroît le risque <strong>de</strong> décharge électrique.<br />
e) Lors d’une utilisation <strong>de</strong> l’appareil électrique en<br />
extérieur, se servir d’une rallonge appropriée à<br />
une utilisation en extérieur. Cela réduit le risque <strong>de</strong><br />
décharge électrique.<br />
f) Si une utilisation <strong>de</strong> l’appareil électrique dans un<br />
environnement humi<strong>de</strong> ne peut être évitée, utiliser<br />
16<br />
Consignes <strong>de</strong> sécurité<br />
une alimentation protégée par un disjoncteur<br />
différentiel. L’utilisation d’un disjoncteur différentiel<br />
réduit le risque <strong>de</strong> décharge électrique.<br />
3) Sécurité <strong>de</strong>s personnes<br />
a) Rester vigilent et faire preuve <strong>de</strong> bon sens lors<br />
<strong>de</strong> la manipulation <strong>de</strong> l’appareil. Ne pas utiliser<br />
un appareil électrique lorsque l’on se trouve<br />
dans un état <strong>de</strong> fatigue, ou sous l’influence <strong>de</strong><br />
drogues, d’alcool ou <strong>de</strong> médicaments. Un moment<br />
d’inattention pendant l’utilisation d’un outil électrique<br />
peut se traduire par <strong>de</strong>s blessures graves.<br />
b) Porter un équipement <strong>de</strong> protection approprié.<br />
Toujours porter une protection oculaire. Le port<br />
<strong>de</strong> masque à poussières, chaussures <strong>de</strong> sécurité<br />
antidérapantes, casque <strong>de</strong> sécurité et protections<br />
antibruit adaptés aux différentes conditions <strong>de</strong> travail<br />
réduit le risque <strong>de</strong> blessures corporelles.<br />
c) Eviter tout démarrage acci<strong>de</strong>ntel. S’assurer que<br />
l’interrupteur marche-arrêt soit en position d’arrêt<br />
avant <strong>de</strong> brancher l’appareil sur l’alimentation<br />
secteur ou d’installer la batterie, <strong>de</strong> prendre<br />
l’appareil ou <strong>de</strong> le transporter. Porter un appareil<br />
électrique tout en maintenant le doigt posé sur<br />
l’interrupteur ou brancher un appareil électrique dont<br />
l’interrupteur est sur la position <strong>de</strong> marche est source<br />
d’acci<strong>de</strong>nts.<br />
d) Enlever toute clé et tout instrument <strong>de</strong> réglage<br />
avant <strong>de</strong> mettre l’appareil électrique en marche.<br />
Une clé ou un instrument <strong>de</strong> réglage laissé fixé à<br />
un élément en rotation <strong>de</strong> l’appareil électrique peut<br />
entraîner <strong>de</strong>s blessures physiques.<br />
e) Ne pas essayer d’atteindre une zone hors <strong>de</strong><br />
portée. Se tenir toujours en position stable<br />
permettant <strong>de</strong> conserver l’équilibre. Cela permet<br />
<strong>de</strong> mieux contrôler l’appareil électrique dans <strong>de</strong>s<br />
situations inattendues.<br />
f) Porter <strong>de</strong>s vêtements appropriés. Ne pas porter<br />
<strong>de</strong> vêtements amples ou <strong>de</strong>s bijoux pendants.<br />
Eloigner cheveux, vêtements et gants <strong>de</strong>s pièces<br />
en mouvement. Les vêtements amples, les bijoux<br />
pendants et cheveux longs peuvent être happés par<br />
les pièces en rotation<br />
g) Si l’appareil est pourvu <strong>de</strong> dispositifs <strong>de</strong>stinés<br />
au raccord d’équipements d’extraction et <strong>de</strong><br />
récupération <strong>de</strong> la poussière/sciure, s’assurer<br />
qu’ils soient bien fixés et utilisés correctement.<br />
L’utilisation <strong>de</strong> ces dispositifs peut réduire les risques<br />
dus à la poussière.<br />
4) Utilisation et entretien <strong>de</strong>s appareils électrique<br />
a) Ne pas forcer sur l’appareil électrique. Utiliser<br />
l’appareil électrique approprié au travail à<br />
effectuer. Un appareil électrique adapté et employé<br />
au rythme pour lequel il a été conçu permettra <strong>de</strong><br />
réaliser un travail <strong>de</strong> meilleure qualité et dans <strong>de</strong>
meilleures conditions <strong>de</strong> sécurité.<br />
b) Ne pas utiliser un appareil électrique dont<br />
l’interrupteur marche-arrêt est hors service. Tout<br />
appareil électrique dont la comman<strong>de</strong> ne s’effectue<br />
plus par l’interrupteur marche-arrêt est dangereux et<br />
doit être réparé.<br />
c) Débrancher l’appareil électrique ou démonter<br />
sa batterie avant d’effectuer tout réglage ou<br />
changement d’accessoire et avant <strong>de</strong> le ranger.<br />
De telles mesures préventives réduiront les risques <strong>de</strong><br />
démarrage acci<strong>de</strong>ntel.<br />
d) Ranger les appareils électriques inutilisés<br />
hors <strong>de</strong> portée <strong>de</strong>s enfants et ne pas permettre<br />
l’utilisation <strong>de</strong> cet appareil aux personnes non<br />
habituées à son maniement ou n’ayant pas lu les<br />
présentes instructions. Les appareils électriques<br />
sont dangereux dans les mains d’utilisateurs<br />
inexpérimentés.<br />
e) Veiller à l’entretien <strong>de</strong>s appareils électriques.<br />
Vérifier que les éléments rotatifs soient bien<br />
alignés et non grippés. S’assurer <strong>de</strong> l’absence <strong>de</strong><br />
pièces cassées ou endommagées susceptibles<br />
<strong>de</strong> nuire au bon fonctionnement <strong>de</strong> l'appareil.<br />
Si l’appareil électrique est endommagé, le faire<br />
réparer avant toute utilisation. De nombreux<br />
acci<strong>de</strong>nts sont dus à l’utilisation d’appareils<br />
électriques mal entretenus.<br />
f) Veiller à ce que les outils <strong>de</strong> coupe soient tenus<br />
affûtés et propres. Des outils <strong>de</strong> coupe bien<br />
entretenus, aux tranchants bien affûtés, sont moins<br />
susceptibles <strong>de</strong> se gripper et sont plus faciles à<br />
contrôler.<br />
g) Utiliser l’appareil électrique, les accessoires et<br />
outils à monter conformément à ces instructions,<br />
en tenant compte <strong>de</strong>s conditions <strong>de</strong> travail et <strong>de</strong><br />
la tâche à réaliser. Toute utilisation d’un appareil<br />
électrique autre que celle pour laquelle il a été conçu<br />
peut entraîner <strong>de</strong>s situations à risque.<br />
5) Révision<br />
a) Ne faire réparer votre appareil électrique que<br />
par un réparateur qualifié utilisant uniquement<br />
<strong>de</strong>s pièces <strong>de</strong> rechange i<strong>de</strong>ntiques. Cela permet<br />
<strong>de</strong> maintenir la sécurité d’utilisation <strong>de</strong> l’appareil<br />
électrique.<br />
CONSIGNES DE SECURITE SUPPLEMENTAIRES<br />
RELATIVES AUX PONCEUSES À CYLINDRE OSCILLANT<br />
Les avertissements, consignes et instructions données<br />
dans le présent manuel ne permettent pas d’abor<strong>de</strong>r<br />
toutes les conditions et les situations à risque susceptible<br />
<strong>de</strong> survenir à l’utilisation d’une ponceuse à cylindre<br />
oscillant. L’utilisateur doit faire preuve <strong>de</strong> bon sens et <strong>de</strong><br />
pru<strong>de</strong>nce lors du ponçage sur ce type d’appareil.<br />
N’utilisez pas la ponceuse à cylindre oscillant tant qu’elle<br />
n’est pas complètement assemblée et tant que vous ne<br />
vous êtes pas familiarisé avec son mo<strong>de</strong> d’emploi et les<br />
étiquettes d’avertissement présentes sur la machine.<br />
1. Assurez-vous du bon état <strong>de</strong> la ponceuse à cylindre<br />
oscillant. Avant toute utilisation, remplacez toute<br />
pièce manquante, déformée ou ne fonctionnant pas<br />
correctement.<br />
2. Préparez la machine en fonction du type <strong>de</strong> ponçage<br />
envisagé, avant <strong>de</strong> la mettre en marche.<br />
3. Tenez la pièce à poncer dans une position sûre sur le<br />
plateau <strong>de</strong> la machine, et tenez la pièce à <strong>de</strong>ux mains.<br />
4. Tenez compte <strong>de</strong> la direction d’avancée <strong>de</strong> la pièce.<br />
Faites progresser la pièce à poncer contre le sens <strong>de</strong><br />
rotation du manchon <strong>de</strong> ponçage.<br />
5. Tenez toujours les mains à l’écart <strong>de</strong> la trajectoire<br />
<strong>de</strong> ponçage et <strong>de</strong>s manchons <strong>de</strong> ponçage. Evitez les<br />
positions susceptibles <strong>de</strong> voir vos mains entraînées vers<br />
l’arbre. Ne placez pas les doigts sous la pièce à poncer<br />
ni autour du manchon <strong>de</strong> ponçage tant que l’arbre est<br />
en rotation.<br />
6. Pour plus <strong>de</strong> sécurité, débranchez l’appareil après<br />
l’avoir éteint. Atten<strong>de</strong>z que l’arbre ait totalement cessé<br />
<strong>de</strong> tourner avant toute opération d’entretien. La machine<br />
doit être débranchée lorsqu’elle n’est pas utilisée ou lors<br />
du changement <strong>de</strong>s plaques d’insert, <strong>de</strong>s manchons <strong>de</strong><br />
ponçage, tambours <strong>de</strong> caoutchouc ou autres éléments.<br />
7. Assurez-vous <strong>de</strong> l’absence <strong>de</strong> tout corps étranger, tel<br />
que clous ou agrafes, dans la pièce à poncer.<br />
8. Cette ponceuse n’est pas conçue pour un ponçage<br />
humi<strong>de</strong>. Un ponçage humi<strong>de</strong> pourrait entraîner un<br />
risque <strong>de</strong> choc électrique, <strong>de</strong> blessure grave voire<br />
fatale.<br />
9. N’employez que <strong>de</strong>s pièces <strong>de</strong> rechange i<strong>de</strong>ntiques sur<br />
votre ponceuse à cylindre oscillant.<br />
10. Assurez-vous que l’arbre ait totalement cessé <strong>de</strong><br />
tourner avant <strong>de</strong> toucher la pièce à poncer.<br />
11. Prenez <strong>de</strong>s précautions au moment du ponçage<br />
<strong>de</strong> surfaces peintes. Il n’est PAS RECOMMANDÉ <strong>de</strong><br />
poncer <strong>de</strong>s surfaces traitées à la peinture au plomb.<br />
La poussière créée est difficilement maîtrisable et est<br />
source d’intoxication par le plomb.<br />
Précautions lors du ponçage <strong>de</strong> surfaces peintes :<br />
• Protégez vos poumons : portez un masque antipoussière.<br />
• Tenez les enfants et femmes enceintes à l’écart <strong>de</strong> la<br />
zone <strong>de</strong> travail tant que la zone n’a pas été nettoyée.<br />
• Ne buvez, ne mangez et ne fumez pas dans la zone<br />
dans laquelle vous procé<strong>de</strong>z au ponçage <strong>de</strong> surfaces<br />
peintes.<br />
• Dans la mesure du possible, utilisez un dispositif<br />
d’aspiration <strong>de</strong>s poussières. Ne laissez pas la poussière<br />
s’infiltrer dans votre zone <strong>de</strong> travail. Assurez-vous <strong>de</strong><br />
ne pas transporter la poussière vers d’autres zones <strong>de</strong><br />
votre environnement.<br />
• Procé<strong>de</strong>z à un nettoyage minutieux <strong>de</strong> la zone <strong>de</strong> travail<br />
une fois le ponçage terminé.<br />
Consignes <strong>de</strong> sécurité 17<br />
F
SYMBOLES<br />
PROTECTION DE L’ENVIRONNEMENT<br />
Les produits électriques usagés ne doivent<br />
pas être jetés avec les ordures ménagères.<br />
Veuillez les recycler dans les centres<br />
prévus à cet effet. Consultez les autorités<br />
locales ou votre reven<strong>de</strong>ur pour <strong>de</strong> plus<br />
amples informations.<br />
Assurez-vous <strong>de</strong> toujours porter lunettes<br />
<strong>de</strong> protection, masque respiratoire et<br />
protections antibruit<br />
ATTENTION. Pour réduire<br />
le risque <strong>de</strong> lésions, ne pas utiliser avant<br />
d’avoir pris pleinement connaissance <strong>de</strong>s<br />
instructions d’utilisation<br />
Avertissement<br />
Double isolation pour une protection<br />
supplémentaire<br />
Conforme à la législation et aux normes <strong>de</strong><br />
sécurité en vigueur.<br />
ASSEMBLAGE<br />
Assurez-vous toujours d’éteindre et <strong>de</strong> débrancher<br />
l’appareil avant <strong>de</strong> procé<strong>de</strong>r à tout réglage, tout<br />
démontage et toute installation d’accessoire.<br />
MONTAGE SUR ETABLI<br />
Si la ponceuse à cylindre oscillant est <strong>de</strong>stinée à être<br />
utilisée en un endroit définitif, il est recommandé <strong>de</strong> la<br />
fixer à un plan <strong>de</strong> travail rigi<strong>de</strong>.<br />
• Le socle <strong>de</strong> l’appareil présente <strong>de</strong>s trous <strong>de</strong> fixation<br />
qui peuvent être utilisés comme gabarit en vue du<br />
perçage <strong>de</strong> trous <strong>de</strong> fixation sur la surface <strong>de</strong> montage<br />
envisagée (établi par exemple). Fixez la ponceuse<br />
à l’ai<strong>de</strong> <strong>de</strong> gros boulons, ron<strong>de</strong>lles et écrous (non<br />
fournis).<br />
• Si la ponceuse à cylindre oscillant est <strong>de</strong>stinée à une<br />
utilisation portative, fixez sur son socle une planche<br />
qui lui permettra d’être facilement retenue en place à<br />
l’ai<strong>de</strong> <strong>de</strong> presses ou <strong>de</strong> serre-joints et retirée en vue<br />
d’une utilisation en un autre<br />
emplacement.<br />
• Si vous utilisez <strong>de</strong>s boulons,<br />
assurez-vous que ceux-ci<br />
soient assez longs pour<br />
pénétrer dans la surface <strong>de</strong><br />
l’établi ou dans la planche<br />
<strong>de</strong> manière à permettre une<br />
fixation sûre.<br />
2. Pour une plus gran<strong>de</strong> efficacité, allumez votre système<br />
d’extraction avant d’allumer la ponceuse.<br />
SELECTION DE L’INSERT DE PLATEAU<br />
Un mauvais choix d’insert <strong>de</strong> plateau et <strong>de</strong> manchon<br />
<strong>de</strong> ponçage peut favoriser les acci<strong>de</strong>nts (doigts qui se<br />
coincent dans l’appareil) et amener la pièce à poncer<br />
à se coincer entre l’insert <strong>de</strong> plateau et le manchon <strong>de</strong><br />
ponçage.<br />
Diamètre du<br />
manchon <strong>de</strong><br />
ponçage<br />
Alésage central<br />
<strong>de</strong> l’insert <strong>de</strong><br />
plateau<br />
Format <strong>de</strong><br />
la ron<strong>de</strong>lle<br />
supérieure<br />
13 mm 13 mm Petite<br />
19 mm 19 mm Moyenne<br />
26 mm 26 mm Moyenne<br />
38 mm 38 mm Gran<strong>de</strong><br />
51 mm 51 mm Gran<strong>de</strong><br />
76 mm 76 mm Gran<strong>de</strong><br />
Le manchon <strong>de</strong> ponçage doit loger intimement dans<br />
l’évi<strong>de</strong>ment central <strong>de</strong> l’insert <strong>de</strong> plateau.<br />
Le tableau suivant vous ai<strong>de</strong>ra à choisir l’insert <strong>de</strong> plateau<br />
et la ron<strong>de</strong>lle d’arbre supérieure les mieux adaptés à<br />
chaque manchon <strong>de</strong> ponçage.<br />
F<br />
EXTRACTION DES POUSSIERES<br />
Il est recommandé d’utiliser la ponceuse à cylindre<br />
oscillant conjointement à un système d’extraction <strong>de</strong>s<br />
poussières pour maintenir un environnement <strong>de</strong> travail<br />
plus propre et plus sain.<br />
1. Installez le tuyau <strong>de</strong> votre système d’extraction sur<br />
la tubulure d’extraction (13) et vérifiez qu’il soit bien<br />
enfoncé.<br />
18<br />
Symboles / Assemblage
INSTALLATION DU MANCHON DE PONÇAGE<br />
Remarque : tous les manchons <strong>de</strong> ponçage, à l’exception<br />
du manchon le plus petit (13 mm), s’installent sur un<br />
tambour <strong>de</strong> caoutchouc (12) <strong>de</strong> même taille.<br />
1. Enfilez la ron<strong>de</strong>lle inférieure<br />
d’arbre (7) sur l’arbre (5),<br />
face texturée orientée vers<br />
le bas.<br />
2. Choisissez le manchon<br />
<strong>de</strong> ponçage (11) le<br />
mieux adapté à la tâche<br />
envisagée, ainsi que son<br />
tambour <strong>de</strong> caoutchouc<br />
(12) adapté, (sauf si vous<br />
employez le manchon <strong>de</strong> 13 mm). Le manchon <strong>de</strong> 13<br />
mm s’emploie SANS tambour.<br />
3. Choisissez l’insert <strong>de</strong><br />
plateau (10) adapté à la<br />
tâche (consultez le tableau<br />
<strong>de</strong> la section « Sélection<br />
<strong>de</strong> l’insert <strong>de</strong> plateau » ci<strong>de</strong>ssus).<br />
4. Enfilez l’insert <strong>de</strong> plateau<br />
(10) sur l’arbre (5) et placezle<br />
sur la ron<strong>de</strong>lle inférieure<br />
d’arbre. Assurez-vous que<br />
l’insert <strong>de</strong> plateau soit <strong>de</strong><br />
niveau avec le plateau.<br />
5. Installez le tambour <strong>de</strong><br />
caoutchouc (12) sur l’arbre.<br />
6. Enfilez le manchon <strong>de</strong><br />
ponçage (11) sur le tambour<br />
<strong>de</strong> caoutchouc (12).<br />
7. Installez la ron<strong>de</strong>lle<br />
supérieure d’arbre (9) sur<br />
l’arbre (5).<br />
• Servez-vous <strong>de</strong> la gran<strong>de</strong><br />
ron<strong>de</strong>lle avec les tambours<br />
<strong>de</strong> caoutchouc <strong>de</strong> 76 mm,<br />
51 mm, et 38 mm.<br />
• Servez-vous <strong>de</strong> la ron<strong>de</strong>lle<br />
moyenne avec les tambours<br />
<strong>de</strong> caoutchouc <strong>de</strong> 26 mm et<br />
19 mm.<br />
• Servez-vous <strong>de</strong> la petite<br />
ron<strong>de</strong>lle avec le manchon <strong>de</strong><br />
ponçage <strong>de</strong> 13 mm.<br />
8. Vissez l’écrou <strong>de</strong> blocage<br />
d’arbre (6) sur l’arbre<br />
(5). Serrez-le juste assez<br />
pour que le tambour <strong>de</strong><br />
caoutchouc (12) épouse bien<br />
la forme du manchon <strong>de</strong> ponçage (11). Ne serrez pas<br />
trop.<br />
Une fois que le manchon <strong>de</strong> ponçage est usé, il est<br />
possible <strong>de</strong> l’installer à l’envers pour utiliser les grains<br />
restants et prolonger sa durée utile.<br />
N’utilisez pas un manchon <strong>de</strong> ponçage excessivement<br />
usé. Cela contribuerait à un échauffement susceptible<br />
d’endommager le tambour <strong>de</strong> caoutchouc. La garantie ne<br />
couvre pas les tambours <strong>de</strong> caoutchouc dont l’usure a été<br />
causée par l’utilisation <strong>de</strong> manchons <strong>de</strong> ponçage usés.<br />
FRONCTIONNEMENT<br />
MISE EN MARCHE ET ARRET<br />
• L’interrupteur (2) est situé<br />
sur la partie frontale <strong>de</strong><br />
la ponceuse à cylindre<br />
oscillant.<br />
• Pour mettre la ponceuse<br />
à cylindre oscillant en<br />
marche, appuyez sur<br />
le bouton vert portant<br />
l’indication (-).<br />
• Pour éteindre la ponceuse à cylindre oscillant, appuyez<br />
sur le bouton rouge portant l’indication (O).<br />
PONCAGE<br />
• AVERTISSEMENT : n’utilisez pas cette ponceuse pour<br />
poncer du métal. Le ponçage du métal entraînera la<br />
production d’étincelles susceptibles d’enflammer les<br />
particules <strong>de</strong> bois et les poussières présentes sur la<br />
machine ou dans l’atelier.<br />
• REMARQUE : L’arbre tourne dans le sens contraire <strong>de</strong>s<br />
aiguilles d’une montre.<br />
1. Vérifiez que la machine soit soli<strong>de</strong>ment installée sur<br />
l’établi et que l’écrou <strong>de</strong> blocage <strong>de</strong> l’arbre (6) soit<br />
bien serré. Vérifiez que le manchon <strong>de</strong> ponçage et<br />
l’insert <strong>de</strong> plateau utilisés soient appropriés à la tâche<br />
envisagée, conformément aux indications <strong>de</strong> la section<br />
« Assemblage ».<br />
2. Assurez-vous <strong>de</strong> porter tous les équipements <strong>de</strong><br />
sécurité appropriés, y compris un masque antipoussière<br />
et <strong>de</strong>s lunettes <strong>de</strong> protection, puis allumez le<br />
système d’extraction <strong>de</strong> poussière (selon le cas).<br />
3. Allumez la machine et laissez le moteur atteindre son<br />
plein régime.<br />
4. Faites avancer la pièce à poncer <strong>de</strong> manière régulière,<br />
CONTRE le sens <strong>de</strong> rotation, sur le manchon <strong>de</strong><br />
ponçage.<br />
Assemblage / Fronctionnement 19<br />
F
• Ne forcez pas sur la pièce à poncer et n’exercez pas <strong>de</strong><br />
pression excessive.<br />
• Procé<strong>de</strong>z toujours contre le sens <strong>de</strong> rotation car, dans<br />
le cas contraire, la force <strong>de</strong> rotation du manchon <strong>de</strong><br />
ponçage entraînera la pièce à s’écarter <strong>de</strong> l’appareil ou<br />
à rebondir.<br />
5. Une fois la tâche terminée, éteignez l’appareil et<br />
débranchez-le.<br />
REVISION ET ENTRETIEN<br />
AVERTISSEMENT ! Assurez-vous <strong>de</strong> toujours<br />
éteindre et débrancher la machine <strong>de</strong> l’alimentation<br />
secteur avant toute intervention.<br />
• Toute détérioration <strong>de</strong> cet appareil doit être réparée et<br />
inspectée par une personne qualifiée avant utilisation.<br />
• Faites réparer votre appareil par une personne qualifiée<br />
en utilisant uniquement <strong>de</strong>s pièces <strong>de</strong> rechange<br />
i<strong>de</strong>ntiques. Cela permet <strong>de</strong> garantir le caractère sûr <strong>de</strong><br />
l’appareil dans la durée.<br />
INSPECTION GÉNÉRALE<br />
• Vérifiez régulièrement que toutes les vis <strong>de</strong> fixation<br />
soient bien serrées. Elles peuvent se <strong>de</strong>sserrer avec le<br />
temps.<br />
NETTOYAGE<br />
1. Enlevez régulièrement la poussière et la saleté. Eliminez<br />
la poussière <strong>de</strong> toutes les parties <strong>de</strong> la ponceuse et du<br />
bloc moteur en y appliquant un jet d’air comprimé ou à<br />
l’ai<strong>de</strong> d’un aspirateur.<br />
2. Retirez périodiquement l’insert et la ron<strong>de</strong>lle inférieure<br />
<strong>de</strong> l’arbre pour éliminer toute accumulation <strong>de</strong><br />
poussière dans l’évi<strong>de</strong>ment du plateau.<br />
3. Lubrifiez les pièces rotatives <strong>de</strong> l’appareil à intervalles<br />
régulier.<br />
4. N’employez jamais <strong>de</strong> produits caustiques pour nettoyer<br />
les éléments en plastique <strong>de</strong> l’appareil.<br />
Nous recommandons l’utilisation d’un détergent doux et<br />
d’un chiffon humi<strong>de</strong> pour nettoyer l’appareil. Veillez à ce<br />
que l’appareil n’entre jamais en contact avec <strong>de</strong> l’eau.<br />
ENTRETIEN DU CORDON D’ALIMENTATION<br />
Si le cordon d’alimentation doit être remplacé, faites<br />
appel au fabricant, à l’agent du fabricant ou à un centre<br />
d’entretien agréé, par souci <strong>de</strong> sécurité.<br />
F<br />
GARANTIE<br />
Pour vali<strong>de</strong>r votre garantie, ren<strong>de</strong>z-vous sur notre site<br />
internet www.tritontools.com* et saisissez vos coordonnées.<br />
Vos coordonnées seront introduites dans notre liste <strong>de</strong><br />
diffusion (sauf indication contraire) afin <strong>de</strong> vous informer <strong>de</strong><br />
nos prochaines nouveautés. Les informations que vous nous<br />
fournirez ne seront pas communiquées à <strong>de</strong>s tiers.<br />
PENSE-BETE<br />
Date d’achat : ___ / ___ / ____<br />
Modèle : TSPS450<br />
Numéro <strong>de</strong> série :__________________<br />
Veuillez conserver votre ticket <strong>de</strong> caisse comme preuve<br />
d’achat.<br />
Si toute pièce <strong>de</strong> ce produit s’avérait défectueuse<br />
du fait d’un vice <strong>de</strong> fabrication ou <strong>de</strong> matériau dans<br />
les 12 MOIS suivant la date d’achat, <strong>Triton</strong> Precision<br />
Power <strong>Tools</strong> s’engage auprès <strong>de</strong> l’acheteur <strong>de</strong> ce<br />
produit à réparer ou, à sa discrétion, à remplacer<br />
gratuitement la pièce défectueuse.<br />
Cette garantie ne s’applique pas à l’utilisation<br />
commerciale et ne s’étend pas non plus à<br />
l’usure normale ou aux dommages causés par<br />
<strong>de</strong>s acci<strong>de</strong>nts, <strong>de</strong>s mauvais traitements ou une<br />
utilisation impropre.<br />
* Enregistrez votre produit en ligne dans les 30<br />
jours suivant la date d’achat.<br />
Offre soumise à conditions.<br />
Ceci n’affecte pas vos droits statutaires<br />
20<br />
Fronctionnement / Revision et Entretien / Garantie
Vielen Dank, dass Sie sich für dieses <strong>Triton</strong>-Werkzeug entschie<strong>de</strong>n haben. Diese Anleitung enthält wichtige Informationen für<br />
das sichere und effektive Arbeiten mit diesem Produkt.<br />
Bitte lesen Sie diese Anleitung sorgfältig durch, um <strong>de</strong>n größtmöglichen Nutzen aus <strong>de</strong>m einzigartigen Design dieses Produkts<br />
ziehen zu können.<br />
Bewahren Sie diese Anleitung griffbereit auf und sorgen Sie dafür, dass alle Benutzer dieses Geräts sie gelesen und verstan<strong>de</strong>n<br />
haben.<br />
Inhalt<br />
Technische Daten 21<br />
Geräteübersicht 21<br />
Sicherheitshinweise 22<br />
Symbole 24<br />
Montage 24<br />
Bedienung 26<br />
Instandhaltung 26<br />
Garantie 27<br />
Technische Daten<br />
Mo<strong>de</strong>llbezeichnung:<br />
Spannung:<br />
TSPS450<br />
220V - 240V (450W)<br />
Leerlaufdrehzahl: 2.000 min -1<br />
Oszillation:<br />
Oszillationshub:<br />
Schleifhülsen (Durchmesser):<br />
Staubabsaugstutzen:<br />
Tischgröße:<br />
Spin<strong>de</strong>l:<br />
Isolierung:<br />
Gerätegewicht:<br />
58/min<br />
16 mm<br />
13 mm, 19 mm, 26 mm, 38 mm, 51 mm, 76 mm<br />
38 mm<br />
370 mm x 295 mm<br />
12,7 mm (Länge) x 1,5 mm (Gewin<strong>de</strong>)<br />
Doppelt isoliert<br />
14,6 kg<br />
Geräteübersicht<br />
1. Aufbewahrungsschlitze für Tischeinlagen<br />
2. Ein-/Ausschalter<br />
3. Motorgehäuse<br />
4. Tischplatte<br />
5. Spin<strong>de</strong>l<br />
6. Sicherungsmutter<br />
7. Untere Spin<strong>de</strong>lscheibe<br />
8. Aufbewahrungsstäbe für Gummiwalzen und<br />
Schleifhülsen<br />
9. Obere Spin<strong>de</strong>lscheib (3 x)<br />
10. Tischeinlage (6 x)<br />
11. Schleifhülse (6 x)<br />
12. Gummiwalze (5 x)<br />
13. Absaugstutzen<br />
14. Schraubenschlüssel<br />
D<br />
Inhalt / Technische Daten / Geräteübersicht<br />
21
D<br />
Allgemeine Sicherheitshinweise<br />
WARNUNG! Lesen Sie alle Sicherheitshinweise<br />
und Anweisungen. Versäumnisse bei <strong>de</strong>r<br />
Einhaltung <strong>de</strong>r Sicherheitshinweise und<br />
Anweisungen können elektrischen Schlag, Brand und/<br />
o<strong>de</strong>r schwere Verletzungen verursachen.<br />
Bewahren Sie alle Sicherheitshinweise und<br />
Anweisungen für die Zukunft auf.<br />
Der in <strong>de</strong>n Sicherheitshinweisen verwen<strong>de</strong>te Begriff<br />
„Elektrowerkzeug“ bezieht sich auf netzbetriebene<br />
Elektrowerkzeuge (mit Netzkabel) und auf<br />
akkubetriebene Elektrowerkzeuge (ohne Netzkabel).<br />
1) Arbeitsplatzsicherheit<br />
a) Halten Sie Ihren Arbeitsbereich sauber und<br />
gut beleuchtet. Unordnung o<strong>de</strong>r unbeleuchtete<br />
Arbeitsbereiche können zu Unfällen führen.<br />
b) Arbeiten Sie mit <strong>de</strong>m Elektrowerkzeug nicht in<br />
explosionsgefähr<strong>de</strong>ter Umgebung, in <strong>de</strong>r sich<br />
brennbare Flüssigkeiten, Gase o<strong>de</strong>r Stäube<br />
befin<strong>de</strong>n. Elektrowerkzeuge erzeugen Funken, die<br />
<strong>de</strong>n Staub o<strong>de</strong>r die Dämpfe entzün<strong>de</strong>n können.<br />
c) Halten Sie Kin<strong>de</strong>r und an<strong>de</strong>re Personen während<br />
<strong>de</strong>r Benutzung <strong>de</strong>s Elektrowerkzeugs fern. Bei<br />
Ablenkung können Sie die Kontrolle über das Gerät<br />
verlieren.<br />
2) Elektrische Sicherheit<br />
a) Der Anschlussstecker <strong>de</strong>s Elektrowerkzeuges<br />
muss in die Steckdose passen. Der Stecker darf<br />
in keiner Weise verän<strong>de</strong>rt wer<strong>de</strong>n. Verwen<strong>de</strong>n<br />
Sie keine Adapterstecker gemeinsam mit<br />
schutzgeer<strong>de</strong>ten Elektrowerkzeugen. Unverän<strong>de</strong>rte<br />
Stecker und passen<strong>de</strong> Steckdosen verringern das<br />
Risiko eines elektrischen Schlages.<br />
b) Vermei<strong>de</strong>n Sie Körperkontakt mit geer<strong>de</strong>ten<br />
Oberflächen wie von Rohren, Heizungen, Her<strong>de</strong>n<br />
und Kühlschränken. Es besteht ein erhöhtes Risiko<br />
durch elektrischen Schlag, wenn Ihr Körper geer<strong>de</strong>t<br />
ist.<br />
c) Halten Sie Elektrowerkzeuge von Regen o<strong>de</strong>r<br />
Nässe fern. Das Eindringen von Wasser in ein<br />
Elektrowerkzeug erhöht das Risiko eines elektrischen<br />
Schlages.<br />
d) Zweckentfrem<strong>de</strong>n Sie das Kabel nicht, um das<br />
Elektrowerkzeug zu tragen, aufzuhängen o<strong>de</strong>r um<br />
<strong>de</strong>n Stecker aus <strong>de</strong>r Steckdose zu ziehen. Halten<br />
Sie das Kabel fern von Hitze, Öl, scharfen Kanten<br />
o<strong>de</strong>r sich bewegen<strong>de</strong>n Geräteteilen. Beschädigte<br />
o<strong>de</strong>r verwickelte Kabel erhöhen das Risiko eines<br />
elektrischen Schlages.<br />
e) Wenn Sie mit einem Elektrowerkzeug im Freien<br />
arbeiten, verwen<strong>de</strong>n Sie nur Verlängerungskabel,<br />
die auch für <strong>de</strong>n Außenbereich geeignet sind. Die<br />
Anwendung eines für <strong>de</strong>n Außenbereich geeigneten<br />
22<br />
Sicherheitshinweise<br />
Verlängerungskabels verringert das Risiko eines<br />
elektrischen Schlages.<br />
f) Wenn <strong>de</strong>r Betrieb <strong>de</strong>s Elektrowerkzeuges in<br />
feuchter Umgebung nicht vermeidbar ist,<br />
verwen<strong>de</strong>n Sie einen Fehlerstromschutzschalter.<br />
Der Einsatz eines Fehlerstromschutzschalters<br />
vermin<strong>de</strong>rt das Risiko eines elektrischen Schlages.<br />
Hinweis: Der Begriff „Fehlerstromschutzschalter”<br />
wird synonym mit <strong>de</strong>n Begriffen „FI-Schutzschalter”<br />
und „FI-Schalter” verwen<strong>de</strong>t.<br />
3) Sicherheit von Personen<br />
a) Seien Sie aufmerksam, achten Sie darauf, was<br />
Sie tun, und gehen Sie mit Vernunft an die<br />
Arbeit mit einem Elektrowerkzeug. Benutzen<br />
Sie kein Elektrowerkzeug, wenn Sie mü<strong>de</strong> sind<br />
o<strong>de</strong>r unter <strong>de</strong>m Einfluss von Drogen, Alkohol<br />
o<strong>de</strong>r Medikamenten stehen. Ein Moment <strong>de</strong>r<br />
Unachtsamkeit beim Gebrauch <strong>de</strong>s Elektrowerkzeuges<br />
kann zu ernsthaften Verletzungen führen.<br />
b) Tragen Sie persönliche Schutzausrüstung und<br />
immer eine Schutzbrille. Das Tragen persönlicher<br />
Schutzausrüstung, wie Staubmaske, rutschfeste<br />
Sicherheitsschuhe, Schutzhelm o<strong>de</strong>r Gehörschutz,<br />
je nach Art und Einsatz <strong>de</strong>s Elektrowerkzeuges,<br />
verringert das Risiko von Verletzungen.<br />
c) Vermei<strong>de</strong>n Sie eine unbeabsichtigte<br />
Inbetriebnahme. Vergewissern Sie sich, dass das<br />
Elektrowerkzeug ausgeschaltet ist, bevor Sie<br />
es an die Stromversorgung und/o<strong>de</strong>r <strong>de</strong>n Akku<br />
anschließen, es aufnehmen o<strong>de</strong>r tragen. Wenn Sie<br />
beim Tragen <strong>de</strong>s Elektrowerkzeuges <strong>de</strong>n Finger am<br />
Schalter haben o<strong>de</strong>r das Gerät eingeschaltet an die<br />
Stromversorgung anschließen, kann dies zu Unfällen<br />
führen.<br />
d) Entfernen Sie Einstellwerkzeuge o<strong>de</strong>r<br />
Schraubenschlüssel, bevor Sie das<br />
Elektrowerkzeug einschalten. Ein Werkzeug o<strong>de</strong>r<br />
Schlüssel, <strong>de</strong>r sich in einem drehen<strong>de</strong>n Geräteteil<br />
befin<strong>de</strong>t, kann zu Verletzungen führen.<br />
e) Vermei<strong>de</strong>n Sie eine unnatürliche Körperhaltung.<br />
Sorgen Sie für einen sicheren Stand und halten Sie<br />
je<strong>de</strong>rzeit das Gleichgewicht. Auf diese Weise lässt<br />
sich das Elektrowerkzeug in unerwarteten Situationen<br />
besser kontrollieren.<br />
f) Tragen Sie geeignete Kleidung. Tragen Sie<br />
keine weite Kleidung o<strong>de</strong>r Schmuck. Halten Sie<br />
Haare, Kleidung und Handschuhe fern von sich<br />
bewegen<strong>de</strong>n Teilen. Lockere Kleidung, Schmuck<br />
o<strong>de</strong>r lange Haare können von sich bewegen<strong>de</strong>n Teilen<br />
erfasst wer<strong>de</strong>n.<br />
g) Wenn Staubabsaug- und -auffangeinrichtungen<br />
montiert wer<strong>de</strong>n können, vergewissern Sie<br />
sich, dass diese angeschlossen sind und<br />
richtig verwen<strong>de</strong>t wer<strong>de</strong>n. Verwendung einer
Staubabsaugung kann Gefährdungen durch Staub<br />
verringern.<br />
4) Verwendung und Behandlung <strong>de</strong>s<br />
Elektrowerkzeuges<br />
a) Überlasten Sie das Gerät nicht. Verwen<strong>de</strong>n Sie für<br />
Ihre Arbeit das dafür bestimmte Elektrowerkzeug.<br />
Mit <strong>de</strong>m passen<strong>de</strong>n Elektrowerkzeug arbeiten<br />
Sie besser und sicherer im angegebenen<br />
Leistungsbereich.<br />
b) Benutzen Sie kein Elektrowerkzeug, <strong>de</strong>ssen<br />
Schalter <strong>de</strong>fekt ist. Ein Elektrowerkzeug, das sich<br />
nicht mehr ein- o<strong>de</strong>r ausschalten lässt, ist gefährlich<br />
und muss repariert wer<strong>de</strong>n.<br />
c) Ziehen Sie <strong>de</strong>n Stecker aus <strong>de</strong>r Steckdose<br />
und/o<strong>de</strong>r entfernen Sie <strong>de</strong>n Akku, bevor Sie<br />
Geräteeinstellungen vornehmen, Zubehörteile<br />
wechseln o<strong>de</strong>r das Gerät weglegen. Diese<br />
Vorsichtsmaßnahme verhin<strong>de</strong>rt <strong>de</strong>n unbeabsichtigten<br />
Start <strong>de</strong>s Elektrowerkzeuges.<br />
d) Bewahren Sie unbenutzte Elektrowerkzeuge<br />
außerhalb <strong>de</strong>r Reichweite von Kin<strong>de</strong>rn<br />
auf. Lassen Sie Personen das Gerät nicht<br />
benutzen, die mit diesem nicht vertraut sind<br />
o<strong>de</strong>r diese Anweisungen nicht gelesen haben.<br />
Elektrowerkzeuge sind gefährlich, wenn sie von<br />
unerfahrenen Personen benutzt wer<strong>de</strong>n.<br />
e) Pflegen Sie Elektrowerkzeuge mit Sorgfalt.<br />
Kontrollieren Sie, ob bewegliche Teile einwandfrei<br />
funktionieren und nicht klemmen, ob Teile<br />
gebrochen o<strong>de</strong>r so beschädigt sind, dass die<br />
Funktion <strong>de</strong>s Elektrowerkzeuges beeinträchtigt<br />
ist. Lassen Sie beschädigte Teile vor <strong>de</strong>m Einsatz <strong>de</strong>s<br />
Gerätes reparieren. Viele Unfälle haben ihre Ursache in<br />
schlecht gewarteten Elektrowerkzeugen.<br />
f) Halten Sie Schneidwerkzeuge scharf und sauber.<br />
Sorgfältig gepflegte Schneidwerkzeuge mit scharfen<br />
Schneidkanten verklemmen sich weniger und sind<br />
leichter zu führen.<br />
g) Verwen<strong>de</strong>n Sie Elektrowerkzeug, Zubehör,<br />
Einsatzwerkzeuge usw. entsprechend diesen<br />
Anweisungen. Berücksichtigen Sie dabei die<br />
Arbeitsbedingungen und die auszuführen<strong>de</strong><br />
Tätigkeit. Der Gebrauch von Elektrowerkzeugen für<br />
an<strong>de</strong>re als die vorgesehenen Anwendungen kann zu<br />
gefährlichen Situationen führen.<br />
5) Service<br />
a) Lassen Sie Ihr Elektrowerkzeug nur von<br />
qualifiziertem Fachpersonal und nur mit Original-<br />
Ersatzteilen reparieren. Damit wird sichergestellt,<br />
dass die Sicherheit <strong>de</strong>s Elektrowerkzeuges erhalten<br />
bleibt.<br />
Zusätzliche Sicherheitshinweise für<br />
Spin<strong>de</strong>lschleifmaschinen<br />
In <strong>de</strong>n in dieser Gebrauchsanweisung genannten<br />
Warnhinweisen, Vorsichtsmaßnahmen und Anleitungen<br />
können nicht alle Situationen und Bedingungen abge<strong>de</strong>ckt<br />
wer<strong>de</strong>n, die möglicherweise auftreten können. Es<br />
muss <strong>de</strong>m Bediener bewusst sein, dass gesun<strong>de</strong>r<br />
Menschenverstand und Vorsicht Faktoren sind, die sich<br />
nicht in dieses Gerät einbauen lassen, son<strong>de</strong>rn vom<br />
Bediener beigesteuert wer<strong>de</strong>n müssen.<br />
Nehmen Sie die Spin<strong>de</strong>lschleifmaschine erst in<br />
Betrieb, wenn sie vollständig montiert ist und Sie die<br />
nachfolgen<strong>de</strong>n Anweisungen und die Gefahrenhinweise<br />
an <strong>de</strong>r Spin<strong>de</strong>lschleifmaschine sorgfältig gelesen und<br />
vollständig verstan<strong>de</strong>n haben.<br />
1. Überprüfen Sie <strong>de</strong>n Zustand <strong>de</strong>r Spin<strong>de</strong>lschleifmaschine.<br />
Wenn ein Teil fehlt, verbogen ist o<strong>de</strong>r nicht<br />
ordnungsgemäß funktioniert, ersetzen Sie dieses Teil<br />
vor Gebrauch <strong>de</strong>r Schleifmaschine.<br />
2. Bestimmen Sie die Art <strong>de</strong>r auszuführen<strong>de</strong>n Aufgabe,<br />
bevor Sie die Spin<strong>de</strong>lschleifmaschine in Betrieb<br />
nehmen.<br />
3. Sichern Sie Ihr Werkstück. Stützen Sie das Werkstück<br />
gut auf <strong>de</strong>r Tischplatte ab und halten Sie es mit bei<strong>de</strong>n<br />
Hän<strong>de</strong>n fest.<br />
4. Achten Sie auf die Vorschubrichtung. Führen Sie das<br />
Werkstück <strong>de</strong>r Schleifhülse gegen die Drehrichtung <strong>de</strong>r<br />
Schleifhülse zu.<br />
5. Halten Sie Ihre Hän<strong>de</strong> stets von <strong>de</strong>r<br />
Schleifmaschinenbahn und <strong>de</strong>n Schleifhülsen fern.<br />
Vermei<strong>de</strong>n Sie Haltungen, in <strong>de</strong>nen Ihre Hand im Falle<br />
eines plötzlichen Abrutschens in die Spin<strong>de</strong>l geraten<br />
kann. Fassen Sie nicht unter das Werkstück o<strong>de</strong>r an die<br />
Schleifhülse, während die Spin<strong>de</strong>l sich dreht.<br />
6. Trennen Sie die Schleifmaschine nach <strong>de</strong>m<br />
Ausschalten vom Stromnetz. Warten Sie, bis die<br />
Spin<strong>de</strong>l zum Stillstand gekommen ist, bevor Sie<br />
Wartungsarbeiten durchführen. Die Schleifmaschine<br />
muss bei Nichtgebrauch sowie beim Wechseln von<br />
Tischeinsätzen, Schleifhülsen, Gummiwalzen und<br />
an<strong>de</strong>rem Zubehör stets vom Stromnetz getrennt sein.<br />
7. Vergewissern Sie sich, dass sich im zu schleifen<strong>de</strong>n<br />
Bereich Ihres Werkstücks keine Nägel o<strong>de</strong>r an<strong>de</strong>ren<br />
Fremdkörper befin<strong>de</strong>n.<br />
8. Verwen<strong>de</strong>n Sie diese Schleifmaschine niemals zum<br />
Nassschleifen. Nichtbefolgen kann zu elektrischem<br />
Schlag führen und somit ernsthafte Verletzungen o<strong>de</strong>r<br />
schlimmeres verursachen.<br />
9. Verwen<strong>de</strong>n Sie bei <strong>de</strong>r Wartung dieser<br />
Spin<strong>de</strong>lschleifmaschine ausschließlich i<strong>de</strong>ntische<br />
Ersatzteile.<br />
10. Stellen Sie sicher, dass die Spin<strong>de</strong>l zum völligen<br />
Stillstand gekommen ist, bevor Sie das Werkstück<br />
berühren.<br />
D<br />
Sicherheitshinweise 23
11. Treffen Sie Vorsichtsmaßnahmen beim Abschleifen<br />
bemalter o<strong>de</strong>r lackierter Oberflächen. Vom Abschleifen<br />
von Bleifarbe wird ausdrücklich abgeraten. Der<br />
kontaminierte Staub lässt sich kaum unter Kontrolle<br />
bringen und kann zu Bleivergiftung führen.<br />
Ergreifen Sie daher beim Abschleifen von Farbe bzw.<br />
Lack folgen<strong>de</strong> Maßnahmen:<br />
• Schützen Sie Ihre Lunge. Tragen Sie eine Staub- o<strong>de</strong>r<br />
Atemschutzmaske.<br />
• Lassen Sie Kin<strong>de</strong>r o<strong>de</strong>r Schwangere nicht <strong>de</strong>n<br />
Arbeitsbereich betreten, bis die Schleifarbeit been<strong>de</strong>t<br />
und <strong>de</strong>r Arbeitsbereich gesäubert ist.<br />
• Wo bemalte bzw. lackierte Flächen abgeschliffen<br />
wer<strong>de</strong>n, darf nicht gegessen, getrunken o<strong>de</strong>r geraucht<br />
wer<strong>de</strong>n.<br />
• Verwen<strong>de</strong>n Sie nach Möglichkeit eine<br />
Staubabsauganlage. Decken Sie <strong>de</strong>n Arbeitsbereich mit<br />
Schutzfolie ab. Sorgen Sie dafür, dass kein Farbstaub<br />
aus <strong>de</strong>m Arbeitsbereich herausgetragen wird.<br />
• Reinigen Sie <strong>de</strong>n Arbeitsbereich nach Beendigung <strong>de</strong>s<br />
Farb-/Lackabschleifens gründlich.<br />
Symbole<br />
UMWELTSCHUTZ<br />
Elektro-Altgeräte dürfen nicht<br />
über <strong>de</strong>n Haushaltsmüll entsorgt<br />
wer<strong>de</strong>n. Bitte nach Möglichkeit über<br />
entsprechen<strong>de</strong> Einrichtungen entsorgen.<br />
Lassen Sie sich diesbezüglich von <strong>de</strong>r<br />
zuständigen Behör<strong>de</strong> o<strong>de</strong>r <strong>de</strong>m Händler<br />
beraten.<br />
Immer Gehör-, Augen- und Atemschutz<br />
tragen<br />
Achtung: Zur Reduzierung<br />
<strong>de</strong>s Verletzungsrisikos muss die<br />
Gebrauchsanweisung sorgfältig vom<br />
Bediener gelesen wer<strong>de</strong>n.<br />
Warnhinweis<br />
Für zusätzlichen Schutz doppelt isoliert<br />
D<br />
Montage<br />
Erfüllt die entsprechen<strong>de</strong>n rechtlichen<br />
Vorschriften und Sicherheitsnormen<br />
Vergewissern Sie sich stets, dass das Gerät<br />
ausgeschaltet und vom Stromnetz getrennt<br />
ist, bevor Sie Einstellungen vornehmen o<strong>de</strong>r Zubehör<br />
anbringen bzw. entfernen.<br />
Werkbankmontage<br />
Für <strong>de</strong>n stationären Einsatz <strong>de</strong>r Spin<strong>de</strong>lschleifmaschine<br />
empfiehlt es sich, das Gerät auf einer stabilen<br />
Arbeitsfläche zu montieren.<br />
• Markieren Sie dazu die Bohrlöcher, in<strong>de</strong>m Sie die<br />
Schleifmaschine so platzieren, wie sie befestigt<br />
wer<strong>de</strong>n soll, und die zu bohren<strong>de</strong>n Löcher durch<br />
die Grundplatte <strong>de</strong>r Schleifmaschine auf <strong>de</strong>r<br />
Montagefläche (d.h. beispielsweise Ihrer Werkbank)<br />
anzeichnen. Bohren Sie die Löcher in die Arbeitsfläche,<br />
setzen Sie die Schleifmaschine auf die Löcher und<br />
montieren Sie das Gerät mit passen<strong>de</strong>n Schrauben,<br />
Unterlegscheiben und Muttern (nicht mitgeliefert) auf<br />
<strong>de</strong>r Werkbank.<br />
• Für <strong>de</strong>n mobilen Einsatz können Sie ein Brett an die<br />
Grundplatte Ihrer Spin<strong>de</strong>lschleifmaschine montieren,<br />
mit <strong>de</strong>m sich das Gerät leicht auf unterschiedlichen<br />
Arbeitsflächen einspannen und wie<strong>de</strong>r abbauen lässt.<br />
• Achten Sie bei <strong>de</strong>n<br />
verwen<strong>de</strong>ten Schrauben<br />
darauf, dass diese lang<br />
genug sind, um tief und fest<br />
in die Werkbank bzw. das<br />
Montagebrett einzudringen.<br />
Staubabsaugung<br />
Um ein sauberes und sicheres Arbeitsumfeld<br />
zu gewährleisten, wird empfohlen, die<br />
Spin<strong>de</strong>lschleifmaschine in Verbindung mit einer<br />
Staubabsauganlage zu verwen<strong>de</strong>n.<br />
1. Schließen Sie <strong>de</strong>n Schlauch <strong>de</strong>r Staubabsauganlage an<br />
<strong>de</strong>n Absaugstutzen (13) an und vergewissern Sie sich,<br />
dass er fest sitzt.<br />
2. Schalten Sie die Staubabsauganlage ein, bevor Sie<br />
die Spin<strong>de</strong>lschleifmaschine in Betrieb nehmen, um<br />
größtmögliche Wirksamkeit zu erreichen.<br />
24<br />
Sicherheitshinweise / Symbole / Montage
Tischeinlage auswählen<br />
Wird nicht die richtige Tischeinlage mit <strong>de</strong>r<br />
entsprechen<strong>de</strong>n Schleifhülse verwen<strong>de</strong>t, so besteht die<br />
Gefahr eingeklemmter Finger. Zu<strong>de</strong>m kann das Werkstück<br />
auf diese Weise nach unten zwischen die Tischeinlage<br />
und die Schleifhülse geraten.<br />
Durchmesser<br />
<strong>de</strong>r<br />
Schleifhülse<br />
Durchmesser <strong>de</strong>r<br />
Tischeinlagenaussparung<br />
13 mm 13 mm klein<br />
19 mm 19 mm mittel<br />
26 mm 26 mm mittel<br />
38 mm 38 mm groß<br />
51 mm 51mm groß<br />
76 mm 76 mm groß<br />
Größe <strong>de</strong>r<br />
oberen<br />
Spin<strong>de</strong>lscheibe<br />
Die Schleifhülse sollte genau, d.h. ohne Spiel, in die<br />
mittige Aussparung <strong>de</strong>r Tischeinlage passen.<br />
Mithilfe <strong>de</strong>r nachfolgen<strong>de</strong>n Tabelle lässt sich bestimmen,<br />
welche Tischeinlage und obere Spin<strong>de</strong>lscheibe mit <strong>de</strong>r<br />
jeweiligen Schleifhülse zu verwen<strong>de</strong>n ist.<br />
Schleifhülse anbringen<br />
Hinweis: Mit Ausnahme <strong>de</strong>r kleinsten, 13 mm großen<br />
Schleifhülse passen alle Schleifhülsen auf die zugehörige<br />
Gummiwalze (12).<br />
1. Setzen Sie die untere<br />
Spin<strong>de</strong>lscheibe (7), mit <strong>de</strong>r<br />
strukturierten Seite nach<br />
unten zeigend, auf die<br />
Spin<strong>de</strong>l (5).<br />
2. Wählen Sie die für die<br />
auszuführen<strong>de</strong> Aufgabe<br />
am besten geeignete<br />
Schleifhülse (11) und die<br />
entsprechen<strong>de</strong> Gummiwalze<br />
(12) aus (außer bei<br />
Gebrauch <strong>de</strong>r 13-mm-<br />
Schleifhülse).<br />
Verwen<strong>de</strong>n Sie bei <strong>de</strong>r<br />
13-mm-Schleifhülse keine<br />
Schleifwalze.<br />
3. Bestimmen Sie die gemäß<br />
obiger Tabelle passen<strong>de</strong><br />
Tischeinlage (10)<br />
(siehe „Tischeinlage<br />
auswählen“).<br />
4. Setzen Sie die Tischeinlage<br />
(10) auf die untere<br />
Spin<strong>de</strong>lscheibe auf <strong>de</strong>r<br />
Spin<strong>de</strong>l (5). Vergewissern<br />
Sie sich, dass die<br />
Tischeinlage bündig mit <strong>de</strong>r<br />
Tischplatte abschließt.<br />
5. Setzen Sie die Gummiwalze (12) auf die Spin<strong>de</strong>l.<br />
6. Schieben Sie die Schleifhülse (11) auf die Gummiwalze<br />
(12).<br />
7. Setzen Sie die obere<br />
Spin<strong>de</strong>lscheibe (9) auf die<br />
Spin<strong>de</strong>l (5).<br />
• Verwen<strong>de</strong>n Sie für die<br />
76-mm-, 51-mm- und<br />
38-mm-Gummiwalzen die<br />
große Scheibe.<br />
• Verwen<strong>de</strong>n Sie für die<br />
26-mm- und 19-mm-<br />
Gummiwalzen die<br />
mittelgroße Scheibe.<br />
• Verwen<strong>de</strong>n Sie für die<br />
13-mm-Schleifhülse die<br />
kleine Scheibe.<br />
8. Setzen Sie die<br />
Sicherungsmutter (6) auf<br />
die Spin<strong>de</strong>l (5). Ziehen Sie<br />
die Mutter soweit an, dass<br />
sich die Gummiwalze (12)<br />
zur Schleifhülse (11) hin aus<strong>de</strong>hnt. Ziehen Sie sie nicht<br />
zu fest an.<br />
Wenn die Schleifhülse teilweise abgenutzt ist, kann<br />
sie umgedreht und auf diese Weise die verbleiben<strong>de</strong><br />
Schleiffläche genutzt wer<strong>de</strong>n.<br />
Verwen<strong>de</strong>n Sie keine vollständig abgenutzten<br />
Schleifhülsen, da dies zu Überhitzung und infolge <strong>de</strong>ssen<br />
zur Beschädigung <strong>de</strong>r Gummiwalzen führen kann.<br />
Auf beschädigte Gummiwalzen aufgrund abgenutzter<br />
Schleifhülsen besteht kein Garantieanspruch.<br />
Montage 25<br />
D
Bedienung<br />
Ein- und Ausschalten<br />
• Der Ein-/Ausschalter (2)<br />
befin<strong>de</strong>t sich vorne an <strong>de</strong>r<br />
Spin<strong>de</strong>lschleifmaschine.<br />
• Betätigen Sie zum<br />
Einschalten <strong>de</strong>r<br />
Spin<strong>de</strong>lschleifmaschine <strong>de</strong>n<br />
grünen, mit (-) markierten<br />
Schalter.<br />
• Betätigen Sie zum<br />
Abschalten <strong>de</strong>r Spin<strong>de</strong>lschleifmaschine <strong>de</strong>n roten, mit<br />
(O) markierten Schalter.<br />
Schleifen<br />
• WARNHINWEIS: Schleifen Sie mit dieser<br />
Schleifmaschine kein Metall. Das Schleifen von Metall<br />
führt zu Funkenbildung, die Holz und Staubpartikel auf<br />
<strong>de</strong>r Schleifmaschine o<strong>de</strong>r im Arbeitsbereich entzün<strong>de</strong>n<br />
können.<br />
• HINWEIS: Die Spin<strong>de</strong>l dreht sich gegen <strong>de</strong>n<br />
Uhrzeigersinn.<br />
1. Vergewissern Sie sich, dass das Gerät sicher auf<br />
<strong>de</strong>r Werkbank montiert ist und dass eine geeignete<br />
Schleifhülse mit passen<strong>de</strong>r Tischeinlage gemäß<br />
<strong>de</strong>r Anweisung unter „Montage” richtig mit <strong>de</strong>r<br />
Sicherungsmutter (6) befestigt ist.<br />
2. Stellen Sie sicher, dass Sie angemessene<br />
Sicherheitsausrüstung einschließlich Gesichtsmaske<br />
und Schutzbrille tragen. Schalten Sie dann – wenn<br />
vorhan<strong>de</strong>n – die Staubabsauganlage ein.<br />
3. Schalten Sie die Schleifmaschine ein und warten Sie,<br />
bis <strong>de</strong>r Motor seine volle Drehzahl erreicht hat.<br />
4. Führen Sie das Werkstück langsam gegen die<br />
Drehrichtung an die Schleifhülse.<br />
• Führen Sie das Werkstück nicht mit Gewalt und üben<br />
Sie keinen übermäßigen Druck aus.<br />
• Führen Sie das Werkstück ausschließlich gegen<br />
die Drehrichtung zu. An<strong>de</strong>rnfalls könnte das<br />
Werkstück durch die Rotationskräfte <strong>de</strong>r sich<br />
drehen<strong>de</strong>n Schleifhülse von dieser abprallen o<strong>de</strong>r<br />
weggeschleu<strong>de</strong>rt wer<strong>de</strong>n.<br />
5. Schalten Sie das Gerät nach Beendigung <strong>de</strong>r Arbeit aus<br />
und trennen Sie es vom Stromnetz.<br />
D<br />
Instandhaltung<br />
WARNUNG! Stellen Sie stets sicher, dass das<br />
Gerät ausgeschaltet und <strong>de</strong>r Netzstecker gezogen<br />
ist, bevor Sie Einstellungen o<strong>de</strong>r Wartungsarbeiten<br />
vornehmen.<br />
• Eventuelle Schä<strong>de</strong>n an diesem Gerät müssen durch<br />
Fachpersonal repariert und das Gerät vor <strong>de</strong>m<br />
Gebrauch erneut sorgfältig überprüft wer<strong>de</strong>n.<br />
• Lassen Sie Ihr Elektrowerkzeug durch Fachpersonal<br />
unter ausschließlicher Verwendung von i<strong>de</strong>ntischen<br />
Ersatzteilen warten. Dadurch wird die Sicherheit <strong>de</strong>s<br />
Gerätes erhalten.<br />
Allgemeine Inspektion<br />
Überprüfen Sie regelmäßig, dass alle<br />
Befestigungsschrauben fest sitzen. Sie können sich mit<br />
<strong>de</strong>r Zeit durch Vibration lösen.<br />
Wartung <strong>de</strong>s Netzkabels<br />
Wenn das Netzkabel ersetzt wer<strong>de</strong>n muss, darf dies<br />
nur durch <strong>de</strong>n Hersteller, einen seiner Vertreter o<strong>de</strong>r<br />
eine autorisierte Vertragswerkstatt geschehen, um<br />
Sicherheitsrisiken zu vermei<strong>de</strong>n.<br />
Reinigung<br />
1. Entfernen Sie regelmäßig Staub und Schmutz. Blasen<br />
o<strong>de</strong>r saugen Sie Staub häufig von allen Geräteteilen<br />
und <strong>de</strong>m Motorgehäuse ab.<br />
2. Nehmen Sie in regelmäßigen Abstän<strong>de</strong>n <strong>de</strong>n<br />
Tischeinsatz und die untere Scheibe von <strong>de</strong>r Spin<strong>de</strong>l<br />
und entfernen Sie angesammelten Staub aus <strong>de</strong>m<br />
Bereich <strong>de</strong>s Tischeinsatzes.<br />
3. Schmieren Sie alle beweglichen Geräteteile in<br />
regelmäßigen Abstän<strong>de</strong>n.<br />
4. Reinigen Sie die Kunststoffteile niemals mit ätzen<strong>de</strong>n<br />
Reinigungsmitteln.<br />
Verwen<strong>de</strong>n Sie zur Reinigung <strong>de</strong>r Kunststoffteile<br />
keine scharfen Reinigungsmittel, son<strong>de</strong>rn ein mil<strong>de</strong>s<br />
Spülmittel und einen feuchten Lappen. Das Gerät darf<br />
niemals mit Wasser in Berührung kommen.<br />
26<br />
Bedienung / Instandhaltung
GARANTIE<br />
Zur Anmeldung Ihrer Garantie besuchen Sie bitte unsere<br />
Website www.tritontools.com* und tragen dort Ihre<br />
persönlichen Daten ein.<br />
Ihre Angaben wer<strong>de</strong>n (wenn nicht an<strong>de</strong>rs angewiesen) in<br />
unseren elektronischen Verteiler aufgenommen, damit Sie<br />
Information über zukünftige Produkteinführungen erhalten.<br />
Die von Ihnen bereitgestellten Angaben wer<strong>de</strong>n nicht an<br />
Dritte weitergegeben.<br />
KAUFINFORMATION<br />
Kaufdatum: ___ / ___ / ____<br />
Mo<strong>de</strong>ll: TSPS450<br />
Seriennummer<br />
(siehe Motorgehäuse): ___________________<br />
Bewahren Sie bitte Ihren Beleg als Kaufnachweis auf.<br />
<strong>Triton</strong> garantiert <strong>de</strong>m Käufer dieses Produkts, dass<br />
<strong>Triton</strong>, wenn sich Teile dieses Produkts innerhalb<br />
von 12 Monaten ab Originalkaufdatum infolge<br />
fehlerhafter Materialien o<strong>de</strong>r Arbeitsausführung<br />
als <strong>de</strong>fekt erweisen, das mangelhafte Teil nach<br />
eigenem Ermessen entwe<strong>de</strong>r kostenlos reparieren<br />
o<strong>de</strong>r ersetzen wird.<br />
Diese Garantie gilt nicht für kommerzielle<br />
Verwendung und erstreckt sich nicht auf normalen<br />
Verschleiß o<strong>de</strong>r Schä<strong>de</strong>n infolge von Unfall,<br />
Missbrauch o<strong>de</strong>r unsachgemäßer Verwendung.<br />
*Bitte registrieren Sie sich innerhalb von 30 Tagen<br />
nach <strong>de</strong>m Kauf online.<br />
Es gelten die allgemeinen Geschäftsbedingungen.<br />
Ihre gesetzlich festgelegten Rechte wer<strong>de</strong>n dadurch<br />
nicht eingeschränkt.<br />
D<br />
Garantie 27
Grazie per aver acquistato questo utensile <strong>Triton</strong>. Queste istruzioni contengono informazioni utili<br />
per il funzionamento sicuro ed affidabile <strong>de</strong>l prodotto.<br />
Per essere sicuri di utilizzare al meglio il potenziale <strong>de</strong>ll'utensile si raccomanda pertanto di leggere a fondo questo manuale.<br />
Conservare il manuale in modo che sia sempre a portata di mano e accertarsi che l'operatore <strong>de</strong>ll'elettroutensile lo abbia letto<br />
e capito a pieno.<br />
INDICE<br />
Caratteristiche tecniche 28<br />
Familiarizzazione 28<br />
Sicurezza 29<br />
Simboli 31<br />
Montaggio 31<br />
Funzionamento 32<br />
Servizio e manutenzione 33<br />
Garanzia 33<br />
Caratteristiche tecniche<br />
Mo<strong>de</strong>llo no:<br />
Tensione:<br />
Velocità a vuoto:<br />
Oscillazioni:<br />
Lunghezza corsa:<br />
diametro manicotto levigatura:<br />
Porta anti-polvere:<br />
Dimensioni banco:<br />
Dimensioni mandrino:<br />
Isolamento:<br />
Peso netto:<br />
TSPS450<br />
220V - 240V (450W)<br />
2.000 RPM<br />
58/min<br />
16 mm<br />
13 mm, 19 mm, 26 mm, 38 mm, 51 mm, 76 mm<br />
38 mm<br />
370 mm x 295 mm<br />
12,7 mm x filo da 1,5 mm<br />
doppio isolamento<br />
14,6 kg<br />
I<br />
Familiarizzazione<br />
1. Inserto di <strong>de</strong>posito incorporato nel banco<br />
2. Interruttore<br />
3. Carcassa motore<br />
4. Piano banco<br />
5. Mandrino<br />
6. Dado di bloccagio mandrino<br />
7. Ron<strong>de</strong>lla mandrino inferiore<br />
8. Deposito mandrino incorporato nel banco<br />
9. Ron<strong>de</strong>lle mandrino superiore (x3)<br />
10. Inserto banco (x6)<br />
11. Manicotti levigatura (x6)<br />
12. Tamburo in gomma (x5)<br />
13. Porta anti-polvere<br />
14. Chiave<br />
28<br />
Indice / Caratteristiche tecniche / Familiarizzazione
Norme generali di sicurezza<br />
AVVERTENZA: Leggere ed assimilare tutte<br />
le istruzioni. La non osservanza <strong>de</strong>lle seguenti<br />
istruzioni può causare scosse elettriche, incendi<br />
e/o lesioni gravi.<br />
Conservare tutte le avvertenze di pericolo e le<br />
istruzioni operative per ogni esigenza futura.<br />
Il termine “elettroutensile” si riferisce all’utensile a<br />
rete fissa (con filo) o un utensile a batteria (senza filo).<br />
1. Area di lavoro.<br />
a. Mantenere l’area di lavoro pulita e a<strong>de</strong>guatamente<br />
illuminata. Il disordine e le zone di lavoro non<br />
illuminate possono essere fonte di inci<strong>de</strong>nti.<br />
b. Non usare gli elettroutensili in presenza di<br />
atmosfere esplosive, come liquidi, gas e polveri<br />
infiammabili. Gli elettroutensili producono scintille<br />
che potrebbero accen<strong>de</strong>re le polveri o i fumi.<br />
c. Tenere altre persone e i bambini a distanza di<br />
sicurezza durante l’impiego <strong>de</strong>ll’utensile elettrico.<br />
Eventuali distrazioni potrebbero far per<strong>de</strong>re il controllo<br />
<strong>de</strong>ll’utensile all’operatore.<br />
2. Sicurezza elettrica<br />
a. Le spine <strong>de</strong>gli elettroutensili <strong>de</strong>vono essere<br />
compatibili con le prese di corrente.<br />
Non modificare in alcun modo la spina<br />
<strong>de</strong>ll’elettroutensile. Non usare adattatori con gli<br />
elettroutensili dotati di collegamento di messa<br />
a terra. L’uso <strong>de</strong>lle spine originali non modificate e<br />
<strong>de</strong>lle prese corrispon<strong>de</strong>nti ridurrà il rischio di scosse<br />
elettriche.<br />
b. Evitare il contatto <strong>de</strong>l corpo con le superfici<br />
collegate a massa come i tubi, i radiatori, le<br />
cucine e i frigoriferi. Se il corpo <strong>de</strong>ll’operatore è<br />
collegato alla terra o alla massa il rischio di scosse<br />
elettriche è maggiore.<br />
c. Non esporre gli elettroutensili alla pioggia e non<br />
lasciarli in ambienti umidi o bagnati. L’ingresso<br />
<strong>de</strong>ll’acqua in una macchina utensile aumenta il rischio<br />
di scosse elettriche.<br />
d. Non usare il cavo in modo improprio. Non afferrare<br />
mai il cavo per trasportare, tirare o staccare<br />
l’elettroutensile dalla presa di corrente. Tenere il<br />
cavo lontano da fonti di calore, olio, e sostanze<br />
affini, bordi appuntiti o parti in movimento. I cavi<br />
danneggiati o attorcigliati aumentano il rischio di<br />
scosse elettriche.<br />
e. Qualora si voglia usare l’utensile all’aperto, usare<br />
cavi di prolunga compatibili con l’uso in ambienti<br />
esterni. Un cavo idoneo all’uso in ambienti esterni<br />
riduce il rischio di scosse elettriche.<br />
f. Se l’utilizzo di un elettroutensile in ambiente<br />
umido è inevitabile, utilizzare una fonte di<br />
alimentazione protetta da un dispositivo<br />
differenziale. L’uso di un dispositivo differenziale<br />
riduce notevolmente il rischio di scosse elettriche.<br />
NOTA : Il termine "dispositivo di corrente residua<br />
(RCD)" può essere sostituita dal termine "circuito<br />
di guasto a terra (GFCI) "o" dispersione a terra<br />
interruttore (ELCB) ".<br />
3. Sicurezza personale<br />
a. Quando si usa un elettroutensile lavorare sempre<br />
con la massima attenzione e concentrazione,<br />
lasciandosi guidare dal buon senso. Non usare<br />
mai un elettroutensile quando si è stanchi o sotto<br />
l’effetto di medicinali e/o sostanze alcoliche o<br />
stupefacenti. Quando si usa un elettroutensile un<br />
attimo di distrazione è sufficiente a causare gravi<br />
lesioni alle persone.<br />
b. Usare dispositivi per la protezione personale.<br />
Indossare sempre protezioni per gli occhi. I<br />
dispositivi per la sicurezza personale, come le<br />
mascherine antipolvere, le calzature di sicurezza<br />
antiscivolo, il casco e la cuffia, se usati in maniera<br />
appropriata, riducono i rischi di lesioni alle persone.<br />
c. Evitare l’avviamento acci<strong>de</strong>ntale. Garantire che<br />
l’interruttore è in posizione arresto (OFF) prima<br />
di attaccare la presa. Trasportare gli elettroutensili<br />
con il dito al di sopra <strong>de</strong>ll’interruttore o attaccando<br />
l’elettroutensile con l’interruttore acceso, aumenta il<br />
rischio di acci<strong>de</strong>nti.<br />
d. Rimuovere tutte le chiavi di regolazione e le chiavi<br />
inglesi prima di accen<strong>de</strong>re l’elettroutensile. Una<br />
chiave inglese o una chiave di regolazione collegata a<br />
una parte in movimento <strong>de</strong>ll’elettroutensile potrebbe<br />
causare lesioni alle persone.<br />
e. Non andare oltre l’altezza consentita. In qualsiasi<br />
momento mantenere i piedi poggiati su superfici<br />
soli<strong>de</strong> e un punto di appoggio sicuro. Un buon<br />
equilibrio consente di avere il massimo controllo<br />
sull’elettroutensile nelle situazioni inaspettate.<br />
f. Vestirsi con abbigliamento a<strong>de</strong>guato. Non indossare<br />
abiti larghi o gioielli. Tenere i capelli, vestiti e guanti<br />
lontano da parti in movimento.<br />
g. Se il dispositivo utilizzato è dotato di bocchetta<br />
per l’aspirazione <strong>de</strong>lla polvere accertarsi che sia<br />
collegato e utilizzato correttamente. L’uso di tali<br />
dispositivi riduce i rischi correlati alle polveri.<br />
4. Maneggio ed impiego accurato di utensili elettrici<br />
a. Non forzare l’elettroutensile. Usare sempre<br />
l’elettroutensile corretto per il lavoro da eseguire.<br />
L’elettroutensile corretto sarà in grado di svolgere il<br />
lavoro in modo più efficiente e sicuro nell’ambito <strong>de</strong>lla<br />
gamma di potenza indicata.<br />
Norme generali di sicurezza 29<br />
I
I<br />
b. Non usare l’elettroutensile se l’interruttore<br />
di accensione non si accen<strong>de</strong> e si spegne. Gli<br />
elettroutensili con un interruttore di accensione<br />
difettoso sono pericolosi e <strong>de</strong>vono essere riparati<br />
immediatamente.<br />
c. Staccare la spina dalla presa di corrente prima<br />
di effettuare qualsiasi regolazione, sostituire gli<br />
accessori o riporre gli attrezzi a motore. Queste<br />
misure di sicurezza preventive riducono il rischio di<br />
avvio involontario.<br />
d. Conservare l’elettroutensile fuori dalla portata<br />
<strong>de</strong>i bambini e non lasciare che venga utilizzato<br />
da persone non a<strong>de</strong>guatamente ad<strong>de</strong>strate e<br />
competenti nell’uso <strong>de</strong>gli elettroutensili o che<br />
non abbiano letto questo manuale di istruzioni. Gli<br />
elettroutensili diventano estremamente pericolosi nelle<br />
mani di persone non ad<strong>de</strong>strate.<br />
e. Mantenere gli elettroutensili. Controllare per<br />
disallineamento o la legatura <strong>de</strong>lle parti in<br />
movimento, la rottura di parti e altre condizioni che<br />
possono influire il funzionamento <strong>de</strong>ll’apparecchio.<br />
In caso di danneggiamento, fare riparare prima<br />
<strong>de</strong>ll’uso. Molti inci<strong>de</strong>nti sono causati da una scarsa<br />
manutenzione <strong>de</strong>ll’utensile.<br />
f. Mantenere le lame pulite e affilate. Gli utensili da<br />
taglio tenuti in buone condizioni operative e con i bordi<br />
taglienti affilati sono meno soggetti a bloccarsi e più<br />
facili da controllare.<br />
g. Utilizzare l’elettroutensile e tutti i componenti e gli<br />
accessori in conformità con le istruzioni di questo<br />
manuale e nella maniera prevista per ciascun<br />
tipo di utensile, tenendo conto <strong>de</strong>lle condizioni<br />
lavorative e <strong>de</strong>l compito da eseguire. L’utilizzo<br />
<strong>de</strong>gli elettroutensili per fini diversi da quelli previsti<br />
rappresenta un rischio per le persone.<br />
5. Assistenza<br />
a. Qualsiasi intervento sull’elettroutensile <strong>de</strong>ve<br />
essere eseguito da personale qualificato<br />
utilizzando unicamente pezzi di ricambio<br />
compatibili e approvati. Ciò garantisce la sicurezza<br />
<strong>de</strong>ll’utensile elettrico.<br />
Supplementare avvisi sulla sicurezza generale per<br />
levigatrici a mandrino<br />
Le avvertenze, precauzioni e le istruzioni discusso in<br />
questo manuale non possono coprire tutte le possibili<br />
condizioni e situazioni che possono verificarsi. L'operatore<br />
<strong>de</strong>ve capire che il buon senso e cautela sono fattori che<br />
non possono essere incorporate in questo prodotto, ma<br />
<strong>de</strong>ve essere fornita dall'operatore.<br />
Non utilizzare la levigatrice a mandrino finché non è<br />
completamente assemblata e non prima di aver letto<br />
e compreso le seguenti istruzioni e le etichette di<br />
avvertimento sulla levigatrice a mandrino.<br />
1. Controllare lo stato <strong>de</strong>lla levigatrice a mandrino .. Se<br />
qualsiasi parte fosse mancante, piegata, o per caso<br />
che non funzioni correttamente, sostituire il pezzo<br />
prima di utilizzare la levigatrice.<br />
2. Determinare il tipo di lavoro che si sta per fare prima di<br />
utilizzare la levigatrice a mandrino.<br />
3. Sicurare il vostro lavoro. Sostenere il pezzo in modo<br />
sicuro sul banco, e tenerlo con entrambe le mani.<br />
4. Essere consapevoli <strong>de</strong>lla direzione di avanzamento.<br />
Alimentare il pezzo nel manicotto abrasivo contro il<br />
senso di rotazione <strong>de</strong>ll’ manicotto di levigatura.<br />
5. Tenere sempre le mani al di fuori il percorso <strong>de</strong>lla<br />
levigatrice e lontano dalle manicotti di levigatura.<br />
Evitare posizioni <strong>de</strong>lle mani, dove una scivolata<br />
improvvisa potrebbe causare la mano di spostarsi nel<br />
mandrino. Non esten<strong>de</strong>re le mani al di sotto il pezzo in<br />
lavorazione o al di sopra il manicotto abrasivo, mentre<br />
il mandrino è in rotazione.<br />
6. Scollegare la levigatrice dopo aver spento l'interruttore<br />
di alimentazione. Atten<strong>de</strong>re che il mandrino Fermi<br />
di ruotare prima di eseguire la manutenzione. La<br />
levigatrice <strong>de</strong>ve essere scollegata quando non in uso<br />
o quando si cambia piastre d’inserto, manicotti di<br />
levigatura, mandrini di gomma, o altri oggetti.<br />
7. Assicurarsi che non ci sono chiodi o altri corpi estranei<br />
nella zona <strong>de</strong>l pezzo da levigare.<br />
8. Non usare mai questa levigatrice per levigatura<br />
a umido. Il mancato rispetto può causare scosse<br />
elettriche, causando lesioni gravi o peggio.<br />
9. Utilizzare solamente parti di ricambio i<strong>de</strong>ntiche quando<br />
eseguendo la manutenzione su questa levigatrice a<br />
mandrino.<br />
10. Assicurarsi che il mandrino è ad un complete arresto<br />
prima di toccare il pezzo di lavoro.<br />
11. Pren<strong>de</strong>re precauzioni quando levigando superfici<br />
verniciate. Levigatura a base di piombo vernice<br />
è SCONSIGLIATO. La polvere contaminata è<br />
troppo difficile da controllare, e potrebbe causare<br />
avvelenamento.<br />
Quando levigando verniciatura:<br />
• Proteggere i polmoni. Indossare una mascherina<br />
antipolvere o respiratore.<br />
• Non permettere ai bambini o donne incinte nella zona<br />
di lavoro fino a quando il lavoro di levigatura vernice è<br />
finito e la pulizia è stata completata.<br />
• Non mangiare, bere o fumare in una zona dove le<br />
superfici verniciate vengono levigate.<br />
• Utilizzare un sistema di raccolta <strong>de</strong>lle polveri, quando<br />
possibile. Sigillare l'area di lavoro con la plastica.<br />
Non traccirea polvere di vernice al di fuori <strong>de</strong>ll'area di<br />
lavoro.<br />
• Pulire accuratamente l'area quando il progetto di<br />
levigatura vernice è completata.<br />
30<br />
Norme generali di sicurezza
SIMBOLI<br />
PROTEZIONE AMBIENTALE<br />
Il simbolo <strong>de</strong>l cestino barrato<br />
indica che il prodotto, una volta<br />
diventato inservibile, non <strong>de</strong>ve essere<br />
gettato tra i rifiuti domestici ma conferito<br />
ad un centro di raccolta differenziata per<br />
apparecchi elettrici ed elettronici oppure<br />
riconsegnato al rivenditore al momento<br />
<strong>de</strong>ll’acquisto di apparecchio sostitutivo.<br />
Indossare sempre protezioni per gli occhi e<br />
per le vie respiratorie.<br />
Il prodotto è conforme alle vigenti<br />
normative e norme di sicurezza<br />
applicabili<br />
MONTAGGIO<br />
Assicurarsi sempre che l'utensile sia spento e<br />
scollegato dalla rete elettrica prima di effettuare<br />
eventuali modifiche o installazioni o rimozioni di mandrini.<br />
MONTAGGIO A BANCO<br />
Se la levigatrice a mandrino <strong>de</strong>ve essere utilizzato in una<br />
posizione permanente, si consiglia di fissarlo ad un piano<br />
di lavoro rigido.<br />
• Usare i fori alla base <strong>de</strong>lla levigatrice a mandrino come<br />
mo<strong>de</strong>llo per segnare e praticare quattro fori nella<br />
vostra superficie <strong>de</strong>stinata al montaggio (es. banco di<br />
lavoro). Fissare la levigatrice a mandrino in posizione<br />
usando grandi bulloni, ron<strong>de</strong>lle e dadi (non forniti).<br />
• Se la levigatrice a mandrino è <strong>de</strong>stinata ad essere più<br />
portabile, fissare un bordo alla base che può essere<br />
facilmente bloccata e<br />
rimossa da varie superfici<br />
di montaggio.<br />
• Se usando bulloni,<br />
assicurarsi che siano<br />
abbastanza lunghi per<br />
penetrare il banco da lavoro<br />
o bordo sufficientemente<br />
per un montaggio sicuro.<br />
Nota nelle istruzioni.<br />
Avvertenza<br />
Doppio isolamento per una protezione<br />
supplementare<br />
SELEZIONE DI UN INSERTO A BANCO<br />
Il mancato utilizzo <strong>de</strong>ll'inserto banco corretto con il<br />
suo manicotto di levigatura di corrispon<strong>de</strong>nza potrebbe<br />
causare dita pizzicatio o risultare nel pezzo di lavoro<br />
di venire tirato giù tra l'inserto banco e il manicotto di<br />
levigatura. Il manicotto abrasivo dovrebbe adattarsi<br />
comodamente nel foro centrale <strong>de</strong>ll'inserto banco.<br />
Diametro <strong>de</strong>ll’<br />
manicotto di<br />
levigatura<br />
Diametro<br />
interiore<br />
<strong>de</strong>ll’inserto banco<br />
Dimensione<br />
ron<strong>de</strong>lla<br />
superiore<br />
13 mm 13 mm Piccola<br />
19 mm 19 mm Media<br />
26 mm 26 mm Media<br />
38 mm 38 mm Gran<strong>de</strong><br />
51 mm 51 mm Gran<strong>de</strong><br />
76 mm 76 mm Gran<strong>de</strong><br />
Utilizzare la seguente tabella per <strong>de</strong>terminare il corretto<br />
inserto banco e ron<strong>de</strong>lla mandrino superiore da utilizzare<br />
con ogni manicotto di levigatura.<br />
ASPIRAZIONE POLVERE<br />
Si raccomanda che la levigatrice a mandrino è utilizzato<br />
con un sistema di aspirazione <strong>de</strong>lla polvere per un<br />
ambiente di lavoro pulito e sicuro.<br />
1. Collegare il tubo dal sistema di aspirazione per la<br />
porta anti polvere (13) e assicurare che sia sicuro in<br />
posizione.<br />
2. Per una maggiore efficienza, attivare il sistema<br />
di aspirazione prima di accen<strong>de</strong>re la levigatrice a<br />
mandrino.<br />
Simboli / Montaggio<br />
31<br />
I
MONTAGGIO DI UN MANICOTTO DI LEVIGATURA<br />
Nota: Tutte le manicotti di levigatura, tranne il più piccolo<br />
di 13 millimetri si adattano al tamburo in gomma (12) in<br />
corrispon<strong>de</strong>nza.<br />
1. Montare la ron<strong>de</strong>lla <strong>de</strong>l<br />
mandrino minore (7) sul<br />
perno (5) con il lato <strong>de</strong>lla<br />
pinna rivolto verso il basso.<br />
2. Selezionare il manicotto<br />
corretto di levigatura (11) per<br />
il lavoro inteso. Selezionare<br />
il tamburo corrispon<strong>de</strong>nte in<br />
gomma (12), (tranne quando<br />
si usa il manicotto<br />
di levigatura di 13<br />
millimetri). Non utilizzare un<br />
tamburo di levigatura con il<br />
manicotto di levigatura di 13<br />
millimetri.<br />
3. Selezionare l'appropriato<br />
inserto banco (10) in<br />
conformità con il banco di<br />
sopra (ve<strong>de</strong>re 'Selezionando<br />
un inserto banco').<br />
4. Montare l’inserto banco (10)<br />
sul perno (5) al di sopra il<br />
mandrino e sulla ron<strong>de</strong>lla<br />
mandrino inferiore.<br />
Garantire l'inserto banco è<br />
parallelo con il banco.<br />
5. Montare il tamburo gomma<br />
(12) sul mandrino.<br />
6. Far scorrere il manicotto di<br />
levigatura (11) al di sopra il tamburo di gomma (12)<br />
7. Montare la ron<strong>de</strong>lla<br />
superiore <strong>de</strong>l mandrino (9)<br />
sul mandrino (5).<br />
• Utilizzare la ron<strong>de</strong>lla gran<strong>de</strong><br />
con I tamburi in gomma di<br />
75 mm, 51 mm e 38 mm.<br />
• Utilizzare la ron<strong>de</strong>lla media<br />
con il tamburo in gomma di<br />
26 millimetri (1 ") e 19mm<br />
(3 / 4")<br />
• Utilizzare la ron<strong>de</strong>lla piccola con il manicotto di<br />
levigatura di 13 millimetri.<br />
8. Montare il dado di<br />
bloccaggio <strong>de</strong>l mandrino<br />
(6) sul mandrino (5).<br />
Stringere il dado di quel<br />
tanto che basta per<br />
espan<strong>de</strong>re il tamburo<br />
gomma (12) contro il<br />
manicotto levigatura<br />
(11). Non stringere<br />
eccessivamente<br />
Quando il manicotto abrasivo è completamente<br />
consumato è possibile capovolgerlo e massimizzare la<br />
durata <strong>de</strong>l servizio utilizzando la grana rimanente. Non<br />
utilizzare un manicotto abrasivo che è troppo usurato.<br />
Questo può portare ad un accumulo di calore eccessivo<br />
e potrebbe danneggiare il tamburo gomma. Un tamburo<br />
di gomma danneggiato a causa di manicotti di levigatura<br />
consumati non sono coperti dalla garanzia.<br />
I<br />
FUNZIONAMENTO<br />
Accensione e spegnimento<br />
• L'interruttore (2) si trova<br />
sulla parte frontale <strong>de</strong>lla<br />
levigatrice a mandrin.<br />
• Per accen<strong>de</strong>re la levigatrice<br />
a mandrino, premere il<br />
pulsante ver<strong>de</strong> marcato (-).<br />
• Per spegnere la levigatrice<br />
a mandrino, premere il<br />
pulsante rosso marcato (O).<br />
LEVIGATURA<br />
• ATTENZIONE: non levigare il metallo con questa<br />
levigatrice. La levigatura di metallo provoca scintille<br />
che potrebbero innescare particelle di legno e polvere<br />
sulla levigatrice o in officina.<br />
• NB: Il mandrino ruota in senso anti-orario.<br />
1. Controllare la macchina è montata saldamente sul<br />
banco di lavoro e il dado di bloccaggio <strong>de</strong>l mandrino<br />
(6) è fissato correttamente con il manicotto abrasivo<br />
appropriato e l’inserto banco, in conformità con la<br />
guida in 'Montaggio'.<br />
2. Assicurarsi che indossi tutto l'equipaggiamento di<br />
sicurezza a<strong>de</strong>guati, compresi maschera e occhiali di<br />
sicurezza, poi accen<strong>de</strong>re il sistema di aspirazione (se<br />
disponibile).<br />
3. Accen<strong>de</strong>re la levigatrice e permettere al motore di<br />
raggiungere velocità.<br />
4. Alimentare il pezzo a poco a poco, CONTRO il senso di<br />
rotazione, sul manicotti di levigatura<br />
• Non forzare il pezzo in lavorazione o applicare una<br />
pressione eccessiva.<br />
• Guida il pezzo di lavoro contro il senso di rotazione<br />
solo, o le forze di rotazione <strong>de</strong>l manicotto abrasivo<br />
ten<strong>de</strong>ranno a lanciare o rimbalzare il pezzo via <strong>de</strong>i<br />
32<br />
Montaggio / Funzionamento
manicotti di levigatura.<br />
5. Al termine, spegnere la macchina e scollegare dalla<br />
rete elettrica.<br />
SERVICE & MAINTENANCE<br />
ATTENZIONE! Assicurarsi sempre che l'utensile<br />
sia spento e che la presa viene rimossa dalla rete<br />
elettrica prima di effettuare eventuali modifiche o<br />
manutenzioni<br />
• Eventuali danni a questo strumento dovrebbero essere<br />
riparati e accuratamente controllati prima <strong>de</strong>ll'uso, da<br />
parte di un personale specializzato.<br />
• Avere l'utensile servito da un personale specializzato e<br />
solo impiegando pezzi i<strong>de</strong>ntici. Questo assicurerà che<br />
la sicurezza <strong>de</strong>ll’elettroutensile è mantenuta.<br />
GENERALI DI ISPEZIONE<br />
Controllare regolarmente che tutte le viti di fissaggio<br />
siano ben serrate. Essi possono vibrare e allentarsi nel<br />
tempo.<br />
PULIZIA<br />
1. Rimuovere la polvere e lo sporco regolarmente.<br />
Frequentemente soffiare o aspirare via la polvere da<br />
tutte le parti <strong>de</strong>lla levigatrice e la carcassa <strong>de</strong>l motore.<br />
2. Periodicamente rimuovere la placca e abbassare la<br />
ron<strong>de</strong>lla dal mandrino e rimuovere eventuali accumuli<br />
di polvere nella zona di placca.<br />
3. Ri-lubrificare tutte le parti in movimento a intervalli<br />
regolari.<br />
4. Non usare mai prodotti caustici per pulire le parti in<br />
plastica.<br />
MANUTENZIONE AL CAVO DI ALIMENTAZIONE<br />
Se il cavo di alimentazione <strong>de</strong>ve essere sostituito,<br />
l'operazione <strong>de</strong>ve essere effettuata dal produttore,<br />
dall’agente <strong>de</strong>l produttore, o un centro d’assistenza<br />
autorizzato al fine di evitare pericoli per la sicurezza.<br />
GARANZIA<br />
Per la registrazione <strong>de</strong>lla garanzia visitare il sito web www.<br />
tritontools.com* e inserire i propri <strong>de</strong>ttagli.<br />
A meno che il proprietario non abbia specificato<br />
diversamente, i suoi <strong>de</strong>ttagli saranno inclusi nella lista di<br />
distribuzione che sarà utilizzata per inviare regolarmente<br />
informazioni sulle novità <strong>Triton</strong>. I dati personali raccolti<br />
saranno trattati con la massima riservatezza e non saranno<br />
rilasciati a terze parti.<br />
INFORMAZIONI SULL’ACQUISTO<br />
Data di acquisto: ___ / ___ / ____<br />
Mo<strong>de</strong>llo N.: TSPS450<br />
Numero di serie: __________________<br />
Conservare lo scontrino come prova <strong>de</strong>ll’acquisto<br />
<strong>Triton</strong> Precision Power tools garantisce al<br />
proprietario di questo prodotto che se dovessero<br />
essere riscontrati difetti di materiali o lavorazione<br />
entro 12 MESI dalla data <strong>de</strong>ll’acquisto originale,<br />
effettuerà gratuitamente la riparazione o, a propria<br />
discrezione, la sostituzione <strong>de</strong>i componenti difettosi.<br />
Questa garanzia non è applicabile per l’uso<br />
commerciale <strong>de</strong>ll’utensile ed esclu<strong>de</strong> la normale<br />
usura o i danni causati all’utensile da inci<strong>de</strong>nti, uso<br />
improprio, abusi o alterazioni.<br />
* Registrati on-line entro 30 giorni.<br />
Condizioni di applicazione.<br />
Questa garanzia non pregiudica in alcun modo i<br />
diritti <strong>de</strong>l consumatore stabiliti dalla legge.<br />
I<br />
Funzionmento / Service & Maintenance / Garanzia 33
Gracias por haber elegido esta herramienta <strong>Triton</strong>. Estas <strong>instrucciones</strong> contienen la información necesaria para un<br />
funcionamiento seguro y eficaz <strong>de</strong> este producto.<br />
Lea este manual atentamente para asegurarse <strong>de</strong> obtener todas las ventajas <strong>de</strong> las características únicas <strong>de</strong> su nuevo equipo.<br />
Conserve este manual a mano y asegúrese <strong>de</strong> que todos los usuarios <strong>de</strong> la herramienta lo hayan leído y entendido<br />
INDICE<br />
Características técnicas 34<br />
Nomenclatura 34<br />
Seguridad 35<br />
Símbolos 37<br />
Montaje 37<br />
Funcionamiento 38<br />
Servicio y mantenimiento 39<br />
Garantía 39<br />
CARACTERÍSTICAS TÉCNICAS<br />
Número <strong>de</strong> producto:<br />
Tensión:<br />
Velocidad en vacío:<br />
Oscilaciones:<br />
Longitud <strong>de</strong> recorrido:<br />
Diámetro <strong>de</strong> los rodillos <strong>de</strong> lija:<br />
Orificio recolector <strong>de</strong> polvo:<br />
Tamaño <strong>de</strong> la mesa:<br />
Dimensiones <strong>de</strong>l husillo:<br />
Aislamiento:<br />
Peso neto:<br />
TSPS450<br />
220V - 240V (450W)<br />
2.000 RPM<br />
58/min<br />
16 mm<br />
13 mm, 19 mm, 26 mm, 38 mm, 51 mm y 76 mm<br />
38 mm<br />
370 mm x 295 mm<br />
12,7 mm y 1,5 mm<br />
doble aislamiento<br />
14,6 kg<br />
NOMENCLATURA<br />
1. Almacenamiento <strong>de</strong> insertos <strong>de</strong> mesa<br />
2. Interruptor <strong>de</strong> encendido/apagado<br />
3. Cubierta <strong>de</strong>l motor<br />
4. Parte superior <strong>de</strong> la mesa<br />
5. Husillo<br />
6. Tuerca <strong>de</strong> bloqueo <strong>de</strong>l husillo<br />
7. Aran<strong>de</strong>la inferior <strong>de</strong>l husillo<br />
8. Almacenamiento <strong>de</strong>l husillo<br />
9. Aran<strong>de</strong>las superiores <strong>de</strong>l husillo (x3)<br />
10. Inserto <strong>de</strong> mesa (x6)<br />
11. Rodillo <strong>de</strong> lijado (x6)<br />
12. Tambor <strong>de</strong> goma (x5)<br />
13. Orificio recolector <strong>de</strong> polvo<br />
14. Llave<br />
E<br />
34<br />
Indice / Características técnicas / Nomenclatura
INSTRUCCIONES GENERALES DE SEGURIDAD<br />
ADVERTENCIA Lea todas las advertencias<br />
<strong>de</strong> seguridad e <strong>instrucciones</strong>. El no respetar<br />
estas advertencias e <strong>instrucciones</strong> pue<strong>de</strong> causar<br />
<strong>de</strong>scargas eléctricas, incendios y/o lesiones graves.<br />
Conserve estas advertencias e <strong>instrucciones</strong> para<br />
referencia futura.<br />
La expresión “herramienta eléctrica” en todas la<br />
advertencias se refiera a su herramienta eléctrica<br />
alimentada por la red eléctrica (herramienta<br />
alámbrica) o su herramienta eléctrica alimentada por<br />
baterías (herramienta inalámbrica).<br />
1) Seguridad en el área <strong>de</strong> trabajo<br />
a) Mantenga el área <strong>de</strong> trabajo limpia y bien<br />
iluminada. Las áreas <strong>de</strong>sor<strong>de</strong>nadas y oscuras invitan<br />
a que se produzcan acci<strong>de</strong>ntes.<br />
b) No maneje herramientas eléctricas en atmósferas<br />
explosivas, como por ejemplo en presencia<br />
<strong>de</strong> líquidos, gases o polvos inflamables. Las<br />
herramientas eléctricas producen chispas que pue<strong>de</strong>n<br />
incendiar el polvo o los vapores.<br />
c) Mantenga alejados a los niños y a las personas<br />
que estén presentes mientras esté trabajando<br />
con una herramienta eléctrica. Las distracciones<br />
pue<strong>de</strong>n hacerle per<strong>de</strong>r el control <strong>de</strong> la herramienta.<br />
2) Seguridad eléctrica<br />
a) El enchufe <strong>de</strong> la herramienta eléctrica <strong>de</strong>be<br />
coincidir con el tomacorriente. No modifique<br />
nunca el enchufe <strong>de</strong> ninguna manera. No utilice<br />
ningún enchufe adaptador con herramientas<br />
eléctricas puestas a tierra. Los enchufes no<br />
modificados y los tomacorrientes coinci<strong>de</strong>ntes<br />
reducirán el riesgo <strong>de</strong> <strong>de</strong>scargas eléctricas.<br />
b) Evite el contacto <strong>de</strong>l cuerpo con superficies<br />
puestas a tierra tales como tuberías, radiadores,<br />
estufas y refrigeradores. El riesgo <strong>de</strong> <strong>de</strong>scarga<br />
eléctrica se incrementa si su cuerpo está puesto a<br />
tierra.<br />
c) No exponga las herramientas eléctricas a la<br />
lluvia o la humedad. La entrada <strong>de</strong> agua en una<br />
herramienta eléctrica aumentará el riesgo <strong>de</strong><br />
<strong>de</strong>scargas eléctricas.<br />
d) No maltrate el cable <strong>de</strong> alimentación. No use<br />
nunca el cable <strong>de</strong> alimentación para transportar<br />
la herramienta eléctrica, tirar <strong>de</strong> ella o<br />
<strong>de</strong>senchufarla. Mantenga el cable <strong>de</strong> alimentación<br />
alejado <strong>de</strong> fuentes <strong>de</strong> calor, <strong>de</strong>l aceite, <strong>de</strong> los<br />
bor<strong>de</strong>s afilados o <strong>de</strong> las piezas móviles. Los cables<br />
<strong>de</strong> alimentación dañados o enredados aumentan el<br />
riesgo <strong>de</strong> <strong>de</strong>scargas eléctricas.<br />
e) Cuando utilice una herramienta eléctrica en el<br />
exterior, use un cable <strong>de</strong> extensión a<strong>de</strong>cuado<br />
para uso en exteriores. La utilización <strong>de</strong> un cable<br />
a<strong>de</strong>cuado para exteriores reduce el riesgo <strong>de</strong><br />
<strong>de</strong>scargas eléctricas.<br />
f) Si es inevitable trabajar con una herramienta<br />
eléctrica en lugares húmedos, use un suministro<br />
protegido por un dispositivo <strong>de</strong> corriente residual<br />
(RCD). El uso <strong>de</strong> un RCD reduce el riesgo <strong>de</strong><br />
<strong>de</strong>scargas eléctricas.<br />
3) Seguridad personal<br />
a) Manténgase alerta, fíjese en lo que está haciendo<br />
y use el sentido común cuando esté utilizando una<br />
herramienta eléctrica. No use una herramienta<br />
eléctrica si se encuentra cansado o bajo la<br />
influencia <strong>de</strong> drogas, alcohol o medicamentos.<br />
Un momento <strong>de</strong> distracción mientras esté utilizando<br />
una herramienta eléctrica pue<strong>de</strong> provocar lesiones<br />
corporales graves.<br />
b) Use equipo <strong>de</strong> protección individual. Use siempre<br />
protección ocular. El uso <strong>de</strong> equipamientos <strong>de</strong><br />
seguridad tales como máscara antipolvo, calzado <strong>de</strong><br />
seguridad anti<strong>de</strong>slizante, casco duro y protecciones<br />
auditivas a<strong>de</strong>cuadas reducirá el riesgo <strong>de</strong> lesiones<br />
corporales.<br />
c) Evite el arranque acci<strong>de</strong>ntal. Asegúrese <strong>de</strong> que el<br />
interruptor está en la posición <strong>de</strong> apagado antes<br />
<strong>de</strong> enchufar la herramienta. Si se transportan<br />
las herramientas con el <strong>de</strong>do en el interruptor o<br />
se enchufan con el interruptor en la posición <strong>de</strong><br />
encendido, se invita a que se produzcan acci<strong>de</strong>ntes.<br />
d) Quite toda llave <strong>de</strong> ajuste o <strong>de</strong> tuercas antes <strong>de</strong><br />
encen<strong>de</strong>r la herramienta eléctrica. Una llave <strong>de</strong><br />
tuercas o <strong>de</strong> ajuste que se ha <strong>de</strong>jado colocada en una<br />
parte móvil <strong>de</strong> la herramienta eléctrica pue<strong>de</strong> causar<br />
lesiones corporales.<br />
e) No adopte posturas forzadas. Manténgase en<br />
posición firme y en equilibrio en todo momento.<br />
De este modo, podrá controlar mejor la herramienta<br />
eléctrica en situaciones inesperadas.<br />
f) Vístase a<strong>de</strong>cuadamente. No lleve ropa holgada<br />
ni joyas. Mantenga el pelo, la ropa y los guantes<br />
alejados <strong>de</strong> las piezas móviles. La ropa holgada, las<br />
joyas o el pelo largo pue<strong>de</strong>n quedar atrapados en las<br />
piezas móviles.<br />
g) Si se proporcionan dispositivos para la conexión<br />
<strong>de</strong> sistemas <strong>de</strong> extracción y recolección <strong>de</strong> polvo,<br />
asegúrese <strong>de</strong> que estén conectados y se usen<br />
correctamente. El uso <strong>de</strong> estos dispositivos pue<strong>de</strong><br />
reducir los peligros relacionados con el polvo.<br />
4) Uso y cuidado <strong>de</strong> las herramientas eléctricas<br />
a) No fuerce la herramienta eléctrica. Use la<br />
herramienta eléctrica correcta para el trabajo a<br />
realizar. La herramienta correcta funcionará mejor<br />
y con más seguridad a la velocidad para la que se ha<br />
diseñado.<br />
E<br />
Instrucciones generales <strong>de</strong> seguridad 35
E<br />
b) No use la herramienta eléctrica si el interruptor no<br />
la encien<strong>de</strong> ni la apaga. Toda herramienta eléctrica<br />
que no se pueda controlar con el interruptor es<br />
peligrosa y <strong>de</strong>be ser reparada.<br />
c) Desconecte el enchufe <strong>de</strong> la fuente <strong>de</strong> alimentación<br />
y/o el paquete <strong>de</strong> batería <strong>de</strong> la herramienta antes<br />
<strong>de</strong> realizar cualquier ajuste, cambio <strong>de</strong> accesorios<br />
o almacenamiento <strong>de</strong> la herramienta eléctrica.<br />
Estas medidas <strong>de</strong> seguridad preventivas reducen<br />
el riesgo <strong>de</strong> arranque acci<strong>de</strong>ntal <strong>de</strong> la herramienta<br />
eléctrica.<br />
d) Guar<strong>de</strong> las herramientas eléctricas que no esté<br />
usando fuera <strong>de</strong>l alcance <strong>de</strong> los niños y no <strong>de</strong>je que<br />
personas que no estén familiarizadas con ellas o<br />
estas <strong>instrucciones</strong> las utilicen. Las herramientas<br />
eléctricas son peligrosas en manos <strong>de</strong> usuarios que no<br />
hayan recibido capacitación.<br />
e) Mantenga sus herramientas eléctricas. Revise que<br />
no haya piezas en movimiento mal alineadas o<br />
trabadas, piezas rotas o cualquier otra condición<br />
que pueda afectar el funcionamiento <strong>de</strong> la<br />
herramienta eléctrica. Si encuentra daños, haga<br />
reparar la herramienta eléctrica antes <strong>de</strong> utilizarla.<br />
Muchos acci<strong>de</strong>ntes son causados por herramientas<br />
eléctricas que carecen <strong>de</strong> un mantenimiento a<strong>de</strong>cuado.<br />
f) Mantenga las herramientas <strong>de</strong> corte afiladas y<br />
limpias. Las herramientas <strong>de</strong> corte con bor<strong>de</strong>s <strong>de</strong><br />
corte afilados son menos propensas a trabarse y son<br />
más fáciles <strong>de</strong> controlar.<br />
g) Utilice la herramienta eléctrica, los accesorios y<br />
las brocas etc. <strong>de</strong> acuerdo con estas <strong>instrucciones</strong><br />
y <strong>de</strong> la forma prevista para el tipo específico <strong>de</strong><br />
herramienta eléctrica, teniendo en cuenta las<br />
condiciones <strong>de</strong> trabajo y el trabajo a realizar. El uso<br />
<strong>de</strong> la herramienta eléctrica para operaciones distintas<br />
<strong>de</strong> aquellas para las que fue diseñada podría causar<br />
une situación peligrosa.<br />
5) Servicio y reparaciones<br />
a) Haga que su herramienta eléctrica reciba<br />
servicio <strong>de</strong> un técnico <strong>de</strong> reparaciones calificado,<br />
utilizando únicamente piezas <strong>de</strong> recambio<br />
idénticas. Esto asegurará que se mantenga la<br />
seguridad <strong>de</strong> la herramienta eléctrica.<br />
ADVERTENCIAS DE SEGURIDAD ADICIONALES PARA<br />
LIJADORAS DE HUSILLO<br />
Las advertencias, precauciones e <strong>instrucciones</strong> que<br />
aparecen en este manual no cubren todas las posibles<br />
condiciones y situaciones que puedan ocurrir. El operador<br />
<strong>de</strong>be enten<strong>de</strong>r que el sentido común y la cautela son<br />
factores que no se pue<strong>de</strong>n construir en este producto,<br />
sino que <strong>de</strong>ben proporcionarse por el operador.<br />
No haga funcionar la lijadora <strong>de</strong> husillo antes <strong>de</strong> que<br />
esté completamente montada y antes <strong>de</strong> haber leído y<br />
comprendido las siguientes <strong>instrucciones</strong> y etiquetas <strong>de</strong><br />
advertencia presentes en la lijadora <strong>de</strong> husillo.<br />
1. Compruebe el estado <strong>de</strong> la lijadora <strong>de</strong> husillo. En el<br />
caso <strong>de</strong> que falte cualquier parte, esté doblada o no<br />
funcione a<strong>de</strong>cuadamente, reemplace la pieza antes <strong>de</strong><br />
usar la lijadora.<br />
2. Determine el tipo <strong>de</strong> trabajo que va a llevar a cabo<br />
antes <strong>de</strong> poner en funcionamiento la lijadora <strong>de</strong> husillo.<br />
3. Asegure su trabajo. Apoye la pieza <strong>de</strong> trabajo <strong>de</strong> forma<br />
segura sobre la mesa, y sosténgala con las dos manos.<br />
4. Esté al tanto <strong>de</strong> la dirección <strong>de</strong> avance. Introduzca<br />
la pieza <strong>de</strong> trabajo en el rodillo <strong>de</strong> lija en contra <strong>de</strong>l<br />
sentido <strong>de</strong> giro <strong>de</strong>l rodillo <strong>de</strong> lija.<br />
5. Siempre mantenga las manos fuera <strong>de</strong> la trayectoria<br />
<strong>de</strong> la lijadora y lejos <strong>de</strong> los rodillos <strong>de</strong> lijado. Evite<br />
posiciones <strong>de</strong> la mano don<strong>de</strong> un resbalón repentino<br />
podría hacer que su mano se mueva hacia el husillo. No<br />
intente alcanzar nada que esté por <strong>de</strong>bajo <strong>de</strong> la pieza<br />
<strong>de</strong> trabajo o cerca <strong>de</strong>l rodillo <strong>de</strong> lija, mientras que el<br />
husillo está girando.<br />
6. Desconecte la lijadora <strong>de</strong>spués <strong>de</strong> apagar el interruptor<br />
<strong>de</strong> encendido. Espere a que el husillo <strong>de</strong>je <strong>de</strong> girar<br />
antes <strong>de</strong> realizar el mantenimiento. La lijadora <strong>de</strong>be<br />
estar <strong>de</strong>sconectada cuando no se esté utilizando o<br />
cuando se cambian los insertos, rodillos <strong>de</strong> lijado,<br />
tambores <strong>de</strong> goma u otros artículos.<br />
7. Asegúrese <strong>de</strong> que no haya clavos u objetos extraños en<br />
el área <strong>de</strong> la pieza que va a lijarse.<br />
8. Nunca utilice esta lijadora para lijar en húmedo.<br />
El incumplimiento con lo anterior podría producir<br />
<strong>de</strong>scargas eléctricas, causando daños graves o más<br />
serios.<br />
9. Utilice sólo piezas <strong>de</strong> repuesto idénticas cuando realice<br />
el servicio <strong>de</strong> mantenimiento <strong>de</strong> esta lijadora <strong>de</strong> husillo.<br />
10. Asegúrese <strong>de</strong> que el husillo ha llegado a <strong>de</strong>tenerse por<br />
completo antes <strong>de</strong> tocar la pieza <strong>de</strong> trabajo.<br />
11. Tome precauciones al lijar superficies pintadas. NO<br />
SE RECOMIENDA lijar pinturas a base <strong>de</strong> plomo. Es<br />
muy difícil <strong>de</strong> controlar el polvo contaminado, y podría<br />
causar envenenamiento por plomo.<br />
Al lijar pintura:<br />
• Proteja sus pulmones. Utilice una máscara contra el<br />
polvo o respirador.<br />
• No permita que niños o mujeres embarazadas<br />
permanezcan en el área <strong>de</strong> trabajo hasta que el trabajo<br />
<strong>de</strong> lijado <strong>de</strong> pintura haya terminado y se haya realizado<br />
la limpieza.<br />
• No coma, ni beba, ni fume en un área don<strong>de</strong> las<br />
superficies pintadas se estén lijando.<br />
• Utilice un sistema <strong>de</strong> recolección <strong>de</strong> polvo cuando sea<br />
posible. Selle el área <strong>de</strong> trabajo con plástico. No limpie<br />
el polvo <strong>de</strong> pintura que esté fuera <strong>de</strong>l área <strong>de</strong> trabajo.<br />
• Limpie el área cuando haya terminado con el trabajo <strong>de</strong><br />
pintura y lijado.<br />
36<br />
Instrucciones generales <strong>de</strong> seguridad
SIMBOLOS<br />
PROTECCIÓN MEDIOAMBIENTAL<br />
Los productos eléctricos usados no se <strong>de</strong>ben<br />
mezclar con la basura casera. Están sujetos<br />
al principio <strong>de</strong> recogida selectiva. Solicite<br />
información a su ayuntamiento o distribuidor<br />
sobre las opciones <strong>de</strong> reciclaje.<br />
Siempre lleve protección auditiva, protección<br />
ocular y respiratoria<br />
Conforme a las normas <strong>de</strong> seguridad y a la<br />
legislación correspondientes<br />
ADVERTENCIA: No utilizar<br />
el producto antes <strong>de</strong> haber leído y entendido<br />
el manual <strong>de</strong>l usuario.<br />
ADVERTENCIA<br />
Doble aislamiento para una protección<br />
adicional<br />
MONTAJE<br />
Asegúrese siempre <strong>de</strong> que la herramienta<br />
esté apagada y <strong>de</strong>sconectada <strong>de</strong> la fuente <strong>de</strong><br />
alimentación antes <strong>de</strong> hacer cualquier ajuste o instalación<br />
o retirar accesorios.<br />
MONTAJE EN EL BANCO<br />
Si la lijadora <strong>de</strong> husillo se va a utilizar en una posición <strong>de</strong><br />
forma permanente se recomienda que la fije <strong>de</strong> forma<br />
segura a una superficie <strong>de</strong> trabajo rígida.<br />
• Utilice los orificios en la base <strong>de</strong> la lijadora <strong>de</strong> husillo<br />
como una plantilla para marcar y perforar cuatro<br />
agujeros en la superficie que <strong>de</strong>sea utilizar como<br />
superficie <strong>de</strong> montaje. Fije la lijadora <strong>de</strong> husillo en<br />
posición con gran<strong>de</strong>s pernos, tuercas y aran<strong>de</strong>las (no<br />
suministrados).<br />
• Si la lijadora <strong>de</strong> husillo está <strong>de</strong>stinada a ser más<br />
portátil, fije un tablero a la base que pueda fijarse<br />
fácilmente y quitarse<br />
<strong>de</strong> varias superficies <strong>de</strong><br />
montaje<br />
• Si utiliza pernos asegúrese<br />
<strong>de</strong> que sean lo suficiente<br />
largos como para penetrar<br />
en el banco <strong>de</strong> trabajo o<br />
tablero para ofrecer una<br />
solución segura.<br />
SELECCIÓN DE UN INSERTO DE MESA<br />
Si no se utiliza el inserto <strong>de</strong> mesa correcto con su rodillo<br />
<strong>de</strong> lija correspondiente, podría resultar en un pellizco en<br />
los <strong>de</strong>dos o que la pieza se empuje hacia abajo entre el<br />
inserto y el rodillo <strong>de</strong> lija.<br />
Diámetro <strong>de</strong><br />
rodillo <strong>de</strong> lija<br />
Diámetro <strong>de</strong>l<br />
agujero central<br />
<strong>de</strong>l inserto <strong>de</strong><br />
mesa<br />
Tamaño <strong>de</strong><br />
la aran<strong>de</strong>la<br />
superior <strong>de</strong>l<br />
husillo<br />
13 mm 13 mm Piccola<br />
19 mm 19 mm Media<br />
26 mm 26 mm Media<br />
38 mm 38 mm Gran<strong>de</strong><br />
51 mm 51 mm Gran<strong>de</strong><br />
76 mm 76 mm Gran<strong>de</strong><br />
El rodillo <strong>de</strong> lija <strong>de</strong>be encajar perfectamente en el recorte<br />
central <strong>de</strong>l inserto <strong>de</strong> mesa.<br />
Utilice la siguiente tabla para <strong>de</strong>terminar cual es el inserto<br />
<strong>de</strong> mesa correcto y la aran<strong>de</strong>la superior <strong>de</strong>l husillo a<br />
utilizar con los rodillos <strong>de</strong> lijado.<br />
EXTRACCIÓN DE POLVO<br />
Se recomienda que la lijadora <strong>de</strong> husillo se utilice con un<br />
sistema <strong>de</strong> extracción <strong>de</strong> polvo para un entorno <strong>de</strong> trabajo<br />
más limpio y seguro.<br />
1. Conecte la manguera <strong>de</strong>l sistema <strong>de</strong> extracción <strong>de</strong><br />
polvo al orificio recolector <strong>de</strong> polvo (13) y asegúrese <strong>de</strong><br />
que está fijada <strong>de</strong> forma segura.<br />
2. Para una mayor eficiencia, active el sistema <strong>de</strong><br />
extracción <strong>de</strong> polvo antes <strong>de</strong> poner en marcha la<br />
lijadora <strong>de</strong> husillo.<br />
COMO COLOCAR UN RODILLO DE LIJA<br />
Nota: Todos los rodillos <strong>de</strong> lijado, excepto el más pequeño<br />
<strong>de</strong> 13 mm encajan y pue<strong>de</strong>n colocarse por encima <strong>de</strong> un<br />
tambor <strong>de</strong> goma correspondiente (12).<br />
Simbolos / Montaje 37<br />
E
E<br />
1. Coloque la aran<strong>de</strong>la inferior<br />
<strong>de</strong>l husillo (7) sobre el<br />
husillo (5) con el lado <strong>de</strong> la<br />
aleta mirando hacia abajo.<br />
2. Seleccione el rodillo <strong>de</strong><br />
lija correcto (11) según el<br />
trabajo que va a realizar.<br />
Seleccione el tambor <strong>de</strong><br />
goma correspondiente (12),<br />
(excepto cuando utilice el<br />
rodillo <strong>de</strong> lija <strong>de</strong> 13 mm).<br />
El tambor <strong>de</strong> lijado se utiliza SIN rodillo <strong>de</strong> lija.<br />
3. Seleccione el inserto <strong>de</strong><br />
mesa correspondiente (10)<br />
en conformidad con la tabla<br />
anterior (ver “Selección <strong>de</strong><br />
un inserto <strong>de</strong> mesa”).<br />
4. Coloque el inserto en la<br />
mesa (10) sobre el husillo (5)<br />
y sobre la aran<strong>de</strong>la inferior<br />
<strong>de</strong>l husillo. Asegúrese <strong>de</strong><br />
que el inserto esté al ras<br />
con la mesa.<br />
5. Coloque el tambor <strong>de</strong> goma<br />
(12) sobre el husillo.<br />
6. Deslice el rodillo <strong>de</strong> lija (11)<br />
sobre el tambor <strong>de</strong> goma<br />
(12).<br />
7. Coloque la aran<strong>de</strong>la<br />
superior <strong>de</strong>l husillo (9) sobre<br />
el husillo (5).<br />
FUNCIONAMIENTO<br />
ENCENDIDO Y APAGADO<br />
• El interruptor <strong>de</strong> encendido/<br />
apagado (2) se encuentra<br />
en la parte <strong>de</strong>lantera <strong>de</strong> la<br />
lijadora <strong>de</strong> husillo.<br />
• Para encen<strong>de</strong>r la lijadora <strong>de</strong><br />
husillo, pulse el botón ver<strong>de</strong><br />
marcado con una (-).<br />
• Para apagar la lijadora,<br />
pulse el botón rojo marcado<br />
con una (O).<br />
LIJADO<br />
• ADVERTENCIA: No lije metal con esta lijadora. Lijar<br />
metal pue<strong>de</strong> causar chispas que pue<strong>de</strong>n incendiar la<br />
ma<strong>de</strong>ra y partículas <strong>de</strong> polvo en la lijadora o en el taller.<br />
• NOTA: El husillo gira en sentido en contra <strong>de</strong> las agujas<br />
<strong>de</strong>l reloj.<br />
1. Compruebe que la máquina esté montada <strong>de</strong> forma<br />
segura en la mesa <strong>de</strong> trabajo y que la tuerca <strong>de</strong><br />
• Utilice la aran<strong>de</strong>la <strong>de</strong> gran<br />
tamaño con los tambores <strong>de</strong><br />
goma <strong>de</strong> 76 mm, 51 mm y<br />
38 mm,<br />
• Use la aran<strong>de</strong>la mediana<br />
con los tambores <strong>de</strong> goma<br />
<strong>de</strong> 26 mm y 19 mm,<br />
• Use la aran<strong>de</strong>la pequeña<br />
con el rodillo <strong>de</strong> lija <strong>de</strong> 13<br />
mm.<br />
8. Coloque la tuerca <strong>de</strong><br />
bloqueo <strong>de</strong>l husillo (6) sobre<br />
el husillo (5). Apriete la<br />
tuerca lo suficiente como<br />
para expandir el tambor <strong>de</strong><br />
goma (12) contra el rodillo<br />
<strong>de</strong> lija (11). No apriete<br />
<strong>de</strong>masiado. Cuando el<br />
rodillo <strong>de</strong> lija esté<br />
completamente <strong>de</strong>sgastado es posible darle la vuelta<br />
y maximizar su vida <strong>de</strong> servicio mediante el uso <strong>de</strong> la<br />
arena restante.<br />
No utilice un rodillo <strong>de</strong> lija que esté <strong>de</strong>masiado<br />
<strong>de</strong>sgastado. Esto podría resultar en un calentamiento<br />
excesivo y daños al tambor <strong>de</strong> goma. La garantía no<br />
cubrirá daños en los tambores que se hayan producido<br />
por utilizar rodillos <strong>de</strong>sgastados.<br />
bloqueo <strong>de</strong>l husillo (6) esté bien fijada con el rodillo<br />
<strong>de</strong> lija y el inserto a<strong>de</strong>cuados, <strong>de</strong> acuerdo con las<br />
orientaciones proporcionadas en la sección 'Montaje'.<br />
2. Asegúrese <strong>de</strong> llevar puesto todo el equipo <strong>de</strong> seguridad<br />
necesario, incluyendo mascarilla y gafas <strong>de</strong> seguridad,<br />
a continuación ponga en marcha el sistema <strong>de</strong><br />
extracción <strong>de</strong> polvo (si está disponible).<br />
3. Encienda la lijadora y <strong>de</strong>je que el motor <strong>de</strong> alcance la<br />
velocidad máxima.<br />
4. Introduzca la pieza poco a poco, CONTRA el sentido <strong>de</strong><br />
giro, en el rodillo <strong>de</strong> lija.<br />
• No fuerce la pieza <strong>de</strong> trabajo, ni aplique una fuerza<br />
excesiva,<br />
• Únicamente guíe la pieza <strong>de</strong> trabajo contra la dirección<br />
<strong>de</strong> giro, o <strong>de</strong> lo contrario la fuerza <strong>de</strong> giro <strong>de</strong>l rodillo <strong>de</strong><br />
lijado hará que la pieza <strong>de</strong> trabajo se <strong>de</strong>splace o rebote<br />
fuera <strong>de</strong>l rodillo <strong>de</strong> lija.<br />
5. Cuando termine, apague la máquina y <strong>de</strong>sconéctela <strong>de</strong><br />
la red eléctrica.<br />
38<br />
Montaje / Funcionamiento
SERVICIO Y MANTENIMIENTO<br />
ADVERTENCIA. Asegúrese siempre <strong>de</strong> que la<br />
herramienta esté apagada y el enchufe retirado <strong>de</strong>l<br />
punto <strong>de</strong> alimentación antes <strong>de</strong> realizar cualquier ajuste o<br />
procedimiento <strong>de</strong> mantenimiento.<br />
• Si la herramienta se ha <strong>de</strong>teriorado, <strong>de</strong>be <strong>de</strong> ser<br />
reparada e inspeccionada por una persona cualificada<br />
antes <strong>de</strong> todo uso.<br />
• Le herramienta <strong>de</strong>be <strong>de</strong> ser reparada por una persona<br />
cualificada usando únicamente piezas <strong>de</strong> recambio<br />
idénticas para garantizar la seguridad <strong>de</strong>l aparato.<br />
INSPECCIÓN GENERAL<br />
Compruebe regularmente que todos los tornillos <strong>de</strong><br />
fijación están apretados. Pue<strong>de</strong>n vibrar y aflojarse a lo<br />
largo <strong>de</strong>l tiempo.<br />
MANTENIMIENTO DEL CABLE DE ALIMENTACIÓN<br />
Si el cable <strong>de</strong> alimentación necesita sustitución, la<br />
tarea <strong>de</strong>be ser realizada por el fabricante, el agente <strong>de</strong>l<br />
fabricante o un centro <strong>de</strong> servicio autorizado para evitar<br />
poner en riesgo la seguridad.<br />
LIMPIEZA<br />
1. Elimine el polvo y la suciedad con regularidad. Aspire o<br />
retire con frecuencia el polvo <strong>de</strong> la lijadora y <strong>de</strong> todas<br />
sus piezas y <strong>de</strong> la cubierta <strong>de</strong>l motor.<br />
2. Periódicamente retire el inserto y la aran<strong>de</strong>la inferior<br />
<strong>de</strong>l husillo y elimine la acumulación <strong>de</strong> polvo.<br />
3. Vuelva a lubricar todas las partes en movimiento a<br />
intervalos regulares.<br />
4. Nunca utilice agentes cáusticos para limpiar las piezas<br />
<strong>de</strong> plástico.<br />
Se recomienda utilizar un paño hume<strong>de</strong>cido con un<br />
<strong>de</strong>tergente suave. El agua no <strong>de</strong>berá entrar jamás en<br />
contacto con la unidad.<br />
GARANTIA<br />
Para registrar su garantía, visite nuestro sitio web en www.<br />
tritontools.com* e introduzca sus datos.<br />
Estos datos serán incluidos en nuestra lista <strong>de</strong> direcciones<br />
(salvo indicación contraria) <strong>de</strong> manera que pueda recibir<br />
información sobre nuestras noveda<strong>de</strong>s. Sus datos no serán<br />
cedidos a terceros.<br />
RECORDATORIO DE SU COMPRA<br />
Fecha <strong>de</strong> compra: ___ / ___ / ____<br />
Mo<strong>de</strong>lo: TSPS450<br />
Número <strong>de</strong> serie__________________<br />
Conserve su recibo como prueba <strong>de</strong> compra.<br />
<strong>Triton</strong> Precision Power <strong>Tools</strong> garantiza al comprador<br />
<strong>de</strong> este producto que si alguna pieza resulta ser<br />
<strong>de</strong>fectuosa a causa <strong>de</strong> materiales o <strong>de</strong> mano<br />
<strong>de</strong> obra <strong>de</strong>ntro <strong>de</strong> los 12 MESES siguientes a la<br />
compra, <strong>Triton</strong> reparará o, a su discreción, sustituirá<br />
la pieza <strong>de</strong>fectuosa sin cargo.<br />
Está garantía no se aplica al uso comercial ni se<br />
amplia al <strong>de</strong>sgaste normal o a los daños resultantes<br />
<strong>de</strong> un acci<strong>de</strong>nte, <strong>de</strong> un abuso o <strong>de</strong> una mala<br />
utilización.<br />
* Regístrese en línea <strong>de</strong>ntro <strong>de</strong> 30 días.<br />
Se aplican los términos y condiciones.<br />
Esto no afecta a sus <strong>de</strong>rechos legales<br />
E<br />
Servicio y Mantenimiento / Garantia<br />
39
DECLARATION OF CONFORMITY<br />
The Un<strong>de</strong>rsigned: Mr Darrell Morris as authorized by: TRITON Declare that:<br />
PRODUCT CODE: TSPS450 DESCRIPTION: Spindle San<strong>de</strong>r 220–240V~ 50 Hz<br />
CONFORMS TO THE FOLLOWING DIRECTIVES: • Machinery Directive 2006/42/EC • Low Voltage Directive 2006/95/EC • EMC Directive 2004/108/EC<br />
• ROHS Directive 2002/95/EC • EN61029-1:2009 • EN55014-1/A1:2009 EN55014-2/A2:2008 • EN61000-3-2/A2:2009; EN61000-3-3:2008<br />
THE TECHNICAL DOCUMENTATION IS KEPT BY TRITON<br />
NOTIFIED BODY: JIANGSU TUV PRODUCT SERVICE LTD<br />
PLACE OF DECLARATION: WUXI, CHINA<br />
EG-VERKLARING VAN OVEREENSTEMMING<br />
De On<strong>de</strong>rgeteken<strong>de</strong>: Mr Darrell Morris Gemachtigd door: TRITON Declare that:<br />
TYPE/ SERIENR: TSPS450 NAAM/MODEL: 220–240V~ 50Hz<br />
VOLDOET AAN DE VEREISTEN VAN DE RICHTLIJN: • Machinery Directive 2006/42/EC • Low Voltage Directive 2006/95/EC • EMC Directive 2004/108/EC<br />
• ROHS Directive 2002/95/EC • EN61029-1:2009 • EN55014-1/A1:2009 EN55014-2/A2:2008 • EN61000-3-2/A2:2009; EN61000-3-3:2008<br />
DE TECHNISCHE DOCUMENTATIE WORDT BEWAARD DOOR TRITON<br />
KEURINGSINSTANTIE: JIANGSU TUV PRODUCT SERVICE LTD<br />
PLAATS VAN AFGIFTE: WUXI, CHINA<br />
DÉCLARATION DE CONFORMITÉ CE<br />
Le soussigné: Mr Darrell Morris autorisé par: TRITON Declare that:<br />
TYPE/SÉRIE NO: TSPS450 NOM/MODÈLE: 220–240V~ 50Hz<br />
SE CONFORME AUX DIRECTIVES SUIVANTES: • Machinery Directive 2006/42/EC • Low Voltage Directive 2006/95/EC • EMC Directive 2004/108/EC<br />
• ROHS Directive 2002/95/EC • EN61029-1:2009 • EN55014-1/A1:2009 EN55014-2/A2:2008 • EN61000-3-2/A2:2009; EN61000-3-3:2008<br />
LA DOCUMENTATION TECHNIQUE EST ENREGISTRÉE PAR TRITON<br />
ORGANISMES NOTIFIÉS: JIANGSU TUV PRODUCT SERVICE LTD<br />
ENDROIT DE LA DÉCLARATION: WUXI, CHINA<br />
KONFORMITÄTSERKLÄRUNG<br />
Name <strong>de</strong>s Unterzeichners: Mr Darrell Morris Bevollmächtiger: TRITON Declare that:<br />
BAUART./ SERIENNUMMER: TSPS450 NAME/ DER GERÄTETYP: 220–240V~ 50Hz<br />
PASST SICH AN DIE FOLGENDEN RICHTLINIEN AN: • Machinery Directive 2006/42/EC • Low Voltage Directive 2006/95/EC • EMC Directive 2004/108/EC<br />
• ROHS Directive 2002/95/EC • EN61029-1:2009 • EN55014-1/A1:2009 EN55014-2/A2:2008 • EN61000-3-2/A2:2009; EN61000-3-3:2008<br />
TECHN. UNTERLAGEN HINTERLEGT BEI TRITON<br />
BENNANTE STELLE: JIANGSU TUV PRODUCT SERVICE LTD<br />
ORT: WUXI, CHINA<br />
EC DECHIARAZIONE DI CONFIRMITÁ<br />
Il sottoscritto: Mr Darrell Morris Come autorizzato di: TRITON Declare that:<br />
TIPO/ NUMERO DI SERIE: TSPS450 NOME/ MODELLO: 220–240V~ 50Hz<br />
SI CONFORMA ALL’ INDIRIZZAMENTO: • Machinery Directive 2006/42/EC • Low Voltage Directive 2006/95/EC • EMC Directive 2004/108/EC<br />
• ROHS Directive 2002/95/EC • EN61029-1:2009 • EN55014-1/A1:2009 EN55014-2/A2:2008 • EN61000-3-2/A2:2009; EN61000-3-3:2008<br />
IL DOCUMENTAZIONE TECNICO É MANTENUTO DI TRITON<br />
CORPO INFORMATO: JIANGSU TUV PRODUCT SERVICE LTD<br />
POSTO DI DICHIARAZIONE: WUXI, CHINA<br />
DECLARACIÓN “CE” DE CONFORMIDAD<br />
El abajo firmante: Mr Darrell Morris Autorizad por: TRITON Declare that:<br />
TIPO Y NO SERIE: TSPS450 MODELO/NOMBRE: 220–240V~ 50Hz<br />
SE HALLA EN CONFORMIDAD CON LA DIRECTIVA: • Machinery Directive 2006/42/EC • Low Voltage Directive 2006/95/EC • EMC Directive 2004/108/EC<br />
• ROHS Directive 2002/95/EC • EN61029-1:2009 • EN55014-1/A1:2009 EN55014-2/A2:2008 • EN61000-3-2/A2:2009; EN61000-3-3:2008<br />
LA DOCUMENTACIÓN TÉCNICA SE GUARDA POR TRITON<br />
ORGANISMO NOTIFICADO: JIANGSU TUV PRODUCT SERVICE LTD<br />
LUGAR DE DECLARACIÓN: WUXI, CHINA<br />
Date: 11/1/12<br />
Signed by:<br />
Mr Darrell Morris<br />
Managing Director