Manual de instrucciones - Triton Tools
Manual de instrucciones - Triton Tools
Manual de instrucciones - Triton Tools

You also want an ePaper? Increase the reach of your titles
YUMPU automatically turns print PDFs into web optimized ePapers that Google loves.
PREPARATION<br />
Capacity<br />
• Workpieces must comply with the following minimum<br />
and maximum dimensions:<br />
i. Min thickness: 3.2mm<br />
ii. Min length: 125mm<br />
iii. Min width: 18mm<br />
iv. Max width: 317mm<br />
• To prevent kickback, do not use a workpiece that is<br />
warped, contains knots, or is embed<strong>de</strong>d with foreign<br />
objects (nails, staples, etc)<br />
• This planer is <strong>de</strong>signed for natural wood material only<br />
• Remove glue and any foreign objects from the<br />
workpiece before planing<br />
• Use the entire width of the cutter head to avoid uneven<br />
wear of bla<strong>de</strong>s<br />
• Measure and compare results to check that the bla<strong>de</strong>s<br />
are correctly aligned and/or to <strong>de</strong>termine the amount<br />
of correction required<br />
• If the bla<strong>de</strong>s need to be re-aligned, see 'Maintenance<br />
– Re-aligning the rollercase' for guidance<br />
Setting the <strong>de</strong>pth of cut<br />
• To protect the motor and cutter head, the<br />
recommen<strong>de</strong>d maximum <strong>de</strong>pth of cut for a single pass<br />
is as follows:<br />
Max Depth of Cut<br />
Width of workpiece<br />
Up to 125mm<br />
From 125mm up to 317mm<br />
Max <strong>de</strong>pth of cut<br />
2.38mm<br />
1.6mm<br />
Rollercase height adjustment<br />
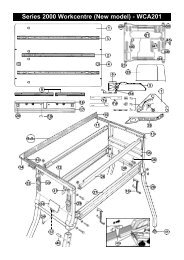
• The Rollercase (1) contains the motor, cutting head<br />
with bla<strong>de</strong>s, and the in-feed and out-feed rollers<br />
• Rotate the Crank Handle (9) to raise or lower the<br />
rollercase. One complete turn of the crank handle<br />
raises or lowers the rollercase 1.58mm (1/16")<br />
• The Scale Pointer (4) and Elevation Scale (3) provi<strong>de</strong><br />
a reading, in metric and imperial graduations, of the<br />
height of the cutter head above the Centre Table<br />
(11) – and therefore the approximate thickness of the<br />
workpiece after planing<br />
• The elevation scale is calibrated at the factory. For<br />
precision woodworking, it is recommen<strong>de</strong>d that<br />
you check the dimension with calipers or a digital<br />
thickness gauge before and after each cutting pass<br />
Checking the rollercase is level<br />
• The rollercase is aligned and checked in the factory.<br />
However, it can become out of alignment during<br />
shipping and handling<br />
• If the rollercase is not level with the Centre Table (11),<br />
this will result in a tapered cut where the thickness on<br />
each si<strong>de</strong> of the workpiece differs. It can also cause<br />
uneven wear of the bla<strong>de</strong><br />
• To check that the bla<strong>de</strong>s are aligned correctly; run two<br />
pieces through each si<strong>de</strong> (left and right) of the planer<br />
To set the <strong>de</strong>pth of cut:<br />
1. Measure the current thickness of the workpiece, and<br />
compare with required thickness<br />
2. Refer to the 'Max Depth of Cut' table above to<br />
<strong>de</strong>termine whether one or more passes are required<br />
3. If just one pass is required:<br />
• Use the crank handle to move the rollercase up<br />
or down until the Scale Pointer (4) indicates, on<br />
the Elevation Scale (3), the finished thickness of<br />
workpiece required<br />
4. If more than one pass will be required:<br />
a) It is recommen<strong>de</strong>d that you divi<strong>de</strong> the total required<br />
into passes of approximately equal <strong>de</strong>pth<br />
b) For the first and any intermediate cuts, set the height<br />
of the rollercase at current workpiece thickness minus<br />
<strong>de</strong>pth calculated in step (a) above<br />
c) Check measurements after each cut with callipers or a<br />
digital thickness gauge<br />
Switching on and off<br />
• The On/Off Switch (13) is located on the front of the<br />
planer<br />
• To turn the planer ON, press the green ON (I) button<br />
• To turn the planer OFF, push the red OFF (0) button<br />
GB<br />
Preparation<br />
7