

12-Cup Programmable Coffeemaker Cafetera programable de 12 ...
12-Cup Programmable Coffeemaker Cafetera programable de 12 ...
12-Cup Programmable Coffeemaker Cafetera programable de 12 ...

Create successful ePaper yourself
Turn your PDF publications into a flip-book with our unique Google optimized e-Paper software.
8<br />
6<br />
4<br />
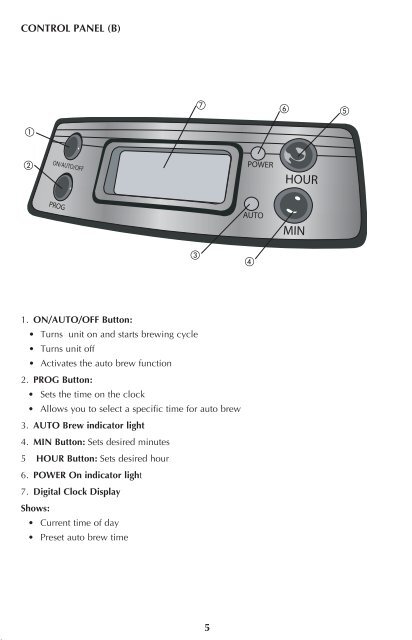
CONTROL PANEL (B)<br />
<br />
<br />
<br />
<br />
How to use:<br />
This unit is for household use only.<br />
GETTING STARTED:<br />
• Remove all packing material, and any stickers from the product.<br />
• Remove and save literature<br />
• Wash all removable parts as instructed in Care and Cleaning section of<br />
this manual.<br />
• Pour fresh cold water up to <strong>12</strong>-cup level mark into the<br />
water reservoir (C).<br />
<br />
ON/AUTO/OFF<br />
POWER<br />
HOUR<br />
10<br />
COFFEE WATER<br />
<strong>12</strong><br />
PROG<br />
AUTO<br />
<br />
<br />
1. ON/AUTO/OFF Button:<br />
• Turns unit on and starts brewing cycle<br />
• Turns unit off<br />
• Activates the auto brew function<br />
2. PROG Button:<br />
• Sets the time on the clock<br />
• Allows you to select a specific time for auto brew<br />
3. AUTO Brew indicator light<br />
4. MIN Button: Sets <strong>de</strong>sired minutes<br />
5 HOUR Button: Sets <strong>de</strong>sired hour<br />
6. POWER On indicator light<br />
7. Digital Clock Display<br />
Shows:<br />
• Current time of day<br />
• Preset auto brew time<br />
MIN<br />
C<br />
D<br />
- 8 -<br />
- 6 -<br />
- 4 -<br />
• Place empty paper filter into filter basket (D).<br />
• Uncoil power cord and plug into standard electrical<br />
outlet.<br />
• Press ON/AUTO/OFF button to brew water through<br />
appliance without adding coffee grounds. This<br />
removes any dust or residue that may remain in the<br />
system during the manufacturing process.<br />
• Discard the water from the carafe. Turn off the<br />
appliance; unplug it and allow appliance to cool down.<br />
SETTING THE CLOCK:<br />
1. Plug appliance into standard electrical outlet.<br />
2. The digital clock displays <strong>12</strong>:00 A.M.<br />
3. Press the Program button; the word Clock appears<br />
on the top right of the display (E).<br />
4. To change the time: Press HOUR button until the<br />
correct time appears on the display. Repeat with the<br />
E<br />
MIN button.<br />
ON/AUTO/OFF<br />
PROG<br />
<strong>12</strong>:00<br />
AM<br />
CLOCK<br />
POWER<br />
AUTO<br />
-4-<br />
-2-<br />
-6-<br />
-<strong>12</strong>-<br />
-10-<br />
-2-<br />
-<strong>12</strong>-<br />
-10-<br />
-8-<br />
HOUR<br />
MIN<br />
TIP: holding the button down makes the hours and minutes change rapidly;<br />
tapping changes the time in 1 minute increments.<br />
NOTE: If the unit is unplugged or power is interrupted even momentarily, the time<br />
will need to be reset (follow steps 1-4).<br />
5<br />
6


