Riva 2 - Thermor
Riva 2 - Thermor
Riva 2 - Thermor

You also want an ePaper? Increase the reach of your titles
YUMPU automatically turns print PDFs into web optimized ePapers that Google loves.
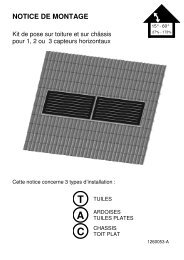
2) How to install the device<br />
The installation template is printed on the packaging.<br />
1/ Unfasten the carton’s flaps and place it<br />
against the wall with the lower flap folded<br />
back and resting flat on he floor. Prick out<br />
the four drill holes though the packaging<br />
(without drilling) and then remove the packaging.<br />
2/ Carefully mark the drilling points with a<br />
pencil (draw a cross, 2 cm wide).<br />
3/ Drill the holes.<br />
4/ Screw on and orient the sleeve in place. Fit<br />
the screws with the washers provided.<br />
5/ Screw the pins on the tubes without locking<br />
them. Check they are correctly positioned<br />
by inserting them in the sleeves, with the<br />
device. After finding the right position, tighten<br />
the screws on each pin.<br />
6/ Place the device on the wall, in the sleeves.<br />
Tighten all the locking screws. Fit the caps<br />
on the ends of the pins.<br />
Note: The pins supplied with the device are of the standard<br />
type. In case of a particular stand, use appropriate pins.<br />
B<br />
C<br />
200 mm 200 mm<br />
A<br />
SOL<br />
Measurement for fitting lugs (mm)<br />
Power A B C<br />
GB<br />
2<br />
3<br />
500 W<br />
656<br />
750 W<br />
320<br />
mini<br />
1066<br />
1000 W 1599<br />
400<br />
1500W<br />
451<br />
1750W<br />
525<br />
mini<br />
861<br />
2000W 1394<br />
386<br />
4 5<br />
6<br />
17