
You also want an ePaper? Increase the reach of your titles
YUMPU automatically turns print PDFs into web optimized ePapers that Google loves.
AVVERTENZE GENERALI - Sia nella fase di rodaggio che successivamente, non richiedere mai<br />
la massima potenza del veicolo prima del raggiungimento della temperatura ottimale di esercizio.<br />
L’assestamento dei vari organi si ottiene mediamente dopo circa 500 km. Si raccomanda una<br />
buona messa a punto generale del motore, del carburatore e del variatore. Questo kit è stato<br />
studiato per alte prestazioni ad alto numero di giri e una taratura errata potrebbe comprometterne<br />
il buon funzionamento.<br />
Consigliamo quindi di usare sempre ricambi originali Polini Motori.<br />
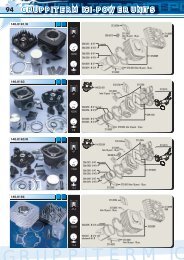
KIT 133.1010 Smontare i prigionieri testa dal cilindro originale e rimontarli sul nuovo cilindro.<br />
Sostituire le lamelle originali con quelle in dotazione nel kit tenendo la scritta Polini all’esterno<br />
della valvola.<br />
KIT 140.0195-140.0196 Si consiglia l’utilizzo della candela Champion C53.<br />
KIT 166.0081-166.0082 Importante! Solo per kit 166.0082: si monta solo con l’albero motore<br />
speciale Polini con spinotto Ø12. Anticipo. È di estrema importanza la sistemazione ottimale<br />
dell’anticipo motore: a 5000 g/m a 17° dal P.M.S.; con comparatore a 1.0 mm. dal P.M.S.<br />
Candela. Si consiglia l’uso della candela Champion L77 JC4.<br />
Se si mantiene il carburatore ed il filtro originale, montare il getto max 88 e la lamella in<br />
carbonio in dotazione nel kit.<br />
KIT 166.0096-166.0097. Importante! si montano solo con l’albero motore speciale Polini con<br />
spinotto Ø12.<br />
ENGLISH<br />
POLINI EVOLUTION KIT<br />
WARRANTY: before assembling the new Polini power unit, carefully read the warranty manual<br />
provided with the product.<br />
PROCEDURE: it is quite easy to assemble this kit, but it is important to carefully follow some<br />
precautions. Wash the vehicle and the engine zone with great care. Disassemble the old power unit<br />
and verify that all the mechanical parts are in perfect condition (bearings, crankshaft and piston<br />
pin’s roller cage) and if damaged, replace them. Before assembling the engine, accurately wash<br />
the cylinder, the piston and the head with petrol and blow in a jet of compressed air; then lubricate<br />
the cylinder liner and all the moving parts with mixture oil. Assemble the piston keeping the arrow<br />
towards the exhaust; if there is no arrow; fit the piston with the pin rings towards the induction.<br />
Check that the piston pin rings perfectly enter their housing. Assemble the cylinder without the piston<br />
rings then rotate the crankshaft, check that the piston slides freely. If a problem occurs, detect<br />
the cause and eliminate it. To achieve the maximum from your Polini power unit, it is necessary to<br />
measure the “squish”. In order to measure it, insert the base gasket, assemble the cylinder and<br />
the piston and insert a tin (solder) wire on it, in the direction of the piston pin (thickness: 1 mm).<br />
Torque the power unit remembering to lock up the fixing screw nuts crosswise.<br />
Delicately turn the flywheel by passing three times through top dead centre.<br />
Then disassemble the head and check the thickness of the tin wire with a calliper (see the schedule<br />
for references). Once finished, reassemble the head with its piston pin rings and again torque the<br />
fixing screw nuts crosswise.<br />
Because of the large power increase, in order to avoid the risk of exceeding the maximum number<br />
of revolutions and of racing the engine, we suggest you using longer transmission gears by<br />
substituting the gear set and/or the sprocket – gear set.<br />
Attention! Silencers and tuned-up exhaust systems which replace the original ones need a specific<br />
carburator’s set up for the correct functioning of the whole group. Different calibrations can be<br />
pointedly different from our data or from the recommended jets.<br />
If you decide to fit other Polini products together with the power unit, please look up in our<br />
catalogues or visit our web site www.polini.com .<br />
RUNNING IN - During the first 500 Km do not exceed ¾ of the accelerator opening and avoid<br />
covering long upward runs which will put the engine under strain.<br />
GENERAL SUGGESTIONS - Both during the running-in and after never try getting maximum<br />
power before achieving the best running temperature. The bedding in of the various parts will<br />
be obtained after an average of about 500 km. We suggest a careful set up of the engine, the<br />
carburator and the variator. This kit has been studied for extreme performance at high revolutions.<br />
A wrong calibration could compromise the engine performance.<br />
Therefore we suggest you using original Polini Motori spare parts o<strong>nl</strong>y<br />
KIT 133.1010 Disassemble the head studs from the original cylinder and reassemble them on<br />
the new cylinder. Replace the original reeds by those provided with the kit, by putting the writing<br />
“Polini” on the outside of the valve.<br />
KIT 140.0195-140.0196 We recommend the use of a spark plug Champion C53<br />
KIT 166.0081-166.0082 Important! O<strong>nl</strong>y for kit 166.0082: it can be assembled o<strong>nl</strong>y with the<br />
special Polini crankshaft Ø12. Advance. It is really important to set the engine’s advance at the<br />
best: at 5000 rpm at 17° from the top dead centre; with the dial gauge at 1.0 mm from the top<br />
dead centre. Spark plug. We recommend the use of a Champion spark plug L77 JC4.<br />
If you keep the original carburator and filter, assemble the 88 max. jet and the carbon reed<br />
provided with the kit.<br />
KIT 166.0096-166.0097 Important! It can be assembled o<strong>nl</strong>y with the special Polini<br />
crankshaft Ø12.<br />
FRANÇAIS<br />
KIT POLINI EVOLUTION<br />
GARANTIE: avant de commencer le montage du nouveau groupe thermique Polini, lire attentivement<br />
le certificat de garantie ci-joint.<br />
DEROULEMENT: le montage du kit n’entraîne pas de difficultés particulières, mais il y a des<br />
précautions à suivre avec attention. Nettoyer soigneusement le véhicule, la partie du moteur en