
You also want an ePaper? Increase the reach of your titles
YUMPU automatically turns print PDFs into web optimized ePapers that Google loves.
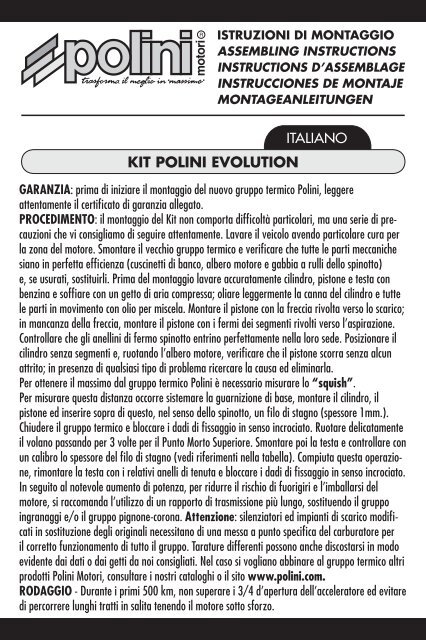
Istruzioni di montaggio<br />
assembling Instructions<br />
Instructions d’assemblage<br />
INSTRUCCIONES DE MONTAJE<br />
MONTAGEANLEITUNGEN<br />
ITALIANO<br />
KIT POLINI EVOLUTION<br />
GARANZIA: prima di iniziare il montaggio del nuovo gruppo termico Polini, leggere<br />
attentamente il certificato di garanzia allegato.<br />
PROCEDIMENTO: il montaggio del Kit non comporta difficoltà particolari, ma una serie di precauzioni<br />
che vi consigliamo di seguire attentamente. Lavare il veicolo avendo particolare cura per<br />
la zona del motore. Smontare il vecchio gruppo termico e verificare che tutte le parti meccaniche<br />
siano in perfetta efficienza (cuscinetti di banco, albero motore e gabbia a rulli dello spinotto)<br />
e, se usurati, sostituirli. Prima del montaggio lavare accuratamente cilindro, pistone e testa con<br />
benzina e soffiare con un getto di aria compressa; oliare leggermente la canna del cilindro e tutte<br />
le parti in movimento con olio per miscela. Montare il pistone con la freccia rivolta verso lo scarico;<br />
in mancanza della freccia, montare il pistone con i fermi dei segmenti rivolti verso l’aspirazione.<br />
Controllare che gli anellini di fermo spinotto entrino perfettamente nella loro sede. Posizionare il<br />
cilindro senza segmenti e, ruotando l’albero motore, verificare che il pistone scorra senza alcun<br />
attrito; in presenza di qualsiasi tipo di problema ricercare la causa ed eliminarla.<br />
Per ottenere il massimo dal gruppo termico Polini è necessario misurare lo “squish”.<br />
Per misurare questa distanza occorre sistemare la guarnizione di base, montare il cilindro, il<br />
pistone ed inserire sopra di questo, nel senso dello spinotto, un filo di stagno (spessore 1mm.).<br />
Chiudere il gruppo termico e bloccare i dadi di fissaggio in senso incrociato. Ruotare delicatamente<br />
il volano passando per 3 volte per il Punto Morto Superiore. Smontare poi la testa e controllare con<br />
un calibro lo spessore del filo di stagno (vedi riferimenti nella tabella). Compiuta questa operazione,<br />
rimontare la testa con i relativi anelli di tenuta e bloccare i dadi di fissaggio in senso incrociato.<br />
In seguito al notevole aumento di potenza, per ridurre il rischio di fuorigiri e l’imballarsi del<br />
motore, si raccomanda l’utilizzo di un rapporto di trasmissione più lungo, sostituendo il gruppo<br />
ingranaggi e/o il gruppo pignone-corona. Attenzione: silenziatori ed impianti di scarico modificati<br />
in sostituzione degli originali necessitano di una messa a punto specifica del carburatore per<br />
il corretto funzionamento di tutto il gruppo. Tarature differenti possono anche discostarsi in modo<br />
evidente dai dati o dai getti da noi consigliati. Nel caso si vogliano abbinare al gruppo termico altri<br />
prodotti Polini Motori, consultare i nostri cataloghi o il sito www.polini.com.<br />
RODAGGIO - Durante i primi 500 km, non superare i 3/4 d’apertura dell’acceleratore ed evitare<br />
di percorrere lunghi tratti in salita tenendo il motore sotto sforzo.
AVVERTENZE GENERALI - Sia nella fase di rodaggio che successivamente, non richiedere mai<br />
la massima potenza del veicolo prima del raggiungimento della temperatura ottimale di esercizio.<br />
L’assestamento dei vari organi si ottiene mediamente dopo circa 500 km. Si raccomanda una<br />
buona messa a punto generale del motore, del carburatore e del variatore. Questo kit è stato<br />
studiato per alte prestazioni ad alto numero di giri e una taratura errata potrebbe comprometterne<br />
il buon funzionamento.<br />
Consigliamo quindi di usare sempre ricambi originali Polini Motori.<br />
KIT 133.1010 Smontare i prigionieri testa dal cilindro originale e rimontarli sul nuovo cilindro.<br />
Sostituire le lamelle originali con quelle in dotazione nel kit tenendo la scritta Polini all’esterno<br />
della valvola.<br />
KIT 140.0195-140.0196 Si consiglia l’utilizzo della candela Champion C53.<br />
KIT 166.0081-166.0082 Importante! Solo per kit 166.0082: si monta solo con l’albero motore<br />
speciale Polini con spinotto Ø12. Anticipo. È di estrema importanza la sistemazione ottimale<br />
dell’anticipo motore: a 5000 g/m a 17° dal P.M.S.; con comparatore a 1.0 mm. dal P.M.S.<br />
Candela. Si consiglia l’uso della candela Champion L77 JC4.<br />
Se si mantiene il carburatore ed il filtro originale, montare il getto max 88 e la lamella in<br />
carbonio in dotazione nel kit.<br />
KIT 166.0096-166.0097. Importante! si montano solo con l’albero motore speciale Polini con<br />
spinotto Ø12.<br />
ENGLISH<br />
POLINI EVOLUTION KIT<br />
WARRANTY: before assembling the new Polini power unit, carefully read the warranty manual<br />
provided with the product.<br />
PROCEDURE: it is quite easy to assemble this kit, but it is important to carefully follow some<br />
precautions. Wash the vehicle and the engine zone with great care. Disassemble the old power unit<br />
and verify that all the mechanical parts are in perfect condition (bearings, crankshaft and piston<br />
pin’s roller cage) and if damaged, replace them. Before assembling the engine, accurately wash<br />
the cylinder, the piston and the head with petrol and blow in a jet of compressed air; then lubricate<br />
the cylinder liner and all the moving parts with mixture oil. Assemble the piston keeping the arrow<br />
towards the exhaust; if there is no arrow; fit the piston with the pin rings towards the induction.<br />
Check that the piston pin rings perfectly enter their housing. Assemble the cylinder without the piston<br />
rings then rotate the crankshaft, check that the piston slides freely. If a problem occurs, detect<br />
the cause and eliminate it. To achieve the maximum from your Polini power unit, it is necessary to<br />
measure the “squish”. In order to measure it, insert the base gasket, assemble the cylinder and<br />
the piston and insert a tin (solder) wire on it, in the direction of the piston pin (thickness: 1 mm).<br />
Torque the power unit remembering to lock up the fixing screw nuts crosswise.<br />
Delicately turn the flywheel by passing three times through top dead centre.<br />
Then disassemble the head and check the thickness of the tin wire with a calliper (see the schedule<br />
for references). Once finished, reassemble the head with its piston pin rings and again torque the<br />
fixing screw nuts crosswise.<br />
Because of the large power increase, in order to avoid the risk of exceeding the maximum number<br />
of revolutions and of racing the engine, we suggest you using longer transmission gears by<br />
substituting the gear set and/or the sprocket – gear set.<br />
Attention! Silencers and tuned-up exhaust systems which replace the original ones need a specific<br />
carburator’s set up for the correct functioning of the whole group. Different calibrations can be<br />
pointedly different from our data or from the recommended jets.<br />
If you decide to fit other Polini products together with the power unit, please look up in our<br />
catalogues or visit our web site www.polini.com .<br />
RUNNING IN - During the first 500 Km do not exceed ¾ of the accelerator opening and avoid<br />
covering long upward runs which will put the engine under strain.<br />
GENERAL SUGGESTIONS - Both during the running-in and after never try getting maximum<br />
power before achieving the best running temperature. The bedding in of the various parts will<br />
be obtained after an average of about 500 km. We suggest a careful set up of the engine, the<br />
carburator and the variator. This kit has been studied for extreme performance at high revolutions.<br />
A wrong calibration could compromise the engine performance.<br />
Therefore we suggest you using original Polini Motori spare parts o<strong>nl</strong>y<br />
KIT 133.1010 Disassemble the head studs from the original cylinder and reassemble them on<br />
the new cylinder. Replace the original reeds by those provided with the kit, by putting the writing<br />
“Polini” on the outside of the valve.<br />
KIT 140.0195-140.0196 We recommend the use of a spark plug Champion C53<br />
KIT 166.0081-166.0082 Important! O<strong>nl</strong>y for kit 166.0082: it can be assembled o<strong>nl</strong>y with the<br />
special Polini crankshaft Ø12. Advance. It is really important to set the engine’s advance at the<br />
best: at 5000 rpm at 17° from the top dead centre; with the dial gauge at 1.0 mm from the top<br />
dead centre. Spark plug. We recommend the use of a Champion spark plug L77 JC4.<br />
If you keep the original carburator and filter, assemble the 88 max. jet and the carbon reed<br />
provided with the kit.<br />
KIT 166.0096-166.0097 Important! It can be assembled o<strong>nl</strong>y with the special Polini<br />
crankshaft Ø12.<br />
FRANÇAIS<br />
KIT POLINI EVOLUTION<br />
GARANTIE: avant de commencer le montage du nouveau groupe thermique Polini, lire attentivement<br />
le certificat de garantie ci-joint.<br />
DEROULEMENT: le montage du kit n’entraîne pas de difficultés particulières, mais il y a des<br />
précautions à suivre avec attention. Nettoyer soigneusement le véhicule, la partie du moteur en
particulier. Démonter le vieux groupe thermique et vérifier que toutes les parties mécaniques<br />
soient en parfait état (roulements de vilebrequin, vilebrequin, cage à aguille) et, si usagées, les<br />
remplacer. Avant le montage, nettoyer soigneusement le cylindre, le piston et la culasse avec de<br />
l’essence et souffler à l’aide d’un jet à air comprimé; lubrifier légèrement le canon du cylindre<br />
et toutes les parties en mouvement avec de l’huile pour mélange. Monter le piston en faisant<br />
attention que la flèche soit tournée vers l’échappement; s’il n’y a pas de flèche, monter le piston<br />
de façon à ce que les arrêts des segments soient tournés vers l’aspiration. Contrôler que les petites<br />
bagues d’arrêts de l’axe soient bien installées dans leur logement. Loger le cylindre sans les<br />
segments et, en faisant tourner le vilebrequin, vérifier que le piston glisse librement et qu’il n’y ait<br />
pas de friction. Si un problème est détecté, en chercher la cause et l’éliminer.<br />
Pour obtenir le maximum du groupe thermique, il faut mesurer le «squish» en agissant de la<br />
façon suivante: placer le joint d’embase, monter le cylindre et le piston et insérer un fil d’étain<br />
(épaisseur 1mm) sur le piston même, selon la direction de l’axe. Fermer le groupe thermique<br />
et bloquer les écrous de fixation en sens croisé. Tourner délicatement le volant en passant 3 fois<br />
par le Point Mort Supérieur. Une fois cette opération terminée, démonter la culasse et contrôler<br />
l’épaisseur du fil à l’aide d’un calibre centésimal (voir tableau des références). A ce point, monter<br />
la culasse avec ses bagues d’arrêt et serrer les écrous de fixation en sens croisé.<br />
Suite à la considérable qualité du produit, nous recommandons l’utilisation d’un rapport de<br />
transmission plus long, en remplaçant le groupe engrenages et / ou le groupe pignon / couronne,<br />
pour réduire le risque que le moteur monte en tours ou qu’il s’emballe.<br />
Attention: après le remplacement du cylindre et de l’échappement ne pas oublier d’effectuer un<br />
réglage du carburateur pour obtenir un fonctionnement correct.<br />
Si vous voulez monter d’autres produits Polini avec le groupe thermique, consultez nos catalogues<br />
ou le site Internet www.polini.com.<br />
RODAGE - Pendant les premiers 500 km ne pas dépasser les 3/4 d’ouverture de l’accélérateur et<br />
éviter de parcourir de longues distances en côte en tenant le moteur sous effort.<br />
AVERTISSEMENTS GENERAUX - Pendant et après le rodage, ne pas monter en régime<br />
maximum avant d’obtenir la température optimale de fonctionnement. La mise en place des<br />
différentes pièces sera obtenue après les premiers 500km. On recommande une parfaite mise<br />
au point générale du moteur, du carburateur et du variateur. Ce kit a été étudié pour joindre une<br />
meilleure longévité à un numéro de tours élevé. Un tarage erroné peut en compromettre le bon<br />
fonctionnement.<br />
On vous conseille donc d’utiliser uniquement des pièces de rechange Polini Motori.<br />
KIT 133.1010 Démonter les goujons de culasse du cylindre d’origine et les monter sur le<br />
nouveau. Remplacer les lamelles d’origine par celles fournies: l’inscription «Polini» doit rester à<br />
l’extérieur de la valve.<br />
KIT 140.0195-140.0196 On conseille l’usage de la bougie Champion C53.<br />
KIT 166.0081-66.0082 Important! Seulement pour le kit 166.0082: ce kit-ci peut être monté<br />
seulement en combinaison avec le vilebrequin spécial Polini avec axe Ø 12.<br />
Avance. Le réglage optimal de l’avance du moteur est vraiment important: à 5000 r/m, à 17° du<br />
P.M.S.: avec comparateur à 1.0 mm du P.M.S. Bougie: On conseille l’usage de la bougie Champion<br />
L77 JC4. Si on garde le carburateur et le filtre d’origine il faut monter le gigleur max. 88 et la<br />
lamelle de carbone fournie.<br />
KIT 166.0096-166.0097 Important! Ces kits peuvent être montés seulement en combinaison<br />
avec le vilebrequin spécial Polini avec axe Ø 12<br />
ESPAÑOL<br />
KIT POLINI EVOLUTION<br />
GARANTIA: antes de empezar el montaje del nuevo kit Polini, leer cuidadosamente el certificado<br />
de garantia anexo.<br />
PROCEDIMIENTO: el montaje del kit no es difícil pero es muy importante seguir las instrucciones.<br />
Limpiar el vehículo, en particular el motor. Desmontar el cilindro antiguo, verificar que todos los<br />
componentes mecánicos estén en perfectas condiciones (rodamientos de bolas, cigüeñal y caja de<br />
rodillos del bulón) y si estan dañados, reemplazarlos. Antes del montaje, limpiar cuidadosamente<br />
cilindro, pistón y culata con gasolina y secarlos con un chorro de aire; engrasar ligeramente la<br />
camisa del cilindro y todas las partes móviles con aceite para mezcla. Montar el pistón con la flecha<br />
hacia el escape. Si falta la flecha sobre el pistón, montar el pistón con los agujeros de sujeción<br />
de los segmentos del lado de la admisión. Controlar que los clips del bulón se han posicionado<br />
correctamente. Colocar el cilindro sin segmentos, rotar el cigüeñal para averiguar que el pistón<br />
deslize sin fricción; si hay problemas, buscar las causas y solucionarlas.<br />
Para obtener lo máximo del kit Polini es necesario medir el “squish”: para medir esta distancia,<br />
colocar la junta de base, montar el cilindro y el piston e insertar un alambre de estaño sobre el<br />
piston, en dirección del bulón, (espesor 1mm). Cerrar el grupo térmico y bloquear las tuercas en<br />
sentido diagonal. Girar suavemente el volante pasando 3 veces por el Punto Muerto Superior.<br />
Hecho eso, desmontar la culata y controlar el espesor del alambre con un calibre centesimal (ver<br />
referencias en la tabla). Volver ahora a montar la culata con sus clips y bloquear las tuercas de<br />
fijacion en sentido diagonal. Debido al aumento de potencia, para reducir el riesgo de exceder el<br />
número máximo de revoluciones y consecuentemente el gripaje del motor, aconsejamos utilizar<br />
un engranaje de trasmisión más largo y sustituir el grupo de los engranajes y/o el grupo piñonengranaje<br />
dentado.<br />
¡Atención! Silenciosos y escapes modificados en sustitución de los originales necesitan una puesta<br />
a punto especifica del carburador para el correcto funcionamiento de todo el grupo. Calibraciones<br />
diferentes pueden alejarse de manera evidente de los datos y de los xicles aconsejados.<br />
Si quisieran acoplar al cilindro otros recambios Polini Motori, consulten nuestros catálogos o visiten<br />
nuestra página web www.polini.com.<br />
RODAJE - Durante los primeros 500 Km no superar los ¾ de abertura del acelerador y evitar<br />
largos trayectos en subida con el motor a sobrerégimen.<br />
ADVERTENCIAS GENERALES - Tanto en el período de rodaje como en general, no buscar nunca
la máxima potencia del motor antes de haber alcanzado la temperatura óptima de funcionamiento.<br />
El correcto funcionamiento de todos los órganos del motor no se podrá observar antes de haber<br />
realizado 500 Km. Se recomienda una buena puesta a punto general del motor, del carburador<br />
y del variador. Este kit ha sido realizado para prestaciones a un alto número de revoluciones.<br />
Cualquier error de calibración podría perjudicar el resultado final.<br />
Se recomienda la utilización de recambios originales Polini Motori.<br />
KIT 133.1010 Desmontar los esparragos del cilindro original y volver a montarlos en el nuevo<br />
cilindro. Reemplazar las laminas originales con las en dotación en el kit: la inscripción “Polini”<br />
debe estar al exterior de la valvúla.<br />
KIT 140.0195-140.0196 Aconsejamos el uso de la bujia Champion C53.<br />
KIT 166.0081-166.0082. ¡Importante! Solo para el kit 166.0082: este kit puede ser montado<br />
exclusivamente con el cigüeñal especial Polini con bulón Ø 12.<br />
Avance. El ajuste del avance del motor es muy importante: a 5000 rpm a 17° del P.M.S.; con<br />
comparador a 1.0 mm del P.M.S. Bujia: Aconsejamos el uso de la bujia Champion L77 JC4.<br />
Si mantienen el carburador y el filtro originales, monten el xicle máximo 88 y la lamina de<br />
carbonio en dotación.<br />
KIT 166.0096-166.0097 ¡Importante! Estos kits pueden ser montados exclusivamente con el<br />
cigüeñal especial Polini con bulón Ø 12.<br />
DEUTSCH<br />
„EVOLUTION“ POLINI KIT<br />
GARANTIE: Vor der Montage des neuen Polini Zylinderkits, unbedingt den beiliegenden<br />
Garantieschein lesen.<br />
VERFAHREN: Die Montage von diesem Zylinderkit ist nicht mit besonderen Schwierigkeiten<br />
verbunden, aber sie erfordert einige Vorsichtsmaßnahmen, die Sie sorgfältig befolgen müssen.<br />
Das Fahrzeug säubern: insbesondere den Motor sorgfältig reinigen. Den alten Zylinderkit ausbauen<br />
und kontrollieren, ob alle mechanischen Teile voll funktionsfähig sind (Kurbelwelle<strong>nl</strong>ager,<br />
Kurbelwelle und Kolbenbolze<strong>nl</strong>ager) und, wenn verschlissen oder defekt, sie erneuern.<br />
Vor der Montage, den Zylinder, den Kolben und den Kopf sorgfältig mit Benzin säubern und mit<br />
Druckluft trocknen. Dann die Zylinderlaufbuchse und alle beweglichen Teile leicht mit Mischungsöl<br />
einölen. Den Kolben mit dem Pfeil in Richtung des Auspuffs montieren. Falls keine Markierung<br />
vorhanden, den Kolben mit den Öffnungen der Kolbenringe in Richtung des Ansaugtraktes<br />
montieren. Dabei darauf achten, dass die Kolbenbolzensicherungsringe perfekt in ihre Sitze<br />
gelangen. Der Zylinderkit ohne Kolbenringe einsetzen und, während Sie die Kurbelwelle drehen,<br />
kontrollieren, dass der Kolben reibungslos läuft. Sollten Sie irgendeine Reibung bemerken, prüfen<br />
Sie die Ursache. Um das Maximum von Ihrem Zylinderkit zu erreichen, ist es notwendig den<br />
„squish“ (Spaltmass) zu messen. Dafür müssen Sie die Dichtungen einsetzen, den Zylinder und<br />
den Kolben zusammenstellen und einen Zinndraht (1 mm Dicke) über den Kolben in Richtung der<br />
Bolzen einsetzen. Der Zylinderkit schließen und die Zylinderkopfmuttern über Kreuz anziehen.<br />
Das Schwungrad drehen, bis der obere Totpunkt drei Mal erreicht worden ist. Anschließend den<br />
Zylinderkopf wieder anbauen und mit einer Lehre die Dicke vom zusammengedrückten Zinndraht<br />
messen (sehen Sie die Merkzeichen in der Tafel). Dann den Kopf mit seinen Dichtungskragen<br />
wieder ausbauen und die Zylinderkopfmuttern über Kreuz anziehen. Wegen der<br />
Leistungserhöhung, und um das Risiko zu verringern, das der Motor fest geht, empfehlen wir die<br />
Benutzung eines längeren Übersetzungsverhältnisses: entwedee den Ersatz des Zahnradaggregats<br />
und/oder des Zahnklanz Ritzelaggregats.<br />
Achtung: veränderte Schalldämpfer und Auspuffsa<strong>nl</strong>age, die die Originale ersetzen, müssen<br />
genau gestellt werden für eine korrekte Funktionierung der Gruppe. Verschiedene Nullabgleiche<br />
können auch von den Daten oder den empfohlenen Guss abweichen.<br />
Wenn Sie andere Polini Ersatzteile brauchen, nachschlagen Sie in unseren Katalogen oder auf<br />
unsere Internet-Seite www.polini.com.<br />
EINFAHREN - Während der ersten 500 km den Gasgriff nicht mehr als bis zu ¾ aufdrehen und<br />
lange Steigungen vermeiden, bei denen der Motor unter Last gehalten wird.<br />
ALLGEMEINE HINWEISE - Sowohl beim Einfahren als auch danach nie den Motor auf<br />
Höchstleistung bringen, bevor die optimale Betriebstemperatur nicht erreicht worden ist.<br />
Die Einfahrzeit der verschiedenen Teile ist im Durchschnitt nach den ersten 500 km abgeschlossen.<br />
Wir empfehlen eine gute Einstellung des Motors, des Vergasers und der Variomatik.<br />
Dieser Zylinderkit wurde für die maximale Leistung bei hohen Drehzahlen entworfen. Eine falsche<br />
Einstellung könnte die gute Arbeitsweise des Motors gefährden.<br />
Aus diesem Grund, wird es empfohlen, ausschließlich POLINI MOTORI Originalersatzteile zu verwenden.<br />
KIT 133.1010 Die Halterungsstiftschraube von dem originalen Zylinder ausbauen und sie auf<br />
den neuen Zylinder anbauen. Die originale Lamelle mit denen in Ausrüstung ersetzen und das<br />
Schreiben „Polini“ außen des Ventils halten.<br />
KIT 140.0195-140.0196 Wir empfehlen die Verwendung eine Kerze Champion C53<br />
KIT 166.0081-166.0082 Wichtig! Nur für Kit 166.0082: es wird nur mit speziellen<br />
Kurbelwelle Polini mit Kolbenbolzen Ø12 montiert. Vorzündung : Es ist wichtig; die optimale<br />
Stellung der Motor-Vorzündung bei 5000 Umdrehungen auf 17° vom Totpunkt mit einer Skala<br />
von 1.0 mm vom Totpunkt einzustellen. Kerze. Wir empfehlen die Verwendung eine Kerze<br />
Champion L77 JC4 Sollten originale Vergaser und Filter verwendet werden, montieren Sie Guss<br />
max. 88 und die mit dem Kit ausgerüsteten Lamelle auf Kohlenstoff.<br />
KIT 166.0096-166.0097 Wichtig! Sie werden nur mit speziellen Kurbelwelle Polini mit<br />
Kolbenbolzen Ø12 montiert.
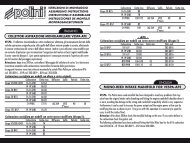
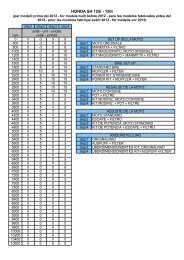
PI 361<br />
TABELLA MISURAZIONE “SQUISH”<br />
SCHEDULE FOR THE MEASUREMENT OF THE “SQUISH”<br />
TABLEAU MESURE “SQUISH”<br />
TABLA MEDIDA “SQUISH”<br />
A B<br />
TAFEL FÜR DIE VERMESSUNG DES “SQUISH” A B<br />
SPESSORE FILO DI STAGNO<br />
TIN WIRE’S THICKNESS<br />
EPAISSEUR FIL D’ETAIN<br />
ESPESOR ALAMBRE DE ESTAÑO<br />
DICKE ZINNDRAHT<br />
LUNGHEZZA STAGNO<br />
TIN WIRE’S LENGTH<br />
LONGUEUR ETAIN<br />
LARGO DEL ESTAÑO<br />
LÄNGE ZINNDRAHT<br />
MISURAZIONE FINALE<br />
FINAL MEASUREMENT<br />
MESURE FINALE<br />
MEDIDA FINAL<br />
LETZTE VERMESSUNG<br />
MISURAZIONE FINALE<br />
FINAL MEASUREMENT<br />
MESURE FINALE<br />
MEDIDA FINAL<br />
LETZTE VERMESSUNG<br />
133.1010 0,8/1 mm. 40,2 mm. 0,8±0,1 mm.<br />
140.0195 0,8/1 mm. 40,2 mm. 0,7 mm.<br />
140.0196 0,8/1 mm. 40,2 mm. 0,6 mm.<br />
142.0157 0,8/1 mm. 40,2 mm. 0,6 mm.<br />
166.0081 0,8/1 mm. 47,6 mm. 0,65 mm.<br />
166.0082 0,8/1 mm. 47,6 mm. 0,65 mm.<br />
166.0084 0,8/1 mm. 40,2 mm. 0,6 mm.<br />
166.0096 0,8/1 mm. 40,2 mm. 0,7 mm.<br />
166.0096/10 0,8/1 mm. 40,2 mm. 0,7 mm.<br />
166.0097 0,8/1 mm. 40,2 mm. 0,6 mm.<br />
166.0097/10 0,8/1 mm. 40,2 mm. 0,6 mm.<br />
-Se lo spessore da voi misurato non è tra i parametri della tabella, è necessario avvicinarsi il più possibile variando le combinazioni della guarnizione di base.<br />
-If the tin you measured is not among the parameters of the schedule, it is necessary to adjust the squish as much as possible by changing the base gasket’s combinations.<br />
-Si l’épaisseur mesuré n’est pas compris entre les paramètres du tableau, il faut s’approcher le plus possible en variant les combinaisons des joints d’embase.<br />
-Si el espesor medido no está entre los parametros de la tabla, es necesario aproximarse lo más posible, cambiando las combinaciones de juntas de embase.<br />
-Sollten Sie eine andere Dicke im Vergleich zu denen in der Tafel verwenden, ist es notwendig, dass Sie so viel wie möglich in deren Nähe kommen, um die<br />
Kombinationen von der Fussdichtung zu ändern.