MR 5550 M BC-HC Multiquick professional - Braun Consumer ...
MR 5550 M BC-HC Multiquick professional - Braun Consumer ...
MR 5550 M BC-HC Multiquick professional - Braun Consumer ...

Create successful ePaper yourself
Turn your PDF publications into a flip-book with our unique Google optimized e-Paper software.
<strong>MR</strong> <strong>5550</strong> M <strong>BC</strong>-<strong>HC</strong><br />
Type 4191<br />
Modèle 4191<br />
Modelo 4191<br />
12<br />
9<br />
4<br />
6<br />
1 3<br />
<strong>Multiquick</strong> <strong>professional</strong>
English 6<br />
Français 10<br />
Español 14<br />
For household use only<br />
Pour usage ménager seulement<br />
Solo para uso doméstico<br />
Internet:<br />
www.braun.com<br />
4-196-369/00/III-07<br />
USA/CDN/MEX<br />
Printed in Spain<br />
Imprimé en Espagne<br />
Impreso en España<br />
Thank you for purchasing a <strong>Braun</strong> product.<br />
We hope you are completely satisfied with your<br />
new <strong>Braun</strong> <strong>Multiquick</strong> Professional.<br />
If you have any questions, please call:<br />
US residents 1-800-BRAUN-11<br />
1-800-272-8611<br />
Canadian residents 1-800-387-6657<br />
Merci d’avoir fait l’achat d’un produit <strong>Braun</strong>.<br />
Nous espérons que vous serez pleinement<br />
satisfait de votre nouveau <strong>Braun</strong> <strong>Multiquick</strong><br />
Professional.<br />
Si vous avez des questions, veuillez appeler<br />
<strong>Braun</strong> Canada : 1-800-387-6657<br />
Gracias por haber comprado un producto <strong>Braun</strong>.<br />
Esperamos que quede completamente satisfecho<br />
con su nueva <strong>Braun</strong> <strong>Multiquick</strong> Professional.<br />
Si tiene alguna duda, por favor llame al:<br />
México: 01(800) 508-5800
3<br />
4<br />
A<br />
4<br />
4<br />
4<br />
1<br />
B<br />
C<br />
D<br />
F<br />
I<br />
J<br />
1 2 3<br />
4<br />
click!<br />
15…20°C<br />
58…68°F<br />
2 3<br />
E<br />
G<br />
H<br />
K<br />
L<br />
M<br />
4…8°C<br />
39…46°F<br />
max.<br />
4 x max. 400 ml /14 oz<br />
4 click!<br />
1 . 3 . . 6 . . 9 . . 12<br />
4<br />
4<br />
4<br />
4
A<br />
B<br />
C<br />
43<br />
<strong>BC</strong><br />
a<br />
b<br />
c<br />
d<br />
12<br />
9<br />
12<br />
9<br />
4<br />
4<br />
12<br />
9<br />
6<br />
6<br />
4<br />
6<br />
1 3<br />
1 3<br />
1 3<br />
Freezer<br />
<strong>BC</strong><br />
<strong>HC</strong><br />
<strong>BC</strong><br />
1<br />
4<br />
7 8 9<br />
1<br />
12<br />
9<br />
4<br />
6<br />
1 3<br />
e<br />
f<br />
<strong>HC</strong><br />
2<br />
<strong>HC</strong><br />
5 6<br />
2 3<br />
4 5 6 7<br />
12<br />
9<br />
4<br />
6<br />
1 3<br />
12<br />
4<br />
6<br />
1 3<br />
12<br />
9<br />
4<br />
6<br />
1 3<br />
12<br />
9<br />
3<br />
4<br />
6<br />
1 3<br />
a<br />
b<br />
c<br />
d<br />
<strong>BC</strong>
English<br />
IMPORTANT SAFEGUARDS<br />
When using electrical appliances, basic safety precautions should always be followed including the following:<br />
6<br />
1. Read all instructions before using.<br />
2. To protect against risk of electrical shock, do not immerse the motor part in water or other liquid.<br />
3. This appliance should not be used by children and care should be taken when used near children.<br />
4. Unplug cord from outlet when not in use, before putting on or taking off parts and before cleaning.<br />
5. Avoid contact with moving parts.<br />
6. Do not operate any appliance with a damaged cord or plug or after the appliance malfunctions or is<br />
dropped or damaged in any manner. Return appliance to an authorized service center for examination,<br />
electrical repair, mechanical repair or adjustment.<br />
7. The use of attachments not recommended or sold by the manufacturer may cause fire, electric shock or<br />
injury.<br />
8. Do not use outdoors.<br />
9. Do not let cord hang over edge of table or counter or touch hot surfaces (including the stove).<br />
10. When mixing liquids, especially hot liquids, use a tall container or make small quantities at a time to avoid<br />
splattering and burning.<br />
11. Keep hands and utensils out of the container while blending with the shaft to prevent the possibility of<br />
severe personal injury and/or damage to the unit. A spatula spatula may be used but only when the unit is<br />
not running.<br />
12. Blades are sharp. Handle carefully.<br />
13. To avoid injury, never place the blade unit on the base without first putting the chopper bowl properly in<br />
place.<br />
14. Be certain chopper gear box is securely locked in place before operating chopper.<br />
15. Do not attempt to defeat the chopper cover interlock mechanism.<br />
16. Keep hands and utensils away from the cutting blade while chopping food to reduce the risk of severe<br />
injury to persons or damage to the food chopper. A spatula may be used but only when the food chopper<br />
is not running.<br />
17. The «<strong>HC</strong>» chopper is intended for processing small quantities of food for immediate consumption, and is<br />
especially recommended for preparing baby food. It is not intended to prepare large quantities of food at<br />
one time.<br />
SAVE THESE INSTRUCTIONS
Our products are engineered to meet the highest<br />
standards of quality, functionality and design.<br />
We hope you thoroughly enjoy your new <strong>Braun</strong><br />
appliance.<br />
Caution<br />
Please read the use instructions carefully and<br />
completely before using the appliance.<br />
• The blades are very sharp!<br />
• Always unplug the appliance before assembling,<br />
disassembling, cleaning or storing.<br />
• The appliance must be kept out of reach of<br />
children.<br />
• This appliance has a polarized plug (one blade is<br />
wider than the other). To reduce the risk of electric<br />
shock, this plug will fit in a polarized outlet only one<br />
way. If the plug does not fit fully in the outlet,<br />
reverse the plug. If it still does not fit, contact a<br />
qualified electrician. Do not modify the plug in any<br />
way.<br />
• Do not hold the motor part A or the whisk gear box<br />
I under running water, nor immerse them in<br />
water.<br />
• <strong>Braun</strong> electric appliances meet applicable safety<br />
standards. Repairs or the replacement of the cord<br />
must only be done by authorized service personnel.<br />
Faulty, unqualified repair work may cause<br />
considerable hazards to the user.<br />
• Before plugging into a socket, check that your<br />
voltage corresponds to the voltage printed on the<br />
bottom of the appliance.<br />
• The appliance is constructed to process normal<br />
household quantities.<br />
• Be advised that the maximum rating of this appliance<br />
is based on the «<strong>HC</strong>» chopper attachment<br />
which draws the greatest power consumption.<br />
The other recommended attachments may draw<br />
significantly less power.<br />
• Neither the beaker H , nor the chopper bowl/jug (c)<br />
is microwave-proof.<br />
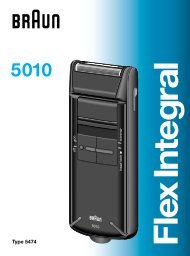
Description<br />
A<br />
B<br />
C<br />
D<br />
E<br />
F<br />
G<br />
H<br />
I<br />
J<br />
K<br />
L<br />
M<br />
Motor part<br />
On/off switch for variable speed<br />
On/off switch for turbo speed<br />
Quick-release knobs<br />
Variable speed regulator<br />
Blender shaft<br />
Wall mount<br />
Measuring beaker with airtight lid<br />
Whisk gear box<br />
Whisk<br />
«<strong>HC</strong>» chopper<br />
«<strong>BC</strong>» chopper<br />
Ice crushing insert for «<strong>BC</strong>» chopper<br />
Setting the speed<br />
When activating the on/off switch B , the processing<br />
speed corresponds to the setting of the variable<br />
speed regulator E . The higher the setting, the faster<br />
the chopping results.<br />
However, maximum processing speed can only be<br />
achieved by pressing the turbo switch C . You may<br />
also use the turbo switch for instant powerful pulses<br />
without having to adjust the variable speed regulator.<br />
Depending on the application, we recommend the<br />
following speed settings:<br />
Handblender 1...turbo<br />
Chopper 1...turbo<br />
Whisk 4...8<br />
How to operate your handblender<br />
The handblender is perfectly suited for preparing<br />
dips, sauces, soups, mayonnaise and baby food as<br />
well as for mixing drinks and milk shakes.<br />
1. Insert the motor part A into the blender shaft F<br />
until it locks into place.<br />
2. Position the handblender deep in the container<br />
being used to prepare your food or drink, then<br />
press the on/off switch B or the on/off turbo<br />
switch C to begin.<br />
3. To release the blender shaft after use, press the<br />
release knobs D and pull it off.<br />
You can operate the handblender in the measuring<br />
beaker H , or in any other container. When blending<br />
directly in the saucepan while cooking, remove the<br />
pan from the burner first to protect your handblender<br />
from overheating.<br />
How to operate your whisk<br />
Use the whisk only for whipping cream, beating egg<br />
whites and mixing instant puddings.<br />
1. Insert the whisk J into the whisk gear box I , then<br />
insert the motor part A into the gear box until it<br />
locks into place.<br />
2. Place the whisk in a bowl before pressing the on/<br />
off switch B to turn on the whisk.<br />
3. To release the whisk, press the release knobs D<br />
and pull off the gear box. Then pull the whisk out<br />
of the gear box.<br />
For best results:<br />
• Use a wide container.<br />
• Only whip up to 400 ml (14 oz) chilled cream at one<br />
time.<br />
• Only whip up to 4 egg whites at one time.<br />
• Move the whisk clockwise when mixing<br />
ingredients.<br />
How to operate your chopper<br />
attachment/s<br />
(see page 4)<br />
«<strong>BC</strong>» chopper «<strong>HC</strong>» chopper<br />
(a) Chopper gear box (a) Chopper gear box<br />
(b) Blade (b) Blade<br />
(c) Jug (c) Chopper bowl<br />
(d) Anti-slip base/lid (d) Anti-slip base/lid<br />
(e) Ice blade<br />
(f) Ice crushing insert<br />
Both the «<strong>HC</strong>» and the «<strong>BC</strong>» choppers are perfectly<br />
suited for chopping meat, cheese, onions, herbs,<br />
garlic, carrots, nuts etc.<br />
When chopping hard foods (e.g. parmesan cheese,<br />
chocolate) use the turbo switch C<br />
.<br />
N.B.:<br />
Do not chop extremely hard food, such as nutmeg or<br />
coffee beans in either chopper.<br />
Use the «<strong>HC</strong>» chopper for smaller quantities.<br />
It is especially suited for chopping herbs and chiles<br />
(with water).<br />
Use the «<strong>BC</strong>» chopper for larger quantities and for<br />
hard foods like parmesan cheese or chocolate.<br />
The «<strong>BC</strong>» chopper is perfect for a variety of other<br />
applications like crushing ice, mixing frozen drinks<br />
and milk shakes, pureeing soups and preparing<br />
batters.<br />
Before chopping ...<br />
• cut meat, cheese, onions, garlic, carrots, chiles<br />
into small pieces (see processing guide on page 5).<br />
• remove stems from herbs, shell nuts.<br />
• remove bones and gristle from meat.<br />
For best results, please refer to the speed settings<br />
recommended in the processing guide on page 5.<br />
Chopping<br />
(see picture section A on page 4)<br />
1. Carefully remove the plastic cover from the blade<br />
(b). Caution: the blade is very sharp! Always hold<br />
it by the upper plastic part.<br />
2. Press the blade on the center pin of the chopper<br />
bowl (c) until it locks into place. For the «<strong>HC</strong>»<br />
chopper: press straight down the blade and turn<br />
7
it 90° to lock in place.<br />
Always place the chopper bowl on the anti-slip<br />
base (d).<br />
3. Place the food in the chopper bowl / jug.<br />
4. Put the gear box (a) on the chopper bowl / jug.<br />
5. Insert the motor part A into the gear box until it<br />
locks into place.<br />
6. Press either switch B or C to operate the<br />
chopper. During processing, hold the motor part<br />
with one hand and the chopper bowl / jug with the<br />
other.<br />
7. After use, press release knobs D to detach the<br />
motor part.<br />
8. Then remove the gear box.<br />
9. Carefully take out the blade.<br />
10. Remove the processed food from the chopper<br />
bowl / jug. The anti-slip base also serves as a lid<br />
for the chopper bowl / jug.<br />
Additional applications for the «<strong>BC</strong>»<br />
chopper<br />
Shakes, drinks, purées<br />
For purées, when very fine results are preferred, you<br />
may also use the handblender shaft directly in the<br />
«<strong>BC</strong>» jug after removing the blade (b).<br />
Light dough (pancake batter)<br />
Using an available pancake batter mix, first pour<br />
liquids into the jug, then add flour and finally eggs.<br />
Pressing the turbo switch C , mix the batter until<br />
smooth.<br />
Crushed ice<br />
(see picture section B)<br />
1. Place the ice crushing insert (f) into the jug. Ensure<br />
it fits properly.<br />
2. Place the shaft of the ice blade (e) into the center<br />
hole of the ice crushing insert and press it down<br />
into place.<br />
3. Fill the ice crushing insert with ice cubes.<br />
4. Place the gear box on the jug.<br />
5. Insert the motor part into the gear box until it locks<br />
into place.<br />
6. Press and hold the turbo switch C until all ice<br />
cubes have been crushed. After use, press release<br />
knobs D to remove the motor part. Then remove<br />
gear box, ice blade and ice crushing insert.<br />
7. Remove the crushed ice or simply add your drink<br />
mixture into the crushed ice and serve directly from<br />
the jug.<br />
Alternative: First mix fruit in the jug with the chopper<br />
blade (b), filling it up to 0.5 litres (2 cups) maximum.<br />
Remove the blade and place the ice crushing insert<br />
into the jug in order to crush ice directly into the<br />
pureed fruit.<br />
Cleaning<br />
(see picture section C)<br />
Wipe the motor part A and the whisk gear box I with<br />
a damp cloth only. The «<strong>BC</strong>» chopper gear box (a)<br />
may be rinsed under the tap, but do not immerse it in<br />
water.<br />
All other parts can be cleaned in the dishwasher.<br />
However, after processing very salty food, you<br />
should rinse the blades right away.<br />
Use the recommended amount of soap and rinse<br />
agent specified by the dishwasher’s manufacturer.<br />
When processing foods with color (e.g. carrots), the<br />
plastic parts of the appliance may become discolored.<br />
Wipe these parts with vegetable oil before<br />
placing them in the dishwasher.<br />
8<br />
Recipes<br />
Mayonnaise (use handblender)<br />
200 – 250 ml (1 cup) oil<br />
1 egg (yolk and white)<br />
1 Tbsp. lemon juice or vinegar<br />
Salt and pepper to taste<br />
Put all ingredients into the beaker in the above order.<br />
Position the handblender at the base of the beaker.<br />
Pressing the turbo switch C , keep the handblender in<br />
this position until the oil emulsifies. Then, without<br />
switching the handblender off, slowly move it up and<br />
down until the mayonnaise is thoroughly combined.<br />
Guacamole (use «<strong>BC</strong>» chopper)<br />
Chop 1 clove garlic,<br />
add 2 ripe avocados (quartered, without skin and<br />
stone)<br />
1 Tbsp. lemon juice<br />
1 Tbsp. olive oil<br />
150 ml (1/2 cup) yogurt<br />
1/2 tsp. sugar,<br />
salt and pepper<br />
Using the turbo switch C , blend for about one<br />
minute.<br />
Ice cream (use «<strong>BC</strong>» chopper)<br />
100 g (3 1/2 oz) frozen raspberries<br />
10 g (2 tsp.) powdered sugar<br />
80 g (1/3 cup) cream<br />
Place all ingredients into the jug, press the turbo<br />
switch C<br />
and blend for about 30 seconds. Serve at<br />
once.<br />
Subject to change without notice.
For USA only<br />
How to obtain service in the USA<br />
Should your <strong>Braun</strong> product require service, please call<br />
1-800-BRAUN 11 (800-272-8611) to be referred to the<br />
authorized <strong>Braun</strong> Service Center closest to you.<br />
To obtain service:<br />
A. Take the product in to the authorized <strong>Braun</strong> Service<br />
Center of your choice or,<br />
B. Ship the product to the authorized <strong>Braun</strong> Service<br />
Center of your choice.<br />
Pack the product well. Ship the product prepaid and<br />
insured (recommended). Include a copy of your proof<br />
of purchase to verify warranty coverage, if applicable.<br />
To obtain original <strong>Braun</strong> replacement parts and<br />
accessories:<br />
Contact an authorized <strong>Braun</strong> Service Center.<br />
Please call 1-800-BRAUN 11 (800-272-8611) to be<br />
referred to the authorized <strong>Braun</strong> Service Center closest<br />
to you.<br />
To speak to a <strong>Braun</strong> <strong>Consumer</strong> Service Representative:<br />
Please call 1-800-BRAUN 11 (800-272-8611).<br />
Limited Warranty<br />
<strong>Braun</strong> warrants this <strong>Braun</strong> appliance to be free of defects<br />
in material and workmanship for a period of one year<br />
from the date of original purchase at retail.<br />
If the appliance exhibits such a defect, <strong>Braun</strong> will, at its<br />
option, repair or replace it without cost for parts and<br />
labor. The product must be carried in or shipped, prepaid<br />
and insured (recommended), to an authorized <strong>Braun</strong><br />
Service Center. Proof of date of original purchase is<br />
required.<br />
The cost to ship the product to an authorized Service<br />
Center is the responsibility of the consumer, the cost to<br />
return the product to the consumer is the responsibility of<br />
<strong>Braun</strong>.<br />
This warranty does not cover finishes, normal wear, nor<br />
does it cover damage resulting from accident, misuse,<br />
dirt, water, tampering, unreasonable use, service<br />
performed or attempted by unauthorized service centers,<br />
failure to provide reasonable and necessary maintenance,<br />
including recharging, or units that have been<br />
modified or used for commercial purposes.<br />
ALL IMPLIED WARRANTIES, INCLUDING ANY IMPLIED<br />
WARRANTY OF MERCHANTABILITY OR FITNESS FOR<br />
ANY PARTICULAR PURPOSE, ARE LIMITED IN<br />
DURATION TO ONE YEAR FROM DATE OF ORIGINAL<br />
PURCHASE. IN NO EVENT WILL BRAUN BE<br />
RESPONSIBLE FOR CONSEQUENTIAL DAMAGES<br />
RESULTING FROM THE USE OF THIS PRODUCT.<br />
Some states do not allow the exclusion or limitation of<br />
incidental or consequential damages, so the above<br />
limitation may not apply to you.<br />
This warranty gives you specific legal rights, and you may<br />
have other legal rights which vary from state to state.<br />
For Canada only<br />
How to obtain service in Canada<br />
Should your <strong>Braun</strong> product require service, please call<br />
1-800-387-6657 to be referred to the authorized <strong>Braun</strong><br />
Service Center closest to you.<br />
To obtain service:<br />
A. Carry the product in to the authorized <strong>Braun</strong> Service<br />
Center of your choice or,<br />
B. Ship the product to the authorized <strong>Braun</strong> Service<br />
Center of your choice.<br />
Pack the product well. Ship the product prepaid and<br />
insured (recommended).<br />
Include a copy of your proof of purchase to verify<br />
warranty coverage, if applicable.<br />
To obtain original <strong>Braun</strong> replacement parts & accessories:<br />
Contact an authorized <strong>Braun</strong> Service Center.<br />
Please call 1-800-387-6657 to be referred to the<br />
authorized <strong>Braun</strong> Service Center closest to you.<br />
To speak to a <strong>Braun</strong> <strong>Consumer</strong> Service Representative:<br />
Please call 1-800-387-6657.<br />
Limited 1-Year Warranty<br />
In the event a <strong>Braun</strong> appliance fails to function within the<br />
specified warranty period because of defects in material<br />
or workmanship, and the consumer returns the unit to an<br />
authorized service center, <strong>Braun</strong> Canada will, at its option<br />
either repair or replace the unit without additional charge<br />
to the consumer. This warranty does not cover any<br />
product which has been damaged by dropping,<br />
tampering, servicing performed or attempted by<br />
unauthorized service agencies, misuse or abuse. This<br />
warranty excludes units which have been modified or<br />
used for commercial purposes.<br />
To the extent allowed by law, <strong>Braun</strong> Canada shall not be<br />
responsible for loss of the product, loss of time,<br />
inconvenience, commercial loss, special or<br />
consequential damages.<br />
The provisions of this warranty are in addition to and not<br />
a modification of or subtraction from the statutory<br />
warranties and other rights and remedies contained in<br />
applicable provincial legislation.<br />
9
Français<br />
INSTRUCTIONS DE SÉCURITÉ<br />
IMPORTANTES<br />
Lors de l’utilisation d’appareils électriques, il est toujours important de prendre des mesures de sécurité de<br />
base, y compris les suivantes :<br />
10<br />
1. Lire toutes les directives avant d’utiliser l’appareil.<br />
2. Pour éviter les risques de décharge électrique, ne pas plonger le bloc-moteur dans l’eau ni dans un autre<br />
liquide.<br />
3. Cet appareil ne devrait pas être utilisé par des enfants et une surveillance attentive est nécessaire lorsque<br />
l’appareil est utilisé à proximité de ceux-ci.<br />
4. Débrancher l’appareil lorsqu’il n’est pas utilisé, avant d’y fixer ou d’y enlever des pièces et avant le<br />
nettoyage.<br />
5. Éviter tout contact avec les pièces mobiles.<br />
6. Ne pas faire fonctionner l’appareil si le cordon ou la fiche sont endommagés, s’il présente une défaillance,<br />
ni si on l’a échappé ou endommagé de quelque façon que ce soit. Retourner l’appareil à un centre de<br />
service après-vente agréé aux fins de vérification, de réparation électrique ou mécanique, ou de mise au<br />
point.<br />
7. L’utilisation d’accessoires non recommandés ni vendus par le fabricant peut entraîner un incendie, une<br />
décharge électrique ou des blessures.<br />
8. Ne pas utiliser à l’extérieur.<br />
9. Ne pas laisser le cordon pendre d’une table ou d’un comptoir ni entrer en contact avec des surfaces<br />
chaudes, y compris la cuisinière.<br />
10. Lors du mélange de liquides, surtout de liquides chauds, utiliser un grand récipient ou préparer de petites<br />
quantités à la fois afin d’éviter les éclaboussures et les brûlures.<br />
11. Tenir les mains et les ustensiles loin du récipient lors du mélange à l’aide du pied mixeur pour éviter de se<br />
blesser gravement et(ou) d’endommager le mixeur. Il est possible d’utiliser une spatule, mais seulement<br />
lorsque l’appareil ne fonctionne pas.<br />
12. Le couteau est tranchant. Manipuler avec précaution.<br />
13. Pour éviter de se blesser, ne jamais placer le couteau sur le socle avant de fixer d’abord solidement le bol<br />
hachoir.<br />
14. S’assurer que le système d’entraînement du bol hachoir est bien mis en place avant d’utiliser le hachoir.<br />
15. Ne pas tenter de défaire le mécanisme de verrouillage du couvercle.<br />
16. Tenir les mains et les ustensiles loin de la lame de coupe en hachant les aliments afin de réduire le risque<br />
de blessure grave ou d’endommagement du hachoir. Il est possible d’utiliser une spatule, mais seulement<br />
lorsque le hachoir ne fonctionne pas.<br />
17. Le hachoir « <strong>HC</strong> » est destiné à hacher de petites quantités d’aliments pour consommation immédiate<br />
et est spécialement recommandé pour préparer les aliments pour bébés. Il n’est pas recommandé pour<br />
préparer de grandes quantités d’aliments à la fois.<br />
CONSERVER CES DIRECTIVES
Nos produits sont conçus et fabriqués pour<br />
satisfaire aux plus hautes exigences de qualité, de<br />
fonctionnalité et de design. Nous espérons que votre<br />
nouvel appareil <strong>Braun</strong> vous apportera entière<br />
satisfaction.<br />
Mise en garde<br />
Lisez le mode d’emploi attentivement<br />
et en entier avant d’utiliser cet appareil.<br />
• Le couteau est très tranchant !<br />
• Toujours débrancher l’appareil avant le montage et<br />
le démontage ainsi qu’avant de le nettoyer et de le<br />
ranger.<br />
• Cet appareil doit rester hors de portée des enfants.<br />
• Cet appareil est muni d’une fiche d’alimentation<br />
polarisée (une des deux broches est plus large que<br />
l’autre). Pour réduire les risques de décharge<br />
électrique, il n’y a qu’une seule façon d’insérer<br />
cette fiche dans une prise de courant polarisée.<br />
Si le branchement n’est pas complet, inverser la<br />
fiche. Si le branchement est toujours incomplet,<br />
communiquer avec un électricien qualifié. Ne pas<br />
modifier la fiche.<br />
• Ne pas passer le bloc-moteur A ni le système<br />
d’entraînement du fouet I sous l’eau du robinet,<br />
ni les plonger dans l’eau.<br />
• Les appareils électriques <strong>Braun</strong> répondent aux<br />
normes de sécurité en vigueur. Leur réparation ou<br />
le remplacement du cordon d’alimentation doivent<br />
être effectués uniquement un technicien agréé.<br />
Des réparations effectuées par un personnel non<br />
qualifié peuvent causer accidents ou blessures à<br />
l’utilisateur.<br />
• Avant de brancher l’appareil, bien vérifier que la<br />
tension correspond à celle indiquée sous l’appareil.<br />
• Cet appareil a été conçu pour une utilisation<br />
domestique.<br />
• Veuillez noter que la tension nominale maximale de<br />
cet appareil est fondée sur le hachoir « <strong>HC</strong> » qui<br />
consomme le plus d’énergie. Les autres<br />
accessoires recommandés peuvent consommer<br />
considérablement moins d’énergie.<br />
• Le bol mesureur H et le grand bol hachoir (c) ne<br />
peuvent pas être utilisés dans les fours à microondes.<br />
Description<br />
A<br />
B<br />
C<br />
D<br />
E<br />
F<br />
G<br />
H<br />
I<br />
J<br />
K<br />
L<br />
M<br />
Bloc-moteur<br />
Interrupteur marche / arrêt pour utilisation avec le<br />
régulateur de vitesse variable<br />
Interrupteur marche / arrêt pour utilisation avec la<br />
vitesse turbo<br />
Boutons de déverrouillage des accessoires<br />
Régulateur de vitesse variable<br />
Pied mixeur<br />
Support mural<br />
Bol mesureur avec couvercle hermétique<br />
Système d’entraînement du fouet<br />
Fouet<br />
Bol « <strong>HC</strong> »<br />
Bol « <strong>BC</strong> »<br />
Accessoire pour broyer la glace à placer dans le<br />
bol « <strong>BC</strong> »<br />
Utilisation des vitesses<br />
Lorsque vous appuyez sur la touche marche / arrêt<br />
B , la vitesse correspond à celle sélectionnée avec le<br />
régulateur de vitesse variable E . Plus la vitesse<br />
sélectionnée est élevée, plus les résultats sont<br />
rapides.<br />
Cependant, la vitesse maximum ne peut être atteinte<br />
qu’en appuyant sur la touche turbo C . Vous pouvez<br />
aussi utiliser la fonction turbo pour utiliser le maximum<br />
de puissance de manière instantanée sans avoir<br />
à faire de changement sur le régulateur de vitesse<br />
variable.<br />
Selon le type d’utilisation, nous vous recommandons<br />
l’utilisation des vitesses suivantes :<br />
Pied mixeur 1…turbo<br />
Bol hachoir 1…turbo<br />
Fouet 4…8<br />
Comment utiliser votre mixeur<br />
Le mixeur est parfaitement adapté à la préparation<br />
de trempettes, sauces, soupes, mayonnaise,<br />
aliments pour bébé, ainsi qu’à celle des boissons<br />
mixées et laits frappés.<br />
1. Insérez le bloc-moteur A dans le pied mixeur F<br />
jusqu’à ce qu’il s’enclenche et se verrouille.<br />
2. Introduisez le mixeur dans le récipient et appuyez<br />
ensuite sur la touche marche / arrêt B ou la touche<br />
turbo C .<br />
3. Pour démonter le pied mixeur, appuyez sur les<br />
boutons D et retirez le pied mixeur.<br />
Vous pouvez utiliser le mixeur dans le bol mesureur<br />
H , aussi bien que dans d’autres récipients. Si vous<br />
utilisez le mixeur directement dans une casserole<br />
pendant la cuisson, retirez-la d’abord du feu pour<br />
protéger votre mixeur de toute chaleur excessive.<br />
Comment utiliser le fouet<br />
Utilisez le fouet uniquement pour fouetter la crème,<br />
monter les blancs en neige et préparer les crèmesdesserts.<br />
1. Insérez le fouet J dans le système d’entraînement<br />
du fouet I , puis insérez le bloc-moteur A dans le<br />
système d’entraînement jusqu’à ce qu’il<br />
s’enclenche.<br />
2. Introduisez le fouet dans un récipient et appuyez<br />
ensuite sur la touche marche / arrêt B pour le faire<br />
fonctionner.<br />
3. Pour démonter le fouet après l’utilisation, appuyez<br />
sur les boutons D et retirez-le du système<br />
d’entraînement.<br />
Pour de meilleurs résultats :<br />
• Utilisez un récipient large.<br />
• Ne pas utiliser plus de 400 mL de crème très<br />
froide.<br />
• Montez les blancs en neige pour une quantité<br />
maximum de 4 blancs d’œufs.<br />
• Déplacez le fouet dans le sens des aiguilles<br />
d’une montre.<br />
Comment utiliser le(s) bol(s) hachoir(s)<br />
(voir page 4)<br />
Bol « <strong>HC</strong> » Bol « <strong>BC</strong> »<br />
(a) Système (a) Système<br />
d’entraînement d’entraînement<br />
du bol hachoir du bol hachoir<br />
(b) Couteau (b) Couteau<br />
(c) Bol hachoir (c) Grand bol<br />
(d) Socle / couvercle (d) Socle / couvercle<br />
anti-dérapant anti-dérapant<br />
(e) Couteau pour<br />
la glace<br />
(f) Accessoire pour<br />
broyer la glace<br />
Les bols hachoirs « <strong>HC</strong> » et « <strong>BC</strong> » sont tout à fait<br />
adaptés pour hacher de la viande, du fromage, des<br />
oignons, des herbes, de l’ail, des carottes, des noix,<br />
etc.<br />
Pour hacher des aliments durs (exemple : parmesan,<br />
chocolat), utilisez la fonction turbo C<br />
.<br />
Remarque :<br />
Ne hachez pas des aliments extrêmement durs,<br />
tels que noix de muscade, grains de café et autres<br />
grains.<br />
Utilisez le bol « <strong>HC</strong> » pour de petites quantités. Il est<br />
particulièrement adapté pour hacher herbes et<br />
piments (avec de l’eau).<br />
Utilisez le bol « <strong>BC</strong> » pour de plus grandes quantités<br />
et pour des aliments durs comme le parmesan ou le<br />
chocolat. De plus, le bol « <strong>BC</strong> » est adapté pour de<br />
nombreuses autres utilisations comme les laits<br />
frappés, boissons, purées, pâtes légères et pour<br />
broyer la glace.<br />
11
Avant de hacher…<br />
• découpez la viande, le fromage, les oignons, l’ail,<br />
les carottes, les piments (voir guide d’utilisation<br />
page 5)<br />
• enlevez les tiges des herbes et dénoyautez les<br />
aliments<br />
• enlevez les os, les tendons et les nerfs de la<br />
viande.<br />
Pour de meilleurs résultats, regardez la vitesse<br />
recommandée dans le guide d’utilisation à la page 5.<br />
Hacher<br />
(voir image partie A, page 4)<br />
1. Enlevez avec précaution le plastique du couteau<br />
(b). Mise en garde : le couteau est très tranchant !<br />
Manipulez-le toujours en tenant la partie<br />
supérieure en plastique.<br />
2. Placez le couteau sur l’axe central du bol hachoir<br />
(c), appuyez dessus jusqu’à ce qu’il s’enclenche.<br />
Bol hachoir « <strong>HC</strong> » : appuyez sur le couteau et<br />
tournez-le de 90° jusqu’à ce qu’il s’enclenche.<br />
Placez toujours le bol hachoir sur son socle antidérapant<br />
(d).<br />
3. Mettez les aliments dans le grand bol / bol<br />
hachoir.<br />
4. Placez le système d’entraînement (a) sur le grand<br />
bol / bol hachoir.<br />
5. Insérez le bloc-moteur A dans le système<br />
d’entraînement jusqu’à ce qu’il s’enclenche.<br />
6. Appuyez sur le bouton B ou C pour faire<br />
fonctionner le bol hachoir. Pendant son<br />
fonctionnement, maintenez le bloc-moteur avec<br />
une main et le grand bol / bol hachoir avec l’autre.<br />
7. Après l’utilisation, appuyez sur les boutons D<br />
pour enlever le bloc-moteur.<br />
8. Vous pouvez ensuite enlever le système<br />
d’entraînement.<br />
9. Retirez le couteau avec précaution.<br />
10. Enlevez ensuite les aliments du grand bol / bol<br />
hachoir. Le socle anti-dérapant sert aussi de<br />
couvercle pour le grand bol / bol hachoir.<br />
Utilisations supplémentaires pour le bol<br />
hachoir « <strong>BC</strong> »<br />
Laits frappés, boissons, purées<br />
Pour les purées, si vous préférez un résultat très fin,<br />
vous pouvez aussi utiliser le pied mixeur dans le<br />
grand bol « <strong>BC</strong> » après avoir enlevé le couteau (b).<br />
Pâtes légères (pâte à crêpes)<br />
Versez d’abord les liquides dans le grand bol, ajoutez<br />
ensuite la farine, puis les œufs. En appuyant sur la<br />
touche turbo C , malaxez la pâte jusqu’à ce qu’elle<br />
soit lisse.<br />
Glace broyée<br />
(voir image partie B)<br />
1. Placez l’accessoire pour broyer la glace (f) dans le<br />
grand bol. Assurez-vous qu’il soit bien mis en<br />
place.<br />
2. Placez la tige du couteau pour la glace (e) dans le<br />
trou central de l’accessoire pour broyer la glace, et<br />
appuyez dessus.<br />
3. Remplissez de glaçons l’accessoire pour broyer la<br />
glace.<br />
4. Placez le système d’entraînement sur le grand bol.<br />
5. Insérez le bloc-moteur sur le système<br />
d’entraînement jusqu’à ce qu’il s’enclenche.<br />
6. Appuyez sur la touche turbo C et maintenez-la<br />
enfoncée jusqu’à ce que tous les glaçons soient<br />
broyés. Après l’utilisation, appuyez sur les boutons<br />
D pour enlever le bloc-moteur. Enlevez ensuite le<br />
système d’entraînement, le couteau pour la glace<br />
et l’accessoire pour broyer la glace.<br />
7. Enlevez la glace broyée ou mettez simplement<br />
votre boisson dans le grand bol pour la servir à<br />
table.<br />
Variante : Mixez d’abord les fruits dans le grand bol<br />
avec le couteau pour hacher (b), en le remplissant<br />
jusqu’à 0,5 litre maximum (2 tasses). Enlevez le<br />
couteau et placez l’accessoire pour broyer la glace<br />
12<br />
dans le grand bol de façon à broyer la glace<br />
directement dans la purée de fruits.<br />
Nettoyage<br />
(voir image partie C)<br />
Nettoyez le bloc-moteur A et le système<br />
d’entraînement du fouet I avec un chiffon humide<br />
seulement. Le système d’entraînement (a) du bol<br />
hachoir « <strong>BC</strong> » peut être rincé sous l’eau du robinet,<br />
mais ne doit pas être plongé dans l’eau.<br />
Tous les autres éléments peuvent être nettoyés au<br />
lave-vaisselle. Cependant, après avoir effectué des<br />
préparations à base d’aliments très salés, il est<br />
préférable de rincer immédiatement le couteau.<br />
Utiliser la quantité recommandée de savon et le<br />
produit de rinçage précisé par le fabricant du lavevaisselle.<br />
Si vous utilisez le mixeur pour la préparation de<br />
légumes colorés (exemple : carottes), les parties en<br />
plastique de l’appareil peuvent être colorées. Dans ce<br />
cas, enduisez ces parties avec de l’huile végétale<br />
avant de les mettre dans le lave-vaisselle.<br />
Recettes<br />
Mayonnaise (utilisez le pied mixeur)<br />
200 – 250 mL (1 tasse) d’huile<br />
1 œuf<br />
1 cuillère à soupe de jus de citron ou vinaigre<br />
Sel et poivre au goût<br />
Mettez tous les ingrédients dans le bol mesureur<br />
dans l’ordre mentionné ci-dessus. Introduisez le pied<br />
mixeur jusqu’au fond du bol, mettez-le en marche<br />
(utilisez la touche turbo C ) jusqu’à ce que l’huile se<br />
mélange au reste de la préparation. Ensuite, sans<br />
arrêter le mixeur, bougez-le doucement de haut en<br />
bas jusqu’à ce que tout soit bien mélangé et que la<br />
mayonnaise ait épaissi.<br />
Sauce à l’avocat (utilisez le bol hachoir « <strong>BC</strong> »)<br />
Hachez une gousse d’ail ;<br />
ajoutez 2 avocats bien mûrs (coupés en quartiers,<br />
sans le noyau)<br />
1 cuillère à soupe de jus de citron<br />
1 cuillère à soupe d’huile d’olive<br />
150 mL (1/2 tasse) de yaourt<br />
1/2 cuillère à thé de sucre, sel et poivre<br />
En utilisant la touche turbo C , mélangez pendant<br />
environ 1 minute.<br />
Crème glacée (utilisez le bol hachoir « <strong>BC</strong> »)<br />
100 g de framboises congelées<br />
10 g (2 c. à thé) de sucre en poudre<br />
80 g (1/3 tasse) de crème<br />
Mettez tous les ingrédients dans le bol hachoir,<br />
appuyez sur la touche turbo C<br />
et mélangez pendant<br />
environ 30 secondes. Servez immédiatement.<br />
Sujet à modification sans préavis.
Seulement pour le<br />
Canada<br />
Service après-vente au Canada<br />
Pour obtenir des services après-vente pour un produit<br />
<strong>Braun</strong>, veuillez composer le 1 800 387-6657 afin d’être<br />
dirigé vers le centre de service après-vente agréé <strong>Braun</strong><br />
le plus proche.<br />
Pour obtenir des services après-vente :<br />
A. Veuillez remettre le produit au centre de service<br />
après-vente agréé <strong>Braun</strong> de votre choix. Ou :<br />
B. Veuillez expédier le produit au centre de service<br />
après-vente agréé <strong>Braun</strong> de votre choix.<br />
Assurez-vous de bien emballer le produit.<br />
Expédiez le produit, port payé et assuré<br />
(recommandé). N’oubliez pas d’inclure une copie de<br />
votre preuve d’achat afin de confirmer la couverture<br />
de la garantie, le cas échéant.<br />
Pour obtenir des pièces et accessoires de rechange<br />
<strong>Braun</strong> d’origine :<br />
Communiquez avec un centre de service après-vente<br />
agréé <strong>Braun</strong>.<br />
Veuillez composer le 1 800 387-6657 afin d’être dirigé<br />
vers le centre de service après-vente agréé <strong>Braun</strong> le plus<br />
proche.<br />
Pour communiquer avec un représentant du Service à la<br />
clientèle <strong>Braun</strong> :<br />
Veuillez composer le 1 800 387-6657.<br />
Garantie limitée d’un an<br />
En l’occurrence d’un défaut à un appareil <strong>Braun</strong> au cours<br />
de la période de garantie mentionnée, soit par suite d'un<br />
vice de matières ou de fabrication, et du renvoi de<br />
l’appareil par le consommateur à un centre de service<br />
après-vente agréé, <strong>Braun</strong> Canada se réserve le choix de<br />
réparer ou remplacer l’appareil sans aucuns frais<br />
supplémentaires pour le consommateur. Cette garantie<br />
devient invalide si le produit est endommagé par une<br />
chute, une modification, un abus, une utilisation<br />
incorrecte ou s’il a été soumis à un entretien ou à des<br />
tentatives d’entretien par des centres de service aprèsvente<br />
non agréés. Cette garantie exclut les appareils<br />
modifiés ou utilisés à des fins commerciales.<br />
Dans la mesure permise par la loi, <strong>Braun</strong> Canada n’est<br />
pas responsable pour une perte d’utilisation, une perte<br />
de temps, un inconvénient, une perte commerciale, un<br />
dommage spécial ou indirect, causés par l’appareil.<br />
Les clauses de cette garantie constituent une addition et<br />
non une modification ou soustraction aux garanties<br />
statutaires et autres droits et recours contenus dans la<br />
législation provinciale applicable.<br />
13
Español<br />
ADVERTENCIAS<br />
Siempre que utilice este aparato siga las instrucciones de seguridad que a continuación se indican:<br />
14<br />
1. Lea este instructivo antes del uso.<br />
2. Para protegerse de un choque eléctrico no sumerja el cuerpo del motor en agua ni en ningún otro líquido.<br />
3. Este producto no debe ser usado por niños y cuidado especial debe tenerse sí hay niños cerca.<br />
4. Desconéctelo cuando no esté en uso, antes de poner o quitar partes y antes de limpiarlo.<br />
5. Evite tocar las partes en movimiento.<br />
6. No utilice este aparato sí:<br />
– El cable o la clavija están dañados.<br />
– Nota que falla.<br />
– Se ha caído.<br />
– Si se ha dañado en cualquier manera.<br />
Si esto sucede, llévelo cuanto antes al Centro de Servicio <strong>Braun</strong> más cercano a su domicilio para su<br />
revisión o su reparación.<br />
7. La utilización de accesorios no recomendados puede causar daños al aparato, choques eléctricos o<br />
lesiones a su persona.<br />
8. No lo use en exteriores.<br />
9. No permita que el cable cuelgue del filo de la mesa o que toque superficies calientes incluyendo la hornilla.<br />
10. Cuando mezcle líquidos, especialmente si están calientes, use un recipiente alto o mezcle pequeñas<br />
cantidades a la vez para evitar salpicaduras y quemaduras.<br />
11. Mantenga las manos y los utensilios de cocina alejados de la jarra mientras utilice el accesorio batidor<br />
para prevenir severas lesiones personales y/o daños al aparato. Puede utilizarse una espátula pero<br />
únicamente cuando el aparato no esté funcionando.<br />
12. Las cuchillas son filosas. Manéjense cuidadosamente.<br />
13. Para evitar accidentes, nunca ponga las cuchillas en la base sin antes colocar correctamente el recipiente<br />
picador en su sitio.<br />
14. Asegúrese de que la caja de engranajes esté firmemente fijada en su lugar antes de operar el accesorio<br />
picador.<br />
15. No trate de anular el mecanismo de seguro de la caja de engranages del accesorio picador.<br />
16. Mantenga las manos y utensilos lejos de las cuchillas mientras pica comida para reducir el riesgo de lesión<br />
severa o dañar el picador. Puede utilizarse un raspador para limpiar, siempre que el picador este<br />
desenchufado.<br />
17. El picador «<strong>HC</strong>» ha sido diseñado para procesar pequeñas cantidades de comida para consumición<br />
inmediata, y es ideal para la preparación de comidas para bebes. No esta diseñado para preparar grandes<br />
cantidades de comida a la misma vez.<br />
CONSERVE ESTE INSTRUCTIVO
Español<br />
Nuestros productos están desarrollados para<br />
alcanzar los más altos estándares de calidad,<br />
funcionalidad y diseño. Esperamos que disfrute de<br />
su nuevo pequeño electrodoméstico <strong>Braun</strong>.<br />
Atención<br />
Lea atentamente el folleto de instrucciones antes<br />
de utilizar este aparato.<br />
• ¡Las cuchillas están muy afiladas!<br />
• Asegurese siempre de que el aparato esté<br />
desenchufado antes de limpiarlo, guardarlo,<br />
montar o retirar cualquier accesorio.<br />
• Mantenga este aparato fuera del alcance de los<br />
niños.<br />
• Este aparato tiene una clavija polarizada<br />
(una de las patas es más ancha que la otra). Para<br />
reducir el riesgo de descarga eléctrica, esta clavija<br />
entrará en un contacto polarizado de una sola<br />
manera. Si la clavija no entra correctamente en el<br />
contacto, voltéela y si aún no entra entonces llame<br />
usted a un electricista calificado. No altere el<br />
enchufe.<br />
• No coloque el cuerpo del motor A y la caja de<br />
engranajes del batidor metálico I bajo el agua<br />
corriente ni los sumerja en ningún líquido.<br />
• Los aparatos eléctricos <strong>Braun</strong> cumplen con las<br />
normas internacionales de seguridad. Tanto las<br />
reparaciones como el reemplazo del cable de<br />
conexión deben ser realizados por un Servicio<br />
Técnico autorizado. Las reparaciones efectuadas<br />
por personal no autorizado pueden causar<br />
accidentes o daños al usuario.<br />
• Antes de conectar el aparato a la red, verifique que<br />
el voltaje indicado en la base del aparato se<br />
corresponda con el de su hogar.<br />
• Este producto está diseñado para uso doméstico<br />
y no industrial.<br />
• Notesé que la máxima potencia de este producto<br />
se obtiene con el accesorio picador «<strong>HC</strong>», que a su<br />
vez consume la máxima ernergía. Los otros<br />
accesorios recomendados pueden consumir<br />
significativamente menos ernergía.<br />
• El vaso medidor/mezclador H , y el recipiente<br />
picador (c) no son aptos para su uso en el<br />
microondas.<br />
Características eléctricas<br />
Potencia nominal: 400 W<br />
Tensión de alimentación: 120 V<br />
Frecuencia de operación: 60 Hz<br />
Descripción<br />
A Cuerpo del motor<br />
B Interruptor para velocidad variable<br />
C Interruptor de máxima potencia (turbo)<br />
D Botones de expulsión de los accesorios<br />
E Selector de velocidades<br />
F Varilla batidora<br />
G Soporte de pared<br />
H Vaso mezclador/medidor con tapa hermética<br />
I Caja de engranajes del batidor metálico<br />
J Accesorio batidor metálico<br />
K Picador «<strong>HC</strong>»<br />
L Picador «<strong>BC</strong>»<br />
M Accesorio picador de hielo para el picador «<strong>BC</strong>»<br />
Selector de velocidades<br />
Al presionar el interruptor B , la velocidad del motor<br />
se corresponderá con la indicada por el selector de<br />
velocidades E . A mayor velocidad, más rápido el<br />
picado.<br />
Sin embargo, la velocidad máxima de la batidora sólo<br />
puede alcanzarse presionando el interruptor de<br />
máxima potencia (turbo) C . También puede utilizar<br />
este interruptor para conseguir incrementos<br />
puntuales de potencia sin tener que usar el selector<br />
de velocidad.<br />
Dependiendo del tipo de preparación,<br />
recomendamos las siguientes selecciones de<br />
velocidad:<br />
Varilla batidora 1…turbo<br />
Accesorio picador 1…turbo<br />
Accesorio batidor 4…8<br />
Funcionamiento de la batidora<br />
La batidora está diseñada para preparar salsas,<br />
sopas, mayonesa y comida para bebés o para<br />
mezclar bebidas y batidos.<br />
1. Introduzca el cuerpo del motor A en la varilla<br />
batidora F hasta que encaje.<br />
2. Introduzca la batidora en el recipiente y presione el<br />
interruptor de puesta en marcha B o el interruptor<br />
de máxima potencia (turbo) C .<br />
3. Para retirar la varilla, presione los botones de<br />
expulsión D y extraiga la varilla batidora.<br />
Puede utilizar la batidora en el vaso mezclador/<br />
medidor H , pero también en cualquier otro recipiente<br />
u olla. Cuando utilice la batidora directamente en la<br />
olla, retire la olla del fuego para proteger la batidora<br />
de sobrecalentamientos.<br />
Funcionamiento del accesorio batidor<br />
metálico<br />
Utilice el accesorio batidor metálico únicamente para<br />
montar nata, levantar claras y preparar mousses o<br />
postres instantáneos.<br />
1. Inserte el batidor metálico J en la caja de<br />
engranajes I . A continuación inserte el cuerpo de<br />
engranajes en el cuerpo del motor A hasta que<br />
encaje.<br />
2. Coloque el batidor en un recipiente y presione el<br />
interruptor B para ponerlo en marcha.<br />
3. Para retirar el accesorio batidor, presione los<br />
botones de expulsión D y retire el cuerpo de<br />
engranajes. A continuación separe el batidor<br />
metálico del cuerpo de engranajes.<br />
Para unos óptimos resultados:<br />
• Utilice un recipiente ancho.<br />
• Para montar nata, use un máximo de 400 ml. de<br />
nata (mínimo 30% de grasa, 4 – 8 °C).<br />
• Para levantar claras, use un máximo de 4 claras.<br />
• Mueva el batidor en el sentido de las agujas del<br />
reloj.<br />
Cómo utilizar el/los accesorio/s<br />
picador/es<br />
(ver pag. 4)<br />
Picador «<strong>BC</strong>» Picador «<strong>HC</strong>»<br />
(a) Caja de (a) Caja de<br />
engranajes engranajes<br />
(b) Cuchilla (b) Cuchilla<br />
(c) Jarre picador (c) Recipiente picadora<br />
(d) Base / tapa (d) Base / tapa<br />
antideslizante antideslizante<br />
(e) Cuchilla para hielo<br />
(f) Accesorio<br />
picador de hielo<br />
Tanto el picador «<strong>HC</strong>» como el «<strong>BC</strong>» están diseñados<br />
especialmente para picar carne, queso, cebolla,<br />
especias, ajo, zanahoria, frutos secos, etc…<br />
Cuando quiera picar alimentos duros (e.g. queso<br />
duro) utilice la función de turbo C<br />
.<br />
Nota:<br />
No intente picar alimentos excesivamente duros<br />
como por ejemplo nuez moscada, café en grano o<br />
cereales.<br />
Utilice el picador «<strong>HC</strong>» para pequeñas cantidades.<br />
Está especialmente diseñado para picar hierbas,<br />
especias y chile (con agua).<br />
Utilice el picador «<strong>BC</strong>» para grandes cantidades y<br />
para alimentos duros como el queseo parmesano o el<br />
chocolate.<br />
Además, el picador «<strong>BC</strong>» es apto para una gran<br />
variedad de preparaciones como batidos, bebidas,<br />
purés, masas ligeras y para picar hielo.<br />
15
Antes de empezar a picar ...<br />
• trocee la carne, el queso, la cebolla, el ajo, las<br />
zanahorias, el chile (ver guía de preparaciones en<br />
la pág. 5)<br />
• corte el tallo de las hierbas, saque la cáscara de los<br />
frutos secos<br />
• limpie la carne de huesos, tendones y nervios.<br />
Para obtener unos mejores resultados, por favor lea<br />
la guía de preparaciones y preste atención a las<br />
recomendaciones de velocidad.<br />
Cuando use el picador<br />
(vea las figuras de la sección A de la pág. 4)<br />
1. Retire cuidadosamente la cubierta de plástico<br />
que cubre la cuchilla (b). Atención: ¡la cuchilla<br />
está muy afilada! Coger siempre por la parte de<br />
plástico.<br />
2. Coloque la cuchilla en el eje del recipiente picador<br />
(c), presiónela hacia abajo hasta que encaje.<br />
Picador «<strong>HC</strong>»: presione hacia abajo y gire la<br />
cuchilla 90º hasta que quede fija. Nunca utilice<br />
el picador sin la tapa/ base anti-deslizante<br />
colocada (d).<br />
3. Introduzca los alimentos en el recipiente/ jarra del<br />
picador.<br />
4. Coloque la caja de engranajes (a) en la parte<br />
superior del recipiente/ jarra.<br />
5. Coloque el cuerpo del motor A en la parte<br />
superior del accesorio picador hasta que encaje<br />
perféctamente.<br />
6. Presione el botón B o C para poner el accesorio<br />
picador en marcha. Durante su funcionamiento,<br />
sujete el cuerpo del motor con una mano y el<br />
accesorio picador con la otra.<br />
7. Cuando haya finalizado, presione los botones de<br />
expulsión D para separar el cuerpo del motor.<br />
8. Retire la caja de engranajes.<br />
9. Retire la cuchilla cuidadosamente.<br />
10. Retire los alimentos procesados del recipiente/<br />
jarra. La base anti-deslizante se puede usar como<br />
tapa para el recipiente/ jarra.<br />
Aplicaciones adicionales para el<br />
picador «<strong>BC</strong>»<br />
Batidos, bebidas, purés<br />
(si desea obtener resultados muy finos cuando<br />
elabore purés, utilice la varilla batidora<br />
introduciéndola el la jarra del picador «<strong>BC</strong>»).<br />
Masas ligeras (pasteles)<br />
Primeramente introduzca los líquidos en la jarra,<br />
seguidamente introduzca la harina y finalmente los<br />
huevos. Presione el botón de turbo C para mezclar la<br />
masa.<br />
Hielo picado<br />
(ver figura en sección B)<br />
1. Introduzca el accesorio picador de hielo (f) en la<br />
jarra. Asegúrese de que está bien colocado.<br />
2. Coloque el eje de la cuchilla para hielo (e) en el<br />
orificio central del accesorio picador de hielo y<br />
presione hacia abajo.<br />
3. Introduzca los cubitos de hielo en el accesorio<br />
picador de hielo.<br />
4. Coloque la caja de engranajes en la jarra.<br />
5. Inserte el cuerpo del motor en la caja de<br />
engranajes hasta que encaje.<br />
6. Presione el botón de turbo C hasta que los cubitos<br />
de hielo queden picados. Cuando haya terminado,<br />
presione los botones D para separar el cuerpo del<br />
motor. Saque la caja de engranajes, la cuchilla<br />
para hielo y el accesorio picador de hielo.<br />
7. Vierta el hielo picado en un recipiente o<br />
simplemente añada el líquido deseado en la jarra<br />
para servir directamente en la mesa.<br />
Alternativa: primeramente, mezcle la fruta en la jarra<br />
con la cuchilla picadora (b), hasta un máximo de 0,5<br />
litros. Retire la cuchilla y coloque el accesorio picador<br />
de hielo en la jarra, pique el hielo directamente sobre<br />
la mezcla de frutas.<br />
16<br />
Limpieza<br />
(ver figura en sección C)<br />
Limpie el cuerpo del motor A y la caja de engranajes<br />
del batidor metálico I únicamente con un paño<br />
húmedo. La caja de engranajes del picador «<strong>BC</strong>» (a)<br />
puede lavarse bajo el grifo, pero no lo sumerja en<br />
agua.<br />
Los demás componentes pueden limpiarse en el<br />
lavavajillas. Sin embargo, después de preparar<br />
alimentos picantes o muy salados, deberá enjuagar<br />
la cuchilla enseguida.<br />
Además, tenga cuidado de no usar demasiado<br />
detergente o descalcificador en el lavavajillas.<br />
Cuando se ha procesado alimentos con alta<br />
pigmentación (ej. zanahorias), los componentes de<br />
plástico del aparato pueden decolorarse. Frote estos<br />
componentes con aceite de cocina antes de ponerlos<br />
en el lavavajillas.<br />
Ejemplo de receta<br />
Mayonesa (utilización de la varilla batidora)<br />
200 – 250 ml de aceite<br />
1 huevo<br />
1 cucharada sopera de zumo de limón o de vinagre<br />
Sal y pimienta al gusto<br />
Ponga todos los ingredientes en el vaso mezclador/<br />
medidor siguiendo el orden anterior. Introduzca la<br />
batidora hasta el fondo del vaso. Presionando el<br />
interruptor de máxima potencia (turbo) C ,<br />
manténgala en esta posición hasta que ligue el<br />
aceite. Manteniendo la batidora en marcha, muévala<br />
despacio hacia arriba y abajo hasta que la mayonesa<br />
quede ligada y suave.<br />
Salsa de aguacate (use el picador «<strong>BC</strong>»)<br />
Pique un diente de ajo;<br />
añada dos aguacates maduros (troceados y sin<br />
hueso),<br />
1 cucharada de zumo de limón<br />
1 cucharada de aceite de oliva<br />
150 ml de yoghurt<br />
1/2 cucharadita de azucar<br />
Sal y pimienta al gusto<br />
Mezcle los ingredientes durante aproximádamente<br />
1 minuto, presionando el botón de turbo C .<br />
Helado (use el picador «<strong>BC</strong>»)<br />
100 g de frambuesas (ultracongeladas)<br />
10 g de azucar en polvo<br />
80 g de nata líquida<br />
Introduzca todos los ingredientes en la jarra picadora<br />
y mézclelos durante aproximádamente 30 segundos<br />
presionando el botón de turbo C<br />
. Sírvalo al<br />
momento.<br />
Modificaciones reservadas.
Solo para México<br />
Garantia<br />
Garantía<br />
La compañía Procter & Gamble Manufactura, S. de<br />
R.L. de C.V. consciente de lo que significa para el<br />
usuario un servicio post-venta, brinda a este aparato<br />
una garantía por 1 año, a partir de la fecha señalada<br />
en el comprobante de compra original,<br />
entendiéndose por ésta, la misma en que el<br />
consumidor recibió el producto. Dentro del plazo de<br />
garantía subsanaremos cualquier defecto de<br />
fabricación o mano de obra, bien sea reparando,<br />
cambiando algunas piezas o sustituyendo el aparato,<br />
según sea el desperfecto de éste. Las piezas o<br />
aparatos que hayan sido sustituidos serán de nuestra<br />
propiedad.<br />
La garantía perderá validez en los siguientes casos:<br />
a) Cuando el producto no hubiese sido operado de<br />
acuerdo al instructivo anexo.<br />
b) Cuando el producto se hubiese utilizado en<br />
condiciones distintas a las normales.<br />
c) Cuando el producto hubiese sido alterado o<br />
reparado por personas no autorizadas.<br />
Para poder hacer efectiva esta garantía así como<br />
para obtener partes consumibles, accesorios y<br />
refacciones, o bien acudir a los centros de servicio<br />
autorizados, le sugerimos comunicarse sin costo al<br />
01-800-508-58-00.<br />
Importado y/o distribuido por:<br />
Procter & Gamble México,<br />
S. de R.L. de C.V.<br />
Loma Florida #32, Col. Lomas de Vista Hermosa,<br />
Del. Cuajimalpa,<br />
05100 México, D.F.<br />
17