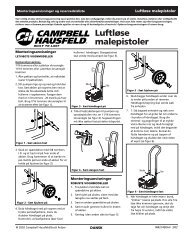
Gasoline Powered Pressure Washers - Campbell Hausfeld
Gasoline Powered Pressure Washers - Campbell Hausfeld
Gasoline Powered Pressure Washers - Campbell Hausfeld

Create successful ePaper yourself
Turn your PDF publications into a flip-book with our unique Google optimized e-Paper software.
<strong>Gasoline</strong> <strong>Powered</strong> <strong>Pressure</strong> <strong>Washers</strong><br />
Safety Guidelines<br />
This manual contains information that<br />
is very important to know and understand.<br />
This information is provided for<br />
SAFETY and to PREVENT EQUIPMENT<br />
PROBLEMS. To help recognize this information,<br />
observe the following symbols.<br />
Danger indicates<br />
! DANGER an imminently<br />
hazardous situation which, if not<br />
avoided, WILL result in death or serious<br />
injury.<br />
Warning indicates<br />
! WARNING a potentially hazardous<br />
situation which, if not avoided,<br />
COULD result in death or serious<br />
injury.<br />
Caution indicates<br />
! CAUTION a potentially hazardous<br />
situation which, if not avoided,<br />
MAY result in minor or moderate<br />
injury.<br />
Notice<br />
! NOTICE indicates important<br />
information, that if not followed,<br />
may cause damage to equipment.<br />
Unpacking<br />
Remove the equipment and all parts<br />
from the carton. The carton should<br />
contain the following:<br />
One (1) <strong>Pressure</strong> washer (pump,<br />
engine, cart base)<br />
One (1) Cart handle Assembly<br />
One (1) Basket (not included with<br />
all models)<br />
One (1) Spray gun<br />
One (1) Lance with nozzle<br />
Five (5) Spray tips (not included<br />
with all models)<br />
One (1) High pressure hose<br />
One (1) Pack of nuts, bolts,<br />
manuals and Chemical Suction<br />
Tube with Filter<br />
If any parts are missing, DO NOT<br />
return unit to the retailer. Know<br />
model number (located on serial number<br />
tag on frame) and call 1-800-330-<br />
0712 for replacement.<br />
After unpacking the product, inspect<br />
carefully for any damage that may<br />
have occurred during transit. Make<br />
www.chpower.com<br />
sure to tighten fittings, bolts, etc.,<br />
before putting unit into service.<br />
Do not operate<br />
unit if damaged<br />
during shipping, handling or use.<br />
Damage could result in bursting and<br />
cause injury or property damage.<br />
! WARNING ALWAYS use this start up procedure to<br />
See Product Manual for<br />
General Safety Information<br />
Assembly<br />
1. Slide handle over legs and secure<br />
with bolts provided.<br />
2. Insert removable spray tips and<br />
rubber grommets into holes provided<br />
on frame (if applicable).<br />
3. Connect the clear plastic chemical<br />
suction tube with filter to chemical<br />
injector hose barb on the pump.<br />
4. Connect the high-pressure hose to<br />
the pump outlet.<br />
5. Connect the high-pressure hose to<br />
the gun.<br />
6. Attach lance with nozzle to the<br />
gun.<br />
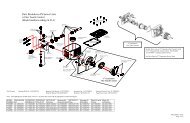
Figure 1 - Pump hook up<br />
2<br />
Pump outlet<br />
Chemical<br />
injector<br />
hose barb<br />
Pump inlet<br />
Start Up<br />
ensure that the unit is started safely<br />
and properly.<br />
If water has<br />
! CAUTION frozen in the pressure<br />
washer, thaw in a warm room<br />
before starting. DO NOT pour hot<br />
water on or into the pump; internal<br />
parts will be damaged.<br />
TRIGGER SAFETY LATCH<br />
In the engaged position, the trigger<br />
safety latch prevents the gun from<br />
being triggered accidentally. Push<br />
latch fully down to engage (See Figure<br />
2). Always engage trigger safety latch<br />
when unit is not in use.<br />
Figure 2 - Trigger Lock<br />
Engaged<br />
Disengaged<br />
1. Check oil levels. Add oil as necessary.<br />
NOTE: Some units are equipped with a<br />
low-oil sensor that shuts engine off if<br />
oil level falls below a certain level. If<br />
unit stops unexpectedly, check both oil<br />
and fuel levels. Check oil level each<br />
time unit is refueled.<br />
2. Check fuel level.<br />
DO NOT refuel a<br />
! WARNING hot engine.<br />
Refueling a hot engine could cause a<br />
fire. Use only fresh, clean regular or<br />
unleaded gasoline. Close the fuel<br />
shutoff valve during refueling.<br />
3. Attach garden hose to inlet side of<br />
pump and connect to water supply.<br />
Hose should have an I.D. of 5/8” and<br />
not be longer than 50 ft. (15 M).