

Perfect Broil⢠Toast-R-Oven⢠- Applica Use and Care Manuals
Perfect Broil⢠Toast-R-Oven⢠- Applica Use and Care Manuals
Perfect Broil⢠Toast-R-Oven⢠- Applica Use and Care Manuals

Create successful ePaper yourself
Turn your PDF publications into a flip-book with our unique Google optimized e-Paper software.
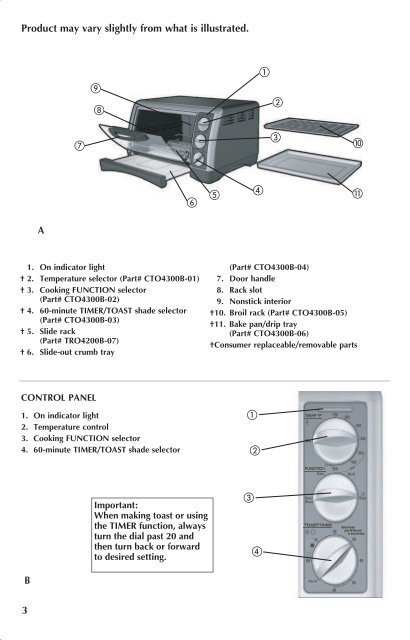
Product may vary slightly from what is illustrated.<br />
How to <strong>Use</strong><br />
This product is for household use only.<br />
<br />
<br />
<br />
<br />
<br />
<br />
<br />
<br />
<br />
<br />
<br />
CAUTION <br />
THIS OVEN THIS OVEN GETS GETS HOT. HOT. WHEN<br />
WHEN IN USE, ALWAYS USE OVEN<br />
IN USE, ALWAYS USE OVEN<br />
MITTS OR POT HOLDERS WHEN<br />
TOUCHING MITTS ORANY POT OUTER HOLDERS OR INNER<br />
WHENSURFACE TOUCHING OF THE ANY OVEN. OUTER<br />
OR INNER SURFACE OF THE<br />
OVEN<br />
A<br />
1. On indicator light<br />
† 2. Temperature selector (Part# CTO4300B-01)<br />
† 3. Cooking function selector<br />
(Part# CTO4300B-02)<br />
† 4. 60-minute Timer/<strong>Toast</strong> shade selector<br />
(Part# CTO4300B-03)<br />
† 5. Slide rack<br />
(Part# TRO4200B-07)<br />
† 6. Slide-out crumb tray<br />
CONTROL PANEL<br />
1. On indicator light<br />
2. Temperature control<br />
3. Cooking FUNCTION selector<br />
4. 60-minute TIMER/TOAST shade selector<br />
Important:<br />
When making toast or using<br />
the TIMER function, always<br />
turn the dial past 20 <strong>and</strong><br />
then turn back or forward<br />
to desired setting.<br />
(Part# CTO4300B-04)<br />
7. Door h<strong>and</strong>le<br />
8. Rack slot<br />
9. Nonstick interior<br />
† 10. Broil rack (Part# CTO4300B-05)<br />
† 11. Bake pan/drip tray<br />
(Part# CTO4300B-06)<br />
†Consumer replaceable/removable parts<br />
<br />
<br />
<br />
<br />
GETTING STARTED<br />
• Remove all packing material <strong>and</strong> any stickers; peel off clear protective film from control panel.<br />
• Wash all removable parts as instructed in <strong>Care</strong> <strong>and</strong> Cleaning section of this manual.<br />
• Select a location where this unit is to be used, allowing enough space between back of the unit<br />
<strong>and</strong> the wall to allow heat to flow without damage to cabinets <strong>and</strong> walls.<br />
• Insert crumb tray below lower heating elements.<br />
• Insert slide rack halfway into lower rack position (C).<br />
• Lift the oven door to bring up the hooks, <strong>and</strong> then slide the rack<br />
until it engages the hooks.<br />
Important: The rack will not slide forward unless the rack is inside<br />
the hooks on the door.<br />
• Close the oven door, noting that rack slides completely into oven.<br />
• Remove tie from cord <strong>and</strong> unwind.<br />
• Plug unit into electrical outlet<br />
C<br />
D<br />
Important: This oven gets hot. When in use, always use oven<br />
mitts or potholders when touching any outer or inner surface of<br />
the oven (D).<br />
Note: Before first use, run this oven empty for 15 minutes to remove/<br />
burn off any possible residues from manufacturing. You may notice<br />
some slight smoke <strong>and</strong> odor escaping from the oven. This is normal<br />
<strong>and</strong> will disappear with use.<br />
B<br />
3<br />
4


