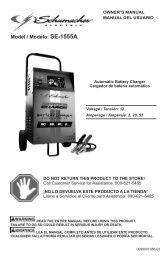
do not return this product to the store! - Schumacher Electric ...
do not return this product to the store! - Schumacher Electric ...
do not return this product to the store! - Schumacher Electric ...
- No tags were found...

Create successful ePaper yourself
Turn your PDF publications into a flip-book with our unique Google optimized e-Paper software.
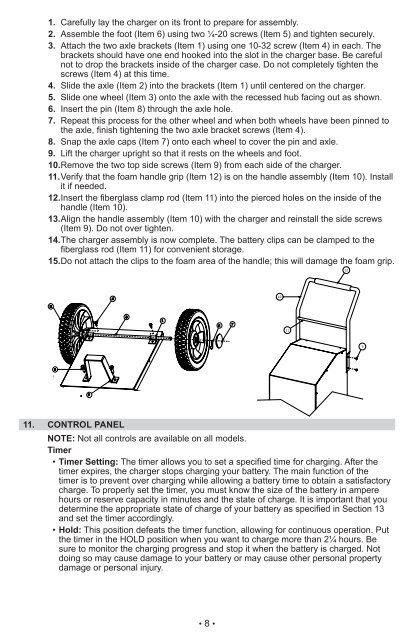
1. Carefully lay <strong>the</strong> charger on its front <strong>to</strong> prepare for assembly.<br />
2. Assemble <strong>the</strong> foot (Item 6) using two ¼-20 screws (Item 5) and tighten securely.<br />
3. Attach <strong>the</strong> two axle brackets (Item 1) using one 10-32 screw (Item 4) in each. The<br />
brackets should have one end hooked in<strong>to</strong> <strong>the</strong> slot in <strong>the</strong> charger base. Be careful<br />
<strong>not</strong> <strong>to</strong> drop <strong>the</strong> brackets inside of <strong>the</strong> charger case. Do <strong>not</strong> completely tighten <strong>the</strong><br />
screws (Item 4) at <strong>this</strong> time.<br />
4. Slide <strong>the</strong> axle (Item 2) in<strong>to</strong> <strong>the</strong> brackets (Item 1) until centered on <strong>the</strong> charger.<br />
5. Slide one wheel (Item 3) on<strong>to</strong> <strong>the</strong> axle with <strong>the</strong> recessed hub facing out as shown.<br />
6. Insert <strong>the</strong> pin (Item 8) through <strong>the</strong> axle hole.<br />
7. Repeat <strong>this</strong> process for <strong>the</strong> o<strong>the</strong>r wheel and when both wheels have been pinned <strong>to</strong><br />
<strong>the</strong> axle, finish tightening <strong>the</strong> two axle bracket screws (Item 4).<br />
8. Snap <strong>the</strong> axle caps (Item 7) on<strong>to</strong> each wheel <strong>to</strong> cover <strong>the</strong> pin and axle.<br />
9. Lift <strong>the</strong> charger upright so that it rests on <strong>the</strong> wheels and foot.<br />
10. Remove <strong>the</strong> two <strong>to</strong>p side screws (Item 9) from each side of <strong>the</strong> charger.<br />
11. Verify that <strong>the</strong> foam handle grip (Item 12) is on <strong>the</strong> handle assembly (Item 10). Install<br />
it if needed.<br />
12. Insert <strong>the</strong> fiberglass clamp rod (Item 11) in<strong>to</strong> <strong>the</strong> pierced holes on <strong>the</strong> inside of <strong>the</strong><br />
handle (Item 10).<br />
13. Align <strong>the</strong> handle assembly (Item 10) with <strong>the</strong> charger and reinstall <strong>the</strong> side screws<br />
(Item 9). Do <strong>not</strong> over tighten.<br />
14. The charger assembly is now complete. The battery clips can be clamped <strong>to</strong> <strong>the</strong><br />
fiberglass rod (Item 11) for convenient s<strong>to</strong>rage.<br />
15. Do <strong>not</strong> attach <strong>the</strong> clips <strong>to</strong> <strong>the</strong> foam area of <strong>the</strong> handle; <strong>this</strong> will damage <strong>the</strong> foam grip.<br />
12<br />
10<br />
11<br />
9<br />
11.<br />
CONTROL PANEL<br />
Note: Not all controls are available on all models.<br />
Timer<br />
• Timer Setting: The timer allows you <strong>to</strong> set a specified time for charging. After <strong>the</strong><br />
timer expires, <strong>the</strong> charger s<strong>to</strong>ps charging your battery. The main function of <strong>the</strong><br />
timer is <strong>to</strong> prevent over charging while allowing a battery time <strong>to</strong> obtain a satisfac<strong>to</strong>ry<br />
charge. To properly set <strong>the</strong> timer, you must know <strong>the</strong> size of <strong>the</strong> battery in ampere<br />
hours or reserve capacity in minutes and <strong>the</strong> state of charge. It is important that you<br />
determine <strong>the</strong> appropriate state of charge of your battery as specified in Section 13<br />
and set <strong>the</strong> timer accordingly.<br />
• Hold: This position defeats <strong>the</strong> timer function, allowing for continuous operation. Put<br />
<strong>the</strong> timer in <strong>the</strong> HOLD position when you want <strong>to</strong> charge more than 2¼ hours. Be<br />
sure <strong>to</strong> moni<strong>to</strong>r <strong>the</strong> charging progress and s<strong>to</strong>p it when <strong>the</strong> battery is charged. Not<br />
<strong>do</strong>ing so may cause damage <strong>to</strong> your battery or may cause o<strong>the</strong>r personal property<br />
damage or personal injury.<br />
• 8 •