HSi In-Ceiling Speaker Systems - Boston Acoustics
HSi In-Ceiling Speaker Systems - Boston Acoustics
HSi In-Ceiling Speaker Systems - Boston Acoustics

Create successful ePaper yourself
Turn your PDF publications into a flip-book with our unique Google optimized e-Paper software.
<strong>HSi</strong> <strong>In</strong>-<strong>Ceiling</strong> <strong>Speaker</strong> <strong>Systems</strong><br />
<strong>HSi</strong> 430 and <strong>HSi</strong> 435<br />
Español<br />
<strong>HSi</strong> Sistemas de parlantes<br />
empotrados en el techo<br />
Français<br />
Systèmes d’enceintes <strong>HSi</strong><br />
encastrées de plafond<br />
Deutsch<br />
<strong>HSi</strong>-Deckenlautsprechersysteme<br />
OWNER’S MANUAL / SAFETY INSTRUCTIONS / COMPLIANCE INFORMATION
Contents<br />
Índice<br />
Table des matières<br />
<strong>In</strong>halt<br />
Thank you! . . . . . . . . . . . . . . . . . . . . .2<br />
¡Gracias! . . . . . . . . . . . . . . . . . . . . . . .2<br />
Merci ! . . . . . . . . . . . . . . . . . . . . . . . . .2<br />
Vielen Dank! . . . . . . . . . . . . . . . . . . .2<br />
Specifications . . . . . . . . . . . . . . . . . . .3<br />
Especificaciones . . . . . . . . . . . . . . . .3<br />
Spécifications . . . . . . . . . . . . . . . . . . .3<br />
Spezifikationen . . . . . . . . . . . . . . . . .3<br />
<strong>In</strong>troduction . . . . . . . . . . . . . . . . . . .4<br />
<strong>In</strong>troducción . . . . . . . . . . . . . . . . . . .4<br />
<strong>In</strong>troduction . . . . . . . . . . . . . . . . . . .4<br />
Einführung . . . . . . . . . . . . . . . . . . . . .4<br />
<strong>Speaker</strong> <strong>In</strong>stallation Locations . .5<br />
Ubicaciones para la<br />
Emplacement d’installation<br />
Positionierung der Lautsprecher 5<br />
<strong>In</strong>stallation Tips . . . . . . . . . . . . . . . .6<br />
instalación de parlantes . . . . . . . .5<br />
des enceintes . . . . . . . . . . . . . . . . . .5<br />
Montagetipps . . . . . . . . . . . . . . . . . .6<br />
<strong>In</strong>stallation <strong>In</strong>structions . . . . . . . .8<br />
Consejos para la instalación . . . .6<br />
Conseils d’installation . . . . . . . . . .6<br />
Montageanleitung . . . . . . . . . . . . .8<br />
Painting . . . . . . . . . . . . . . . . . . . . . .13<br />
<strong>In</strong>strucciones para la instalación 8<br />
<strong>In</strong>structions d’installation . . . . . . .8<br />
Lackierung . . . . . . . . . . . . . . . . . . .13<br />
Listening Levels and<br />
Pintura . . . . . . . . . . . . . . . . . . . . . . .13<br />
Peinture . . . . . . . . . . . . . . . . . . . . . .13<br />
Lautstärkeneinstellungen und<br />
Power Handling . . . . . . . . . . . . . . .13<br />
Niveles de audición y<br />
Niveaux d’écoute et gestion<br />
Leistungsverarbeitung . . . . . . . .13<br />
Limited Warranty . . . . . . . . . . . . .14<br />
Manejo de potencia . . . . . . . . . . .13<br />
de la puissance . . . . . . . . . . . . . . .13<br />
Eingeschränkte Garantie . . . . . .14<br />
Garantía Limitada . . . . . . . . . . . .14<br />
Garantie limitée . . . . . . . . . . . . . . .14<br />
Thank you!<br />
¡Gracias!<br />
Merci !<br />
Vielen Dank!<br />
Thank you for selecting <strong>Boston</strong><br />
<strong>Acoustics</strong> ® in-ceiling loudspeakers. Your<br />
speakers have been designed to deliver<br />
years of stunning audio performance.<br />
Please keep your manual in a safe<br />
place in case you need to refer to it later.<br />
For the professional installers who have<br />
experience with in-ceiling speakers,<br />
please read the <strong>In</strong>stallation Tips sections<br />
as it contains <strong>HSi</strong>-specific information.<br />
Enjoy your new <strong>HSi</strong> in-ceiling speakers.<br />
Gracias por elegir los parlantes para<br />
empotrar en el techo <strong>Boston</strong><br />
<strong>Acoustics</strong>®. Sus parlantes han sido<br />
diseñados para proporcionarle años de<br />
impresionante sonido y rendimiento.<br />
Por favor, conserve el manual en un<br />
lugar seguro por si necesita consultarlo<br />
después. En el caso de instaladores<br />
profesionales con experiencia en el<br />
montaje de parlantes empotrados en el<br />
techo, deben consultar los Consejos<br />
para la instalación donde se incluye<br />
información específica sobre <strong>HSi</strong>.<br />
Disfrute de sus nuevos parlantes <strong>HSi</strong><br />
para empotrar en el techo.<br />
Nous vous remercions d’avoir choisi<br />
les enceintes encastrées de plafond de<br />
<strong>Boston</strong> <strong>Acoustics</strong>®. Ces enceintes ont<br />
été conçues pour produire des<br />
performances audio inégalées pendant<br />
de nombreuses années.<br />
Veuillez conserver ce manuel en lieu<br />
sûr pour référence future. Pour les<br />
installateurs professionnels ayant une<br />
expérience en enceintes encastrées de<br />
plafond, veuillez lire la section Conseils<br />
d’installation car elle contient des<br />
informations spécifiques sur le modèle<br />
<strong>HSi</strong>.<br />
Nous espérons que vous apprécierez<br />
vos nouvelles enceintes encastrées <strong>HSi</strong>.<br />
Vielen Dank, dass Sie sich für die<br />
Deckenlautsprecher von <strong>Boston</strong><br />
<strong>Acoustics</strong>® entschieden haben. Ihre<br />
Lautsprecher werden Ihnen auf Jahre<br />
hinaus eine beeindruckende<br />
Klangleistung bieten.<br />
Heben Sie das Handbuch bitte an<br />
einem sicheren Ort auf, falls Sie es<br />
später noch einmal benötigen.<br />
Personen, die sich professionell mit der<br />
<strong>In</strong>stallation von Lautsprechern befassen<br />
und somit viel Erfahrung mit<br />
Deckenlautsprechern haben, sollten<br />
den Abschnitt “Montagetipps“ lesen, da<br />
dieser Abschnitt <strong>HSi</strong>-spezifische<br />
<strong>In</strong>formationen enthält.<br />
Viel Spaß mit Ihren neuen <strong>HSi</strong>-<br />
Deckenlautsprechern<br />
– 2 –
SPECIFICATIONS<br />
<strong>HSi</strong> 430/<strong>HSi</strong> 435<br />
FREQUENCY RESPONSE (±3dB)<br />
100Hz-20kHz with High Pass Filter (HPF) switched off;<br />
180Hz-20kHz with High Pass Filter (HPF) switched on<br />
RECOMMENDED AMPLIFIER POWER<br />
10-100 watts<br />
NOMINAL IMPEDANCE<br />
8 ohms<br />
SENSITIVITY 1 WATT (2.83V) At 1m<br />
86dB<br />
TWEETER<br />
3<br />
/4" (20mm) Dome<br />
WOOFER<br />
3 1 /2" (89mm)<br />
CROSSOVER FREQUENCY<br />
180Hz (to Subwoofer); 3,500Hz (woofer – tweeter)<br />
GRILLE FRAME SIZE 5 1 /2" (138mm) diameter (<strong>HSi</strong> 430); 5 1 /2" (138mm) square (<strong>HSi</strong> 435)<br />
MOUNTING HOLE CUTOUT<br />
4 7 /8" (124mm) diameter<br />
MOUNTING DEPTH (FROM SURFACE)<br />
7 1 /2" (190mm)<br />
OPTIONAL NEW CONSTRUCTION BRACKET<br />
NCBR3<br />
ESPECIFICACIONES<br />
<strong>HSi</strong> 430/<strong>HSi</strong> 435<br />
RESPUESTA DE FRECUENCIA (±3dB)<br />
100Hz-20kHz con filtro de pasa alto (HPF) apagado;<br />
180Hz-20kHz con filtro de pasa alto (HPF) encendido<br />
POTENCIA DE AMPLIFICADOR RECOMENDADA<br />
10-100 watts<br />
IMPEDANCIA NOMINAL<br />
8 ohmios<br />
SENSIBILIDAD 1 WATT (2,83V) A 1m<br />
86dB<br />
BAFLE DE AGUDOS<br />
Cúpula de 3 /4" (20mm)<br />
BAFLE DE BAJOS<br />
3 1 /2" (89mm)<br />
FRECUENCIA DE TRANSICIÓN<br />
180Hz (al Subwoofer); 3.500Hz (bafle de bajos – bafle de agudos)<br />
TAMAÑO DEL MARCO DE REJILLA 5 1 /2" (138mm) de diámetro (<strong>HSi</strong> 430); 5 1 /2" (138mm) cuadrado (<strong>HSi</strong> 435)<br />
ORIFICIO DE MONTAJE<br />
4 7 /8" (124mm) de diámetro<br />
PROFUNDIDAD DE MONTAJE (DESDE LA SUPERFICIE) 7 1 /2" (190mm)<br />
SOPORTE OPCIONAL PARA CONSTRUCCIÓN NUEVA NCBR3<br />
SPÉCIFICATIONS<br />
<strong>HSi</strong> 430/<strong>HSi</strong> 435<br />
DISTORSION DE FRÉQUENCE (±3dB) 100Hz-20kHz avec filtre passe-haut (HPF) désactivé ;<br />
180Hz-20kHz avec filtre passe-haut (HPF) activé<br />
PUISSANCE RECOMMANDÉE DE L’AMPLIFICATEUR 10-100 watts<br />
IMPÉDANCE NOMINALE<br />
8 ohms<br />
SENSIBILITÉ 1 WATT (2,83V) À 1m<br />
86dB<br />
HAUT-PARLEUR D’AIGUS<br />
Dôme de 20mm<br />
HAUT-PARLEUR DE GRAVES<br />
89mm<br />
FRÉQUENCE DE RECOUVREMENT<br />
180Hz (vers caisson de basse) ; 3500Hz (haut-parleur de graves / d’aigus)<br />
TAILLE DU COFFRET DE LA GRILLE Diamètre de 138mm (<strong>HSi</strong> 430) ; Carré de 138mm (<strong>HSi</strong> 435)<br />
DÉCOUPE DE L’ORIFICE DE MONTAGE<br />
Diamètre de 124mm<br />
PROFONDEUR DE MONTAGE (À PARTIR DE LA SURFACE) 190 mm<br />
NOUVEAU SUPPORT DE CONSTRUCTION (OPTION) NCBR3<br />
SPEZIFIKATIONEN<br />
<strong>HSi</strong> 430/<strong>HSi</strong> 435<br />
FREQUENZBEREICH (±3dB)<br />
100Hz-20kHz mit ausgeschaltetem Hochpassfilter (HPF);<br />
180Hz-20kHz mit eingeschaltetem Hochpassfilter (HPF)<br />
EMPFOHLENE VERSTÄRKERLEISTUNG<br />
10-100 Watt<br />
NOMINALIMPEDANZ<br />
8 ohms<br />
EMPFINDLICHKEIT 1 WATT (2,83V) BEI 1m<br />
86dB<br />
TWEETER<br />
20mm Kalotte<br />
WOOFER<br />
89mm<br />
TRENNFREQUENZ<br />
180Hz (zum Subwoofer); 3.500Hz (Woofer – Tweeter)<br />
GITTERRAHMENGRÖßE 138mm Durchmesser (<strong>HSi</strong> 430); 138mm Quadrat (<strong>HSi</strong> 435)<br />
AUSSCHNITT FÜR MONTAGELOCH<br />
124mm Durchmesser<br />
MONTAGETIEFE (AB DER OBERFLÄCHE)<br />
190mm<br />
OPTIONALE HALTERUNGEN FÜR NEUBAUTEN<br />
NCBR3<br />
– 3 –
WARNING<br />
Always turn off the amplifier or receiver<br />
when connecting speakers or any<br />
other components to the system.<br />
NOTE<br />
This manual assumes the installer<br />
possesses skill in the proper use of<br />
hand and power tools, knowledge of<br />
local building and fire codes, and a<br />
familiarity with the environment<br />
behind the wall or ceiling in which the<br />
speakers will be installed.<br />
<strong>In</strong>troduction<br />
<strong>Boston</strong> <strong>Acoustics</strong> <strong>HSi</strong><br />
<strong>Systems</strong><br />
<strong>In</strong>-ceiling speakers with an impressive<br />
lineage. Styled to blend into any<br />
decorating scheme.<br />
Given the intelligent engineering<br />
inside, an <strong>HSi</strong> speaker will make its<br />
presence known to any set of critical<br />
ears in the room. Our <strong>HSi</strong> speakers are<br />
direct descendants of our highly<br />
acclaimed <strong>Boston</strong> Reference speakers.<br />
Every screw, cone, grille, and bevel is<br />
designed to facilitate incredible, lifelike<br />
sound with a minimum of diffraction<br />
(the breaking up of sound by<br />
obstructions) and maximum<br />
dispersion (widespread sound). The<br />
result is optimum sound in a wide<br />
range of installation locations.<br />
ADVERTENCIA<br />
Apague siempre el amplificador o el<br />
receptor al conectar parlantes o<br />
cualquier otro componente al<br />
sistema.<br />
NOTA<br />
En este manual se presupone que el<br />
instalador posee habilidad en el<br />
manejo de herramientas manuales y<br />
eléctricas, conocimiento sobre los<br />
códigos vigentes de construcción local<br />
y normas sobre incendios y que está<br />
familiarizado con el entorno que se<br />
encuentra del otro lado de la pared o el<br />
techo en los que se instalarán los<br />
parlantes.<br />
<strong>In</strong>troducción<br />
Sistemas <strong>HSi</strong> de <strong>Boston</strong><br />
<strong>Acoustics</strong><br />
Parlantes empotrados en el techo de<br />
excelente diseño. Diseñados para<br />
integrarse en cualquier estilo de<br />
decoración.<br />
Teniendo en cuenta el gran desarrollo<br />
de ingeniería de los parlantes <strong>HSi</strong>,<br />
cualquier oído crítico reconocerá su<br />
presencia en el ambiente donde están<br />
instalados. Nuestros parlantes <strong>HSi</strong> son<br />
descendientes directos de nuestros<br />
sistemas de parlantes <strong>Boston</strong>,<br />
altamente elogiados. Cada tornillo,<br />
cono, rejilla y bisel ha sido diseñado<br />
para facilitar un sonido natural increíble,<br />
con mínima difracción (disgregación<br />
del sonido a causa de obstrucciones) y<br />
máxima dispersión (sonido envolvente).<br />
El resultado es un sonido óptimo en<br />
una amplia gama de ubicaciones.<br />
AVERTISSEMENT<br />
Débranchez toujours l’amplificateur<br />
ou le récepteur avant de connecter les<br />
enceintes ou tout autre composant au<br />
système.<br />
NOTE<br />
Ce manuel suppose que l’installateur<br />
sait utiliser les outils manuels et<br />
électriques nécessaires à l’installation,<br />
qu’il connaît la réglementation en<br />
vigueur sur la construction et<br />
l’incendie, et qu’il sait exactement<br />
quels éléments sont situés derrière les<br />
murs ou les plafonds sur lesquels les<br />
enceintes seront fixées.<br />
<strong>In</strong>troduction<br />
Systèmes <strong>HSi</strong> <strong>Boston</strong><br />
<strong>Acoustics</strong><br />
Enceintes encastrées de plafond<br />
issues d’une tradition prestigieuse. Style<br />
adaptable à toutes sortes de<br />
décoration.<br />
Grâce à sa construction intelligente,<br />
une enceinte <strong>HSi</strong> est reconnaissable<br />
immédiatement par toutes les<br />
personnes ayant l’ouïe fine. Nos<br />
enceintes <strong>HSi</strong> sont en effet les<br />
descendantes directes de nos enceintes<br />
de référence <strong>Boston</strong> si réputées.<br />
Chaque vis, cône, grille et biseau est<br />
conçu pour dégager un son<br />
incroyablement naturel avec un<br />
minimum de diffraction (fragmentation<br />
du son causée par les obstacles) et un<br />
maximum de dispersion (son à large<br />
diffusion). Un son de qualité optimale<br />
en résulte, quel que soit l’endroit où les<br />
enceintes sont installées.<br />
ACHTUNG<br />
Stellen Sie den Verstärker oder<br />
Empfänger immer ab, wenn<br />
Lautsprecher oder andere<br />
Komponenten an das System<br />
angeschlossen werden.<br />
HINWEIS<br />
Dieses Handbuch setzt voraus, dass<br />
der <strong>In</strong>stallateur im Umgang mit Handund<br />
Elektrowerkzeugen versiert ist, die<br />
örtlichen Bau- und<br />
Brandschutzvorschriften kennt und<br />
weiß, wo und welche Leitungen in der<br />
Wand bzw. hinter der<br />
Wandverkleidung verlaufen, in der die<br />
Lautsprecher montiert werden sollen.<br />
Einführung<br />
<strong>HSi</strong>-Systeme von <strong>Boston</strong><br />
<strong>Acoustics</strong><br />
Deckenlautsprecher mit einem<br />
beeindruckenden Sortiment. Stile für<br />
alle Dekors.<br />
Durch die intelligenten technischen<br />
<strong>In</strong>nenkomponenten wird ein <strong>HSi</strong>-<br />
Lautsprecher von jedem kritischen Ohr<br />
in einem Raum erkannt. Unsere <strong>HSi</strong>-<br />
Lautsprecher sind direkte Nachfolger<br />
unserer allgemein geschätzten <strong>Boston</strong>-<br />
Reference-Lautsprechersysteme. Jede<br />
Schraube, jeder Trichter, jedes Ziergitter<br />
und jede Einfassung ist so ausgeführt,<br />
dass der unglaubliche, lebensechte<br />
Klang bei minimaler Beugung<br />
(Klangstörungen durch Hindernisse)<br />
und maximaler Dispersion<br />
(Klangverteilung) erzeugt wird. Das<br />
Resultat ist optimaler Klang bei einer<br />
breiten Auswahl an Montageorten.<br />
– 4 –
<strong>Speaker</strong> <strong>In</strong>stallation<br />
Locations<br />
<strong>HSi</strong> 430 and <strong>HSi</strong> 435<br />
When selecting installation locations<br />
you must take into account both<br />
mechanical and acoustical factors. The<br />
tweeter of the <strong>HSi</strong> 430 and <strong>HSi</strong> 435<br />
helps them produce excellent sound<br />
even when they are installed in less<br />
than ideal locations.<br />
The mechanical factors have to do<br />
with the structural parts inside the<br />
ceiling. If you are installing the<br />
speakers in new construction it is easy<br />
to take this into account. Simply select<br />
the installation locations before the<br />
wall board goes up. <strong>In</strong> retrofit<br />
installation things are more<br />
complicated. First, you must know the<br />
locations of the ceiling rafters to be<br />
sure the installation location is<br />
between them. An electronic stud<br />
finder can help locate the ceiling<br />
rafters. You must also know the depth<br />
of the rafters to be sure there is<br />
enough room above the ceiling for the<br />
speakers.<br />
The locations of heating outlet ducts<br />
and electrical fixtures can help indicate<br />
where there may be obstructions in<br />
the ceiling. As a final check, before<br />
cutting the hole for installation, drill a<br />
small hole at the center of the<br />
installation location. <strong>In</strong>sert a long, bent<br />
piece of wire and move it around to<br />
confirm that there are no obstructions<br />
behind the chosen location.<br />
<strong>In</strong>stallation in drop ceilings is easy<br />
since ceiling tiles can be removed for<br />
access to the installation location. Just<br />
be sure there is adequate room above<br />
the ceiling grid to accommodate the<br />
speakers. See the Mounting Depth<br />
specifications on page 3.<br />
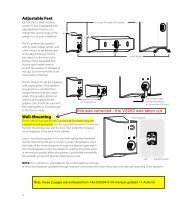
<strong>In</strong> addition to the area for the<br />
installation cutout you must allow an<br />
additional 3 ⁄4-inch (19mm) of clearance<br />
around it. This ensures that there is<br />
room for the mounting clamps to<br />
deploy.<br />
Ubicaciones para<br />
la instalación de<br />
parlantes<br />
<strong>HSi</strong> 430 y <strong>HSi</strong> 435<br />
Al elegir las ubicaciones para la<br />
instalación debe tener en cuenta los<br />
factores mecánicos y los factores<br />
acústicos. El bafle de agudos del <strong>HSi</strong><br />
430 y del <strong>HSi</strong> 435 contribuye a la<br />
producción de un sonido excelente,<br />
aún cuando se instalen en ubicaciones<br />
que no son ideales.<br />
Los factores mecánicos tienen que<br />
ver con las partes estructurales del<br />
techo. Si usted va a instalar los parlantes<br />
en una construcción nueva es fácil<br />
tener en cuenta estos factores.<br />
Simplemente elija los lugares para la<br />
instalación antes de levantar las<br />
paredes. Cuando la instalación se realiza<br />
en construcciones ya existentes las<br />
cosas se complican. En primer lugar,<br />
debe saber dónde se encuentran las<br />
vigas del techo para estar seguro de<br />
que la instalación se ubique entre las<br />
mismas. Un detector electrónico de<br />
entramado lo puede ayudar a ubicar las<br />
vigas del techo. También debe conocer<br />
la profundidad de las vigas para estar<br />
seguro de que hay espacio suficiente<br />
arriba del techo para los parlantes.<br />
Las ubicaciones de los conductos de<br />
salida de calefacción y de accesorios<br />
eléctricos lo pueden ayudar a<br />
determinar dónde puede haber<br />
obstrucciones en el techo. Como<br />
comprobación final, antes de hacer el<br />
agujero para la instalación, perfore un<br />
pequeño orificio en el centro de la<br />
ubicación para la instalación. <strong>In</strong>serte un<br />
alambre largo y curvado y muévalo<br />
alrededor para confirmar que no hay<br />
obstrucciones detrás de la ubicación<br />
elegida.<br />
La instalación en falsos cielorrasos es<br />
fácil, ya que se pueden retirar las placas<br />
del cielorraso para tener acceso al lugar<br />
de instalación. Simplemente verifique<br />
que haya espacio adecuado arriba del<br />
enrejado del cielorraso para ubicar los<br />
parlantes. Consulte las especificaciones<br />
sobre Profundidad de montaje en la<br />
página 3.<br />
Emplacement<br />
d’installation des<br />
enceintes<br />
<strong>HSi</strong> 430 et <strong>HSi</strong> 435<br />
Quand vous sélectionnez<br />
l’emplacement d’installation, vous<br />
devez prendre en compte à la fois des<br />
facteurs mécaniques et acoustiques.<br />
Le haut-parleur d’aigus des modèles<br />
<strong>HSi</strong> 430 et <strong>HSi</strong> 435 permet de générer<br />
un son d’excellente qualité même si<br />
les enceintes sont installées dans des<br />
emplacements peu appropriés.<br />
Les facteurs mécaniques se<br />
rapportent aux éléments structurels<br />
présents dans le plafond. Si vous<br />
installez les enceintes dans une<br />
construction neuve, ces facteurs sont<br />
faciles à prendre en compte.<br />
Sélectionnez simplement les<br />
emplacements d’installation avant de<br />
fixer les panneaux de revêtement.<br />
Dans les installations anciennes<br />
améliorées, l’installation est plus<br />
complexe. En premier lieu, vous devez<br />
connaître l’emplacement des chevrons<br />
du plafond pour bien installer les<br />
enceintes entre ces chevrons. Un<br />
détecteur de montant électronique<br />
peut permettre de détecter ces<br />
chevrons. Vous devez également<br />
connaître la profondeur des chevrons<br />
afin de vous assurer que l’espacement<br />
au-dessus du plafond est suffisant<br />
pour les enceintes.<br />
L’emplacement des sorties des<br />
conduits de chauffage et des appareils<br />
électriques peut vous indiquer les<br />
obstacles présents dans le plafond.<br />
Pour vérifier et avant de réaliser la<br />
découpe d’installation, percez un petit<br />
trou au centre de l’emplacement<br />
d’installation. <strong>In</strong>sérez une longe tige<br />
tordue et déplacez-la à l’intérieur pour<br />
confirmer l’absence d’obstruction<br />
derrière l’emplacement choisi.<br />
L’installation est simple dans les fauxplafonds<br />
étant donné que les dalles<br />
peuvent être enlevées. Vérifiez<br />
simplement que l’espacement audessus<br />
de la trame de plafond est<br />
suffisant pour installer les enceintes.<br />
Voir les spécifications sur la profondeur<br />
de montage à la page 3.<br />
Positionierung der<br />
Lautsprecher<br />
<strong>HSi</strong> 430 und <strong>HSi</strong> 435<br />
Bei der Auswahl der Montagestellen<br />
müssen Sie sowohl mechanische als<br />
auch akustische Faktoren<br />
berücksichtigen. Der Tweeter des <strong>HSi</strong><br />
430 und des <strong>HSi</strong> 435 führt sogar dann<br />
zu einem ausgezeichneten Klang,<br />
wenn diese an nicht ganz idealen<br />
Stellen montiert werden.<br />
Die mechanischen Faktoren haben<br />
mit den strukturellen Bestandteilen im<br />
<strong>In</strong>nern der Decke zu tun. Wenn Sie die<br />
Lautsprecher in einem Neubau<br />
montieren kann dies aber ganz<br />
einfach berücksichtigt werden.<br />
Wählen Sie einfach die Montagestellen<br />
aus, bevor die Wand errichtet wird. Die<br />
Montage in bestehenden Gebäuden<br />
kann etwas problematischer sein.<br />
Zuerst müssen Sie herausfinden, wo<br />
sich die Deckensparren befinden, um<br />
sicherstellen zu können, dass sich die<br />
Montagestelle dazwischen befindet.<br />
Ein elektronisches Balkensuchgerät<br />
kann bei der Suche nach den Sparren<br />
helfen. Sie müssen außerdem wissen,<br />
wie tief die Sparren in der Decke<br />
liegen, um sicherstellen zu können,<br />
dass über der Decke genug Raum für<br />
die Lautsprecher zur Verfügung steht.<br />
Der Verlauf von Heizungsrohren und<br />
Elektroinstallationen kann einen<br />
Hinweis darauf geben, wo sich in der<br />
Decke Hindernisse befinden könnten.<br />
Als letzte Prüfung, bevor Sie das Loch<br />
für die Montage aus der Decke<br />
schneiden, bohren Sie ein kleines Loch<br />
in die Mitte der Montagestelle. Führen<br />
Sie ein langes, gebogenes Stück Draht<br />
ein und bewegen Sie es rund herum,<br />
um sicherzustellen, dass sich hinter<br />
der gewählten Montagestelle keine<br />
Hindernisse befinden.<br />
Die Montage in abgehängten<br />
Decken ist einfach, da sich<br />
Deckenplatten entfernen lassen und<br />
so ein Zugang zur Montagestelle<br />
gewährleistet ist. Stellen Sie nur sicher,<br />
dass über dem Deckengitter<br />
genügend Platz zur Verfügung steht,<br />
um die Lautsprecher aufzunehmen.<br />
Siehe die Spezifikationen zur<br />
Montagetiefe auf Seite 3.<br />
Before cutting speaker holes, drill a small hole and use a coat hanger wire or long screwdriver to check for<br />
clearance above the ceiling.<br />
Antes de cortar los orificios de los parlantes, perfore un pequeño orificio y use un cable de suspensión<br />
recubierto o un destornillador largo para comprobar la separación arriba del techo<br />
Avant de réaliser la découpe pour l’enceinte, percez un petit trou et utilisez un morceau de cintre ou un long<br />
tournevis pour vérifier l’espacement au-dessus du plafond.<br />
Bevor Sie die Lautsprecherlöcher aus der Decke ausschneiden, bohren Sie ein kleines Loch und verwenden<br />
Sie einen Kleiderbügel oder einen langen Schraubenzieher, um sicherzustellen, dass über der Decke alles<br />
frei ist.<br />
– 5 –
Also remember that you must run<br />
speaker wires from the amplifier to the<br />
installation location. This is easy in new<br />
construction installations. It is also easy<br />
in drop ceiling installations once the<br />
wire is in the area above the ceiling<br />
grid. <strong>In</strong> retrofit installations wire<br />
routing is more difficult. Be sure to take<br />
this into account when planning your<br />
installation.<br />
Además del área que se abre para la<br />
instalación se debe dejar una<br />
separación adicional de ” (19mm)<br />
alrededor del agujero. De esta forma se<br />
asegura que se dispondrá de espacio<br />
para utilizar las abrazaderas de montaje.<br />
Recuerde también que debe tender<br />
los cables de los parlantes desde el<br />
amplificador hasta la ubicación de la<br />
instalación. Esto es fácil cuando la<br />
instalación se realiza en construcciones<br />
nuevas. También es fácil en las<br />
instalaciones que se realizan en falsos<br />
cielorrasos una vez que el cable se<br />
encuentra en el área arriba del enrejado<br />
del cielorraso. En las instalaciones que<br />
se realizan en construcciones ya<br />
existentes es más difícil colocar el cable.<br />
Asegúrese de tener todo esto en<br />
cuenta al planificar su instalación.<br />
En plus de la zone pour la découpe<br />
d’installation, vous devez laisser un<br />
espacement de 19 mm autour de cet<br />
orifice. Ainsi, l’espace sera suffisant<br />
pour déployer les pinces de fixation.<br />
N’oubliez pas que les fils de<br />
l’enceinte doivent courir de<br />
l’amplificateur jusqu’à l’emplacement<br />
d’installation. Cet acheminement est<br />
simple dans les constructions neuves.<br />
Elle est également simplifiée dans les<br />
faux-plafonds dès que le fil est dans la<br />
zone située au-dessus de la trame de<br />
plafond. Dans les installations<br />
anciennes<br />
améliorées,<br />
l’acheminement est plus complexe.<br />
Prenez bien ces facteurs en compte<br />
quand vous planifiez votre installation.<br />
Zusätzlich zur Fläche des<br />
Montagelochs muss ein Spiel von 19<br />
mm vorhanden sein. Dies<br />
gewährleistet, dass genügend Platz für<br />
das Anbringen der Montageklemmen<br />
vorhanden ist.<br />
Denken Sie auch daran, dass Sie<br />
zwischen dem Verstärker und der<br />
Montagestelle Lautsprecherkabel<br />
verlegen müssen. Bei einer Montage in<br />
einem Neubau ist dies einfach. Ebenso<br />
einfach ist es bei der Montage in<br />
abgehängten Decken, sobald sich das<br />
Kabel im Bereich über dem<br />
Deckengitter befindet. Bei der<br />
Montage in einem bestehenden<br />
Gebäude gestaltet sich die<br />
Kabelverlegung schwieriger. Stellen<br />
Sie sicher, dass Sie dies bei der Planung<br />
der Montage berücksichtigen.<br />
5 5 /8"<br />
143mm<br />
4 7 /8"<br />
124mm<br />
<strong>HSi</strong> 430<br />
<strong>HSi</strong> 435<br />
<strong>In</strong>stallation Tips<br />
Required Clearances<br />
Behind the mounting surface, there<br />
must be 3 ⁄4-inch (19mm) clearance<br />
around the mounting hole.<br />
New Construction<br />
Taking steps to increase the rigidity<br />
of the mounting surface by using<br />
additional drywall screws, and/or the<br />
use of a construction adhesive<br />
between the drywall and joists adjacent<br />
to the speaker location, will further<br />
enhance performance.<br />
Consejos para la<br />
instalación<br />
Separación requerida<br />
Detrás de la superficie de<br />
instalación, debe haber una<br />
separación de 3 ⁄4 pulgadas (19mm)<br />
alrededor del orificio de montaje.<br />
Construcción nueva<br />
Para mejorar aún más el<br />
rendimiento, se puede aumentar la<br />
rigidez de la superficie de montaje<br />
usando tornillos para pared de<br />
mampostería y/o un adhesivo para<br />
construcción entre la pared de<br />
mampostería y las viguetas<br />
adyacentes a la ubicación del parlante.<br />
Conseils<br />
d’installation<br />
Espacements nécessaires<br />
Derrière la surface de montage, un<br />
espacement de 19mm doit être<br />
présent autour du trou de fixation.<br />
Construction neuve<br />
L’augmentation de la rigidité de la<br />
surface de montage obtenue par<br />
l’utilisation de vis pour maçonnerie<br />
sèche supplémentaires et/ou l’emploi<br />
d’un adhésif de construction entre la<br />
maçonnerie sèche et les poutrelles<br />
adjacentes à l’emplacement de<br />
l’enceinte permet d’améliorer les<br />
performances.<br />
Montagetipps<br />
Erforderliche<br />
Mindestabstände<br />
Hinter der Montagefläche muss um<br />
das Montageloch ein Spiel von 19mm<br />
vorhanden sein.<br />
Neubauten<br />
Sie können die Leistung Ihres<br />
Lautsprechers verbessern, indem Sie<br />
zusätzliche Schnellbauschrauben<br />
und/oder Montagekleber zwischen<br />
der Trockenmauer und den<br />
Deckenbalken neben der<br />
Montagestelle verwenden, um die<br />
Stabilität der Montagefläche zu<br />
erhöhen.<br />
– 6 –
Bass Management<br />
If you are using your loudspeakers<br />
with a surround sound processor and a<br />
separately amplified subwoofer, set the<br />
bass management control as follows:<br />
• Set Bass management control to<br />
"Small."<br />
• Consult your surround receiver or<br />
processor manual for instructions<br />
on changing the bass management<br />
settings.<br />
• If you are using your speakers for<br />
full range audio or with the <strong>HSi</strong><br />
S6W2 in-ceiling subwoofer, set Bass<br />
Management to “Large.”<br />
Damp Locations<br />
If the loudspeakers are installed in a<br />
damp location (kitchen, bathroom),<br />
they should be positioned so that<br />
moisture cannot collect inside them.<br />
Highpass Filter Control<br />
These speakers feature a switchable<br />
highpass filter, which removes bass<br />
frequencies below 180Hz. If you are<br />
using the speakers without a<br />
subwoofer, leave the highpass filter<br />
switched off. However, if the speakers<br />
will be used full-range in high sound<br />
level applications, using the highpass<br />
filter will help protect the speaker.<br />
If you are using a dedicated<br />
subwoofer in your installation, switch<br />
the highpass filter on.<br />
Manejo de bajos<br />
Si usted utiliza los parlantes con un<br />
procesador de sonido envolvente y un<br />
subwoofer amplificado por separado,<br />
ajuste el control de manejo de bajos de<br />
la siguiente forma:<br />
• Fije el control de bajos en “Small"<br />
(pequeño).<br />
• Consulte en el manual del receptor<br />
de sonido envolvente o del<br />
procesador las instrucciones para<br />
cambiar los parámetros de control<br />
de bajos.<br />
• Si usted usa los parlantes para el<br />
rango completo de audio o con el<br />
subwoofer <strong>HSi</strong> S6W2 empotrado en<br />
el techo, fije el manejo de bajos en<br />
“Large” (grande).<br />
Lugares húmedos<br />
Si los parlantes se instalan en un lugar<br />
húmedo (cuarto de baño, cocina)<br />
deben colocarse de tal modo que la<br />
humedad no traspase a su interior.<br />
Control de filtro de pasa<br />
alto<br />
Estos parlantes ofrecen un filtro de<br />
pasa alto conmutable que elimina las<br />
frecuencias de bajos por debajo de<br />
180 Hz. Si usted utiliza los parlantes sin<br />
un subwoofer, deje el filtro de pasa<br />
alto apagado. Sin embargo, si los<br />
parlantes se usarán en rango<br />
completo en aplicaciones de alto nivel<br />
de sonido, el uso del filtro de pasa alto<br />
protegerá al parlante.<br />
Si usted está utilizando un<br />
subwoofer dedicado en su instalación,<br />
encienda el filtro de pasa alto.<br />
Gestion des basses<br />
Lorsque les enceintes sont utilisées<br />
avec un processeur ambiophonique et<br />
un caisson de basse amplifié séparé,<br />
réglez la gestion des basses comme<br />
indiqué ci-dessous :<br />
• Réglez la commande de gestion des<br />
basses sur « Small ».<br />
• Consultez le manuel du récepteur<br />
ou du processeur ambiophonique<br />
pour connaître les instructions de<br />
modification de la gestion des basses.<br />
• Si vous utilisez vos enceintes sur la<br />
plage audio complète ou avec un<br />
caisson de basse encastré de plafond<br />
<strong>HSi</strong> S6W2, réglez la gestion des basses<br />
sur « Large ».<br />
Emplacements humides<br />
Lorsque les enceintes sont installées<br />
dans un lieu humide (salle de bains,<br />
cuisine), elles doivent être disposées<br />
de façon à ce que l’humidité ne<br />
s’accumule pas à l’intérieur.<br />
Commande du filtre<br />
passe-haut<br />
Ces enceintes sont pourvues d’un<br />
filtre passe-haut commutable qui<br />
annule les basses fréquences<br />
inférieures à 180Hz. Si vous utilisez les<br />
enceintes sans un caisson de basse,<br />
laissez le filtre passe-haut désactivé.<br />
Cependant, si les enceintes sont<br />
utilisées sur la plage complète dans des<br />
applications à haut niveau d’écoute,<br />
l’utilisation du filtre passe-haut<br />
permettra de protéger les enceintes.<br />
Si vous employez un caisson de<br />
basse dédié dans votre installation,<br />
activez le filtre passe-haut.<br />
Feuchte Montagestellen<br />
Wenn die Lautsprecher an einer<br />
feuchten Montagestellet installiert<br />
werden, (Badezimmer, Küche) sollten<br />
sie so positioniert werden, dass sich<br />
darin keine Feuchtigkeit ansammeln<br />
kann.<br />
Bassregelung<br />
Wenn Sie den Lautsprecher mit einem<br />
Surround-Klangprozessor und seperat<br />
verstärktem Subwoofer verwenden,<br />
muss die Bassregelung wie folgt<br />
eingestellt werden:<br />
• Stellen Sie die Bassregelung auf<br />
“Klein"<br />
• Anweisungen zum Ändern der<br />
Bassregelungen entnehmen Sie bitte<br />
dem Handbuch Ihres Surround-<br />
Empfängers bzw. -Prozessors<br />
• Wenn Sie Ihre Lautsprecher für Full-<br />
Range-Audio oder mit dem <strong>HSi</strong> S6W2<br />
Decken-Subwoofer verwenden,<br />
stellen Sie die Bassregelung auf “Groß”<br />
Hochpassfilter-<br />
Kontrolle<br />
Lautsprecher verfügen über einen<br />
ein- und ausschaltbaren Hochpassfilter,<br />
der Bassfrequenzen unter 180 Hz<br />
entfernt. Wenn Sie die Lautsprecher<br />
ohne einen Subwoofer verwenden,<br />
sollten Sie den Hochpassfilter<br />
ausgeschaltet lassen. Wenn Sie die<br />
Lautsprecher jedoch Full-Range in<br />
Anwendungssituationen mit hohem<br />
Klangniveau einsetzen, hilft Ihnen die<br />
Verwendung des Hochpassfilters dabei,<br />
die Lautsprecher zu schützen.<br />
Wenn Sie in Ihrer <strong>In</strong>stallation einen<br />
dedizierten Subwoofer einsetzen,<br />
schalten Sie den Hochpassfilter ein.<br />
HIGHPASS<br />
FILTER<br />
ON<br />
OFF<br />
Optional Brackets for New<br />
Construction<br />
For new construction installations,<br />
we offer new construction brackets.<br />
The NCB brackets act as a perfect<br />
guide when cutting the wallboard.<br />
Model Bracket<br />
<strong>HSi</strong> 430 NCBR3<br />
<strong>HSi</strong> 435 NCBR3<br />
Soportes adicionales para<br />
construcción nueva<br />
Para instalaciones en construcciones<br />
nuevas, ofrecemos soportes para las<br />
mismas. Los soportes NCB (para<br />
construcción nueva) sirven<br />
perfectamente de guías para el corte<br />
de paredes de cartón de yeso.<br />
Modelo Soporte<br />
<strong>HSi</strong> 430 NCBR3<br />
<strong>HSi</strong> 435 NCBR3<br />
Supports optionnels pour<br />
les constructions neuves<br />
Pour une installation dans une<br />
construction neuve, nous proposons<br />
des supports spéciaux. Ces supports<br />
NCB sont parfaits pour servir de guides<br />
lors de la découpe des panneaux de<br />
revêtement.<br />
Modèle Support<br />
<strong>HSi</strong> 430 NCBR3<br />
<strong>HSi</strong> 435 NCBR3<br />
Optionale Halterungen für<br />
Neubauten<br />
Für die Montage in neuen<br />
Gebäuden bieten wir besondere<br />
Halterungen. Die NCB-Halterungen<br />
eignen sich hervorragend als Führung<br />
beim Schneiden von<br />
Gipskartonplatten.<br />
Modell Halterung<br />
<strong>HSi</strong> 430 NCBR3<br />
<strong>HSi</strong> 435 NCBR3<br />
– 7 –
<strong>In</strong>stallation Tips (cont.)<br />
Consejos para el montaje (cont.)<br />
Conseils d’installation (suite)<br />
Tipps zur <strong>In</strong>stallation (Forts.)<br />
Transformers<br />
If the wire must be run more than 75<br />
feet a high voltage distribution system is<br />
recommended. Such systems use a<br />
special amplifier that has a “70V” (or in<br />
some countries, “100V”) output. This<br />
allows relatively small gauge speaker<br />
wires to be run over great distances<br />
without signal degradation. <strong>Speaker</strong>s<br />
used in a high voltage system require a<br />
transformer. Special versions of the <strong>HSi</strong><br />
series speakers with built-in transformers<br />
are available. Contact a custom audio<br />
system installer for more information.<br />
To Remove Grille<br />
If you need to remove the grille,<br />
gently lift it out at the edges. Use a<br />
sharp pointed instrument such as an<br />
awl or the optional <strong>Boston</strong> <strong>Acoustics</strong><br />
grille pick.<br />
<strong>In</strong>stallation<br />
<strong>In</strong>structions<br />
WARNING<br />
Always turn off the amplifier or<br />
receiver when connecting speakers or<br />
any other components to the system.<br />
NOTE<br />
This manual assumes the installer<br />
possesses skill in the proper use of<br />
hand and power tools, knowledge of<br />
local building and fire codes, and a<br />
familiarity with the environment<br />
behind the wall or ceiling in which the<br />
speakers will be installed.<br />
Tools You’ll Need<br />
1. A utility knife, jig saw, or other tool<br />
for cutting the required hole in the<br />
mounting surface.<br />
2. A #2 Phillips screwdriver.<br />
3. A wire cutter or stripper for<br />
preparing the speaker wires.<br />
4. A pencil.<br />
Transformadores<br />
Si el cable debe recorrer más de 75<br />
pies, se recomienda un sistema de<br />
distribución de alta tensión. Estos<br />
sistemas usan un amplificador especial<br />
que tiene una salida de “70 voltios”(o en<br />
algunos países, de “100V”). Esto permite<br />
tirar cables de parlantes de calibre<br />
relativamente pequeño a lo largo de<br />
grandes distancias sin deterioro de la<br />
señal. Para parlantes utilizados en un<br />
sistema de alta tensión se requiere un<br />
transformador. Hay versiones especiales<br />
de parlantes de la serie Hsi con<br />
transformadores incorporados. Para<br />
mayor información, contáctese con un<br />
instalador de sistemas de audio<br />
personalizados.<br />
Para quitar la rejilla<br />
Si necesita quitar la rejilla, levántela<br />
con cuidado por los bordes. Use un<br />
instrumento afilado y puntiagudo,<br />
como un punzón, o la púa para rejillas<br />
opcional de <strong>Boston</strong> <strong>Acoustics</strong>.<br />
<strong>In</strong>strucciones para<br />
la instalación<br />
ADVERTENCIA<br />
Apague siempre el amplificador o el<br />
receptor al conectar parlantes o<br />
cualquier otro componente al sistema.<br />
NOTA<br />
En este manual se presupone que el<br />
instalador posee habilidad en el<br />
manejo de herramientas manuales y<br />
eléctricas, conocimiento sobre los<br />
códigos vigentes de construcción local y<br />
normas sobre incendios y que está<br />
familiarizado con el entorno que se<br />
encuentra del otro lado de la pared o el<br />
techo en los que se instalarán los<br />
parlantes.<br />
Herramientas necesarias<br />
1. Una navaja multiusos, una sierra<br />
caladora u otra herramienta para<br />
cortar el agujero adecuado en la<br />
superficie de montaje.<br />
2. Un destornillador Phillips o de cruz<br />
número 2.<br />
3. Un cortador de alambre o<br />
pelacables para preparar el<br />
cableado de los parlantes.<br />
4. Un lápiz.<br />
Transformateurs<br />
Si le fil doit parcourir un chemin<br />
supérieur à 25m, l’utilisation d’un<br />
système de distribution à haute tension<br />
est recommandée. Ces systèmes utilisent<br />
un amplificateur spécial pourvu d’une<br />
sortie de 70V (ou 100V dans certains<br />
pays). Des fils d’enceinte relativement<br />
petits peuvent ainsi être acheminés sur<br />
une grande distance sans dégradation<br />
du signal. Un transformateur est<br />
nécessaire quand les enceintes sont<br />
employées dans un système à haute<br />
tension. Des versions spéciales des<br />
enceintes de série <strong>HSi</strong> avec<br />
transformateurs intégrés sont<br />
disponibles. Contactez un installateur de<br />
système audio spécialisé pour obtenir<br />
des informations complémentaires.<br />
Supports optionnels pour<br />
les constructions neuves<br />
Pour une installation dans une<br />
construction neuve, nous proposons<br />
des supports spéciaux. Ces supports<br />
NCB sont parfaits pour servir de guides<br />
lors de la découpe des panneaux de<br />
revêtement.<br />
<strong>In</strong>structions<br />
d’installation<br />
AVERTISSEMENT<br />
Débranchez toujours l’amplificateur<br />
ou le récepteur avant de connecter les<br />
enceintes ou tout autre composant au<br />
système.<br />
NOTE<br />
Ce manuel suppose que l’installateur<br />
sait utiliser les outils manuels et<br />
électriques nécessaires à l’installation,<br />
qu’il connaît la réglementation en<br />
vigueur sur la construction et<br />
l’incendie, et qu’il sait exactement<br />
quels éléments sont situés derrière les<br />
murs ou les plafonds sur lesquels les<br />
enceintes seront fixées.<br />
Outils nécessaires<br />
1. Un couteau à lame rétractable, une<br />
scie sauteuse ou tout autre outil<br />
capable de découper l’orifice<br />
nécessaire dans la surface de<br />
montage.<br />
2. Un tournevis cruciforme No. 2.<br />
3. Une pince coupante ou un outil à<br />
dénuder pour préparer les fils des<br />
enceintes.<br />
4. Un crayon.<br />
Transformatoren<br />
Wenn das Kabel länger als 25m ist,<br />
empfehlen wir ein Hochspannungsverteilersystem.<br />
Diese Systeme<br />
verwenden einen speziellen Verstärker<br />
mit 70-V-Leistung (oder in manchen<br />
Ländern auch mit 100V). Dadurch<br />
können Lautsprecherkabel mit relativ<br />
kleiner Gauge über größere<br />
Entfernungen verlegt werden, ohne dass<br />
Klangeinbußen entstehen. Für<br />
Lautsprecher, die in einem<br />
Hochspannungssystem eingesetzt<br />
werden, benötigen Sie einen<br />
Transformator. Es sind spezielle<br />
Lautsprecherversionen der <strong>HSi</strong>-Serie mit<br />
eingebauten Transformatoren erhältlich.<br />
Setzen Sie sich mit einem <strong>In</strong>stallateur für<br />
spezialangefertigte Audiosysteme in<br />
Verbindung, wenn Sie weitere<br />
<strong>In</strong>formationen benötigen...<br />
Entfernen des Ziergitters<br />
Wenn das Ziergitter entfernt werden<br />
muss, heben Sie dieses an den Kanten<br />
vorsichtig heraus. Verwenden Sie dazu<br />
ein spitzes Werkzeug wie eine Ahle<br />
oder den optionalen Ziergitterspitz<br />
von <strong>Boston</strong> <strong>Acoustics</strong>.<br />
Montageanleitung<br />
ACHTUNG<br />
Stellen Sie den Verstärker oder<br />
Empfänger immer ab, wenn<br />
Lautsprecher oder andere<br />
Komponenten an das System<br />
angeschlossen werden.<br />
HINWEIS<br />
Dieses Handbuch setzt voraus, dass<br />
der <strong>In</strong>stallateur im Umgang mit Handund<br />
Elektrowerkzeugen versiert ist, die<br />
örtlichen Bau- und<br />
Brandschutzvorschriften kennt und<br />
weiß, wo und welche Leitungen in der<br />
Wand bzw. hinter der<br />
Wandverkleidung verlaufen, in der die<br />
Lautsprecher montiert werden sollen.<br />
Benötigte Werkzeuge<br />
1. Ein Extraktormesser, eine Stichsäge<br />
oder anderes Werkzeug zum<br />
Ausschneiden des notwendigen<br />
Lochs aus der Montagefläche.<br />
2. Ein Kreuzschlitz-Schraubendreher,<br />
Größe 2.<br />
3. Eine Drahtzange oder einen<br />
Drahtstripper zur Vorbereitung der<br />
Lautsprecherkabel.<br />
4. Ein Bleistift.<br />
– 8 –
Retrofit <strong>In</strong>stallations<br />
1. Mark the outline of the installation<br />
hole using the supplied template.<br />
Make a small hole at the center of<br />
the speaker location. <strong>In</strong>sert a long,<br />
bent piece of wire and rotate to<br />
confirm that there are no<br />
obstructions behind the chosen<br />
location.<br />
2. Cut the installation hole.<br />
Note: The flange of the speaker<br />
face is very narrow. Be very careful<br />
to cut the hole accurately.<br />
3. Run the wire from the amplifier<br />
location to the cutout. Allow for an<br />
extra foot of wire at the cutout.<br />
<strong>In</strong>stalaciones en<br />
construcciones ya<br />
existentes<br />
1. Marque el contorno del agujero de<br />
montaje con la plantilla<br />
suministrada. Haga un pequeño<br />
agujero en el centro de la ubicación<br />
del parlante. <strong>In</strong>serte un alambre<br />
largo y curvado y déle vueltas para<br />
confirmar que no hay obstrucciones<br />
detrás de la ubicación elegida.<br />
2. Corte el agujero para la instalación.<br />
Nota: La pestaña en el frente del<br />
parlante es muy angosta. Tenga<br />
mucho cuidado para cortar el<br />
agujero con precisión.<br />
3. Tienda el cable desde el<br />
amplificador hasta el agujero. Deje<br />
un pie adicional de cable en el<br />
agujero.<br />
<strong>In</strong>stallations anciennes<br />
améliorées<br />
1. Tracez le contour de l’orifice<br />
d’installation en utilisant le gabarit<br />
fourni. Faites un petit trou au centre<br />
de l’endroit où sera placée<br />
l’enceinte. <strong>In</strong>sérez une longue tige<br />
tordue et déplacez-la à l’intérieur<br />
pour confirmer l’absence<br />
d’obstruction<br />
derrière<br />
l’emplacement choisi.<br />
2. Coupez l’orifice d’installation.<br />
Note : Le panneau frontal de<br />
l’enceinte est très étroit. Prenez<br />
garde de réaliser la découpe avec<br />
précision.<br />
3. Amenez le câble de l’amplificateur<br />
jusqu’à l’orifice en prévoyant 30 cm<br />
de fil supplémentaire.<br />
Einbau in eine fertige<br />
Fläche<br />
1. Zeichnen Sie den Umriss des<br />
<strong>In</strong>stallationslochs mit der<br />
mitgelieferten Schablone an.<br />
Bohren Sie dann in der Mitte der<br />
auszuschneidenden Fläche ein<br />
kleines Loch. Schieben Sie ein<br />
langes Stück gebogenen Drahts in<br />
das Loch ein, um zu prüfen, dass<br />
sich hinter der gewählten Stelle<br />
keine Hindernisse befinden.<br />
2. Schneiden Sie das Montageloch<br />
aus.<br />
Hinweis: Der Flansch der<br />
Lautsprechervorderseite ist sehr<br />
schmal. Achten Sie darauf, das Loch<br />
akkurat auszuschneiden.<br />
3. Verlegen Sie das Kabel vom<br />
Verstärker zum eben erzeugten<br />
Ausschnitt. An der Ausschnittstelle<br />
sollten Sie etwa 30 cm extra<br />
Kabellänge vorsehen.<br />
All <strong>In</strong>stallations<br />
Connecting the <strong>Speaker</strong>s<br />
Unscrew the fasteners on the back<br />
of the speaker that hold the wire<br />
clamp in place. Open up the clamp<br />
and insert about 2” (50mm) of wire<br />
through the opening. Tighten the<br />
clamp screws to secure the wire. Note:<br />
If there is a jacket around the two wire<br />
conductors fasten the clamp to the<br />
jacketed part of the wire. Remove the<br />
jacket from the part of the wire that<br />
extends beyond the clamp.<br />
Separate the two conductors of the<br />
wire. Remove about 3 ⁄8” (10mm) of<br />
insulation from the end of the wire.<br />
<strong>In</strong>sert the wires into the appropriate<br />
terminals on the connector and<br />
tighten the screws on the side of the<br />
connector to secure the wire. Be sure<br />
there are no loose strands of wire.<br />
Just before the speaker is mounted<br />
plug the connector into the back of<br />
the speaker. Set the wire clamp in<br />
place and tighten the fasteners to<br />
secure it. Finally rotate the cover plate<br />
into position and tighten the fasteners<br />
to hold it in place.<br />
Todas las instalaciones<br />
Conexión de los parlantes<br />
Desatornille los sujetadores de la<br />
parte trasera del parlante que fijan la<br />
abrazadera del cable en su lugar. Abra<br />
la abrazadera e inserte<br />
aproximadamente 2” (50mm) de cable<br />
a través de la abertura. Apriete los<br />
tornillos de la abrazadera para sujetar<br />
el cable. Nota: Si hay una envoltura<br />
alrededor de los conductores de dos<br />
cables, ajuste la abrazadera a la parte<br />
forrada del cable. Quite la envoltura de<br />
la parte del cable que se extiende más<br />
allá de la abrazadera.<br />
Separe los dos conductores del<br />
cable. Desprenda aproximadamente<br />
3 ⁄8” (10mm) de la aislación del extremo<br />
del cable. <strong>In</strong>serte los cables en los<br />
terminales que correspondan del<br />
conector y apriete los tornillos del lado<br />
del conector para sujetar el cable.<br />
Asegúrese de que no queden<br />
filamentos de cable sueltos.<br />
Justo antes de instalar el parlante,<br />
enchufe el conector en la parte trasera<br />
del parlante. Fije la abrazadera del<br />
cable en su lugar y apriete los<br />
sujetadores para fijarla. Por último, rote<br />
la placa de la tapa en su lugar y apriete<br />
los sujetadores para fijarla.<br />
Toutes installations<br />
Branchement des enceintes<br />
Dévissez les fixations qui<br />
maintiennent le serre-fils à l’arrière de<br />
l’enceinte. Ouvrez le serre-fils et insérez<br />
environ 50mm de fil à travers<br />
l’ouverture. Serrez les vis de serrage<br />
pour bloquer le fil. Note : Si les deux<br />
conducteurs de fil sont pourvus de<br />
gaines, fixez le serre-fils à la partie<br />
gainée du fil. Retirez la gaine de la<br />
partie du fil qui dépasse le serre-fils.<br />
Séparez les deux conducteurs du fil.<br />
À l’extrémité du fil, dénudez la gaine<br />
sur environ 10mm. <strong>In</strong>sérez les fils dans<br />
les bornes appropriées du connecteur<br />
et serrez les vis situées sur le côté du<br />
connecteur pour bloquer le fil. Vérifiez<br />
que tous les conducteurs de fil sont<br />
insérés.<br />
Juste avant de monter l’enceinte,<br />
branchez le connecteur à l’arrière de<br />
l’enceinte. Fixez le serre-fils en place et<br />
serrez les fixations pour le maintenir en<br />
place. Finalement, tournez le<br />
couvercle en position et serrez les<br />
fixations pour le maintenir en position.<br />
Alle <strong>In</strong>stallationen<br />
Anschluss der Lautsprecher<br />
Schrauben Sie die Verschlüsse an der<br />
Rückseite des Lautsprechers auf, die die<br />
Drahtklemmen fixieren. Öffnen Sie die<br />
Klemme und führen Sie etwa 50mm<br />
Kabel durch die Öffnung ein. Ziehen Sie<br />
die Klemmenschrauben an, um das<br />
Kabel zu sichern. Hinweis: Falls die<br />
beiden Leiterdrähte ummantelt sind,<br />
befestigen Sie die Klemmen am<br />
ummantelten Teil des Kabels. Entfernen<br />
Sie die Ummantelung von dem Teil des<br />
Kabels, der hinter der Klemme liegt.<br />
Trennen Sie die beiden Leiter des<br />
Kabels. Entfernen Sie etwa 10mm der<br />
Isolierung am Ende des Kabels. Führen<br />
Sie die Drähte in die geeigneten<br />
Klemmen am Verbindungsstecker ein<br />
und drehen Sie die Schrauben auf der<br />
Seite des Steckers fest, um den Draht zu<br />
sichern. Stellen Sie sicher, dass keine<br />
losen Einzeldrähte heraushängen.<br />
Stecken Sie den Verbindungsstecker<br />
kurz vor der Montage des<br />
Lautsprechers in die Rückseite des<br />
Lautsprechers ein. Positionieren Sie die<br />
Drahtklemme und ziehen Sie die<br />
Drehverschlüsse an, um sie zu sichern.<br />
Drehen Sie schließlich die Abdeckplatte<br />
in die richtige Position und ziehen Sie<br />
die Verschlüsse fest, um sie zu<br />
befestigen.<br />
– 9 –
<strong>In</strong>stallation <strong>In</strong>structions (cont.) <strong>In</strong>strucciones de <strong>In</strong>stalación (cont.)<br />
<strong>In</strong>structions d’installation (suite) <strong>In</strong>stallationsanweisungen (Forts.)<br />
<strong>Speaker</strong> Connection<br />
Polarity<br />
It is important that all the speakers in a<br />
system are hooked up with the same<br />
polarity or “in phase.” <strong>In</strong>stead of the<br />
wire terminals typical of most<br />
speakers, the <strong>HSi</strong> 430 and 435 models<br />
are supplied with a Molex plug-in<br />
connector to facilitate installation.<br />
<strong>Speaker</strong> wires are connected to the<br />
plug-in connector then, just before<br />
installing the speaker, the Molex<br />
connector is plugged in.<br />
This illustration shows the connector<br />
on the speaker and the plug-in<br />
connector the speaker wires are<br />
attached to. Note the label beside the<br />
speaker connector. It shows the<br />
middle two pins on the connectors are<br />
“+” and “-”. The outer two pins are<br />
labeled “LOOP +” and “LOOP –”. The<br />
“LOOP” connections are connected to<br />
the regular “+” and “–” connections<br />
inside the speaker and facilitate<br />
connecting multi-speaker installations.<br />
Use the color coding or other marking<br />
on the speaker wires to be sure that<br />
the “+” terminal of the amplifier is<br />
connected to the “+” terminal of the<br />
speaker, and “–” is connected to “–”, at<br />
every connection.<br />
Polaridad de conexión de<br />
los parlantes<br />
Es importante que todos los parlantes<br />
de un sistema estén conectados con la<br />
misma polaridad o “en fase”. En lugar<br />
de los terminales alámbricos típicos de<br />
la mayoría de los parlantes, los<br />
modelos de las series Hsi 430 y 435<br />
tienen un conector enchufable Molex<br />
para facilitar la instalación. Los cables<br />
de los parlantes se conectan al<br />
conector enchufable entonces, junto<br />
antes de instalar el parlante, se<br />
enchufa el conector Molex.<br />
Esta ilustración muestra el conector del<br />
parlante y el conector enchufable al<br />
cual se acoplan los cables del parlante.<br />
Tenga en cuenta la etiqueta que está<br />
junto al conector del parlante. Muestra<br />
que las dos clavijas del medio de los<br />
conectores son “+” y “-”. Las dos clavijas<br />
exteriores llevan la etiqueta “LOOP+”<br />
(bucle+) y “LOOP-” (bucle-). Las<br />
conexiones en “BUCLE” se conectan a<br />
las conexiones normales “+” y “-” dentro<br />
del parlante y facilitan la conexión en<br />
las instalaciones de parlantes múltiples.<br />
Use los códigos de color u otras marcas<br />
de los cables de los parlantes para estar<br />
seguro de que el terminal “+” del<br />
amplificador esté conectado al terminal<br />
“+”del parlante y que “-”esté conectado<br />
a “-”, en cada conexión.<br />
Polarité de branchement<br />
des enceintes<br />
Il est important que toutes les<br />
enceintes d’un système soient<br />
branchées avec la même polarité,<br />
c’est-à-dire « en phase ». Au lieu des<br />
bornes de fils habituelles, les modèles<br />
<strong>HSi</strong> 430 et <strong>HSi</strong> 435 sont équipés d’un<br />
connecteur enfichable Molex pour<br />
faciliter l’installation. Les fils des<br />
enceintes sont alors branchés au<br />
connecteur enfichable. Juste avant<br />
d’installer l’enceinte, le connecteur<br />
Molex est branché.<br />
Cette illustration montre le<br />
connecteur sur l’enceinte et le<br />
connecteur enfichable auquel les fils<br />
de l’enceinte sont reliés. Notez<br />
l’étiquette à côté du connecteur de<br />
l’enceinte. Elle indique que les deux<br />
broches centrales des connecteurs<br />
sont « + » et « – ». Les deux broches<br />
d’extrémité sont étiquetées « LOOP+ »<br />
et « LOOP – ». Les connexions « LOOP »<br />
sont branchées aux connexions « + »<br />
et « – » habituelles à l’intérieur de<br />
l’enceinte et facilitent le branchement<br />
dans des installations à plusieurs<br />
enceintes. Pour chaque connexion,<br />
utilisez le code de couleur ou autre<br />
marquage des fils pour vérifier que la<br />
borne « + » de l’amplificateur est<br />
branchée à la borne « + » de l’enceinte,<br />
et que la borne « – » est branchée à la<br />
borne « – ».<br />
Polarität der<br />
Lautsprecheranschlüsse<br />
Es ist sehr wichtig, dass alle<br />
Lautsprecher innerhalb eines <strong>Systems</strong><br />
mit derselben Polarität oder<br />
'phasengleich' angeschlossen werden.<br />
Statt der üblicherweise bei<br />
Lautsprechern verwendeten<br />
Drahtklemmen verfügen die Modelle<br />
<strong>HSi</strong> 430 und 435 über eine Molex-<br />
Steckverbindung, um die <strong>In</strong>stallation<br />
zu erleichtern. Die Lautsprecherkabel<br />
werden mit der Steckverbindung<br />
verbunden und kurz vor der Montage<br />
der Lautsprecher wird dann der<br />
Molex-Stecker eingesteckt.<br />
Diese Abbildung zeigt den Anschluss<br />
am Lautsprecher und die<br />
Steckverbindung, mit der die Kabel<br />
verbunden sind. Beachten Sie die<br />
Beschriftung neben dem<br />
Lautsprecheranschluss. Dort sehen Sie,<br />
dass die zwei mittleren Stecker am<br />
Anschluss“+” und “-” sind. Die beiden<br />
äußeren Stecker sind mit “LOOP +” und<br />
“LOOP–” beschriftet. Die “LOOP”-Stecker<br />
sind mit den normalen “+” und “-”<br />
Anschlüssen im <strong>In</strong>nern der<br />
Lautsprecher verbunden und<br />
erleichtern den Anschluss von<br />
mehreren Lautsprechern. Benutzen Sie<br />
die Farbmarkierung oder andere<br />
Markierungen an den Lautsprechern,<br />
um sicherzustellen, dass bei jeder<br />
Verbindung der “+”-Anschluss des<br />
Verstärkers mit dem “+”-Anschluss des<br />
Lautsprechers verbunden ist und dass<br />
die “-”-Pole miteinander verbunden sind.<br />
– 10 –
<strong>In</strong>stallation <strong>In</strong>structions (cont.) <strong>In</strong>strucciones de <strong>In</strong>stalación (cont.)<br />
<strong>In</strong>structions d’installation (suite) <strong>In</strong>stallationsanweisungen (Forts.)<br />
Multiple <strong>Speaker</strong><br />
Connections<br />
Sometimes you may want to connect<br />
more than one speaker to a given<br />
channel of an amplifier. This can be<br />
done with certain limitations. The<br />
main concern is that the impedance<br />
(or electrical “resistance”), expressed in<br />
ohms, of the combined speaker load<br />
must be within a range common<br />
amplifiers can handle. The following<br />
information describes basic common<br />
multi-speaker connection schemes.<br />
For the sake of clarity and space the<br />
connection diagrams will show<br />
common schematic symbols.<br />
There are two basic connection<br />
methods – parallel and series.<br />
Examples of parallel and series<br />
connections are shown below.<br />
Parallel Connections<br />
The connection example below shows<br />
the wire from the amplifier and the wire<br />
for the second speaker connected to<br />
the same terminals. The example on<br />
the right shows the wires to the<br />
second speaker connected to the<br />
“loop” terminals which are connected<br />
to the other terminals inside the<br />
speaker. This makes connecting the<br />
wires to the terminals easier. But it also<br />
means that if the first speaker is<br />
unplugged for any reason the signal to<br />
the second speaker is cut off. Parallel<br />
connections can also be made by<br />
connecting wires from both speaker<br />
directly to the amplifier terminals,<br />
typically referred to as “home run”<br />
connections. This often results in more<br />
wire being used – usually something<br />
you want to avoid.<br />
The parallel connection diagrams also<br />
show that two 8 ohm speakers<br />
produce an impedance of 4 ohms at<br />
the amplifier. Most amplifiers can<br />
handle a 4 ohm impedance load.<br />
Impedance loads lower than 4 ohms<br />
can trigger amplifier protection<br />
circuits or, in some cases, cause over<br />
heating.<br />
8 ohms<br />
Conexión de Múltiples<br />
Parlantes<br />
Es posible que algunas veces quiera<br />
conectar más de un parlante a un<br />
determinado canal de un amplificador.<br />
Esta conexión puede hacerse con<br />
algunas limitaciones. El principal<br />
problema es que la impedancia (o<br />
“resistencia” eléctrica), expresada en<br />
ohmios, de la carga combinada de los<br />
parlantes debe estar dentro de una<br />
banda que puedan soportar los<br />
amplificadores comunes. A<br />
continuación se describen esquemas<br />
básicos de conexión común de<br />
múltiples parlantes. Para mayor<br />
claridad y por razones de espacio, en<br />
los diagramas de conexión aparecen<br />
símbolos esquemáticos comunes.<br />
Existen dos métodos básicos de<br />
conexión - en paralelo y en serie. Más<br />
abajo se muestran ejemplos de<br />
conexiones en paralelo y en serie.<br />
Conexiones en paralelo<br />
El siguiente ejemplo de conexión<br />
muestra el cable del amplificador y el<br />
cable del segundo parlante conectados<br />
a los mismos terminales. El ejemplo del<br />
lado derecho muestra los cables al<br />
segundo parlante conectados a los<br />
terminales “en bucle” que se conectan a<br />
los otros terminales dentro del parlante.<br />
Esto facilita la conexión de los cables a<br />
los terminales. Pero esto también<br />
significa que si el primer parlante se<br />
desenchufa por cualquier razón, se<br />
corta la señal que va al segundo<br />
parlante. También se pueden hacer<br />
conexiones en paralelo conectando los<br />
cables de los dos parlantes<br />
directamente a los terminales del<br />
amplificador, en las conexiones que<br />
típicamente se conocen como “home<br />
run”. Con frecuencia el resultado es que<br />
se usa más cable - algo que<br />
habitualmente se desea evitar.<br />
Los diagramas de conexión en paralelo<br />
también muestran que dos parlantes<br />
de 8 ohmios producen una impedancia<br />
de 4 ohmios en el amplificador. La<br />
mayoría de los amplificadores puede<br />
resistir una carga de impedancia de 4<br />
ohmios. Cargas de impedancia<br />
inferiores a 4 ohmios pueden activar<br />
circuitos de protección del amplificador<br />
o, en algunos casos, provocar<br />
sobrecalentamiento.<br />
Parallel Connections<br />
8 ohms<br />
8 ohms<br />
Branchement d’enceintes<br />
multiples<br />
Vous pouvez souhaiter brancher<br />
plusieurs enceintes à un canal<br />
d’amplificateur donné. Certaines<br />
limites s’appliquent dans ce cas.<br />
L’impédance (ou « résistance »<br />
électrique), exprimée en ohms, de la<br />
charge combinée des enceintes est le<br />
principal problème car elle doit être<br />
dans la plage que des amplificateurs<br />
courants peuvent supporter. Les<br />
informations qui suivent décrivent les<br />
schémas de base pour le<br />
branchement de plusieurs enceintes.<br />
Pour des raisons de clarté et d’espace,<br />
les schémas de branchement utilisent<br />
les mêmes symboles.<br />
Il existe deux méthodes de<br />
branchement de base : parallèle et série.<br />
Des exemples de branchements en<br />
parallèle et en série sont illustrés cidessous.<br />
Branchements en parallèle<br />
L’exemple de branchement ci-dessous<br />
illustre le fil de l’amplificateur et le fil de<br />
la deuxième enceinte branchés aux<br />
mêmes bornes. L’exemple de droite<br />
illustre les fils de la deuxième enceinte<br />
branchés aux bornes « Loop » qui sont<br />
reliées aux autres bornes à l’intérieur<br />
de l’enceinte. Le branchement des fils<br />
aux bornes est ainsi simplifié.<br />
Cependant, si la première enceinte est<br />
débranchée pour une raison<br />
quelconque, le signal vers la deuxième<br />
enceinte est coupé. Les branchements<br />
en parallèle peuvent également être<br />
réalisés en reliant les fils des deux<br />
enceintes directement aux bornes de<br />
l’amplificateur,<br />
connexions<br />
dénommées couramment « colonnes<br />
domotiques ». Ce type d’installation<br />
nécessite souvent l’utilisation d’un<br />
nombre de fils plus élevé, un<br />
problème à éviter la plupart du temps.<br />
Les schémas de branchement en<br />
parallèle montrent également que<br />
deux enceintes de 8 ohms produisent<br />
une impédance de 4 ohms au niveau<br />
de l’amplificateur. La plupart des<br />
amplificateurs peuvent gérer une<br />
charge d’impédance de 4 ohms. Les<br />
charges d’impédance inférieures à 4<br />
ohms peuvent déclencher les circuits<br />
de protection de l’amplificateur ou,<br />
dans certains cas, entraîner une<br />
surchauffe.<br />
8 ohms<br />
Conexiones en paralelo<br />
Branchements en parallèle<br />
Parallele Anschlüsse<br />
Anschluss mehrerer<br />
Lautsprecher<br />
Eventuell möchten Sie mehr als einen<br />
Lautsprecher an einen beliebigen<br />
Kanal eines Verstärkers anschließen.<br />
Dies ist möglich, allerdings mit einigen<br />
Einschränkungen. Das Hauptproblem<br />
dabei ist, dass die in Ohm<br />
ausgedrückte Impedanz (oder der<br />
elektrische “Widerstand“) der<br />
kombinierten Lautsprecherlast sich<br />
innerhalb der Bandbreite bewegt, die<br />
ein normaler Verstärker verarbeiten<br />
kann. Die folgenden <strong>In</strong>formationen<br />
beschreiben grundlegende<br />
Anschlussmodelle für den normalen<br />
Anschluss mehrerer Lautsprecher. Aus<br />
Gründen der Klarheit und des Platzes<br />
zeigen die Anschlussdiagramme<br />
normale Schaltbildsymbole.<br />
Es gibt zwei grundlegende<br />
Anschlussmethoden – parallel und<br />
seriell. Beispiele für parallele und<br />
serielle Anschlüsse werden unten<br />
dargestellt.<br />
Parallele Anschlüsse<br />
Das folgende Anschlussbeispiel zeigt,<br />
wie das Kabel vom Verstärker und das<br />
Kabel vom zweiten Lautsprecher mit<br />
denselben Anschlussklemmen<br />
verbunden sind. Das Beispiel auf der<br />
rechten Seite zeigt, wie die Kabel zum<br />
zweiten Lautsprecher mit den “LOOP“-<br />
Klemmen verbunden sind, die<br />
wiederum an die anderen Klemmen<br />
im <strong>In</strong>nern des Lautsprechers<br />
angeschlossen sind. Dies erleichtert<br />
den Anschluss der Kabel an die<br />
Klemmen. Es bedeutet aber auch, dass<br />
wenn der erste Lautsprecher aus<br />
welchem Grund auch immer<br />
ausgesteckt wird, das Signal zum<br />
zweiten Lautsprecher ebenfalls<br />
unterbrochen ist. Parallele Anschlüsse<br />
können auch vorgenommen werden,<br />
indem Kabel von beiden<br />
Lautsprechern mit den<br />
Verstärkerklemmen verbunden<br />
werden, was typischerweise als “Home<br />
Run“-Anschluss bezeichnet wird.<br />
Dadurch muss oft mehr Kabel<br />
verwendet werden – etwas, was Sie<br />
normalerweise vermeiden möchten.<br />
Die parallelen Anschlussdiagramme<br />
zeigen auch, dass zwei Lautsprecher<br />
mit 8 Ohm am Verstärker eine<br />
Impedanz von 4 Ohm erzeugen. Die<br />
meisten Verstärker können eine<br />
Impedanzlast von 4 Ohm bewältigen.<br />
Impedanzlasten unter 4 Ohm können<br />
die Schutzschaltungen der Verstärker<br />
auslösen oder in einigen Fällen<br />
Überhitzung verursachen.<br />
LOOP<br />
LOOP<br />
LOOP<br />
LOOP<br />
LOOP<br />
LOOP<br />
LOOP<br />
LOOP<br />
4 ohms 4 ohms<br />
amplifier or receiver<br />
Amplificador o receptor<br />
Amplificateur ou récepteur<br />
Verstärker oder Receiver<br />
– 11 –
Series Connections<br />
The diagram below shows examples<br />
of series connections. Two 8 ohm<br />
speakers in series produces a 16 ohm<br />
impedance. This is an easy impedance<br />
for an amplifier to handle. However it<br />
will result in somewhat lower power<br />
output. The connection method on<br />
the left is a modified “home run” type<br />
connection. The example on the right<br />
side is electrically the same and often<br />
requires less wire. But it can be a bit<br />
more tricky to wire.<br />
NOTE: These types of connections<br />
are unusual in that the “–” of one<br />
speaker is connected to the “+” of the<br />
other. This may seem odd, but since<br />
the signal flows through one speaker<br />
to the other this is how it must be<br />
done in order for the speaker to be “in<br />
phase”.<br />
Conexiones en serie<br />
El diagrama siguiente muestra<br />
ejemplos de conexiones en serie. Dos<br />
parlantes de 8 ohmios en serie<br />
producen una impedancia de 16<br />
ohmios. Es un valor de impedancia<br />
que un amplificador resiste fácilmente.<br />
Pero la salida de potencia será un poco<br />
menor. El método de conexión de la<br />
izquierda es una conexión de tipo<br />
“home run” modificada. El ejemplo del<br />
lado derecho es eléctricamente el<br />
mismo y a menudo requiere menos<br />
cable. Pero puede ser un poquito más<br />
difícil realizar el cableado.<br />
NOTA: Estos tipos de conexión no<br />
son habituales, ya que el “-” de un<br />
parlante se conecta al “+” del otro. Esto<br />
puede parecer extraño, pero como la<br />
señal fluye a través de un parlante<br />
hacia el otro, esta es justamente la<br />
forma en que se debe hacer para que<br />
el parlante esté "en fase".<br />
Branchements en série<br />
Le schéma ci-dessous illustre des<br />
branchements en série. Deux<br />
enceintes de 8 ohms branchées en<br />
série produisent une impédance de 16<br />
ohms. Cette charge d’impédance est<br />
facile à gérer par un amplificateur.<br />
Toutefois, la puissance de sortie sera<br />
quelque peu inférieure. La méthode<br />
de branchement située à gauche est<br />
une connexion « colonne domotique »<br />
modifiée. L’exemple de droite est le<br />
même en termes électriques et<br />
nécessite souvent moins de fils. Il est<br />
cependant un peu plus complexe.<br />
NOTE : Ces types de branchements<br />
sont inhabituels dans le sens où la<br />
borne « – » d’une enceinte est reliée à<br />
la borne « + » de l’autre enceinte. Cela<br />
peut sembler étrange. Cependant,<br />
étant donné que le signal passe d’une<br />
enceinte à l’autre, cette connexion<br />
doit être réalisée ainsi afin que<br />
l’enceinte soit « en phase ».<br />
Serielle Anschlüsse<br />
Im folgenden Diagramm sehen Sie<br />
Beispiele serieller Anschlüsse. Zwei<br />
Lautsprecher mit 8 Ohm in Serie<br />
geschalten, erzeugen eine Impedanz<br />
von 16 Ohm. Diese Impedanz kann<br />
von einem Verstärker leicht bewältigt<br />
werden. Sie wird jedoch zu einer etwas<br />
geringeren Leistung führen. Bei der<br />
Anschlussmethode auf der linken<br />
Seite handelt es sich um eine Art<br />
modifizierten “Home Run“-Anschluss.<br />
Das Beispiel auf der rechten Seite ist<br />
elektrisch gesehen gleich, benötigt<br />
aber oft weniger Kabel. Aber die<br />
Verkabelung kann sich etwas<br />
schwieriger gestalten.<br />
HINWEIS : Diese Anschlussmethoden<br />
sind insofern ungewöhnlich, als dass der<br />
“-“-Pol des einen Lautsprechers an den<br />
“+“-Pol des anderen angeschlossen wird.<br />
Dies mag seltsam erscheinen, da jedoch<br />
das Signal durch den einen Lautsprecher<br />
in den anderen fliest, muss es genau so<br />
geschaltet werden, damit die<br />
Lautsprecher “phasengleich“ sind.<br />
Series Connections<br />
Conexiones en serie<br />
Branchements en série<br />
Serielle Anschlüsse<br />
8 ohms<br />
8 ohms<br />
8 ohms<br />
8 ohms<br />
LOOP<br />
LOOP<br />
LOOP<br />
LOOP<br />
LOOP<br />
LOOP<br />
LOOP<br />
LOOP<br />
16 ohms 16 ohms<br />
amplifier or receiver<br />
Amplificador o receptor<br />
Amplificateur ou récepteur<br />
Verstärker oder Receiver<br />
Placing the <strong>Speaker</strong><br />
1. Slide the speaker into the cutout.<br />
2. Tighten the 3 Phillips mounting<br />
screws. The mounting arms will<br />
pivot into position and clamp the<br />
speaker to the mounting surface.<br />
Important: Do not overtighten the<br />
screws.<br />
Colocación del parlante<br />
1. Deslice el parlante en el agujero.<br />
2. Apriete los tres tornillos de<br />
montaje Phillips. Los brazos de<br />
montaje girarán para quedar en<br />
posición y sujetar el parlante en la<br />
superficie de montaje.<br />
Importante: No apriete demasiado<br />
los tornillos.<br />
Placement de l’enceinte<br />
1. Glissez l’enceinte dans l’orifice de<br />
découpe.<br />
2. Serrez les 3 vis à tête cruciforme. Les<br />
bras de fixation pivotent en<br />
position et bloquent l’enceinte à la<br />
surface de montage.<br />
Important : Ne serrez pas<br />
excessivement les vis.<br />
Positionierung der<br />
Lautsprecher<br />
1. Schieben Sie den Lautsprecher in<br />
den Deckenausschnitt.<br />
2. Ziehen Sie die drei Kreuzschlitz-<br />
Befestigungsschrauben an. Die<br />
Befestigungsarme schwenken dann in<br />
Position und klemmen den<br />
Lautsprecher an die Befestigungsfläche.<br />
Wichtig: Ziehen Sie die Schrauben<br />
nicht zu fest an.<br />
– 12 –
Painting<br />
Pintura<br />
Peinture<br />
Lackierung<br />
The <strong>Speaker</strong> Frame<br />
The speakers may be painted before<br />
or after they are installed. They are<br />
already primed.<br />
1. <strong>In</strong>sert the supplied paint mask into<br />
the frame of the speaker.<br />
2. Paint the frame. If you are using<br />
spray paint, apply two light coats. If<br />
you are applying paint with a brush<br />
or roller, thin the paint and apply<br />
two very light coats. This helps<br />
prevent excessive paint buildup or<br />
“runs” on the frame.<br />
3. After the paint has dried, use the<br />
finger pulls to remove the paint<br />
mask.<br />
El marco del parlante<br />
Los parlantes pueden pintarse antes<br />
o después de la instalación. Vienen de<br />
fábrica con base para pintura o primer.<br />
1. <strong>In</strong>serte la plantilla (máscara) para<br />
pintar suministrada en el marco del<br />
parlante.<br />
2. Pinte el marco. Si utiliza pintura a<br />
pistola, aplique dos capas ligeras.<br />
Si utiliza pincel o rodillo, diluya la<br />
pintura y aplique dos capas muy<br />
delgadas. Esto evitará el exceso de<br />
concentración de pintura y el<br />
“corrimiento” de la misma sobre el<br />
marco.<br />
3. Una vez seca la pintura, tire de los<br />
lugares previstos en la máscara<br />
para retirarla.<br />
Coffret de l’enceinte<br />
Les enceintes peuvent être peintes<br />
avant ou après leur installation. Elles<br />
ont déjà reçu une couche de fond.<br />
1. <strong>In</strong>sérez le masque à peinture fourni<br />
dans le coffret de l’enceinte.<br />
2. Peignez le coffret. Si vous utilisez<br />
de la peinture au pistolet,<br />
appliquez deux couches légères. Si<br />
vous appliquez la peinture avec un<br />
pinceau ou un rouleau, diluez-la et<br />
appliquez deux couches très<br />
légères. Vous éviterez ainsi une<br />
accumulation excessive de<br />
peinture ou des coulées sur le<br />
coffret.<br />
3. Une fois la peinture sèche, utilisez<br />
les languettes pour retirer le<br />
masque de peinture.<br />
Lautsprecherrahmen<br />
Die Lautsprecher können vor oder<br />
nach der <strong>In</strong>stallation lackiert<br />
werden. Sie sind bereits mit einer<br />
Grundierung versehen.<br />
1. Legen Sie die mitgelieferte<br />
Lackierungsmaske in den<br />
Lautsprecherrahmen.<br />
2. Lackieren Sie den Rahmen. Wenn<br />
Sie den Lack aufsprühen, müssen<br />
zwei dünne Schichten aufgetragen<br />
werden. Wenn Lack mit einem<br />
Pinsel oder einer Rolle aufgetragen<br />
wird, verdünnen Sie erst den Lack<br />
und tragen dann zwei ganz dünne<br />
Schichten auf. Dies verhindert<br />
übermäßig<br />
dicke<br />
Lackansammlungen oder Lack-<br />
„Tränen“ auf dem Rahmen.<br />
3. Nach dem Trocknen des Lacks<br />
ziehen Sie die Lackierungsmaske<br />
an den Fingerlaschen ab.<br />
The <strong>Speaker</strong> Grille<br />
1. Paint the grille. If you are using<br />
spray paint, apply two light coats. If<br />
you are applying paint with a brush<br />
or roller, thin the paint and apply<br />
two very light coats. This helps<br />
prevent paint from filling the holes<br />
on the grille.<br />
2. After the paint is dry, reinstall the<br />
cloth and grille logo.<br />
Listening Levels<br />
Power Handling<br />
The power recommendations for the<br />
speakers assume that you will operate<br />
the amplifier in a way that will not<br />
produce distortion. Even our rugged<br />
speakers can be damaged by an<br />
amplifier if it is producing distortion.<br />
If you hear a harsh, gritty sound, turn<br />
down the volume. Prolonged or<br />
repeated operation of your speaker<br />
with a distorted signal from the<br />
amplifier can cause damage that is not<br />
covered by the warranty.<br />
La rejilla del parlante<br />
1. Pinte la rejilla. Si utiliza pintura a<br />
pistola, aplique dos capas ligeras.<br />
Si utiliza pincel o rodillo, diluya la<br />
pintura y aplique dos capas muy<br />
delgadas. Esto evitará que la<br />
pintura llene los orificios de la<br />
rejilla.<br />
2. Una vez seca la pintura, vuelva a<br />
instalar la tela y el logo de la rejilla.<br />
Niveles de<br />
audición Manejo<br />
de potencia<br />
Las recomendaciones sobre potencia<br />
de los parlantes asumen que el<br />
amplificador se ajustará de manera que<br />
no se produzca distorsión acústica.<br />
<strong>In</strong>cluso nuestros robustos parlantes<br />
pueden ser dañados si el amplificador<br />
produce distorsión.<br />
Si se produce un sonido áspero y<br />
“arenoso”, baje el volumen. Si deja que<br />
su parlante siga funcionando por un<br />
tiempo prolongado o repetidamente<br />
con una señal distorsionada del<br />
amplificador, podrían producirse daños<br />
que no están amparados por la<br />
garantía.<br />
Grille des enceintes<br />
1. Peignez la grille. Si vous utilisez de la<br />
peinture au pistolet, appliquez deux<br />
couches légères. Si vous appliquez<br />
la peinture avec un pinceau ou un<br />
rouleau, diluez-la et appliquez deux<br />
couches très légères. Vous éviterez<br />
ainsi que la peinture ne remplisse<br />
les trous de la grille.<br />
2. Une fois la peinture sèche,<br />
réinstallez le tissu et le logo de la<br />
grille.<br />
Niveaux d’écoute<br />
et gestion de la<br />
puissance<br />
Les recommandations de puissance<br />
applicables aux enceintes supposent<br />
que vous utilisez l’amplificateur de telle<br />
manière qu’il ne produise aucune<br />
distorsion. Malgré leur robustesse, nos<br />
enceintes peuvent être endommagées<br />
par l’amplificateur s’il déforme les sons.<br />
Si le son est discordant et strident,<br />
baissez le volume. L’utilisation<br />
prolongée ou répétée des enceintes<br />
avec un signal déformé de<br />
l’amplificateur peut provoquer des<br />
dommages non couverts par la<br />
garantie.<br />
Das Lautsprecher-Ziergitter<br />
1. Lackieren Sie das Ziergitter. Wenn Sie<br />
den Lack aufsprühen, müssen zwei<br />
dünne Schichten aufgetragen werden.<br />
Wenn Lack mit einem Pinsel oder einer<br />
Rolle aufgetragen wird, verdünnen Sie<br />
erst den Lack und tragen dann zwei<br />
ganz dünne Schichten auf. Damit wird<br />
verhindert, dass sich die Löcher des<br />
Ziergitters mit Lack füllen.<br />
2. Nachdem der Lack trocken ist, bringen<br />
Sie das Tuch und das Ziergitter-Logo<br />
wieder an.<br />
Lautstärkeneinstel<br />
lungen und<br />
Leistungsverarbeit<br />
ung<br />
Die Leistungsempfehlungen für die<br />
Lautsprecher setzen voraus, dass der<br />
Verstärker so betrieben wird, dass es zu<br />
keinen Verzerrungen kommt. Sogar<br />
unsere robusten Lautsprecher können<br />
durch einen Verstärker beschädigt<br />
werden, der Verzerrungen erzeugt.<br />
Wenn Sie scharfe, schleifende Töne<br />
hören, reduzieren Sie die Lautstärke. Ein<br />
lange andauernder oder wiederholter<br />
Betrieb des Lautsprechers mit einem<br />
verzerrten Signal vom Verstärker kann<br />
Schäden verursachen, die nicht durch<br />
die Garantie gedeckt sind.<br />
– 13 –
Limited Warranty<br />
<strong>Boston</strong> <strong>Acoustics</strong> warrants to the<br />
original purchaser of our <strong>HSi</strong><br />
loudspeakers that they will be free of<br />
defects in materials and workmanship<br />
for a period of 5 years from the date of<br />
purchase.<br />
Your responsibilities are to install and<br />
use the system according to the<br />
instructions supplied, to provide safe<br />
and secure transportation to an<br />
authorized <strong>Boston</strong> <strong>Acoustics</strong> service<br />
representative, and to present proof of<br />
purchase in the form of your sales slip<br />
when requesting service.<br />
Excluded from this warranty is<br />
damage that results from abuse,<br />
misuse, improper installation,<br />
accidents, shipping, or repairs/<br />
modifications by anyone other than an<br />
authorized <strong>Boston</strong> <strong>Acoustics</strong> service<br />
representative.<br />
This warranty is limited to the <strong>Boston</strong><br />
<strong>Acoustics</strong> product and does not cover<br />
damage to any associated equipment.<br />
This warranty does not cover the cost<br />
of removal or reinstallation.<br />
This warranty is void if the serial<br />
number has been removed or<br />
defaced.<br />
This warranty gives you specific legal<br />
rights, and you may also have other<br />
rights which vary from state to state.<br />
Garantía Limitada<br />
<strong>Boston</strong> <strong>Acoustics</strong> garantiza al<br />
comprador original de nuestros<br />
parlantes <strong>HSi</strong> contra defectos de<br />
materiales y de mano de obra durante<br />
un período de 5 años desde la fecha<br />
de compra.<br />
Es responsabilidad suya instalar y<br />
utilizar el sistema de acuerdo con las<br />
instrucciones suministradas,<br />
proporcionar un transporte seguro<br />
hasta un representante de servicio<br />
autorizado de <strong>Boston</strong> <strong>Acoustics</strong>, y<br />
presentar la prueba de compra en<br />
forma de recibo de compra cuando<br />
sea necesario este servicio.<br />
Quedan excluidos de esta garantía<br />
los daños que resulten del uso<br />
incorrecto, del mal uso, de una<br />
instalación inadecuada, de accidentes,<br />
del transporte, o de<br />
reparaciones/modificaciones que no<br />
sean realizadas por el representante de<br />
servicio autorizado de <strong>Boston</strong><br />
<strong>Acoustics</strong>.<br />
Esta garantía se limita al producto de<br />
<strong>Boston</strong> <strong>Acoustics</strong> y no cubre daños de<br />
equipos afines. Esta garantía no cubre<br />
los costos de desinstalación o<br />
reinstalación.<br />
Esta garantía será nula cuando se<br />
haya retirado o borrado el número de<br />
serie.<br />
Esta garantía le otorga derechos<br />
legales específicos y también le<br />
podrían corresponder otros derechos<br />
que varían de un país a otro.<br />
Garantie limitée<br />
<strong>Boston</strong> <strong>Acoustics</strong> garantit à l’acheteur<br />
d’origine que les enceintes <strong>HSi</strong> ne<br />
comportent aucun défaut de pièce et<br />
main d’uvre pendant une période de 5<br />
ans à partir de la date d’achat.<br />
Votre responsabilité consiste à<br />
installer et à utiliser le système en<br />
accord avec les instructions fournies, à<br />
assurer un transport sécurisé vers un<br />
représentant de service agréé de<br />
<strong>Boston</strong> <strong>Acoustics</strong>, et à présenter une<br />
preuve d’achat sous la forme d’un ticket<br />
de caisse en cas de demande de service<br />
après-vente.<br />
Les dommages résultant d’une<br />
utilisation abusive ou erronée, d’une<br />
installation incorrecte, d’un accident,<br />
d’une expédition inadaptée ou de<br />
réparations / modifications par une<br />
personne autre qu’un représentant de<br />
service agréé de <strong>Boston</strong> <strong>Acoustics</strong> sont<br />
exclus de cette garantie.<br />
La présente garantie est réservée au<br />
produit de <strong>Boston</strong> <strong>Acoustics</strong> et ne<br />
couvre pas les dommages d’un<br />
quelconque équipement associé. Elle<br />
ne couvre pas le coût de l’enlèvement<br />
ou de la réinstallation.<br />
La présente garantie est annulée si le<br />
numéro de série a été enlevé ou abîmé.<br />
Cette garantie vous accorde des<br />
droits légaux spécifiques. Vous pouvez<br />
disposer de droits complémentaires qui<br />
diffèrent d’un État à l’autre.<br />
Eingeschränkte<br />
Garantie<br />
Für die Dauer von 5 Jahren ab<br />
Kaufdatum garantiert <strong>Boston</strong><br />
<strong>Acoustics</strong> dem Originalbesitzer<br />
unserer <strong>HSi</strong>-Lautsprecher, dass diese<br />
frei von Materialfehlern und<br />
Verarbeitungsmängeln sind.<br />
Ihre Verantwortung besteht darin,<br />
das System entsprechend der<br />
beigefügten Anleitung zu installieren<br />
und zu betreiben, es sicher bei einer<br />
autorisierten <strong>Boston</strong> <strong>Acoustics</strong><br />
Service-Vertretung anzuliefern und<br />
den Kauf durch Vorlage des<br />
Verkaufsbelegs nachzuweisen, falls<br />
Garantieleistungen in Anspruch<br />
genommen werden.<br />
Von dieser Garantie ausgeschlossen<br />
sind Schäden, die auf Missbrauch,<br />
unsachgemäße <strong>In</strong>stallation, Unfall,<br />
Fracht<br />
oder<br />
Reparaturen/Modifikationen<br />
zurückzuführen sind, die von jemand<br />
anderem als einer autorisierten <strong>Boston</strong><br />
<strong>Acoustics</strong> Service-Vertretung<br />
durchgeführt wurden.<br />
Diese Garantie ist auf das <strong>Boston</strong><br />
<strong>Acoustics</strong> Produkt beschränkt und<br />
erstreckt sich nicht auf etwaige damit<br />
verbundene Geräte. Diese Garantie<br />
deckt auch keine Kosten für den<br />
Ausbau oder die erneute <strong>In</strong>stallation.<br />
Diese Garantie ist verwirkt, falls die<br />
Seriennummer entfernt oder<br />
unleserlich ist.<br />
Diese Garantie verleiht Ihnen<br />
bestimmte Rechte. Darüber hinaus<br />
haben Sie unter Umständen weitere<br />
Rechte, die von Staat zu Staat variieren.<br />
– 14 –
If Service Seems Necessary<br />
First, contact the dealer from whom<br />
you purchased the speakers. If that is<br />
not possible, write to:<br />
Si cree que necesita servicio<br />
técnico<br />
Primero, póngase en contacto con el<br />
distribuidor al cual ha comprado los<br />
parlantes. Si esto no es posible, escriba a:<br />
Demande de service aprèsvente<br />
Veuillez contacter en premier lieu le<br />
revendeur auprès duquel vous avez<br />
acheté ces enceintes. Si aucune<br />
assistance n’est possible, veuillez<br />
écrire à :<br />
Reparaturanforderung<br />
Wenden Sie sich bitte zuerst an den<br />
Fachhändler, bei dem Sie die<br />
Lautsprecher gekauft haben. Wenn<br />
dies nicht möglich ist, schreiben Sie<br />
an:<br />
<strong>Boston</strong> <strong>Acoustics</strong>, <strong>In</strong>c.<br />
100 Corporate Drive<br />
Mahwah, NJ 07430 U.S.A.<br />
<strong>Boston</strong> <strong>Acoustics</strong>, <strong>In</strong>c.<br />
100 Corporate Drive<br />
Mahwah, NJ 07430 U.S.A.<br />
<strong>Boston</strong> <strong>Acoustics</strong>, <strong>In</strong>c.<br />
100 Corporate Drive<br />
Mahwah, NJ 07430 États-Unis<br />
<strong>Boston</strong> <strong>Acoustics</strong>, <strong>In</strong>c.<br />
100 Corporate Drive<br />
Mahwah, NJ 07430 U.S.A.<br />
Or contact us via e-mail at:<br />
support@bostona.com<br />
We will promptly advise you of what<br />
action to take. If it is necessary to<br />
return your speaker to the factory,<br />
please ship it prepaid. After it has been<br />
repaired, we will return it freight<br />
prepaid in the United States and<br />
Canada.<br />
O póngase en contacto con nosotros<br />
por correo electrónico a:<br />
support@bostona.com<br />
Le indicaremos de inmediato qué<br />
acción tomar. Si fuera necesario<br />
devolver su parlante a fábrica, le<br />
pedimos que lo envíe con gastos de<br />
transporte pagos. Después de la<br />
reparación, lo devolveremos con<br />
costos de transporte pagados sólo en<br />
Estados Unidos y Canadá.<br />
Ou veuillez nous contacter par e-mail :<br />
support@bostona.com<br />
Nous vous informerons rapidement<br />
des mesures à prendre. Si vous devez<br />
retourner votre enceinte à l’usine,<br />
veuillez l’expédier dans un colis<br />
prépayé. Après la réparation, elle vous<br />
sera retournée en fret prépayé aux<br />
États-Unis et au Canada.<br />
Oder kontaktieren Sie uns per E-Mail<br />
unter: support@bostona.com<br />
Wir werden Ihnen unverzüglich<br />
mitteilen, wie Sie weiter vorgehen<br />
sollten. Falls Ihr Lautsprecher an den<br />
Hersteller zurückgeschickt werden<br />
muss, versenden Sie ihn bitte<br />
frachtfrei. Nach der Reparatur werden<br />
wir ihn in den USA und in Kanada<br />
ebenfalls frachtfrei zurücksenden.<br />
– 15 –
300 Jubilee Drive, Peabody, MA 01960 USA<br />
bostonacoustics.com<br />
<strong>Boston</strong>, <strong>Boston</strong> <strong>Acoustics</strong>, the <strong>Boston</strong> <strong>Acoustics</strong> logo, and are<br />
registered trademarks of <strong>Boston</strong> <strong>Acoustics</strong>, <strong>In</strong>c. Specifications are<br />
subject to change without notice.<br />
<strong>Boston</strong>, <strong>Boston</strong> <strong>Acoustics</strong> y el logo de <strong>Boston</strong> <strong>Acoustics</strong> son<br />
marcas registradas de <strong>Boston</strong> <strong>Acoustics</strong>, <strong>In</strong>c. Las especificaciones<br />
están sujetas a cambios sin previo aviso.<br />
<strong>Boston</strong>, <strong>Boston</strong> <strong>Acoustics</strong> et le logo de <strong>Boston</strong> <strong>Acoustics</strong> sont des<br />
marques déposées de <strong>Boston</strong> <strong>Acoustics</strong> <strong>In</strong>c. Les spécifications<br />
peuvent être modifiées sans avis préalable.<br />
<strong>Boston</strong>, <strong>Boston</strong> <strong>Acoustics</strong> und das Logo von <strong>Boston</strong> <strong>Acoustics</strong> logo<br />
sind eingetragene Warenzeichen von <strong>Boston</strong> <strong>Acoustics</strong>, <strong>In</strong>c.<br />
Spezifikationen können ohne vorherige Ankündigung geändert<br />
werden.<br />
© 2009 <strong>Boston</strong> <strong>Acoustics</strong>, <strong>In</strong>c. 142-003616-0<br />
– 16 –