Download PDF Gebrauchsanweisung
Download PDF Gebrauchsanweisung
Download PDF Gebrauchsanweisung

You also want an ePaper? Increase the reach of your titles
YUMPU automatically turns print PDFs into web optimized ePapers that Google loves.
2<br />
Before Use<br />
Read and understand the instructions completely.<br />
Hand wash the mask.<br />
Inspect the mask components for damage or wear; replace if<br />
necessary.<br />
Cleaning Instructions for the Mask and Headgear<br />
For multi-patient, multi-use in the hospital/institutional<br />
environment, visit us on-line at www.sleepapnea.com or contact<br />
Customer Service at 1-724-387-4000 or Respironics Deutschland<br />
at +49 8152 93060 to obtain mask disinfecting instructions.<br />
For single patient reuse in the home, the mask and CPA<br />
P<br />
tubing should be cleaned daily. The headgear should be cleaned<br />
weekly, or as needed. The headgear does not need to be<br />
removed for daily cleaning. Inspect the headgear for wear and<br />
tear, replace as needed.<br />
Hand wash in warm water with a mild liquid dish washing<br />
detergent. Do not use bleach, alcohol, or cleaning solutions<br />
containing alcohol. Do not use cleaners containing<br />
conditioners or moisturizers.<br />
Rinse thoroughly. Air dry completely before use.<br />
<br />
Inspect all parts for damage or wear; replace if necessary.<br />
<br />
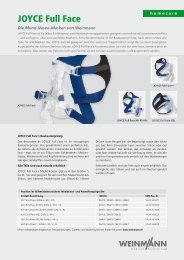
EasyLife Mask<br />
The EasyLife Mask is designed with two mask cushions that work together.<br />
The inner cushion provides a comfortable and automatically adjusting seal.<br />
The outer cushion provides stability and support to the mask. The outer<br />
cushion is not designed to provide seal.<br />
Achieving the Right Fit<br />
1. Have the patient hold the mask with the inner cushion over their nose<br />
and pull the headgear on over their head. The headgear is preset to a<br />
large setting to go on easily right out of the package.<br />
2. Have the patient evenly adjust the upper straps (Figure 3) to a<br />
comfortable position by using the tabs on both sides of the headgear.<br />
3.<br />
4.<br />
5.<br />
6.<br />
7.<br />
8.<br />
9.<br />
Do not pull the straps tight.<br />
The cushion should lightly touch the face<br />
and the upper strap will rest above the ears.<br />
Evenly adjust the lower straps (Figure 4) to a comfortable position by<br />
using the tabs on both sides of the headgear. Do not pull the straps<br />
tight.<br />
The lower strap will sit below the ears and the headgear will cross<br />
at the base of the head (Figure 5).<br />
Attach the separate exhalation device (e.g.: Whisper Swivel) to the blue<br />
standard elbow (SE).<br />
Connect the tubing (included with the CPA<br />
P or bi-level device) to the<br />
standaard elbow.<br />
<br />
Have the patient lie down and breathe normally through the nose,<br />
keeping lips closed.<br />
Adjust the headgear evenly to reduce leaks or pressure points at the<br />
bridge of the nose or above the lip.<br />
Reseat the mask, if necessary.<br />
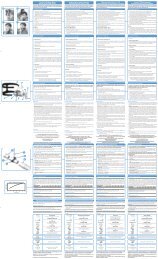
A = Forehead pad slot<br />
B = Inner sealing cushion with blue flap<br />
C = Forehead pad<br />
D = Attachment tabs<br />
E = Outer support cushion<br />
F = Headgear stop<br />
G = Blue SE Standard Elbow<br />
no built-in exhalation)<br />
Figure 3<br />
Figure 4<br />
Figure 5<br />
<br />
<br />
<br />
<br />
Comfort Tips<br />
<br />
<br />
<br />
<br />
<br />
<br />
<br />
Removing the Mask<br />
Quickly and easily remove the mask by grabbing the back headgear strap and sliding the entire assembly<br />
forward over your head. If needed, undo the lower headgear straps.The headgear stop prevents the<br />
headgear from slipping out of the frame. You do not need to pull the headgear straps beyond the stops<br />
for daily cleaning or adjustments.<br />
Removing and Attaching the Cushions<br />
To Remove<br />
1.<br />
2.<br />
3.<br />
To Attach<br />
1.<br />
Pull outward on the three attachment tabs on each side of the outer<br />
support cushion until this cushion separates from the mask frame.<br />
Remove the outer support cushion.<br />
<br />
Place the smaller inner sealing cushion on the mask frame (Figure 6).<br />
Note<br />
<br />
2. Slide the larger outer support cushion with tabs facing downward<br />
around the inner sealing cushion until all three sides click into the mask<br />
frame (Figure 7).<br />
3. Gently tug on the cushions to make sure they are securely in place.<br />
4. Gently press the forehead pad into the forehead pad slot in the mask<br />
frame.<br />
Attaching the Headgear to the Mask<br />
1.<br />
2.<br />
To reattach the headgear, thread the upper headgear straps into the<br />
slots in the top of the mask frame. Fold the tabs back to catch the<br />
headgear straps.<br />
Thread the lower headgear straps into the slots in the bottom of the<br />
mask frame. Fold the tabs back to catch the headgear straps.<br />
Note<br />
The upper headgear straps are longer and the lower headgear straps are<br />
shorter (Figure 8).<br />
Figure 6<br />
Figure 7<br />
Figure 8<br />
3