Download PDF Gebrauchsanweisung
Download PDF Gebrauchsanweisung
Download PDF Gebrauchsanweisung

Create successful ePaper yourself
Turn your PDF publications into a flip-book with our unique Google optimized e-Paper software.
2<br />
Before Use<br />
Read and understand the instructions completely.<br />
Hand wash the mask.<br />
Inspect the mask components for damage or wear; replace if<br />
necessary.<br />
Cleaning Instructions for the Mask and Headgear<br />
For multi-patient, multi-use in the hospital/institutional<br />
environment, visit us on-line at www.sleepapnea.com or contact<br />
Customer Service at 1-724-387-4000 or Respironics Deutschland<br />
at +49 8152 93060 to obtain mask disinfecting instructions.<br />
For single patient reuse in the home, the mask and CPAP<br />
tubing should be cleaned daily. The headgear should be cleaned<br />
weekly, or as needed. The headgear does not need to be removed<br />
for daily cleaning. Inspect the headgear for wear and tear, replace<br />
as needed.<br />
Hand wash in warm water with a mild liquid dish washing<br />
detergent. Do not use bleach, alcohol, or cleaning solutions<br />
containing alcohol. Do not use cleaners containing<br />
conditioners or moisturizers.<br />
Rinse thoroughly. Air dry completely before use.<br />
Inspect all parts for damage or wear; replace if necessary.<br />
<br />
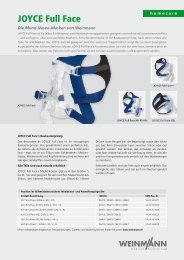
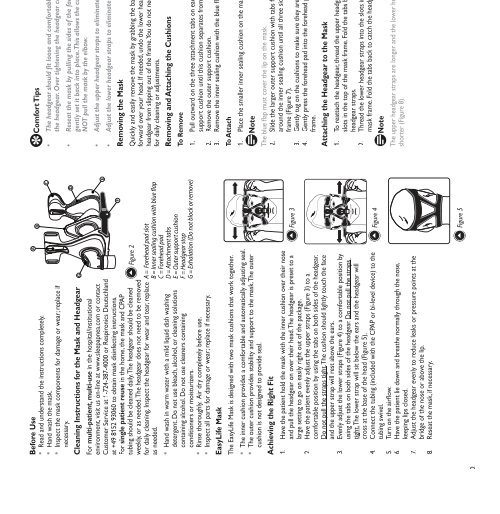
EasyLife Mask<br />
The EasyLife Mask is designed with two mask cushions that work together.<br />
The inner cushion provides a comfortable and automatically adjusting seal.<br />
The outer cushion provides stability and support to the mask. The outer<br />
cushion is not designed to provide seal.<br />
Achieving the Right Fit<br />
1. Have the patient hold the mask with the inner cushion over their nose<br />
and pull the headgear on over their head. The headgear is preset to a<br />
large setting to go on easily right out of the package.<br />
2. Have the patient evenly adjust the upper straps (Figure 3) to a<br />
comfortable position by using the tabs on both sides of the headgear.<br />
3.<br />
4.<br />
5.<br />
6.<br />
7.<br />
8.<br />
Do not pull the straps tight.<br />
The cushion should lightly touch the face<br />
and the upper strap will rest above the ears.<br />
Evenly adjust the lower straps (Figure 4) to a comfortable position by<br />
using the tabs on both sides of the headgear. Do not pull the straps<br />
tight.<br />
The lower strap will sit below the ears and the headgear will<br />
cross at the base of the head (Figure 5).<br />
Connect the tubing (included with the CPAP or bi-level device) to the<br />
tubing swivel.<br />
<br />
Have the patient lie down and breathe normally through the nose,<br />
keeping lips closed.<br />
Adjust the headgear evenly to reduce leaks or pressure points at the<br />
bridge of the nose or above the lip.<br />
Reseat the mask, if necessary.<br />
Figure 2<br />
A = Forehead pad slot<br />
B = Inner sealing cushion with blue flap<br />
C = Forehead pad<br />
D = Attachment tabs<br />
E = Outer support cushion<br />
F = Headgear stop<br />
G = Exhalation (Do not block or remove)<br />
Figure 3<br />
Figure 4<br />
C<br />
Figure 5<br />
<br />
<br />
<br />
<br />
Comfort Tips<br />
<br />
<br />
<br />
<br />
<br />
<br />
<br />
Removing the Mask<br />
Quickly and easily remove the mask by grabbing the back headgear strap and sliding the entire assembly<br />
forward over your head. If needed, undo the lower headgear straps.The headgear stop prevents the<br />
headgear from slipping out of the frame. You do not need to pull the headgear straps beyond the stops<br />
for daily cleaning or adjustments.<br />
Removing and Attaching the Cushions<br />
To Remove<br />
1. Pull outward on the three attachment tabs on each side of the outer<br />
support cushion until this cushion separates from the mask frame.<br />
2. Remove the outer support cushion.<br />
<br />
To Attach<br />
1. Place the smaller inner sealing cushion on the mask frame (Figure 6).<br />
Note<br />
<br />
2. Slide the larger outer support cushion with tabs facing downward<br />
around the inner sealing cushion until all three sides click into the mask<br />
frame (Figure 7).<br />
3. Gently tug on the cushions to make sure they are securely in place.<br />
4. Gently press the forehead pad into the forehead pad slot in the mask<br />
frame.<br />
Attaching the Headgear to the Mask<br />
1. To reattach the headgear, thread the upper headgear straps into the<br />
slots in the top of the mask frame. Fold the tabs back to catch the<br />
headgear straps.<br />
2. Thread the lower headgear straps into the slots in the bottom of the<br />
mask frame. Fold the tabs back to catch the headgear straps.<br />
Note<br />
The upper headgear straps are longer and the lower headgear straps are<br />
shorter (Figure 8).<br />
Figure 6<br />
Figure 7<br />
Figure 8<br />
3