Installation Instructions - Klaxon Signals Ltd.
Installation Instructions - Klaxon Signals Ltd.
Installation Instructions - Klaxon Signals Ltd.

You also want an ePaper? Increase the reach of your titles
YUMPU automatically turns print PDFs into web optimized ePapers that Google loves.
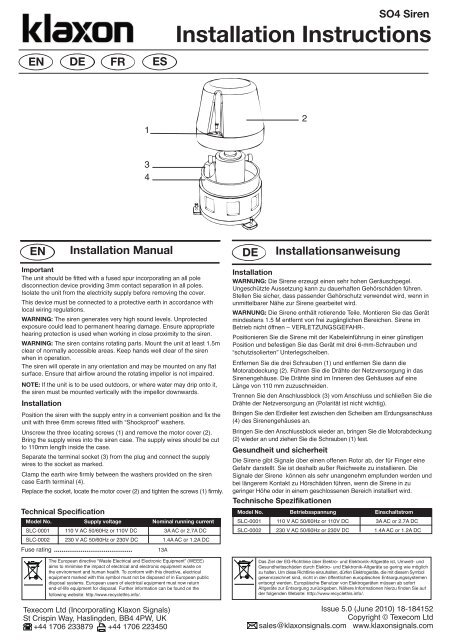
SO4 Siren<br />
<strong>Installation</strong> <strong>Instructions</strong><br />
EN<br />
DE<br />
FR<br />
ES<br />
1<br />
2<br />
3<br />
4<br />
EN<br />
<strong>Installation</strong> Manual<br />
DE<br />
<strong>Installation</strong>sanweisung<br />
Important<br />
The unit should be fitted with a fused spur incorporating an all pole<br />
disconnection device providing 3mm contact separation in all poles.<br />
Isolate the unit from the electricity supply before removing the cover.<br />
This device must be connected to a protective earth in accordance with<br />
local wiring regulations.<br />
WARNING: The siren generates very high sound levels. Unprotected<br />
exposure could lead to permanent hearing damage. Ensure appropriate<br />
hearing protection is used when working in close proximity to the siren.<br />
WARNING: The siren contains rotating parts. Mount the unit at least 1.5m<br />
clear of normally accessible areas. Keep hands well clear of the siren<br />
when in operation.<br />
The siren will operate in any orientation and may be mounted on any flat<br />
surface. Ensure that airflow around the rotating impellor is not impaired.<br />
NOTE: If the unit is to be used outdoors, or where water may drip onto it,<br />
the siren must be mounted vertically with the impellor downwards.<br />
<strong>Installation</strong><br />
Position the siren with the supply entry in a convenient position and fix the<br />
unit with three 6mm screws fitted with “Shockproof” washers.<br />
Unscrew the three locating screws (1) and remove the motor cover (2).<br />
Bring the supply wires into the siren case. The supply wires should be cut<br />
to 110mm length inside the case.<br />
Separate the terminal socket (3) from the plug and connect the supply<br />
wires to the socket as marked.<br />
Clamp the earth wire firmly between the washers provided on the siren<br />
case Earth terminal (4).<br />
Replace the socket, locate the motor cover (2) and tighten the screws (1) firmly.<br />
Technical Specification<br />
Model No. Supply voltage Nominal running current<br />
SLC-0001 110 V AC 50/60Hz or 110V DC 3A AC or 2.7A DC<br />
SLC-0002 230 V AC 50/60Hz or 230V DC 1.4A AC or 1.2A DC<br />
Fuse rating<br />
13A<br />
The European directive “Waste Electrical and Electronic Equipment” (WEEE)<br />
aims to minimise the impact of electrical and electronic equipment waste on<br />
the environment and human health. To conform with this directive, electrical<br />
equipment marked with this symbol must not be disposed of in European public<br />
disposal systems. European users of electrical equipment must now return<br />
end-of-life equipment for disposal. Further information can be found on the<br />
following website: http://www.recyclethis.info/.<br />
<strong>Installation</strong><br />
WARNUNG: Die Sirene erzeugt einen sehr hohen Geräuschpegel.<br />
Ungeschützte Aussetzung kann zu dauerhaften Gehörschäden führen.<br />
Stellen Sie sicher, dass passender Gehörschutz verwendet wird, wenn in<br />
unmittelbarer Nähe zur Sirene gearbeitet wird.<br />
WARNUNG: Die Sirene enthält rotierende Teile. Montieren Sie das Gerät<br />
mindestens 1.5 M entfernt von frei zugänglichen Bereichen. Sirene im<br />
Betrieb nicht öffnen – VERLETZUNGSGEFAHR-.<br />
Positionieren Sie die Sirene mit der Kabeleinführung in einer günstigen<br />
Position und befestigen Sie das Gerät mit drei 6-mm-Schrauben und<br />
“schutzisolierten” Unterlegscheiben.<br />
Entfernen Sie die drei Schrauben (1) und entfernen Sie dann die<br />
Motorabdeckung (2). Führen Sie die Drähte der Netzversorgung in das<br />
Sirenengehäuse. Die Drähte sind im Inneren des Gehäuses auf eine<br />
Länge von 110 mm zuzuschneiden.<br />
Trennen Sie den Anschlussblock (3) vom Anschluss und schließen Sie die<br />
Drähte der Netzversorgung an (Polarität ist nicht wichtig).<br />
Bringen Sie den Erdleiter fest zwischen den Scheiben am Erdungsanschluss<br />
(4) des Sirenengehäuses an.<br />
Bringen Sie den Anschlussblock wieder an, bringen Sie die Motorabdeckung<br />
(2) wieder an und ziehen Sie die Schrauben (1) fest.<br />
Gesundheit und sicherheit<br />
Die Sirene gibt Signale über einen offenen Rotor ab, der für Finger eine<br />
Gefahr darstellt. Sie ist deshalb außer Reichweite zu installieren. Die<br />
Signale der Sirene können als sehr unangenehm empfunden werden und<br />
bei längerem Kontakt zu Hörschäden führen, wenn die Sirene in zu<br />
geringer Höhe oder in einem geschlossenen Bereich installiert wird.<br />
Technische Spezifikationen<br />
Model No. Betriebsspannung Einschaltstrom<br />
SLC-0001 110 V AC 50/60Hz or 110V DC 3A AC or 2.7A DC<br />
SLC-0002 230 V AC 50/60Hz or 230V DC 1.4A AC or 1.2A DC<br />
Das Ziel der EG-Richtlinie über Elektro- und Elektronik-Altgeräte ist, Umwelt- und<br />
Gesundheitsschäden durch Elektro- und Elektronik-Altgeräte so gering wie möglich<br />
zu halten. Um diese Richtlinie einzuhalten, dürfen Elektrogeräte, die mit diesem Symbol<br />
gekennzeichnet sind, nicht in den öffentlichen europäischen Entsorgungssystemen<br />
entsorgt werden. Europäische Benutzer von Elektrogeräten müssen ab sofort<br />
Altgeräte zur Entsorgung zurückgeben. Nähere Informationen hierzu finden Sie auf<br />
der folgenden Website: http://www.recyclethis.info/.<br />
Texecom <strong>Ltd</strong> (Incorporating <strong>Klaxon</strong> <strong>Signals</strong>)<br />
St Crispin Way, Haslingden, BB4 4PW, UK<br />
+44 1706 233879 +44 1706 223450<br />
@<br />
Issue 5.0 (June 2010) 18-184152<br />
Copyright © Texecom <strong>Ltd</strong><br />
sales@klaxonsignals.com www.klaxonsignals.com
FR<br />
Notice d'instructions<br />
ES<br />
Instrucciones de Instalación<br />
<strong>Installation</strong><br />
ATTENTION : La sirène génère des sons très hauts qui pourraient causer<br />
des problèmes d’audition permanents. Assurez vous que vous porter des<br />
protections adéquates lorsque vous travailler près de la sirène.<br />
ATTENTION : La sirène contient des parties tournantes. Installez la sirène<br />
a au moins 1.5 m d’endroits normalement accessibles. N’approchez pas<br />
vos mains de la sirène en fonctionnement.<br />
Positionner la sirène en veillant à prévoir une position d'entrée d'alimentation<br />
pratique et fixer la sirène à l'aide de trois vis de 6 mm dotées de rondelles<br />
“antichoc”.<br />
Dévisser les trois vis de centrage (1) et retirer le couvercle du moteur (2).<br />
Amener les fils d'alimentation au boîtier de la sirène. Les fils d'alimentation<br />
doivent être coupés à une longueur de 110 mm à l'intérieur du boîtier.<br />
Séparer le bornier (3) de la prise et connecter les fils d'alimentation au<br />
bornier (polarité interchangeable).<br />
Attacher fermement le fil de terre entre les rondelles fournies sur la borne<br />
de mise à la terre (4) du boîtier de la sirène.<br />
Replacer le bornier, centrer le couvercle du moteur (2) et visser fermement<br />
les vis (1).<br />
Consigne de sante & securite<br />
Le son de la sirène provenant d'un rotor sans protection capable de<br />
blesser les doigts, la sirène doit être installée hors de portée. La sirène<br />
produit un son gênant qui pourrait, à long terme, provoquer des troubles<br />
de l'acuité auditive. La sirène ne doit par conséquent pas être installée sur<br />
une surface trop basse, dans un endroit fermé. bajo y dentro de un recinto<br />
cerrado.<br />
Instalación<br />
AVISO: La sirena genera un sonido muy alto. Estar expuesto a este<br />
sonido sin protección puede causar daños permanentes de audición.<br />
Asegúrese que usa protección apropriada para sus oidos si tiene que<br />
trabajar cerca de la sirena.<br />
AVISO: La sirena tiene piezas rotativas. Monte la sirena por lo menos a<br />
1.5m de altura en zonas que estén fuera de alcance. Mantenga sus<br />
manos alejadas de la sirena mientras esta esté en funcionamiento.<br />
Colocar la sirena con la entrada del suministro eléctrico en una posición<br />
adecuada y fijar la unidad con tres tornillos de 6 mm que incorporen<br />
arandelas a prueba de “golpes”.<br />
Desatornillar los tres tornillos de fijación (1) y retirar la cubierta del motor (2).<br />
Llevar los cables de suministro eléctrico hacia la carcasa de la sirena. Los<br />
cables de suministro eléctrico deberán cortarse a una longitud de 110mm<br />
en el interior de la carcasa.<br />
Separar la base de terminales (3) del enchufe y conectar los cables de<br />
suministro eléctrico a la base (no hace falta tener en cuenta la polaridad).<br />
Fijar firmemente el cable de puesta a tierra entre las arandelas suministradas<br />
en el terminal de tierra (4) de la sirena.<br />
Volver a colocar la base, colocar la cubierta del motor (2) y apretar los<br />
tornillos (1) fuertemente.<br />
Advertencia sobre seguridad e higiene<br />
La sirena emite un sonido a partir de un rotor abierto, en el que pudieran<br />
quedar atrapados los dedos, por lo que deberá montarse fuera de alcance.<br />
El sonido de esta sirena causará malestar y podría llegar a dañar los oídos<br />
por un período indeterminado de tiempo, como consecuencia de haber sido<br />
montada a un nivel demasiado bajo y dentro de un recinto cerrado.<br />
Spécification technique<br />
Model No. Tension d'utilisation Courant d'utilisation<br />
SLC-0001 110 V AC 50/60Hz or 110V DC 3A AC or 2.7A DC<br />
SLC-0002 230 V AC 50/60Hz or 230V DC 1.4A AC or 1.2A DC<br />
Especificaciones Técnicas<br />
Model No. Tensión de funcionamiento Corriente de servicio nominal<br />
SLC-0001 110 V AC 50/60Hz or 110V DC 3A AC or 2.7A DC<br />
SLC-0002 230 V AC 50/60Hz or 230V DC 1.4A AC or 1.2A DC<br />
Fusible<br />
13A<br />
Fusible<br />
13A<br />
La directive européenne " Déchets d'Equipements Electriques et Electroniques<br />
" (DEEE) a pour but de minimiser l'impact des déchets électriques et<br />
électroniques sur l'environnement et la santé humaine. Conformément à cette<br />
directive, tout équipement électrique disposant de ce symbole ne doit pas<br />
être jeté dans les systèmes d'évacuation des déchets publics européens. Les<br />
utilisateurs européens d'équipement électrique doivent désormais renvoyer<br />
tout équipement électrique en fin de vie pour évacuation. Vous trouverez de<br />
plus amples informations sur le site Web suivant : http://www.recyclethis.info/.<br />
El objetivo de la directiva europea de Eliminación de equipos eléctricos y electrónicos<br />
(WEEE) es minimizar el impacto de la eliminación de equipos eléctricos y electrónicos<br />
sobre el medioambiente y la salud de las personas. Para cumplir con esta directiva,<br />
el equipamiento eléctrico marcado con este símbolo no deberá desecharse en<br />
ningún sistema de eliminación europeo público. Los usuarios europeos de<br />
equipamiento eléctrico deberán retornar los equipos eléctricos y electrónicos al<br />
final de su vida útil para su eliminación. Para más información visite el siguiente<br />
sitio Web: http://www.recyclethis.info/.