D_F_GB_EBA_TB4_3tlg_6-10.qxp ... - Dr. Hahn
D_F_GB_EBA_TB4_3tlg_6-10.qxp ... - Dr. Hahn
D_F_GB_EBA_TB4_3tlg_6-10.qxp ... - Dr. Hahn

Create successful ePaper yourself
Turn your PDF publications into a flip-book with our unique Google optimized e-Paper software.
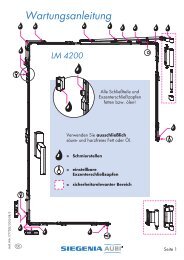
Einstell anleitung<br />
Notice de réglage<br />
Adjustment instructions<br />
dreiteilig<br />
trois lames<br />
three-piece<br />
Verstellung der Bänder nur durch im Türenbau erfahrene Fachhandwerker.<br />
Faire effetuer le montage uniquement par des monteurs professionnels.<br />
Mounting and application only to be done by an experienced tradesman.<br />
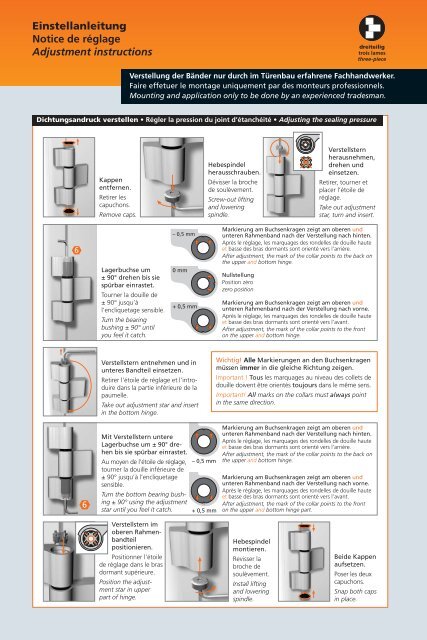
Dichtungsandruck verstellen • Régler la pression du joint d’étanchéité • Adjusting the sealing pressure<br />
Kappen<br />
entfernen.<br />
Retirer les<br />
capuchons.<br />
Remove caps.<br />
Hebespindel<br />
herausschrauben.<br />
Dévisser la broche<br />
de soulèvement.<br />
Screw-out lifting<br />
and lowering<br />
spindle.<br />
Verstellstern<br />
herausnehmen,<br />
drehen und<br />
einsetzen.<br />
Retirer, tourner et<br />
placer l’étoile de<br />
réglage.<br />
Take out adjustment<br />
star, turn and insert.<br />
6<br />
Lagerbuchse um<br />
± 90° drehen bis sie<br />
spürbar einrastet.<br />
Tourner la douille de<br />
± 90° jusqu’à<br />
l’encliquetage sensible.<br />
Turn the bearing<br />
bushing ± 90° until<br />
you feel it catch.<br />
– 0,5 mm<br />
0 mm<br />
+ 0,5 mm<br />
Markierung am Buchsenkragen zeigt am oberen und<br />
unteren Rahmenband nach der Verstellung nach hinten.<br />
Après le réglage, les marquages des rondelles de douille haute<br />
et basse des bras dormants sont orienté vers l’arrière.<br />
After adjustment, the mark of the collar points to the back on<br />
the upper and bottom hinge.<br />
Nullstellung<br />
Position zéro<br />
zero position<br />
Markierung am Buchsenkragen zeigt am oberen und<br />
unteren Rahmenband nach der Verstellung nach vorne.<br />
Après le réglage, les marquages des rondelles de douille haute<br />
et basse des bras dormants sont orienté vers l’avant.<br />
After adjustment, the mark of the collar points to the front<br />
on the upper and bottom hinge.<br />
Verstellstern entnehmen und in<br />
unteres Bandteil einsetzen.<br />
Retirer l’étoile de réglage et l’introduire<br />
dans la partie inférieure de la<br />
paumelle.<br />
Take out adjustment star and insert<br />
in the bottom hinge.<br />
Wichtig! Alle Markierungen an den Buchsen kragen<br />
müssen immer in die gleiche Richtung zeigen.<br />
Important ! Tous les marquages au niveau des collets de<br />
douille doivent être orientés toujours dans le même sens.<br />
Important! All marks on the collars must always point<br />
in the same direction.<br />
6<br />
Mit Verstellstern untere<br />
Lagerbuchse um ± 90° drehen<br />
bis sie spürbar einrastet.<br />
Au moyen de l’étoile de réglage,<br />
tourner la douille inférieure de<br />
± 90° jusqu’à l’encliquetage<br />
sensible.<br />
Turn the bottom bearing bushing<br />
± 90° using the adjustment<br />
star until you feel it catch.<br />
– 0,5 mm<br />
+ 0,5 mm<br />
Markierung am Buchsenkragen zeigt am oberen und<br />
unteren Rahmenband nach der Verstellung nach hinten.<br />
Après le réglage, les marquages des rondelles de douille haute<br />
et basse des bras dormants sont orienté vers l’arrière.<br />
After adjustment, the mark of the collar points to the back on<br />
the upper and bottom hinge.<br />
Markierung am Buchsenkragen zeigt am oberen und<br />
unteren Rahmenband nach der Verstellung nach vorne.<br />
Après le réglage, les marquages des rondelles de douille haute<br />
et basse des bras dormants sont orienté vers l’avant.<br />
After adjustment, the mark of the collar points to the front<br />
on the upper and bottom hinge part.<br />
Verstellstern im<br />
oberen Rahmenbandteil<br />
positionieren.<br />
Positionner l’étoile<br />
de réglage dans le bras<br />
dormant supérieure.<br />
Position the adjustment<br />
star in upper<br />
part of hinge.<br />
Hebespindel<br />
montieren.<br />
Revisser la<br />
broche de<br />
soulèvement.<br />
Install lifting<br />
and lowering<br />
spindle.<br />
Beide Kappen<br />
aufsetzen.<br />
Poser les deux<br />
capuchons.<br />
Snap both caps<br />
in place.
Einstell anleitung<br />
Notice de réglage<br />
Adjustment instructions<br />
Höhenverstellung • Réglage en hauteur • Adjusting the height<br />
Untere Kappe entfernen.<br />
Höhenverstellung<br />
+ 3 / – 2 mm.<br />
Kappe aufsetzen.<br />
Retirer le capuchon<br />
inférieur. Réglage de la<br />
hauteur + 3 / – 2 mm.<br />
Poser le capuchon.<br />
Remove bottom cap.<br />
Height adjustment<br />
+ 3 / – 2 mm. Snap on cap.<br />
Höhenverstellung<br />
immer nur am unteren<br />
Band vornehmen –<br />
obere Bänder nur<br />
nachstellen.<br />
Le réglage en hauteur<br />
s’effectue uniquement sur<br />
la paumelle basse les paumelles<br />
supérieures sont<br />
uniquement réajustées.<br />
Carry out height adjustment only on bottom<br />
hinge – Readjust only upper hinges.<br />
Horizontalverstellung • Réglage horizontal • Horizontal adjustment<br />
3<br />
3<br />
3<br />
Abdeckstück muss<br />
von der Rückseite<br />
gesichert sein.<br />
Le cache-vis doit être<br />
bloqué par derrière.<br />
Covering cap must be<br />
secured from the rear<br />
side.<br />
Gewindestifte mit<br />
einer 1 / 2 -Umdrehung<br />
lösen.<br />
Desserrer les vis pointeaux<br />
en effectuant un<br />
demi-tour.<br />
Loosen set screws by<br />
half a turn.<br />
Kappe entfernen. Horizontal verstellung<br />
± 2,5 mm. Kappe aufstecken.<br />
Retirer le capuchon. Réglage horizontal<br />
± 2,5 mm. Placer le capuchon.<br />
Remove cap. Horizontal adjustment<br />
± 2.5 mm. Snap cap in place.<br />
Wichtig: Gewindestifte<br />
abwechselnd<br />
festziehen.<br />
Important : Serrrer les<br />
vis pointeaux tour à<br />
tour.<br />
Important: Tighten the<br />
setscrews alternately.
<strong>Hahn</strong> Türband 4<br />
dreiteilig<br />
trois lames<br />
three-piece<br />
Demontage an der Baustelle • Démontage sur le chantier • Disassembly on site<br />
3<br />
Gewindestifte<br />
lösen.<br />
Desserrer les vis<br />
pointeaux.<br />
Loosen set<br />
screws.<br />
Kappen<br />
entfernen.<br />
Retirer les<br />
capuchons.<br />
Remove caps.<br />
Hebespindel<br />
herausschrauben.<br />
Dévisser la broche<br />
de soulèvement.<br />
Screw-out lifting<br />
and lowering<br />
spindle.<br />
Verstellstern<br />
entnehmen.<br />
Retirer l’étoile de<br />
réglage.<br />
Take out<br />
adjustment star.<br />
Bolzen von<br />
unten<br />
austreiben.<br />
Chasser l’axe<br />
de bas en haut.<br />
Knock pin out<br />
from below.<br />
Tür aushängen.<br />
Dégonder la porte.<br />
Take door off its<br />
hinges.<br />
<strong>Dr</strong>. <strong>Hahn</strong> GmbH & Co. KG<br />
Trompeterallee 162 – 170 · D-41189 Mönchengladbach · Postfach 40 01 09 · D-41181 Mönchengladbach<br />
Phone + 49 (0) 2166 / 954-3 · Fax + 49 (0) 2166 / 954-444 · Internet www.dr-hahn.de · E-Mail sales@dr-hahn.com<br />
<strong>EBA</strong> Türband 4 3teilig D / F / <strong>GB</strong> / D-<strong>EBA</strong>0073 / 09.10 LW2,5’ Technische Änderungen vorbehalten. Sous réserve de modifications techniques. Right to alter technical details reserved.