
You also want an ePaper? Increase the reach of your titles
YUMPU automatically turns print PDFs into web optimized ePapers that Google loves.
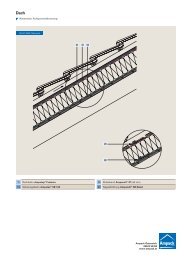
Einsatzgebiete und Besonderheiten<br />
Emploi et caractéristiques<br />
Campi d'applicazione e particolarità<br />
Areas of application/special features<br />
Reissfeste Dampfbremse und Pfettenanschlussbahn<br />
aus thermisch verfestigten<br />
Endlosfasern mit PP-Füllschicht<br />
(100% Polypropylen).<br />
• Kompatibel mit allen üblichen<br />
Wärmedämmstoffen<br />
• Formstabil und geschmeidig<br />
• Zieht keinen Staub an<br />
Verlegetipps<br />
Ampatex ® <strong>DB</strong> <strong>90</strong> dient in der Breite<br />
von 75 cm als Pfettenanschlussbahn,<br />
Dampfbremse und Luftdichtung.<br />
Ampatex ® <strong>DB</strong> <strong>90</strong> Pfettenanschlussbahn<br />
wird warmseitig der Wärmedämmschicht<br />
eingesetzt. Die Bahn<br />
wird gleichmässig über die Pfette abgerollt<br />
und im Überlappungsbereich<br />
mit Klammern oder Nägeln verdeckt<br />
befestigt.<br />
Die glatte, bedruckte Seite zeigt dabei<br />
zur Pfette bzw. zum Rauminneren. Die<br />
spätere Verklebung mit der raumseitig<br />
verlegten Dampfbremse Ampatex ®<br />
<strong>DB</strong> <strong>90</strong> sollte auf der glatten, bedruckten<br />
Oberfläche erfolgen. Wird so verfahren,<br />
ist später die rauhe Oberseite<br />
der Bahn die Laufseite.<br />
Damit die Bahn auf der Pfette nicht<br />
verrutscht, wird empfohlen, die Bahn<br />
sorgfältig auf die Oberseite der Pfette<br />
mit Tackerklammern zu befestigen. Sie<br />
erhöhen die Rutschsicherheit zusätzlich,<br />
indem Sie vorgängig die Bahn<br />
auf der Pfette mittels der doppelseitigen<br />
Klebebänder Ampacoll ® DT oder<br />
Ampacoll ® DoubleSeal verkleben.<br />
Treffen sie dennoch die notwendigen<br />
Vorkehrungen zur Absturzsicherung.<br />
Beim Verlegen der Bahnenstreifen darauf<br />
achten, dass die Bahnenenden 10<br />
cm überlappen. Diese Überlappungen<br />
sind anschliessend mit Acrylklebeband<br />
Ampacoll ® XT dicht abzukleben.<br />
Wir empfehlen, alle diese Arbeiten<br />
als Vorfertigung in der Werkstatt zu<br />
erledigen. Durch die Transparenz der<br />
Bahn werden Abbundzeichen und<br />
Anrisse später gut erkannt.<br />
Zur Vermeidung von Kondensat oder<br />
Feuchtestau im Bereich der Pfette<br />
empfehlen wir, den Bahnenstreifen<br />
nach Montage der Sparren an diese<br />
zu heften, damit eine ungehinderte<br />
Austrocknung stattfinden kann.<br />
Bitte beachten Sie, dass bei Pfettendurchdringungen<br />
an der Giebelwand<br />
der Bahnenstreifen rundum – auch auf<br />
der Oberseite der Pfette an die Giebelwand<br />
angedichtet werden muss.<br />
Wir empfehlen hierzu den Einsatz des<br />
Butylbandes Ampacoll ® BK 535 oder<br />
Ampacoll ® XT, 100 mm, geschlitzt. Je<br />
nach Untergrund kann ein Voranstrich<br />
mit Primer Ampacoll ® Connecto nötig<br />
sein. Bitte konsultieren Sie unsere<br />
Klebematrix.<br />
Fehlstellen oder Beschädigungen der<br />
Bahn durch die Aufrichttätigkeit sind,<br />
soweit später von unten nicht mehr<br />
zugänglich und reparabel, vor der<br />
Weiterarbeit mittels den genannten<br />
Klebebändern zu reparieren. Alle<br />
Fugen, Spalten, Überlappungen,<br />
Anschlüsse und Durchbrüche müssen<br />
luftdicht ausgebildet werden.<br />
Pare-vapeur et lé pour les raccords de<br />
pannes résistant à la déchirure formé<br />
de filaments renforcés thermiquement<br />
avec couche intermédiaire de PP<br />
(100% polypropylène).<br />
• Compatible avec tous les matériaux<br />
isolants courants<br />
• Stabilité de forme et souplesse<br />
• N’attire pas la poussière<br />
Conseils de pose<br />
Ampatex ® <strong>DB</strong> <strong>90</strong> en largeur 75 cm<br />
sert de lé pour les raccords de<br />
pannes, de pare-vapeur et de couche<br />
d'étanchéité à l'air.<br />
Le lé pour raccord de panne Ampatex<br />
® <strong>DB</strong> <strong>90</strong> s'installe du côté chaud de<br />
la couche d'isolation thermique. Le lé<br />
est déroulé de manière uniforme sur<br />
la panne et fixé au niveau du joint de<br />
recouvrement à l'aide d'agrafes ou<br />
de clous.<br />
Le côté lisse et imprimé donne du<br />
côté de la panne ou de l'intérieur de<br />
la pièce. Le collage ultérieur avec le<br />
pare-vapeur Ampatex ® <strong>DB</strong> <strong>90</strong> posé<br />
côté pièce doit s'effectuer sur la face<br />
lisse imprimée. En procédant de la<br />
sorte, la partie supérieure rugueuse<br />
du lé devient par la suite le côté de<br />
passage.<br />
Afin que le lé ne glisse pas sur la<br />
panne, il est recommandé d'agrafer<br />
soigneusement le lé sur la partie<br />
supérieure de la panne. Pour augmenter<br />
le pouvoir antidérapant, collez au<br />
préalable le lé sur la panne à l'aide<br />
des rubans adhésifs double face Ampacoll<br />
® DT ou Ampacoll ® DoubleSeal.<br />
Par mesure de précaution, assurezvous<br />
cependant de faire le nécessaire<br />
pour éviter les chutes.<br />
Lors de la pose des lés, veillez à ce<br />
que les extrémités se chevauchent<br />
de 10 cm. Collez ensuite ces joints de<br />
recouvrement de manière étanche<br />
à l'aide du ruban adhésif acrylique<br />
Ampacoll ® XT.<br />
Nous recommandons de réaliser préalablement<br />
tous ces travaux à l'atelier.<br />
En raison de la transparence du<br />
lé, des marques d'assemblage et des<br />
amorces de fissures sont aisément<br />
identifiables ultérieurement.<br />
Afin d'éviter toute condensation ou<br />
accumulation d'humidité au niveau<br />
de la panne, nous recommandons<br />
de fixer les lés aux chevrons après le<br />
montage de ces derniers pour assurer<br />
un séchage parfait.<br />
Lors des pénétrations des pannes au<br />
niveau du mur pignon, le lé doit être<br />
scellé hermétiquement tout autour,<br />
y compris sur la partie supérieure de<br />
la panne contre le mur pignon. Nous<br />
recommandons à cet effet d'utiliser<br />
du ruban en caoutchouc butyle Ampacoll<br />
® BK 535 ou Ampacoll ® XT fendu<br />
de 100 mm. En fonction du subjectile,<br />
une couche d'apprêt avec l'enduit<br />
primaire Ampacoll ® Connecto peut<br />
s'avérer nécessaire. Veuillez consulter<br />
la matrice de collage.<br />
Dans la mesure où les éventuels défauts<br />
ou détériorations du lé ne sont<br />
plus accessibles et réparables ultérieurement<br />
par-dessous, réparez le lé<br />
avant de poursuivre le travail à l'aide<br />
des rubans adhésifs mentionnés. Tous<br />
les joints, fissures, chevauchements,<br />
raccords et perforations doivent être<br />
parfaitement étanches.<br />
Freno-vapore e nastro di raccordo per<br />
terzere resistente allo strappo composto<br />
da fibre rinforzate termicamente<br />
con strato di riempimento PP (100%<br />
Polipropilene).<br />
• Compatibile con tutti i materiali<br />
termoisolanti usuali<br />
• Stabile nella forma e flessibile<br />
• Non attira la polvere<br />
Consigli per la posa<br />
Grazie alla sua larghezza di 75 cm,<br />
Ampatex ® <strong>DB</strong> <strong>90</strong> può essere utilizzato<br />
come nastro di raccordo per terzere,<br />
freno vapore e strato impermeabile<br />
all'aria.<br />
Il nastro di raccordo per terzere<br />
Ampatex ® <strong>DB</strong> <strong>90</strong> viene impiegato<br />
all'interno. Il nastro viene posato in<br />
maniera uniforme sul lato caldo della<br />
terzera e fissato con graffe e chiodi in<br />
corrispondenza delle sovrapposizioni.<br />
Il lato liscio e stampato è rivolto verso<br />
l'interno ed è su questo lato che in<br />
un secondo tempo dovrà essere<br />
applicato il nastro adesivo Ampatex ®<br />
<strong>DB</strong> <strong>90</strong>. Procedendo in questo modo,<br />
la parte ruvida sarà il lato sul quale<br />
camminare.<br />
Affinché il nastro non si sposti, si<br />
consiglia di fissarlo accuratamente<br />
con delle graffe in corrispondenza<br />
della parte superiore della terzera. Il<br />
rischio di scivolare viene ulteriormente<br />
ridotto se sulla terzera viene prima<br />
applicato il doppio nastro adesivo<br />
Ampacoll ® DT o Ampacoll ® Double-<br />
Seal. Si consiglia di prendere in ogni<br />
caso le dovute precauzioni contro le<br />
cadute.<br />
Durante la posa delle strisce di telo,<br />
assicurarsi che rimangano 10 cm in<br />
più di nastro oltre la fine della terzera.<br />
Le parti sovrapposte dovranno essere<br />
ben incollate con nastro adesivo acrilico<br />
Ampacoll ® XT.<br />
Consigliamo di eseguire questi<br />
lavori di pre-assemblaggio in officina.<br />
Grazie alla trasparenza del nastro, le<br />
marcature e tracciature saranno ben<br />
individuabili anche in seguito.<br />
Per evitare la formazione di condensato<br />
o ristagno di umidità in corrispondenza<br />
delle terzere, dopo il montaggio<br />
dei puntoni consigliamo di fissare<br />
a quest'ultimi le strisce di telo per<br />
permetterne l'asciugatura.<br />
In caso di penetrazione di acqua<br />
nelle terzere alla parete con frontone,<br />
bisogna assicurarsi che la striscia<br />
aderisca bene a tale parete, anche<br />
sulla parte superiore della terzera.<br />
Consigliamo a tale scopo l'utilizzo del<br />
nastro adesivo butilico Ampacoll ® BK<br />
535 o Ampacoll ® XT, 100 mm, intagliato.<br />
In base alla superficie, potrebbe<br />
essere necessario passare una mano<br />
di Primer Ampacpoll® Connecto. A<br />
tale scopo si prega di consultare la<br />
matrice adesiva.<br />
Una posa sbagliata o danni al nastro<br />
verificatisi al momento del sollevamento<br />
non sono più accessibili e<br />
riparabili nella parte inferiore una<br />
volta terminato il lavoro. Prima di<br />
continuare con il lavoro è possibile<br />
eseguire delle riparazioni utilizzando i<br />
nastri adesivi sopra menzionati. Ogni<br />
giunto, fessura, sovrapposizione o<br />
raccordo deve essere sigillato ermeticamente.<br />
Tear-proof vapour check and purlin<br />
connection strip made of endless<br />
thermoset polypropylene fibres with<br />
polypropylene filling layer (100%<br />
polypropylene).<br />
• Compatible with all conventional<br />
heat insulation materials<br />
• Keeps its shape and is flexible<br />
• Does not attract dust<br />
Tips for laying<br />
Ampatex ® <strong>DB</strong> <strong>90</strong> serves in a width of<br />
75 cm as a purlin connection strip,<br />
vapour barrier and insulation.<br />
Ampatex ® <strong>DB</strong> <strong>90</strong> roof-beam junction<br />
strip is inserted on the warm side of<br />
the thermal insulation layer. The strip<br />
is rolled evenly over the roof beam<br />
and fastened invisibly in the overlap<br />
area with brackets and nails.<br />
In doing so, the even, printed side is<br />
directed towards the roof beam or<br />
to the interior of the room. The later<br />
bonding with the Ampatex ® <strong>DB</strong> <strong>90</strong> vapour<br />
barrier installed inside the room<br />
should be carried out on an even,<br />
printed surface. If this procedure is<br />
carried out, the rough surface of the<br />
strip is later on the running side.<br />
To prevent the strip from slipping out<br />
of place on the roof beam, we recommend<br />
carefully fastening the strip on<br />
the top side of the roof beam with<br />
staples. They increase the anti-slip<br />
properties additionally by bonding<br />
the strip on the roof beam with<br />
the double-sided Ampacoll ® DT or<br />
Ampacoll ® DoubleSeal adhesive tapes<br />
beforehand. You should nevertheless<br />
take the necessary fall protection<br />
precautions.<br />
When laying the strip, ensure that the<br />
ends overlap by 10 cm. These overlaps<br />
must then be sealed tight with<br />
Ampacoll ® XT acrylic adhesive tape.<br />
We recommend carrying out all this<br />
work as prefabrication in the workshop.<br />
Due to the transparency of the<br />
strip, joining marks and cracks are<br />
later clearly visible.<br />
To avoid condensation or moisture<br />
build-up in the area of the roof beam,<br />
we recommend stapling the strips to<br />
the rafters after installing them so that<br />
unhindered drying is possible.<br />
Please note that in the event of roof<br />
beam penetration on the gable wall<br />
with strips all around it, it is also necessary<br />
to seal on the top side of the<br />
roof beam on the gable wall. To this<br />
end, we recommend using the butyl<br />
tape Ampacoll ® BK 535 or Ampacoll ®<br />
XT, 100 mm, slotted. Depending on<br />
the subsurface, a prime coat with<br />
Primer Ampacpoll ® Connecto may be<br />
necessary. Please consult the bonding<br />
matrix.<br />
Imperfections or damage to the strip<br />
from setting up must be repaired<br />
with the above adhesive tapes before<br />
continuing work if they are later no<br />
longer accessible and repairable from<br />
the bottom. All joins, cracks, overlaps,<br />
connections and openings must be<br />
sealed tight.<br />
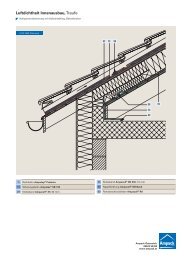
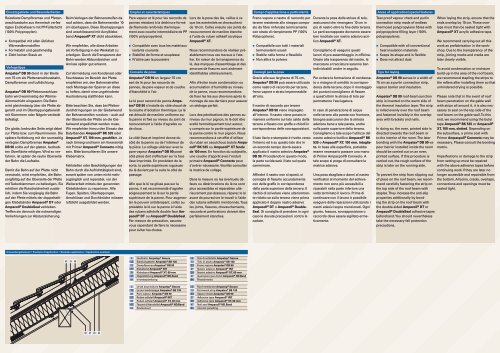
Anwendungsbeispiel • Exemple d'application • Esempio applicativo • Application example<br />
47 3 29<br />
3 Dachbahn Ampatop ® Secura<br />
13 Schalungsbahn Ampatex ® SB 130<br />
23 Dampfbremse Ampatex ® <strong>DB</strong> <strong>90</strong><br />
27 Klebeband Ampacoll ® INT<br />
29 Klebeband Ampacoll ® XT, 60 mm<br />
47 Nageldichtung Ampacoll ® ND.Band<br />
84 Innenbeplankung<br />
3 Lé de sous-toiture Ampatop ® Secura<br />
13 Lé sur lambrissage Ampatex ® SB 130<br />
23 Pare-vapeur Ampatex ® <strong>DB</strong> <strong>90</strong><br />
27 Ruban adhésif Ampacoll ® INT<br />
29 Ruban adhésif Ampacoll ® XT, 60 mm<br />
47 Taquet d'étanchéité Ampacoll ® ND.Band<br />
84 Revêtement<br />
3 Telo di sottotetto Ampatop ® Secura<br />
13 Telo di assito Ampatex ® SB 130<br />
23 Freno vapore Ampatex ® <strong>DB</strong> <strong>90</strong><br />
27 Nastro adesivo Ampacoll ® INT<br />
29 Nastro adesivo Ampacoll ® XT, 60 mm<br />
47 Guarnizioni per chiodi Ampacoll ® ND.Band<br />
84 Rivestimento<br />
3 Roof membrane Ampatop ® Secura<br />
13 Formwork strip Ampatex ® SB 130<br />
23 Vapour check Ampatex ® <strong>DB</strong> <strong>90</strong><br />
27 Adhesive tape Ampacoll ® INT<br />
29 Adhesive tape Ampacoll ® XT, 60 mm<br />
47 Nail seal Ampacoll ® ND.Band<br />
84 Internal panelling<br />
23 27 23 84