Recessed Lighting Kit Installation Instructions - Trilingual - Deckorators
Recessed Lighting Kit Installation Instructions - Trilingual - Deckorators
Recessed Lighting Kit Installation Instructions - Trilingual - Deckorators

Create successful ePaper yourself
Turn your PDF publications into a flip-book with our unique Google optimized e-Paper software.
<strong>Recessed</strong> <strong>Lighting</strong> <strong>Kit</strong> <strong>Installation</strong> <strong>Instructions</strong>, continued<br />
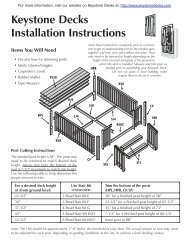
• Disconnect the lights from each other and insert each fixture<br />
into its corresponding hole by feeding the two (2) wires first<br />
then pressing the fixture firmly into the hole so that it fits<br />
tightly against the surface. There are two bulbs in each light.<br />
Make sure the bulbs are consistently oriented horizontally or<br />
vertically. Repeat this step for all eight (8) lights.<br />
• Connect the male end of the extension wire to the "OUT"<br />
connection of the photo sensor and the female end to the<br />
first fixture.<br />
• Connect the female end of the extension wire to the<br />
first light fixture and each fixture to the next.<br />
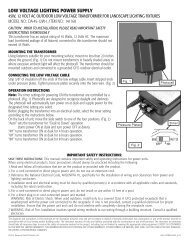
Step 4: Connect the photo sensor and the transformer.<br />
• Connect the photo sensor to the transformer.<br />
• Plug the transformer into the electrical receptacle.<br />
How to test the system<br />
• To test the lights during daytime, cover the photo<br />
sensor with black tape.<br />
• This component reacts to light conditions. It automatically<br />
turns ON the light fixtures at dusk and turns them OFF at<br />
dawn. It should not be exposed to any artificial light sources.<br />
Trouble shooting<br />
• Most problems lie within the fixture's connection or LEDs.<br />
• Check the connection and make sure the male and female<br />
connectors are pressing firmly together, and secure with<br />
the screw nut.<br />
• To check a light fixture, exchange it with another fixture<br />
that is working.<br />
Maintenance<br />
• To clean, wipe with a soft, damp cloth.<br />
• Replacement parts may be ordered by using the fixture<br />
model number and the part's name.<br />
OUTDOOR<br />
TRANSFORMER<br />
TRANSFORMATEUR<br />
POUR L’EXTÉRIEUR<br />
ADAPTADOR DE PODER<br />
PARA EXTERIORES<br />
E338180<br />
The diagrams and instructions in this brochure are for illustration purposes only and are not meant to replace a licensed professional.<br />
Any construction or use of the product must be in accordance with all local zoning and/or building codes. The consumer assumes all<br />
risks and liability associated with the construction or use of this product. The consumer or contractor should take all necessary steps to<br />
ensure the safety of everyone involved in the project, including, but not limited to, wearing the appropriate safety equipment. SELLER<br />
MAKES NO WARRANTY FOR THIS PRODUCT, EITHER EXPRESS OR IMPLIED. SELLER EXPRESSLY DISCLAIMS ANY AND ALL<br />
LIABILITY FOR DAMAGES ARISING OUT OF THE USE OR OWNERSHIP OF THE PRODUCT, INCLUDING DISCLAIMING INCIDENTAL<br />
AND CONSEQUENTIAL DAMAGES, UNLESS OTHERWISE REQUIRED BY STATE LAW.<br />
877.463.8379<br />
©2010 Universal Forest Products, Inc. All rights reserved. The UL logo is a registered trademark of Underwriters Laboratories, Inc.<br />
933 US Route 202, Greene, ME 04236 www.ufpi.com 5449_1/13