Keystone Decks Installation Instructions - Deckorators
Keystone Decks Installation Instructions - Deckorators
Keystone Decks Installation Instructions - Deckorators

You also want an ePaper? Increase the reach of your titles
YUMPU automatically turns print PDFs into web optimized ePapers that Google loves.
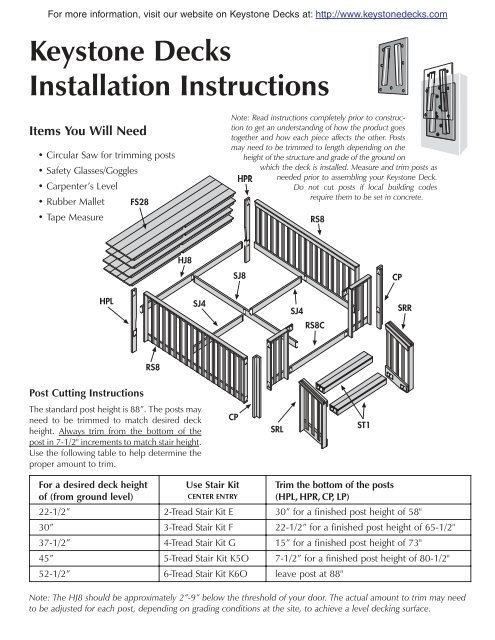
For more information, visit our website on <strong>Keystone</strong> <strong>Decks</strong> at: http://www.keystonedecks.com<strong>Keystone</strong> <strong>Decks</strong><strong>Installation</strong> <strong>Instructions</strong>Items You Will Need• Circular Saw for trimming posts• Safety Glasses/Goggles• Carpenter’s Level• Rubber Mallet• Tape MeasureNote: Read instructions completely prior to constructionto get an understanding of how the product goestogether and how each piece affects the other. Postsmay need to be trimmed to length depending on theheight of the structure and grade of the ground onwhich the deck is installed. Measure and trim posts asneeded prior to assembling your <strong>Keystone</strong> Deck.Do not cut posts if local building codesrequire them to be set in concrete.Post Cutting <strong>Instructions</strong>The standard post height is 88”. The posts mayneed to be trimmed to match desired deckheight. Always trim from the bottom of thepost in 7-1/2" increments to match stair height.Use the following table to help determine theproper amount to trim.For a desired deck heightof (from ground level)Use Stair KitCENTER ENTRYTrim the bottom of the posts(HPL, HPR, CP, LP)22-1/2” 2-Tread Stair Kit E 30” for a finished post height of 58"30” 3-Tread Stair Kit F 22-1/2” for a finished post height of 65-1/2"37-1/2” 4-Tread Stair Kit G 15” for a finished post height of 73"45” 5-Tread Stair Kit K5O 7-1/2” for a finished post height of 80-1/2"52-1/2” 6-Tread Stair Kit K6O leave post at 88"Note: The HJ8 should be approximately 2”-9” below the threshold of your door. The actual amount to trim may needto be adjusted for each post, depending on grading conditions at the site, to achieve a level decking surface.
1. Begin by leaning the left house post (HPL) andright house post (HPR) upright against the structure.Face the two connectors away from thestructure and the notched side of the poststoward each other. Slide the house joist (HJ8)onto the house posts, ensuring the middle connectorfaces the deck. Lean assembled H-frameagainst the house or structure. Secure joist inplace by tapping with a rubber mallet. Checkhouse joist (HJ8) for level.HPLHJ8HPRRS8HPRCP2. Slide an 8' handrail section (RS8) onto a cornerpost (CP), making sure the middle connector onthe handrail and the corner post connectors onthe adjacent side of the post face toward the deck.This is best achieved by lining up the longer bottomconnectors prior to sliding the connectorstogether. Slide the opposite end of the rail section(RS8) onto the right house post (HPR). Secure toposts by tapping each side of rail section with arubber mallet. Repeat for opposite side rail.3. Slide front center entry rail section (RS8C) ontoeach corner post (CP) and secure by tapping witha rubber mallet. Note: The 8' rail sections areinterchangeable. A center entry rail section canbe placed in any 8' rail location which gives youmultiple stairway position options.CPRS8CCPSJ4SJ8SJ44. Connect the 8’ sub joist (SJ8) to the front rail section(RS8C) and house joist (HJ8). One at a time, install 4’ subjoists (SJ4) to the 8’ sub joist (SJ8) and rail sections (RS8)to complete the deck frame. Secure all joists in place bytapping with a rubber mallet.
5. Check the completed deck frame for square and level. Square by measuring the frame diagonally from corner tocorner. The frame is square when these measurements are equal. If joists or rail sections are not level, be sure allconnector plates are completely in place. The posts may need blocking to level the frame.wing nutwasherFS28eyeboltFS286. Lay the pre-assembled 2’x8’ deck panels (FS28)into place. Direction of the boards is based onpreference. For best appearance, place them parallelto the house. Once all panels are in place,fasten each deck panel to the sub joist and framesupporting it. There will be three j-bolts used foreach section. Slide each j-bolt through the eyeboltthat is pre-attached to the bottom of the frame ofthe deck panel and hook around the deck frameor joist. Finger-tighten each j-bolt with a washerand wing nut. It helps to weigh down the top ofthe deck surface while installing the j-bolts.7. One at a time, slide stair rail sections(SRL and SRR) onto center entry railconnectors (RS8C).SRLRS8CSRR8. Place pre-assembled stair tread panels (ST1) inplace beginning with the tread closest to thedeck. Secure each tread in place by tapping witha rubber mallet.SRLST1SRR
Add-on and projection kits are easily added to the 8’x8’ starter deckExpanding your 8’x8’ starter kit to an 8’x12’1. Begin by removingthe j-bolts andthen floor panels(FS28). Removethe 4' joist (SJ4) onthe side you’reexpanding andthen the side railsection (RS8).2. Replace the front corner post (CP) with a line post(LP). Slide a 4' rail section (RS4) onto the corner post(CP) and then line post (LP). This is best achieved by liningup the longerbottom connectorsprior to sliding theconnectors together.Secure by tappingwith a rubber mallet.LPRS43. Replace the house post (HP) with a three-sided subpost (SP3). Make sure the surface without a connectoris facing the house. Connect the house post (HP)to the sub post (SP3) with a 4' sub joist (SJ4). Secureby tapping intoplace with a rubbermallet.HPRNote: For expansionswhich require placing asupport at the center ofthe deck, use a foursidedsub post (SP4).CPSP3CPSJ4HPR4. Slide 8' side rail section (RS8) onto the house post(HP) and corner post (CP) and secure by tapping witha rubber mallet. Connect 8' sub joist (SJ8) to the linepost (LP) and to the sub post (SP3). One at a time,connect 4' sub joists (SJ4) from each side of the 8' subjoist (SJ8) to theprevious 8' subSJ4joist and the 8' railsection to completethe deck LPSP3SJ4frame. Secure allSJ4joists in place bytapping with aSJ8rubber mallet.5. Check the completed deck frame for square and level.Square by measuring the frame diagonally from cornerto corner. The frame is square when these measurementsare equal. If joists or rail sections are not level,be sure all connector plates are completely in place.The posts may need blocking to level the frame.6. Lay the pre-assembled 2'x8' deck panels (FS28) intoplace. The boards will need to be placed perpendicularto the structure for an 8'x12' deck. Once all panelsare in place, fasten each deck panel to the sub joistand frame supporting it. There will be three j-boltsused for each section. Slide each j-bolt through theeyebolt that is pre-attached to the frame of the deckpanel and hook around the deck frame or joist.Finger-tighten each j-bolt with a washer and wing nut.It helps to weigh down the top of the deck surfacewhile installing the j-bolts.Follow these principles to expandyour deck to any size.<strong>Keystone</strong> <strong>Decks</strong> are approved for free-standing, one-storyresidential decks not exceeding 200 square feet. Pleaseconsult your local building code official prior to installing.For more information, call 800-273-2729or visit our website: www.keystonedecks.com2900_10/14/05