Two-Handle Lavatory Faucet Grifo de Baño Con Dos ... - Gerber
Two-Handle Lavatory Faucet Grifo de Baño Con Dos ... - Gerber
Two-Handle Lavatory Faucet Grifo de Baño Con Dos ... - Gerber

You also want an ePaper? Increase the reach of your titles
YUMPU automatically turns print PDFs into web optimized ePapers that Google loves.
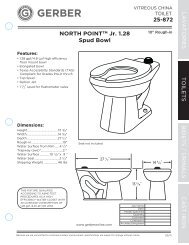
0043341<br />
<strong>Two</strong>-<strong>Handle</strong> <strong>Lavatory</strong> <strong>Faucet</strong><br />
<strong>Grifo</strong> <strong>de</strong> Baño <strong>Con</strong> <strong>Dos</strong> Manija<br />
Robinet De Lavabo À Poignée Douche<br />
Warning:<br />
The product should be installed by a local licensed<br />
plumber.<br />
Advertencia:<br />
El producto ha <strong>de</strong> ser instalado por un plomerolocal<br />
autorizado.<br />
Avertissement:<br />
Ce produit doit être installé par un plombier qualifié<br />
pour exercer dans cette région.<br />
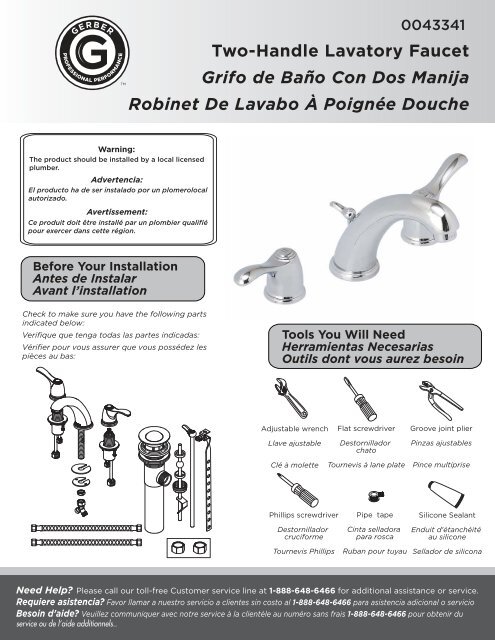
Before Your Installation<br />
Antes <strong>de</strong> Instalar<br />
Avant l’installation<br />
Check to make sure you have the following parts<br />
indicated below:<br />
Verifique que tenga todas las partes indicadas:<br />
Vérifier pour vous assurer que vous possé<strong>de</strong>z les<br />
pièces au bas:<br />
Tools You Will Need<br />
Herramientas Necesarias<br />
Outils dont vous aurez besoin<br />
Adjustable wrench<br />
Llave ajustable<br />
Flat screwdriver<br />
Destornillador<br />
chato<br />
Groove joint plier<br />
Pinzas ajustables<br />
Clé à molette<br />
Tournevis à lane plate<br />
Pince multiprise<br />
Phillips screwdriver<br />
Destornillador<br />
cruciforme<br />
Tournevis Phillips<br />
Pipe tape<br />
Cinta selladora<br />
para rosca<br />
Ruban pour tuyau<br />
Silicone Sealant<br />
Enduit d'étanchéité<br />
au silicone<br />
Sellador <strong>de</strong> silicona<br />
Need Help? Please call our toll-free Customer service line at 1-888-648-6466 for additional assistance or service.<br />
Requiere asistencia? Favor llamar a nuestro servicio a clientes sin costo al 1-888-648-6466 para asistencia adicional o servicio<br />
Besoin d’ai<strong>de</strong>? Veuillez communiquer avec notre service à la clientèle au numéro sans frais 1-888-648-6466 pour obtenir du<br />
service ou <strong>de</strong> l’ai<strong>de</strong> additionnels..
<strong>Faucet</strong> Installation Procedures/Instalación <strong>de</strong>l <strong>Grifo</strong>/Procédures d’installation du robinet<br />
Shut off main water supply before installation.<br />
Cierre el suministro <strong>de</strong> agua antes <strong>de</strong> instalar.<br />
Couper l’alimentation d’eau principale avant l’installation.<br />
1. Apply silicone sealant around bottom of spout trim ring. Insert<br />
spout into 1-1/2” diameter mounting hole in <strong>de</strong>ck from above.<br />
Ponga sellante <strong>de</strong> silicona alre<strong>de</strong>dor <strong>de</strong> la base <strong>de</strong>l anillo<br />
ornamental <strong>de</strong>l grifo. Introduzca por arriba el vertedor en el<br />
orificio <strong>de</strong> montaje <strong>de</strong> 1-1/2’’ <strong>de</strong> diámetro situado en el soporte.<br />
Appliquez l’enduit d’étanchéité à la silicone autour du bas <strong>de</strong> la<br />
garniture circulaire <strong>de</strong> bec. Insérer le bec, par le <strong>de</strong>ssus, dans le<br />
trou <strong>de</strong> montage d’un diamètre <strong>de</strong> 1-1/2 po du tablier.<br />
2. From un<strong>de</strong>rneath the sink, install the rubber washer,<br />
mental washer and lock nut. Thread on adapter to<br />
bottom of spout shank, and tighten.<br />
Remueva los accesorios <strong>de</strong> montaje <strong>de</strong> la manivela.<br />
<strong>Con</strong>ecte el suministro <strong>de</strong> agua al cuerpo <strong>de</strong> la válvula.<br />
Enlever le petit maté riel <strong>de</strong> fixation du corps <strong>de</strong> la<br />
manette. Fixer I'alimentation d'eau au corps du robinet.<br />
3. Remove mounting hardware from handle body.<br />
Remueva los accesorios <strong>de</strong> montaje <strong>de</strong> la manivela.<br />
Enlever le petit maté riel <strong>de</strong> fixation du corps <strong>de</strong> la<br />
manette.<br />
Note: There should be a gap (1/32”-1/16”) between<br />
handle trim ring and canopy for free handle operation.<br />
1/32"~1/16"<br />
(1.2mm~1.5mm)<br />
<strong>Handle</strong><br />
Nota: Debe haber un espacio (1/32’’ - 1/16’’) entre el<br />
capuchón ornamental <strong>de</strong> la manija y la cubierta para que<br />
la manija pueda moverse sin dificulta<strong>de</strong>s.<br />
Base of <strong>Handle</strong><br />
Remarque: S'assurer qu'il existe un espace (1/32 po -<br />
1/16 po [0,8 mm - 1,6 mm]) entre la garniture <strong>de</strong> manette<br />
et sa base pour que le fonctionnement <strong>de</strong> la manette ne soit<br />
pas gêné.<br />
Maintenance Your new faucet is <strong>de</strong>signed for years of trouble-free performance. Keep it looking new by cleaning it periodically<br />
with a soft cloth.Avoid abrasive cleaners, steel wool and harsh chemicals as these will dull the finish and void your warranty.
(1)<br />
(2)<br />
4. Place the handle body through right hole. Re-assemble the mounting hardware onto valve shank; use phillip<br />
screwdriver for final tightening after handle is aligned.<br />
NOTE: <strong>Two</strong> options for installing sleeve<br />
1. For <strong>de</strong>ck thickness of less than 1", please refer to picture (1).<br />
2. For <strong>de</strong>ck thickness between 1" and 2", the sleeve nut needs to be reversed, please refer to picture (2).<br />
Coloque el cuerpo <strong>de</strong> la manija a través <strong>de</strong>l orifico <strong>de</strong> la <strong>de</strong>recho. Vuelva a ensamblar las piezas <strong>de</strong><br />
montaje en el vástago <strong>de</strong> la válvula. Después <strong>de</strong> alinear la manija, ajuste con un <strong>de</strong>stornillador cruciforme.<br />
NOTA: <strong>Dos</strong> opciones para instalar la manga.<br />
1. Para un soporte <strong>de</strong> un grosor inferior a 1”, consulte la imagen (1).<br />
2. Para un soporte con un grosor entre 1” y 2”, hay que invertir la tuerca <strong>de</strong> manga; consulte la imagen (2).<br />
Mettre le corps <strong>de</strong> la manette dans l’orifice droite. Rassembler le petit matériel <strong>de</strong> fixation sur la tige du<br />
robinet ; utiliser un tournevis Phillips pour serrer à la toute fin, lorsque la manette est bien centrée.<br />
NOTE : Deux façons d’installer le manchon<br />
1. Épaisseur <strong>de</strong> comptoir inférieure à 1 po (2,5 cm) : voir l’illustration (1).<br />
2. Épaisseur <strong>de</strong> comptoir entre 1 po et 2 po (2,5 cm et 5 cm) : tourner le manchon dans l’autre sens; voir l’illustration (2).<br />
5. <strong>Con</strong>nect hoses from valves to Y adapter on spout and tighten.<br />
<strong>Con</strong>ecte las mangueras que van <strong>de</strong>s<strong>de</strong> las válvulas al<br />
adaptador “Y” en el grifo, y ajústelas.<br />
Raccor<strong>de</strong>r les boyaux <strong>de</strong> robinet à l’adaptateur en Y<br />
sur le bec et serrer.<br />
Mantenimiento Su grifo nuevo está diseñado para brindar años <strong>de</strong> servicio sin problemas. Mantenga su apariencia nueva limpiándolo<br />
periódicamente con un paño suave. Evite limpiadores abrasivos, estropajo <strong>de</strong> acero y químicos cáusticos porque <strong>de</strong>slustrarán el acabado y anularán la garantía.<br />
Entretien Votre nouveau robinet est conçu pour fonctionner sans problème, <strong>de</strong>s années durant. Le nettoyez périodiquement avec un chiffon<br />
doux pour qu’il conserve la même apparence qu’à l’état neuf. Éviter les nettoyants abrasifs, la laine d’acier et les produits chimiques forts puisqu’ils<br />
endommageront le fini et rendront votre garantie nulle.
6.<br />
Attach water supply hoses or tubes to the faucet. To<br />
avoid breaking the copper tube from the faucet, use<br />
two wrenches (as shown) to keep from twisting the<br />
supply tube from the faucet when you tighten the<br />
nut.<br />
Instale en el grifo las mangueras o tubos <strong>de</strong><br />
suministro <strong>de</strong> agua. Para evitar dañar el tubo <strong>de</strong><br />
cobre <strong>de</strong>l grifo, use dos llaves para mantener el tubo<br />
<strong>de</strong>recho al ajustar la tuerca [ver ilustración].<br />
Raccor<strong>de</strong>r les boyaux ou les tuyaux d’alimentation<br />
d’eau au robinet. Pour éviter <strong>de</strong> briser les tuyaux <strong>de</strong><br />
cuivre provenant du robinet, utiliser <strong>de</strong>ux clés<br />
(comme il est montré) afin d’empêcher les tuyaux<br />
d’alimentation provenant du robinet <strong>de</strong> tourner<br />
lorsqu’on serre l’écrou.<br />
7.<br />
After installing faucet, remove aerator and turn on<br />
water to remove any left over <strong>de</strong>bris. Re-assemble<br />
aerator.<br />
Después <strong>de</strong> instalar el grifo, remueva el aireador y<br />
abra el paso <strong>de</strong>l agua para remover cualquier residuo.<br />
Vuelva a armar el aireador.<br />
Après avoir terminé l’installation du robinet,enlever le<br />
brise-jet, puis ouvrir le robinet pour que l’eau évacue<br />
tout débris pouvant se trouver à l’intérieur.<br />
Réassembler le brise-jet.<br />
Maintenance Your new faucet is <strong>de</strong>signed for years of trouble-free performance. Keep it looking new by cleaning it periodically<br />
with a soft cloth.Avoid abrasive cleaners, steel wool and harsh chemicals as these will dull the finish and void your warranty.
Pop-Up Drain Installation/Instalación <strong>de</strong>l Desagüe Levadizo/Installation <strong>de</strong> la vidange mécanique<br />
8<br />
Main plunger<br />
Tapón <strong>de</strong>l <strong>de</strong>sagüe<br />
Dispositif principal<br />
<strong>de</strong> fermeture mobile<br />
1<br />
Lift rod<br />
Varilla levadiza<br />
Tige <strong>de</strong> levage<br />
Flange<br />
Brida<br />
Bri<strong>de</strong><br />
9<br />
2<br />
Thumb screw<br />
Tornillo<br />
Vis à oreilles<br />
Friction ring<br />
Aran<strong>de</strong>la <strong>de</strong> cierre<br />
Anneau <strong>de</strong> friction<br />
Lock nut<br />
<strong>Con</strong>tratuerca<br />
Écrou <strong>de</strong> blocage<br />
Drain assembly<br />
Tubo <strong>de</strong> <strong>de</strong>sagüe<br />
Tuyau <strong>de</strong> queue<br />
11<br />
10<br />
7<br />
Ball nut<br />
Tuerca asiento glóbulo<br />
Écrou <strong>de</strong> pivot<br />
6<br />
5<br />
3<br />
Lift rod strap<br />
Prolongación <strong>de</strong> varilla levadiza<br />
Sangle <strong>de</strong> tige <strong>de</strong> levage<br />
4<br />
Spring clip<br />
Pinza sujetadora<br />
Pince<br />
Ball rod<br />
Varilla glóbulo<br />
Levier à rotule<br />
1. Remove old pop-up drain assembly.<br />
Remueva el ensamblaje <strong>de</strong>l <strong>de</strong>sagüe<br />
levadizo viejo.<br />
Enlever la vidange mécanique existante.<br />
4. Thread lock nut (11) from un<strong>de</strong>rsi<strong>de</strong> of<br />
sink until rubber washer sits securely<br />
insi<strong>de</strong> opening of sink. Tighten lock nut.<br />
2. Place a ring of putty around drain<br />
opening of sink.<br />
Coloque un anillo <strong>de</strong> masilla <strong>de</strong> plomería<br />
alre<strong>de</strong>dor <strong>de</strong>l orificio <strong>de</strong>l <strong>de</strong>sagüe <strong>de</strong>l<br />
lavabo.<br />
Mettre du mastic autour <strong>de</strong> l’ouverture<br />
du drain du lavabo.<br />
3. Insert threa<strong>de</strong>d end of drain body up through<br />
drain hole and attach flange (9) to body.<br />
Introduzca el extremo roscado <strong>de</strong>l tubo <strong>de</strong>l<br />
<strong>de</strong>sagüe por el orificio en el lavabo y fije la<br />
brida (9) al tubo.<br />
Insérer l’extrémité filetée du corps du drain<br />
dans l’orifice <strong>de</strong> drain et fixer la bri<strong>de</strong> (9) au<br />
corps.<br />
Enrosque la contratuerca (11) por <strong>de</strong>bajo<br />
<strong>de</strong>l lavabo hasta que el empaque <strong>de</strong><br />
caucho se asegure <strong>de</strong>ntro <strong>de</strong>l orificio<br />
<strong>de</strong>l lavabo. Apriete la contratuerca.<br />
Visser l’écrou <strong>de</strong> blocage (11) en <strong>de</strong>ssous<br />
du lavabo jusqu’à ce que la ron<strong>de</strong>lle<br />
<strong>de</strong> caoutchouc soit soli<strong>de</strong>ment placée<br />
à l’intérieur <strong>de</strong> l’ouverture du lavabo.<br />
Serrer l’écrou <strong>de</strong> blocage.<br />
5. Insert main plunger (8) into drain. Insert<br />
ball rod (5) into rod port and into hole at<br />
bottom of main plunger.<br />
Introduzca el obturador en el <strong>de</strong>sagüe (8).<br />
Introduzca la varilla glóbulo (5) en la<br />
abertura lateral <strong>de</strong>l tubo <strong>de</strong>l <strong>de</strong>sagüe y<br />
en el hoyo al fondo <strong>de</strong>l obturador.<br />
Insérer le dispositif principal <strong>de</strong> fermeture<br />
mobile (8) dans le drain. Insérer le levier à<br />
rotule (5) dans l’orifice <strong>de</strong> levier et dans le<br />
trou au bas du dispositif principal <strong>de</strong><br />
fermeture mobile.<br />
6. Place one end of spring clip (4) on end of<br />
ball rod (5). Pass the tip of the rod through<br />
the hole in the lift rod strap (3) and then<br />
through the hole on the other end of the<br />
spring clip (4).<br />
Coloque un extremo <strong>de</strong> la pinza sujetadora<br />
(4) en el extremo <strong>de</strong> la varilla glóbulo (5).<br />
Pase la varilla por un hoyo en la prolongación<br />
<strong>de</strong> la varilla levadiza (3) y entonces por el otro<br />
hoyo en la pinza sujetadora (4).<br />
Mettre une extrémité <strong>de</strong> la pince (4) au bout<br />
du levier à rotule (5). Insérer la sangle <strong>de</strong> tige<br />
<strong>de</strong> levage (3) dans l’orifice <strong>de</strong> la pince (4).<br />
7. Insert bottom of lift rod (1) into hole at<br />
top of lift rod strap (3). Tighten with<br />
thumb screw (2).<br />
Inserte el extremo inferior <strong>de</strong> la varilla<br />
levadiza (1) en el orificio en el extremo<br />
superior <strong>de</strong> la prolongación <strong>de</strong> la varilla<br />
levadiza (3). Apriete con el tornillo (2).<br />
Insérer la partie inférieure <strong>de</strong> la tige <strong>de</strong><br />
levage (1) dans l’orifice sur le <strong>de</strong>ssus <strong>de</strong><br />
la sangle <strong>de</strong> tige <strong>de</strong> levage (3). Serrer à<br />
l’ai<strong>de</strong> <strong>de</strong> la vis à oreilles (2).<br />
Mantenimiento Su grifo nuevo está diseñado para brindar años <strong>de</strong> servicio sin problemas. Mantenga su apariencia nueva limpiándolo<br />
periódicamente con un paño suave. Evite limpiadores abrasivos, estropajo <strong>de</strong> acero y químicos cáusticos porque <strong>de</strong>slustrarán el acabado y anularán la garantía.<br />
Entretien Votre nouveau robinet est conçu pour fonctionner sans problème, <strong>de</strong>s années durant. Le nettoyez périodiquement avec un chiffon<br />
doux pour qu’il conserve la même apparence qu’à l’état neuf. Éviter les nettoyants abrasifs, la laine d’acier et les produits chimiques forts puisqu’ils<br />
endommageront le fini et rendront votre garantie nulle.
Trouble-Shooting/Guía <strong>de</strong> Solucionar Problemas/Dépannage<br />
If you've followed the instructions carefully and your faucet still does not work properly, take these<br />
corrective steps.<br />
Si usted ha seguido las instrucciones cuidadosamente y su grifo todavía no funciona correctamente,<br />
sigue estos pasos correctivos.<br />
Si vous avez suivi attentivement les instructions et que votre robinet ne fonctionne toujours pas<br />
correctement, apporter les correctifs suivants :<br />
Problem/Problema/Problème Cause/Causa/Cause Action/Solución/Correctif<br />
Leaks un<strong>de</strong>rneath handle.<br />
Goteo <strong>de</strong>bajo <strong>de</strong> la manija.<br />
Fuites sous la manette.<br />
Bonnet nut has come loose. O-ring is<br />
dirty or damaged.<br />
Tuerca cubierta se ha aflojado. La<br />
aran<strong>de</strong>la circular está sucia o dañada.<br />
L’écrou <strong>de</strong> fixation s’est <strong>de</strong>sserré. Le<br />
joint torique est sale ou endommagé.<br />
Tighten the bonnet nut. Clean or replace<br />
o-ring.<br />
Apriete la tuerca cubierta. Limpie o<br />
reemplace la aran<strong>de</strong>la circular.<br />
Serrer l’écrou <strong>de</strong> fixation. Nettoyer ou<br />
remplacer le joint torique.<br />
Aerator leaks or has an inconsistent<br />
water flow pattern.<br />
El aireador gotea o el chorro <strong>de</strong> agua<br />
está irregular.<br />
Le brise-jet fuit ou la diffusion <strong>de</strong>s jets<br />
qui s’en écoulent n’est pas uniforme.<br />
Aerator is dirty or misfitted.<br />
El aireador está sucio o mal puesto.<br />
Le brise-jet est mal ajusté ou sale.<br />
Unscrew the aerator to check rubber packing<br />
or replace the aerator.<br />
Destornille el aireador para chequear el empaque<br />
<strong>de</strong> caucho. Vuelva a instalar el aireador.<br />
Dévisser le brise-jet pour vérifier le joint en<br />
caoutchouc. Réassembler le brise-jet.<br />
Need Help? Please call our toll-free Customer service line at 1-888-648-6466 for additional assistance or service.<br />
Requiere asistencia? Favor llamar a nuestro servicio a clientes sin costo al 1-888-648-6466 para asistencia adicional o servicio<br />
Besoin d’ai<strong>de</strong>? Veuillez communiquer avec notre service à la clientèle au numéro sans frais 1-888-648-6466 pour obtenir du<br />
service ou <strong>de</strong> l’ai<strong>de</strong> additionnels..
WARNING !<br />
Check with the local plumbing co<strong>de</strong> requirements before installation.<br />
Antes <strong>de</strong> la instalación,consulte las exigencias <strong>de</strong>l código local <strong>de</strong> plomería.<br />
Vérifier les exigences du co<strong>de</strong> <strong>de</strong> la plomberie qui s’applique avant <strong>de</strong> procé<strong>de</strong>r à l’installation.<br />
The products should be installed by the local licensed plumber.<br />
El producto ha <strong>de</strong> ser instalado por un plomero local autorizado.<br />
Ce produit doit être installé par un plombier qualifié pour exercer dans cette région.<br />
This product is engineered to meet the EPA WaterSense flow requirement. The flow rate is<br />
governed by the aerator. If replacement is ever required, be sure to request Watersense<br />
compliant lavatory faucet aerator to retain the water conserving faucets of this faucet.<br />
Este producto se ha hecho para cumplir con las exigencias <strong>de</strong> caudal WaterSense <strong>de</strong> la EPA.<br />
El caudal está controlado por el aireador.Si es necesario sfectuar una sustitución, solicite un<br />
aireador <strong>de</strong>l grífo <strong>de</strong>l lavabo que cumpla con el programa WaterSense para mantener los<br />
grifos que conservan agua <strong>de</strong> este producto.<br />
Ce produit a été concu pour répondre aux exigences <strong>de</strong> débit du programme WaterSense<br />
<strong>de</strong> I’EPA. Le débit est réglé par un aérateur. Si jamais il doit être remplacé, s’assurer <strong>de</strong><br />
<strong>de</strong>man<strong>de</strong>r un aérateur <strong>de</strong> robinet <strong>de</strong> bains conforme au programme WaterSense pour<br />
continuer d’économiser l’eau.<br />
Need Help? Please call our toll-free Customer service line at 1-888-648-6466 for additional assistance or service.<br />
Requiere asistencia? Favor llamar a nuestro servicio a clientes sin costo al 1-888-648-6466 para asistencia adicional o servicio<br />
Besoin d’ai<strong>de</strong>? Veuillez communiquer avec notre service à la clientèle au numéro sans frais 1-888-648-6466 pour obtenir du<br />
service ou <strong>de</strong> l’ai<strong>de</strong> additionnels..