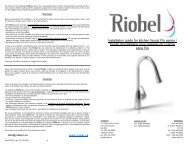
Installation guide for shower rail Guide d'installation pour ... - Riobel
Installation guide for shower rail Guide d'installation pour ... - Riobel
Installation guide for shower rail Guide d'installation pour ... - Riobel

Create successful ePaper yourself
Turn your PDF publications into a flip-book with our unique Google optimized e-Paper software.
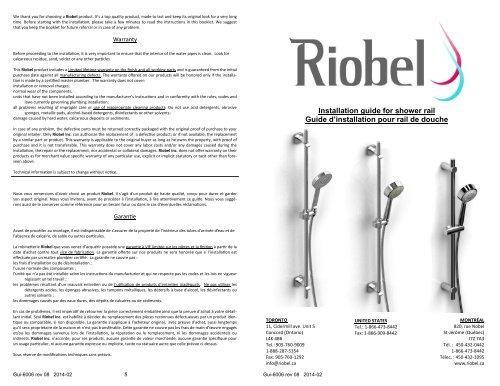
We thank you <strong>for</strong> choosing a <strong>Riobel</strong> product. It’s a top quality product, made to last and keep its original look <strong>for</strong> a very longme. Be<strong>for</strong>e starng with the installaon, please take a few minutes to read the instrucons in this booklet. We suggestthat you keep the booklet <strong>for</strong> future referral or in case of any problem.WarrantyBe<strong>for</strong>e proceeding to the installaon, it is very important to ensure that the interior of the water pipes is clean. Look <strong>for</strong>calcareous residue, sand, solder or any other parcles.This <strong>Riobel</strong> product includes a Limited lifeme warranty on the finish and all working parts and is guaranteed from the inialpurchase date against all manufacturing defects. The warranty offered on our products will be honored only if the installa‐on is made by a cerfied master plumber. The warranty does not cover:installaon or removal charges;normal wear of the components;units that have not been installed according to the manufacturer’s instrucons and in con<strong>for</strong>mity with the rules, codes andlaws currently governing plumbing installaon;all problems resulng of improper care or use of inappropriate cleaning products. Do not use acid detergents, abrasivesponges, metallic pads, alcohol‐based detergents, disinfectants or other solvents;damage caused by hard water, calcareous deposits or sediments.In case of any problem, the defecve parts must be returned correctly packaged with the original proof of purchase to youroriginal retailer. Only <strong>Riobel</strong> inc. can authorize the replacement of a defecve product; or if not available, the replacementby a similar part or product. This warranty is applicable to the original buyer as long as he owns the property, with proof ofpurchase and it is not transferable. This warranty does not cover any labor costs and/or any damages caused during theinstallaon, the repair or the replacement, nor accidental or collateral damages. <strong>Riobel</strong> inc. does not offer warranty on theirproducts as <strong>for</strong> merchant value specific warranty of any parcular use, explicit or implicit statutory or tacit other than <strong>for</strong>eseenabove.<strong>Installation</strong> <strong>guide</strong> <strong>for</strong> <strong>shower</strong> <strong>rail</strong><strong>Guide</strong> d’installation <strong>pour</strong> <strong>rail</strong> de doucheTechnical in<strong>for</strong>maon is subject to change without noce.Nous vous remercions d’avoir choisi un produit <strong>Riobel</strong>. Il s’agit d’un produit de haute qualité, conçu <strong>pour</strong> durer et garderson aspect original. Nous vous invitons, avant de procéder à l’installaon, à lire aenvement ce <strong>guide</strong>. Nous vous suggéronsaussi de le conserver comme référence <strong>pour</strong> un besoin futur ou dans le cas d’éventuelles réclamaons.GaraneAvant de procéder au montage, il est indispensable de s'assurer de la propreté de l'intérieur des tubes d'arrivée d'eau et del'absence de calcaire, de sable ou autres parcules.La robineerie <strong>Riobel</strong> que vous venez d’acquérir possède une garane à VIE limitée sur les pièces et la finion à parr de ladate d’achat contre tout vice de fabricaon. La garane offerte sur nos produits ne sera honorée que si l’installaon esteffectuée par un maître plombier cerfié. La garane ne couvre pas :les frais d’installaon ou de désinstallaon ;l’usure normale des composantes ;l’unité qui n’a pas été installée selon les instrucons du manufacturier et qui ne respecte pas les codes et les lois en vigueurrégissant un tel travail ;les problèmes résultant d’un mauvais entreen ou de l’ulisaon de produits d’entreen inadéquats. Ne pas uliser lesdétergents acides, les éponges abrasives, les tampons métalliques, les détersifs à base d'alcool, les désinfectants ouautres solvants ;les dommages causés par des eaux dures, des dépôts de calcaires ou de sédiments.En cas de problèmes, il est impéraf de retourner la pièce correctement emballée ainsi que la preuve d’achat à votre détaillantinial. Seul <strong>Riobel</strong> inc. est habilité à décider du remplacement des pièces reconnues défectueuses par un produit iden‐que ou comparable, si non disponible. La garane s’applique à l’acheteur original, avec preuve d’achat, aussi longtempsqu’il sera propriétaire de la maison et n’est pas transférable. Cee garane ne couvre pas les frais de main‐d’œuvre engagéset/ou les dommages survenus lors de l’installaon, la réparaon ou le remplacement, ni les dommages accidentels ouindirects. <strong>Riobel</strong> inc. n’accorde, <strong>pour</strong> ses produits, aucune garane de valeur marchande, aucune garane spécifique <strong>pour</strong>un usage parculier, ni aucune garane expresse ou implicite, tacite ou statuaire autre que celle prévue ci‐dessus.Sous réserve de modificaons techniques sans préavis.TORONTO11, Cidermill ave. Unit 5Concord (Ontario)L4K 4B6Tel.: 905‐760‐90091‐888‐287‐5354Fax: 905‐760‐1292info@riobel.caUNITED STATESTel.: 1‐866‐473‐8442Fax: 1‐866‐909‐8442MONTRÉAL820, rue NobelSt‐Jérôme (Québec)J7Z 7A3Tél. : 450‐432‐04421‐866‐473‐8442Télec. : 450‐432‐1095www.riobel.caGui-6006 rev 08 2014-028Gui-6006 rev 08 2014-02
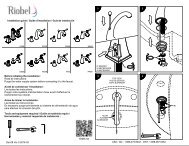
7007 & 7070 <strong>shower</strong> <strong>rail</strong> installationA. On the wall, position the wall brackets (4) according to the center tocenter distance (Image #1). Used provided screws (5) and if necessarythe plastic anchors (6) to add strength.B. Insert the fixture (2) on the <strong>rail</strong> <strong>shower</strong> (1) and use the blocking screw(3) to maintain the assembly together.C. Slide the fixture (2) and <strong>rail</strong> <strong>shower</strong> (1) assembly onto the wall brackets(4) and fix in place using the set screw (7).D. Install the hand <strong>shower</strong> hose (7) to the hand <strong>shower</strong> (5) by screwingthe conical nut to the end. (Image #3). Be cautious of the direction ofthe hose as the nut (8) with the inscription “FLOW” on it must be installedto the outlet supply. (Image #4).E. Be sure the gaskets (6) are in place at both ends (7 and 8) be<strong>for</strong>escrewing them.Image #1Image #2Hole at the bottom of one wall bracket to drainwater | Trou au bas d’un support mural <strong>pour</strong>évacuer l’eau.Outlet supply |Sortie d’eau<strong>Installation</strong> de <strong>rail</strong> de douche 7007 et 7070A. Sur le mur, fixer les supports muraux (4) selon la distance centre àcentre (Image #1). Utiliser les vis fournies (5) et si nécessaire utiliserles ren<strong>for</strong>ts de plastique (6) <strong>pour</strong> plus de solidité.B. Insérer sur le <strong>rail</strong> de douche (1) la fixation (2) et visser la vis de blocage(3) <strong>pour</strong> maintenir la fixation (2) en place sur le <strong>rail</strong> de douche.C. Glisser l’assemblage des fixations (2) et du <strong>rail</strong> de douche (1) sur lessupports muraux (4) et maintenir en place à l’aide des vis de serrage(7).D. Installer le boyau de la douchette (7) à la douchette (5) en vissant lanoix conique jusqu’au bout. (Image #3) Faire attention au sens duboyau, la noix (8) avec l’inscription “FLOW” doit être vissée sur la sortied’eau. (Image #4).E. Veuillez-vous assurer que les joints d’étanchéité (6) soient bien enplace à chacune des extrémités (7 et 8) avant de les visser.Image #4Image #3Gui-6006 rev 08 2014-022Gui-6006 rev 08 2014-027
Image #16006, 6050 and 4806 <strong>shower</strong> <strong>rail</strong> installationA. On the wall, position the <strong>shower</strong> <strong>rail</strong> according to the center to centerdistance between wall brackets (2). (Image #1)B. Install the <strong>shower</strong> <strong>rail</strong> by inserting the screws (4) in the wall brackets(2). The wall bracket with a hole at its base should be installed at thebottom of the <strong>shower</strong> <strong>rail</strong> to allow water to drain. IMPORTANT: use theprovided screws in the package. They are protected against rust.C. Place the screw caps (1) on the wall brackets (2).D. Install the hand <strong>shower</strong> hose (7) to the hand <strong>shower</strong> (5) by screwingthe conical nut to the end. (Image #3). Be cautious of the direction ofthe hose as the nut (8) with the inscription “FLOW” on it must be installedto the outlet supply. (Image #4).E. Be sure the gaskets (6) are in place at both ends (7 and 8) be<strong>for</strong>escrewing them.Image #2<strong>Installation</strong> de <strong>rail</strong> de douche 6006, 6050 and 4806Outlet supply |Sortie d’eauA. Sur le mur, positionner le <strong>rail</strong> de douche selon la distance centre àcentre entre les supports muraux. (Image #1)B. Fixer le <strong>rail</strong> de douche en insérant les vis (4) dans les supports muraux(2). Installer l’embout ayant un trou à sa base au bas du <strong>rail</strong> de douche<strong>pour</strong> s’assurer que l’eau puisse s’évacuer. IMPORTANT: utiliser les visfournies dans l’emballage. Elles sont protégées contre la rouille.C. Mettre en place les cache vis (1).D. Installer le boyau de la douchette (7) à la douchette (5) en vissant lanoix conique jusqu’au bout. (Image #3) Faire attention au sens duboyau, la noix (8) avec l’inscription “FLOW” doit être vissée sur la sortied’eau. (Image #4).E. Veuillez-vous assurer que les joints d’étanchéité (6) soient bien enplace à chacune des extrémités (7 et 8) avant de les visser.Image #4Image #3Gui-6006 rev 08 2014-026Gui-6006 rev 08 2014-023
50051010, 1050, 2020, 2050, 4040, 4050, 4810, 4812, 4820 and 5005<strong>shower</strong> <strong>rail</strong> installationA. On the wall, position the <strong>shower</strong> <strong>rail</strong> according to the center to centerdistance between the wall brackets (2). (Image #1 and see Image #5<strong>for</strong> the 5005 model).B. To install the <strong>shower</strong> <strong>rail</strong>, insert the screws (1) in the wall brackets (2).The screws (1) must sit inside the bar (3). IMPORTANT: use the providedscrews in the package. They are protected against rust.C. Place the screw caps (4) on the wall brackets(2).D. Install the hand <strong>shower</strong> hose (7) to the hand <strong>shower</strong> (5) by screwingthe conical nut to the end. (Image #3). Be cautious of the direction ofthe hose as the nut (8) with the inscription “FLOW” on it must be installedto the outlet supply. (Image #4).E. Be sure the gaskets (6) are in place at both ends (7 and 8) be<strong>for</strong>escrewing them.Image #1Image #5<strong>Installation</strong> de <strong>rail</strong> de douche 1010, 1050, 2020, 2050,4040, 4050, 4810, 4812, 4820 et 5005A. Sur le mur, positionner le <strong>rail</strong> de douche selon la distance centre àcentre entre les supports muraux. (Image #1 et voir image #5 <strong>pour</strong> lemodèle 5005)B. Fixer le <strong>rail</strong> de douche en insérant les vis (1) dans les supports muraux(2). La vis (1) doit se loger à l’intérieur de la barre de douche (3). IM-PORTANT: utiliser les vis fournies dans l’emballage. Elles sont protégéescontre la rouille.C. Mettre en place les cache vis (4).D. Installer le boyau de la douchette (7) à la douchette (5) en vissant lanoix conique jusqu’au bout. (Image #3) Faire attention au sens duboyau, la noix (8) avec l’inscription “FLOW” doit être vissée sur la sortied’eau. (Image #4).E. Veuillez-vous assurer que les joints d’étanchéité (6) soient bien enplace à chacune des extrémités (7 et 8) avant de les visser.Outlet supply| Sortie d’eauImage #2Image #3Image #4Gui-6006 rev 08 2014-024Gui-6006 rev 08 2014-025