

solar motion light lampe solaire à detecteur de ... - Toolfetch.com
solar motion light lampe solaire à detecteur de ... - Toolfetch.com
solar motion light lampe solaire à detecteur de ... - Toolfetch.com

You also want an ePaper? Increase the reach of your titles
YUMPU automatically turns print PDFs into web optimized ePapers that Google loves.
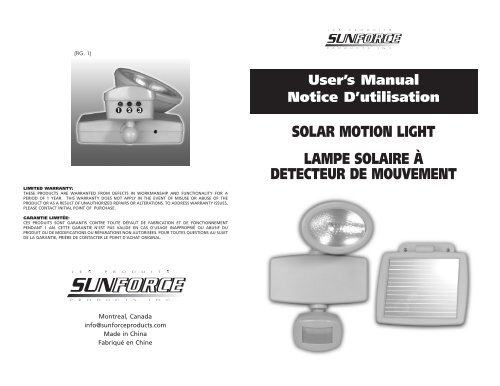
(FIG. 1)<br />
1 2 3<br />
LIMITED WARRANTY:<br />
THESE PRODUCTS ARE WARRANTED FROM DEFECTS IN WORKMANSHIP AND FUNCTIONALITY FOR A<br />
PERIOD OF 1 YEAR. THIS WARRANTY DOES NOT APPLY IN THE EVENT OF MISUSE OR ABUSE OF THE<br />
PRODUCT OR AS A RESULT OF UNAUTHORIZED REPAIRS OR ALTERATIONS. TO ADDRESS WARRANTY ISSUES,<br />
PLEASE CONTACT INITIAL POINT OF PURCHASE.<br />
GARANTIE LIMITÉE:<br />
CES PRODUITS SONT GARANTIS CONTRE TOUTE DÉFAUT DE FABRICATION ET DE FONCTIONNEMENT<br />
PENDANT 1 AN. CETTE GARANTIE N'EST PAS VALIDE EN CAS D'USAGE INAPPROPRIÉ OU ABUSIF DU<br />
PRODUIT OU DE MODIFICATIONS OU RÉPARATIONS NON AUTORISÉES. POUR TOUTES QUESTIONS AU SUJET<br />
DE LA GARANTIE, PRIÈRE DE CONTACTER LE POINT D'ACHAT ORIGINAL.<br />
Montreal, Canada<br />
info@sunforceproducts.<strong>com</strong><br />
Ma<strong>de</strong> in China<br />
Fabriqué en Chine<br />
User’s Manual<br />
Notice D’utilisation<br />
SOLAR MOTION LIGHT<br />
LAMPE SOLAIRE À<br />
DETECTEUR DE MOUVEMENT
WARNING!<br />
USER’S MANUAL<br />
SINCE YOU PURCHASED A HIGH QUALITY HIGH POWERED SOLAR MOTION LIGHT, PLEASE CHARGE IN<br />
FULL SUN FOR 4 DAYS BEFORE FIRST USE. (PLEASE ENSURE LIGHT IS OFF TO GET MAXIMUM CHARGE)<br />
OPERATING INSTRUCTIONS<br />
Solar Motion Security Light is the perfect system for your home and business. It is controlled by a<br />
sensor which measures ambient luminance and movement. It has a total working time of 20-30<br />
minutes per day. It can <strong>de</strong>tect from 0-12 meters (0-36 feet). Solar Motion Light requires<br />
NO DANGEROUS ELECTRICAL WIRING.<br />
INSTALLATION<br />
A. Mounting Location<br />
For best results, install Solar Motion Light on an area that can receive good sun<strong>light</strong> for recharging.<br />
To fully charge the Solar Motion Light from a totally empty battery, it has to be charged<br />
approximately for four days un<strong>de</strong>r sun<strong>light</strong> (ensure <strong>light</strong> is off to get a maximum charge).<br />
B. Wall Mounting or Woo<strong>de</strong>n Surface Mounting<br />
The Solar Motion Light is <strong>de</strong>signed to be easily mounted on most flat surfaces.<br />
1. Solar Panel Mounting: Place the <strong>solar</strong> panel in high visibility (mount with screws to surface).<br />
2. Motion Light Mounting: Place the Motion <strong>light</strong> in chosen area and mount with screws<br />
to surface.<br />
C. Plug in the panel to the back of the Solar Motion Light<br />
USE:<br />
Use of the Three Dials on Motion Sensor (FIG. 1)<br />
Please begin with each setting on the minimum setting and then adjust accordingly.<br />
1. Darkness: Activation - the <strong>solar</strong> <strong>motion</strong> <strong>light</strong> can be tuned to only turn on at night thereby<br />
extending battery life - begin with minimum and adjust accordingly.<br />
2. Time: Time the <strong>light</strong> stays on - begin with minimum and adjust accordingly.<br />
3. Sensitivity: Sensitivity of the <strong>motion</strong> sensor - begin with setting to minimum and<br />
adjust as nee<strong>de</strong>d.<br />
Operating Tips and Procedures<br />
If the Solar Motion Light does not function properly, please read carefully the above operating<br />
instructions and then take the following steps:<br />
1. Make sure that the sensor head is positioned such that no other <strong>light</strong> is shining on it after<br />
dark, it must be in the darkness at night, or the Solar Motion Light will “think” that is still<br />
day time and will not illuminate.<br />
2. Make sure that the <strong>solar</strong> panel is located where is receives several hours of bright sun<br />
shine everyday, with the flat face of the <strong>solar</strong> panel facing the noon time sun and the plug<br />
from panel to unit is connected.<br />
3. Check and make sure that <strong>solar</strong> panel is not clogged. If <strong>light</strong> keeps turning ON and OFF:<br />
The sensor head may be affected by heat emitted from the Solar Motion lamp or by tem<br />
perature change from a nearby source. Try re-aiming or re-positioning the sensor head, or<br />
adjust its coverage area by taping over a portion of the lens with weather resistant tape.<br />
NOTICE D’UTILISATION<br />
AVERTISSEMENT<br />
VOUS AVEZ ACQUIS UNE LAMPE SOLAIRE DE SÉCURITÉ À DÉTECTEUR DE MOUVEMENT DE HAUTE<br />
QUALITÉ. SVP, CHARGEZ-LA EN PLEIN SOLEIL PENDANT 4 JOURS AVANT DE L'UTILISER POUR LA<br />
PREMIÈRE FOIS. (POUR OBTENIR UNE CHARGE MAXIMALE, ASSUREZ-VOUS QUE LA LAMPE EST ÉTEINTE<br />
DURANT LA CHARGE.)<br />
MODE D'EMPLOI<br />
La <strong>lampe</strong> <strong>solaire</strong> <strong>de</strong> sécurité <strong>à</strong> détecteur <strong>de</strong> mouvement est l'appareil idéal pour la maison et<br />
l'établissement d'affaires. Elle est contrôlée par <strong>de</strong>s capteurs qui détectent la lumière ambiante et le<br />
mouvement. Elle offre une durée <strong>de</strong> fonctionnement <strong>de</strong> 20-30 minutes par jour. Elle peut détecter<br />
les mouvements dans un rayon <strong>de</strong> 0 <strong>à</strong> 12 mètres (0 <strong>à</strong> 36 pieds). La <strong>lampe</strong> <strong>solaire</strong> <strong>à</strong> détecteur <strong>de</strong><br />
mouvement ne nécessite AUCUN CÂBLAGE ÉLECTRIQUE DANGEREUX.<br />
INSTALLATION<br />
A. Position <strong>de</strong> montage<br />
Pour les meilleurs résultats, installez la <strong>lampe</strong> <strong>solaire</strong> <strong>à</strong> détecteur <strong>de</strong> mouvement dans un endroit<br />
ensoleillé assurant ainsi une bonne recharge. Pour charger <strong>com</strong>plètement la <strong>lampe</strong> <strong>solaire</strong> alors que<br />
la pile est <strong>com</strong>plètement <strong>à</strong> plat, exposez celle-ci aux rayons <strong>solaire</strong>s pendant quatre jours (pour<br />
assurer une charge maximale, assurez-vous que la <strong>lampe</strong> est éteinte (OFF) pendant la charge).<br />
B. Montage au mur ou sur une surface plane<br />
La <strong>lampe</strong> <strong>solaire</strong> <strong>à</strong> détecteur <strong>de</strong> mouvement est conçue pour être facilement montée sur la plupart<br />
<strong>de</strong>s surfaces planes.<br />
1. Montage du capteur <strong>solaire</strong> : Placez le capteur <strong>solaire</strong> pour qu'il soit bien exposé tout au<br />
long du jour aux rayons <strong>solaire</strong>s. Fixez-le avec <strong>de</strong>s vis <strong>à</strong> la surface sélectionnée.)<br />
2. Montage <strong>de</strong> la <strong>lampe</strong> <strong>à</strong> détecteur <strong>de</strong> mouvement : Placez la <strong>lampe</strong> <strong>à</strong> l'endroit choisi et<br />
fixez-la <strong>à</strong> la surface au moyen <strong>de</strong> vis.<br />
C. Branchez le capteur <strong>solaire</strong> <strong>à</strong> l'arrière <strong>de</strong> la <strong>lampe</strong> <strong>solaire</strong> <strong>à</strong> détecteur<br />
<strong>de</strong> mouvement.<br />
UTILISATION :<br />
Réglage <strong>de</strong>s trois <strong>com</strong>man<strong>de</strong>s du détecteur <strong>de</strong> mouvement (FIG. 1)<br />
SVP, <strong>com</strong>mencez par placer chaque <strong>com</strong>man<strong>de</strong> <strong>à</strong> sa position minimale, puis ajustez au besoin.<br />
1. Darkness (Obscurité) : Activation - La <strong>lampe</strong> <strong>solaire</strong> <strong>à</strong> détecteur <strong>de</strong> mouvement peut être<br />
réglée pour ne s'allumer que le soir pour prolonger la vie <strong>de</strong> la pile - <strong>com</strong>mencez <strong>à</strong> la<br />
position minimale et ajustez au besoin.<br />
2. Time (Durée) : Pério<strong>de</strong> pendant laquelle la <strong>lampe</strong> <strong>de</strong>meure allumée - <strong>com</strong>mencez <strong>à</strong> la<br />
position minimale et ajustez au besoin.<br />
3. Sensitivity (Sensibilité) : Sensibilité du détecteur <strong>de</strong> mouvement - <strong>com</strong>mencez <strong>à</strong> la position<br />
minimale et ajustez au besoin.<br />
Procédures et suggestions d'emploi<br />
Si la <strong>lampe</strong> <strong>solaire</strong> <strong>à</strong> détecteur <strong>de</strong> mouvement ne fonctionne pas correctement, lisez avec soin les<br />
instructions qui précè<strong>de</strong>nt et procé<strong>de</strong>z <strong>com</strong>me suit :<br />
1. Assurez-vous que le détecteur <strong>de</strong> lumière est positionné <strong>de</strong> telle façon qu'aucune autre<br />
lumière ne le frappe lorsqu'il fait noir. Ce détecteur doit être dans l'obscurité le soir;<br />
autrement, la <strong>lampe</strong> <strong>solaire</strong> « pensera » qu'il fait encore jour et ne s'allumera pas.<br />
2. Assurez-vous que le capteur <strong>solaire</strong> est exposé aux rayons <strong>solaire</strong>s plusieurs heures chaque<br />
jour, ayant sa surface plane face au soleil <strong>de</strong> midi. Assurez-vous que le câble est branché<br />
entre le capteur <strong>solaire</strong> et la <strong>lampe</strong> <strong>à</strong> détecteur <strong>de</strong> mouvement.<br />
3. Vérifiez et assurez-vous que le photodétecteur n'est pas encrassé ou colmaté. Si la <strong>lampe</strong><br />
s'allume et s'éteint continuellement, le photodétecteur peut être affecté par la chaleur<br />
provenant <strong>de</strong> la <strong>lampe</strong> <strong>à</strong> détecteur <strong>de</strong> mouvement ou par le changement <strong>de</strong> température<br />
d'une autre source <strong>à</strong> proximité. Tentez <strong>de</strong> réaligner ou <strong>de</strong> repositionner le photodétecteur<br />
ou ajustez le secteur couvert en couvrant une partie <strong>de</strong> la lentille avec du ruban résistant<br />
aux intempéries.