YAMAHA FAZER 600 '01 KIT FULLMASTER - Shad
YAMAHA FAZER 600 '01 KIT FULLMASTER - Shad
YAMAHA FAZER 600 '01 KIT FULLMASTER - Shad

Create successful ePaper yourself
Turn your PDF publications into a flip-book with our unique Google optimized e-Paper software.
Consejo para un correcto montaje del kit: No apretar los tornillos del todo hasta asegurarse que el <strong>KIT</strong> está correctamente colocado y alineado.<br />
En caso de montar los soportes <strong>KIT</strong> FULL (Y0FZ61SF) y su moto ya posee los soportes <strong>KIT</strong> TOP (Y0FZ61ST), deberá desmontar los soportes<br />
<strong>KIT</strong> TOP para montar en primer lugar los soportes <strong>KIT</strong> FULL.<br />
Advice for correct fitting of the kit: Do not fully tighten the screws until it is ensured that the <strong>KIT</strong> is correctly attached and aligned.<br />
If assembling <strong>KIT</strong> FULL supports (YOFZ61SF) and the bike already has <strong>KIT</strong> TOP supports (YOZF61ST) first dismantle <strong>KIT</strong> TOP<br />
supports and assemble <strong>KIT</strong> FULL supports.<br />
Conseil pour un montage correct du kit: Ne pas serrer les vis avant de vous être assuré que le kit est placé et aligné correctement.<br />
Si vous installez les supports <strong>KIT</strong> FULL (Y0FZ61SF) et que les supports <strong>KIT</strong> TOP (Y0FZ61ST) sont déjà montés sur votre moto, il sera<br />
nécessaire de démonter les supports <strong>KIT</strong> TOP pour installer les supports <strong>KIT</strong> FULL d'abord.<br />
Ratgeber zur korrekten Montage des Kit: Ziehen Sie die Schrauben nicht ganz fest, bevor Sie sich nicht vergewissert haben, daß der Bausatz<br />
korrekt eingestellt und ausgerichtet ist. Wenn Sie die <strong>KIT</strong> FULL-Träger (Y0FZ61SF) montieren und ihr Motorrad bereits mit dem <strong>KIT</strong> TOP<br />
(Y0FZ61ST) ausgestattet ist, sollten Sie die <strong>KIT</strong> TOP ausbauen, um zuerst die <strong>KIT</strong> FULL-Träger zu montieren.<br />
Consigli per un corretto montaggio del kit: Non stringere del tutto le viti fin tanto non si è sicuri che il kit è collocato correttamente e allineato.<br />
Se si montano i supporti <strong>KIT</strong> FULL (Y0FZ61SF) su una moto già corredata di supporti <strong>KIT</strong> TOP (Y0FZ61ST), si dovranno smontare i supporti <strong>KIT</strong><br />
TOP per montare prima i supporti <strong>KIT</strong> FULL.<br />
1.<br />
2.<br />
B<br />
D<br />
E<br />
1<br />
11<br />
8<br />
10<br />
2<br />
9-11<br />
F<br />
G<br />
C<br />
C<br />
3<br />
A<br />
H<br />
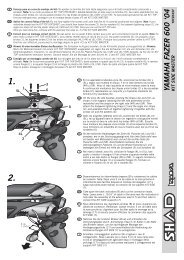
Desmontar y desestimar los intermitentes traseros (A).<br />
Desmontar y desestimar los tapones (B) del agarradero.<br />
Desmontar y desestimar el agarradero posterior (C)<br />
mediante los tornillos (D) y arandelas (E), dichos tornillos y<br />
arandelas se desestiman. En zona estribera (F) cambiar los<br />
pasadores (G), por los tornillos (1) y arandelas (2).<br />
Dismantle and remove rear indicators (A).<br />
Dismantle and remove handgrip (B) covers.<br />
Dismantle and remove rear handgrips ( C) using screws (D)<br />
and washers (E) and remove them. In area (F) exchange<br />
pins (G) for screws (1) and washers (2).<br />
Démontez les clignotants arrières (A) et retirez-les.<br />
Démontez les caches (B) de la poignée et retirez-les.<br />
Démontez la poignée postérieure (C) et retirez-les. Pour la<br />
démonter, ôtez les vis (E) et les rondelles (E), dont vous ne<br />
tiendrez pas non plus compte.<br />
Dans la zone des repose-pied (F), changez les goupilles (G)<br />
en enlevant les vis (1) et les rondelles (2).<br />
Bauen Sie die hinteren Blinklichter (A) aus und beseitigen<br />
Sie sie. Bauen Sie die Verschlüsse (B) des Griffes aus und<br />
beseitigen Sie sie. Bauen Sie die den hinteren Griff (C)<br />
mit den Schrauben (D) und den Unterlegscheiben (E) aus<br />
und beseitigen Sie die genannten Schrauben und<br />
Unterlegscheiben. Tauschen Sie im Trittbrettbereich (F)<br />
die Abstandshalter (G) mit den Schrauben (1) und den<br />
Unterlegscheiben (2) aus.<br />
Smontare ed eliminare gli intermittenti posteriori (A).<br />
Smontare ed eliminare i tappi (B) del manico.<br />
Smontare ed eliminare il manico posteriore (C) usando le<br />
viti (D) e le guarnizioni (E), anch’esse da eliminare.<br />
Nella zona del predellino (F) sostituire i fermagli (G) con le<br />
viti (1) e le guarnizioni (2).<br />
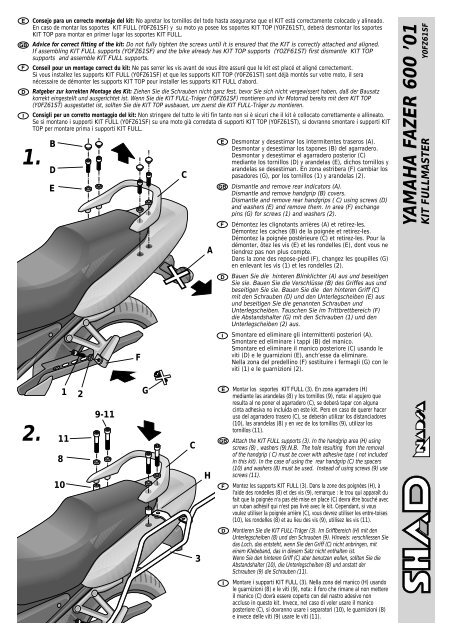
Montar los soportes <strong>KIT</strong> FULL (3). En zona agarradero (H)<br />
mediante las arandelas (8) y los tornillos (9), nota: el agujero que<br />
resulta al no poner el agarradero (C), se deberá tapar con alguna<br />
cinta adhesiva no incluida en este kit. Pero en caso de querer hacer<br />
uso del agarradero trasero (C), se deberán utilizar los distanciadores<br />
(10), las arandelas (8) y en vez de los tornillos (9), utilizar los<br />
tornillos (11).<br />
Attach the <strong>KIT</strong> FULL supports (3). In the handgrip area (H) using<br />
screws (8) , washers (9).N.B. The hole resulting from the removal<br />
of the handgrip ( C) must be cover with adhesive tape ( not included<br />
in this kit). In the case of using the rear handgrip (C) the spacers<br />
(10) and washers (8) must be used. Instead of using screws (9) use<br />
screws (11).<br />
Montez les supports <strong>KIT</strong> FULL (3). Dans la zone des poignées (H), à<br />
l'aide des rondelles (8) et des vis (9), remarque : le trou qui apparaît du<br />
fait que la poignée n'a pas été mise en place (C) devra être bouché avec<br />
un ruban adhésif qui n'est pas livré avec le kit. Cependant, si vous<br />
voulez utiliser la poignée arrière (C), vous devrez utiliser les entre-toises<br />
(10), les rondelles (8) et au lieu des vis (9), utilisez les vis (11).<br />
Montieren Sie die <strong>KIT</strong> FULL-Träger (3). Im Griffbereich (H) mit den<br />
Unterlegscheiben (8) und den Schrauben (9). Hinweis: verschliessen Sie<br />
das Loch, das entsteht, wenn Sie den Griff (C) nicht anbringen, mit<br />
einem Klebeband, das in diesem Satz nicht enthalten ist.<br />
Wenn Sie den hinteren Griff (C) aber benutzen wollen, sollten Sie die<br />
Abstandshalter (10), die Unterlegscheiben (8) und anstatt der<br />
Schrauben (9) die Schrauben (11).<br />
Montare i supporti <strong>KIT</strong> FULL (3). Nella zona del manico (H) usando<br />
le guarnizioni (8) e le viti (9), nota: il foro che rimane al non mettere<br />
il manico (C) dovrà essere coperto con del nastro adesivo non<br />
accluso in questo kit. Invece, nel caso di voler usare il manico<br />
posteriore (C), si dovranno usare i separatori (10), le guarnizioni (8)<br />
e invece delle viti (9) usare le viti (11).<br />
<strong>YAMAHA</strong> <strong>FAZER</strong> <strong>600</strong> ’01<br />
<strong>KIT</strong> <strong>FULLMASTER</strong> Y0FZ61SF
<strong>YAMAHA</strong> <strong>FAZER</strong> <strong>600</strong> ’01<br />
<strong>KIT</strong> <strong>FULLMASTER</strong> Y0FZ61SF<br />
REF. 500479<br />
Edición 1ª<br />
3.<br />
1<br />
2<br />
Pos. Ref. Cant.<br />
4 5 6 7<br />
13<br />
2<br />
COMPONENTES / PARTS / COMPOSANTES / EINZELBAUTEILE / COMPONENTI:<br />
1 304177 2 Tornillo M6 x 55 DIN 912 Ø2 cal 12.9 - Screw - Vis - Schraube - Vite<br />
2 303021 6 Arandela Ø6 - Washer - Rondelle - Scheibe - Rondella<br />
3 260793 1 Soporte derecho full - Full right support - Support droit full - Rechter Full-Träger - Supporto destro full<br />
260794 1 Soporte izquierdo full - Full left support - Support gauche full - Linker Full-Träger - Supporto sinistro full<br />
4 303018 2 Arandela de grueso Ø8 - Washer - Rondelle d’épaisseur - Scheibe - Rondella<br />
5 303017 2 Arandela esp. Ø18 x Ø6 - Washer - Rondelle - Scheibe - Rondella<br />
6 302021 4 Tuerca M6 - Nuts - Ecrou - Schraubenmutter - Dado<br />
7 303053 2 Clip pasador - Retaining clip - Goupille clip - Rechter Full-Träger - Fermaglio di sicurezza<br />
8 303020 6 Arandela Ø8 - Washer - Rondelle - Scheibe - Rondella<br />
9 304036 2 Tornillo M8 x 45 DIN 7380 - Screw - Vis - Schraube - Vite<br />
10 260712 2 Distanciador Ø20 Ø11 x 22. (0.42 e) - Spacer - Entre-toise - Abstandshalter - Distanziatore<br />
11 304090 4 Tornillo M8 x70 DIN 912 - Screw - Vis - Schraube - Vite<br />
12 260795 1 Soporte tubo unión - Junction tube support - Support d’attache du pot - Linker Full-Träger - Supporto tubo d'unione<br />
13 304052 2 Tornillo M6 x 20 DIN 7380 - Screw - Vis - Schraube - Vite<br />
14 260695 4 Bridas - Clamp - Brides - Große - Fascette<br />
3<br />
12<br />
2<br />
6<br />
En zona estribera (F) mediante los tornillos (1), arandelas (2),<br />
arandelas de grueso (4), arandelas especiales (5), tuercas (6) y por<br />
último lo mas importante, por sistema de seguridad colocar los clips<br />
pasador (7). Nota: no circular con la moto provista del <strong>KIT</strong> FULL, sin<br />
asegurarse de que los clips pasador (7) estan colocados.<br />
In the footrest area (F) using screws (1), washers (2) widening washers<br />
(4), special washers (5) and nuts (6). Finally and most importantly, as a<br />
security measure, attach pin clip (7) N.B. do not ride the bike with the<br />
<strong>KIT</strong> FULL attached without first ensuring that the pin clip (7) is attached.<br />
Dans la zone des repose-pied (F), à l'aide des vis (1), des rondelles (2), des<br />
rondelles plus grosses (4), des rondelles spéciales (5), des écrous (6) et<br />
enfin, le plus important placez les goupilles qui serviront de système de<br />
sécurité(7). Remarque: ne pas circuler avec la moto sur laquelle le <strong>KIT</strong><br />
FULL a été installé sans vous assurer que les goupilles (7) sont en place.<br />
Im Trittbrettbereich (F) mit den Schrauben (1), den Unterlegscheiben<br />
(2), den dicken Unterlegscheiben (4), den besonderen Unterlegscheiben<br />
(5) und den Schraubenmuttern (6) und zuletzt das Wichtigste, stellen Sie<br />
aus Sicherheitsgründen die Klammern (7) ein. Hinweis: Benutzen Sie das<br />
Motorrad mit dem <strong>KIT</strong> FULL nicht, bevor Sie sich nicht vergewissert<br />
haben, daß die Klammern (7) eingestellt sind.<br />
Nella zona del predellino (F) usando le viti (1), le guarnizioni (2), le<br />
guarnizioni di spessore (4), le guarnizioni speciali (5), i dadi (6) ed infine<br />
la cosa più importante: per il sistema di sicurezza collocare i fermagli di<br />
sicurezza (7). Nota: non circolare con la moto corredata di <strong>KIT</strong> FULL se<br />
non si è controllato che i fermagli di sicurezza (7) sono a posto.<br />
4. Montar el tubo unión soportes (12) a los soportes <strong>KIT</strong> FULL (3) y fijarlos con<br />
los tornillos (13), arandelas (2) y tuercas (6). Realizar la conexión de los<br />
internitentes incluidos en este <strong>KIT</strong>, fijar los cables con las bridas (14).<br />
Attach union pipe supports (12) to <strong>KIT</strong> FULL supports(3) and secure with<br />
screws (13), washers (2) and nuts (6).Connect the indicators included in this<br />
<strong>KIT</strong>, attach cables with bridles (14)<br />
Montez le tube d'union des supports (12) sur les supports du <strong>KIT</strong> FULL<br />
(3) et fixez avec les vis (13), les rondelles (2) et les écrous (6). Branchez<br />
les clignotants inclus dans ce <strong>KIT</strong>, fixez les câbles aux brides (14).<br />
Montieren Sie die das Verbindungsrohr für die Träger (12) an die <strong>KIT</strong><br />
FULL-Träger (3) an und befestigen Sie es mit den Schrauben (13),<br />
Unterlegscheiben (2) und Schraubenmuttern (6).<br />
Verbinden Sie die in diesem Bausatz enthaltenen Blinker und befestigen<br />
Sie die Kabel an den Laschen (14).<br />
Montare il tubo d’unione dei supporti (12) ai supporti del <strong>KIT</strong> FULL (3) e<br />
fissarli con le viti (13), le guarnizioni (2) e i dadi (6). Effettuare la<br />
connessione degli intermittenti acclusi in questo <strong>KIT</strong>, fissare i cavi con i<br />
morsetti (14).