MANUALE COSMO in 4 lingue:FEV 1000-950.qxd.qxd - Polti
MANUALE COSMO in 4 lingue:FEV 1000-950.qxd.qxd - Polti
MANUALE COSMO in 4 lingue:FEV 1000-950.qxd.qxd - Polti

Create successful ePaper yourself
Turn your PDF publications into a flip-book with our unique Google optimized e-Paper software.
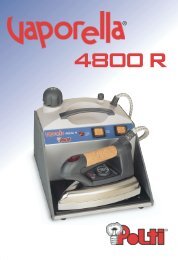
Fig. 1<br />
3<br />
4<br />
5<br />
1<br />
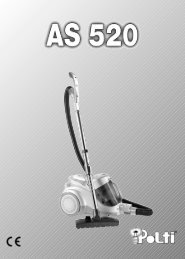
Fig. 4 Fig. 5<br />
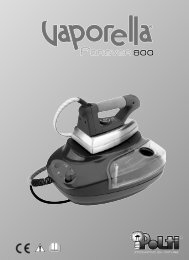
Fig. 7<br />
2<br />
Cosmo<br />
Fig. 2 Fig. 3<br />
<strong>COSMO</strong> - 1R11<br />
9<br />
8<br />
7<br />
Fig. 6<br />
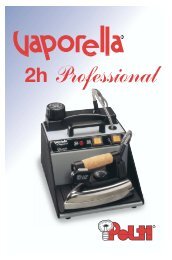
Fig. 8 Fig. 9<br />
6<br />
5a<br />
5b<br />
5c
Cosmo<br />
• GEBRAUCHSANWEISUNG pag. 2<br />
• MISE EN ROUTE DE L’APPAREIL pag. 6<br />
• ISTRUZIONI PER L’USO pag. 10<br />
• INSTRUCTIONS FOR USE pag. 14<br />
ITALIANO FRANÇAIS DEUTSCH<br />
ENGLISH
DEUTSCH<br />
cosmo<br />
Vor dem Gebrauch des Geräts sorgfältig die vorliegende Bedienungsanleitung lesen.<br />
LEGENDE<br />
1) Kapselfachklappe<br />
2) Kapselfach<br />
3) Netzschalter / Kontrollleuchte der Kaffeeausgabe<br />
4) Kaffeeausgabe<br />
5) Kapselaufnahmelade/ Tropfenauffangschale<br />
5a) Anpassgitter<br />
5b) Tropfenauffangschale<br />
5c) Kapselaufnahmelade<br />
6) Netzschalter<br />
VORSICHTSMAßNAHMEN BEIM<br />
GEBRAUCH<br />
DIESE GEBRAUCHSSANWEISUNGEN AUFBE-<br />
WAHREN.<br />
• Lesen Sie die vorliegende Gebrauchsanweisung<br />
aufmerksam, bevor Sie das Gerät verwenden<br />
• Jeder nicht mit den vorliegenden Anweisungen<br />
übere<strong>in</strong>stimmende Gebrauch führt zum Erlöschen<br />
der Garantie.<br />
SICHERHEITSHINWEISE:<br />
Stromschlag- bzw. Kurzschlussgefahr<br />
- Das elektrische Netz, an welches das Gerät angeschlossen<br />
werden soll, muss den gültigen gesetzlichen<br />
Vorschriften entsprechen.<br />
- Bevor Sie das Gerät an das Stromnetz anschließen,<br />
stellen Sie sicher, dass die Netzspannung<br />
mit der auf dem Typenschild des Geräts angegebenen<br />
Spannung übere<strong>in</strong>stimmt und dass die<br />
Steckdose e<strong>in</strong>e Erdschutzleitung besitzt.<br />
- Wenn das Gerät nicht verwendet wird, empfiehlt<br />
es sich, den Netzstecker abzuziehen.<br />
- Das Gerät nie unbeaufsichtigt lassen, wenn es<br />
an das Stromnetz angeschlossen ist.<br />
- Vor der Ausführung von Wartungsarbeiten stets<br />
das Netzkabel vom Stromnetz trennen.<br />
- Das Netzkabel nicht durch Ziehen an demselben<br />
ausstecken, sondern, um Schäden an der Steckdose<br />
zu vermeiden, den Netzstecker herausziehen.<br />
- Nicht gestatten, dass das Netzkabel Drehungen,<br />
Quetschungen oder Dehnungen erleidet oder mit<br />
scharfen oder aufgeheizten Flächen <strong>in</strong> Kontakt<br />
kommt.<br />
Dieses Gerät ist vorschriftsgemäß zur 2004/108/CE (EMC) abgeändert und zur<br />
2006/95/CE (Niedrigspannung) abgeändert.<br />
Modelländerung <strong>in</strong> Ausstattung, technischen Daten und Zubehör vorbehalten.Technische und Herstellungdaten<br />
können von POLTI S.p.A. ohne Vorankündigung geändert werden, wenn sich dies als<br />
nützlich erweisen sollte.<br />
2<br />
7) Netzkabel<br />
8) Tank<br />
9) Tankdeckel<br />
- Das Gerät nicht verwenden, wenn das Netzkabel<br />
oder wichtige Teile des Geräts beschädigt s<strong>in</strong>d,<br />
sondern sich an e<strong>in</strong>e autorisierte Kundendienststelle<br />
wenden.<br />
- Ke<strong>in</strong>e, vom Hersteller nicht genehmigten, elektrischen<br />
Verlängerungsstücke verwenden, die<br />
Schäden und Brände verursachen könnten.<br />
- Berühren Sie das Gerät nie mit nassen Händen<br />
oder Füssen, wenn der Netzstecker <strong>in</strong> der Steckdose<br />
sitzt.<br />
- Das Gerät nie barfuss <strong>in</strong> Betrieb nehmen.<br />
- Das Gerät nie <strong>in</strong> unmittelbarer Nähe von Badewannen,<br />
Duschen und mit Wasser gefüllten<br />
Behältern verwenden.<br />
- Bevor das Gerät vom Stromnetz getrennt wird,<br />
das Gerät immer mit dem dazu bestimmten<br />
Schalter ausschalten.<br />
- Das Gerät oder se<strong>in</strong>e Teile zum Waschen nicht<br />
<strong>in</strong> Wasser tauchen und nicht im Geschirrspüler<br />
re<strong>in</strong>igen.<br />
SICHERHEITSHINWEISE:<br />
Verletzungs- bzw. Verbrennungsgefahr<br />
während der Verwendung des Geräts.<br />
- Die Verwendung des Geräts <strong>in</strong> explosionsgefährdeten<br />
Umgebungen ist verboten.<br />
- Das Gerät nicht bei Vorhandense<strong>in</strong> von Giftstoffen<br />
benutzen.<br />
- Sollte das Gerät h<strong>in</strong>gefallen se<strong>in</strong>, muss es von<br />
e<strong>in</strong>er autorisierten Kundendienststelle überprüft<br />
werden, da <strong>in</strong>terne Störungen vorhanden se<strong>in</strong><br />
könnten, die die Sicherheit des Produktes e<strong>in</strong>schränken.<br />
- Bei Defekten oder Störungen das Gerät aus-
schalten und niemals versuchen es zu zerlegen<br />
sondern sich an e<strong>in</strong>e autorisierte Kundendienststelle<br />
wenden.<br />
- Dieses Gerät ist mit Sicherheitsvorrichtungen ausgestattet,<br />
deren Auswechselung e<strong>in</strong>em autorisierten<br />
Techniker vorbehalten ist.<br />
- Vor dem Re<strong>in</strong>igen oder Wegstellen des Gerätes<br />
stets darauf achten, dass dieses komplett abgekühlt<br />
ist.<br />
- Dieses Gerät ist nicht für den Gebrauch durch<br />
Personen (<strong>in</strong>begriffen K<strong>in</strong>der) geeignet, die nur<br />
über e<strong>in</strong>geschränkte körperliche, sensorielle<br />
oder geistige Fähigkeiten verfügen oder die<br />
ke<strong>in</strong>e ausreichenden Kenntnisse besitzen, es sei<br />
denn, sie werden beaufsichtigt oder wurden h<strong>in</strong>sichtlich<br />
des Gebrauchs des Geräts von e<strong>in</strong>er<br />
Person unterwiesen, die für deren Sicherheit verantwortlich<br />
ist.<br />
- K<strong>in</strong>der beaufsichtigen um sicherzustellen, dass sie<br />
nicht mit dem Gerät spielen.<br />
- Das Gerät darf nicht verwendet werden, wenn es<br />
herunter gefallen ist, sichtbare Schäden aufweist<br />
oder das Wasser austritt.<br />
- Dieses Gerät gibt heiße Flüssigkeiten aus, die zu<br />
Verbrühungen oder Verletzungen führen können.<br />
Deshalb ist Personen (e<strong>in</strong>schließlich K<strong>in</strong>dern)<br />
mit körperlichen, sensorischen oder geistigen<br />
E<strong>in</strong>schränkungen bzw. ohne ausreichende<br />
Kenntnisse der Gebrauch untersagt.<br />
SICHERHEITSHINWEISE:<br />
Verwendung des Geräts<br />
- Das Gerät immer auf stabile Flächen stellen.<br />
- Das heiße Gerät nicht auf hitzeempf<strong>in</strong>dlichen<br />
Oberflächen abstellen. Die Oberfläche könnte<br />
dadurch beschädigt werden.<br />
- Das Gerät niemals der Witterung aussetzen.<br />
- Das Gerät nicht <strong>in</strong> der Nähe von e<strong>in</strong>geschalteten<br />
Kochherden, Elektroöfen oder, allgeme<strong>in</strong>, <strong>in</strong> der<br />
Nähe von Wärmequellen aufstellen.<br />
- Das Gerät nicht Umgebungstemperaturen unter<br />
0°C und über 40°C aussetzen.<br />
- Die Tasten ausschließlich und nicht zu heftig mit<br />
dem F<strong>in</strong>ger drücken und die Benutzung von spitzen<br />
Gegenständen, wie Stiften und Ähnlichem,<br />
vermeiden.<br />
- Das Netzkabel niemals um das Gerät herum<br />
wickeln und <strong>in</strong> ke<strong>in</strong>ster Weise, wenn das Gerät<br />
heiß ist.<br />
- Während der Benutzung nicht die warmen Oberflächen<br />
des Geräts berühren.<br />
- Das Gerät auf e<strong>in</strong>e horizontale Fläche stellen.<br />
- Vor dem E<strong>in</strong>schalten des Geräts überprüfen,<br />
dass der Tank mit Wasser gefüllt ist.<br />
- Zum Füllen des Wasserbehälters ausschließlich<br />
Cosmo<br />
3<br />
frisches und sauberes Wasser und niemals kohlensäurehaltiges<br />
M<strong>in</strong>eralwasser, entm<strong>in</strong>eralisiertes<br />
oder destilliertes Wasser, Milch oder andere<br />
Flüssigkeiten verwenden.<br />
- Das Gerät während der Tankbefüllung ausschalten<br />
und den Netzstecker ziehen.<br />
- Wasser <strong>in</strong> der Kapselaufnahmelade ist normal,<br />
es stammt aus der Entleerung des Kreislaufs<br />
jeweils am Ende e<strong>in</strong>er Ausgabe.<br />
- Wir empfehlen, ausschließlich Orig<strong>in</strong>al <strong>Polti</strong>-Produkte<br />
zu verwenden, da Produkte anderer<br />
Marken nicht für den E<strong>in</strong>satz <strong>in</strong> <strong>Polti</strong>-Geräten<br />
geeignet se<strong>in</strong> und Schäden verursachen könnten.<br />
SACHGEMÄßE VERWENDUNG DES<br />
PRODUKTS<br />
Dieses Gerät ist, gemäß den Beschreibungen und<br />
den Anleitungen <strong>in</strong> diesem Handbuch, für den<br />
häuslichen Gebrauch bestimmt. Bitte lesen Sie diese<br />
Anleitungen aufmerksam durch und bewahren<br />
Sie sie auf, sie könnten Ihnen <strong>in</strong> Zukunft von Nutzen<br />
se<strong>in</strong>.<br />
Für eventuelle Unfälle, die auf unsachgemäßen,<br />
nicht den vorliegenden Gebrauchsanweisungen<br />
entsprechenden Gebrauch von diesem Gerät<br />
zurückzuführen s<strong>in</strong>d, lehnt <strong>Polti</strong> S.p.A jegliche<br />
Haftung ab.<br />
ACHTUNG<br />
Richtl<strong>in</strong>ie 2002/96/EU (Elektro- und Elektronik-Altgeräte<br />
- WEEE): Benutzer<strong>in</strong>formationen<br />
Dieses Produkt entspricht der EU- Richtl<strong>in</strong>ie<br />
2002/96/EU.<br />
Das Symbol des auf dem Gerät dargestellten, durchgestrichenen<br />
Mülleimers gibt an, dass das Produkt<br />
am Ende se<strong>in</strong>er Nutzungsdauer gesondert vom<br />
Hausmüll zu behandeln ist.<br />
Am Ende der Nutzungsdauer ist der Benutzer<br />
für die Überantwortung des Geräts an<br />
geeignete Sammelstellen verantwortlich.<br />
Die angemessene, getrennte Müllsammlung<br />
zwecks umweltkompatibler Behandlung<br />
und Entsorgung für den anschließenden Recycl<strong>in</strong>gbeg<strong>in</strong>n<br />
des nicht mehr verwendeten Geräts trägt<br />
zur Vermeidung möglicher schädlicher Wirkungen auf<br />
Umwelt und Gesundheit bei und begünstigt das Recycl<strong>in</strong>g<br />
der Materialien, aus denen das Produkt zusammengesetzt<br />
ist.<br />
Für nähere Informationen bezüglich der zur Verfügung<br />
stehenden Sammelsysteme, wenden Sie sich<br />
bitte an den örtlichen Müllentsorgungsdienst oder an<br />
das Geschäft, <strong>in</strong> dem der Kauf getätigt worden ist.<br />
DEUTSCH
DEUTSCH<br />
WICHTIG<br />
Bevor sie die Fabrik verlassen, werden alle unsere<br />
Produkte strengen Abnahmen unterzogen.<br />
DAS KAPSELSYSTEM<br />
Die Masch<strong>in</strong>e wurde für den ausschließlichen<br />
Betrieb mit den “Aroma <strong>Polti</strong>”-Kapseln entworfen.<br />
Jede Kapsel enthält die richtige Dosis mit<br />
der richtigen Mahlung, um b<strong>in</strong>nen kürzester Zeit<br />
den besten Espresso zu erzielen. Die Kapselhülle<br />
ist aus Polypropylen hergestellt, das dank<br />
se<strong>in</strong>er praktischen und hygienischen Eigenschaften<br />
und se<strong>in</strong>er Hitzebeständigkeit, e<strong>in</strong><br />
ideales Material für den Kontakt mit Lebensmitteln<br />
ist. Neben der großen Zweckmäßigkeit und<br />
Benutzerfreundlichkeit wird vom Kapselsystem<br />
das vollständige Aroma und die Frische von soeben<br />
geröstetem Kaffee gewährleistet. Auf<br />
diese Weise können Sie Ihre bevorzugte Mischung<br />
genießen.<br />
Die Verwendung von anderen Kapseln als<br />
"Aroma <strong>Polti</strong>" hat den Garantieverfall zur Folge.<br />
VORBEREITUNG<br />
• Die Geräteverpackung entfernen und das Produkt<br />
auf Vollständigkeit und Unversehrtheit prüfen.<br />
• Das Gerät auf e<strong>in</strong>e Arbeitsfläche stellen, die vor<br />
Wasser geschützt ist.<br />
• Wenn große Tassen benutzt werden, das entsprechende<br />
Anpassgitter (5a) <strong>in</strong> die Tropfenauffangschale<br />
(5b) schieben (Abb. 8).<br />
• Wenn kle<strong>in</strong>e Tassen benutzt werden, das entsprechende<br />
Anpassgitter (5a) auf die Tropfenauffangschale<br />
(5b) legen (Abb. 9).<br />
• Den Deckel (9) (Abb. 1) abnehmen, den Wassertank<br />
(8) herausnehmen (Abb. 2) und mit kaltem,<br />
klarem Wasser abspülen.<br />
• Den Behälter (8) nur mit frischem und sauberem<br />
Wasser füllen, ihn wieder <strong>in</strong> das Gerät e<strong>in</strong>setzen<br />
und den Deckel schließen. Zum Befüllen des<br />
Behälters ke<strong>in</strong> Wasser mit Kohlensäure oder andere<br />
Flüssigkeiten verwenden.<br />
• Den Netzkabelstecker (7) an e<strong>in</strong>en geerdeten,<br />
geeigneten Netzanschluss anschließen.<br />
• Das Gerät durch Drücken des Netzschalters (6)<br />
anschalten (Abb. 3). Das rote Licht des Schalters/der<br />
Kontrollleuchte schaltet sich e<strong>in</strong> (3).<br />
Abwarten, bis das Licht grün wird, nun kann der<br />
Kaffee ausgegeben werden.<br />
• Es kann höchstens 50ml Kaffee ausgegeben werden.<br />
cosmo<br />
4<br />
ACHTUNG:<br />
• Vor Erst<strong>in</strong>betriebnahme des Geräts muss e<strong>in</strong><br />
Re<strong>in</strong>igungszyklus wie <strong>in</strong> Kapitel “WARTUNG”<br />
beschrieben vorgenommen werden.<br />
• jedes Mal, wenn Sie das Gerät e<strong>in</strong>schalten, ist<br />
es empfehlenswert, e<strong>in</strong>ige Sekunden Wasser<br />
ohne Kapsel zu brühen, damit sich die Temperatur<br />
stabilisiert und sich die Aufgussorgane<br />
re<strong>in</strong>igen.<br />
• nachdem das grüne Licht aufgeleuchtet ist,<br />
kann normal Kaffee ausgegeben werden, auch<br />
wenn der Schalter/die rote Kontrollleuchte (3)<br />
e<strong>in</strong>geschaltet ist. E<strong>in</strong> abwechselndes Aufleuchten<br />
des roten/grünen Lichts ist e<strong>in</strong> normaler<br />
Vorgang während des Heizzyklus des Kessels.<br />
ZUBEREITUNG DES KAFFEES<br />
• E<strong>in</strong>e kle<strong>in</strong>e Tasse unter die Kaffeeausgabe (4)<br />
stellen.<br />
• Die Klappe des Kapselfachs (1) öffnen und die<br />
Kapsel <strong>in</strong>s Kapselfach (2) <strong>in</strong> die dafür vorgesehene<br />
Formaufnahme legen.<br />
Die Klappe wieder schließen und bis zum Anschlag<br />
drücken (Abb. 4).<br />
• ACHTUNG: Das E<strong>in</strong>schieben der Kapsel <strong>in</strong>s<br />
Fach<strong>in</strong>nere erfolgt durch Verschließen des<br />
Fachs (1), <strong>in</strong>dem dasselbe bis zum Anschlag<br />
gedrückt wird, automatisch. Um die Kapsel<br />
zu schieben, aus ke<strong>in</strong>em Grund die eigenen<br />
F<strong>in</strong>ger benutzen.<br />
• Drücken Sie den Schalter /die Kontrollleuchte für<br />
die Kaffeeausgabe (3). Der Espresso wird nun<br />
ausgegeben. Sobald die gewünschte Kaffeemenge<br />
erreicht ist, erneut den Schalter /die Kontrollleuchte<br />
(3) drücken, um die Kaffeeausgabe<br />
zu unterbrechen. Es ist daher möglich, e<strong>in</strong>en<br />
starken oder schwachen Kaffee zuzubereiten, <strong>in</strong>dem<br />
die ausgegebene Kaffeemenge dosiert<br />
wird.<br />
• Die verwendete Kapsel fällt automatisch <strong>in</strong> das<br />
entsprechende Fach (5c), sobald die Klappe (1)<br />
geöffnet wird. Die Lade für gebrauchte Kapseln<br />
muss häufig geleert werden, um zu vermeiden,<br />
dass sie den Austrittkanal verstopfen.<br />
• Um die Kapselaufnahmelade und Tropfenauffangschale<br />
(5) zu leeren, wie folgt vorgehen:<br />
- Die Lade (5) aus dem Gerät nehmen (Abb. 6).<br />
- Die Tropfenauffangschale (5b) von der Kapselaufnahmelade<br />
(5c) (Abb. 7) trennen und beide<br />
ausleeren.<br />
- Alles wieder <strong>in</strong> das Gerät e<strong>in</strong>setzen.
WARTUNG<br />
• Vor der Ausführung von Wartungsarbeiten stets<br />
das Netzkabel vom Stromnetz trennen.<br />
• Zur äußeren Re<strong>in</strong>igung des Geräts e<strong>in</strong>fach e<strong>in</strong><br />
feuchtes Tuch verwenden. Ke<strong>in</strong>e Lösungs- oder<br />
Re<strong>in</strong>igungsmittel verwenden, die die Plastikoberfläche<br />
beschädigen könnten.<br />
• Regelmäßig die Kapselaufnahmelade (5c) und<br />
die Tropfenauffangschale (5b) leeren.<br />
• Die Zubehörteile mit Wasser und Re<strong>in</strong>igungsmittel<br />
waschen.<br />
• Geräteteile niemals im Geschirrspüler re<strong>in</strong>igen.<br />
REINIGUNGSZYKLUS<br />
Der Re<strong>in</strong>igungszyklus muss e<strong>in</strong>mal pro Jahr durchgeführt<br />
werden, wenn der mittlere Verbrauch bei 3<br />
Kapseln pro Tag liegt. Bei höherem Verbrauch ist er<br />
häufiger vorzunehmen.<br />
Gehen Sie wie folgt vor:<br />
• Den Wasserbehälter (8) mit Wasser füllen und<br />
e<strong>in</strong>e Ampulle Clean Espresso e<strong>in</strong>füllen, d.h. die<br />
Speziallösung gegen Kalk und Fett, und dabei<br />
die Anweisungen auf der Verpackung beachten.<br />
• E<strong>in</strong> Gefäß ausreichender Größe unter den Kaffeeauslauf<br />
stellen<br />
• Die Klappe (1) des Kapselfachs öffnen, sich vergewissern,<br />
dass die vorhandene Kapsel <strong>in</strong> das<br />
Kapselfach fällt, und die Klappe wieder zuschieben,<br />
bis sie den Anschlag erreicht hat.<br />
Cosmo<br />
STÖRUNGSSUCHE<br />
Problem Ursache Abhilfe<br />
Die Kapselfachklappe DieKapselaufnahmelade (5c) ist Die Kapselaufnahmelade leeren<br />
(1) lässt sich nicht sch- voll mit gebrauchten Kapseln<br />
ließen (nicht gewaltsam<br />
schließen)<br />
Das Gerät funktioniert Ke<strong>in</strong>e Kapsel im Kapselfach Die Kapsel <strong>in</strong>s Kapselfach legen und die Sch-<br />
ordnungsgemäß, gibt<br />
ritte wiederholen.<br />
aber<br />
aus<br />
ke<strong>in</strong>en Kaffee<br />
Die Kaffeeausgabe ist Auslauftülle verunre<strong>in</strong>igt Auslauftülle mit e<strong>in</strong>em feuchten Tuch re<strong>in</strong>igen<br />
unregelmäßig und<br />
erfolgt nicht <strong>in</strong> die Tasse<br />
5<br />
• Drücken Sie den Schalter /die Kontrollleuchte für<br />
die Kaffeeausgabe (3). Das Gerät gibt Wasser<br />
ab; wiederholen Sie diesen Vorgang so lange,<br />
bis ke<strong>in</strong> Wasser mehr im Tank (8) ist.<br />
• Diesen Schritt nur mit Wasser wiederholen, also<br />
ohne Zugabe von Clean Espresso.<br />
• Bei Beendigung der Prozedur ist die Masch<strong>in</strong>e<br />
bereit für die Ausgabe der Getränke.<br />
Für die Re<strong>in</strong>igung und Wartung der mit Kaffeekapseln<br />
<strong>Polti</strong> betriebenen Espressomasch<strong>in</strong>e raten<br />
wir Ihnen, das Re<strong>in</strong>igungsset Clean Espresso (Artikelnummer<br />
PAEU0176) zu benutzen.<br />
Dank zweier neu entwickelter Rezepturen<br />
(Entkalkung und Entfettung) re<strong>in</strong>igt, schützt und<br />
verlängert Clean Espresso die Lebenserwartung Ihrer<br />
Espressomasch<strong>in</strong>e.<br />
Clean Espresso ist auf www.aromapolti.com<br />
erhältlich.<br />
Damit die <strong>in</strong>ternen Leitungen der Masch<strong>in</strong>e sorgfältig<br />
gespült werden, sollten bei der Verwendung des<br />
Re<strong>in</strong>igungssets CLEAN ESPRESSO die im Punkt 8<br />
des Anleitungsblatts genannten Arbeitsvorgänge<br />
m<strong>in</strong>destens 3 Mal ausgeführt werden.<br />
DEUTSCH
FRANÇAIS<br />
cosmo<br />
Lire attentivement le mode d’emploi suivant avant d’utiliser l’appareil.<br />
LÉGENDE<br />
1) Couvercle logement capsule<br />
2) Logement capsule<br />
3) Interrupteur / voyant distribution<br />
4) Distributeur de café<br />
5) Bac de récupération capsules usagées / gouttes<br />
5a) Grille réducteur<br />
5b) Bac de récupération gouttes<br />
5c) Bac de récupération capsules usagées<br />
6) Interrupteur général<br />
AVERTISSEMENTS<br />
CONSERVER CES INSTRUCTIONS<br />
• Avant d'utiliser l'appareil, lisez attentivement les<br />
présentes <strong>in</strong>structions d'utilisation.<br />
• Toute utilisation non conforme aux présentes recommandations<br />
annulera la garantie.<br />
INFORMATIONS SUR LA SÉCURITÉ:<br />
Risque de décharges électriques et/ou courtcircuit<br />
- L'<strong>in</strong>stallation électrique à laquelle l'appareil est<br />
branché doit être réalisée en conformité avec les<br />
lois en vigueur.<br />
- Avant de brancher l'appareil, assurez-vous que<br />
la tension du réseau correspond à la valeur <strong>in</strong>diquée<br />
sur la plaque signalétique de l'appareil, et<br />
que la prise d'alimentation est munie d'une mise<br />
à la terre<br />
- Si vous ne devez pas utiliser l’appareil, il est conseillé<br />
de le débrancher de la prise électrique.<br />
- Ne laissez jamais l’appareil sans surveillance lorsqu’il<br />
est branché au réseau électrique.<br />
- Avant d’effectuer tout type d’entretien, assurezvous<br />
que le câble d’alimentation est débranché<br />
du réseau électrique.<br />
- Ne débranchez pas l'appareil en tirant le câble<br />
d'alimentation mais extraire la fiche de la prise<br />
pour éviter de l’endommager.<br />
- Veillez à ce que le câble d'alimentation ne subisse<br />
pas de torsions, d'écrasements ou d'étirements,<br />
et qu'il n'entre pas en contact avec des<br />
surfaces coupantes ou chaudes..<br />
- N’utilisez pas l’appareil si le câble d’alimentation<br />
ou des parties importantes de l’appareil sont endommagés.<br />
Contactez un SAV agréé.<br />
Cet appareil est conforme a la directive 2004/108/CE (CEM) et a la directive 2006/95/CE<br />
(basse tension)<br />
POLTI se réserve le droit d’<strong>in</strong>troduire toutes modifications techniques qui s’avéreraient nécessaires<br />
sans aucun préavis.<br />
6<br />
7) Câble d’alimentation<br />
8) Réservoir<br />
9) Couvercle du réservoir<br />
- N’utilisez pas de rallonges électriques sans l'autorisation<br />
du fabricant car elles pourraient provoquer<br />
des dommages ou <strong>in</strong>cendie<br />
- Ne touchez jamais l'appareil si vous avez les<br />
ma<strong>in</strong>s ou les pieds mouillés et si la fiche est<br />
branchée.<br />
- N’utilisez pas l'appareil pieds nus.<br />
- N’utilisez pas l'appareil à côté d'une baignoire,<br />
d'une douche ou d'un récipient ple<strong>in</strong> d'eau.<br />
- Toujours éte<strong>in</strong>dre l’appareil en appuyant sur l’<strong>in</strong>terrupteur<br />
prévu à cet effet avant de le débrancher<br />
du réseau électrique.<br />
- Ne jamais plonger l’appareil ou des parties de<br />
l’appareil dans l’eau et ne jamais laver les composants<br />
dans le lave-vaisselle.<br />
INFORMATIONS SUR LA SÉCURITÉ:<br />
Risque de lésions et/ou brûlures durant<br />
l’utilisation de l’appareil<br />
- Il est <strong>in</strong>terdit d'utiliser l'appareil en cas de danger<br />
d'explosion.<br />
- N’utilisez pas le produit en présence de substances<br />
toxiques.<br />
- En cas de chute accidentelle de l'appareil, faitesle<br />
vérifier par un Service Après-vente autorisé<br />
car un mauvais fonctionnement <strong>in</strong>terne pourrait<br />
en limiter la sécurité.<br />
- En cas de panne ou de mauvais fonctionnement,<br />
éteignez l'appareil et n’essayez jamais de le démonter<br />
mais adressez-vous à un Service Aprèsvente<br />
autorisé.<br />
- Cet appareil est doté de dispositifs de sécurité<br />
dont le remplacement nécessite l’<strong>in</strong>tervention<br />
d’un technicien autorisé.
- Avant de nettoyer ou de ranger l’appareil, assurez-vous<br />
qu’il est froid.<br />
- L’appareil n’est pas dest<strong>in</strong>é à être utilisé par des<br />
personnes (y compris les enfants) dont les capacités<br />
physiques, sensorielles ou mentales sont<br />
réduites, ou qui ne possèdent pas l’expérience<br />
ou les connaissances nécessaires, à mo<strong>in</strong>s<br />
qu’elles aient bénéficié, grâce à l’aide d’une personne<br />
chargée de leur sécurité, d’une surveillance<br />
ou d’<strong>in</strong>structions sur l’utilisation de l’appareil.<br />
- Veiller à ce que les enfants ne jouent pas avec<br />
l’appareil.<br />
- L’appareil ne peut pas être utilisé après une<br />
chute, lorsqu’il présente des signes visibles de<br />
dommages ou lorsqu’il fuit.<br />
- Cet appareil distribue des liquides chauds pouvant<br />
brûler ou causer des dommages physiques;<br />
l’utilisation par des personnes (y compris les enfants)<br />
dont les capacités physiques, sensorielles<br />
ou mentales sont réduites, ou qui ne possèdent<br />
pas l’expérience ou les connaissances nécessaires,<br />
est par conséquent <strong>in</strong>terdite.<br />
INFORMATIONS SUR LA SÉCURITÉ:<br />
utilisation de l’appareil<br />
- Posez toujours l'appareil sur des surfaces stables<br />
et planes.<br />
- Ne posez pas l’appareil chaud sur une surface<br />
sensible à la chaleur. Cela pourrait endommager<br />
la surface.<br />
- Conservez toujours l’appareil à l’abri des agents<br />
atmosphériques.<br />
- Ne placez pas l’appareil à proximité de fourneaux<br />
allumés, radiateurs électriques ou toute<br />
autre source de chaleur.<br />
- N’exposez pas l’appareil à des températures ambiantes<br />
<strong>in</strong>férieures à 0°C et supérieures à 40°C.<br />
- Appuyez sur les touches uniquement avec le<br />
doigt, sans forcer ni utiliser des objets po<strong>in</strong>tus<br />
comme les stylos.<br />
- N’enroulez pas le câble d'alimentation autour de<br />
l'appareil et surtout jamais si l'appareil est chaud.<br />
- Ne pas toucher les surfaces chaudes de l’appareil<br />
pendant l’usage.<br />
- Positionner l’appareil sur un plan horizontal.<br />
- Avant d’allumer l’appareil, vérifier que le réservoir<br />
contient de l’eau.<br />
- Pour remplir le réservoir d’eau, utiliser uniquement<br />
de l’eau fraîche et propre, ne jamais verser<br />
d’eau m<strong>in</strong>érale gazeuse, d’eau dém<strong>in</strong>éralisée,<br />
d’eau distillée, de lait ou d’autres liquides.<br />
- Durant le remplissage du réservoir, il est recommandé<br />
d’éte<strong>in</strong>dre l’appareil et de le débrancher<br />
de la prise d’alimentation.<br />
Cosmo<br />
7<br />
- La présence d’eau dans le bac de récupération<br />
capsules usagées est normale et due au vidage<br />
du circuit après chaque distribution.<br />
- Il est conseillé de n’utiliser que des produits d’orig<strong>in</strong>e<br />
<strong>Polti</strong> car ceux d’autres marques pourraient<br />
ne pas convenir aux appareils <strong>Polti</strong> et les abîmer.<br />
USAGE CORRECT DU PRODUIT<br />
Cet appareil est dest<strong>in</strong>é à un usage domestique selon<br />
les descriptions et les <strong>in</strong>structions reportées<br />
dans ce manuel. Prière de lire attentivement ces<br />
<strong>in</strong>structions et de les conserver, elles pourraient<br />
vous servir à l’avenir.<br />
<strong>Polti</strong> S.p.A. décl<strong>in</strong>e toute responsabilité en cas<br />
d’accidents dérivants d’un usage de cet appareil<br />
non conforme à la notice d’utilisation présente.<br />
ATTENTION<br />
Directive 2002/96/CE (Déchets d'équipements<br />
électriques et électroniques - DEEE): <strong>in</strong>formations<br />
aux utilisateurs<br />
Ce produit est conforme à la Directive EU<br />
2002/96/CE.<br />
Le symbole de la corbeille barrée reporté sur l’appareil<br />
<strong>in</strong>dique que ce dernier doit être élim<strong>in</strong>é à part<br />
lorsqu’il n’est plus utilisable et non pas avec les ordures<br />
ménagères.<br />
L'utilisateur a la responsabilité de porter<br />
l’appareil hors d’usage à un centre de ramassage<br />
spécialisé.<br />
Le tri approprié des déchets permet<br />
d’achem<strong>in</strong>er l’appareil vers le recyclage,<br />
le traitement et l’élim<strong>in</strong>ation de façon écologiquement<br />
compatible. Il contribue à éviter les effets négatifs<br />
possibles sur l'environnement et sur la santé,<br />
tout en favorisant le recyclage des matériaux dont<br />
est constitué le produit. Pour avoir des <strong>in</strong>formations<br />
plus détaillées sur les systèmes de ramassage disponibles,<br />
s’adresser au service local d’élim<strong>in</strong>ation<br />
des déchets ou au revendeur.<br />
IMPORTANT<br />
Avant de sortir de l’us<strong>in</strong>e, tous nos produits sont<br />
soumis à des essais rigoureux.<br />
LE SYSTÈME À CAPSULES<br />
La mach<strong>in</strong>e a été conçue pour fonctionner avec le<br />
système à capsules « Aroma <strong>Polti</strong> » seulement.<br />
Chaque capsule en plastique contient la dose<br />
exacte de café, moulu comme il se doit, pour obtenir<br />
un bon espresso en quelques secondes. Le polypropylène<br />
qui enrobe les capsules est le matériau<br />
FRANÇAIS
FRANÇAIS<br />
idéal pour usage alimentaire car il est pratique,<br />
conforme à l’hygiène et résiste très bien aux hautes<br />
températures. En plus de sa facilité d’emploi, le<br />
système à capsules conserve l’arôme et la fraîcheur<br />
du café comme s’il venait d’être torréfié. Plusieurs<br />
types de mélanges sont disponibles.<br />
L'emploi de capsules autres que celles « Aroma<br />
<strong>Polti</strong> » annule la garantie.<br />
PRÉPARATION<br />
• Enlevez l’emballage de l’appareil, vérifiez le contenu<br />
et l’<strong>in</strong>tégrité du produit.<br />
• Placez l’appareil sur un plan de travail à l’abri de<br />
l’eau.<br />
• Si l’on utilise de grandes tasses, utiliser la grille<br />
réducteur (5a) en la faisant glisser dans le bac<br />
de récupération gouttes (5b) (fig. 8).<br />
• Si l’on utilise de petites tasses, utiliser la grille réducteur<br />
(5a) en la plaçant au-dessus du bac de<br />
récupération gouttes (5b) (fig. 9).<br />
• Ouvrir le couvercle (9) (fig. 1), retirer le réservoir<br />
d’eau (8) (fig. 2) et laver avec de l’eau froide et<br />
propre.<br />
• Remplir le réservoir (8) uniquement avec de l’eau<br />
fraîche et propre, replacer le réservoir dans la mach<strong>in</strong>e<br />
et refermer le couvercle. Pour remplir le réservoir,<br />
ne pas utiliser d’eau gazeuse ou d’autres<br />
liquides.<br />
• Brancher la fiche du câble d’alimentation (7) dans<br />
une prise de courant équipée d’une connexion de<br />
mise à la terre.<br />
• Allumer l’appareil en appuyant sur l’<strong>in</strong>terrupteur<br />
général (6) (fig. 3). La lumière rouge de l’<strong>in</strong>terrupteur<br />
/ voyant s’allumera (3).<br />
Attendre que la lumière devienne verte puis distribuer<br />
le café.<br />
• La quantité maximale de café pouvant être distribuée<br />
est d’environ 50 ml.<br />
ATTENTION:<br />
• à la première utilisation de l’appareil, il est important<br />
d’effectuer un cycle de lavage en suivant<br />
les <strong>in</strong>structions du paragraphe “ENTRE-<br />
TIEN”.<br />
• lorsque la mach<strong>in</strong>e s’allume, il est conseillé de<br />
faire couler l’eau pendant quelques secondes,<br />
sans placer la capsule, af<strong>in</strong> de stabiliser la<br />
température et de nettoyer les accessoires<br />
pour l’<strong>in</strong>fusion.<br />
• après le premier allumage de la lumière verte,<br />
on peut distribuer du café même si l’<strong>in</strong>terrupteur/le<br />
voyant rouge (3) est allumé. L’alternance<br />
de la lumière rouge ou verte est due au<br />
cycle normal de chauffage de la chaudière.<br />
cosmo<br />
8<br />
PRÉPARATION DU CAFÉ<br />
• Placer une tasse sous la buse de distribution<br />
café (4).<br />
• Ouvrir le couvercle du logement capsule (1) et<br />
placer la capsule dans le logement (2), dans la<br />
position suggérée par la forme du logement.<br />
Refermer le couvercle en le poussant jusqu’au<br />
bout (fig. 4).<br />
• ATTENTION : la capsule est poussée automatiquement<br />
à l'<strong>in</strong>térieur du logement lorsque<br />
l’on referme le couvercle (1) en le poussant<br />
à fond. Ne jamais pousser la capsule<br />
avec les doigts.<br />
• Appuyer sur l’<strong>in</strong>terrupteur/voyant distribution<br />
café (3). Après un court <strong>in</strong>stant, le café commencera<br />
à sortir. Lorsque la quantité de café<br />
souhaitée est atte<strong>in</strong>te, appuyer de nouveau sur<br />
l’<strong>in</strong>terrupteur/voyant (3) pour <strong>in</strong>terrompre la distribution.<br />
Il est ma<strong>in</strong>tenant possible de préparer un<br />
café, long ou serré, tout simplement en en dosant<br />
la quantité distribuée.<br />
• La capsule usagée tombera automatiquement<br />
dans le bac (5c) à chaque fois que le couvercle<br />
sera ouvert (1). Il est nécessaire de vider fréquemment<br />
le bac des capsules usagées pour<br />
éviter que l’accumulation des capsules n’obstrue<br />
le canal de sortie.<br />
• Pour vider le bac de récupération capsules<br />
usagées et gouttes (5), procéder de la manière<br />
suivante:<br />
- Extraire le bac (5) de l’appareil (fig. 6).<br />
- Séparer le bac de récupération gouttes (5b) du<br />
bac de récupération capsules usagées (5c)<br />
(fig. 7) et les vider.<br />
- Replacer le tout dans l’appareil.<br />
ENTRETIEN<br />
• Avant d’effectuer tout type d’entretien, s’assurer<br />
que le câble d’alimentation est débranché du réseau<br />
électrique.<br />
• Pour le nettoyage externe de l’appareil, il suffit<br />
d’utiliser un chiffon humide. Eviter d’utiliser des<br />
solvants ou des détergents qui pourraient endommager<br />
la surface en plastique.<br />
• Vider périodiquement le bac de récupération capsules<br />
usagées (5c) et le bac de récupération<br />
gouttes (5b).<br />
• Laver les accessoires avec de l’eau et un détergent.<br />
• Ne laver aucun composant au lave-vaisselle.
CYCLE DE LAVAGE<br />
Effectuer le cycle de lavage une fois par an, pour<br />
une utilisation moyenne de 3 capsules par jour.<br />
Pour une utilisation plus fréquente, effectuer le cycle<br />
de lavage plus souvent.<br />
Procéder comme suit:<br />
• Remplir le réservoir (8) d’eau et ajouter un flacon<br />
de Clean Espresso, le décalcifiant et dégraissant<br />
spécial, en suivant les <strong>in</strong>structions figurant sur<br />
l’emballage.<br />
• Placer un grand récipient sous la buse de distribution<br />
du café.<br />
• Ouvrir le couvercle (1) du logement capsule,<br />
s’assurer que la capsule tombe dans le bac de<br />
récupération capsules usagées, refermer le couvercle<br />
et pousser jusqu’au bout.<br />
• En appuyant sur l’<strong>in</strong>terrupteur/voyant distribution<br />
(3), la mach<strong>in</strong>e distribuera de l’eau. Répéter<br />
l’opération jusqu’à ce que le réservoir d’eau (8)<br />
soit vide.<br />
• Répéter l’opération avec de l’eau seulement,<br />
sans Clean Espresso.<br />
• Au terme de l’opération, la mach<strong>in</strong>e est prête<br />
pour la distribution de boissons.<br />
Cosmo<br />
RECHERCHE D’ANOMALIES<br />
Problème Cause Solution<br />
Le couvercle logement Bac de récupération capsules Vider le bac de récupération capsules<br />
capsule (1) ne se ferme usagées (5c) ple<strong>in</strong> de capsules usagées<br />
pas (ne pas forcer la<br />
fermeture)<br />
usagées<br />
L’appareil fonctionne Pas de capsule dans le logement. Placer la capsule dans le logement et répé-<br />
correctement mais ne<br />
distribue pas de café<br />
ter les opérations.<br />
La distribution de café Buse de distribution sale Nettoyer la buse de distribution à l’aide d’un<br />
est irrégulière et le café<br />
chiffon humide<br />
ne tombe pas dans la<br />
tasse<br />
9<br />
Pour le nettoyage et l'entretien de votre mach<strong>in</strong>e à<br />
café à capsules <strong>Polti</strong>, nous vous recommandons<br />
d'utiliser le kit de nettoyage Clean Espresso (réf.<br />
art. PAEU0176).<br />
Clean Espresso nettoie, protège et allonge la durée<br />
de vie des mach<strong>in</strong>es à café grâce à ses deux nouvelles<br />
formules (décalcifiante et dégraissante) spécialement<br />
conçues à cet effet.<br />
Clean Espresso est disponible sur les sites Internet<br />
www.aromapolti.com<br />
En cas d'utilisation du kit de nettoyage CLEAN<br />
ESPRESSO, il est recommandé de répéter au<br />
mo<strong>in</strong>s trois fois les opérations décrites au po<strong>in</strong>t 8 de<br />
la notice d'utilisation af<strong>in</strong> de r<strong>in</strong>cer parfaitement les<br />
conduits <strong>in</strong>ternes de la mach<strong>in</strong>e.<br />
FRANÇAIS
ITALIANO<br />
LEGENDA<br />
1) Leva vano capsula<br />
2) Vano capsula<br />
3) Interruttore / spia erogazione<br />
4) Erogatore caffè<br />
5) Cassetto raccogli capsule / raccogli gocce<br />
5a) Griglia riduttore<br />
5b) Cassetto raccogli gocce<br />
5c) Cassetto raccogli capsule<br />
6) Interruttore generale<br />
cosmo<br />
Prima di utilizzare l'apparecchio, leggere attentamente le presenti istruzioni d'uso.<br />
PRECAUZIONI PER L’USO<br />
CONSERVARE QUESTO <strong>MANUALE</strong> DI<br />
ISTRUZIONI<br />
• Prima di utilizzare l’apparecchio, leggere attentamente<br />
le presenti istruzioni d’uso.<br />
• Ogni utilizzo difforme dalle presenti avvertenze <strong>in</strong>validerà<br />
la garanzia.<br />
AVVERTENZE DI SICUREZZA:<br />
Rischio di scariche elettriche e/o corto circuito<br />
- L’impianto elettrico a cui è collegato l’apparecchio<br />
dovrà essere realizzato <strong>in</strong> conformità alle<br />
leggi vigenti.<br />
- Prima di collegare l’apparecchio accertarsi che la<br />
tensione di rete corrisponda a quella <strong>in</strong>dicata sui<br />
dati di targa dell’apparecchio e che la presa di<br />
alimentazione sia munita di messa a terra.<br />
- Se l'apparecchio dovesse restare <strong>in</strong>utilizzato, si<br />
raccomanda di staccare la sp<strong>in</strong>a di alimentazione<br />
dalla rete elettrica.<br />
- Non lasciare mai l'apparecchio <strong>in</strong>custodito<br />
quando è collegato alla rete.<br />
- Prima di effettuare qualunque operazione di manutenzione,<br />
staccare sempre la sp<strong>in</strong>a di alimentazione<br />
dalla rete elettrica.<br />
- Non staccare il cavo di alimentazione tirandolo,<br />
ma estrarre la sp<strong>in</strong>a per evitare danni alla presa.<br />
- Non permettere che il cavo di alimentazione subisca<br />
torsioni, schiacciature o stiramenti o entri <strong>in</strong><br />
contatto con superfici affilate o riscaldate.<br />
- Non utilizzare l'apparecchio se il cavo alimentazione<br />
o altre parti importanti dell'apparecchio<br />
sono danneggiate ma rivolgersi ad un centro as-<br />
Questo apparecchio è conforme alla direttiva 2004/108/CE (EMC) e alla direttiva<br />
2006/95/CE (bassa tensione).<br />
POLTI S.p.A. si riserva la facoltà di <strong>in</strong>trodurre le modifiche tecniche e costruttive che riterrà necessarie,<br />
senza obblighi di preavviso.<br />
10<br />
7) Cavo alimentazione<br />
8) Serbatoio<br />
9) Coperchio serbatoio<br />
sistenza autorizzato.<br />
- Non utilizzare prolunghe elettriche non autorizzate<br />
dal fabbricante, che potrebbero causare<br />
danni ed <strong>in</strong>cendi.<br />
- Non toccare mai l'apparecchio con mani o piedi<br />
bagnati quando la sp<strong>in</strong>a è <strong>in</strong>serita.<br />
- Non usare l'apparecchio a piedi nudi.<br />
- Non utilizzare l'apparecchio nelle immediate vic<strong>in</strong>anze<br />
di lavand<strong>in</strong>i, vasche da bagno, docce o recipienti<br />
pieni d'acqua.<br />
- Spegnere sempre l’apparecchio attraverso l’apposito<br />
<strong>in</strong>teruttore prima di scollegarlo alla rete.<br />
- Non immergere mai l’apparecchio o parti di esso<br />
<strong>in</strong> acqua e non usare mai la lavastoviglie per lavare<br />
le componenti.<br />
AVVERTENZE DI SICUREZZA:<br />
Rischio di lesioni e/o scottature durante<br />
l’utilizzo dell’apparecchio<br />
- È vietato l’uso dell’apparecchio <strong>in</strong> luoghi <strong>in</strong> cui<br />
sussiste pericolo di esplosioni.<br />
- Non utilizzare il prodotto <strong>in</strong> presenza di sostanze<br />
tossiche.<br />
- Nel caso di caduta accidentale dell'apparecchio<br />
è necessario farlo verificare ad un centro assistenza<br />
autorizzato perché potrebbero esserci dei<br />
malfunzionamenti <strong>in</strong>terni che limitano la sicurezza<br />
del prodotto.<br />
- In caso di guasto o malfunzionamento, spegnere<br />
l'apparecchio e non tentare mai di smontarlo, ma<br />
rivolgersi ad un centro assistenza autorizzato.<br />
- Questo apparecchio è dotato di dispositivi di sicurezza<br />
per la cui sostituzione è richiesto l'<strong>in</strong>ter-
vento di un tecnico autorizzato.<br />
- Prima di pulire o riporre l’apparecchio, accertarsi<br />
sempre che si sia raffreddato completamente.<br />
- L’apparecchio non è dest<strong>in</strong>ato a essere usato da<br />
persone (bamb<strong>in</strong>i compresi) le cui capacità fisiche,<br />
sensoriali o mentali siano ridotte, oppure<br />
con mancanza di esperienza o di conoscenza, a<br />
meno che esse abbiano potuto beneficiare, attraverso<br />
l’<strong>in</strong>termediazione di una persona responsabile<br />
della loro sicurezza, di una sorveglianza o<br />
di istruzioni riguardanti l’uso dell’apparecchio.<br />
- Sorvegliare i bamb<strong>in</strong>i per assicurarsi che non<br />
gioch<strong>in</strong>o con l’apparecchio.<br />
- L’apparecchio non può essere utilizzato se ha<br />
subito una caduta, se ha segni visibili di danni o<br />
se ha perdite.<br />
- Questo apparecchio eroga liquidi caldi <strong>in</strong> grado<br />
di ustionare o provocare danni fisici, si vieta pertanto<br />
l’uso a persone (<strong>in</strong>clusi bamb<strong>in</strong>i) con capacità<br />
fisiche, sensoriali o mentali ridotte, o non<br />
aventi l’esperienza o conoscenza necessarie.<br />
AVVERTENZE DI SICUREZZA:<br />
utilizzo dell’apparecchio<br />
- Appoggiare sempre l’apparecchio su superfici<br />
stabili.<br />
- Non posare l'apparecchio caldo su superfici sensibili<br />
al calore. La superficie potrebbe danneggiarsi.<br />
- Non lasciare mai l'apparecchio esposto ad agenti<br />
atmosferici.<br />
- Non posizionare l'apparecchio vic<strong>in</strong>o a fornelli<br />
accesi, stufe elettriche, o comunque vic<strong>in</strong>o a fonti<br />
di calore.<br />
- Non esporre l’apparecchio a temperature ambientali<br />
<strong>in</strong>feriori a 0°C e superiori di 40°C<br />
- Premere i tasti unicamente con il dito, senza eccessivo<br />
vigore ed evitare di usare oggetti appuntiti<br />
come penne o altro.<br />
- Non avvolgere il cavo di alimentazione attorno<br />
all'apparecchio e <strong>in</strong> nessun modo quando l’apparecchio<br />
è caldo.<br />
- Durante l’utilizzo non toccare le superfici calde<br />
dell’apparecchio.<br />
- Posizionare l’apparecchio su un piano orizzontale.<br />
- Prima di accendere l’apparecchio, verificare che<br />
sia presente acqua nel serbatoio.<br />
- Per riempiere il serbatoio dell’acqua utilizzare<br />
soltanto acqua fresca e pulita, mai acqua m<strong>in</strong>erale<br />
frizzante, acqua dem<strong>in</strong>eralizzata, acqua distillata,<br />
latte o altri liquidi.<br />
- Durante il riempimento del serbatoio si raccomanda<br />
di spegnere l’apparecchio e dis<strong>in</strong>serire la<br />
Cosmo<br />
11<br />
sp<strong>in</strong>a di alimentazione.<br />
- La presenza di acqua nel cassetto capsule usate<br />
è normale ed è dovuta allo svuotamento del circuito<br />
ogni f<strong>in</strong>e erogazione.<br />
- Si consiglia di utilizzare soltanto prodotti orig<strong>in</strong>ali<br />
<strong>Polti</strong> <strong>in</strong> quanto prodotti di altre marche potrebbero<br />
non essere idonei all’utilizzo negli apparecchi<br />
<strong>Polti</strong> e potrebbero causare spiacevoli danni.<br />
USO CORRETTO DEL PRODOTTO<br />
Questo apparecchio è dest<strong>in</strong>ato all’uso domestico<br />
secondo le descrizioni ed istruzioni riportate <strong>in</strong> questo<br />
manuale. Si prega di leggere attentamente queste<br />
istruzioni e di conservarle, Le potrebbero essere<br />
utili <strong>in</strong> futuro.<br />
<strong>Polti</strong> S.p.A. decl<strong>in</strong>a tutte le responsabilità <strong>in</strong> caso<br />
di <strong>in</strong>cidenti derivanti da un utilizzo di questo<br />
apparecchio non conforme alle presenti istruzioni<br />
d’uso.<br />
ATTENZIONE<br />
INFORMAZIONE AGLI UTENTI<br />
Ai sensi dell'articolo 13 del decreto Legislativo 25<br />
luglio 2005, n. 15 di "Attuazione delle Direttive<br />
2002/95/CE, 2002/96/CE e 2003/108/CE, relative<br />
alla riduzione dell'uso di sostanze pericolose nelle<br />
apparecchiature elettriche ed elettroniche, nonchè<br />
allo smaltimento dei rifiuti”.<br />
Il simbolo del cassonetto barrato riportato<br />
sull'apparecchio <strong>in</strong>dica che il prodotto,<br />
alla f<strong>in</strong>e della propria vita utile, deve essere<br />
raccolto separatamente dagli altri rifiuti.<br />
L'utente dovrà, pertanto, conferire l'apparecchiatura<br />
giunta a f<strong>in</strong>e vita agli idonei centri di raccolta differenziata<br />
dei rifiuti elettronici ed elettrotecnici, oppure<br />
riconsegnarla al rivenditore al momento dell'acquisto<br />
di una nuova apparecchiatura di tipo<br />
equivalente, <strong>in</strong> ragione di uno a uno.<br />
L'adeguata raccolta differenziata per l'avvio successivo<br />
dell'apparecchio dismesso al riciclaggio, al trattamento<br />
e allo smaltimento ambientalmente compatibile<br />
contribuisce ad evitare possibili effetti<br />
negativi sull'ambiente e sulla salute e favorisce il riciclo<br />
dei materiali di cui è composta l'apparecchiatura.<br />
Lo smaltimento abusivo del prodotto da parte del<br />
detentore comporta l'applicazione delle sanzioni<br />
amm<strong>in</strong>istrative previste dalla normativa vigente.<br />
ITALIANO
ITALIANO<br />
IMPORTANTE<br />
Prima di lasciare la fabbrica tutti i nostri prodotti sono<br />
sottoposti a rigorosi collaudi.<br />
IL SISTEMA A CAPSULE<br />
La macch<strong>in</strong>a è stata progettata per funzionare esclusivamente<br />
con il sistema a capsule "Aroma <strong>Polti</strong>".<br />
Ogni capsula contiene la dose corretta e con la giusta<br />
mac<strong>in</strong>atura, per ottenere <strong>in</strong> pochi secondi il miglior<br />
caffè espresso. L'<strong>in</strong>volucro delle capsule è fabbricato<br />
<strong>in</strong> polipropilene, un materiale ideale per il<br />
contatto con gli alimenti, grazie alle sue caratteristiche<br />
di igiene e praticità, ed alla sua elevata resistenza<br />
alle alte temperature. Oltre alla grande praticità<br />
e facilità d'uso, il sistema a capsule garantisce<br />
tutto l'aroma e la freschezza del caffè appena tostato.<br />
Potete così gustare la Vostra miscela preferita.<br />
L'utilizzo di capsule diverse da quelle "Aroma<br />
<strong>Polti</strong>" <strong>in</strong>valida la garanzia.<br />
PREPARAZIONE<br />
• Rimuovere l’apparecchio dall’imballaggio, verificando<br />
il contenuto e l’<strong>in</strong>tegrità del prodotto.<br />
• Posizionare l’apparecchio su un piano di lavoro<br />
lontano dall’acqua.<br />
• Se si utilizzano tazze grandi utilizzare la griglia riduttore<br />
(5a) facendola scorrere nella vaschetta<br />
raccogligocce (5b) (fig. 8)<br />
• Se si utilizzano tazze piccole utilizzare la grigia<br />
riduttore (5a) posizionandola sopra la vaschetta<br />
raccogligocce (5b)(fig. 9)<br />
• Aprire il coperchio (9) (fig. 1), rimuovere il serbatoio<br />
dell'acqua (8) (fig. 2) e lavarlo con acqua<br />
fredda pulita.<br />
• Riempire il serbatoio (8) solo con acqua fredda<br />
pulita, riposizionarlo nella macch<strong>in</strong>a e chiudere il<br />
coperchio. Per riempire il serbatoio non utilizzare<br />
acqua gasata o altri liquidi.<br />
• Inserire la sp<strong>in</strong>a del cavo di alimentazione (7) <strong>in</strong><br />
una presa idonea dotata di collegamento a terra.<br />
• Accendere l'apparecchio premendo l'<strong>in</strong>terruttore<br />
generale (6) (fig. 3). Si accenderà la luce rossa<br />
dell’<strong>in</strong>terruttore/spia (3).<br />
Attendere che la luce diventi verde, a questo<br />
punto è possibile erogare caffè.<br />
• La massima quantità di caffè erogabile è di circa<br />
50ml<br />
cosmo<br />
12<br />
ATTENZIONE:<br />
• al primo utilizzo dell'apparecchio è importante<br />
effettuare un ciclo di lavaggio come descritto<br />
nel paragrafo “MANUTENZIONE”.<br />
• ogni qual volta si accende la macch<strong>in</strong>a è consigliato<br />
erogare per qualche secondo acqua,<br />
senza <strong>in</strong>serire la capsula, <strong>in</strong> modo da stabilizzare<br />
la la temperatura e pulire gli organi di <strong>in</strong>fusione.<br />
• dopo la prima accensione della luce verde, si<br />
può erogare caffè regolarmente anche se è accesa<br />
l’<strong>in</strong>teruttore/spia (3) rossa. L’alternanza<br />
della luce rossa o verde e dovuto al normale<br />
ciclo di riscaldamento della caldaia.<br />
PREPARAZIONE DEL CAFFE’<br />
• Posizionare una tazz<strong>in</strong>a sotto l'erogatore caffè<br />
(4).<br />
• Aprire la leva del vano capsula (1) e appoggiare<br />
la capsula nel vano (2), nella posizione suggerita<br />
dalla sagomatura di quest' ultimo.<br />
Richiudere lo sportello sp<strong>in</strong>gendolo f<strong>in</strong>o a f<strong>in</strong>e<br />
corsa (fig. 4).<br />
• ATTENZIONE: la sp<strong>in</strong>ta della capsula all'<strong>in</strong>terno<br />
del vano avviene automaticamente richiudendo<br />
lo sportello (1) sp<strong>in</strong>gendolo f<strong>in</strong>o a<br />
f<strong>in</strong>e corsa. Non utilizzare per alcun motivo le<br />
proprie dita per sp<strong>in</strong>gere la capsula.<br />
• Premere l'<strong>in</strong>terruttore/spia erogazione caffè (3).<br />
Dopo qualche istante il caffè <strong>in</strong>izierà ad uscire.<br />
Una volta raggiunta la quantità di caffè desiderata,<br />
premere nuovamente l'<strong>in</strong>terruttore/spia (3)<br />
per <strong>in</strong>terrompere l’erogazione. E' qu<strong>in</strong>di possibile<br />
preparare un caffè, lungo o ristretto a piacere,<br />
semplicemente dosandone la quantità erogata.<br />
• La capsula utilizzata cadrà automaticamente nell'apposito<br />
cassetto (5c) ogni volta che verrà<br />
aperta la leva (1). E' necessario svuotare frequentemente<br />
il cassetto delle capsule usate<br />
per evitare che l'accumulo di queste ostruisca<br />
il canale di fuoriuscita.<br />
• Per svuotare il cassetto raccogli capsule e raccogli<br />
gocce (5) procedere nel seguente modo:<br />
- Estrarre il cassetto (5) dall’apparecchio ( fig. 6).<br />
- Separare il cassetto raccogli gocce (5b) dal<br />
cassetto raccogli capsule (5c) (fig. 7) e svuotarli.<br />
- Riposizionare il tutto nell’apparecchio.
MANUTENZIONE<br />
• Prima di effettuare qualunque operazione di manutenzione,<br />
staccare sempre la sp<strong>in</strong>a di alimentazione<br />
dalla rete elettrica.<br />
• Per la pulizia esterna dell’apparecchio, utilizzare<br />
semplicemente un panno umido. Evitare l’uso di<br />
solventi o detergenti che potrebbero arrecare<br />
danni alla superficie plastica.<br />
• Svuotare periodicamente il cassetto capsule (5c)<br />
e la vasca raccogli gocce (5b).<br />
• Lavare gli accessori con acqua e un detergente.<br />
• Non lavare nessuno componente <strong>in</strong> lavastoviglie.<br />
CICLO DI LAVAGGIO<br />
Effettuare il ciclo di lavaggio una volta all’anno, per<br />
un utilizzo medio di n. 3 capsule al giorno. Per un<br />
utilizzo maggiore effettuarlo prima.<br />
Procedere nel seguente modo:<br />
• Riempiere il serbatoio (8) di acqua e aggiungere<br />
una fialetta di Clean Espresso, lo speciale decalcificante<br />
e sgrassante, seguendo le istruzioni riportate<br />
nella confezione.<br />
• Posizionare un recipiente capiente sotto l’uscita<br />
caffè<br />
• Aprire la leva (1) del vano capsula, assicurarsi<br />
che la capsula presente cada nel vano raccogli<br />
capsula, richiuderla sp<strong>in</strong>gendo f<strong>in</strong>o a f<strong>in</strong>e corsa.<br />
• Premere l’<strong>in</strong>terruttore/spia erogazione (3), la<br />
macch<strong>in</strong>a erogherà acqua, cont<strong>in</strong>uare l’operazione<br />
f<strong>in</strong>o all’esaurimento dell’acqua presente<br />
nel serbatoio (8).<br />
• Ripetere l’operazione solo con acqua, senza<br />
Clean Espresso.<br />
• Al term<strong>in</strong>e dell’operazione la macch<strong>in</strong>a è pronta<br />
per l’erogazione delle bevande.<br />
Cosmo<br />
RICERCA INCONVENIENTI<br />
Problema Causa Risoluzione<br />
La leva vano capsula (1) Cassetto raccogli capsule (5c) pie- Svuotare il cassetto raccogli capsule<br />
non si chiude (non forzare<br />
la chiusura)<br />
no di capsule usate<br />
L'apparecchio funziona cor- Capsula non presente nel vano. Inserire la capsula nel vano e ripetere le<br />
rettamente ma non eroga<br />
caffè<br />
operazioni.<br />
L’erogazione caffè è irregolare<br />
e non <strong>in</strong> tazza<br />
Beccuccio erogazione sporco Pulire il beccuccio erogazione con un<br />
panno umido<br />
13<br />
Per la pulizia e la manutenzione della vostra macch<strong>in</strong>a da<br />
caffè a capsule <strong>Polti</strong>, vi suggeriamo l’utilizzo del kit di pulizia<br />
Clean Espresso (cod. art. PAEU0176). Clean Espresso<br />
pulisce e protegge, prolungando la vita delle macch<strong>in</strong>e da<br />
caffè grazie a due nuove formulazioni (decalcificante e<br />
sgrassante) appositamente studiate.<br />
Clean Espresso è disponibile su<br />
www.aromapolti.com<br />
In caso di utilizzo del kit di pulizia CLEAN ESPRESSO, si<br />
consiglia di ripetere le operazioni descritte al punto 8 del foglio<br />
istruzioni per almeno tre volte <strong>in</strong> modo da risciacquare<br />
al meglio i condotti <strong>in</strong>terni della macch<strong>in</strong>a.<br />
SERVIZIO CLIENTI<br />
Chiamando questo<br />
numero al costo<br />
di Euro 0,11 al m<strong>in</strong>uto<br />
IVA <strong>in</strong>clusa, i<br />
nostri <strong>in</strong>caricati saranno<br />
a disposizione per rispondere alle Sue domande<br />
e fornirLe tutte le <strong>in</strong>dicazioni utili per sfruttare<br />
al meglio le qualità dei prodotti POLTI.<br />
ITALIANO
ENGLISH<br />
KEY<br />
1) Capsule compartment lever<br />
2) Capsule compartment<br />
3) Switch / delivery <strong>in</strong>dicator light<br />
4) Coffee dispenser<br />
5) Used capsules collection drawer / drip tray<br />
5a) Reducer grill<br />
5b) Drip drawer<br />
5c) Used capsules collection drawer<br />
6) Ma<strong>in</strong> switch<br />
PRECAUTIONS<br />
KEEP THESE INSTRUCTIONS<br />
• Read these <strong>in</strong>structions for use carefully before<br />
us<strong>in</strong>g the appliance.<br />
• Any use which does not comply with these <strong>in</strong>structions<br />
will <strong>in</strong>validate the warranty.<br />
SAFETY WARNINGS:<br />
Risk of electric discharges and/or short circuit<br />
- The wir<strong>in</strong>g system to which the appliance is connected<br />
must always comply with the laws <strong>in</strong><br />
force.<br />
- Before connect<strong>in</strong>g the appliance, make sure that<br />
the ma<strong>in</strong>s voltage is the same as the voltage <strong>in</strong>dicated<br />
on the data label of the appliance and<br />
that the power outlet is connected to earth.<br />
- If the appliance is left unused, disconnect it from<br />
the ma<strong>in</strong>s.<br />
- Never leave the appliance unattended with the<br />
cable plugged <strong>in</strong>to the ma<strong>in</strong>s.<br />
- Before attempt<strong>in</strong>g any ma<strong>in</strong>tenance operation,<br />
make sure to always disconnect the appliance<br />
from the ma<strong>in</strong>s.<br />
- Do not pull the power cord out of the socket, but<br />
grasp the plug itself to avoid damage to the<br />
socket.<br />
- Do not allow the power cord to be twisted,<br />
crushed, stretched, or come <strong>in</strong>to contact with<br />
sharp or hot surfaces.<br />
- Do not use the appliance if the power cable or<br />
other important parts of the appliance are damaged.<br />
Instead, contact an authorised service centre.<br />
cosmo<br />
Read these <strong>in</strong>structions carefully before us<strong>in</strong>g the appliance.<br />
This unit conforms with EC-directives 2004/108/CE (EMC) and 2006/95/CE (low voltage).<br />
<strong>Polti</strong> S.p.A. reserves the right to change equipment or accessory specification without<br />
prior notice.<br />
14<br />
7) Power supply cable<br />
8) Reservoir<br />
9) Reservoir lid<br />
- Do not use electric extension leads that are not<br />
authorized by the manufacturer, as they may<br />
cause damage or fire.<br />
- Never touch the appliance with wet hands or feet<br />
with the cable plugged <strong>in</strong>to the ma<strong>in</strong>s.<br />
- Do not use the appliance when barefoot.<br />
- Do not use the appliance near a bath tub, shower<br />
or conta<strong>in</strong>er full of water<br />
- Always turn off the appliance at the on/off switch<br />
before unplugg<strong>in</strong>g it.<br />
- Never immerse the appliance or any of its parts<br />
<strong>in</strong> water and never use the dishwasher to wash<br />
the components.<br />
SAFETY WARNINGS:<br />
Risk of damage and/or burns dur<strong>in</strong>g<br />
use of the appliance<br />
- Use of the appliance <strong>in</strong> places where there is a<br />
danger of explosions is prohibited.<br />
- Do not use the product with toxic substances.<br />
- In case of accidental fall of the appliance it is<br />
necessary to have it checked by an authorized<br />
Service Centre as the <strong>in</strong>ternal safety features<br />
may have been affected.<br />
- In case of breakdown or malfunction switch off<br />
the appliance and never attempt to disassemble<br />
it, but refer to an authorized Service Centre.<br />
- This appliance is equipped with safety devices<br />
which are to be replaced only by a suitably qualified<br />
technician.<br />
- Before clean<strong>in</strong>g or stor<strong>in</strong>g the appliance, always<br />
first ensure that the appliance has cooled down<br />
completely.
- This appliance is not <strong>in</strong>tended for use by persons<br />
(<strong>in</strong>clud<strong>in</strong>g children) with reduced physical, sensory<br />
or mental capabilities, or lack of experience<br />
and knowledge, unless they have been given supervision<br />
or <strong>in</strong>struction concern<strong>in</strong>g use of the appliance<br />
by a person responsible for their safety.<br />
- Children should be supervised to ensure that<br />
they do not play with the appliance.<br />
- The appliance must not be used if it has fallen,<br />
been dropped or when it has visible signs of damage<br />
or leaks.<br />
- This appliance dispenses hot liquids that can<br />
burn or cause <strong>in</strong>jury. Therefore it cannot be used<br />
by persons (<strong>in</strong>clud<strong>in</strong>g children) with reduced physical,<br />
sensory or mental capabilities, or lack of<br />
the required experience or knowledge.<br />
SAFETY WARNINGS:<br />
use of the appliance<br />
- Always rest the appliance on a stable surface.<br />
- Do not place the hot appliance on heat-sensitive<br />
surfaces. It could damage the surface.<br />
- Never leave the appliance exposed to weather<strong>in</strong>g.<br />
- Do not place the appliance near a live element,<br />
an electric stove or any other source of heat.<br />
- Do not expose the appliance to temperatures under<br />
0°C or over 40°C<br />
- Press the buttons only with a f<strong>in</strong>ger, without excessive<br />
force and avoid us<strong>in</strong>g a po<strong>in</strong>ted object<br />
such as a pen.<br />
- Do not w<strong>in</strong>d the power cable around the appliance,<br />
especially when the appliance is still hot.<br />
- When us<strong>in</strong>g the appliance do not touch the hot<br />
surfaces.<br />
- Position the appliance on a horizontal work surface.<br />
- Before switch<strong>in</strong>g on the appliance, check that<br />
there is water <strong>in</strong> the reservoir.<br />
- To fill the water reservoir use only fresh, clean<br />
water, never use sparkl<strong>in</strong>g m<strong>in</strong>eral water, dem<strong>in</strong>eralised<br />
water, distilled water, milk or other liquids.<br />
- While refill<strong>in</strong>g the reservoir, switch off and disconnect<br />
the appliance from the ma<strong>in</strong>s.<br />
- The presence of water <strong>in</strong> the used capsule<br />
drawer is normal and is due to the empty<strong>in</strong>g of<br />
the circuit at the end of each dispens<strong>in</strong>g operation.<br />
- We recommend you use orig<strong>in</strong>al <strong>Polti</strong> products<br />
only, as products of other brands may not be suitable<br />
for use <strong>in</strong> <strong>Polti</strong> products and could cause<br />
damage.<br />
Cosmo<br />
15<br />
CORRECT PRODUCT USE<br />
This appliance is <strong>in</strong>tended for household use only<br />
accord<strong>in</strong>g to the descriptions and <strong>in</strong>structions conta<strong>in</strong>ed<br />
<strong>in</strong> this user manual. Please read these <strong>in</strong>structions<br />
carefully and keep them, they could be<br />
useful <strong>in</strong> the future.<br />
<strong>Polti</strong> S.p.A. decl<strong>in</strong>es all responsibility <strong>in</strong> case of<br />
accident due to the use of this appliance which<br />
is not <strong>in</strong> accordance with the present <strong>in</strong>structions<br />
for use.<br />
WARNINGS<br />
Directive 2002/96/EC (Waste Electrical and Electronic<br />
Equipment - WEEE): <strong>in</strong>formation for users<br />
This product complies with EU Directive<br />
2002/96/EC.<br />
The crossed-out wastebasket symbol on<br />
the appliance means that at the end of its<br />
useful lifespan, the product must be disposed<br />
of separately from ord<strong>in</strong>ary household<br />
wastes.<br />
The user is responsible for deliver<strong>in</strong>g the appliance<br />
to an appropriate collection facility at the end of its<br />
useful lifespan.<br />
Appropriate separate collection to permit recycl<strong>in</strong>g,<br />
treatment and environmentally compatible disposal<br />
helps prevent negative impact on the environment<br />
and human health and promotes recycl<strong>in</strong>g of the<br />
materials mak<strong>in</strong>g up the product. For more <strong>in</strong>formation<br />
on available collection facilities, contact your<br />
local waste collection service or the shop where<br />
you bought this appliance.<br />
PLEASE NOTE<br />
All our products are rigorously tested before leav<strong>in</strong>g<br />
the factory.<br />
THE CAPSULE SYSTEM<br />
The mach<strong>in</strong>e is designed exclusively for use with<br />
the "Aroma <strong>Polti</strong>" capsule system. Each capsule<br />
conta<strong>in</strong>s just the right amount and just the right<br />
gr<strong>in</strong>d to obta<strong>in</strong> the best espresso coffee <strong>in</strong> a few<br />
seconds. The wrapper on the capsule is made of<br />
polypropylene, an excellent material for use <strong>in</strong> contact<br />
with foodstuff. It is hygienic, convenient, and<br />
very resistant to high temperatures.<br />
The capsule system is not only very convenient and<br />
easy to use, it guarantees all the freshness and aroma<br />
of freshly roasted coffee, so that you can enjoy<br />
your favourite blend.<br />
Use with capsules other than "Aroma <strong>Polti</strong>"<br />
capsules will result <strong>in</strong> forfeiture of the warranty.<br />
ENGLISH
ENGLISH<br />
PREPARATION<br />
• Remove the appliance from the packag<strong>in</strong>g,<br />
check<strong>in</strong>g that the product is whole and that all the<br />
parts are there.<br />
• Position the appliance on a work surface away<br />
from water.<br />
• If you use large cups, use the reducer grill (5a)<br />
mak<strong>in</strong>g it slide <strong>in</strong>to the drip tray (5b) (fig. 8)<br />
• If you use small cups, use the reducer grill (5a)<br />
position<strong>in</strong>g it above the drip tray (5b) (fig. 9)<br />
• Open the reservoir lid (9) (fig. 1), remove the water<br />
reservoir (8) (fig. 2) and wash it with clean cold<br />
water.<br />
• Fill up the reservoir (8) only with clean cold water,<br />
replace it <strong>in</strong> the mach<strong>in</strong>e and close the lid. Do not<br />
use sparkl<strong>in</strong>g water or other liquids to fill the reservoir.<br />
• Plug the power lead (7) <strong>in</strong>to a suitable socket with<br />
an earth connection.<br />
• Switch on the appliance by press<strong>in</strong>g the power<br />
switch (6) (fig. 3). The red light of the<br />
switch/<strong>in</strong>dicator will come on (3).<br />
Wait until the light becomes green; at this po<strong>in</strong>t<br />
you can make coffee.<br />
• The maximum quantity of coffee that can be dispensed<br />
is about 50 ml.<br />
WARNING:<br />
• the first time you use the appliance, it is important<br />
to carry out a wash cycle as described <strong>in</strong><br />
the paragraph “MAINTENANCE”.<br />
• whenever the mach<strong>in</strong>e is turned on, it is recommended<br />
to brew only water for a few seconds,<br />
without <strong>in</strong>troduc<strong>in</strong>g any capsules, so<br />
as to stabilise the temperature and clean<br />
brew<strong>in</strong>g parts.<br />
• after the first time the green light comes on,<br />
coffee can be regularly dispensed even if the<br />
red switch/<strong>in</strong>dicator light (3) is on. The alternation<br />
of the red or green light is due to the normal<br />
heat<strong>in</strong>g cycle of the boiler.<br />
PREPARING THE COFFEE<br />
• Place a cup under the coffee dispenser (4).<br />
• Open the lever of the capsule compartment (1)<br />
and place the capsule <strong>in</strong> the compartment (2), <strong>in</strong><br />
the position suggested by the shape of the latter.<br />
Close the door push<strong>in</strong>g it home (fig. 4).<br />
• WARNING: the capsule is automatically pushed<br />
<strong>in</strong>to the compartment when the door (1)<br />
is closed, push<strong>in</strong>g it as far as it will go. Never<br />
push the capsule <strong>in</strong> with your f<strong>in</strong>gers.<br />
• Press the coffee dispenser switch/<strong>in</strong>dicator light<br />
cosmo<br />
16<br />
(3). A few moments later, the coffee will start to<br />
come out. Once the desired quantity of coffee<br />
has been dispensed, press the switch/<strong>in</strong>dicator<br />
light aga<strong>in</strong> (3) to stop delivery. You can thus prepare<br />
a long or short coffee accord<strong>in</strong>g to preference,<br />
by simply dos<strong>in</strong>g the quantity delivered.<br />
• The used capsule will automatically fall <strong>in</strong>to the<br />
special drawer (5c) every time the lever is opened<br />
(1). The used capsule drawer must be<br />
emptied frequently to prevent the accumulation<br />
of used capsules from clogg<strong>in</strong>g the exit<br />
channel.<br />
• To empty the capsule collection and drip drawer<br />
(5) proceed as follows:<br />
- Remove the drawer (5) from the appliance (fig.<br />
6).<br />
- Separate the drip drawer (5b) from the capsule<br />
drawer (5c) (fig. 7) and empty them.<br />
- Fit the parts back <strong>in</strong>to the appliance.<br />
MAINTENANCE<br />
• Before attempt<strong>in</strong>g any ma<strong>in</strong>tenance operation,<br />
make sure to always disconnect the appliance<br />
from the ma<strong>in</strong>s.<br />
• To clean the body of the appliance, simply use a<br />
moist cloth. Do not use solvents or detergents as<br />
these could damage the plastic surfaces.<br />
• Empty the capsule drawer (5c) and the drip tray<br />
(5b) regularly.<br />
• Wash the accessories with water and detergent.<br />
• Never wash any part <strong>in</strong> a dishwasher.<br />
CLEANING CYCLE<br />
Run the clean<strong>in</strong>g cycle once a year for an average<br />
use of 3 capsules per day. For greater use, run it<br />
earlier.<br />
Proceed as follows:<br />
• Fill the reservoir (8) with water and add a bottle<br />
of Clean Espresso, a special descal<strong>in</strong>g and degreas<strong>in</strong>g<br />
product, follow<strong>in</strong>g the <strong>in</strong>structions on<br />
the package.<br />
• Place a large conta<strong>in</strong>er under the coffee outlet<br />
• Open the lever (1) of the capsule compartment,<br />
make sure that the capsule falls <strong>in</strong>to the capsule<br />
collect<strong>in</strong>g compartment, and close it by push<strong>in</strong>g it<br />
home.<br />
• Press<strong>in</strong>g the dispenser switch/<strong>in</strong>dicator light(3):<br />
the mach<strong>in</strong>e will dispense water. Repeat this<br />
operation until all the water <strong>in</strong> the reservoir has<br />
been emptied (8).<br />
• Repeat the process with water only, without<br />
Clean Espresso.<br />
• At the end of the process the mach<strong>in</strong>e is ready<br />
for brew<strong>in</strong>g dr<strong>in</strong>ks.
To clean and ma<strong>in</strong>ta<strong>in</strong> your <strong>Polti</strong> capsule coffeemaker,<br />
we recommend us<strong>in</strong>g the Clean Espresso<br />
clean<strong>in</strong>g kit (item code PAEU0176).<br />
Clean Espresso cleans and protects, extend<strong>in</strong>g the<br />
life of your coffeemaker thanks to two new, specifically<br />
designed formulas (decalcify<strong>in</strong>g and degreas<strong>in</strong>g).<br />
Clean Espresso is available at<br />
www.aromapolti.com<br />
If you decide to use the CLEAN ESPRESSO clean<strong>in</strong>g<br />
kit, we recommend repeat<strong>in</strong>g the action described<br />
at po<strong>in</strong>t 8 of the <strong>in</strong>struction manual at least three<br />
times, <strong>in</strong> order to r<strong>in</strong>se the <strong>in</strong>sides of the<br />
mach<strong>in</strong>e thoroughly<br />
Cosmo<br />
TROUBLESHOOTING<br />
Problem Cause Solution<br />
The capsule compart- The capsule collection drawer (5c) is Empty the capsule collection drawer.<br />
ment lever (1) does not<br />
close (do not force it)<br />
full of used capsules<br />
The appliance appears No capsule <strong>in</strong> the compartment. Put a capsule <strong>in</strong> the compartment and<br />
to work properly, but<br />
repeat the process.<br />
does not dispense coffee<br />
The flow of coffee is irre- The dispens<strong>in</strong>g nozzle is dirty Clean dispens<strong>in</strong>g nozzle with a damp<br />
gular and flows outside<br />
the cup<br />
cloth<br />
17<br />
ENGLISH
NOTE<br />
18
NOTE<br />
19
NOTE<br />
20
NOTE<br />
21
Qonix SA<br />
Via Passeggiata 24<br />
CH - 6828 Balerna<br />
<strong>Polti</strong> S.p.A. - 22070 Bulgarograsso (CO) - Italy - Via Ferloni, 83<br />
www.polti.com