DM-810A • DM-820A DM-830A • DML-430A Digital Multimeters ...
DM-810A • DM-820A DM-830A • DML-430A Digital Multimeters ...
DM-810A • DM-820A DM-830A • DML-430A Digital Multimeters ...

You also want an ePaper? Increase the reach of your titles
YUMPU automatically turns print PDFs into web optimized ePapers that Google loves.
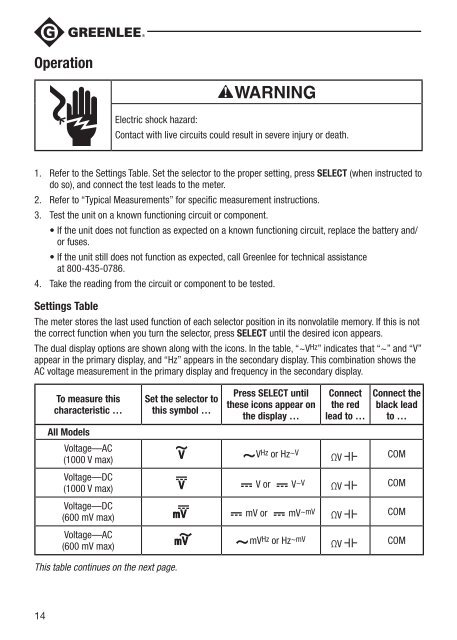
OperationElectric shock hazard:Contact with live circuits could result in severe injury or death.1. Refer to the Settings Table. Set the selector to the proper setting, press SELECT (when instructed todo so), and connect the test leads to the meter.2. Refer to “Typical Measurements” for specific measurement instructions.3. Test the unit on a known functioning circuit or component.• If the unit does not function as expected on a known functioning circuit, replace the battery and/or fuses.• If the unit still does not function as expected, call Greenlee for technical assistanceat 800-435-0786.4. Take the reading from the circuit or component to be tested.Settings TableThe meter stores the last used function of each selector position in its nonvolatile memory. If this is notthe correct function when you turn the selector, press SELECT until the desired icon appears.The dual display options are shown along with the icons. In the table, “~V Hz ” indicates that “~” and “V”appear in the primary display, and “Hz” appears in the secondary display. This combination shows theAC voltage measurement in the primary display and frequency in the secondary display.To measure thischaracteristic …All ModelsVoltage—AC(1000 V max)Voltage—DC(1000 V max)Voltage—DC(600 mV max)Voltage—AC(600 mV max)Set the selector tothis symbol …Press SELECT untilthese icons appear onthe display …Connectthe redlead to …Connect theblack leadto …V Hz or Hz ~V ΩV COMV or V~V ΩV COMmV or mV ~mV ΩV COMmV Hz or Hz ~mV ΩV COMThis table continues on the next page.14